
Chapter 4
Exploring Ideation Techniques and Tools

The third step in the design thinking process is all about coming up with ideas. You must think of as many ideas as you can to explore the design space as thoroughly as possible. Once you have accomplished this, you must prioritize and choose several of these ideas to move forward with.
To explore the design space, you must ideate. The process of ideation allows you to be divergent, generative, and creative. It allows you to explore the relationships between concepts, patterns, or even existing solutions and see things in a new light.
Ideation requires you to be artistic. You rely on your creativity and imagination to come up with fantastical new product ideas. You think of features and functionalities that could enhance those ideas. You sketch out your ideas and visualize concepts to imagine the user’s experience.
Ideation also requires you to leverage science. You work from a problem to solve based on research, observation, and evidence. You analyze products and remix their characteristics by adjusting variables. You organize ideas into prioritizations, systematically deciding which ideas to pursue further.
It is through this blend of art and science that you will navigate the ideation phase of design thinking and arrive at a solution that best fits users’ wants and needs.
Where Are You in the Design Thinking Process?
As you wrap up your understanding of the problem you want to solve, you begin to transition from the define step of the design thinking process to the next step—ideate (FIGURE 4.1).1
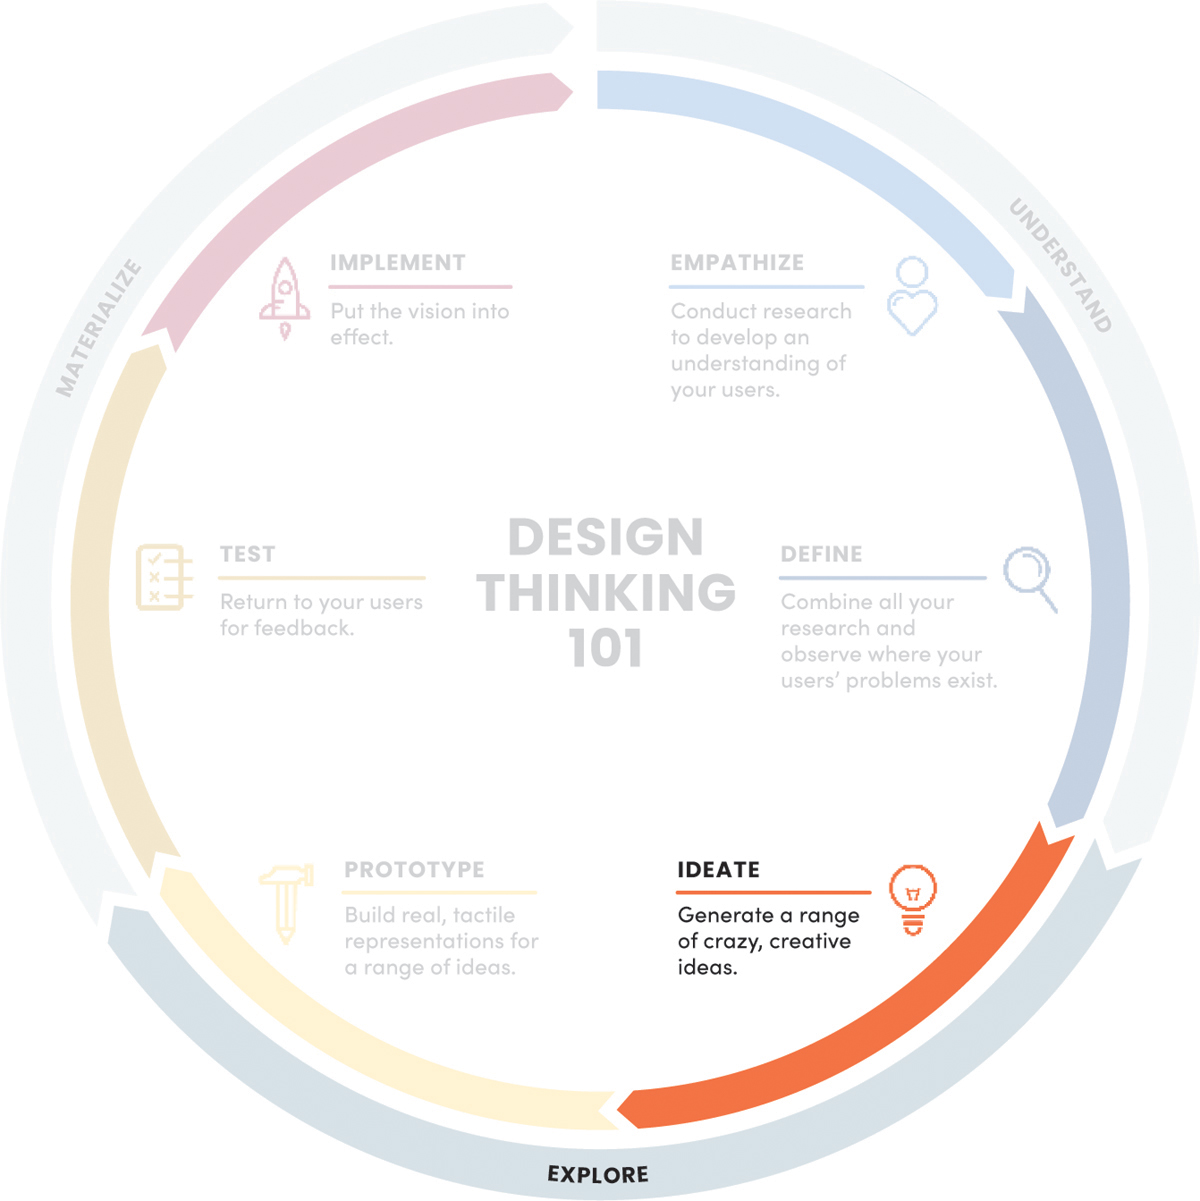
FIGURE 4.1 The NN/g design thinking model. The third step of the model is ideate. It is part of the explore phase of design thinking, where you work from the problem to solve and think of solutions that could help your users.
1 www.nngroup.com/articles/design-thinking/
During the ideate step of the design thinking process, the goal is to come up with ideas that will address the problem to solve. Now that you know the users and their struggles, what can you do about it? What ideas can you generate that might work? The goal is to explore the design space and create a solution for your users.
Coming out of this step, you should have looked at all the ideas that you generated by diverging around the possibility space, then converging around a few of those options to proceed with.
Ideation
Now that we have a problem to solve, let’s start solving that problem! We’re at the point in the design process where we get to come up with all sorts of ideas that could work for our users.
This can feel like a daunting step. Where do we begin? How do we generate ideas that can change people’s lives or, at the very least, actually solve the problems they are experiencing? Will our ideas even be any good? These are common and valid concerns. Fortunately, to get to this point, you’ve done a lot of research and definition around what you want to accomplish. Now, you get to move forward and start accomplishing your goals—through ideation.
What Is Ideation?
Ideation is a creative process where you generate ideas with the intent to build concepts that solve users’ problems. It’s rooted in problems—this is why it is so crucial to define a “problem to solve” in the earlier steps of the design thinking process, and why you shouldn’t think about solutions until you have a clearly defined problem to work from.
Ideation is also divergent. The purpose of ideation is to come to a solution that works for users. To get there, you must generate many, many ideas and possibilities that could solve that problem. You’ll pare down eventually, but to start, you need to allow yourself the room to explore. Who knows? An idea you think might be too crazy or outlandish could end up working well, or perhaps it could be modified to be a real, practical solution.
Finally, ideation is judgment free. Because you should focus on being divergent and create as many ideas as possible, your focus should be on quantity, not quality. At the end of the ideation process, you will evaluate your ideas and pursue a few you think would work best.
The d.school said it best:
[Ideation] is not about coming up with the right idea; it’s about generating the broadest range of possibilities.2
2 www.alnap.org/help-library/an-introduction-to-design-thinking-process-guide
When Could You Ideate?
In the context of the process, you turn to ideation after you have a clear problem to solve. That problem to solve, however, could vary depending on the stage of the product, the goals of the company, or the needs of the user. You should turn to ideation for many reasons.
Create a New Approach
You may use ideation when you want to create a new approach to solving a specific problem for customers. This could be like Tinder, who wanted to create a new way to engage with the dating culture to make it faster to meet potential matches. Their app popularized an interaction pattern for speeding up the matchmaking process.
Improve the Current User Experience
You may ideate to improve the user’s experience with the current product. This could be like Microsoft, who over the years, have invested a lot of time and energy iterating on Microsoft Teams, especially during the shift toward a more remote workforce.
Explore New Revenue Strategies
You may turn to ideation to think of new revenue streams or business strategies for a product. This could be like Uber leveraging its drivers to deliver food or packages to users, allowing Uber to expand their product offering, allowing drivers to make more money, and allowing customers to leverage multiple services from the same provider.
All of the Above
From my own experience, I’ve used ideation in all these use cases, sometimes on the same project. For example, I used ideation to accomplish all these goals when I worked at Food Network. We needed a new approach for our product to reach more customers, so I had to port a native mobile product to the web. I also had to improve those customers’ current user experience, since we already had an existing website and the features I was bringing over were meant to enhance that experience. Finally, I had to consider how this user experience generated new revenue for the business, as it was a new monetization opportunity for Food Network to take their premium app to a new platform.
What Types of Ideation Exist?
Ideation comes in many forms. Not only does the purpose of ideation vary, but the processes to generate ideas vary as well.
Conceptual Ideation
What concepts can you come up with? Some ideation techniques focus on generating high-level concepts for you to debate and explore. The most common form of this is brainstorming (FIGURE 4.2), but other techniques exist as well.

FIGURE 4.2 Designers (me included) in the middle of a brainstorming session.
Conceptual ideation is a great place to start the ideate step of the design thinking process because it is a high level, broad strokes, what-can-you-do type of ideation. It generates a wide range of ideas, from which you can choose several of these ideas to explore further using another style of ideation—visual ideation.
Visual Ideation
What could a solution look like for users? Several ideation techniques rely on visual depictions of an experience to help guide idea generation. You could draw a flow by roughly sketching ideas on a piece of paper, create a short story about our users by storyboarding their journey, or even create a mood board of ideas and inspiration via a lightning demo (FIGURE 4.3).
FIGURE 4.3 The lightning demo from Chapter 3, which is not only a form of competitive research but also a form of visual ideation.
Visual ideation is a great technique to turn to when solutions already exist, or when you have a clearer idea of the solution you want to explore further. For example, once you’ve completed a brainstorming session and chosen a few ideas to explore more, you could use a visual ideation technique like sketching to expand on those ideas.
Relational Ideation
How do related concepts connect in the problem space? Several ideation techniques explore the links between elements to think of ideas. Starting from a root concept, these techniques allow you to branch off an initial idea and create relationships to new ones. These techniques include creating a “family tree” of ideas via mind mapping (FIGURE 4.4) or remixing existing products into new ideas via a technique called SCAMPER (substitute, combine, adapt, modify, put to other use, eliminate, rearrange)3 (see the “SCAMPER” section for more information).

FIGURE 4.4 A relation-based idea generation technique called a mind map. This one explores the connections between elements related to a pier to generate new revenue ideas for the business owners of that pier.
3 https://en.wikipedia.org/wiki/SCAMPER
Relational ideation is good to turn to if you are stuck at any point in the ideation process and are struggling to come up with ideas—conceptual or visual. By creating a mind map of related concepts, for example, you will start to generate areas of focus for your conceptual ideation or more details to explore for your visual ideation.
What Are Some Ideation Best Practices?
To ensure a successful ideation, it’s critical to establish the right environment for idea generation. Thankfully, you can rely on a few best practices when creating that environment.
Assemble a Team, Not an Army
For most ideation techniques, it’s best to have multiple people involved. By inviting different disciplines into the ideation process, you will be able to leverage various perspectives and thought processes. Multiple forms of representation will allow you to generate better ideas to choose from—and it will also let you represent the perspectives of different people in your design thinking process.
Author’s Note
For ideation exercises, I’ve found teams are most successful when inviting a lot of people to generate ideas and vote on their favorites but relying on a team of “two pizzas” to choose which ideas to prioritize and explore further. I’ve participated in brainstorming sessions of up to 40 people generating ideas and a team of four to eight people evaluating which of those ideas to explore further. It’s a fun teambuilding activity that lets people be creative and allows the team to capture a wide, diverse range of perspectives.
That being said, you don’t have to invite everyone. In fact, you may want to invite some but not all of your team, since more people in the room means more perspectives to consider, more ideas to sift through, and more time spent prioritizing ideas. Amazon is known for popularizing the “two pizza rule” when conducting ideation: Don’t invite more than two pizzas’ worth of people (six to eight people).
Choose a Facilitator
For a successful ideation session, you need a person to drive the conversation. Regardless of the technique, someone will have to explain the ideation’s context (such as the problem to solve and additional background information), establish the rules of the ideation, and keep people on track as the session proceeds. Generally, the designer or product manager of the initiative is the facilitator, though at times people from other disciplines can lead the session as well.
Set Time Limits
Ideation sessions are usually constrained to a specific length of time; this keeps the process flowing and limits how long the team has to spend in debate about ideas. A common phrase in the industry is to “time box” the session so that everyone focuses on the ideation and doesn’t get caught in any specific step.
Author’s Note
Usually I’ll give somewhere from 15 to 30 minutes to generate ideas, then assign time to discuss the ideas. If there are a small number of participants (fewer than eight or so), I’ll give them each two to three minutes to talk about their ideas. For a larger number of participants (eight or more), I’ll break them into teams to present as groups, or spend three to five minutes summarizing the ideas in each category of the ideation.
Establish the Context
Since ideation requires some sort of goal, it’s important for the facilitator to establish what the goal of the session is. Usually, the goal revolves around the problem to solve, or has some background that needs to be understood to focus the session. If you’re conducting a brainstorm, for example, you need to be able to explain what you are brainstorming against. Establishing the problem to solve, the users you want to solve it for, and any pertinent background information on the project is a good way to prime participants and guide the ideation session.
Quantity Over Quality
Ideation is all about generating ideas. It doesn’t matter what the quality of your ideas is at this point—rather, it’s more important to generate as many ideas as possible. This is because you want as large a list as possible to choose ideas from so you can explore the problem space fully. You evaluate ideas at the end of the ideation process—you diverge around as many ideas as possible, then converge on a few ideas that you want to explore further.
Weird Ideas
Because you diverge, it’s encouraged that you diverge as far as you can. Come up with wild, crazy ideas that probably won’t work—those ideas will influence other team members and cause you to think of ideas that could work. The sky’s the limit in ideation!
Create a “Safe Space”
When coming up with ideas, it really is important to evaluate them at the end of the process. Postpone judgment or criticism of any idea. Let people know they will be heard, not judged—this will free them up to think of those wild and crazy ideas that could change your users’ lives and produce amazing user experiences.
This applies not only to words but to body language as well. Try to avoid any types of negative body language that you can, like crossed arms, rolled eyes, or anything else that signals a disapproval of someone’s idea. Think of ideation as an improv class—use the framework “yes, and” to build on the ideas of others.
Using Ideation in the Design Thinking Process
Now that you understand what ideation is, have a few types of ideation styles to choose from, and have a good set of heuristics to adhere to in your ideations, you can start to explore each one in more depth. This chapter looks at each type of ideation, how they work, and how to use them to generate ideas.
Conceptual Ideation
At the start of the ideation process, all you have is the research you’ve done up to this point. You understand the problem you want to solve, who you want to solve it for, and how other companies are solving it today. Armed with this knowledge, what will you make? It can be a challenge to get started, even when you have a lot of information that guides your thinking.
Luckily, you have more than just information. You have the design thinking process as well—all its structure, techniques, and exercises that allow you to keep going. You can turn to this process to generate solutions using conceptual ideation techniques that let you get started on what a solution could be. Out of all the most common ideation techniques that exist, the most popular is brainstorming.
Author’s Note
Sometimes, you may find yourself in a position where you must conduct brainstorming on your own. While less effective, brainstorming can be done individually as well.
What Is Brainstorming?
Brainstorming is a conceptual ideation technique used by teams to solve clearly defined problems. As a group, you generate ideas that could help solve a design problem. To brainstorm effectively, you work from a clear problem to solve—you need a problem so that you can think of solutions to that problem.
It’s a common misconception that brainstorming means ideation. However, it is not the only ideation technique—just the most common one. So, people tend to confuse the two. In the same way that UI is a part of the UX, brainstorming is just one of the techniques available to use when you want to ideate (FIGURE 4.5).
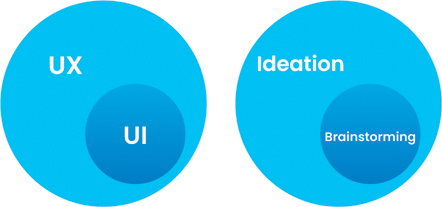
FIGURE 4.5 Just as UI exists as a part of UX, brainstorming exists as a part of ideation. Ideation is broader than brainstorming, just as UX is broader than UI.
How Do You Brainstorm?
At its core, brainstorming is a group activity in which participants try to think of ideas to solve a problem. It usually involves a whiteboard, some sticky notes, or some other notetaking method that allows participants to write down short, quick solutions to a possible problem.
To brainstorm, you gather a group of people (ideally with different perspectives on a problem) and ask them to think of as many ideas as possible that could solve a problem you are working on. Participants take time to individually write down their ideas (on sticky notes, for example), and after a few minutes of solo thinking, each participant shares their ideas with the group (FIGURE 4.6).4 Afterward, the group discusses the possibilities, building off each other’s ideas, and eventually votes on a few of those ideas to proceed forward.

FIGURE 4.6 To see a great example of brainstorming in action, check out this video of a sample brainstorming session produced by world-renowned design agency IDEO. (julief514/123RF)
4 www.youtube.com/watch?v=WIVlACbAWio&ab_channel=IDEOU
Let’s go through a sample brainstorming session together to see how it could all play out.
First, you’ll need a problem to solve. Let’s assume that you own a banana stand at a pier and want to increase your revenue by attracting more customers. How can you achieve this result for your business?
To conduct this brainstorm, you’ll need to gather supplies. You could do this in person with sticky notes and Sharpies, or you could do it digitally using a tool like Figma or Miro. I’m going to use Figma’s whiteboarding tool, FigJam, to record all my ideas for the brainstorming session (FIGURE 4.7).
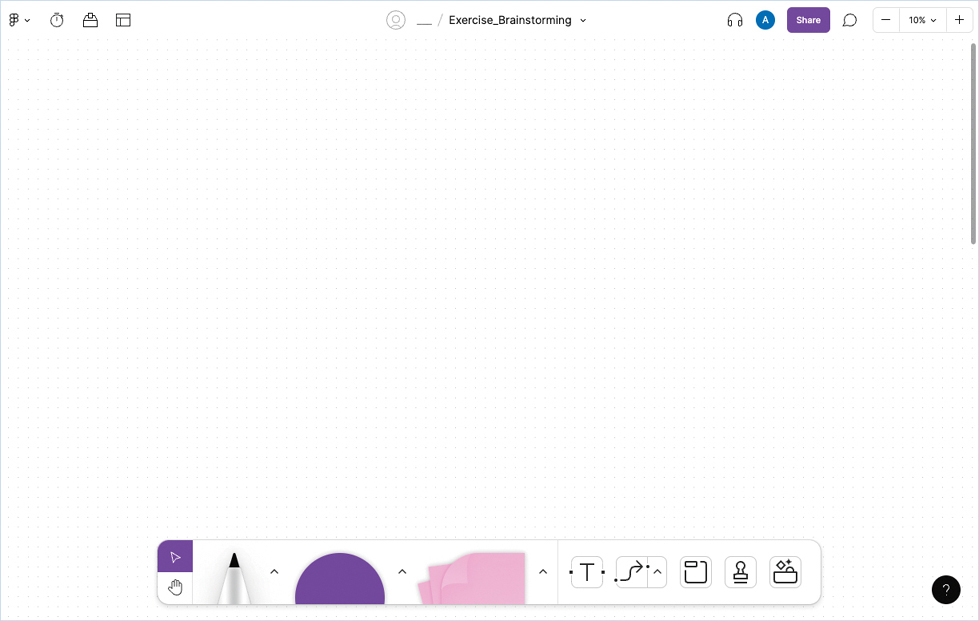
FIGURE 4.7 A blank canvas in Figma for the brainstorm.
Next, you’ll want to set a time limit. This is easily achieved using Figma’s timer function (FIGURE 4.8).

FIGURE 4.8 Figma’s timer function. I chose 15 minutes for this brainstorm.
Next, you give the participants 15 minutes to think of ideas related to the problem to solve. For me, I would start diverging around the problem space and think of all the ways you could generate more revenue for the business. That could be marketing promotions, partnerships with other businesses, or even games people could play at the banana stand. Plenty of ideas could work (FIGURE 4.9).

FIGURE 4.9 The results of my 15-minute brainstorm. I came up with lots of ideas for the banana stand.
If I were doing this brainstorm in a group setting, I would then give each participant time to talk about their ideas with the group. This would allow everyone to share their ideas, feel heard, and possibly inspire the group to combine ideas or even generate new ones.
Here’s a list of everything I came up with during the brainstorm:
Give away bananas as prizes for carnival games.
Bundle bananas with other sales at the pier, like fish.
Give oddly shaped bananas personalities as a marketing ploy.
Put on theater shows using the bananas.
Give out free bananas on Tuesdays.
Mail people bananas as a tactic for them to visit the store.
Hold trivia competitions about bananas.
Start a challenge around bananas that gets people excited and social.
Partner with influencers to sell bananas.
Partner with zoos; give bananas to people to feed animals.
Use the peels as art and sell them.
Bring a monkey to the store and allow people to feed it bananas.
Create banana-based recipes.
Advertise via a banana-shaped billboard.
Sell banana-themed merchandise.
To take this a step further, I could group these concepts into themes to see if any strategies emerge from those themes. The benefit of this is that it may cause me to generate more ideas or combine ideas into a newer, stronger one. Possible themes could include:
Repurposed bananas (recipes, peels, activities)
Partnerships (influencers, businesses)
Giveaways (promotions, bundles, prizes)
Games (prizes, bananas as a theme)
Branding (merchandise, billboards)
You could then work from these themes to think of new ideas, or combine themes to create stronger, multifunctional ideas (FIGURE 4.10).
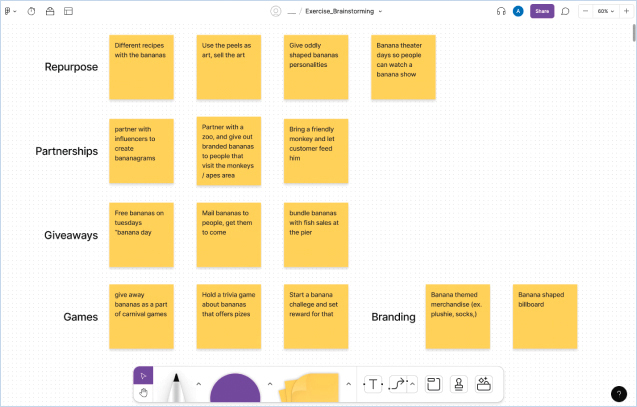
FIGURE 4.10 The themes that emerged from sorting the ideas into different buckets.
Brainstorming is a highly divergent activity that produces results that can be combined, remixed, and iterated on further. Hopefully, this exercise convinced you that there’s always money in the banana stand.
How Do You Brainstorm Well?
As an ideation technique, many of the best practices5 of ideation also apply to brainstorming specifically.
5 www.interaction-design.org/literature/topics/brainstorming
Set a Clear Problem to Solve
This is a crucial step to the brainstorming process, and the first—you have to establish the purpose of the session. Explain the context to the group, including what problem you are trying to solve with your brainstorming session.
Include Your Research
In addition to setting the context with the problem to solve, you can also include your persona in the exercise. Being able to connect with a persona during the brainstorm will help people think of solutions that incorporate your users’ wants and needs.
Set a Time Limit
Establish how much time participants will have to think about solutions. Being upfront with time limits ensures participants focus on the task at hand, and setting limits in thinking about ideas in addition to discussing them afterward prevents the activity from spiraling out of control. I usually give 15 to 30 minutes, but your problem may require more or less time, depending on what you are working on and how much time you have to devote to it.
Aim for Quantity
Since brainstorming is about finding the best ideas, you should focus on creating as many as possible. You don’t know what the best ideas are yet—that’s why you’re brainstorming! Shoot for as many ideas as you can rather than thinking of the perfect, singular idea during the brainstorm. You want a wide range of ideas to choose from later.
Encourage “Crazy” or “Weird” Ideas
In brainstorming, no idea is too crazy. In fact, crazy ideas can create related ideas that are more feasible variations. Encourage your participants to think outside of the box, use a “magic wand” on the problem, or otherwise think of things that they may not believe feasible but would be amazing if they work.
Build on the Ideas of Others
Since brainstorming is a group activity, approach it with a mindset of collaboration. As people share their ideas, ask yourself whether you can build on those ideas to take them further.
Have One Conversation at a Time
To make sure everyone stays on track during your brainstorm, it’s good to have one conversation at a time. This will allow the team to be respectful of each other’s ideas and create the opportunity for participants to build off each other’s ideas.
Take Notes
Make sure someone is taking notes and keeping things on track during your entire session. This could be the facilitator of the session, but it’s sometimes better to have someone else do this while the facilitator focuses on moderating the conversation.
No Negativity
Remove judgment, criticism, and negative body language from the session where possible. Negativity prevents people from sharing their ideas and being valued, which reduces the effectiveness of your brainstorm and prevents the best ideas from coming through.
When Should You Avoid Brainstorming?
Brainstorming is one of the most common forms of ideation. However, it’s not always appropriate. There are times when you don’t need to use brainstorming.
You Don’t Know What Your Problem Is
If you don’t have a clear grasp on what you want to solve, then brainstorming will not be effective. You need to rely on other ways to understand your problem, and to perform that research before trying to think of solutions via brainstorming.
You Know Exactly How to Solve Your Problem
If you have a complete understanding of how to solve your problem, then you don’t need to use brainstorming—you can instead focus on executing that solution, possibly using a visual ideation technique to explore different ways of implementing that solution.
Author’s Note
In this book, you will be using several ideation techniques. If you have been working on your project by yourself, it may be a fun exploration to invite several other people to participate in your ideation sessions.
You Won’t Be Able to Use Ideas from Your Brainstorm
If you are unable to use the ideas from a brainstorm, then you shouldn’t have a brainstorming session. This may be because your roadmap is locked in for the foreseeable future, or you might not have the time to conduct the session and work on the ideas that participants generate.
Brainstorming Is the Quintessential Ideation Technique
Brainstorming is often confused for ideation for a reason. It’s a powerful, reliable, common exercise that produces incredible results. It’s the perfect ideation technique for the design thinking process, and one to turn to at the start of the ideation step of design thinking. If you need to generate concepts for your design solution, brainstorming is one of the best tools you can use.
Author’s Note
This is a great time to go back to your persona and consider it while brainstorming. During the design thinking process, you will constantly refer to the artifacts you’ve been making to influence future design decisions, and the persona is one of the major ones to return to.
Let’s Do It!
Let’s brainstorm solutions for our solo traveler project. Let’s start by taking another look at the problem to solve:
As solo travelers, our users want to feel informed and assured so that they can feel comfortable on their trip. How might we provide a way for our users to maximize their solo travel experience?
To brainstorm around this activity, you will want to create a working space for yourself (and your participants, should you choose to invite others along for the session). I suggest Figma, Miro, or even some sticky notes and Sharpies.
Author’s Note
When using sticky notes and Sharpies, I recommend writing in all capital letters. It’s easier to read from a distance.
Alternatively, you can use the working space I established in Figma: https://tinyurl.com/asuxd-brainstorm
You’ll also want to keep the tenets of good brainstorming in mind.
Diverge. Think of wild and crazy ideas and try to come up with as many concepts as you can.
Don’t evaluate your ideas just yet. Focus on generating them over making decisions about them—decisions will come later.
Build off the ideas generated. When looking back at the list, see if you can combine ideas, create themes, or otherwise find a way to enhance what you’ve thought of.
Author’s Note
Refer to the “Brainstorming” section in the appendix for examples to compare your brainstorming results with.
Visual Ideation
Brainstorming and other forms of conceptual ideation help you figure out, at a really high level, some solutions that could satisfy the problem to solve. The purpose of conceptual ideation is to generate a wide range of concepts so that you can choose a few to move forward with.
To make those solutions more tangible for yourself and the team, however, you’ll need some visual ideation to go alongside them. Visual ideation starts the process of taking a concept and bringing it to life with examples. Conceptual ideation, on its own, isn’t enough to establish buy-in for the team and develop a clear path forward. You need to take the ideas generated during this step of the design thinking process and show what they could look like.
Several types of ideations help flesh out concepts further and depict the vision you have for a solution. One of the most effective and common forms of visual ideation is to draw out that solution via sketching.
What Is Sketching?
Sketching is an ideation technique that allows you to explore and communicate ideas visually. If two people talk about a concept without seeing a visual representation of that concept, they may end up imagining different things. It’s much easier to see the vision of an idea laid out, as if the idea actually exists.
Author’s Note
After all my years of working experience, the common saying really is true: A picture is worth a thousand words.
That’s why you sketch—you take the representation out of your head, put it on paper, and have a conversation about what you think the solution should look like and how it should function. Additionally, by sketching, you can explore the idea further. This could possibly lead to a clearer sense of the solution’s features and functionalities or, alternatively, help you see that the concept wouldn’t actually work or be that impactful. Sketching helps you communicate, clarify, and explore the concept much further (FIGURE 4.11).

FIGURE 4.11 Sketches like these allow the team to debate the validity of the solution and its execution at a higher level, sooner than if you actually built it. (Chaosamran_Studio/Shutterstock)
Sketching is a way to explore and communicate ideas visually. It’s abstract—just enough detail for everyone to get the high-level idea, yet specific enough to provide the gist of what you want to convey.
Sketching is also imperfect—it’s not meant to be the final idea; rather, it’s a concept. You don’t spend time on details to make a perfect sketch to present; instead, you create rough versions of ideas to get a good sense of them. An added benefit of it being imperfect is that the idea still feels malleable rather than finalized and concrete.
Finally, sketching is iterative—you don’t have to stick with the first drawing or first idea. Rather, you can keep redrawing and iterating on ideas until you feel they make sense to pursue further.
Why Do You Sketch?
You may turn to sketching for many reasons, including the reasons in the following sections.
Cost Effective
Sketching is extremely cost effective. You save time by thinking about the problem in the fastest way possible. Instead of building a complete thing or manipulating a digital tool, you can rely on sketching to build a concept in the lowest-effort way. Sketches are cheap, and this disposability lends itself well to the ideation process. When you’re finished, you don’t feel bad about throwing out a sketch. That means you don’t feel bad about tossing out the work, either. The purpose of the sketch was to get you to a better sense of the idea rather than be attached to any specific thing you made during the sketching process.
Idea Definition
Since you turn to sketching to illustrate the first pass at your ideas, the sketching process causes you to define your ideas better. You must visually show your idea playing out, and going through the act of sketching your idea causes you to fill in gaps and better portray what you are thinking. As a result, you think more deeply about the problem and the solution you’re trying to create to solve it.
Communicative
If you have an idea and want to communicate it to someone, how do you explain it? Do you discuss functionality and verbalize your thoughts? Yes, probably. But a sketch helps align and communicate very well, showing someone your thoughts rather than telling them. This lets you get your ideas out of your head and onto paper so you can show others and get everyone on the same page.
Collaborative
If you choose to, you can sketch as a group to flesh out ideas. You could involve stakeholders or other team members and do it together, to foster a sense of creation among the team and make sure everyone has a chance to be involved in the solution.
How Do You Sketch?
When you’re ready to sketch, you’ll need a few things at your disposal:
Something to write with (pen, pencil, sharpie, stylus, and so on)
Something to write on (paper, whiteboard, iPad, and so on)
Tools to support the process:
Straight edge or a ruler
Eraser
Color (for emphasis)
For physical sketching, you could also invest in a UI stencil multipurpose tool to draw specific shapes and icons. UIStencils.com (FIGURE 4.12) is a great place to find these types of tools:

FIGURE 4.12 A sketching tool from UIStencils.com that makes sketching easier.
Conventions
When you’re sketching, there are agreed-upon conventions that you can rely on to communicate your ideas. Using these conventions, you’re able to speak a common language with others and transfer your thoughts to the page so that others can see what you’re thinking of.
You can break down digital interfaces into common high-level components.
Lines
At the core of an interface is a series of lines. Lines divide content into separate sections, represent elements like text, or even combine to form shapes like boxes that hold text or circles that represent user profiles (FIGURE 4.13).

FIGURE 4.13 Common representations of lines.
For text, you can also use actual handwriting if you want to communicate a specific word or sentence.
Containers
Using a series of lines, you can create a container (FIGURE 4.14). A container holds content, like text, images, icons, or many other things an interface would want to represent. Depending on what’s inside the container, you could have a button, a control (like a toggle or checkbox), or a card.

FIGURE 4.14 Common representations of containers.
Author’s Note
With many design deliverables, there are multiple ways to communicate information. There’s not always a “right” way to do something; rather, if your artifact communicates your point, then you did things correctly.
Images
Images are represented in several ways (FIGURE 4.15), depending on personal preference. I’ve seen people use an X inside a container to communicate an image. I’ve also seen people draw a mountain with a circle to imply a picture. For specific images, like a profile picture, you can also use an avatar (a circle and a semicircle).
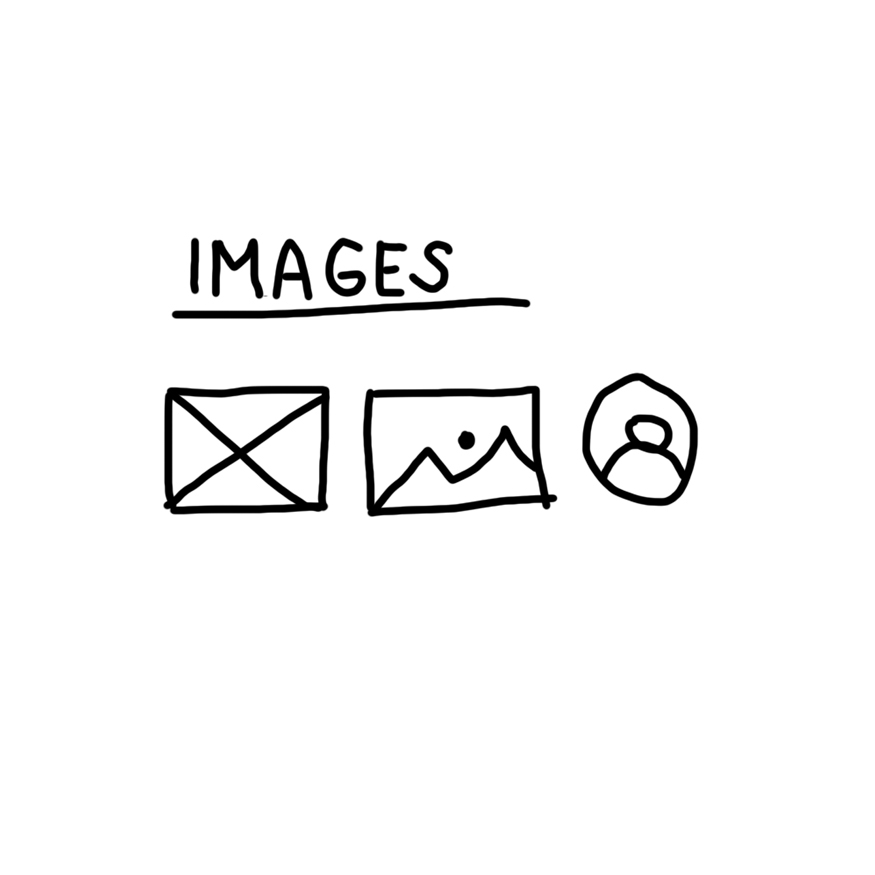
FIGURE 4.15 Common representations of images.
Icons
Icons are a nice way to communicate aspects that are common across many products, like search, reviews, home, settings, notifications, and many more (FIGURE 4.16).

FIGURE 4.16 Common representations of icons.
These elements are often combined to make an interface, like the one in FIGURE 4.17.

FIGURE 4.17 Combining various elements into a high-level sketch.
I haven’t told you what this sketch is intended to represent. Yet you can get a sense of what I’m trying to talk about by looking at the common elements that exist in this sketch. It looks like a mobile phone (since it’s a rectangle), with an image at the top (the big X in the rectangle), a few cards (the row of rectangles with Xs and text), another image (another X), and finally a bottom navigation bar with search, voice, and save options (the row at the bottom with icons). Perhaps this is a voice memo product, with the ability to record, search for notes, and look at bookmarked recordings. We’re able to have that conversation because of the conventions that exist for me to represent my ideas.
Warmups
When sketching, it’s good to do a few one- to two-minute exercises to warm up. I suggest taking a few minutes to draw some simple UIs to stretch your sketching muscles before diving into a more complicated sketching session.
Feel free to practice with any of these UIs to warm up. When re-creating these screens, try to stick to one to three minutes per screen.
Easy Warmup (Google Search)
An easy warmup could be a sketch without a lot of elements. This gives you the time to get right all the elements that are present on the page without worrying too much about the details (FIGURE 4.18).

FIGURE 4.18 Google’s homepage.
Medium Warmup (Bing Search)
A medium warmup could be a sketch with a few more elements but still a lot of white space. While there’s an image in the background and a few more elements at the bottom of the screen, this example is comparable to the previous one (FIGURE 4.19).

FIGURE 4.19 Microsoft Bing’s homepage.
Hard Warmup (Yahoo Search)
A hard warmup could be a sketch with a lot of elements. This example has a lot of different components that come together to form a page (FIGURE 4.20). It can be challenging to draw all these elements in only a few minutes!
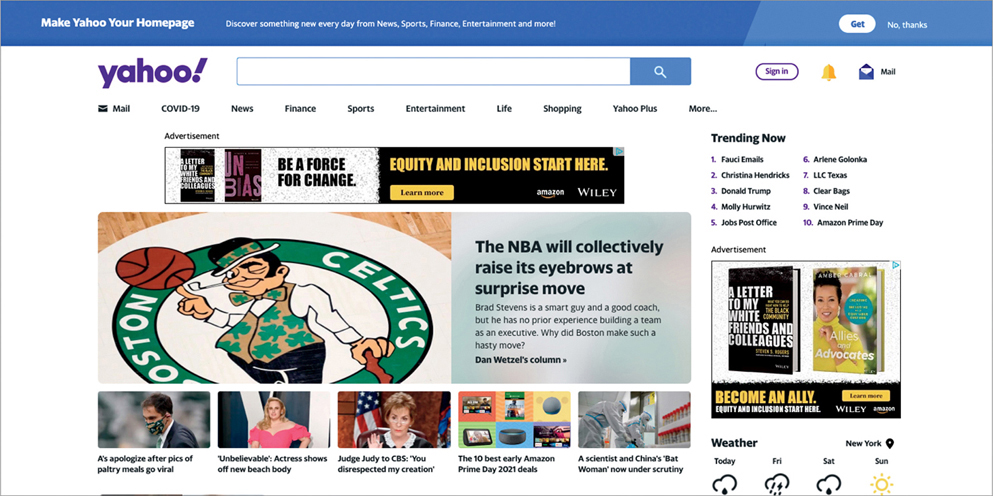
FIGURE 4.20 Yahoo’s homepage.
Author’s Note
Many designers, me included, fear a blank piece of paper the most. It’s hard to get started when you don’t have a starting point.
Crazy 8s
After you’ve warmed up a bit, you’ll be ready to start sketching ideas based on the concept you choose to visualize. It can be a challenge to know where to start, however—you’ll be working from a blank canvas.
To make it easier on yourself, I suggest a technique that’s popular in the industry. Crazy 8s is a sketching technique that drives rapid ideation around a concept you want to explore (FIGURE 4.21).
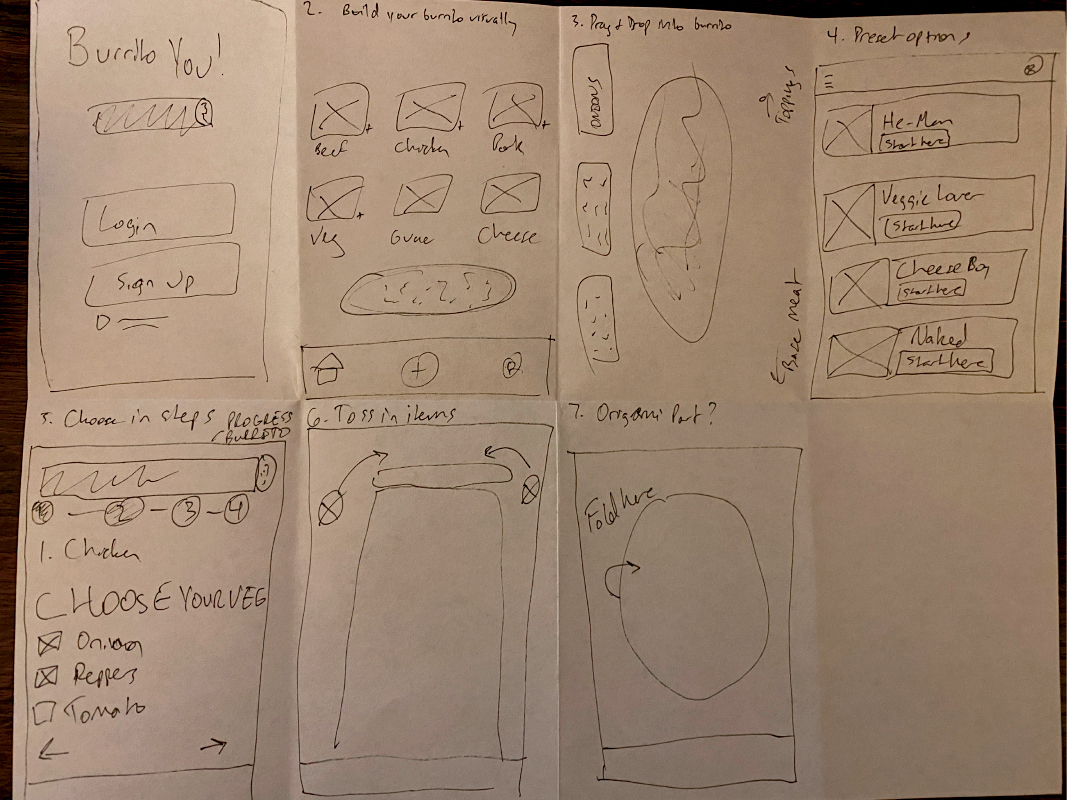
FIGURE 4.21 A crazy 8s exercise I did for a build-your-own-burrito app. I didn’t fill up the entire page in the eight minutes, and that’s OK.
Author’s Note
While the recommendation is eight visualizations in eight minutes, it’s really difficult to fill up the page in that amount of time. It’s OK if it takes you more than eight minutes for fewer than eight pictures—this is more of a guideline than a rule.
To use this technique, follow these steps:
Get a piece of paper and fold it into eight sections.
Starting with the first section, draw one screen of your solution, or one idea you want to explore. Try to take around one minute to do so.
Move on to the second section, spending a minute visualizing your idea.
Keep moving from section to section as the time allows.
The goal is to fill up the page with visualizations of your idea—one visualization per section on the piece of paper.
When doing this exercise, you should time box yourself—this exercise is meant to be rapid-fire ideation, to drive the benefits of sketching. You can set any time limit you want, but eight minutes is a nice amount of time to spend (one minute per section). By the end of the exercise, you would have eight visualizations in eight minutes.
For the crazy 8s technique, I’ve experimented with several additional areas of focus to help me develop my ideas. I’ve narrowed down my ideation process to focusing on one of two themes:
Divergent ideation—How many different ways can you visualize a solution? This style of crazy 8s puts a focus on representing the idea in as many ways as possible.
Flow-based ideation—Think of a journey your user will go on in your product. What would that journey look like? You can visualize each step of the journey, at a high level, to see what you come up with.
Author’s Note
Feel free to do this ideation by yourself or with a team. If you do it with a team, be sure to present everyone’s sketches for three minutes after each round.
You don’t have to be limited to a single crazy 8s session, either—you can, and should, do multiple rounds to better develop your ideas. For example, you could do one round of divergent ideation to explore different ways to execute the concept, then a round of flow-based ideation to better explore your favorite idea from the first round. It’s totally up to you!
Visual Ideation Gives Ideas More Definition
Visual ideation is the practice of exploring possible solutions in a visual manner. Sketching is an excellent visual ideation technique to turn to once you have a rough idea of some solutions to the problem to solve. Sketching helps us take high-level concepts and visualize them in a way that allows us to have more detailed conversations. Sketching allows us to get out of our heads and explore ideas to see if they could actually work. It’s the perfect technique to use in the ideation phase of the design thinking process.
Let’s Do It!
Let’s make some sketches for the solo traveler project. Remember, this was our problem to solve:
As a solo traveler, our users want to feel informed and assured so that they can feel comfortable on their trip. How might we provide a way for our users to maximize their solo travel experience?
Hopefully you have already completed your brainstorm to create ideas to sketch around. If you have, feel free to take one to three of those ideas and start sketching using the crazy 8s method.
Author’s Note
Refer to the “Sketching” section in the appendix for examples to compare your sketches with.
If you don’t have any ideas to sketch around, that’s OK—you can try the crazy 8s method using any of the following prompts (which are also good for practicing the technique in general).
Give yourself eight minutes to work through any of the following prompts:
Design an app to build your own burrito.
Design a custom T-shirt-making website.
Design an app that helps people decide where to get lunch.
Design a mobile app that lets people find tasty recipes.
Design an app that teaches kids a new language.
Design an app that lets people discover new books.
Relational Ideation—New Ideas Out of Existing Concepts
Brainstorming and sketching are two of the most common forms of ideation. The former allows you to generate multiple concepts that address the problem to solve, while the latter lets you visualize those concepts into something more concrete and tangible.
Relational ideation is yet another way to get your mind thinking about the problem space. Unlike the other forms of ideation, this ideation focuses on exploring what already exists in the hopes of kickstarting an idea that addresses the problem to solve. By exploring the relationships between things and looking through a different lens or from a different angle, you may observe something and gather enough momentum to think of an interesting solution.
Relational ideation is designed to get your brain making connections. It takes what currently exists and shifts the perspective, just slightly, to see if you can look at something from a new angle. Sometimes this will be related concepts, like with mind mapping, while other times it will be remixing ideas to make something new, like with SCAMPER. If you feel stuck in your ideation and want to try a different approach, give relational ideation a try.
Mind Mapping
A mind map is a diagram that explores how concepts are related to each other. Mind maps begin with a central theme or idea as the starting point. From there, various themes or ideas extend outwards from the core idea to form branches. Those ideas could also have their own concepts branch out from them, creating what looks like a family history or tree. In this way, you can draw relationships between concepts in an effort to think about a problem space in a new way.
Let’s look at a mind map for a hypothetical project—a business that sells merchandise at the beach (FIGURE 4.22). Let’s say you’re looking to figure out what things you could sell at the beach but aren’t really sure what items to offer. Do you branch out into things to do on the beach, like games or sporting goods? Or maybe you start selling food? Perhaps you sell essentials, like towels or sunscreen. It feels like you could go in so many directions.

FIGURE 4.22 A mind map that explores concepts related to the beach.
Fortunately, if you want to explore the problem space—what do you sell—you can think of all the things that are associated with the beach as a start. From there, you can focus on themes for your store and the things you want to sell. A mind map would allow you to explore these themes and see what you may even be interested in selling.
To build this mind map, let’s start at the core concept—a beach. From that concept, I branched into related ideas of things you would expect at a beach, like the sand, the water, the boardwalk, and the sun (FIGURE 4.23).
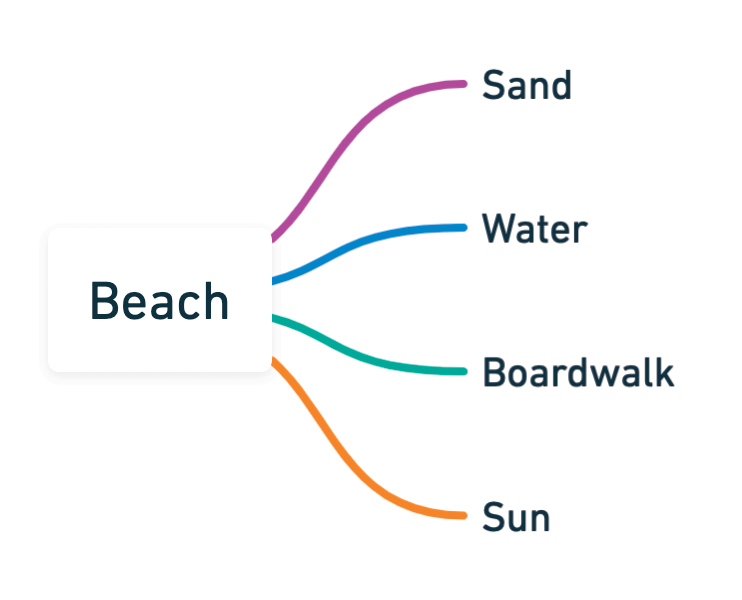
FIGURE 4.23 The second level of mind mapping in my exploration of beach-related items.
Each of those concepts also has related concepts, like blankets or sunglasses. I spent some time thinking about each branch and how ideas could be related to those sections, like in FIGURE 4.24.
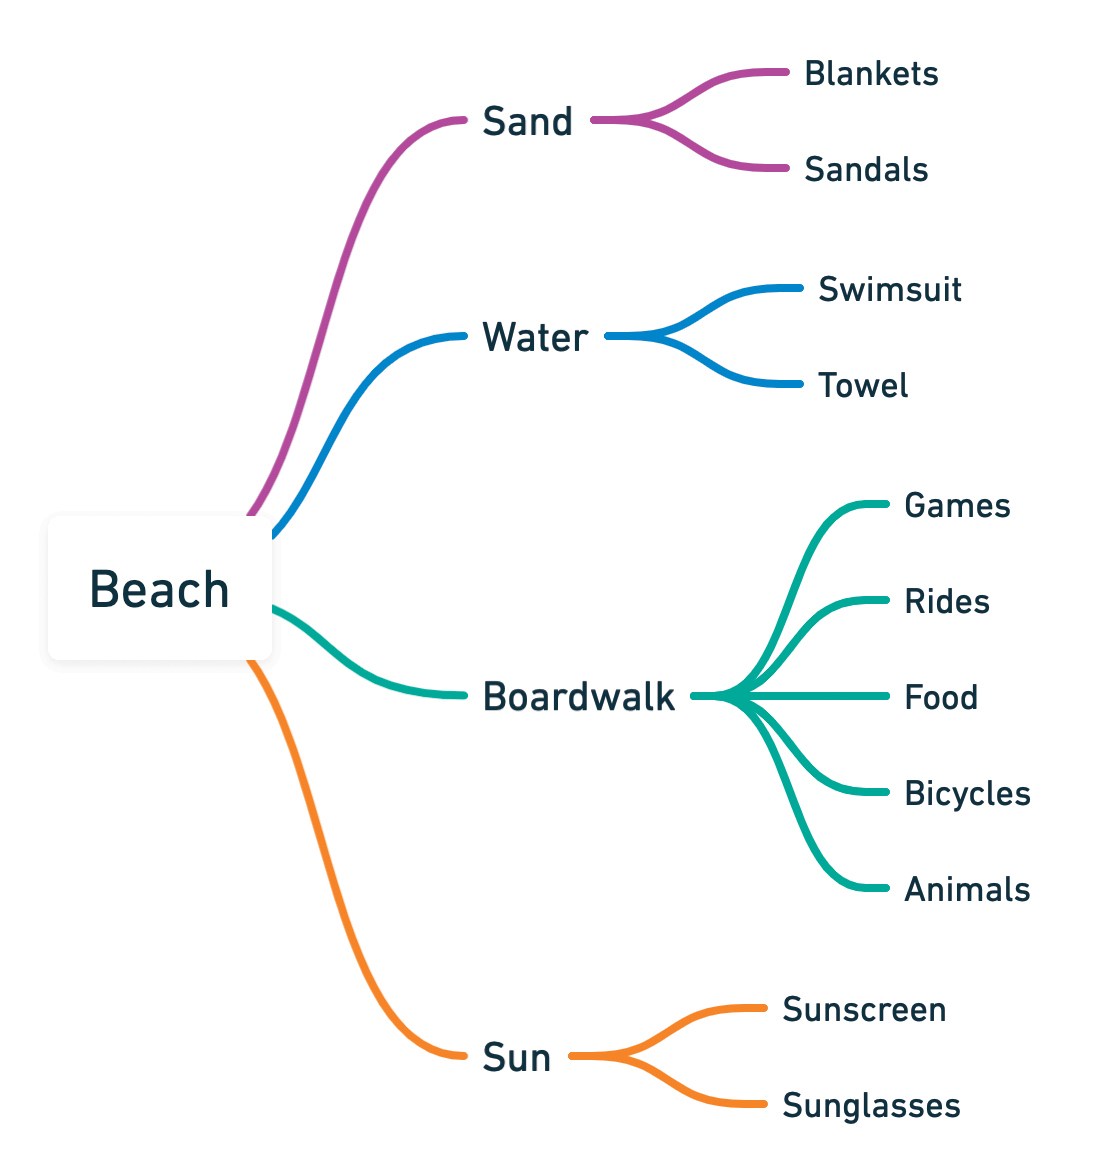
FIGURE 4.24 The third level of mind mapping in my exploration of beach-related items.
You could continue to explore this as much as you want, going deeper and deeper into related concepts as you progress through the mind map. I did so for the food category, and stopped there after I felt like I had a sufficient number of relationships.
At the end of this process, you would ideally have a lot of areas to explore. If you look at the first branches, those feel like themes—you could focus on the boardwalk, for example, and set up shop on or next to the boardwalk. You could offer food, or have rides, or even carnival games that passersby could play. Or perhaps you want to focus on beach essentials, and you open your business near the entrance to the beach, selling towels, blankets, and footwear.
With relational ideation, mind maps are used to explore relationships between ideas. When you think of something like the beach, what do you associate with it? That’s where mind maps can help—to establish the links between one concept and related concepts.
When mind mapping, don’t worry about being neat—this is an iterative exercise with the room for revision. Focus on getting your ideas out there and refine after you’ve explored the problem space.
Also, don’t map out solutions—map out relationships. After you’ve established all the relationships, you can go back and think of some solutions related to those. For example, in our beach mind map, you explored all the elements and products related to the beach, but you haven’t explored how you will sell them or to whom you will sell those items. Rather, you are establishing a comprehensive list of related elements, so that you have explored the problem space and have a list to work from once you start to think of solutions.
SCAMPER
The SCAMPER technique is another form of relational ideation. This technique allows you develop or improve products or services by relating concepts to form new ideas.
SCAMPER is an acronym made up of seven themes to guide ideation:
Substitute
Combine
Adapt
Modify
Put to other use
Eliminate
Rearrange
Each of these themes is a prompt for you to think differently about a problem. To use this technique, you take a product or service and apply each theme in the list to that product or service. As you apply the themes, you can start to generate product ideas for the problem you are working on.
After going through each theme, you can look at the list of ideas you generated and compare them to the problem to solve. You may find a concept you want to explore further, and you could use another ideation technique, like sketching, to build from it.
SCAMPER is an excellent ideation technique that offers a lot of creative association potential. As a form of relational ideation, it allows you to generate concepts that you can explore further via visual ideation. Additionally, it allows you to improve upon concepts you may have already generated, which would improve the quality of the solution you want to explore.
Use SCAMPER when you want a new perspective to generate concepts or explore a solution even further.
Let’s take a closer look at each theme in SCAMPER and think of how you can apply it to a product or service.
Substitute
What can be replaced? With substitute, you are trying to think of something that already exists and swap it with something else. You must break down the parts of existing products and see what elements can be replaced.
Can you change how something is made? Can you swap one part for another? Can you use different ingredients or materials to make it? Think about how a product is made, sold, distributed, and perceived, and how you can substitute something else in the place of those elements.
Let’s look at a few examples.
What if you took Airbnb but replaced houses with pets?
What if you replaced the music in Spotify with ASMR audio?
What if you substituted cashiers with touch screens?
What if you replaced gym memberships with home equipment?
Some of these substitutions have already been made. Companies like Peloton, Tonal, and Mirror advertise themselves as an at-home gym replacement. People now have the option to substitute working out at a gym with working out in their homes (FIGURE 4.25).

FIGURE 4.25 A person exercising in their home—a substitute for going to the gym. (Studio Romantic/Shutterstock)
Combine
What can be combined? With combine, you are trying to take two things that exist and put them together. Think of combine as a mashup of existing elements that could bring new life to an industry or solve a problem. You can consider anything from materials to processes, technologies, or even entire products. Sometimes, creating something new is taking two existing things and putting them together.
What if you combine Spotify and virtual reality for digital concerts?
What if you combine people who travel often and empty office space?
What if you combine social networking with professional networks?
What if you combine cabs and people who want to carpool?
Prior to ridesharing services really taking off, getting in a cab with a stranger did not sound like an appealing option. Having to wait for that stranger and not knowing where you were going or when you’d arrive at your destination felt like bad user experiences. However, with the advent of Uber and other ridesharing services (FIGURE 4.26), it’s a common option to save a little bit of money and choose a carpool instead of taking a shorter, direct route to your destination. By combining different trips, all riders save a little bit of money at the cost of time.

FIGURE 4.26 Uber’s carpool option, UberX Share, combines riders so that each rider saves money.
Adapt
What can be added or repurposed? What about the current system can you enhance? With adapt, you look at an existing product and think of the things you can tweak or adjust to obtain a different outcome.
Plane tickets could have concierge services where an airline representative takes travelers around the city for a day.
Zoom could introduce low-latency video calls for large online gatherings to expand into the virtual conference market.
Netflix could expand its content library with a community section featuring independent films.
DoorDash could adjust its delivery service to include hardware or household supplies in addition to food deliveries.
DoorDash (and other delivery services) initially started as food delivery services. Since then, they have adapted their products to include more items for delivery, like groceries, alcohol, and pet items (FIGURE 4.27).

FIGURE 4.27 Doordash’s bottom menu includes other categories for delivery besides food, such as grocery and retail options.
Modify
What can be changed? With modify, the focus is on minimizing, maximizing, or otherwise enhancing existing elements to create a new experience. If you dial down or dial up one element, what would happen?
Smaller movie theaters could book private screenings and put more seats to use in a smaller space.
Uber could maximize the types of goods it delivers via Uber Eats to generate more sales.
Apple could minimize the number of components in its hardware to make the thinnest laptops possible.
Dayuse (FIGURE 4.28) is a hotel service that allows customers to book hotels for a few hours at a time. This could be perfect for travelers that need a few hours of sleep or rest between activities in cities they aren’t staying at for very long.

FIGURE 4.28 Dayuse.com’s homepage, which advertises hourly hotel stays.
Put to Other Use
Can you use a product in a different industry or context? What would it be like to sell to a different customer? Or to use the product in a different way?
Old phones have limited utility. Can you record audio tours on them and give them to travelers?
Can you make a streaming service for children instead of adults?
Can you repurpose old tablets and give them to children?
Can you take discarded technology and turn it into art?
What if you used virtual reality to show home renovations to new homeowners?
Nintendo, a video game company, is widely known for its creations. One of those products, the Nintendo 3DS, was originally intended to be a high-quality portable video gaming experience. Unexpectedly, the Louvre museum contracted Nintendo to use this technology for a completely different use than playing video games—they wanted the console to serve as an audiovisual visitor guide for guests of the museum (FIGURE 4.29).6 Nintendo complied, putting their console to another use.

FIGURE 4.29 In 2012, the Louvre offered audio tours using 3DS video game systems from Nintendo—not Nintendo’s original purpose when creating the console. (Trinochka/Shutterstock)
6 www.nintendoworldreport.com/news/29776/nintendo-3ds-audio-guides-available-at-louvre-museum
Eliminate
What can be removed or simplified? With eliminate, you try to take out certain elements and observe what would happen. What if you had access to only certain resources, or cut out a part of the process?
Hotels have bathrooms for each guest. Can you consolidate to a single shared public restroom or even shared rooms?
What if you removed the concept of ownership from a car, and instead rented cars to people when they needed them?
What if Amazon removed the step for going to your shopping cart, and instead let you buy an item immediately from their site using your saved information?
What if you eliminated cashiers from supermarkets and let people check themselves out?
Returning to an example in a previous chapter, eliminating steps in the process can help improve the user experience. Adding a “buy now” option to an e-commerce website allows the user to skip steps in the process, eliminating the need to go to a checkout page (FIGURE 4.30).


FIGURE 4.30 The product detail pages for the same item on two different websites.
Rearrange
What happens if you reverse or flip a process or flow? With rearrange, you take steps in the process and reorder them to produce something new.
Museums ask for an entry fee. What if you collected payment when guests leave and ask them to pay what they think the experience was worth?
What if you generated a list of items in a person’s shopping cart, and every week asked them to remove items from it to confirm their order instead of adding items to it to build it?
What if you messaged someone in a dating app before seeing their profile, then after several conversations, got to see what they looked like?
Lovetastic7 is a dating app (FIGURE 4.31) that offers profiles, matching, setting search parameters, and more. One thing it doesn’t offer, however, is photos—the premise of the app is that dating profiles don’t contain pictures. Instead, the app hopes that people foster a connection first, then choose to meet and see each other’s photos afterward.
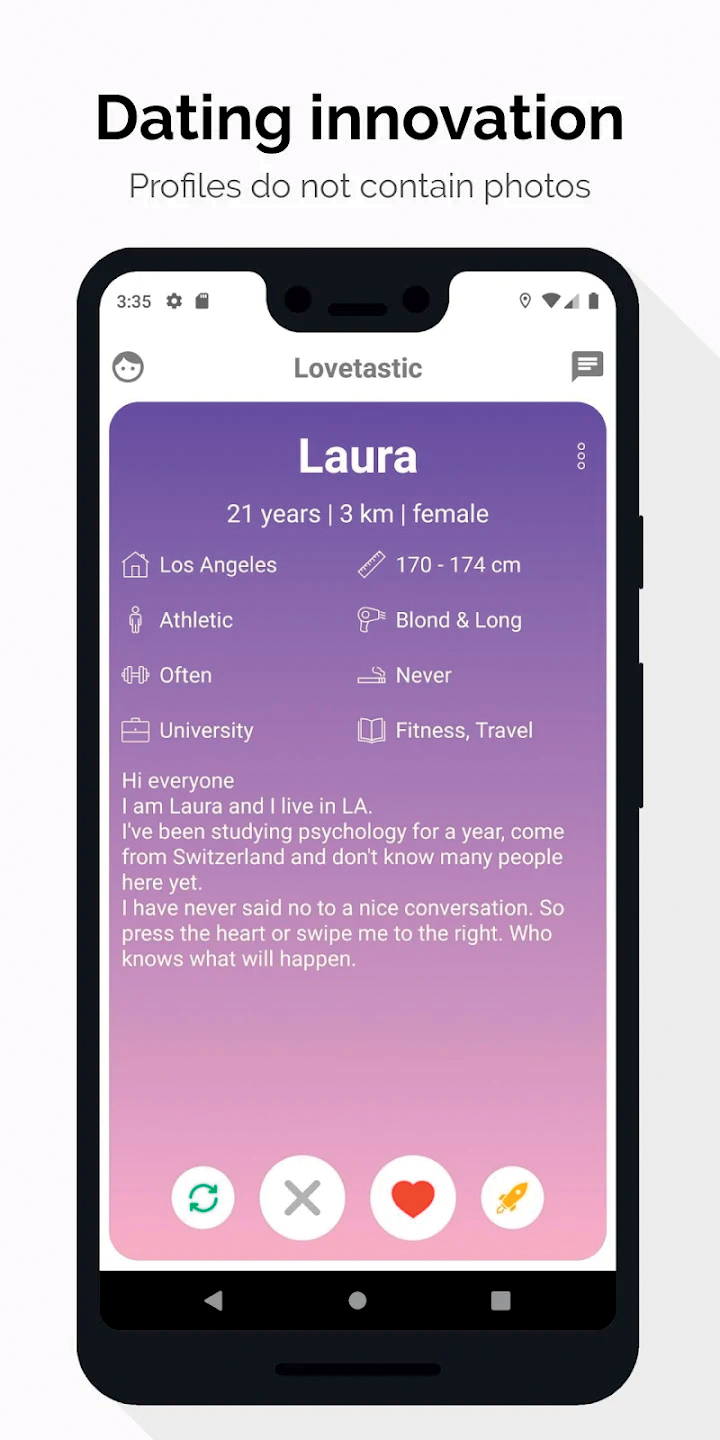
FIGURE 4.31 Lovetastic, a dating app with no photos.
7 https://play.google.com/store/apps/details?id=com.lovetastic.android
Let’s Do It!
Let’s try a relational ideation technique for our solo traveler project. Remember, this was our problem to solve:
As a solo traveler, our users want to feel informed and assured so that they can feel comfortable on their trip. How might we provide a way for our users to maximize their solo travel experience?
For this exercise, try one of the following:
Create a mind map related to the problem to solve. Can you come up with a mind map containing 30 things related to the problem space?
Perform a SCAMPER related to the problem to solve. For each theme in SCAMPER, try to think of three or four ideas related to the problem space.
Author’s Note
Refer to the “Mind Mapping” section in the appendix for examples to compare your maps with.
Once your ideation is complete, see if anything comes out of it that you want to incorporate into your project.
Prioritization
By the end of our ideation process, you should have generated tons of ideas to explore. You could have done this with brainstorming, lightning demos, mind maps, sketching, SCAMPER, or some other form of ideation. You could have done this as a team or as an individual. You could have done this for a specific problem, or to explore the design space more broadly for a solution. However you get there, you will reach a point where you need to figure out what you actually want to build.
The process of choosing what to build, and when, is called prioritization.
What Is Prioritization?
Prioritization is the process of determining what ideas you want to work on for your product. With respect to design thinking, it occurs when you need to choose which ideas to bring through the design thinking process from the ideate phase to the prototype phase.
Author’s Note
You may have to prioritize ideas on your own—especially if you work for a small organization or are working on a personal project. That’s OK—you can still use prioritization to figure out what’s most important for you to design.
Usually, prioritization is a team effort. It’s uncommon for a single person to completely own the decision-making process for what to test or ship. In fact, it’s common to bring in other voices during this process to gain their perspective. Stakeholders, mentors, directors, or others may come in at this step to share their thoughts and help push a direction forward. In these instances, it can be especially helpful to have a framework for deciding.
Let’s explore several frameworks that will let you prioritize.
Dot Voting
Dot voting is one of the most common methods of prioritization, and it’s simple—every participant gets a few votes, chooses the ideas they like the most, and puts a dot on each of them (FIGURE 4.32). At the end of the process, you tally up all the dots, and the ideas with the most dots get built.

FIGURE 4.32 A brainstorming exercise with dots on the ideas the team wants to prioritize.
Figure 4.33 is a sample brainstorm with a ton of options to choose from. For this brainstorm, participants were given three dots to vote with, and everyone used all their dots to vote for their favorite ideas. There were four votes for one idea (upper left), three votes for a second idea (middle), and two votes for a third idea (upper middle). Since those were the most popular votes, the team would pursue those opportunities first.
Dot voting has a lot of benefits that make it one of the most common methods of prioritizing.
Transparent—Votes are cast at the same time in a clear, obvious way. It’s obvious what ideas have the most votes and who voted for them.
Democratic—Everyone has an equal voice, and the ideas that most people agree to are the ones that move forward.
Fast—Since voting is done simultaneously (usually at the end of the session), there isn’t a lot of time spent debating ideas or going back and forth on choosing what to build.
Easy—You take a few dots, put them on what you like, and go from there. It’s not a complicated or time-intensive method.
Dot voting is a great method to use when you’re earlier in your ideation and trying to figure out what concepts to pursue. If you’re deeper in the process—say, trying to determine what features you should implement for a specific idea, and when—dot voting helps less. Instead, you’ll need a different method of prioritization to choose just how much of your product to build.
MoSCoW Method
If you have a good idea of the general thing you’d like to build but aren’t sure how many features you should include or how to prioritize them, then the MoSCoW method might be the perfect method for you to try next. MoSCoW is an acronym:
Must—The things you absolutely must include
Should—The things you probably should include but don’t have to
Could—The things you could include but probably don’t want to (yet)
Won’t—The things you know you won’t include (yet)
Using the MoSCoW method, you can develop a sense of the things you immediately want to include and, just as importantly, the things you agree not to include so that you don’t get distracted by the possibilities. The way the method works is you create a matrix of Must, Should, Could, and Won’t (FIGURE 4.33), then map your ideas to that matrix to come to a consensus on what to build.

FIGURE 4.33 A MoSCoW that prioritizes which features to include for a solo traveler project.
For this MoSCoW, I was trying to think of all the features I could include in the product I wanted to design. I had a ton of ideas after the group brainstorm and needed to pare down to choose which to pursue. If I’d had time, I could’ve pulled from other categories, but for the first visualization of the idea, I wanted to stick to the Must section of the MoSCoW prioritization.
This particular MoSCoW helped transition from brainstorming to sketching so that I could better visualize ideas on this project and move into the prototyping step of the design process.
The MoSCoW method of prioritization has a lot of benefits:
Collaborative—Everyone discusses the placement of each idea in the matrix, leading toward a discussion of not only the ideas but the importance of them as well.
Aligns—MoSCoW builds consensus and aligns teams, since there is open conversation about each idea.
Eliminates—MoSCoW helps eliminate ideas, since it’s just as important to decide what not to build as it is to decide what to build.
The MoSCoW method could be perfect for your prioritization needs, especially if you feel the need to discuss every idea from your brainstorm. However, if your team still can’t decide on prioritization after trying MoSCoW or dot voting, you may just have to include most or all your ideas in your prioritization approach.
Cars Method
If you or someone on your team really wants to at least see each possibility, then the Cars method might be the correct approach. The Cars method is a method I’ve developed working in the industry to size product features and gain alignment from teams on what you should specifically focus on building and is an excellent method for exploring the design space.
This method usually works best with a specific idea that has a lot of potential features or variance. Essentially, it’s broken into three groups, represented by cars that increase in both quality and cost:
Compact—What’s the smallest version of what you can build?
Midsize—What are all the features needed to most likely satisfy the problem to solve?
Cadillac—What’s the biggest, largest version of what you could create that would be the dream product for your users?
To perform this method, for each large idea that comes out of your ideation, create a feature set that extends across each car size. What is the minimum viable product of your solution, the bare basics of what you can deliver on? That’s your Compact—the least you need to do to satisfy the problem.
Next, ask yourself what you think is needed to create a really good experience—everything you feel would make this idea not only solve the problem but be delightful and enjoyed by users as well. That’s your Midsize.
Finally, think about all the extra stuff from your ideation that you could include —the bells, whistles, and otherwise fun and crazy ideas you came up with. That’s your Cadillac.
To prioritize, create a table that outlines the size, feature set, and vision of each category, like in TABLE 4.1.
If you were to try this method with Spotify, for example, Table 4.1 is a possible place where you could land for the first version of the service.
TABLE 4.1 The Cars Method for Spotify
SPOTIFY PRODUCT CONCEPT | ||
|---|---|---|
SIZE | FEATURE SET | VISION |
Compact |
| A lightweight version, allowing users to listen to music they don’t own |
Midsize |
| A more robust version, adding additional aspects to our product like account creation, library management, and social features |
Cadillac |
| The most robust possible version, adding additional aspects like community uploads, data tracking and recommendations, and microinteractions/animations |
The first, Compact iteration of Spotify could be a place for people to search for music and play it, with no tracking or concept of saving a profile. Think of it as a jukebox that plays music—you can choose what you want to play, but you can’t save your information or preferences. This is the barebones version of a freeform music listening experience that lets users select the specific music they want to hear.
The Midsize would add the ability to save playlists and interact with others on the platform. This would elevate the service to something very enjoyable—users could save their favorite songs, make playlists out of them, and share those playlists with friends. You’re already at a compelling service based on the Midsize alone.
Can you elevate that further? If you upgrade to the Cadillac, you would add data tracking, recommendations, uploading, and custom animations. Now the service would listen to its users, make recommendations, build playlists for them, and even let them share their own music on the platform. It would even have delightful elements toward the fit and finish of the product, such as custom animations depending on the song you’re listening to.
Spotify has all these features today. However, they didn’t start at this point—they built toward it, over time, through iteration and product enhancements. This may have been their vision all along, but to get there, they needed to take one step at a time and prioritize the more important elements.
To use Cars in the design thinking process, you would go through this exercise, then propose these three options to the team and see which ones they thought were worth building. To validate our MVP, you may need only the Compact. Or you may have team members or stakeholders that want to see the Cadillac, or at least have it tested with users before discarding it. It’s a method that can help bring around that alignment and have a conversation around what’s important.
Cars is a method that has especially resonated with stakeholders because it shows them the entire problem space and all your thinking, then invites them into the process to determine which version to pursue. Are you trying to launch your product quickly, or are you uncertain how successful it will be? Let’s deliver the Compact. Is this something you want to go all in on as a company and give 110% for? Let’s go for the Cadillac. It frames the prioritization process like a menu, where key decisionmakers check off which features they want to order.
Conclusion
Generating ideas during this step of the design thinking process is one of the most fun parts about design. There are so many possibilities to explore, things to do for your users, and ideas to address the problem to solve.
It can be really challenging to move forward from a list of several dozen ideas. Luckily, you have many prioritization techniques that allow you to choose the best ideas to pursue. Best measures more than the quality of an idea—it can measure its feasibility or practicality as well. These techniques help you determine the best ideas to move forward with—best based on our constraints, that best address the problem to solve, that best enhance the lives of users.
Let’s Do It!
After all the ideation you’ve done, it’s time to prioritize some ideas from that ideation. For this exercise, you should apply one of the prioritization methods to one of the ideations you completed earlier in this chapter. Of the various ideation methods you’ve conducted, the easiest to prioritize would probably be your brainstorm. However, I leave the choice to you.
Author’s Note
Refer to the “Cars Method” section in the appendix for examples to compare your cars method results with.
Choose whatever method of prioritization you’d like—dot voting, MoSCoW, or Cars. However, dot voting is a method you can’t complete by yourself. I recommend inviting a few others to a prioritization session to see which ideas they find most interesting and why.
After You Ideate, You Prototype
This chapter began by introducing the concept of ideation—the process by which you generate ideas that could solve your users’ problems. From there, you defined three types of ideation—conceptual, visual, and relational. You explored each type, including techniques to help you ideate across each type of ideation. You then learned what to do with all these ideas by learning how to prioritize ideas with techniques that are collaborative, easy, and transparent.
In the next step in the design thinking process, you will take the ideas you have prioritized and start bringing them to life further. It’s time to visualize your ideas and prepare to get them in the hands of your users to test. To get feedback about your solutions, you need to test your designs with users. To test your designs, however, you need to complete a preparatory step first—you need to prototype your ideas so that users can interact with them.