Chapter 7. the WallFollower program: navigating a maze
In this chapter, we’ll create the WallFollower program that allows the TriBot to find its way out of a simple maze. As you create the program, I’ll take you through all the steps required to plan and write a program, from the initial design to the final testing. This will include choosing the initial settings for certain blocks, seeing how well they work, and adjusting those settings as necessary—because programs almost never work exactly right the first time you run them. Let’s start by learning how to read and write pseudocode.
pseudocode
The more complex your program is, the more difficult it is to give a short, precise description of the program using normal sentences and paragraphs. There are better ways to describe the logic of your program, and one of the most common is pseudocode.
Pseudocode can be used to describe the most important details about how a program works and the logic behind the program. This gives you an easy way to share your programs with others or to build an EV3 program based on pseudocode written by someone else. Generally, pseudocode resembles traditional text-based programming languages such as Java or C, but it doesn’t need to follow strict rules.
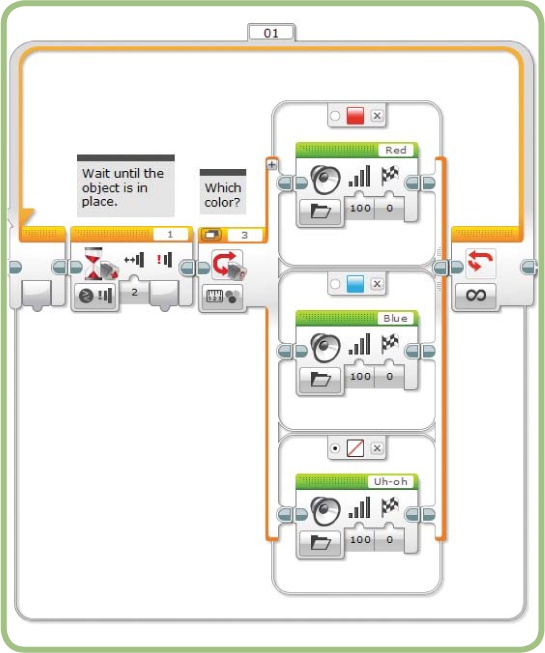
For example, Figure 7-1 shows the RedOrBlue program from Chapter 6. The program waits for the Touch Sensor to be pressed and then uses the Color Sensor to tell whether the object being tested is blue or red. Example 7-1 shows the pseudocode for this program.
begin loop
   wait for the Touch Sensor to be pressed
   if Color Sensor detects red then
      use a Sound block to say "Red"
   else if the Color Sensor detects blue then
      use a Sound block to say "Blue"
   else
      use a Sound block to say "Uh-oh"
   end if
loop forever
This pseudocode gives a concise, easy-to-understand description of the program. With a little practice, you’ll quickly get used to reading pseudocode and turning it into a working EV3 program.
Note the following about Example 7-1:
In most cases, a separate line is used for each block.
The lines are indented to show when blocks are nested (placed inside another block). Indenting makes it easier to see what’s happening inside a Loop or Switch block, for example.
We use the terms
if,then, andelseto describe the behavior of the Switch block. Many programming languages useif-thenstatements, and you would describe the logic similarly in plain English.The indented lines below the first
ifdescribe the blocks on the Switch block’s upper case, and the indented lines afterelse ifdescribe the blocks on the middle case. The lines below theelsedescribe the Switch block’s default case (the default case should be described last regardless of where it appears in the Switch block). This basically means “If the first case is true, do this set of actions. If the second case is true, do this other set of actions. Otherwise (else), do that set of actions.”The
end ifline marks where the Switch block ends, after which the program moves on to the next part of the code.
In this example, the pseudocode describes a finished program with all of the details filled in. However, pseudocode is often used when planning and developing a program, in which case the details of the code might not all be filled in yet.
Now let’s start planning out the WallFollower program. After we figure out what our program needs to accomplish, we can write pseudocode to help us think through the entire program.
solving a maze
There are many well-known approaches to solving a maze. For this program, you will use a method known as the right-hand rule algorithm. An algorithm is a set of instructions for solving a problem. In this case, the right-hand rule has one fundamental instruction: always follow the wall to the right, and go through any opening on that side.
The right-hand rule algorithm works for mazes without tunnels or bridges, where the start and end points are at the outer edges of the maze. (It won’t always work for a maze where the goal is to get to the center.) As long as the maze fits these criteria, the robot is guaranteed to find the exit.
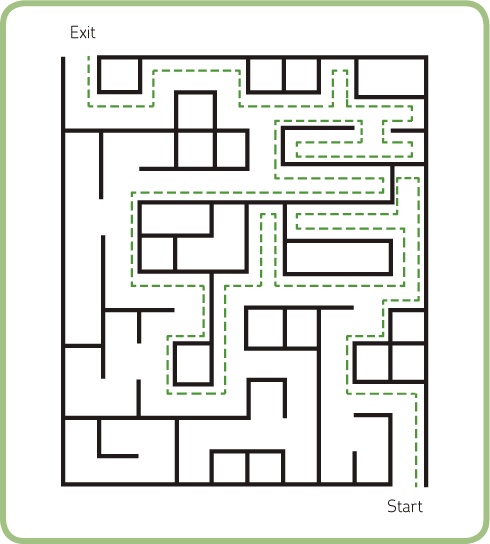
Figure 7-2 shows an example maze with a path drawn using the right-hand rule. To understand the algorithm, imagine that you’re walking through this maze, always keeping your hand on the wall to your right. You would follow the path marked in the figure and eventually make your way to the exit. Although this method won’t necessarily find the shortest route through the maze, it will eventually find the exit.
program requirements
The first step in writing this program is to make a simple list of the program requirements that describe exactly what the program needs to do. Our program should be successful as long as it meets all the requirements on the list.
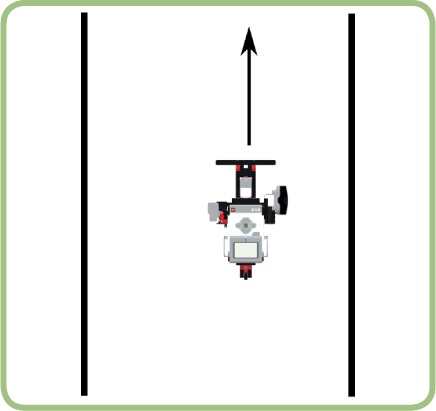
To develop the list of requirements, let’s think about the different situations the robot will encounter and decide how the program should react in each case. For example, when there is a wall to the robot’s right, as shown in Figure 7-3, it should keep moving straight. As it moves forward, the robot needs to keep a consistent distance from the wall so that it doesn’t stray too far or veer into the wall.
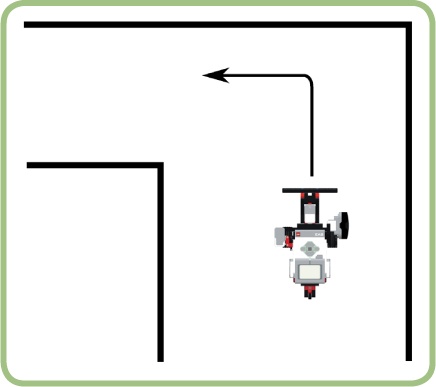
When the robot meets a corner with a wall to the right and front of it, as shown in Figure 7-4, the robot should turn to the left and continue forward.
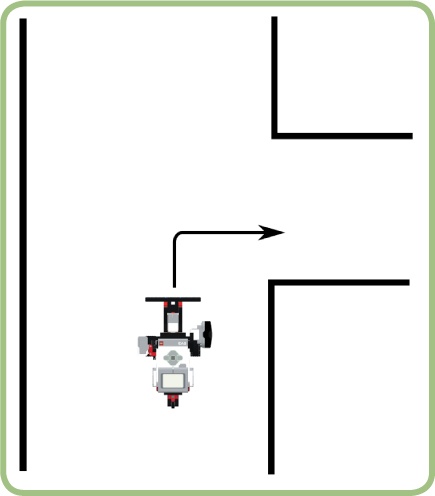
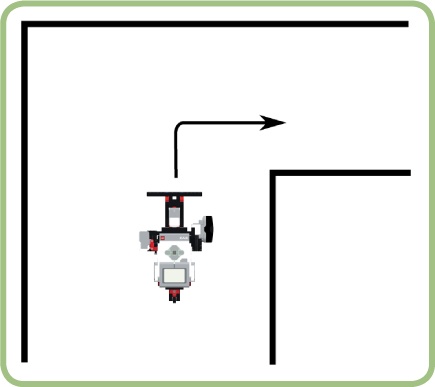
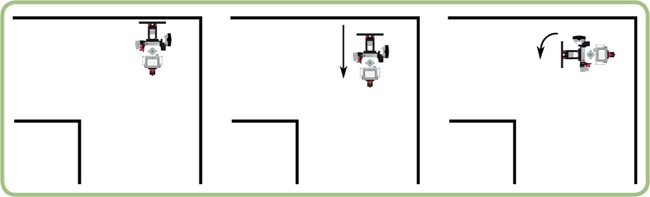
When there is an opening in the wall to the right, as shown in Figure 7-5, the robot should turn into the opening. To follow the right-hand rule, the robot should always turn into an opening on the right, even when it can go straight as in Figure 7-6, or when it can go left as in Figure 7-7.

Based on these situations, you can summarize the program requirements with the following three statements:
The TriBot should move forward along the wall on its right, staying close to the wall.
If the TriBot finds a wall in front and to the right, it should turn left 90 degrees and then follow the new wall.
If the TriBot comes to an opening in the wall on the right, it should turn right 90 degrees and go through the opening.
assumptions
While coming up with the requirements, it’s also a good idea to list any assumptions or restrictions about the program. This helps you decide which conditions you need to test and which you can ignore. You can make four assumptions about this program:
The walls of the maze are straight.
All openings are big enough for the TriBot to fit through.
Walls meet at right angles. (This will simplify the code for turning at a corner.)
At the start of the program, the TriBot will be placed with a wall to its right.
The last item in this list, which describes how the robot is arranged when the program starts, is called an initial condition. Starting the program with the robot in place will be much easier than making the robot wander around looking for the maze entrance.
Thinking about these assumptions before you start programming helps you to know which problems you need to solve and which you can ignore. Together with the list of requirements, this will determine what you do and don’t expect the program to do.
If your final program ends up being more versatile than you initially planned, that’s great! For example, one of the assumptions is that the walls are straight, but you may end up with a program that works with curved walls, too.
initial design
Next, we need to figure out how to make the robot perform each required task. The first task is to make the TriBot travel next to the wall while staying a short distance away from it. You can use the Infrared or Ultrasonic Sensor to detect how far the TriBot is from the wall. Then use Move Steering blocks to command the TriBot to move toward or away from the wall.
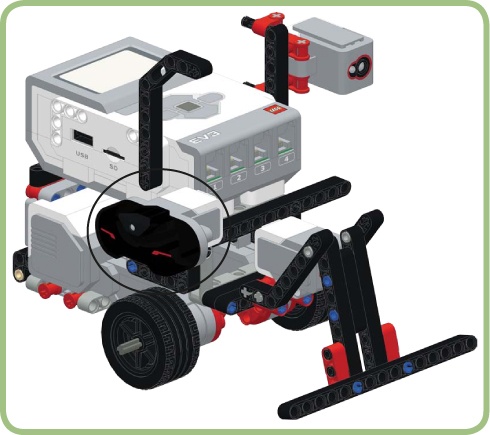
Because the wall will be next to the TriBot as it’s moving, you need to mount the Infrared Sensor pointing to the side (instead of to the front). Follow the building instructions in alternate placement for the ultrasonic or infrared sensor to mount the sensor so that it points to the side, as shown in Figure 7-8.
Next, we need to make the robot respond correctly when it’s following the wall to its right and then runs into a wall in front of it, as shown earlier in Figure 7-4 and Figure 7-5. We’ll use the Touch Sensor here. When the TriBot runs into the wall, the Touch Sensor will be pressed, at which point we can make the TriBot back up, make a quarter-turn to the left, and follow the wall it just ran into. (The BumperBot program performs similar behaviors, so you should have a good idea of how this will work.)
Finally, we need our program to detect and respond to openings in the wall to the right of the robot. For this, you’ll use the Infrared Sensor to detect when the robot passes an opening. If the sensor suddenly reads a large distance while the TriBot is following a wall, you know that it has reached an opening.
We’ll place the whole program in a Loop block so that the TriBot will keep moving until you manually end the program.
Now that we’ve thought through the high-level tasks, we can write pseudocode to describe how the program will work (see Example 7-2). This listing gives a concise summary of the steps expressed in the previous few paragraphs and depicted in Figure 7-5 through Figure 7-7. Because we are in an early stage of developing the program, the listing covers only the main points. In the following sections, we’ll develop the details of each part of the EV3 program.
begin loop
  if too close to the wall (use Infrared Sensor) then
     drive forward, steering away from the wall
  else
     drive forward, steering toward the wall
  end if
  if Touch Sensor is pressed then
     back up a little to get room to turn around
     spin one quarter-turn to the left
  end if
  if an opening is detected (by the Infrared Sensor) on
     the right then
     spin one quarter-turn toward the opening
  end if
loop forever
following a straight wall
The first section of EV3 code will make the TriBot travel along the wall. You’ll use a Switch block to choose between two Move Steering blocks: one that goes forward while steering toward the wall and one that goes forward while steering away from the wall. This block should keep the TriBot moving forward at a consistent distance from the wall. This approach is similar to the first version of the LineFollower program in Chapter 6, and it’s a pattern that you’ll often see when using a sensor to control a motor.
writing the code
To write this part of the code, first we need to decide what the TriBot’s distance from the wall should be. The TriBot should stay close to the wall but still have enough room to turn when it gets to a corner. You can get a reasonable starting value by using the Port View and following these steps:
Put the TriBot on the floor next to the wall, with the Infrared Sensor facing the wall. Make sure there is enough room to spin the TriBot all the way around (see Figure 7-9).
Use the Port View window in the EV3 software or on the EV3 Brick, and note the reading from the Infrared Sensor.
I got a reading of 7, so that’s what I’ll use in the following instructions. Remember that the Infrared Sensor does not measure an exact distance, so your value may be different from mine.
Now we can start writing the program. We’ll begin by putting the blocks together according to the instructions below, and then we’ll fine-tune the settings after some testing:
Create a new project named Chapter7.
Create a new program named WallFollower.
Drag a Loop block onto the program. Use the default Unlimited mode.
Drag a Switch block into the Loop block.
Set the mode to Infrared Sensor - Compare - Proximity.
Set the Threshold parameter to the value you determined earlier (my value was 7).

Note
If you’re using the Ultrasonic Sensor, set the mode on the Switch block to Ultrasonic Sensor - Compare - Distance Inches (or Centimeters). Set the Threshold value to 5 inches (about 13 cm).

The Switch block should look like Figure 7-10.
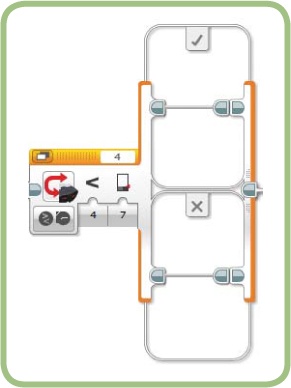
Drag a Move Steering block onto the Switch block’s upper case.
Set the mode to On to keep the motors moving while the steering is adjusted each time through the loop.
The Move Steering block will run when the Infrared Sensor reads less than the Threshold value, meaning the TriBot is too close to the wall. In this case, the robot should steer to the left, away from the wall. Start with a Steering value of -10 to get a slight turn.
Set the Steering value to -10.
Add a similar block to the bottom case to move the robot toward the wall by using a positive Steering value.
Drag a Move Steering block onto the Switch block’s lower case.
Set the mode to on and the Steering value to 10.
At this point, the Switch block (Figure 7-11) should enable the TriBot to travel along a wall. The next step is to do a little testing and modify the program as needed.

testing
Now let’s do some testing to see how well this first part of the program works. Then we can make some adjustments to improve the program. It’s difficult to get the settings just right on the first try, so it’s important to test them out and adjust the program as necessary.
To test the WallFollower program, you need a wall with a corner and an opening, or you can use a full maze (which is a little more fun). To build a maze, you just need walls that are tall enough for the Infrared Sensor to detect. Boxes, piles of books, or large blocks of wood work well for the maze walls. You could even build a maze out of LEGO blocks!
When you test the program, you want to see if the robot runs into the wall or wanders too far away from it. If this happens, the Power parameter might be too high, so the robot moves too fast to adjust its path in time. Another problem could be that the steering is not turning sharply enough to keep the robot at the right distance from the wall.
Let’s adjust both of these settings in order to make this part of our program more reliable. First, slow the robot down to make adjusting the steering a little easier.
Set the Power parameter on both Move Steering blocks to 25.
Slowing the TriBot down in this way should help a lot, but we can improve the program even more by adjusting the Steering parameter to control the sharpness of the TriBot’s turns. Test different Steering values to see how they affect the robot’s motion, and remember to change the setting on both Move Steering blocks. Table 7-1 shows my results.
Steering Value | Result |
10 | The TriBot does fine for a while but eventually runs into the wall because it’s too close and doesn’t respond quickly enough. |
20 | The TriBot stays close to the wall without hitting it. The motion is not perfectly smooth, but it’s not bad. |
30 | The TriBot stays close to the wall without hitting it. The movement is very choppy, with a lot of side-to-side motion. |
Based on my results, I suggest setting the Steering value to 20.
Set the Steering parameter of the block on the upper case to -20.
Set the Steering parameter of the block on the lower case to 20.
Figure 7-12 shows the changes to the program. At this point, the TriBot should do a good job following a straight wall with no corners or openings.

turning a corner
The next part of the program uses the Touch Sensor to detect when the robot reaches a corner, at which point it turns the TriBot to the left so that it can follow the new wall. This is similar to the BumperBot program, which also makes the TriBot back up and turn when it runs into something.
Example 7-3 shows the pseudocode for this section of the program.
if the Touch Sensor is pressed then
  stop the motors
  back up far enough to turn the robot
  spin a quarter-turn to the left
end if
After the TriBot backs up and turns, it needs to be positioned the correct distance from the wall so that it doesn’t run into it or stray from it. To get the right positioning, you have to determine the correct Duration settings for the two Move Steering blocks. You can start with the values from the BumperBot program and adjust the values as needed after some testing.
writing the code
Follow these steps to add this section to the program:
Drag a Switch block into the Loop block, placing it to the right of the existing Switch block. The program should look like Figure 7-13. Keep the default settings (Touch Sensor in Compare - State mode). The blocks on the upper case of the Switch block will be used if the robot runs into a wall and the Touch Sensor is pressed.
Drag a Move Steering block to the upper case of the new Switch block. Set the mode to Off.
Add another Move Steering block to the upper Sequence Beam. Set the mode to On for Degrees and the Degrees parameter to -300; this block will make the TriBot back away from the corner.
Set the Power parameter to 25 to match the other Move Steering blocks. (The robot moves more smoothly when all the Move Steering blocks use the same Power parameter.)
Add another Move Steering block to the upper case. Set the Steering parameter to -100, the Degrees parameter to 250 degrees, and the Power parameter to 25. This block spins the TriBot so that the Infrared Sensor faces the new wall.
Set the Steering parameter to -100 to make the robot spin to the left.
This Switch block uses only the upper case because the program doesn’t need to do anything if the Touch Sensor is not pressed. Click the Flat/Tabbed View button on the Switch block to use Tabbed View, and hide the empty bottom case.
Figure 7-14 shows the completed Switch block.

testing
To test the new code, start the TriBot close to a corner and see how it reacts when it bumps into the wall. Figure 7-15 shows roughly how the robot should move as it backs up and turns around.
My initial testing revealed a couple of flaws: The TriBot moves back too far, and it spins a little too far. After trying a few values, I settled on backing up for 150 degrees and then spinning for 210 degrees. Figure 7-16 shows the two Move Steering blocks with the new settings.


Before moving on to the next section of the program, retest the wall-following code from earlier to make sure it still works as expected.
going through an opening
When the TriBot comes to an opening in the wall on its right, it should turn to go through the opening and continue to follow the wall on its right.
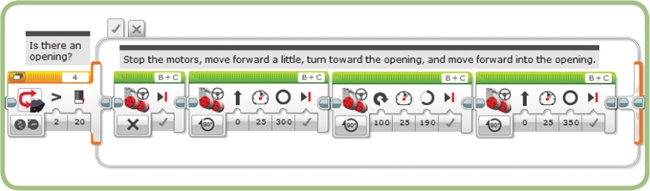
When the Infrared Sensor faces an opening, it will suddenly read a much greater distance than it did when following the wall. The Infrared Sensor will reach the opening before the back half of the robot, so the robot needs to move forward a little more before turning. After the TriBot has spun a quarter-turn toward the opening, the robot needs to move forward a little more before the Infrared Sensor will be next to the wall. Figure 7-17 shows how the TriBot should move, and Example 7-4 shows the pseudocode for this section of the program.

if the Ultrasonic Sensor detects an opening then
  stop the motors
  move forward a little
  spin a quarter-turn to the right
  move forward into the opening
end if
Before adding any blocks to the program, you need to determine the values to use for the Switch block and the Move Steering blocks. For the Switch block, begin with a Trigger value of 15 inches (10 inches for the Ultrasonic Sensor), which should be big enough to make sure the TriBot has found a real opening and not just a small bump in the wall. For the Move Steering blocks, begin with the same value you used to back the TriBot away from the corner, and then adjust the value after some testing.
writing the code
Follow these steps to make the TriBot move through an opening:
Add a Switch block to the end of the code inside the Loop block.
Set the mode to infrared sensor - Compare - proximity. Set the Threshold parameter to 15 and the comparison to > (greater than).
Click the flat/Tabbed View button. You only need to add blocks to the true case.
Add a Move Steering block to the true case of the Switch block. Set the mode to off.
Add another Move Steering block. Set the mode to on for Degrees, the Power to 25, and the Degrees to 150. This block will move the robot forward so that the whole robot is next to the opening.
Add a third Move Steering block. Set the mode to on for Degrees, the Steering parameter to 100, the Power to 25, and the Degrees to 210. This block will spin the robot to the right so that it’s facing the opening.
Add a fourth Move Steering block. Set the mode to on for Degrees, the Power to 25, and the Degrees to 150. This block will move the TriBot forward into the opening.
Note
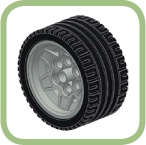
For the Education Edition tires, use 110 degrees for moving forward and 160 degrees for turning.
Figure 7-18 shows this part of the program.
testing
Test the new code by placing the TriBot along the wall near an opening and running the program. Carefully observe how the robot moves into the opening and starts following the new wall. Here are some things to look for:
If the Threshold value for the Infrared or Ultrasonic Sensor is too large, the robot may not notice an opening.
If the Threshold value for the Infrared or Ultrasonic Sensor is too small, the robot will turn toward the wall when there isn’t an opening.
If the Infrared or Ultrasonic Sensor has trouble detecting the wall because it’s not a good surface for the sensor (too soft, too dark, etc.), the robot will turn toward the wall (as if it sees an opening).
If the robot does not move forward far enough, it will turn too soon and hit the corner of the wall.
If the robot moves too far forward before turning, it will miss the opening or end up too far from the wall after turning.

Turning into an opening requires four Move Steering blocks. When you’re testing and changing this code, it can be useful to know when one block ends and the next begins so that you’ll have a better idea of which block to adjust if necessary.
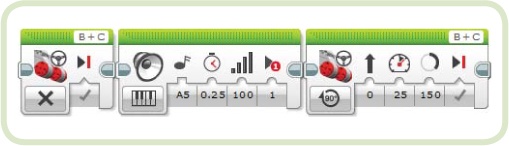
It can be helpful to add Sound blocks playing different notes before each block so you can tell where each Move Steering block begins and ends. Be sure that the Sound block’s Play Type is set to play once (instead of Wait for Completion) so that the TriBot doesn’t stop while it plays the sound. Figure 7-19 shows a Sound block added between the first and second Move Steering blocks.
Whenever you add code for debugging purposes, such as a Sound block, be sure that the added code has as little influence as possible on the program’s timing; otherwise, when you remove the debugging code, the program may act differently.
When you’re done testing, you can remove the Sound blocks, but be sure to test the program again after removing them to make sure that it still works.
If the turn is too short, it will make the TriBot move too far from the wall.
If the turn is too long, the TriBot will run into the wall.
If the final move is too short, the TriBot won’t enter the opening, and the Infrared Sensor won’t detect the new wall.
If the final move is too long, the TriBot might move past a tight corner or run into another wall.
My testing showed that the durations for all three moves were a little off. After some experimentation, I settled on Duration parameters of 300 degrees for the move forward, 190 degrees for the turn, and 350 degrees for the move into the opening. I also noticed that sometimes the TriBot acts as if there is an opening when there isn’t one. Setting the Threshold value for the Infrared Sensor in the Switch block to 20 yields a big improvement.
Note
If you’re using the Education Edition, try setting the Durations to 225, 140, and 260 degrees and the Threshold value for the Ultrasonic Sensor to 13 inches (about 33 cm).
Figure 7-20 shows this section of the program with the final values.
final test
When the TriBot can move through an opening correctly, it’s time to test the entire program. The requirements for this program (as listed in program requirements) state that the TriBot should be able to follow a straight wall and negotiate corners and openings. If the TriBot can do these things, then it should be able to navigate a simple maze. Try a variety of test mazes to see whether the program correctly handles several turns and corners in a row.
When you are sure that the program fulfills its requirements, see how it works in other situations. For example, adjust the spacing of the walls (make the corridors narrower or wider) to see how that influences the robot’s behavior. You can also try adding some curved or slanted walls to see how the robot responds. Even though the program wasn’t designed to handle these situations, it might work just fine. If not, think about how you might adjust the program to make it more versatile.
further exploration
After you have the program working well, try these activities:
If you can keep the TriBot at just the right distance from the wall, then you don’t necessarily need a separate section of code for recognizing an opening. The robot will automatically move around the corner of a wall on the right using the code in the first section, which sets the Steering value based on the Infrared or Ultrasonic Sensor. The challenge is to find a Threshold value that keeps the TriBot at the right distance so that it can complete the turn without straying or running into the wall. Try different values to see if you can get this to work for your test area.
This program currently makes 90-degree turns because we said the maze would contain only right angles. But neither of these turns has to be perfect because the robot will soon straighten out based on the Infrared or Ultrasonic Sensor readings. Try a maze with corridors that meet at odd angles, and experiment with different turning angles to let the TriBot handle varied situations. Is it better to have the TriBot spin too far or not far enough?
The LineFollower program from Chapter 6 used nested Switch blocks to reduce side-to-side motion. The same technique can be applied to the code that makes the TriBot follow the wall. Make the necessary changes, see how smooth you can make the robot’s motion while following the wall, and then see what effect, if any, this has on how well the program recognizes an opening on the right.
Instead of using the Touch Sensor to detect a wall, try using the Color Sensor and a brightly colored area on the wall at the intersection. Use different colors to give the program special directions, such as playing a certain sound when it sees red or changing speed or direction when it sees blue.
conclusion
In this chapter, I’ve taken you through the steps involved in developing a typical EV3 maze-navigating program. At each step, you added a logical piece of the program, did some testing, and then made necessary modifications to adjust the move durations and fix bugs.
The next chapter starts your exploration of data wires— one of the most powerful features of EV3 programming.