
Your Home Network
Abstract
This chapter talks about how to properly secure your home network and your home Wi-Fi network and how to safely let guests connect to your home network without risking your home computer.
Keywords
network; router; Wi-Fi; friends; guests; worm prevention; virus prevention
Information in This Chapter
In this chapter, we will be discussing proper ways to secure your home network so that people aren’t able to get onto your wireless network without your express permission.
Securing your home network
A shockingly easy way for people to access your home computer is via your home network. An improperly configured home network would allow any attacker on the public Internet to contact your home computer and attempt to install a virus or key logger on it. Another potential point of vulnerability for many home networks is the Wi-Fi network. An incorrectly configured Wi-Fi could, while appearing to be secure, actually be completely insecure. Using someone’s incorrectly secured Wi-Fi to gain access to their files and information does require that they are close to your home, typically within just a few hundred feeds. This doesn’t however give any level of protection because people often do “war driving” where they simply drive around a neighborhood looking for unsecure Wi-Fi networks that they can use. Once gaining access to an unsecured Wi-Fi network, the person could be attempting to break into the owner’s computer remotely, or they could use the Wi-Fi connection to perform some sort of illegal act such as viewing or downloading child pornography, hacking into a company or government computer network, stealing music or software, or any number of other activities.
Securing your router
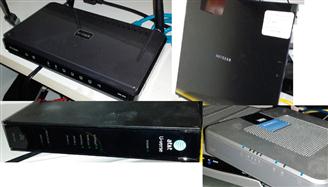
When you have high-speed Internet access such as cable Internet or a DSL service, you will have some sort of router. The router may be a device that was purchased by you or it could have been provided by your Internet service provider. Routers come in a variety of shapes and sizes, a variety of which are shown in Figure 3.1.
If the router is not properly secured, it could leave the home network vulnerable to attack from an outside attacker via the Internet. The first thing to ensure that the home network is protected is by having a home router. Most (but not all) home Internet service will provide two devices that are used to connect the home computers to the Internet. Cable Internet services will typically provide a cable modem and a router, while DSL services will typically provide a DSL modem and a router. Some of these services such as the AT&T U-verse service will provide you only with a single device that serves as both the DSL modem and the router in a single device.
There are a couple of different software components within the home router that help secure the home network from the potential hackers who are on the Internet. These two main components are the use of a technology called network address translation (NAT) and the network firewall.
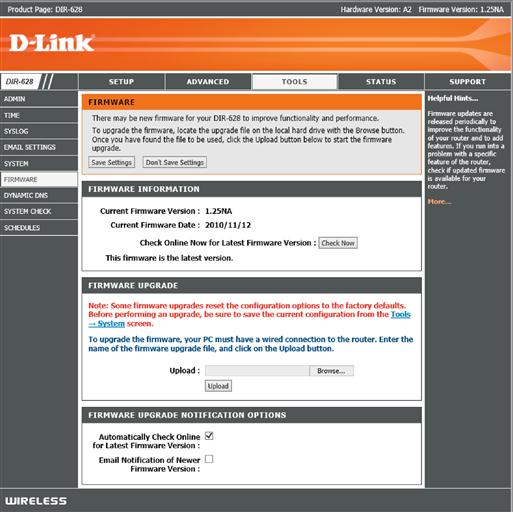
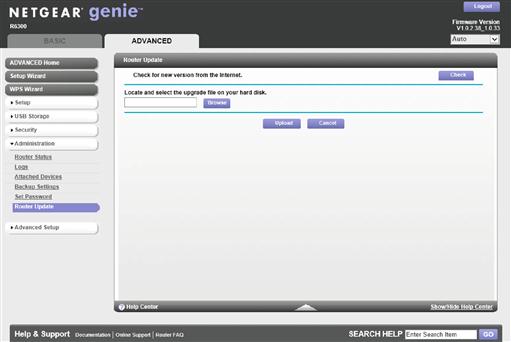
How each of these routers is configured will vary depending on the router and the version of the software that is installed. Many of these routers ship with older software than is currently available for these routers. Updating the software on the router requires logging onto the router itself using a web browser. There will be instructions, which came with the router, that tell you how to connect to the router and what the default username and password are if you haven’t changed it. If you don’t have that documentation handy, a quick Internet search for “{your router model} documentation” where {your router model} is the actual model number found on the back or bottom of your router will usually find the documentation. Once you are logged onto the router, you’ll need to find the firmware page. This will usually have some sort of way to check if the firmware is up-to-date, or at least it will have a link to the manufacturer’s website so you can manually check that the firmware is up-to-date. You can see the firmware page for a D-Link router in Figure 3.2 and the router update page for a NetGear router can be found in Figure 3.3.
Not all routers can be updated manually. An example of this is the router that the AT&T U-verse service ships to you. The reason that this router can’t be updated manually is because AT&T pushes new firmware to the router automatically when there are updates available so the router is always current. They can do this because the router is provided as a part of the service and it is partially managed by AT&T as a part of the U-verse service. Some providers offer this level of services but many do not. You’ll need to check with your service provider to see if they handle this for you.
Network address translation
NAT is used for a couple of different reasons within home routers. The first reason is due to the fact that Internet service providers typically only issue one public IP address to home network customers. IP addresses are the way that computers talk to each other over the Internet. Every computer or device on the Internet needs to have an IP address, and with the Internet service provider only providing a single IP address, a way is needed to give multiple computers and other devices within the home network access to the Internet by sharing that one IP address.
Because of the mapping that NAT does, which is typically turned on by default, it makes it very hard for potential attackers on the public Internet to access the computers within the home network. This is because network address translation is a one-way process where computers and devices on the home network can talk to the Internet, but a computer or device on the public Internet, a website, for example, cannot connect to a computer on the home network. This feature alone helps protect the home network from an attacker who is trying to access the home computers and the home network.
Network firewalls
Network firewalls are used to ensure that no one is able to connect to the home router. The router will have a variety of management services running on it such as the website that is used to configure the router among other services. Because the router is connected to the public Internet, we don’t want anyone being able to connect to the router and make any changes on it from the public Internet. Because of that, the router should be configured with the firewall on the router preventing any sort of network access to the router itself, which will typically be configured by the manufacturer of the router before the router is sold. Without having the firewall in place, an attacker could attempt to break into the router, and if they were successful, they would then be able to reconfigure the router to allow themselves access to one or more of the computers or devices on the home network.
Securing your Wi-Fi network
Incorrectly configured Wi-Fi networks are an extremely easy way for attackers to gain access to personal information, which is being transmitted over the Wi-Fi network, even when the Wi-Fi network is configured to use some of the available forms of encryption. This is because the older encryption standard, called WEP or Wired Equivalent Privacy, is considered to be extremely insecure. There are several flaws in the design and implementation of the WEP encryption system, so any network that is configured to use WEP should be considered to be just as insecure as a Wi-Fi network that doesn’t have any data encryption configured at all. In fact, in 2004, the IEEE standards committee, which is the committee that decides what versions of what protocols make it into the final Wi-Fi specifications, had declared that WEP was to be removed from the Wi-Fi specification.
After WEP was introduced, but before it was declared as not worth using, a second set of encryption protocols was introduced into the Wi-Fi specification. This new encryption specification is called WPA or Wi-Fi Protected Access and comes in two different versions, WPA and WPA2. WPA was first ratified in 2003, while WPA2 was first ratified in 2004, so they should be available in every modern Wi-Fi router created since then and all modern operating systems. Even older operating systems such as older versions of the Microsoft Windows operating system, which were created before 2003 and 2004, have had patches created that should be installed so that WPA and WPA2 are available on these older computers. Given the option between WPA and WPA2, WPA2 should be the version that is used as it is more secure than the older WPA specification.
Setting up these settings requires configuring the Wi-Fi access point or router with the specified setting. Many of the newer home routers come preconfigured using the WPA2 setting, while older routers did support these secure settings and came with the security settings disabled by default.
AT&T U-Verse router
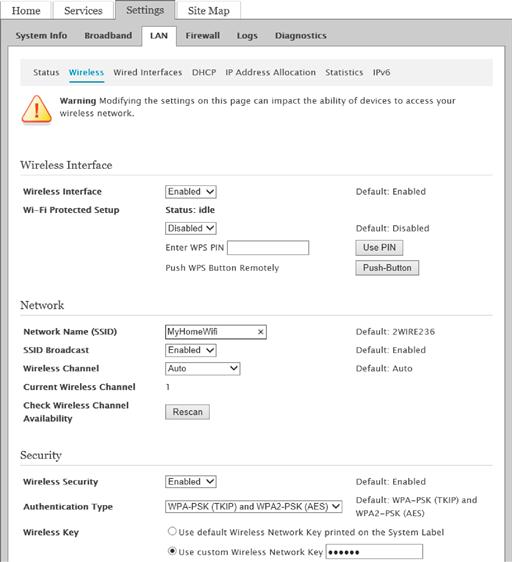
Securing your Wi-Fi router requires connecting to the router’s webpage. As stated earlier in this chapter, you’ll find the information on connecting to your router in your router’s documentation. For the AT&T U-verse router as an example, this is changed on the Settings page, then the LAN tab, and then the Wireless subtab. On this page, there are several settings that can be adjusted shown in Figure 3.4 and specified later:
• The wireless can be enabled or disabled.
• The wireless network name (SSID) can be set manually or the default can be used.
• Authentication and encryption settings can be set.
• The encryption key, which can be either the default one that is on the sticker on the back of the router or your own wireless password.
D-Link router
For the D-Link routers, the Wi-Fi settings are found by clicking the Setup tab at the top and then the “Wireless Settings” tab on the right. Then you can either go through the provided wizard or click on the “Manual Wireless Network Setup” button, which you can see in Figure 3.5.
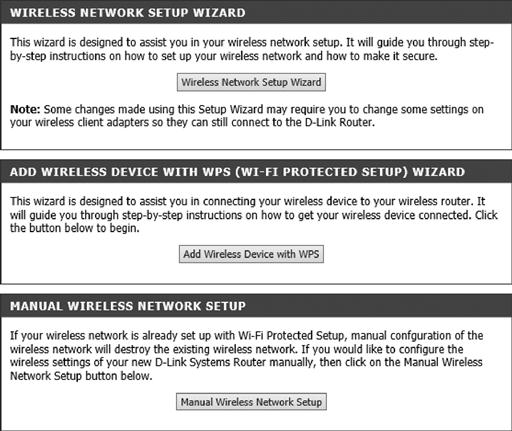
Selecting the “Manual Wireless Network Setup” button will show you several settings that you can configure, some of which are shown in Figure 3.6 and upon scrolling down the security settings shown in Figure 3.7.
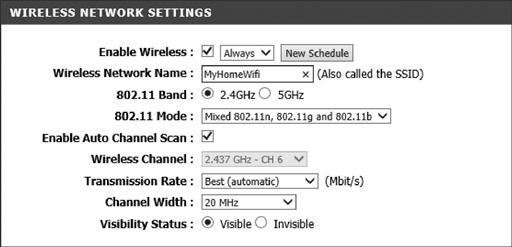
As shown in Figure 3.6, you can see the wireless network name (called the SSID) if you want to use 2.4 GHz or 5 GHz wireless frequency, the Wi-Fi modes that will be used, and the other basic Wi-Fi settings. There is no difference from a security perspective between the two frequencies. Selection of one of the other is simply a preference depending on what other devices you have in your home, which use the same frequencies.
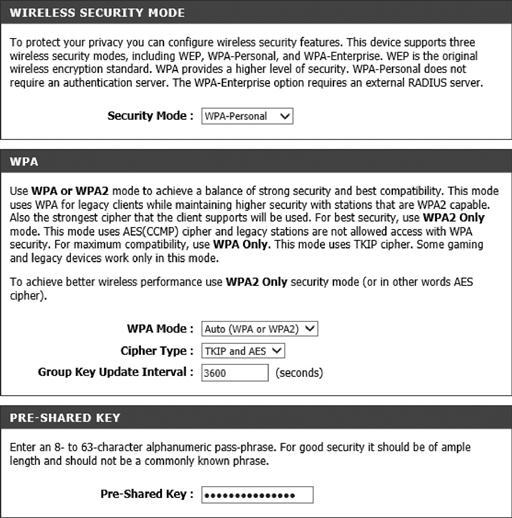
In the security section shown in Figure 3.7, you’ll see the security mode, which in this case is set to WPA-Personal. The WPA section is shown because the mode is set to WPA. This router in this case is allowing for both WPA and WPA2, using TKIP and AES, and the key is updated every 3600 seconds, which is the default setting. At the very bottom of the screen and in Figure 3.7, you’ll see the preshared key, which is set to the password that is used to connect to the Wi-Fi network.
NetGear routers
For NetGear routers, there are two different wireless network settings that are configured, which are accessed via the Advanced tab after connecting to the router and then selecting Setup and then “Wireless Setup.” This is because the NetGear router is a brand new device as of the writing of this book in the summer of 2013, and it has both 2.4 and 5 GHz transmitters. The two networks have different names so that the user can identify which network he or she wishes to connect to as shown in Figure 3.8.
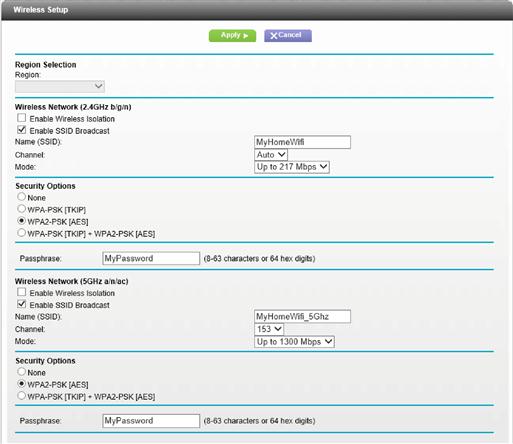
Each of these wireless networks shown in Figure 3.8 is configured independently from each other and should only be enabled if they will be used.
The process to change the Wi-Fi protection varies for each Wi-Fi router out there. No matter what kind of router you have, you’ll need a username and password to connect to the management webpage. Most if not all routers can be configured by going to the router’s IP address from a web browser on any computer within the home network. Finding out what the IP address of the router is can be a little tricky if you don’t have the documentation that came with the router handy or if the IP address of the router has been changed. There are a few different approaches that can be taken. On any Windows computer, it can be found by looking at the Wi-Fi Network Connection from within the Network Control Panel. One way to get into the Network Control Panel is to right click on the network icon next to the clock in the task bar, typically located at the bottom right corner of the screen as shown in Figure 3.9.
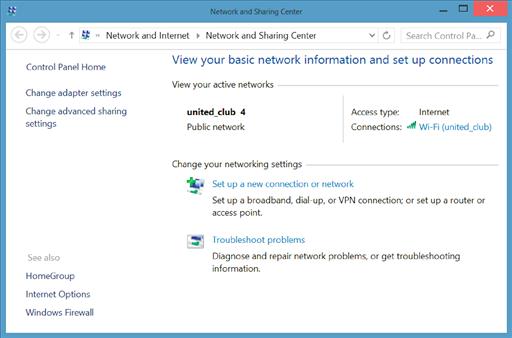
In this case, I’m connected to a Wi-Fi network so the network icon (the one in the middle of Figure 3.9) shows the Wi-Fi signal strength. If I was plugged into the router via an Ethernet cable, then the icon would look like a small computer instead. In either case, right click on the menu and select “Open Network & Sharing Center” from the context menu that appears. This will open a window similar to the one shown in Figure 3.10.
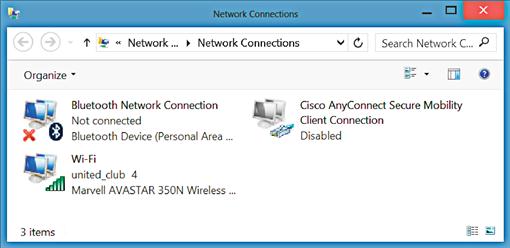
If you are using an older version of Windows such as Windows XP, then you may not see an icon similar to that shown in Figure 3.9. This is because in older operating systems like Windows XP, the icon wasn’t shown by default. To locate the networking icons in Windows XP, click on the Start button, then select Control Panel, and then double click on the “Network Connections” icon within the Control Panel. This will show you a window similar to that shown in Figure 3.11.
Once the Network and Sharing Center is open, click on the link to the left that says “Change adapter settings.” This will open a window similar to that shown in Figure 3.11.
Once the window similar to the one shown in Figure 3.11 appears, you’ll need to identify the Network Connection that is being used. Odds are that you’ll only have one or two icons in here at the most, and if there are extra ones, they will probably be grayed out and says “Disabled” like the one on the right of Figure 3.11. Find the one that is connected; it will probably have a network name of some sort under the network adapter name. In the case of the window shown in Figure 3.11, this would be the icon labeled “Wi-Fi”; then under that, it says “united_club 4” and then under that, it says “Marvell AVASTAR 350N Wireless … .” This information tells me that the Wi-Fi Network Connection within Windows is called “Wi-Fi,” that I’m connected to a network called “united_club” (the 4 tells me that it’s the fourth network called “united_club” that I’ve connected to on this machine), and that the network card is a “Marvell AVASTAR 350N Wireless Network Adapter.” This window on your machine will say something different depending on your Network Connection name, network name, and the brand and model of the network card you are using. The important part on this window is to find the correct icon, which will probably be the only one in color. Once you have identified the correct Network Connection, double click on that Network Connection and you should see a window similar to Figure 3.12.
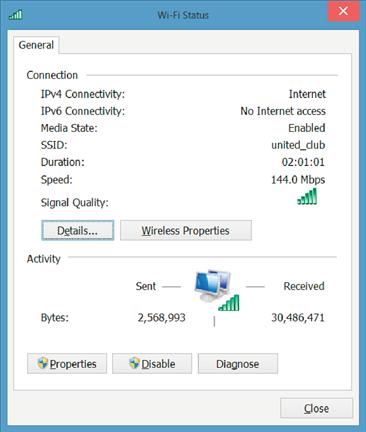
Once the window shown in Figure 3.12 is visible, the final thing to do is to click on the “Details button” in the middle of Figure 3.12. This will bring up a window similar to that shown in Figure 3.13.
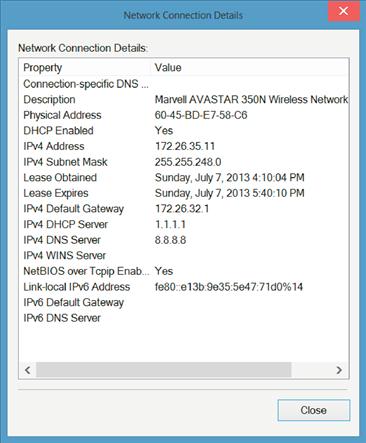
As you can see in Figure 3.13, there are several IP addresses listed; the important one in this case is the “IPv4 Default Gateway,” which is 172.16.32.1. The default gateway, which your home network uses, will probably be different from this network and will probably be 192.168.0.1 or 192.168.1.1 or 192.168.1.254 or 192.168.0.254, but in reality, it could be just about anything.
By entering this IP address, you should have access to the management webpage for the home router. Use the username and password, which were configured when the router was first configured. If you don’t have the username and password, you’ll need to contact the company that made the router to get the default username and password or to get assistance in resetting the username and password to something that you can remember. From here, follow the instructions provided by the company that made the router on how to configure it for WPA2 connections.
Hiding your wireless network
One of the features that people like to turn on in order to protect their Wi-Fi networks is the option to hide the Wi-Fi network. Normally, Wi-Fi networks broadcast their network name in order to make it easy for people to locate the network and connect to it. Figure 3.14 shows the network screen from a Windows 8 computer, which I was using while at San Francisco International Airport. You can see several networks available including the “united_club” network, which I was connected to at the time.

The theory that people use when configuring their Wi-Fi router to be hidden is that because people can’t see the network when they open the connection window, this makes the network more secure. In reality, this isn’t the case. It is in fact very easy to find “hidden” networks. There are a variety of programs that can be downloaded, which will show you the various hidden network, and a variety of information about those Wi-Fi networks. Using an application called inSSIDer, I can quickly and easily see all the hidden networks in the area. After launching inSSIDer and telling the application to scan the Wi-Fi networks, it quickly shows me several hidden Wi-Fi networks including the one shown in Figure 3.15.
While hiding Wi-Fi networks will keep the casual person from finding a Wi-Fi network, it won’t stop someone who actually wants to find the hidden networks, and hiding the Wi-Fi network shouldn’t take the place of properly securing the Wi-Fi Network Connection via WPA2.
One of the reasons that hidden Wi-Fi networks are so easy to find is that just because the Wi-Fi router or access point isn’t broadcasting the network name, the machines that are connecting to the hidden network will need to broadcast the network name so that the Wi-Fi router or access point can accept the connection. So while a normal user wouldn’t be able to see the hidden access points, someone with some experience in looking for hidden networks just needs to sit and wait for a computer to attempt to talk to the hidden network and capture the hidden network’s network name.
If you are going to choose to hide the network to keep random neighbors from attempting to connect to it, that’s a good idea in a lot of cases, especially when there are lots of people in the area with Wi-Fi access points. However, this must be teamed up with WPA2 network security to ensure that when people that you don’t want finding your Wi-Fi access point do find it, they still can’t get connected easily.
MAC address filtering
Most, if not all, Wi-Fi routers include a feature called MAC address filtering. MAC address filtering allows you to specify the exact computers that are going to be allowed to access the Wi-Fi network. In theory, this is a very sound idea in that only the computers with the correct MAC addresses would be able to connect to the network. The reality is that it isn’t all that hard to pretend to be using a different MAC address when connecting to a Wi-Fi network.
There is a variety of software out there, which will let someone scan for all the MAC addresses currently in use in the area (remember we are talking about wireless networking so all this information is simply being broadcast by all the machines in the area). Once an attacker has the MAC address of a computer that is allowed to connect, it is a simple job to temporarily change the MAC address of the computer that they are using so that they can get past the MAC address filter.
Changing the MAC address in Windows
Changing the MAC address of a Wi-Fi card in Windows is surprisingly simple.
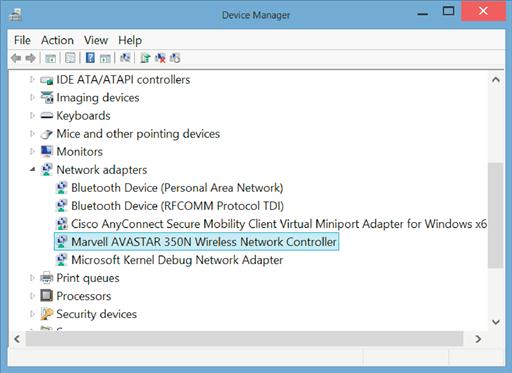
The first step is to open the Control Panel. The version of Windows you are using will determine how this is done. In Windows 7 and below, click on the Start menu and then click on the Control Panel option from the Start menu. In Windows 8 or Windows 8.1, bring up the Start menu and then type “Control.” The Control Panel option will be on the list. Clicking the Control Panel option from the list will bring up the control panel. At this point, the instructions are the same. At the top right of the control panel, you’ll see a drop-down menu that probably says “View By: Category.” Change this dropdown to say “View By: Small Icons.” In the new list of icons, find and open the icon labeled “System.” From here, click on the link in the upper left that says “Device Manager.” In the Device Manager window that opens, find the “Network Adapters” menu and expand it as shown in Figure 3.16.
After the Device Manager opens, double click the Wi-Fi Network Card. On the new window that opens, select the Advanced tab. From there, find the MAC address option if available and simply change one character of the MAC address (only using the numbers or the letters A-F). When you click OK, the MAC address has been changed. Not all network cards allow for the MAC address to be changed, but with a little searching around, any determined teenager would be able to find the information to change their MAC address.
Changing the MAC address in Apple OS X
Changing the MAC address on an Apple computer is slightly harder, just because it requires the use of the command prompt. To change the MAC address on your Apple OS X or newer machine, start by opening a command prompt window on the machine. From there, run the command “ifconfig” to see what the current MAC address is. If you combine the ifconfig command with the grep command, this will be easier to find.
ifconfig en1 | grep ether
Using ifconfig with the grep command.
Use of the ifconfig and the greg commands should return something that contains the MAC address of the computer. Changing the MAC address is pretty straightforward. We need to use the sudo command so that the ifconfig command that we are using is run with root (or administrative) permissions.
sudo ifconfig en1 ether 00:a1:a2:a3:a4:a5
Using ifconfig to change the MAC address.
Once the MAC address has been changed, it can be verified using the ifconfig command shown earlier.
Letting others onto your Wi-Fi network
Friends and Wi-Fi networks are a dangerous combination. Having your friends have access to your Wi-Fi network isn’t all that dangerous; it’s the fact that letting your friend’s computers onto your Wi-Fi network now gives your friend’s computers direct access to your computer, meaning that any software installed on their computer, such as a virus, for example, would then have access to your computer and the virus may try and install itself onto your computer. Given that viruses are one very common way for personal information to be compromised on home computers, having someone else have access to your home computer network with a laptop, phone, tablet, etc., which may or may not have a virus on it, isn’t the greatest of ideas.
There are a couple of options to solve this problem. The first is to create a pocket network that is a different Wi-Fi network from the Wi-Fi network that you put your computers onto. This second network would still give them Internet access, but it wouldn’t let them connect to your computers or have any software that was installed on their computer such as viruses have access to attempt to install themselves on your computer.
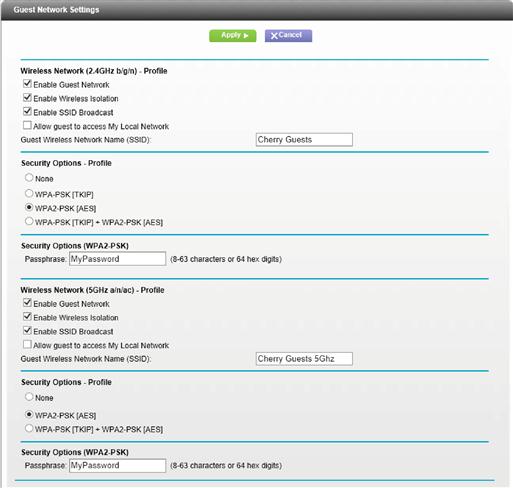
Another option that is available in some home routers, which have the ability to create a guest network, for just this specific reason. The guest network would be a totally separate network name; I might call my home Wi-Fi network “Cherry Home” while the guest network would be called “Cherry Guests” as shown in Figure 3.17. These guest networks are a little different from the normal Wi-Fi networks that we connect to when it’s our home network. The Wi-Fi router knows that anyone on the Guest network should be isolated from the normal network. This keeps anything that is installed on our friend’s computer from having access to our home computer network. We don’t want the Guest network to be wide open to the outside world. We want this network to be secured with WPA2 just like our network, just using a different password, one that we are OK with giving to our guests. The reason that we don’t just want this guest network open to the entire world is because if someone was going to drive past our home and see the open network, we wouldn’t want them doing something on our home Internet connection that might not be legal as that activity might be traced back to our home (don’t forget the sidebar earlier in this chapter titled “You may be legally responsible for what others do on your computer network”).
Other devices on the network
The home network has a large number of devices connected to it, usually over Wi-Fi. These can include devices that you would expect to find on the network such as your desktop and laptop computer, which are hopefully all running with firewalls and the accounts have passwords on them. However, there could be a lot of other devices connected to your home Wi-Fi network as well. This could include your cable box, DVD player, TV, burglar alarm, home automation devices (which could control things like light switches, power outlets, garage door openers, and holiday lights), stereo systems, door locks, baby monitors, security cameras, refrigerators, and probably many other devices.
These extra devices all can pose a risk of a privacy breach within the home. Where someone is able to get into the home network and be able to access these devices, it would become potentially very easy for someone to begin to learn much more about you and your life than you probably want exposed. For example, if someone was able to gain access to your alarm system through your home Network Connection, they could very easily figure out when you are away and when you aren’t making it very easy to figure out when to break into your house. They might even be able to disable your alarm remotely or just power it off so that it can’t send a signal to the alarm company when the break-in is going to happen.
The devices that just sit on your home network don’t pose the most risk; the devices that publish the information so that you can view it from anywhere are the most dangerous. The perfect example for this are the new baby monitors that can stream a video and audio feed to the Internet so that parents can keep an eye on the baby from another room, the neighbors’ house, or even their office miles away. Some of these include the ability to use speakers on the baby monitor so that you can talk to the baby if they wake up and just need to hear your voice in order to calm down and go back to sleep. Many products like this are designed for convenience and not with any sort of security in mind, often not requiring any password or that the default password be changed. With these devices publishing the data to the Internet where basically anyone can view the feeds is a major data privacy risk. By using a variety of easy-to-find tools, or sometimes even a quick search on Google, dozens or hundreds of openly accessible video devices can be viewed and sometimes controlled via the public Internet without the device owner being aware that someone is viewing their device.
All this sounds pretty scary and farfetched. We’ve all seen these sorts of things in TV shows like CSI, NCSI, and Law & Order and assumed that this sort of thing is totally impossible to actually happen. In reality, this is actually very possible and in fact has actually happened to a family with a baby monitor in Houston, Texas. In this case, the baby monitor has speakers, a microphone, and a video feed and is remote controllable. Someone was able to break into the remote feed of the baby monitor, likely through a poorly configured password or lack of password, and see into the baby’s room and talk to the baby, even going so far as to try and wake the child up.
The easiest way to make sure that devices you purchase will support proper log-ins is to only purchase new devices (used devices from family, friends, and yard sales should be avoided whenever possible). When purchasing the new devices, read the box and it should say something about authentication and that it supports SSL (Secure Socket Layer), which is the same data encryption that you use when doing online shopping on websites like Amazon and eBay.
Summary
A properly configured home network is very important when it comes to protecting yourself. While the chances of someone driving by your home network and attempting to gain access to it aren’t that high, it is very possible that a friend or neighbor could have a virus on their computer that they don’t even know about. If that friend or neighbor were to put their computer on your home network, any virus that they had on their computer could attempt to access your computer. Once installed on your computer, that virus would do whatever it was programmed to do, which oftentimes these days involves looking for your personal information and sending it to some sort of criminal.