Posting Information Online
Abstract
This chapter talks about what information you should and shouldn’t be posting online and how to protect what you do post online.
Keywords
Facebook; Twitter; LinkedIn; FlickR; MySpace
Information in This Chapter
This chapter talks about what you really shouldn’t be posting online and how to protect what you do post online.
Kinds of information that shouldn’t be posted online
These are the kinds of answers that you’ll typically hear when it comes to what you shouldn’t be posting on the Internet on social media websites:
• Anything you wouldn’t want your grandmother and/or grandfather to see
• Anything you wouldn’t want your parents to see
• Anything you wouldn’t want your kids to see
• Anything you wouldn’t want your boss to see
A lot of this comes down to personal embarrassment at family gatherings (see the statements with grandparents, parents, and kids), getting fired (see the statement about your boss), losing your insurance (see the one about your insurance company), or getting arrested (see the one about the government). If you post something online, then odds are that someone that you don’t intend of seeing it will see it. A perfect example is shown in Figure 5.1.
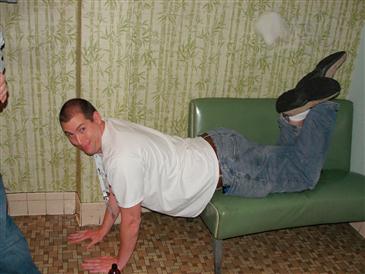
Figure 5.1 Example of someone doing something that they probably wouldn’t want posted online in a bar bathroom.
Anything that is posted online, be it text, photo, video, or anything else that we come up with in the future should be assumed that once it is online it will be online forever. Even if information is deleted from an online service such as flickr.com, twitter.com, and facebook.com, there is no guarantee that the information that you try to delete will actually be deleted. First of all, it’s likely that the site that hosts it won’t be deleting the files right away, if at all. In many cases, the End-User License Agreement (EULA) usually says that anything that is posted on these sites legally becomes their property and they can use them as they see fit.
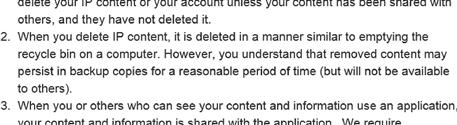
For example, looking at the Facebook license agreement as of the summer of 2013, Facebook specifically says in the End User License Agreement (EULA) in Section 2.2, shown in Figure 5.2, that “…removed content may persist in backup copies for a reasonable period of time (but will not be available to others).” There is nothing in the agreement that says what a “reasonable period of time” will be. It could mean days, months, or even years depending on how long Facebook decides how long they should keep copies of their backup tapes. While Facebook doesn’t publish their backup policies, there are many companies who keep backups for several years and others who keep a periodically taken backup forever.
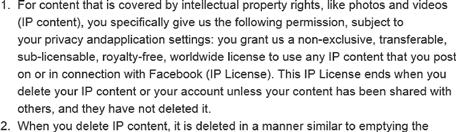
We can learn more about how Facebook deals with deleted data when we look at Section 2.1 of their license agreement (as of the summer of 2013) that states that you give Facebook a license to use your intellectual property (your photos and videos) for no cost until you delete the content as shown in Figure 5.3. However, if a friend on Facebook shares your Intellectual Property (IP), then Facebook continues to have the license to use your IP until everyone that shares the photo or video has also deleted it. This tells us that when you upload a picture and someone you are friends with shares it and you then delete the file, it won’t be deleted because others will still have shared it. So if you delete it, it isn’t actually deleted. It could live on Facebook’s site without you having control of the file that you uploaded.
Reading the Flickr End User License Agreement, we first see that because the site is owned by Yahoo, we are bound by the Yahoo agreement. The Yahoo agreement as of the summer of 2013 doesn’t specifically mention what happens when you delete specific content. The only reference talks about the fact that if you delete your account, your information may be retained in their archived records after your account has been deleted as shown in Figure 5.4.
Based on the fact that Flickr is all about posting images online and people being able to download those photos, we need to be really sure that anything that we upload to Flickr is safe to be seen by others, forever. Because of this, if you post something to Flickr, you should expect that even if you go and delete that image, you could easily expect to see that picture come back online somewhere else.
There are some SD cards that you can purchase for camera that allow the camera to automatically upload the photos that are taken with the camera to the sites such as Flickr automatically. These include cards like the Eye-Fi cards. It’s easy to forget that you have a card such as the Eye-Fi card installed in the camera, so you could end up taking pictures that you don’t necessarily want uploaded to the Internet.
When it comes to the Twitter Terms of Services (TOS) as of the summer of 2013, there is nothing listed in the terms of services at all about what happens to tweets that are deleted. This lack of information extends to pictures that are uploaded to the Twitter photo-sharing service. Part of this may be because there is a feed from Twitter to the United States Library of Congress. This feed is allowing the Library of Congress to archive every tweet that has been posted to the Twitter service. What happens to these archived tweets when the user that posted the tweet deletes it isn’t explained.
We can assume that tweets aren’t actually deleted from Twitter’s database. This is shown a little bit on the Twitter Support site under the topic of Deleting a Tweet that is available at http://basicsofdigitalprivacy.com/go/DeleteTweet and is shown in a note on the page as of the summer of 2013 as seen in Figure 5.5. This tells us that the Tweets that you delete aren’t actually deleted since they will show up in Twitter Search. Search data on Twitter are only available for a small period of time so at the longest, the tweets will fall out of search when they simply expire from the search window.

Posting information online can have actual major consequences for the people that post them. CNN and BuzzFeed have put together a great montage about 10 people who posted online stupid things that they have done that have ended up getting them fired. You can find the CNN article and video at http://basicsofdigitalprivacy.com/go/CNNFired. This includes the Taco Bell employee who licked taco shells, a teacher who thought that her male students were attractive and how much she liked smoking weed (the mostly naked pictures that her students could easily enough find probably didn’t help either), the Australian miners who did the “Harlem Shake” and posted it online, among several others.
How to protect information that is posted online
Most if not all of the social networking services allow you to protect information that you post online so that you can control who sees the information that you post online. It is very much recommended that you protect the information that you post online so that people that you don’t want seeing your social networking posts can’t see them. Just keep in mind that these protections only apply to new items that you post and not to items that were already posted online.
Twitter offers you the ability to protect your tweets by protecting your account. When you protect your tweets on Twitter, this prevents anyone from seeing your Tweets until you approve them to be able to follow your account. This prevents your tweets that you made after making your account protected from showing up in Search.
You can change your settings by logging into the Twitter webpage on a computer and click on the gear icon at the top right of the screen that looks something similar to that shown in Figure 5.6.

On the setting page, scroll down to the Tweet Privacy setting that should be around halfway down the page. Checking the box next to the in the Tweet Privacy setting, shown in Figure 5.7, will turn your account into a protected account and only your followers will be able to view your tweets.

Keep in mind that there are still ways that tweets from a protected account can be shared and therefore viewed by others. The first way would be by a follower doing an “old style” retweet. This is where someone takes a tweet that is a protected tweet, which can only be seen by the person’s followers, and is then tweeted by someone with “RT” in front of the tweet. Now everyone who follows the second person can see the tweet that the first person posted.
To spell this out a little easier, let’s assume that we have a person named Kris who has protected her tweets because she doesn’t want people that she doesn’t know to see her tweets. She tweets something that Steve sees that he wants to share with his followers. Steve then retweets the tweet that Kris posted making it so that people who follow Steve but not Kris can now see Kris’s tweet.
Unfortunately as long as you are using Twitter, there is no way to prevent this situation from happening as you can’t prevent another user from retweeting your tweets.
When posting something on Facebook, there are a couple of ways to limit the people who can view your posts.
Securing a specific Facebook post
The first is to secure the actual post itself. When writing up a new post on Facebook, you’ve probably seen the little grayed out drop-down menu next to the post button as show in Figure 5.8.
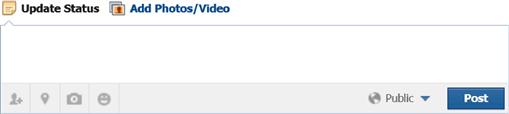
Normally when things are grayed out, they are disabled but this isn’t the case with Facebook. When you click on the drop-down menu shown in Figure 5.8, you’ll get a drop-down menu that will look similar to the one shown in Figure 5.9. This drop-down allows you to configure who has the ability to see this specific post. You can leave the setting at Public that is the default that will allow everyone on Facebook to see the post if they went to look at your wall.
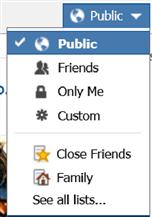
By selecting “Friends” from the menu shown in Figure 5.9, only people who are your friend on Facebook would be able to see the post. By selecting “Only Me” from the menu shown in Figure 5.9, you are the only person who can see the post. The most powerful option on the menu shown in Figure 5.9 is the “Custom” option. By selecting this option, another menu is shown that allows specific people or groups of people that you have set up within Facebook to see or not see the post. This new menu shown in Figure 5.10 allows you to specifically list out people that you do or do not want to be able to see the post.
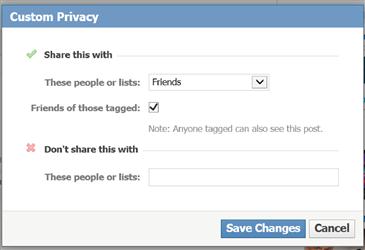
The screenshot shown in Figure 5.10 shows the default version of this screen where you can select a specific group of people to allow to see the post then the “Don’t share this with” section where you can exclude people from this list.
As shown in Figure 5.10, there is a dropdown in the “Share this with” section. This defaults to “Friends” when opened. The other options on this list are “Friends of Friends” that would allow your friends as well as their friends to be able to see the post. The other option of note is the “Specific People or Lists…” option that allows you to specify that the post should only be visible to the specific people that are put into the dialog box that appears when “Specific People or Lists…” is selected as shown in Figure 5.11.
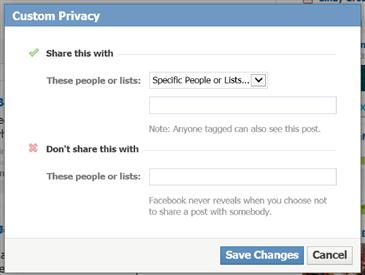
Figure 5.11 The “Custom Privacy” dialog box with the setting changed to “Specific People or Lists …”
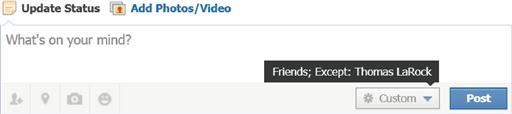
If, for example, I wanted to post a message on Facebook where I complained about the work that my friend Thomas LaRock was doing while working at the technical editor of this book (he did a fantastic job, it’s just an example), I probably wouldn’t want him to see that post on Facebook. So in order to do this, I would select the “Share this with” setting to Friends so that only my friends can see the post, and then in the “Don’t share this with” section, I would put Tom’s name as shown in Figure 5.12.
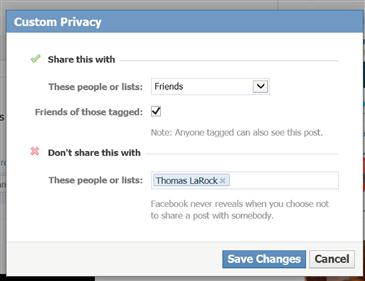
After making the changes and clicking the “Save Changes” button, you’ll be shown something similar to that shown in Figure 5.13. The post can then be written and posted as normal with only the limited people being able to see the post.
Setting Facebook privacy settings
One place where Facebook is doing a better job than some of the other social networking websites is in the privacy settings. The Facebook privacy settings allow you to configure who by default can see your new posts, who can contact you, and who can search for you using your e-mail address or phone number. The privacy settings can be found by clicking the little light blue gear on the upper right-hand side of the Facebook webpage shown in Figure 5.14.
Once clicking on the icon shown in Figure 5.14 a menu similar to the one shown in Figure 5.15.
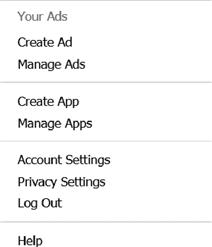
By clicking on the “Privacy Settings” option in the menu shown in Figure 5.15, the actual screen that allows you to change the privacy settings will be shown, which will look similar to what is shown in Figure 5.16.
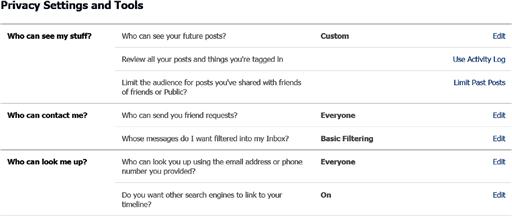
The first section shown in Figure 5.16 allows you to change who can view your posts. By clicking on the “Edit” link next to “Who can see your future posts?,” the screen will be changed to look something like what is shown in Figure 5.17.

By clicking on the “Public” drop-down menu, you can customize the permissions much like when a new post is being written as shown in Figures 5.10–5.12.
When making changes to permissions via the “Who can see your future posts?” setting, these changes only affect new posts. If the permissions for older posts need to be changed, the only option for changing the permissions in bulk is to limit the past posts to only being visible to your friends. This is done by clicking the “Limit Past Posts” link to the right of “Limit The Audience for Old Posts on Your Timeline” option shown in Figure 5.16.
If permissions from older posts need to be changed one by one, this can be done by going to your wall on Facebook and locating the specific post that you wish to edit. Once the post has been located, click on the small gray gear next to the time when the post was made as shown in Figure 5.18.
After clicking on the gray gear shown in Figure 5.18, a menu will be shown that looks similar to the one shown in Figure 5.9. The settings can then be changed using the screens shown in Figures 5.10–5.12.
With these various settings, you’ll be able to prevent people who you don’t want to see specific posts from being able to see them. This same technique is used to secure pictures, videos, etc., on Facebook.
Flickr
Like Facebook and Twitter, the other social networking websites that have been mentioned in this chapter, Flickr includes some privacy settings that can be used to keep the pictures that are being posted online from being viewed by people that you wouldn’t want them viewed by. There are a variety of settings available to you and understanding each one and what exactly it controls is key to keeping your personal data on Flickr private.
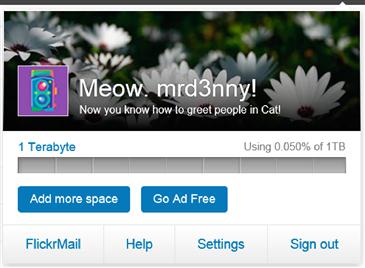
Accessing the privacy settings on Flickr is quite easy. Simply go to the Flickr homepage www.flickr.com and log into the site using your normal username and password that you use for the site. After logging in put your mouse on the small avatar icon in the upper right corner of the screen as shown in Figure 5.19. In this example, the avatar is the default avatar that yours should look similar to.

When your mouse has been placed over the avatar, a menu should appear similar to the one shown in Figure 5.20. If the menu doesn’t appear, click on your Avatar that should cause the menu to appear as well. Once the menu has appeared, click on the settings link shown at the bottom of Figure 5.20.
The settings page has four tabs with all the privacy settings being shown on the “Privacy and Permissions” tab. Clicking on this tab will show you the various settings.
The first permission shown on the Privacy and Permissions tab, partially shown in Figure 5.21, is the ability to control who has access to all your original picture files that have been uploaded.
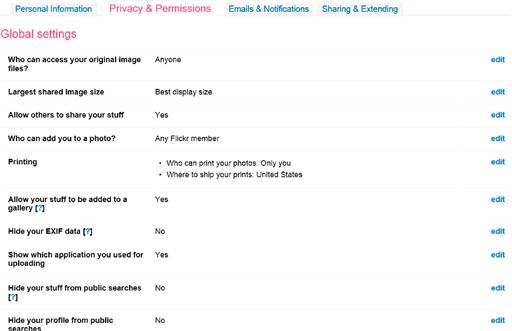
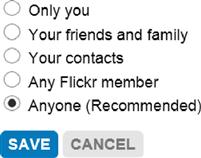
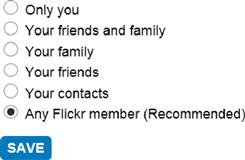
By default, this setting is configured to allow anyone to download the original files as shown in Figure 5.22. There are four other options available with this setting: “Only you,” “Your friends and family,” “Your contacts,” and “Any Flickr member.” The “Only you” setting prevents any other member from seeing your pictures. The “Your friends and family” setting allows anyone who you have configured as being a friend or a member of your family to be able to see your pictures and no one else. The “Your contacts” setting allows anyone who is configured on Flickr’s website as a contact to be able to see the setting. The final option “Any Flickr member” allows anyone who is signed into the Flickr website the ability to view the pictures that have been uploaded.
The next setting down the list shown in Figure 5.21 is “Who can add you to a photo?,” which is a very important setting when it comes to ensuring that you maintain the most possible control over your online presence. When others are allowed to tag you in pictures that they have posted on Flickr, these pictures can impact both your online and your off-line reputation. At the beginning of this chapter, we learned about the fact that we need to ensure that we don’t post information online that we don’t want others to see online. Well what happens when someone posts information about us and we can’t control it? This setting gives us the ability to control that, at least on the Flickr website. The “Who can add you to a photo?” setting is the most detailed setting we have control of so far as shown in Figure 5.23.
The six options that are shown in Figure 5.23 are not set with the best possible privacy option configured by default. By default, Flickr is configured to allow anyone who uploads a photo with you in it to be able to tag you in the photo. While Flickr recommends this setting to be the default setting, this is for their benefit, not yours. They benefit from this setting being enabled by making a more dynamic platform that allows for the easiest sharing of photographs and videos possible. However, this is purely in their best interest and not in yours. Your best interest as the user of Flickr (and other social networking sites in general) is to ensure that while using the service, you have as much control over your data as possible, which isn’t going to work well with the social networking sites’ best interest. The setting that should be used, which is in your best interest, is to select the “Only you” option shown in Figure 5.23. This way, you maintain complete control over what pictures can be assigned to you.
An acceptable setting from a personal data privacy perspective would be to allow people that you trust to be able to tag you in pictures, also known as your family, which is one of the available options. The other options such as “Your friends,” “Your friends and family,” “Your contacts,” and “Any Flickr member” settings allow people who probably aren’t in your most-trusted circle to be able to tag you in pictures.
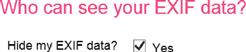
The next setting with regard to privacy to adjust is the “Who can see your EXIF data?” setting. Before we can decide if we want to allow others to see our EXIF data, we need to know what the EXIF data are. The EXIF data are information that is stored within the photograph and stores a variety of information about the photograph. This information includes information about the camera, the lens, the shuttle speed, the date and time the picture was taken, and, in a lot of cases, the GPS location of the picture. Having the GPS information available to anyone on the Internet tells people potentially where your home is, where your office is, where you’re, where your friends live, where you vacation, etc. You can turn this feature off within the camera or camera phone. Check with the technical support department for your camera for more information about how to disable this feature. Based on all this information turning off the EXIF data from bein available to people who are viewing your photographs online may be a good idea for many people. The EXIF setting only allows to be turned on or to be turned off. For the sake of personal privacy, the setting of “Hide my EXIF data?” should be set to “Yes” as shown in Figure 5.24.
The next setting on Flickr’s privacy settings page that we need to worry about is the “Who can see what on your profile” setting as shown in Figure 5.25. This allows various groups of people to see the four settings that this setting controls. These four settings are “E-mail address,” “Instant messaging names,” “Read name,” and “Current city.” By default “E-mail address” and “Instant messaging names” are available only to people who are your contacts while “Real name” and “Current city” are available to anyone.
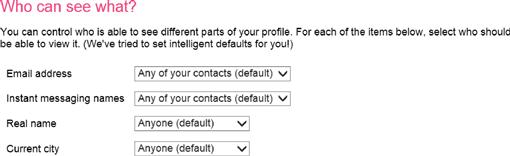
Again, like with the EXIF setting, the settings shown in Figure 5.25 are not set with your best interest in mind. This is because it allows anyone to see where you most recently uploaded pictures from. Like with the settings discussed earlier in this section, these settings, specifically the “Current city” setting, should be set for trusted people only such as the option from the list “Family and Friends.” This setting is the most restrictive of the available options for these settings.
MySpace
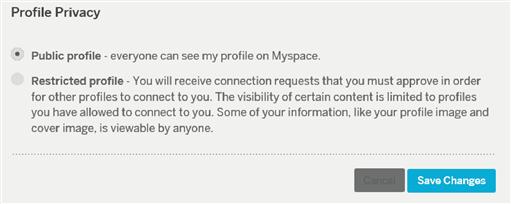
Privacy settings on the MySpace website are probably the least flexible of all the social networking sites that I have seen. The only option that MySpace gives you is the ability to configure a profile as a “Restricted Profile.” Having a restricted profile means that you have to approve all connection requests before they will be connected to you. A restricted profile also limits “certain content is limited to profiles you have allowed to connect to you” according to the MySpace webpage.
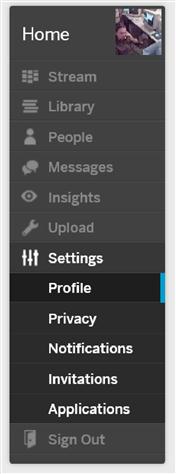
Changing the profile setting from a public profile to a restricted profile is a pretty basic process. First, log onto the MySpace website at www.myspace.com. Then click on the settings button on the main menu, shown in Figure 5.26, typically shown on the left of the webpage.
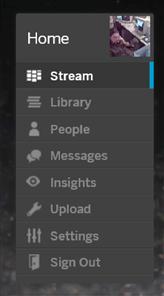
Once the settings menu has opened, as shown in Figure 5.27, several additional options become available including the Privacy Settings option. Selecting the Privacy option from the menu allows you to view the full privacy settings menu.
As stated, the MySpace website only has a single privacy setting. This setting, shown in Figure 5.28, allows you to change your profile from public to restricted and back as needed.
Summary
As we’ve seen in this chapter, there is a variety of information that simply shouldn’t be posted online. While it may seem like a good idea to post your entire life online, there are people out there who can use the information that you post online against you. This includes family members, employers, bosses, potential employers, and law enforcement. Many of the social networking sites include some sort of privacy settings, as shown throughout this chapter where you have been shown how to change the privacy settings of Twitter, Facebook, Flickr, and MySpace.
Not all of the social networking sites include privacy settings, and not all of the privacy settings are created equal some sites giving much more fine-grained control than other sites give. When selecting the social networking site to use, be sure to select social networking website that provides the level of privacy over your personal data that you want to give.