
10
Light and the Human Eye
The ability of the human eye to perceive light is truly one of the wonders of nature. Incredibly complex and delicate, the human eye is sensitive to a remarkable range of light levels and detail. In order to understand how we perceive light and color, let’s begin by considering light’s basic characteristics—where does it come from and how do we describe it. We will then explore the characteristics of the eye and human vision to better understand the components of compelling nightscape images.
Light
The ability to perceive the different colors of light is surely one of life’s greatest joys. Light is the name given to electromagnetic radiation that is perceptible by the human eye, Figure 10.1. You may be surprised to learn this, since light might seem to have nothing to do with either electricity or magnetism. Yet, of all the different wavelengths of electromagnetic radiation, light is the only type that we can detect directly with our eyes. Some creatures, for example, rattlesnakes and ticks, are extremely sensitive to infrared radiation. Our skin is also sensitive to infrared radiation, which is why we hold our palms out to a campfire when they’re cold. Others, including certain species of fish, can detect ultraviolet radiation.
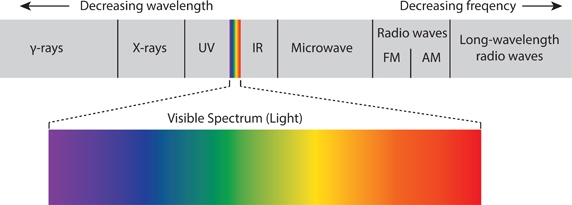
10.1
The electromagnetic spectrum, showing how light, or visible electromagnetic radiation, is only a small portion of it.
What a different world we would perceive if we were also able to see in different wavelength ranges of the electromagnetic spectrum! Everything would look completely different—if we could “see” in the X-ray portion of the spectrum, we might perceive people as ghostly skeletons covered with a translucent gel within transparent buildings (provided that there were X-ray sources other than the sun available to illuminate them). Of course that would be normal; our current appearance in the visible portion would then be considered “ghostly!” Alternatively, we might perceive the cell phones we carry as bright sources of light if we “saw” radio waves. Even the night sky would appear different, as can be seen for the region near Orion shown in Figure 10.2 comparing its appearance under (a) full-spectrum and (b) hydrogen-alpha (H-alpha) filtered visible wavelengths.
Electromagnetic radiation outside the visible range is still important for photographers. Infrared radiation permeates the night sky, and while invisible to the human eye, modern digital single-lens reflex (DSLRs) are easily modified so as to be capable of sensing and recording it. Ultraviolet radiation is responsible for the vivid hues and brightness of fluorescent pigments; these materials absorb ultraviolet radiation and then emit light of an entirely different hue. Also, modern fabric “whiteners” contain chemicals that absorb ultraviolet radiation and re-emit light of a bluish hue, which makes fabrics appear whiter and hence cleaner.

10.2
The night sky region near Orion shown for (left) the full-spectrum of light and (right) light filtered to only allow the hydrogen-alpha (H-alpha) visible wavelengths to appear. Viewing the same region of the sky but with different wavelengths thus reveals a different view. Which one is “real?”
Source: Tunç Tezel/The World At Night
Light is created by one of two mechanisms: (i) incandescence, in which the source is physically hot and (ii) luminescence, in which the source is physically cool and light is produced through a chemical, biological, electrical, or other mechanism. The sun, molten lava, lightning, and fire are examples of natural incandescent sources; flashlights with incandescent bulbs are artificial incandescent sources. Fireflies and bioluminescent algae are examples of natural bioluminescent sources; fluorescent lights, liquid-crystal displays (LCDs) and light-emitting diodes (LEDs) are examples of artificial fluorescent and electroluminescent sources, respectively.
We can understand the color of different light sources by examining their electromagnetic spectra, Figure 10.3(a). The spectrum of our sun contains every wavelength of light, Figure 10.3(a), and is referred to as white light. Many manufacturers of light bulbs strive to produce light mimicking this spectral distribution. In contrast, light from a source that is predominantly a single color will exhibit a high intensity at that wavelength, and lower intensities at other wavelengths. Most artificial light sources exhibit this trait and thus have a distinct color cast, Figure 10.3(b). Finally, the distinct colors of the aurorae, which originate from specific chemical species, have a spectrum containing only very specific wavelengths, Figure 10.3(a). In fact, spectral analysis can help determine the sources of auroral light. Understanding the spectra of different light sources helps us understand how to control the appearance of images created with each of them.

10.3 (a) Characteristic electromagnetic spectra of different light sources. Incandescent sources, like sunlight or incandescent light bulbs, emit all wavelengths. Artificial lights, however, preferentially emit only certain wavelengths, which can result in a distinct color cast. The specific colors in the aurora originate from particular atmospheric gas molecules, as described in Chapter 4, and are mostly the result of oxygen and nitrogen. (b) Different light sources have different spectra, which manifest themselves as different colors. Here, a combination of flashlights, cellphones, and headlamps are used to creatively spell the word BRILLIANT.
Hue, Saturation and Scene Luminance, LV
Photography is the collection and rendering of ambient light. Sources of ambient light are either direct sources, i.e. objects that emit light, or indirect sources, i.e. objects that redirect light produced from direct sources, Figure 10.4. Examples of direct sources include the incandescent and luminescent sources described above. Indirect light source examples include light scatterers, like the sky and its atmospheric gases; light refractors, like atmospheric ice crystals and water droplets; and perhaps most commonly, light reflectors, such as the moon, satellites, planets, comets, people, mountains, lakes, and trees. Light reflectors can be further classified as diffuse reflectors, such as trees, mountains, and people, where the reflected light is sent in random directions, and specular reflectors, such as mirrors, where the incident light rays are simply redirected by reflection.

10.4
Direct and indirect sources of light. Direct sources emit light, like the sun, while indirect sources redirect light produced from direct sources. Indirect sources either scatter light, as in the blue sky, refract light, as in rainbows and ice haloes, specularly reflect light, as in the case of a mirror or the calm surface of a lake, or diffusely reflect light, as in the case of a sheet of paper or a person’s face.
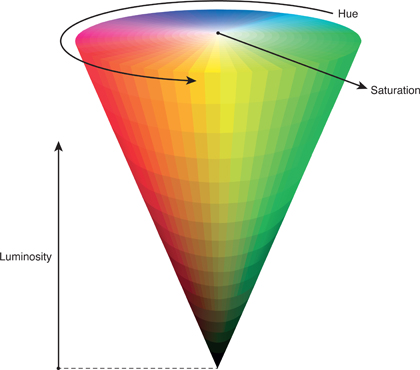
10.5
Schematic diagram illustrating the nature of, and relationships between hue, saturation and brightness/lightness.
The light that enters our camera can be characterized by three main qualities: hue, saturation, and luminance/lightness/brightness/value/intensity, Figure 10.5. These, in turn, depend on the specific characteristics of the direct or indirect light sources within the camera’s field of view.
Hue is what we think of as the color of light–turquoise water or a red headlamp. Hue has an infinite range of possibilities, depending on the hues of the constituent sources. For example, outdoor subjects in full sunlight have two different hues of light illuminating them: the direct white light from the sun and the primarily blue, scattered light from the sky. This combination is generally unflattering, which is why the best outdoor portraits are made under neutral, cloudy skies.
The brightness of a direct or indirect light source is characterized by its luminance, also termed lightness, value, or intensity. Luminance has nothing to do with color; two red and green objects can have exactly the same luminance. The luminance, Sx, is measured in units of lux, which simply indicates the amount of light available per unit area. All the direct and indirect sources of light within a scene contribute to its total, overall brightness. The extraordinary sensitivity of the human vision system allows it to detect and interpret images with luminance levels ranging from less than 0.001 lux to well over 50,000 lux. However, this enormous range makes luminance a completely impractical parameter for photography. The currency equivalent would be to conduct all your purchases, from sticks of gum to groceries to cars to real estate, solely with individual pennies!
Instead, photographers have devised a way to convert the luminance into a much more useful parameter called the light value (LV), which only ranges from −12 to +12 or so. A LV of −12 corresponds to near total darkness; a LV of +12 to blazingly intense light. The LV is obtained from luminance simply by taking its logarithm:
| (Eq. 10.1) |
where C is a calibration coefficient for the light-meter used to measure the scene luminance, safely assumed to be approximately equal to the number one. Following the example of currency, the LV would the equivalent of higher denomination coins and paper currency.
The practical interpretation of Equation 10.1 is straightforward—when the ambient brightness, or Sx, doubles, LV increases by one; when Sx quadruples, LV increases by two, and so on, as illustrated schematically in Figure 10.6 (overleaf) and summarized in Table 10.1. The fact that the quantity of light doubles or halves between individual LV levels has led to the designation of a one-LV difference in luminance as being one exposure stop, or one f-stop. In other words, when the LV changes by one exposure stop, the amount of light either increases or decreases by a factor of two.
Table 10.1 Approximate Light Values, LV, for Typical Landscape and Astrophotography Scenes
| ASTROPHOTOGRAPHY TARGET | SCENE LV | SCENE LUMINANCE (LUX) | |
| Sunsets and sunrises | |||
| At sunset | 8 | 320 | |
| Moonlight, Moon altitude > 40° | |||
| Full | −3 to −2 | 0.16 | |
| Gibbous | −4 | 0.08 | |
| Quarter | −5 | 0.04 | |
| Aurorae | |||
| Bright | −4 to −3 | 0.08 0.16 | |
| Medium | −6 to −5 | 0.02 0.04 | |
| Milky Way scenes | −8 to −5 | 0.02 |
Since each scene contains of a unique set of direct and indirect light sources, each with their own characteristic luminance, each scene will have a unique LV. For example, typical nightscapes will include both direct light sources, such as stars, and streetlights, and indirect light sources, such as the moon, planets, mountains, and other foreground objects that reflect light originating from the direct sources.
A key advantage of using light values as a measure of brightness in determining exposure settings in photography is that scenes with comparable overall lighting will have roughly equivalent LV levels, regardless of minor differences in light levels within the scenes. For example, perhaps we have a scene with relatively abundant ambient light, such as is the case during late evening before the sun has set. It is a safe and practical starting point to assume that this scene would likely have a LV of approximately six to eight, regardless of the details of what’s in the scene, or where in the world it’s located. Or maybe we are attempting an image an hour after sunset during a waxing gibbous moon, where the foreground is dimly illuminated. In this case, our LV would be lower since there is less light, likely around −4 or so. Or possibly we are seeking an image of the relatively faint

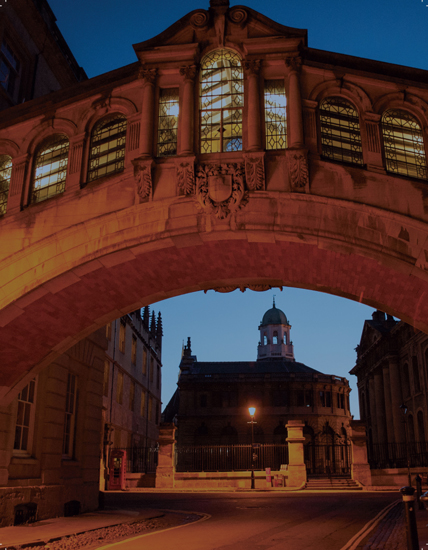
10.6
(a) Schematic illustration of how the available light, or the light value (LV), of a scene increases with its luminance (Not to scale). A few typical landscape astrophotography scenes are included for reference: moonless and moonlit nights in California’s Sierra Nevada; twilight in Oxford, England; sunset along the Big Sur coast in California; and midday at the base of Mt. Everest, Nepal. (b) Schematic illustration of how a sunset scene’s LV decreases during the golden hour, sunset, and each phase of twilight.
Milky Way during the middle of the night of the new moon, deep in the wilderness, far away from any city lights. Here, our light value would be even lower, likely around −6 to −5 or so.1 This ability to characterize most landscape astrophotography scenes in terms of their approximate light value is extremely helpful to the next step of knowledgably setting your camera exposure settings in preparation for creating your nightscape image.
The final parameter of interest used to characterize light is its saturation, which simply refers to the vividness of its hue, Figure 10.5. If two different subjects have the same hue and luminance, but different saturation levels, the one with the lower saturation appears more wan, or “washed-out,” than the other.
Human Eye
The human eye has several characteristics worth appreciating from a photographic perspective, especially for night photography. Let’s start with its anatomy, Figure 10.7. In many ways, the human eye is roughly analogous to a camera with many of the same features. It has a lens, an aperture stop (the iris), and a sensor (the retina). Missing is the shutter; our eyelids are simply part of a protective and cleansing system. Instead, our vision acquisition system functions in much the same way as a video camera, which also lacks a mechanical shutter. Images are extracted from our retinas approximately twenty times per second and sequenced together by our brains to create the perception of motion.

10.7
Schematic diagram of the anatomy of the human eye. The key features include the lens, iris, and retina, analogous to the lens, aperture, and sensor of your camera, respectively. The retina contains color-sensitive cones, and much more sensitive rods, but which are only able to provide black and white vision. The highest concentration of cones is found in the macula, with the very highest concentration in the fovea, found at the macula’s center. The highest concentration of rods is found in a doughnut-shaped ring surrounding the fovea, explaining why the best night vision is often obtained by using “averted vision”, or by looking just to the side of the area you’re trying to see.
This ability provides the basis for motion pictures and video. By sequencing a series of still images at a faster rate than the retinal extraction rate of our brain, we are able to perceive the sequence of images as showing motion. If the sequence is animated at a rate slower than our brain’s retinal extraction rate, then we are able to discern the individual images, and we recognize the animation as a sequence of still images rather than fluid motion.
The lens of our eye is truly a miracle of nature. It contains both living cells and inert, structural protein molecules arranged in such a way as to be optically transparent and mechanically flexible. There are relatively few blood capillaries within the lens, owing to the need for optical transparency, which makes its regeneration relatively slow when damaged.
The curvature of the lens is what allows it to form an image on the retina. Since the lens always sits at the same distance away from the retina, its curvature must change to allow it to focus on objects that are at different distances away. This is accomplished through a series of small muscle groups connected between the lens and other regions of the eye. When the muscles contract, the lens stretches and becomes more flat. When the muscles loosen, the lens relaxes and becomes more convex. This process constantly occurs as we focus on objects around us—even as you read these words!
The iris of our eyes is the direct equivalent of the diaphragm in our camera. Both are mechanical systems that open or close depending on the desired quantity of light. The hole in the center of the iris is called the pupil; the hole in the center of the camera’s diaphragm is called the aperture. The next time you look in the mirror, take a careful look at your pupil. Did you know that it is actually a transparent opening into your eye? Although obvious in retrospect, it is still amazing to think that with the right equipment you could actually look into your eyes in the mirror and see your retina!
The pigments in the cells that make up the iris are responsible for giving the iris its color. The pupil can range in size diameter from approximately 1.5 mm in bright conditions to 8 mm in dim conditions. It has a range of effective aperture from f/2 to f/11, with a focal length of approximately 35 mm. A 35 mm camera lens on a full-frame camera is often considered to produce images having equivalent dimensions as human vision.
The eye’s retina is the layer of photoreceptor cells coating its inner, rear surface that converts light into biochemical signals that can be interpreted by our brain, Figure 10.7. The retina contains two different types of cells: rods and cones. Both contain photopigments, proteins that change form when they absorb light. There are three types of cones, each with peak sensitivity to blue, green, and red light, respectively. Consequently, cones are responsible for color vision, although they are not as sensitive as rods to low luminance scenes. Although rods are much more sensitive to low light levels, they only yield vision in black and white, and have a peak sensitivity to blue light. How different our vision would be if our retina only contained one of these four types of cells!
Both sets of cells are concentrated in the retina in an area near the center of the optical axis of the lens, known as the macula. Within the macula is the fovea—the region of the retina with the very highest concentration of cones. There is a critical difference in how the rods and cones are distributed within the macula that produces important differences between our vision during the day and at night. The very highest concentration of cones is found at the center of the fovea, which helps us see with the greatest clarity of color during the day. The very highest concentration of rods, however, are found in a donut-shaped ring surrounding the fovea, but approximately 20° away from its center.
This fact has extremely important implications for our vision at night. When we look directly at an object at night, we are relying primarily on the cones within the fovea to create our vision. If, however, we look slightly to one side of an object at night, or about the width of your thumb at arm’s length, then the object’s image falls onto this donut-shaped area with its extremely high concentration of rods, instead. This process is known as averted vision. Since the rods are so much better at resolving images at night than the cones, we are able to achieve much higher image resolution at night using averted vision. Practice this a few times and you will soon appreciate the difference!
Finally, the process of dark adaptation by your eyes is a crucial part of night photography. Dark adaptation is the name given to the physiological process by which the rods in your retina increase their level of photopigments until they are nearly a million times more sensitive to light than in full daylight. Dark adaptation takes around twenty minutes to become completely functional, and increases with time after that. However, it only takes a few seconds of exposure to bright lights to reverse your eye’s dark adaptation. Also, since rods are relatively insensitive to red light, the use of red headlamps, or red cellophane taped over normal flashlights, allows the cones to function enough to assist with vision and yet maintain the dark adaptation of the rods.
Bibliography
Horenstein, Henry & Russell Hart, Photography, 2004, Prentice Hall, Upper Saddle River, New Jersey
Jacobson, Sidney F., Ray, Geoffrey G. Attridge & Norman R. Axford, The Manual of Photography, 2000, Ninth Edition, Focal Press, New York and London
Johnson, Charles S., Jr., Science for the Curious Photographer, 2010, A.K. Peters, Ltd, Natick, Massachusetts
Knight, Randall D., Physics for Scientists and Engineers, Third Edition, 2013, Pearson, Glenview, Illinois
London, Barbara, Jim Stone & John Upton, Photography, Tenth Edition, 2011, Prentice Hall, Upper Saddle River, New Jersey
Sussman, Aaron, The Amateur Photographer’s Handbook, 1973, Eighth Revised Edition, Thomas Y. Crowell Company, New York
Note
1 You probably have noticed that the LV levels of a scene can range from positive to negative values. There is no special significance to negative LVs; just like a negative temperature, a negative LV simply means one that is low. The zero in the LV scale is simply an arbitrary reference point and also has no special meaning.