

18
Essential Hardware and Equipment
This chapter reviews equipment that can make or break an evening photography session. Some are critical and should be carried with you every time you venture out, while others are optional and simply provide the opportunity to enhance the experience. We will review general field gear as well as equipment specific to astronomy and photography. None of the items shown here are intended as endorsements; there are many products available with equivalent capabilities. They are simply shown to represent the types of items that you may wish to consider. Complete checklists of suggested equipment are provided in Appendix I.
General Field Gear
There are two items I never leave behind whenever I venture into the field for a nightscape photo session: (i) a reliable headlamp equipped with a red light setting, Figure 18.1(a) and a compass, Figure 18.1(b). No other pieces of equipment are so important to your personal safety.

18.1
The two items I never leave behind: (a) A portable headlamp ideally suited to landscape astrophotography. Note the red light-emitting diodes (LED) critical to preserve night vision. The headband keeps both hands free and always points the light right where you’re looking. Some models have the useful ability to adjust the angle of the light. (b) Orienteering compass that allows you to correct for magnetic declination. The mirror allows you to view the horizontally oriented compass while aligning the bearing target through a sighting notch in the top of the housing.
If you’ve never used a headlamp, you’ll be astonished at how useful they are—both hands are kept free and the light always shines right where you’re looking. In fact, you should always carry a spare! You may also want to bring a second hand-held flashlight as well. It is helpful for lighting the trail, light-painting projects, and a myriad of other tasks. Finally, don’t forget duplicate sets of spare batteries.
A compass is invaluable at getting oriented in new surroundings, Figure 18.1(b). I frequently use mine during the day to estimate the future locations of night sky objects, thus narrowing down choices of scene composition. Be sure to choose one that allows you to correct for the difference between true and magnetic north, or the magnetic declination. A magnetic declination adjustment is helpful since the earth’s magnetic North Pole is offset slightly from its physical North Pole. Such models are often described as orienteering compasses. Correcting your compass for magnetic declination allows you to take readings directly from its dial while allowing the compass needle to point to magnetic north.
Your cellphone can also be invaluable in the field, even without coverage, Figure 18.2(a). Used with the apps described in Chapter 17, it can provide times of sunset/sunrise, moonset/moonrise and twilights, photography settings, as well as the positions and orientations of sky objects. A small, rechargeable power supply can be a helpful accessory if its power runs low, Figure 18.2(b). Finally, it may be able to summon emergency services, although coverage in remote areas is unreliable and often nonexistent.

18.2
(a) Map/cellphone /GPS screen from a mobile device showing accurate GPS positioning even though the phone is in “airplane mode.” Its GPS sensors function independently from the cell and wireless services. (b) Rechargeable, external power supply useful for recharging your mobile devices when afield.
Source: (a) Google Maps
Another vital device to carry into the field is a dedicated GPS device. Most of the time it’s not needed, but it can make an enormous difference if you become lost. Such devices are also invaluable at navigating in areas with limited coverage by cellphones, and have the added benefit of providing precise position coordinates for pinpointing your position. Many models feature a “go-to” capability, which allows you to navigate to a specific destination, for example, your car, or camp at the end of the session. I have relied on this feature on several occasions to return from a nightscape session in dark, featureless surroundings.
A roll of gaffer’s tape—photographer’s “duct tape”, Figure 18.3, is a surprisingly useful accessory to keep in your camera bag. There are innumerable uses for it, from securing loose cables, to serving as a shim for a loose lens cap, taping handwarmers to your camera… you will be glad you brought it along.

18.3
Gaffer’s tape: the duct tape of photographers. You will find countless uses for it, from attaching, securing, propping up, labeling, marking, repairing, bundling… the list seems endless. A must-have item.
A simple chair has the ability to transform an evening of nightscape photography from a battle of endurance to a relaxing night in the outdoors. Backpack chairs are perfect for carrying equipment and supplies a short distance, and also help whenever a brief (or long!) nap is needed. A dedicated camera backpack, however, is your best option for longer hikes. Camera backpacks typically have myriad padded and zippered compartments for all your gear along with a carrying pouch for your tripod. You can use them to carry a surprising amount of gear quite a long distance.
In cold-weather destinations, any of the available handwarmers are a wonderful way to stave off chilly, damp night air. They can also be used to keep your camera and batteries warm either by taping them in place with gaffer’s tape, attaching them via rubber bands, or even elasticized bandage wraps. Attached to your lens body, they can also help avoid dew formation and frost.
Reusable devices that use liquid fuel and disposable devices that use solid fuel work well. The disposable warmers can be attached to the lens and camera body with rubber bands or elasticized tape to assist in very cold weather operation. The liquid fuel variety should be kept way from camera lenses, however, owing to the possibility of contamination from the liquid fuel or deposits from its fumes.
A variety of plastic bags are also indispensable. I always carry at least one large (in the range of 13 gallon) trash bag whenever I venture outdoors into the night. These have a variety of uses, ranging from an all-out emergency, keep-everything-dry bag in case of unexpected rain, to a clean surface to lay out your gear in dusty or wet environments, to an emergency shelter in case of becoming lost. You will also find an assortment of one-quart and one-gallon zip lock type plastic bags to be very helpful in organizing smaller pieces of gear and electronics; and protecting them from the environment.
There are several miscellaneous items that are worth considering. I often keep a few energy bars, trail mix, or pieces of fruit inside my bag for a late night energy boost. A thermos of hot chocolate, tea, or coffee can also make a world of difference. I generally keep a fleece hat, gloves, nylon windbreaker, and a bandanna on hand in case temperatures drop unexpectedly. You may wish to create a dedicated waterproof bag of sunscreen, insect repellent, and antibacterial disposable hand wipes; you never know when annoying insects can suddenly materialize and cause mischief. Earplugs and a headscarf or bandanna are also great at keeping insects and cool breezes at bay. I always keep a small roll of toilet paper and a backpacking hand shovel tucked inside my bag in case a restroom isn’t nearby, and I’m on suitable public land. Finally, in bear habitat, a can of bear spray is good insurance. While this book is no substitute for a complete course in bear safety, good bear-safety habits are vital for the bear’s health, as well as your own, and must be adopted whenever you travel in bear country, especially areas inhabited by North American grizzly bears.
Astronomy Gear
I always carry a planisphere with me when I venture into the night, Chapter 2, preferably one with glow-in-the-dark markings. Not only does it allow me to readily confirm the identity of specific objects, it helps in understanding how they move throughout the night. I also carry a green laser pointer (5 mW or less) to help in identifying night sky objects to others.
Photography Gear
The absolute necessities are your camera, tripod, memory cards, and batteries. It is a good practice to confirm that your camera actually contains its memory card and battery before leaving for your destination. While it may seem obvious, on more than one occasion, I have hiked into a pre-dawn location only to find an empty memory card slot in my camera and no spare memory cards in my pack—I had simply overlooked them and failed to check! Other essential gear, described below or elsewhere in the book, includes a remote shutter release or an intervalometer, Figure 18.4, a color correction tool, a flashlight for light painting, a handheld loupe to assist in focusing on the stars, and a dust blower to keep the lenses clean. Beyond these basics, I will occasionally bring along assorted filters, a panoramic head, a flash, and wireless remote triggers. If I intend to perform very long exposure star trails, I will bring the external battery pack for the camera and/or an external camera power supply. Small patches of Velcro and tabs attached to the upper legs of my tripod can help keep the intervalometer and other cables in order and untangled.

18.4
Remote shutter releases: (a) manual, with a locking capability and (b) an intervalometer for sequential and/or very long single exposures.
Photography Gear—Filters
There are several lens filters you may wish to consider. Although some of the effects can be mimicked through post-processing, several cannot. The filters attach to the lens body in one of two ways—they either screw directly onto the front of the lens or they come as flat glass or plastic plates that slide into a separate holder that screws into the front of the lens. A key advantage to the plate version is that, owing to the characteristics of the filters themselves, it is often desirable to adjust the vertical or horizontal position of the filter at a certain point. In contrast, filters that screw directly onto the lens have no way to make such precise adjustments. In addition, many of the filters are difficult, if not impossible, to see through, so it’s much easier to compose, focus, and then slide the filter into position rather than to have to screw in the filter before each exposure and risk losing focus or composition, to say nothing of time.
The circular polarizing filter almost doesn’t qualify as a filter for nightscape astrophotography since its primary function is to block polarized sunlight. When light becomes “polarized,” it simply means that it has acquired an orientation of maximum intensity. A polarizing filter simply allows light oriented in one direction through but blocks light of all other orientations.
This effect is helpful in landscape astrophotography in that light both scattered from the sky and reflective surfaces becomes polarized, and is affected by the action of a polarizing filter, as demonstrated in Figure 18.5(a, b). The polarizing filter darkens the sky and blocks water reflections, shifting attention to the rest of the landscape. The effect is most pronounced when viewing regions of the sky oriented at right angles to the sun, for example, facing south when the sun is in the west. It is, therefore, helpful during, sunsets and sunrises, as well as scenes with bright moonlight and clouds.
The polarizing filter is also very effective in enhancing the contrast of rainbows and moonbows owing to its ability to block the light reflected from the front surfaces of the water drops and thus enhance the relative intensity of the internally reflected light. However, care must be taken not to block the rainbow completely! This tendency is the same reason that colors in general become slightly more saturated when viewed through a correctly oriented polarizing filter, as the diffusely reflected light becomes more dominant owing to the specularly reflected light being blocked.

18.5
Circular polarizer showing darkening of the sky and removal of the surface reflection from the water. Useful during sunsets and sunrises; also for enhancing the contrast of moonbows and rainbows.
Source: Kirsten Larson

18.6
Example of a sunset scene, (a), without a ten-stop neutral density filter, (b), and with the filter, (c). A far-longer shutter speed can be used with the filter, which has the effect of smoothing out the ripples in the water seen in (a) to produce the effect in (b).
The neutral density filter blocks light without imparting a color shift. It allows you to create images with much longer exposure times than otherwise, for example, several seconds in daylight or near sunset. This ability causes moving water to become blurred, Figure 18.6. It also allows you to create images that lack the presence of any moving object within them, like walking people or cars. Having a range of densities, from one-stop to ten-stop is helpful.
18.7
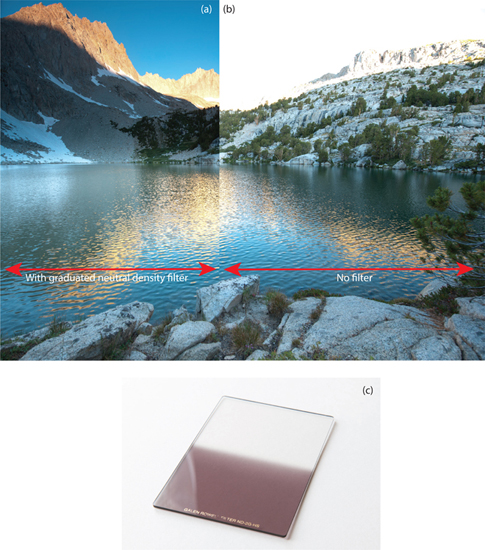
Example of using a graduated neutral density filter: (a) with and (b) without (c) the filter. The darkened half of the filter is positioned to block the bright, sky portion of the scene, allowing the darker, lower portion of the scene to be properly exposed. An inverted graduated neutral density filter is also helpful in situations with strong light pollution or in cityscapes, and can help in reducing the light intensity along the brighter bottom of the image while allowing the night sky light to pass through unimpeded.
A variation is the graduated, or split neutral density filter. The graduated neutral density filter is split into a neutral density half and a clear half, Figure 18.7(c). The neutral density half can then be positioned so as to block the light from the sky, while the clear section allows the foreground light to pass into the camera unimpeded, as shown in Figure 18.7(a). Grad-ND filters are very helpful during sunrises and sunsets, owing to the extreme differences in light values between the sky and the foreground, Figure 18.7(b). While grad-ND filters are available in a form that can be physically screwed into the lens, this is one filter that is best used in the plate form, owing to the nearly constant need to adjust the position of the split within the composition.

18.8
Sunsets and sunrises can be beautifully enhanced using the simple FLW filter (b). In (a), the exposures were made facing away from the sunset, and in (c), facing towards the sunset. In both (a) and (c), comparison images were made seconds apart with and without the FLW filter.
The graduated neutral density filter also finds use in landscape astrophotography for scenes involving city skylines and other regions of significant light pollution in the foreground. Here, the filter is inverted so that the dark side is along the bottom. It thus blocks the bright foreground regions of the scene and allows the relatively dim light from the sky to pass into the camera.
The FLW filter, Figure 18.8, is especially helpful during sunrises and sunsets. It tends to accentuate the magenta hues of these transitional times, and can create very pleasing color contrasts.
Another filter that you may wish to consider for starlit scenes is the fog filter, as shown in Figure 18.9. The fog filter tends to diminish the brightness of dimmer stars while enhancing the brightness of the brighter stars. While not to everyone’s tastes, the effects can sometimes be quite pleasing. Owing to the overall softening effect in the foreground, nightscapes involving fog filters typically combine an unfiltered image of the foreground with a filtered image of the night sky.

18.9
The Tiffen fog filter, (c), is a wonderful tool for really bringing out the more prominent stars while de-emphasizing the dimmer ones. In (a), the Teapot within Sagittarius really jumps out of the image when the filter is used in contrast to the more subdued version, (b), without the fog filter.
An alternate method to use the fog filter in the field is to simply position it in front of the lens by hand for a portion of the exposure, typically a few seconds, and then carefully withdrawing it.
Star effect filters are available to create diffraction spikes, or rays of light, emanating from point sources of light. They can be assets in scenes with several prominent stars. They may have a more natural effect than the plugins described in Chapter 21 since they produce the effect on all stars, rather than selectively as can be the case in post-processed images, which can appear artificial.
Although I carry an ultraviolet (UV) filter to attach to my lenses in the event of rain, I never use it otherwise. There is no need to remove the UV portion of the spectrum from your images. Careful handling of your gear will preclude damage to the lenses, especially compared to the glare and lens flare introduced through an extraneous layer of glass. My UV filter only goes on my lens during rain, or in areas where water spray is a possibility and frequent drying and cleaning of the filter is necessitated. If you are shooting in dry areas, consider leaving yours behind; your images will thank you.
Finally, you may wish to explore the use of newly available clip-filters that mount directly in front of the sensor, within the camera body. An example of an image created with such a filter is shown in Figure 10.2. While these are currently available for Canon at the time of printing, they are designed to alleviate the effects of light pollution and enhance the contrast of the image.
Specialty Tripod Heads
A panoramic head is invaluable for creating single-row or multi-row panoramas described in Chapter 22, Figure 18.10(a). These systems allow the camera to rotate about their nodal point, meaning that parallax errors are minimized.

18.10
There are two broad categories of accessory heads for your tripod worth considering. (a) Panoramic heads make creating images used for single- or multi-row panoramas a breeze. Their clearly marked rotational axes allows for the precise positioning of sequential images. They also allow for the calibration of the camera’s nodal point, or the axis around which parallax between adjacent images is minimized. (b) Equatorial mount tracking heads, used to counter-rotate against the earth’s natural rotation. These heads allow for pinpoint images of several minutes in length. Shown here are two popular heads: (left) Astrotrac and (right) the Polarie Star Tracker. Both allow operation in either the Northern or Southern Hemisphere. The Polarie Star Tracker also has a one-half speed setting, which allows for a single, long exposure of both foreground and sky. The need to blend two images, as shown in Figure 22.6 is thus eliminated, as the exposure times with no star streaking from the Rule of 400/500/600 are effectively doubled. With sufficiently wide-angle lenses, say below 24 mm on a full-frame camera, the increase in foreground blur is usually insignificant.
Another specialty tripod head is a tracking system, like the Astrotrac or Polarie, Figure 18.10(b). With its external power supply, tracking heads can be indispensable for creating exposures of a longer duration than the limit imposed by the Rule of 400/500/600 described in Chapter 12. Such systems are a basic equatorial mount, which means that after being aligned with the earth’s axis of rotation, they physically rotate in the opposite direction and at the same rate as the earth. A camera mounted on them can then follow a single area of the sky as the sky moves overhead, while the foreground appears to move underneath, Figure 18.11. These systems can easily be calibrated to the user’s latitude for accurate results; just be sure to do so ahead of time. A secondary benefit for the case of the Polarie mount is that it can easily convert to a panning head for use in image acquisition for time-lapse videos.

18.11
An unavoidable side effect of especially long exposures with a tracking head is the tendency for the foreground to become blurred, as shown here. The way to mitigate this problem is to shorten the exposure time. Alternatively, a second, untracked exposure of the foreground made with the same shutter time can be blended with the exposure made of the sky, as demonstrated in Figure 22.6.

18.12
This image illustrates my daytime battery recharging and image management setup when I am far away from civilization. It provides indefinite, free electrical power. It all begins with a set of three, fifteen-watt solar panels along with a 12-V marine battery coupled with a 12VDC/115VAC power inverter and power conditioner. These can be used to charge camera batteries, as well as my laptop and its charger, a memory card reader, and two portable 3-terabyte external hard drives.
Electronics and Power
For nightscape sessions longer than a single night, I usually bring my laptop and its charger, a memory card reader, and two portable 3+ terabyte (TB) external hard drives, Figure 18.12. These allow me to copy and backup the images in the field. They also allow me to perform a detailed image review for issues like focusing, compositional tweaks, and depth of field that can be done at a higher resolution than possible on the camera display. The external hard drives also provide the option of emptying memory cards after each night to create room for new images. Preliminary versions of multiple shot projects, like panoramas, star trails and time-lapses can also be tested and verified so that any necessary adjustments can be made during subsequent nights. Two related accessories that can also make the world of difference: an outlet expander and a three-prong adapter.
A set of three, fifteen-watt solar panels along with a 12-V marine battery coupled with a 12VDC/115VAC power inverter provides free, limitless power while on the road, Figure 18.12. An alternative, shorter-term supply of electrical power is a portable, rechargeable 12VDC jump-starter. Although it can only power a laptop for an hour or 2, it holds enough energy to easily charge a cellphone overnight. And, of course, it can also provide an emergency jumpstart for your car when fully charged. Finally, an excellent alternative is to find the local public library, and if permissible, avail yourself of its quiet environment to plug in your electronics and catch up on your tasks.