
P A R T 1
![]()
Getting Started
Chapter 1 takes you through building a Drupal site from planning to giving people the privilege of posting pages and other content, with lots of key Drupal concepts covered and tips given along the way. Building this site is continued in Chapters 8 and 33.
Chapter 2 introduces two essential tools in the life of any Drupalista: Drush, the Drupal Shell that makes many tasks in Drupal much faster and easier; and Git, a distributed version control system that allows you to experiment freely with your code—and to collaborate with people around the world.
C H A P T E R 1
![]()
Building a Drupal 7 Site
“Ok, we can do this the hard way or we can do this the Drupal way.”
—Forest Mars (kombucha)
This book will accelerate you along Drupal's learning curve by covering all aspects of building web sites with Drupal 7: architecture and configuration; module development; front end development; running projects sustainably; and contributing to Drupal's code, documentation, and community.
What better way to get started than to build a complete site in the first chapter? You'll go from zero to sixty miles per hour (or one hundred kilometers per hour, as the case may be) in 27 pages. In later chapters, you'll add turbochargers with dynamic pages using Views, racing stripes with theming, and cup holders with JQuery; you'll also perform some fancy maneuvers with Commerce and much more.
Throughout the book, we'll try to guide you to the Drupal way of doing things. There's never only one way to reach a goal, but some approaches ignore or even work against Drupal's offerings. The Drupal way, by contrast, is any way that builds on Drupal's strengths. (Chapter 8 covers one of those strengths—an active and helpful community that can keep you on course.)
The site you'll build in this chapter will allow users to easily create and categorize content. The scenario is not hypothetical. This book needs a website, and you are going to create it! You will:
- Use a basic approach to planning a site.
- Install Drupal 7.
- Configure Drupal core to provide a collaboration-oriented site that accepts content and comments from authors and visitors.
- Give the site and its front page a mix of static (semi-permanent) content and fresh updates.
- Give authors and visitors different levels of access for adding and editing content.
This is just the first chapter, so buckle up!
Planning: Setting Parameters and Knowing Where You're Going
Before embarking on any project, you should have some idea what it entails, if only to set some parameters on what you're getting into. The key to delivering happiness is setting expectations. (See Chapter 9 for more on planning and management with an agile approach.)
Discovery: Why Should This Site Be Built?
When starting a project, the first thing to figure out is not how to do it but why. All implementation answers should flow from an understanding of the project's purpose. The process of discovering this purpose is the discovery phase of a project, which is defined in this book's introduction and discussed further in Chapter 9.
![]() Tip Though obvious, the critically important discovery phase is sometimes given too little attention. Even a website built only for yourself should begin by you defining your goals. Skipping this step can mean repeating all the other phases as the understanding of needs changes and new needs are discovered late in the process.
Tip Though obvious, the critically important discovery phase is sometimes given too little attention. Even a website built only for yourself should begin by you defining your goals. Skipping this step can mean repeating all the other phases as the understanding of needs changes and new needs are discovered late in the process.
Asking the site initiators (the authors) about their goals for the site reveals that they want people to learn more about The Definitive Guide to Drupal 7 and they want the site to aid conversation and collaboration among multiple authors, readers, and interested Drupalistas.
Overall, the DefinitiveDrupal.org web site (hereafter referred to as the DGD7 site) should complement the book's goals, which include the following:
- Give people of diverse skill backgrounds onramps to going great places with Drupal.
- Help people learn how to learn more on their own.
- Encourage those interested in the Drupal software to participate in the community that makes the software possible.
For the book to meet its goals, it helps if people buy it, so all web site visitors must be able to see basic information about the book, selected and bonus content, and book buying information. Authors need to be able to add, edit, and arrange this information. People must be able to suggest ideas for inclusion in the book or future editions. Later, readers of the book must be able to comment on or ask questions about particular chapters. (These more structured forms of interaction are more sustainable for the authors than a contact form or site-wide forum.) The site must be able to be extended with new features as well as new content, and visitors must be able to sign up to receive updates when important new information about Drupal is added.
![]() Tip Another question the builders of a site should ask early on is where the resources will come from. Who is going to pay for this project—in time, resources, and money? Everyone involved needs to have a sense of what can be accomplished with funding and what can only be achieved with volunteered time.
Tip Another question the builders of a site should ask early on is where the resources will come from. Who is going to pay for this project—in time, resources, and money? Everyone involved needs to have a sense of what can be accomplished with funding and what can only be achieved with volunteered time.
Information Architecture: Exactly What Will You Build?
Once the purpose of a project is well understood, it's time to move onto the next step, information architecture. Discovery is why. Information architecture is what. This phase is sometimes also called specifications or site architecture. Typically, information architecture consists of writing functional requirements and drawing wireframes.
Functional requirements consist of every individual thing the site must do and how each will fit together, stated as clearly and succinctly as possible. Wireframes are quick sketches of where links, forms, features, menus, content, and anything else should be on key pages or sections of the site. Together, functional requirements and wireframes show precisely what the site must do.
With the grounding of the broad goals established in the discovery phase, you can ask the site initiators what they want in the site. You must filter requests based on the already established goals. With the DGD7 site, requests range from a paragraph-by-paragraph annotation tool to making the whole web site look like a book. This is where you must learn—and employ—the most important technique of web development: saying no.
![]() Tip In web development, the question “What do you need?” often comes back as something like “I need a fully 3D pony leaping around the screen and every click on him adds another cup of hot chocolate to the shopping cart and I need it by Tuesday.” It's your job to say no and to help people prioritize their ideas to be in line with their goals and resources.
Tip In web development, the question “What do you need?” often comes back as something like “I need a fully 3D pony leaping around the screen and every click on him adds another cup of hot chocolate to the shopping cart and I need it by Tuesday.” It's your job to say no and to help people prioritize their ideas to be in line with their goals and resources.
As Drupal developers, it is very tempting to say yes to everything, because pretty much everything is possible with Drupal. The missing word is eventually. For the sake of everyone's happiness, it is best to help site initiators keep their vision in mind and build web site features that achieve this vision first. Requirements need to fit into a strategy for what the site's initiators want to accomplish. Explain that time and resources are finite: yes, nearly everything is possible with Drupal, but not all at once. Given the overall goal, what are the most important parts of the site? Which have priority?
With this in mind, we can produce a list of functional requirements for the book site:
- Visitors shall see a prominent mission statement on the front page of the site.
- The authors shall be able to edit and rearrange a public table of contents with optional chapter summaries.
- The authors shall be able to post resources that relate to their chapters and are connected to their chapter summary in the table of contents.
- Registered visitors shall be able to comment on individual resources associated with a chapter.
- Registered users should be able to share suggestions for the book such as tips or warnings, anecdotes about Drupal, or concepts that should be covered.
- The most recent participant-contributed posts and comments should be visible in a side column on every page on the site.
- Authors and other participants shall be able to categorize content to create linkages and organization throughout the site.
- After publication, readers shall be able to register and participate in discussions (grouped by chapter), discover new material, and give feedback.
Functional requirements are frequently more specific than these, but we'll break down these broader ones as we implement each feature. (Note that not all of these features will be built in this chapter.)
With the functional requirements complete, it's time to use wireframes to suggest a basic visual structure for the data on the website (see Figure 1-1). This is an important part of the initial development stage because it lays out the requirements visually, shows how they relate to each other, and helps develop the user interface for the site. If nothing else, wireframes help keep you honest about what will fit on a given page.
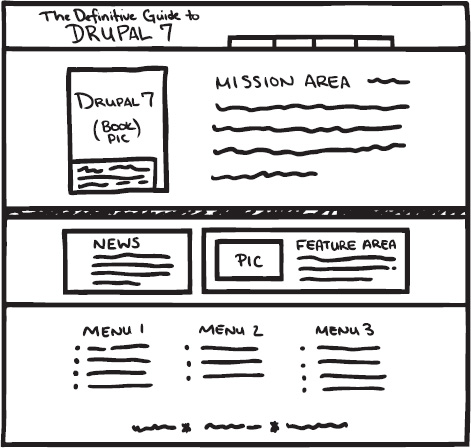
Figure 1-1. Napkin sketch wireframe. Chapter 9 has resources for making slick-looking wireframes, but wireframes can be simple hand-drawn sketches, too.
Exercising the discipline to do wireframes as a first and separate step helps ensure that you do not prematurely close off your options. It is too easy with Drupal to slip from planning what must be done to planning how to do it—or even to starting to configure it. Drupal can be (and often is) used as a rapid prototyping tool, but the separation of phases should be adhered to—no site building yet. Indeed, at the information architecture stage, the use of Drupal to build the site should not yet be a foregone conclusion.
![]() Tip The authors love Drupal, but even they can admit that using Drupal for a one-page site is like setting up a catapult to hand someone a mango.
Tip The authors love Drupal, but even they can admit that using Drupal for a one-page site is like setting up a catapult to hand someone a mango.
Design
When creating a design, remember that Drupal web sites are dynamic. A Drupal design (or, when implemented, theme), acknowledges that every page will have regions, such as header, left sidebar, main content, footer, and so on. A quick glance at the requirements shows that the site needs a sidebar for displaying the most recently added posts and comments (requirement #6). So this region (the sidebar) that contains the recent comments list will need to expand when there are more or longer comment titles. This is why functionality should be defined first; the dynamic areas of a site specified by the functional requirements should be reflected in the wireframes on which the design then builds.
For the DGD7 web site, it makes sense to create a professional, easy-to-read design that is consistent with the Apress style. Theming is covered in Chapters 15 and 16; what is important to note here is that the design you make with a graphics program is not a theme. It is a drawing of what the site should look like after it is built and then themed.
Drupal separates appearance from functionality, and the design phase does not need to take place in this order. Building the site first and designing directly before or even as part of the theming phase may be the way to go (this is the order in the introduction). Regardless of when the design is made, the site should be built based on its functional requirements and wireframes before it is themed (see Figure 1-2).
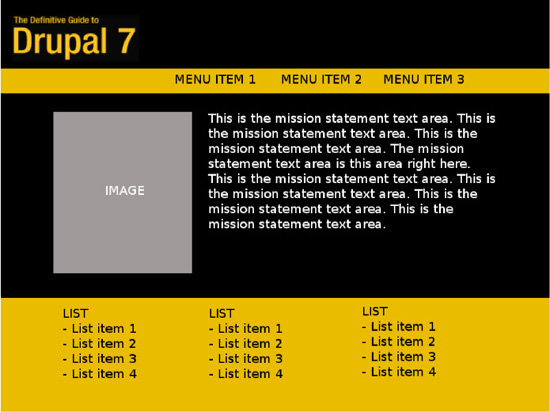
Figure 1-2. A mock-up of the DGD7 home page. It is not a working site, or even HTML; it is only a design, a picture. (The home page has a special arrangement and places recent comments below the main content, rather than in a sidebar.)
![]() Note Design is typically the third step in a project's life-cycle, but thanks to the separation of appearance from content and functionality in Drupal, it can be worked on in parallel with implementing a site's functionality.
Note Design is typically the third step in a project's life-cycle, but thanks to the separation of appearance from content and functionality in Drupal, it can be worked on in parallel with implementing a site's functionality.
Implementation
Now the rubber hits the road. The implementation phase is covered in the balance of this chapter. It includes installing and configuring Drupal to fulfill the plan of the previous phases. After implementation, the remaining phases of site building are commonly broken into the following three:
- Content staging: the writing and uploading of content, which is usually the site initiator's responsibility (with coaching from the site builders).
- Quality assurance: the testing of the site, which should be done by both the site builders and the site initiator.
- Deployment and launch: putting the site or service out in the world for its intended audience and users.
The post-implementation phases are covered more extensively in later chapters (deployment and launch specifically in Chapter 12).
![]() Tip Large projects can be done in iterations of these same basic steps, from discovery to deployment. As you add features to a web site, you will follow these steps over and over again.
Tip Large projects can be done in iterations of these same basic steps, from discovery to deployment. As you add features to a web site, you will follow these steps over and over again.
Installing Drupal
To begin building any Drupal website, you first need to install Drupal. Many different combinations of operating systems (Linux, Windows, Mac OS X), web servers (Apache, IIS, Nginx), and databases (MariaDB/MySQL, PostgreSQL, SQLite) support Drupal. Appendices F through I cover getting set up with a web server and database on several operating systems. Let's move on to the fun stuff.
Putting the Files in Place
Drupal core is hosted as a project on Drupal.org along with thousands of related contributed projects. While Drupal.org highlights direct download links, you can also download Drupal from its project page at http://drupal.org/project/drupal (see Figure 1-3). Like every other project, it has recommended releases, and that's where you can download the latest stable release of Drupal 7.
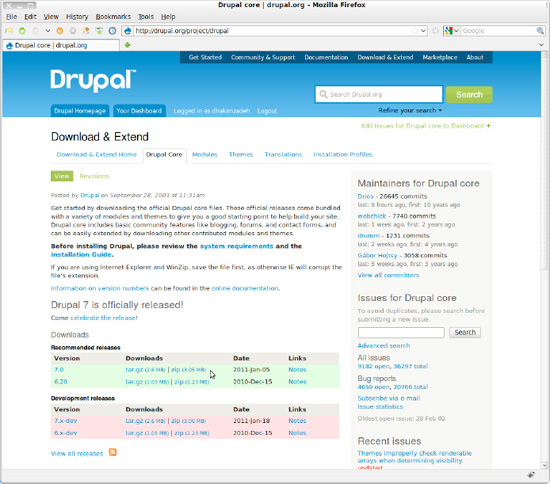
Figure 1-3. Drupal's project page
Where you put your files is determined by your chosen web server setup (see dgd7.org/install). Wherever you unpack your Drupal files, the location where you see index.php and .htaccess is what we refer to as the Drupal root or web root directory.
![]() Tip It is good practice to create a directory for the project (in this case,
Tip It is good practice to create a directory for the project (in this case, dgd7) and put Drupal core into it as a subdirectory (such as dgd7/web). This makes it easy to put everything related to a project—including things that should not be accessible from the web—in version control together (see Chapter 2).
Then go to your Drupal root directory and create a copy of the sites/default/default.settings.php file as sites/default/settings.php (copy, don't move) and change the permissions of the new settings.php file to make it writable by Drupal. Also, create the sites/default/files directory at this time and make it writeable by the web server. OS-specific installation instructions are covered in Appendices F through I; see dgd7.org/install for more resources.
![]() Tip Don't be deterred by any difficulties in getting set up. Really. Installing can be the hardest part. Take the remaining 800 pages of the book as proof that it is possible, and don't give up.
Tip Don't be deterred by any difficulties in getting set up. Really. Installing can be the hardest part. Take the remaining 800 pages of the book as proof that it is possible, and don't give up.
Drupal's Automatic Installer
Now load up your Drupal root directory in your browser (the exact address will be different depending on your local hosting environment). For the recommended Ubuntu instructions, the DGD7 web site will be at http://dgd7.localhost; for a WAMP, MAMP, or a standard LAMP setup, it might be http://localhost/dgd7/web. You will automatically be redirected to install.php, Drupal's automatic installer.
Choose the standard installation profile. (The minimal installation profile doesn't even create the administrator role for you.) Click through the language page; it won't offer any options unless you first get files as described at drupal.org/localize (or, better, begin with the localization-ready distribution of Drupal, drupal.org/project/l10n_install).
Enter in your database settings on the next screen (the values you provided when creating the database). Alternatively, you can choose SQLite and tell Drupal to use a directory that is writeable by your web server, and Drupal will create an SQLite database for you. (The authors don't currently recommend SQLite for a site headed for an important production deployment, but it's great for getting started easily.) Submit the form and Drupal will install itself!
When installation is done (it may take a couple of minutes), you will be able fill in some basic site details and create a username and e-mail address with credentials suitable for the administrative user (called the site maintenance account).
![]() Caution The first user created in the installation process is given permission to do everything on the site, forever. Therefore, it is advised that you do not use this site maintenance account as your own personal account. The site might be just on your computer now, but when you move it online, you'll want to preserve the user accounts. See Chapter 6 on Drupal security for more information, including advice on strong passwords and dealing with Drupal's unique e-mail address per account requirement.
Caution The first user created in the installation process is given permission to do everything on the site, forever. Therefore, it is advised that you do not use this site maintenance account as your own personal account. The site might be just on your computer now, but when you move it online, you'll want to preserve the user accounts. See Chapter 6 on Drupal security for more information, including advice on strong passwords and dealing with Drupal's unique e-mail address per account requirement.
Congratulations, you now have a Drupal site! And it's…completely empty. There is no content at all yet, and Drupal 7 is nice enough to tell you that your home page is empty because there is no front page content (see Figure 1-4). (Front page content means, sensibly enough, content that is marked as “promoted to front page.”) Before we start creating content, however, let's take a look at the Administration menu.

Figure 1-4. Your new, empty home page, including the Drupal toolbar and shortcut bar at the top
Drupal's Administration Menu
Drupal's Administration menu (see Figure 1-5) gives you access to administer every aspect of your Drupal site. The standard installation profile installs the Toolbar module that puts the main sections of the Administration menu at the top of every page of your site. From the toolbar you can do the following:
- Find and add content.
- Build things that affect the site's structure.
- Add and enable themes to change the site's appearance.
- Manage which people can log into your site and what they can do.
- Extend your site's functionality by adding and enabling modules.
- Change default settings and the configuration of everything.
- See reports regarding the status of different things on your site.
- Get helpon all of these topics and tasks.

Figure 1-5. Drupal 7's Administration menu in the toolbar, with the shortcut bar beneath it
Other modules can add links to the Administration menu. Indeed, the Dashboard module, also included in Drupal core and enabled by the standard installation profile, provides a configurable overview of what's happening on your site and adds the dashboard link to the toolbar.
The Shortcut module adds a hideable bar beneath the toolbar that holds bookmarks to any pages you want to make instantly accessible. You can make multiple sets of shortcut links at Administration ![]() Configuration
Configuration ![]() User interface
User interface ![]() Shortcuts (
Shortcuts (admin/config/user-interface/shortcut). Administrators can set which shortcut set a user sees in the user's Shortcuts tab (user/7/shortcuts, for instance, for the user with ID number 7). Alternatively, you can give all people in a role permission to choose their own shortcut set at Administration ![]() People
People ![]() Permissions (
Permissions (admin/people/permissions) with the “Select any shortcut set” permission. (Roles and setting permissions will be covered later in this chapter.) The shortcut bar is visible to users in roles with the “Use the administration toolbar” permission; if they can't see the toolbar, they can't use shortcuts.
![]() Tip Like all core modules, the shortcut bar has additional documentation in the built-in help (
Tip Like all core modules, the shortcut bar has additional documentation in the built-in help (admin/help/shortcut) and online at http://drupal.org/documentation/modules/shortcut.
Appearance: Changing a Core Theme's Color Scheme
Using themes, you can quickly and easily change the overall look and feel of a Drupal website. The design aspect of the DGD7 web site plan calls for the site to have a clean, professional appearance and use the black and yellow color scheme of Apress books. You can see the themes available for your site, currently only core, at Administer ![]() Appearance (
Appearance (admin/appearance). These themes—and more importantly, how to make your own—are described in Chapter 15.
![]() Tip Many, many more themes are available for Drupal for free. Browse
Tip Many, many more themes are available for Drupal for free. Browse drupal.org/project/themes and filter by compatibility with 7.x. One of these, Corolla (drupal.org/project/corolla), was built for inclusion in Drupal 7 core (but wasn't considered sufficiently vetted in time to be included in the core download).
The new default theme for Drupal 7, Bartik, features integration with the Color module. This makes it possible to change the color scheme without touching any code (see Figure 1-6). By following the Settings link, you can select a new color scheme. Choose Slate, a subdued and neutral color scheme (which was the intended default for Bartik before the Drupal community demanded blue).
Slate won't have the yellow called for in the design, but it will be clean and won't be a distraction. In Chapter 15, you'll learn how to create themes. For now, the Bartik theme provides a layout and regions consistent with the wireframes so you can move on to building the website.
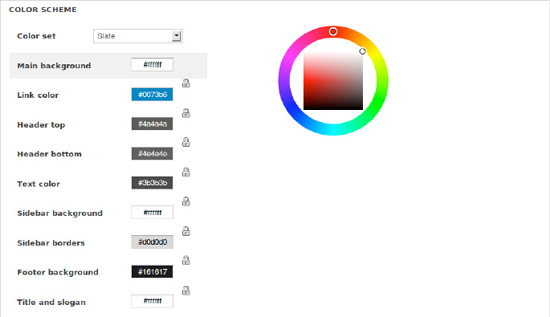
Figure 1-6. Selecting a different color scheme in Bartik's theme settings
![]() Caution Trying to create your own color scheme though the Color module's tempting user interface (UI) is a really good way to make your site look unprofessional. Unless you are sure of what you're doing—or you just don't care—stick with a pre-set color scheme.
Caution Trying to create your own color scheme though the Color module's tempting user interface (UI) is a really good way to make your site look unprofessional. Unless you are sure of what you're doing—or you just don't care—stick with a pre-set color scheme.
Extending Functionality with Modules
Modules can be used to extend Drupal's features and functionality. Core modules are those included with the main download of Drupal, and you can turn on their functionality without installing additional software. Contributed modules—thousands of them—are available on Drupal.org (see Chapter 4). Later in the book you'll even learn how to create your own modules. For now, enabling core modules is a good place to begin. You can do this at the Administration ![]() Modules page (
Modules page (admin/modules).
Allowing People to Register and Log In with OpenID
Enable the OpenID module by selecting the checkbox next to it and submitting the form with the Save configuration button at the bottom (see Figure 1-7).
Figure 1-7. The OpenID module row in the form at admin/modules
![]() Note You will find core modules in alphabetical order (by their system name, which may not be the same as their displayed name) under Core on the modules administration page. As more contributed modules are added to this page, using your browser's in-page search capability (often available with Control+F or Command+F) can be the fastest way to find the module you are looking for.
Note You will find core modules in alphabetical order (by their system name, which may not be the same as their displayed name) under Core on the modules administration page. As more contributed modules are added to this page, using your browser's in-page search capability (often available with Control+F or Command+F) can be the fastest way to find the module you are looking for.
No configuration is needed for OpenID—people will be able to register and log in using their OpenID accounts now. (OpenID is a decentralized standard for authenticating users, allowing users to log on to different services with the same digital identity. Anyone with a Google, Yahoo, LiveJournal, Wordpress.com, MayFirst.org, or AOL.com account has an OpenID; dedicated OpenID providers such as MyOpenID.com and Yiid.com offer free sign-up. See openid.net for more information. You can host your own OpenID, too, and there's a Drupal module for that at drupal.org/project/openid_provider.)
![]() Caution When taking your site online, you will want to set up an anti-spam module (see Chapter 4 for a brief introduction to options such as Captcha, Mollom, and Antispam) or turn off user self-registration (which Drupal has enabled by default, though accounts need to be approved by an administrator).When a CAPTCHA is used, a text riddle or an image that has an audio fallback is preferred for accessibility reasons.
Caution When taking your site online, you will want to set up an anti-spam module (see Chapter 4 for a brief introduction to options such as Captcha, Mollom, and Antispam) or turn off user self-registration (which Drupal has enabled by default, though accounts need to be approved by an administrator).When a CAPTCHA is used, a text riddle or an image that has an audio fallback is preferred for accessibility reasons.
Disabling Unneeded Modules
Introductions to Drupal are mostly all about enabling modules to unleash new functionality, but it can be good to know when to disable a module instead. Disabling unneeded modules reduces the complexity of the site for you, the site builder, and improves the site's performance and scalability. We'll disable two modules, Color and Overlay.
You have already used the Color module to set Bartik's color scheme and you don't need it any more. Banish the temptation! The Overlay module makes it too easy to lose your work (see note). Disable these two modules by unchecking the boxes next to their module names at Administration ![]() Modules (
Modules (admin/modules). Submit the form with the Save configuration button at the bottom.
![]() Note Why disable Overlay? If a user of your site types a thousand-word post into an Add content form (such as
Note Why disable Overlay? If a user of your site types a thousand-word post into an Add content form (such as node/add/page) in Overlay and clicks the “More information about text formats” link before submitting, everything typed is gone forever. Without Overlay, a good browser like Firefox typically preserves whatever data has been entered into a tab. Accidentally click a link? Pressing a back button brings you back to what you've written. Close a tab? Control+Shift+T brings it back—with any data you've typed into it. With Overlay, a single misclick will lose your administrative form changes or an unsubmitted post. (There is a proposed fix for this behavior; see drupal.org/node/655388. If an issue is marked fixed for Drupal 7, you can know the fix will be included in the next point release of Drupal 7 after that date.) If you're using Overlay, at the very least you should disable the administration theme (which uses Overlay) when creating and editing content; see the bottom of the Administration ![]() Appearance (
Appearance (admin/appearance) page for this option. Overlay can also be disabled for individual users on their user Edit forms (such as user/86/edit).
Creating Content Types and Adding Content
As a world-class content management system, Drupal naturally does quite well at managing content. Every piece of content on your Drupal site will belong to one of several content types, and you can create as many of your own content types as you need. Content types make it easy for site editors to update content that you, as a site builder, have made sure will end up displaying in the right way and in the right place.
All content has a title, a creation date, and an author (a user on the site), among other qualities. The content type determines if a piece of content will have a body (main text) field, if it allows comments, and what its default settings are. Most wonderfully, a content type can have any number of fields including text and number fields, file and image fields, listing and option fields, and categories. The particular bundle of fields that you configure for a content type is available to all posts of that content type.
Creating the Suggestion Content Type
For this site, registered users should be able to leave suggestions for concepts to cover in subsequent editions of the book. For this, we'll be creating a new content type called Suggestion and giving registered users permission to create content of this type. To enable people to categorize their suggestions (as a tip, a warning, an anecdote, a module suggestion, etc.), we'll also be creating a taxonomy vocabulary and attaching it to this content type. (This will all be explained below!)
To create the Suggestion content type, click on Structure in the administration toolbar, then select Content types. In the screen that follows, click + Add content type.
![]() Note This book will typically direct you to pages by the breadcrumb trail followed in parenthesis by the relative path you could enter directly in your browser's address bar. For example, Administration
Note This book will typically direct you to pages by the breadcrumb trail followed in parenthesis by the relative path you could enter directly in your browser's address bar. For example, Administration ![]() Structure
Structure ![]() Content types
Content types![]() Add content type (
Add content type (admin/structure/types/add).
Name your new content type Suggestion and add a quick description in the description field. Descriptions are displayed on the Add content page (node/add) and help site editors and users decide if a given content type is the one they want to use. Farther down this form, in the Submission form settings, you can enter an explanation or submission guidelines, which will be shown at the top of the content adding and editing forms. You can always return later to edit anything here. There are no other settings you need to change, and you will be adding fields, so go ahead and press the Save and Add Fields button.
![]() Note For the Suggestion content type, you left comments enabled; this is the default when creating a new content type when the Comment module is enabled. For some content types, such as a news or event listing, you might want to disable comments, which can be done in the Comment settings tab in the vertical tabs at the bottom of the content type add/edit form.
Note For the Suggestion content type, you left comments enabled; this is the default when creating a new content type when the Comment module is enabled. For some content types, such as a news or event listing, you might want to disable comments, which can be done in the Comment settings tab in the vertical tabs at the bottom of the content type add/edit form.
Drupal now takes you to the Manage fields tab for your content type, where you can edit fields, delete fields, re-order fields, and add new and existing fields (see Figure 1-8). (Drupal lets you share fields across content types.) At this point, your content type only has two fields, a title and a body. Although the body field is created by default, you can delete it. The title field is not fully using the field system and is always required.

Figure 1-8. Add a new field to your content type. This field is called Explanation with the machine name field_explanation (the field_ part is automatically prefixed for you).
To enable users to explain how their suggestion fits into the book, make a new field called Explanation. Under the Add new field section, give your new field a label, field name (a machine-readable name), and choose the long text data type. The field label will show up next to the field on the edit form; the field name will identify the field within Drupal. Using the long text data type allows users to submit paragraphs; the text data type is for a single line of input.
![]() Tip Field names are an important part of working in Drupal. Note that they can't be changed once they're set. Pick field names that are both descriptive and short, as exercising the full flexibility of custom theming will make use of these field names. You'll learn theming in Chapters 15 and 16.
Tip Field names are an important part of working in Drupal. Note that they can't be changed once they're set. Pick field names that are both descriptive and short, as exercising the full flexibility of custom theming will make use of these field names. You'll learn theming in Chapters 15 and 16.
Click Save field settings on the next page, as the long text field type has no settings. (You wouldn't be the only one who thinks Drupal ought to skip an unnecessary page here, but currently the issue to fix it is marked for Drupal 8; drupal.org/node/552604.)
On the next page you can configure some settings (see Figure 1-9). You can make it a required field, which will prevent suggestion authors from publishing the suggestion if the field isn't filled out. Add some help text to explain that you want the field to be an explanation. Set the rows to only three to try to convey that the explanation should be short. Set text processing to plain text, since this field is not about presentation. (Both plain text and filtered text will, by default, strip out potentially malicious script tags from published content.) Keep the Number of values at one (unless you think people should be able to submit multiple explanations for one suggestion!), and press Save settings. Your new content type is good to go.
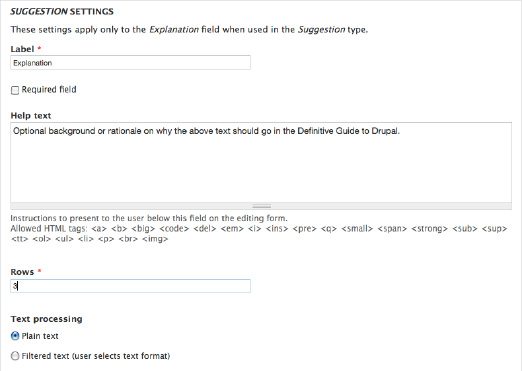
Figure 1-9. Configure settings for a long text field
Creating Content
This book is focused on site building, not using Drupal sites, but you still need to create content sometimes!
Adding a Page with a Human-Readable URL and a Link from the Main Menu
Don't let the long heading fool you; this is a simple task. To fulfill the requirement of a page where people can get information about buying the book, you can create a static page linked from the main menu. You can use the basic page content type provided by Drupal's standard installation profile. Begin by going to Add content ![]() Basic page (
Basic page (node/add/page).
![]() New in 7 The Add content link (formerly Create content in Drupal 6) is available from the shortcut bar beneath the toolbar and from the content administration page, as well as the Navigation menu.
New in 7 The Add content link (formerly Create content in Drupal 6) is available from the shortcut bar beneath the toolbar and from the content administration page, as well as the Navigation menu.
Give the new page a title like Buying the Definitive Guide to Drupal 7 and in the body put in an a link to the book. Powell's and Amazon provided cut-and-paste affiliate links. To embed an image into the text and do other special formatting you will need to change the body field's text format to Full HTML.
Next, in the nifty vertical tabs at the bottom of the form, go to Menu settings and check “Provide a menu” link (see Figure 1-10). Provide a title (the text of the link), a description (the tool-tip people will see if they hover their mouse over it), and a “heavy” (positive) weight to put it toward the right side of the selected <Main menu>, and you are in business.
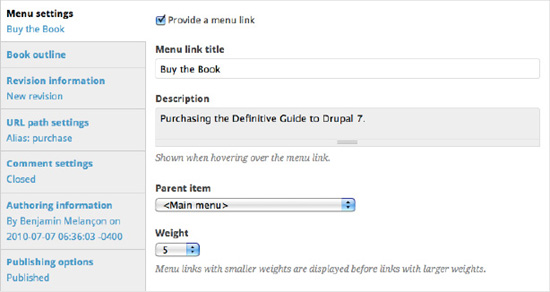
Figure 1-10. Adding a menu link for a basic page
Add a human-friendly URL for the post (which people will see instead of “node/1”, for instance, in their browser's address bar) at the URL path settings tab. Make the URL alias purchase. (Figure 1-10 shows the summary where this has already been done.)
![]() Note You may notice in Figure 1-10 that Revision information indicated “New revision.” This doesn't mean anything when you first create a piece of content, but it's best practice to have your content types set to create new revisions by default. See Chapter 4 for a description of using the Content Type Overview module to set this and other settings for every content type at once.
Note You may notice in Figure 1-10 that Revision information indicated “New revision.” This doesn't mean anything when you first create a piece of content, but it's best practice to have your content types set to create new revisions by default. See Chapter 4 for a description of using the Content Type Overview module to set this and other settings for every content type at once.
Save the new content, and see your link appear to the right of Home in the main menu bar.
Adding a Post and Promoting It to the Front Page
The web site plan calls for the front page to have a brief introduction to the book, which stays above any other posts put on the front page. You can do this in Drupal from the Administration menu: add content as a basic page. Write in what you want for the title and the body. Under Publishing options, check the two unchecked-by-default options: “Promoted to front page” and “Sticky at top of lists”(see Figure 1-11). You now have content that's been promoted to your front page. “Sticky at top of lists” means that the post will “stick” to the top of listing pages, such as the default front page, as new content is added (normally the newest post is displayed first).
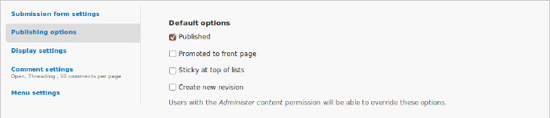
Figure 1-11. The publishing options of a default basic page
![]() Note A common beginning Drupal question is “Where's my content?” because the front page remains blank even after you create content if it is not promoted to front page. In the standard installation profile, the Basic page content type is not set to be promoted to the front page by default. You can always see all the content on a Drupal website by going to Content in the Administration menu (
Note A common beginning Drupal question is “Where's my content?” because the front page remains blank even after you create content if it is not promoted to front page. In the standard installation profile, the Basic page content type is not set to be promoted to the front page by default. You can always see all the content on a Drupal website by going to Content in the Administration menu (admin/content).
Blocks: Creating a Mission Statement
Blocksare pieces of information that can be displayed in the regions of your theme. Blocks can take many forms. Usually they are dynamic lists of information or menus. Drupal 7 provides some default blocks; you can find them on the blocks page at Administration ![]() Structure
Structure ![]() Blocks (
Blocks (admin/structure/block). The blocks page shows all the available blocks and all the regions they can be placed in. If you have multiple themes enabled, you can configure blocks for each enabled theme (and you can always configure blocks for the administration theme, which does not have to be enabled to be used).
The third requirement for the website is for the front page of the site to have a prominent mission statement. To add this, you can create a custom mission statement block. Again, go to Administration ![]() Structure
Structure ![]() Blocks and this time Add block. In the block description field, write“ Mission statement” (this is not shown to site visitors). Leave the block title blank. In the block body, write the mission statement (see Figure 1-12).
Blocks and this time Add block. In the block description field, write“ Mission statement” (this is not shown to site visitors). Leave the block title blank. In the block body, write the mission statement (see Figure 1-12).
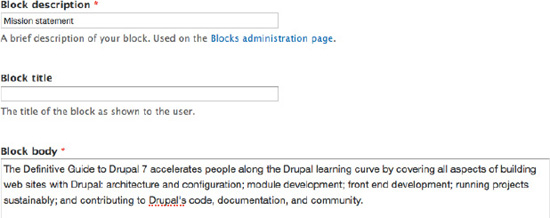
Figure 1-12. The custom block add/edit format (for adding a new block) admin/structure/block/add
![]() New in 7 All prior versions of Drupal since version 4.0 in 2002 had a configuration setting mission statement field under site information. Drupal 7 drops this special-case region for this more flexible approach.
New in 7 All prior versions of Drupal since version 4.0 in 2002 had a configuration setting mission statement field under site information. Drupal 7 drops this special-case region for this more flexible approach.
Move farther down the form to Region settings and place this new block in the Highlighted region; Bartik provides this region for mission statement-like content and it will work nicely. Under Visibility settings, go to the Pages vertical tab and set “Show block on specific pages” to “Only the listed pages” and type <front> in the text area (see Figure 1-13).
![]() Tip Region names can differ between themes, so if you change themes you might have to respecify the correct region for your blocks.
Tip Region names can differ between themes, so if you change themes you might have to respecify the correct region for your blocks.
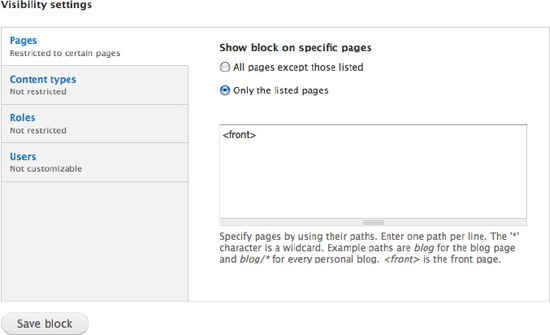
Figure 1-13. Visibility settings for the mission statement block
Finally, submit the form with the Save block button.
![]() Tip Drupal will let you set visibility settings not just for specific pages, but for content types and user roles as well. This is helpful when you only want to show a list of recent blog entries, for example, on all the blog pages but not anywhere else on the site.
Tip Drupal will let you set visibility settings not just for specific pages, but for content types and user roles as well. This is helpful when you only want to show a list of recent blog entries, for example, on all the blog pages but not anywhere else on the site.
One of the DGD7 web site requirements is that the most recent participant-contributed posts and comments should be visible in a side column on every page on the site (see Figure 1-14). Dragging the Recent content and Recent comments blocks to the Sidebar first region (or selecting the region in the drop-down selection for each), and saving the page is all you have to do to check that requirement off as complete (see Figure 1-15).
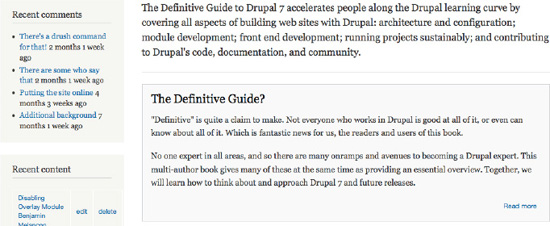
Figure 1-14. The home page contains the recent comments, Mission Statement block, and the first piece of content.
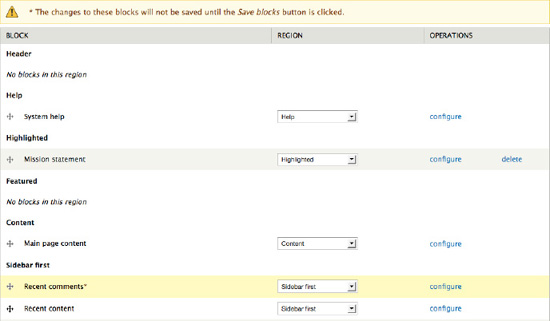
Figure 1-15. The block administration page with the Recent comments block enabled for the Sidebar first region but the form not yet saved
![]() Caution Custom blocks can be deleted, but there is no undo. Be certain you are not mistakenly deleting a block when you really want to disable it temporarily or only for a particular theme. The delete link is out in the open; to disable a block, change the block's region to Noneor Disabled.
Caution Custom blocks can be deleted, but there is no undo. Be certain you are not mistakenly deleting a block when you really want to disable it temporarily or only for a particular theme. The delete link is out in the open; to disable a block, change the block's region to Noneor Disabled.
Taxonomy: Categorizing Content
Drupal allows you to easily classify content using the core Taxonomy module. You can define your own vocabularies (groups of taxonomy terms) and add terms to each vocabulary. Vocabularies can be flat or hierarchical, can allow single or multiple selection, and can also be “free tagging” (meaning that you can add new terms on the fly when creating or editing content). Each vocabulary can then be attached to one or more content types; in this way, nodes on your site can be grouped into categories, tagged, or otherwise classified in any way you choose.
![]() Tip A major use of applying taxonomy terms to content is that content with a given term can then be listed together. Drupal core provides this by default at the path
Tip A major use of applying taxonomy terms to content is that content with a given term can then be listed together. Drupal core provides this by default at the path taxonomy/term/8, where 8 is the taxonomy term ID. (This is the path you go to when you click on a term on a piece of content—it will list that piece of content and any others that have that term. You can use taxonomy to show content in many more ways (see Chapter 3 on the most important of these, Views). For example, you could make events that are listed by format and topic, or album listings that are sorted by music genre.
Let's go back to the requirement that registered users shall be able to share suggestions for the book such as tips or warnings, anecdotes about Drupal, or concepts that should be covered. You've already created the Suggestion content type; now you need to allow it to be categorized.
For organizing all the different types of suggestions the authors will accept for the book, go to Administration ![]() Structure
Structure ![]() Taxonomy (
Taxonomy (admin/structure/taxonomy). Next, create a new vocabulary by clicking + Add vocabulary. Enter a name that is logical; in this case Book element. Click the edit link next to the automatically generated machine name to shorten it to element, as shown in Figure 1-16. In the optional description text field, used for the administrative interface only, put in something like Content or concepts in, or suggested for, the book.

Figure 1-16. Using Taxonomy module to add a Book element vocabulary
Now you can add taxonomy terms to this vocabulary by pressing the + Add term link. Add the following terms:
- Tip
- Note
- Gotcha
- Caution
- Reality
- New in Drupal 7
- Concept
- Anecdote
Next, create another vocabulary called Status and add these terms to it:
- Don't waste pixels on it
- If there's room
- Slated to go in
- Already in the book
Now you need to add a field to your Suggestion content type for each vocabulary. The option for people adding suggestions to select these associated taxonomy terms will then show up right near the title and body fields.
Go to Administration ![]() Structure
Structure ![]() Content types, and click on the Manage fields link for your Suggestion content type. Under Add new field, enter
Content types, and click on the Manage fields link for your Suggestion content type. Under Add new field, enter Book element for your new field's label, enter element for the field name, and select term reference for the data type. This last selection will bring up options in the last column; select “check boxes/radio buttons” for the form element, as shown in Figure 1-17. Click Save.

Figure 1-17. Adding a vocabulary to a content type with term reference field
![]() Note If a “Check boxes/radio buttons” field has a Number of values limit of only one value, it will be radio buttons. If it can have two or more or unlimited values, it will be checkboxes.
Note If a “Check boxes/radio buttons” field has a Number of values limit of only one value, it will be radio buttons. If it can have two or more or unlimited values, it will be checkboxes.
On the configuration page you are brought to after saving, choose the vocabulary called Book elements and click Save field settings. On the next screen, checkmark Required field and save the page.
![]() Tip New in Drupal 7, the same vocabulary can be attached to the same content type twice by adding a new field that references the same vocabulary. This allows, for instance, a Location vocabulary to be used as both the origin and destination of a product content type.
Tip New in Drupal 7, the same vocabulary can be attached to the same content type twice by adding a new field that references the same vocabulary. This allows, for instance, a Location vocabulary to be used as both the origin and destination of a product content type.
Follow the same steps used to add the Book element field to add a Status term reference field for the Status vocabulary to the Suggestion content type. This time, make the field optional by leaving the Required field checkbox unchecked.
With this done, you can test it out by clicking Add content (in the default shortcut bar) and then choosing Suggestion. You'll see the text field for the title and text areas for the body and explanation, followed by the radio buttons for the taxonomy terms. Cool!
You can adjust the order of these fields by returning to the content type's field management page at Administration ![]() Structure
Structure ![]() Content types
Content types ![]() Manage
Manage ![]() Suggestion
Suggestion ![]() Fields(
Fields(admin/structure/types/manage/suggestion/fields). Drag the fields up and down using the cross icon. This affects the field order on Suggestion add and edit forms (the order of fields when displaying can be changed independently at the Display fields tab). Don't forget to click Save.
Now, registered users of DGD7 can add suggestions and classify them, too. Or can they? Nothing in Drupal is finished until you have configured permissions.
Users, Roles, and Permissions
Every visitor to your site is considered a user by Drupal. Users on your site can be assigned permissions via roles. Drupal supports multiple roles, and each user can be assigned to one or more of these roles.
![]() Note Drupal 7 tries to be polite and uses “people” for its administration section, but the term “user” is more correct for a person who uses the site. You will add users and configure user settings.
Note Drupal 7 tries to be polite and uses “people” for its administration section, but the term “user” is more correct for a person who uses the site. You will add users and configure user settings.
A standard installation of Drupal starts out with the following three roles:
- Anonymous user: any visitor to your web site who is not logged in.
- Authenticated user: any visitor to your web site who is logged in.
- Administrator: a role that automatically receives all permissions when a new module is enabled.
The first two roles cannot be deleted; they are needed for Drupal's functioning. The administrator role can be deleted, but you really shouldn't. If you do delete it or you install Drupal with the minimal installation profile, you can choose which role will be the administrator role at Administration ![]() Configuration
Configuration ![]() People
People ![]() Account settings (
Account settings (admin/config/people/accounts).
The more interesting thing about roles is you can create any number of your own custom roles. Each role can be assigned specific permissions that control what the users in that role can or can't do on the site. For example, if you have content editors who should be able to add or edit content, but shouldn't be able to handle other administrative tasks, you would create a role called “editor” and assign appropriate permissions to it.
![]() Tip Giving a permission to the authenticated user role means all other roles receive it. Note, however, that giving a permission to the anonymous user role does not mean that the authenticated role or any other role has that permission. The anonymous user role is entirely separate from the authenticated user role. All other roles require that a user be logged in to have it, however, so they inherit the permissions given to the authenticated user role.
Tip Giving a permission to the authenticated user role means all other roles receive it. Note, however, that giving a permission to the anonymous user role does not mean that the authenticated role or any other role has that permission. The anonymous user role is entirely separate from the authenticated user role. All other roles require that a user be logged in to have it, however, so they inherit the permissions given to the authenticated user role.
On the DGD7 web site, all registered, or authenticated, users should be able to submit suggestions and edit or delete their own suggestions, but they shouldn't be able to edit or delete someone else's suggestion or add other types of content. Authors should be able to add any type of content and edit chapter content. Let's go ahead and do that for book authors.
First you'll need to add an author role. This can be done at Administration ![]() People
People ![]() Permissions
Permissions ![]() Roles (
Roles (admin/people/permissions/roles). On the People administration page, Permissions is the tab farthest to the right and Roles is in the next level of tabs below it(after you click the Permissions tab). In the text field beneath the existing roles type author and press the Add role button, as shown in Figure 1-18.

Figure 1-18. The roles administration screen. You can have many roles on your site.
Next, you assign permissions to the role that tell Drupal what users with that role can and can't do on the site. So that your site has users to have roles assigned to them, you will need to allow anonymous users to sign up, configured at admin/config/people/accounts, or you will need to add users yourself, at admin/people/create.
For Suggestions on the DGD7 website, registered or authenticated users should be able to submit suggestions, but the Status field should be reserved for the book's authors when filtering through the suggestions. Chapter 8 introduces the Field Permissions module for even more fine-grained permissions— making the Status vocabulary field you just created available only to authors and administrators.
To assign permissions, you can click the Edit permissions link next to your newly created role to edit the permissions for that role, or you can edit the permissions for every role at once by clicking back to the Permissions tab. Checking the appropriate boxes in the user role columns will grant role-specific permissions. This will allow all users in the author role to take the actions specified, when they are logged in. Users can have any number of roles, and permissions aggregate across the roles they have.
To finish the Suggestion requirement, scroll down to the Taxonomy section and give authors the ability to edit and delete terms from Status. Authors will also need the following permissions:
- Access the content overview page.
- Create new Basic page content.
- Edit own Basic page content.
- Edit any Basic page content.
- Create new Suggestion content.
- Edit own Suggestion content.
- Edit any Suggestion content.
- Use the administration pages and help.
- Use the administration toolbar.
Once the author role permissions are configured, you can assign users to that role. Clicking on People in the Administration menu will show you a list of users that have registered on the site. You can create accounts for people with the + Add user link. While creating a new user account, you can select roles for that user and ask Drupal to e-mail the person that their account has been created. (Note that people can't use your site and likely can't get e-mail from it until it is online, of course; see Chapter 12.)
![]() Tip You can add or remove a role from many existing users at once by checking the chosen people and using the appropriate option from the Update options drop-down menu. See Figure 1-19.
Tip You can add or remove a role from many existing users at once by checking the chosen people and using the appropriate option from the Update options drop-down menu. See Figure 1-19.
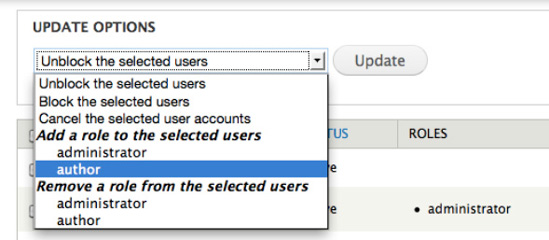
Figure 1-19. Easily change or add roles for multiple users simultaneously on the People page under the Administration menu
Time for a Celebratory Beverage
Congratulations, you have just built a web site using Drupal 7! It might be overwhelming to think that you have only scratched the surface—you have not yet added a single contributed module to Drupal's core functionality—but there's nothing to be worried about. The best way to learn Drupal is to get it installed and start playing around with it. That's what Chapter 1 was all about.
You planned a web site and built it. Specifically, you:
- Installed Drupal 7 locally and configured a core theme.
- Created new content types and taxonomy vocabularies to categorize them.
- Configured blocks and created a custom block to serve as a mission statement.
- Enabled and disabled selected core modules.
- Created a role and configured permissions to give authors and visitors different levels of access to adding and editing content.
In the next chapter we'll cover some essential tools for doing work with Drupal at a high level, Drush and Git. (The important matter of good tools is continued in Chapter 12, which covers setting up your development environment). In Chapter 3, you will move beyond Drupal core with the extremely powerful and versatile Views project. Chapter 4 provides a survey of some contributed extensions (called modules) available for Drupal 7 and some advice on choosing which ones to use. With this new knowledge, building the DGD7 site continues in earnest in Chapter 8.
![]() Note See additional material and ask question questions about this chapter at
Note See additional material and ask question questions about this chapter at dgd7.org/firstsite.