
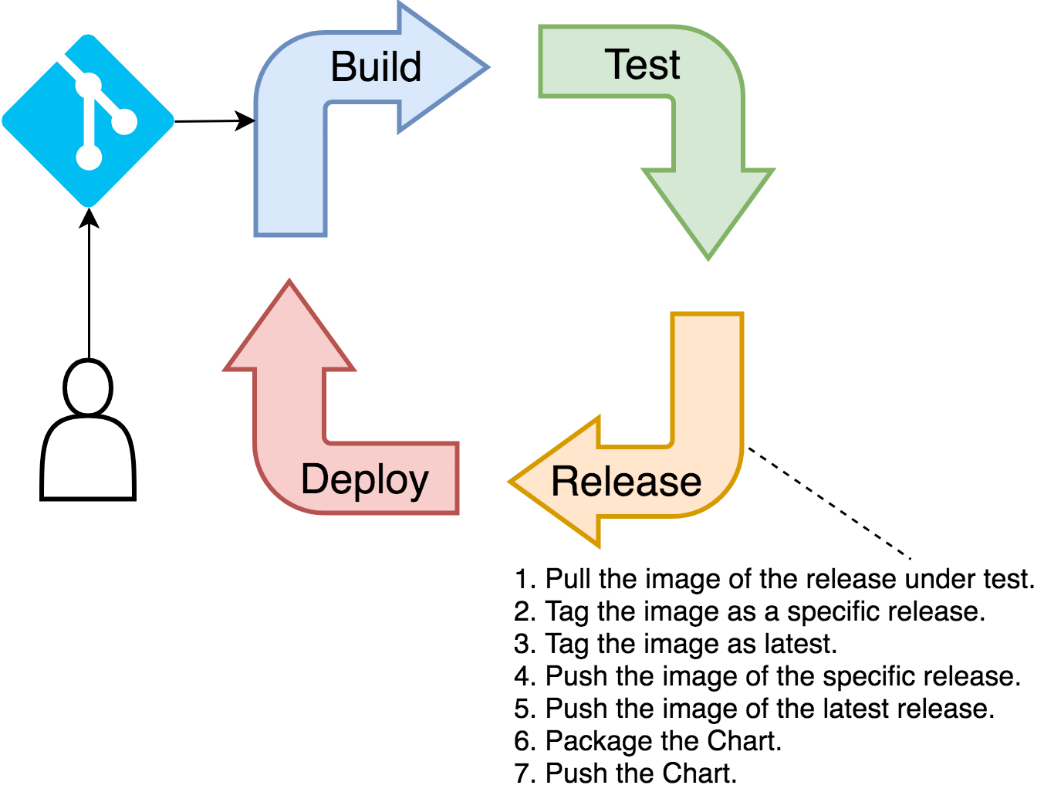
In the release stage, we'll push Docker images to the registry as well as the project's Helm Chart. The images will be tags of the image under test, but this time they will be named using a convention that clearly indicates that they are production- ready.
In the build stage, we're tagging images by including the branch name. That way, we made it clear that an image is not yet thoroughly tested. Now that we executed all sorts of tests that validated that the release is indeed working as expected, we can re-tag the images so that they do not include branch names. That way, everyone in our organization can easily distinguish yet-to-be-tested from production-ready releases.
Since we cannot know (easily) whether the Chart included in the project's repository changed or not, during this stage, we'll push it to ChartMuseum. If the Chart's release number is unchanged, the push will merely overwrite the existing Chart. Otherwise, we'll have a new Chart release as well.
The significant difference between Docker images and Charts is in the way how we're generating releases.
Each commit to the repository probably results in changes to the code, so building new images on each build makes perfect sense. Helm Charts, on the other hand, do not change that often.
One thing worth noting is that we will not use ChartMuseum for deploying applications through Jenkins' pipelines. We already have the Chart inside the repository that we're cloning. We'll store Charts in ChartMuseum only for those that want to deploy them manually without Jenkins. A typical user of those Charts are developers that want to spin up applications inside local clusters that are outside Jenkins' control.
Just as with the previous stages, we are focused only on the essential steps which you should extend to suit your specific needs. Examples that might serve as inspiration for the missing steps are those that would create a release in GitHub, GitLab, or Bitbucket. Also, it might be useful to build Docker images with manifest files in case you're planning on deploying them to different operating system families (for example, ARM, Windows, and so on). Another thing that would be interesting to add is an automated way to create and publish release notes. Don't get your hopes too high because we'll skip those and quite a few other use-cases in an attempt to keep the pipeline simple, and yet fully functional.
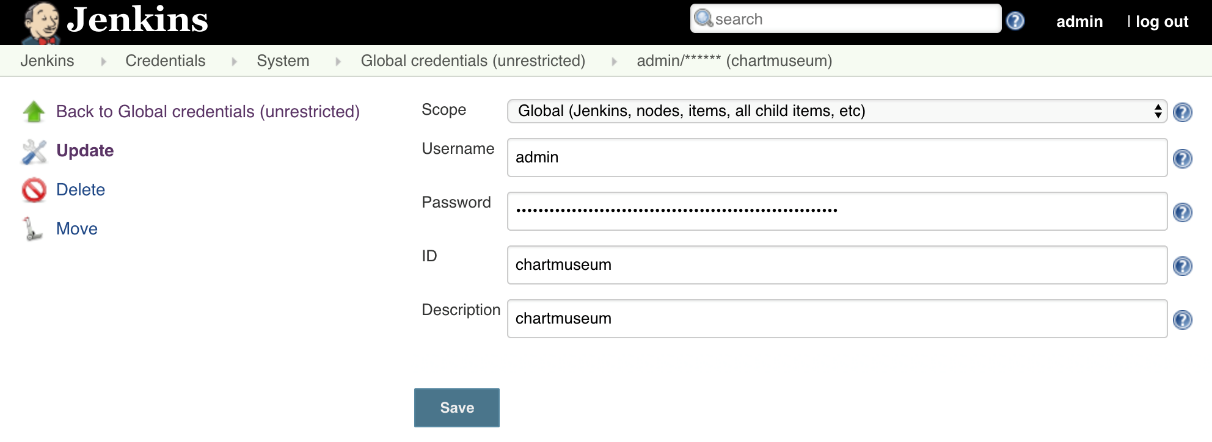
Before we move on, we'll need to create a new set of credentials in Jenkins to store ChartMuseum's username and password.
 1  open
    "http://$JENKINS_ADDR/credentials/store/system/domain/_/newCredentials"
Please type admin as both the Username and the Password. The ID and the Description should be set to chartmuseum. Once finished, please click the OK button to persist the credentials.
Next, we'll retrieve the updated credentials.xml file and store it in the cluster/jenkins directory. That way, if we want to create a new Jenkins instance, the new credentials will be available just as those that we created in the previous chapter.
 1  JENKINS_POD=$(kubectl
 2      -n go-demo-3-jenkins
 3      get pods
 4      -l component=go-demo-3-jenkins-jenkins-master
 5      -o jsonpath='{.items[0].metadata.name}')
 6
 7  echo $JENKINS_POD
 8
 9  kubectl -n go-demo-3-jenkins cp
10      $JENKINS_POD:var/jenkins_home/credentials.xml
11      cluster/jenkins
We retrieved the name of the Pod hosting Jenkins, and we used it to copy the credentials.xml file.
Now we can update the job.
1 open "http://$JENKINS_ADDR/job/go-demo-3/configure"
If you are NOT using minishift, please replace the existing code with the content of the cdp-jenkins-release.groovy (https://gist.github.com/vfarcic/2e89eec6ca991ab676d740733c409d35) Gist.
If you are a minishift user, replace the existing code with the content of the cdp-jenkins-release-oc.groovy (https://gist.github.com/vfarcic/33650e28417ceb1f2f349ec71b8a934d) Gist.
Just as before, we'll explore only the differences between the two pipeline iterations.
 1  ...
 2  env.CM_ADDR = "cm.acme.com"
 3  env.TAG = "${currentBuild.displayName}"
 4  env.TAG_BETA = "${env.TAG}-${env.BRANCH_NAME}"
 5  env.CHART_VER = "0.0.1"
 6  ...
 7      stage("release") {
 8        node("docker") {
 9          sh """sudo docker pull
10            ${env.IMAGE}:${env.TAG_BETA}"""
11          sh """sudo docker image tag
12            ${env.IMAGE}:${env.TAG_BETA}
13            ${env.IMAGE}:${env.TAG}"""
14          sh """sudo docker image tag
15            ${env.IMAGE}:${env.TAG_BETA}
16            ${env.IMAGE}:latest"""
17          withCredentials([usernamePassword(
18            credentialsId: "docker",
19            usernameVariable: "USER",
20            passwordVariable: "PASS"
21          )]) {
22            sh """sudo docker login
23              -u $USER -p $PASS"""
24          }
25          sh """sudo docker image push
26            ${env.IMAGE}:${env.TAG}"""
27          sh """sudo docker image push
28            ${env.IMAGE}:latest"""
29        }
30        container("helm") {
31          sh "helm package helm/go-demo-3"
32          withCredentials([usernamePassword(
33            credentialsId: "chartmuseum",
34            usernameVariable: "USER",
35            passwordVariable: "PASS"
36          )]) {
37            sh """curl -u $USER:$PASS
38              --data-binary "@go-demo-3-${CHART_VER}.tgz"
39              http://${env.CM_ADDR}/api/charts"""
40          }
41        }
42      }
43    }
44  }
Just as before, we declared a few new environment variables. They should be self-explanatory.
We start the steps of the release stage inside the docker node. Since the nodes in AWS and GCP are dynamic, there is no guarantee that it'll be the same agent as the one used in the build stage since we set retention to ten minutes. Typically, that is more than enough time between the two requests for the node. However, some other build might have requested the node in between and, in that case, a new one would be created. Therefore, we cannot
be sure that it's the same physical VM. To mitigate that, the first step is pulling the
image we build previously. That way, we're ensuring that the cache is used in
subsequent steps.
Next, we're creating two tags. One is based on the release (build display name), and the other on the latest. We'll use the more specific tag, while leaving the option to others to use the latest that that points to the last production-ready release.
Further on, we're logging to Docker Hub and pushing the new tags.
Finally, we are switching to the helm container of the podTemplate. Once inside, we are packaging the Chart and pushing it to ChartMuseum with curl. The essential element is the environment variable CHART_VER. It contains the version of the Chart that must correspond to the version in Chart.yaml file. We're using it to know which file to push. Truth be told, we could have parsed the output of the helm package command. However, since Charts do not change that often, it might be less work to update the version in two places than to add parsing to the code. It is true that having the same thing in two places increases the chances of an error by omission. I invite you to a challenge the current design by making a PR that will improve it.
Before we move on, you'll need to make the necessary changes to the values of the environment variables. Most likely, all you need to do is change vfarcic to your Docker Hub and GitHub users as well as acme.com to the value of the environment variable ADDR available in your terminal session.
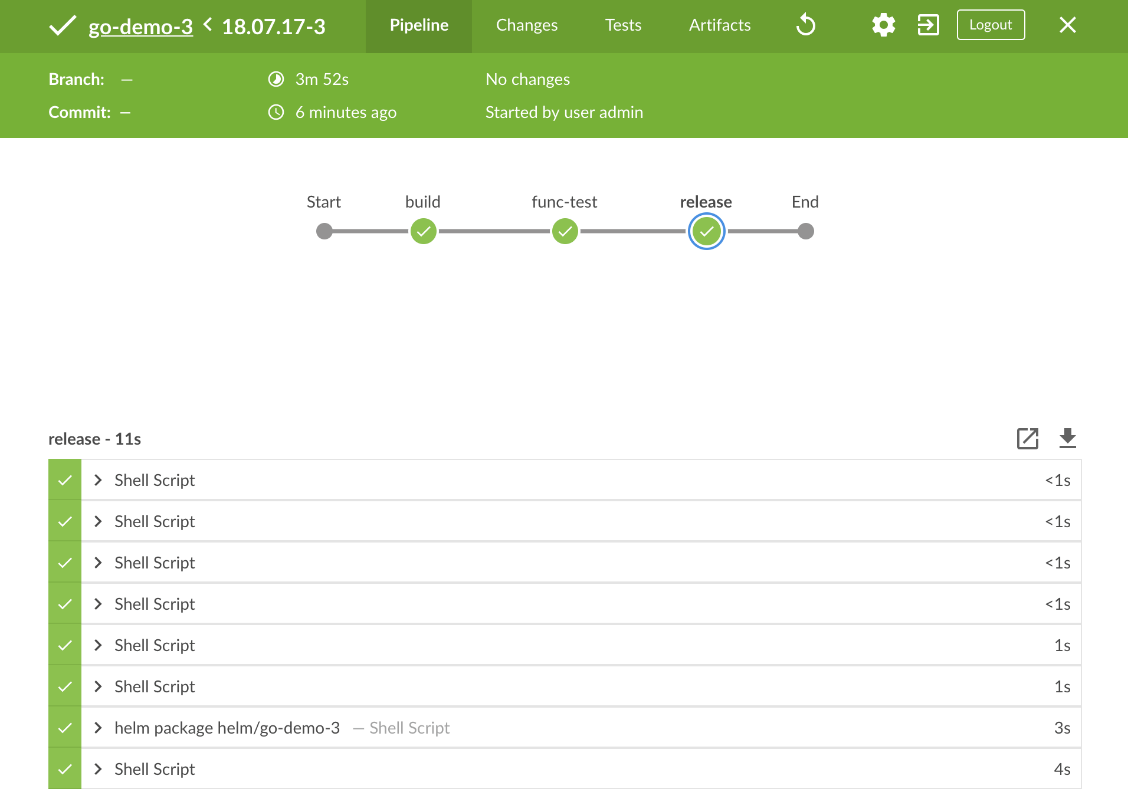
Don't forget to click the Save button to persist the change. After that, follow the same process as before to run a new build by clicking the Open Blue Ocean link from the left-hand menu, followed with the Run button. Click on the row of the new build and wait until it's finished.
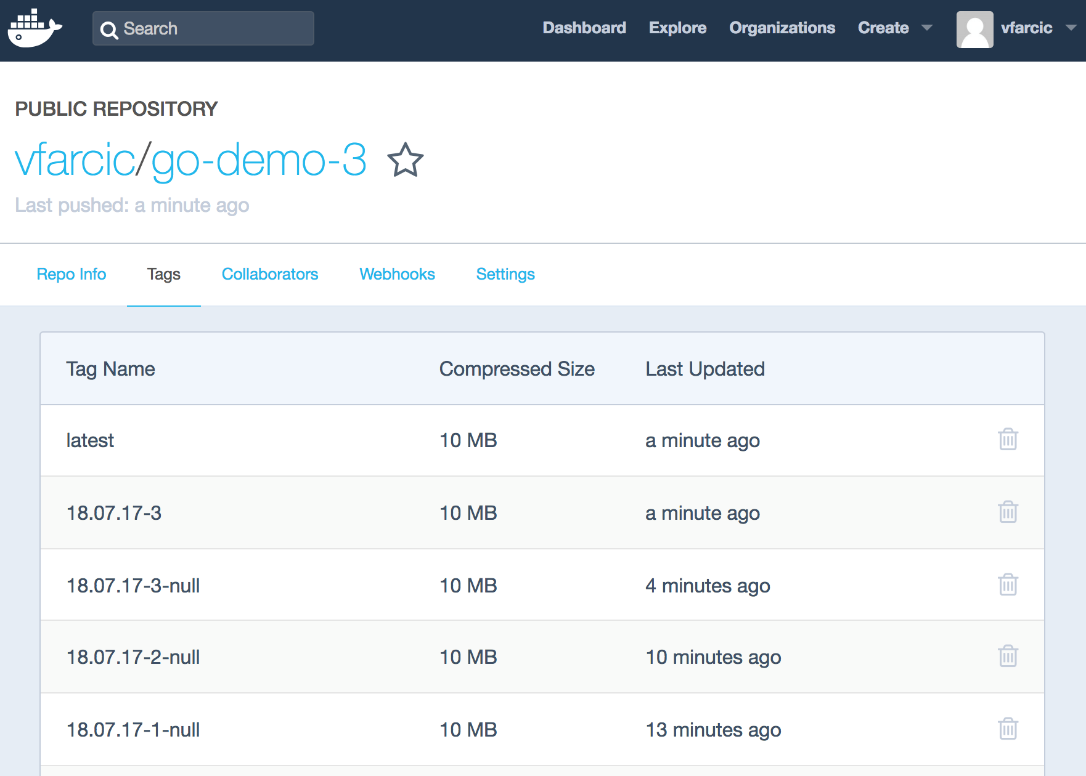
If everything went as expected, we should have a couple of new images pushed to Docker Hub. Let's confirm that.
1 open "https://hub.docker.com/r/$DH_USER/go-demo-3/tags/"
This time, besides the tags based on branches (for now with null), we got two new ones that represent the production-ready release.
Similarly, we should also have the Chart stored in ChartMuseum.
 1  curl -u admin:admin
 2      "http://$CM_ADDR/index.yaml"
The output is as follows.
apiVersion: v1
entries:
  go-demo-3:
  - apiVersion: v1
    created: "2018-07-17T21:53:30.760065856Z"
    description: A silly demo based on API written in Go and MongoDB
    digest: d73134fc9ff594e9923265476bac801b1bd38d40548799afd66328158f0617d8
    home: http://www.devopstoolkitseries.com/
    keywords:
    - api
    - backend
    - go
    - database
    - mongodb
    maintainers:
    - email: [email protected]
      name: Viktor Farcic
    name: go-demo-3
    sources:
    - https://github.com/vfarcic/go-demo-3
    urls:
    - charts/go-demo-3-0.0.1.tgz
    version: 0.0.1
generated: "2018-07-17T21:56:28Z"
Now that we confirmed that both the images and the Chart are being pushed to their registries, we can move onto the last stage of the pipeline.