The pipeline we designed has at least two significant shortcomings. It is not aware of branches, and it is not in source control. Every time we instructed Jenkins to use the git step, it pulled the latest commit from the master branch. While that might be OK for demos, it is unacceptable in real-world situations. Our pipeline must pull the commit that initiated a build from the correct branch. In other words, no matter where we push a commit, that same commit must be used by the pipeline.
If we start processing all commits, no matter from which branch they're coming, we will soon realize that it does not make sense always to execute the same stages. As an example, the release and deploy stages should be executed only if a commit is made to the master branch. Otherwise, we'd create a new production release always, even if the branch is called i-am-bored-so-i-decided-to-experiment. As you can imagine, that is not what we'd like to happen.
Moving onto the second issue with the current pipeline...
I have a mantra that I already repeated quite a few times in this book. Everything we do, no matter whether its code, a configuration, or a properties file, must be in version control. I even go as far as to say that if someone finds something on some server that is not stored in version control, that person has full rights to remove that something. "If it's not in Git, it does not exist." It's as simple as that. Everything else can be considered "hocus-pocus, ad-hoc, nobody knows what was done" type of things. CD pipeline is code and, as such, it must be stored in version control. There can be no exceptions.
Fortunately, we can solve those problems through a combination of Jenkinsfiles, Multistage builds, and a bit of refactoring.
Let's take a look at Jenkinsfile located in the root of go-demo-3 repository.
1 cat ../go-demo-3/Jenkinsfile
The output is as follows.
import java.text.SimpleDateFormat

def props
def label = "jenkins-slave-${UUID.randomUUID().toString()}"
currentBuild.displayName = new SimpleDateFormat("yy.MM.dd").format(new Date()) + "-" + env.BUILD_NUMBER

podTemplate(
  label: label,
  namespace: "go-demo-3-build",
  serviceAccount: "build",
  yaml: """
apiVersion: v1
kind: Pod
spec:
  containers:
  - name: helm
    image: vfarcic/helm:2.9.1
    command: ["cat"]
    tty: true
    volumeMounts:
    - name: build-config
      mountPath: /etc/config
  - name: kubectl
    image: vfarcic/kubectl
    command: ["cat"]
    tty: true
  - name: golang
    image: golang:1.12
    command: ["cat"]
    tty: true
  volumes:
  - name: build-config
    configMap:
      name: build-config
"""
) {
  node(label) {
    stage("build") {
      container("helm") {
        sh "cp /etc/config/build-config.properties ."
        props = readProperties interpolate: true, file: "build-config.properties"
      }
      node("docker") {
        checkout scm
        k8sBuildImageBeta(props.image)
      }
    }
    stage("func-test") {
      try {
        container("helm") {
          checkout scm
          k8sUpgradeBeta(props.project, props.domain, "--set replicaCount=2 --set dbReplicaCount=1")
        }
        container("kubectl") {
          k8sRolloutBeta(props.project)
        }
        container("golang") {
          k8sFuncTestGolang(props.project, props.domain)
        }
      } catch(e) {
          error "Failed functional tests"
      } finally {
        container("helm") {
          k8sDeleteBeta(props.project)
        }
      }
    }
    if ("${BRANCH_NAME}" == "master") {
      stage("release") {
        node("docker") {
          k8sPushImage(props.image)
        }
        container("helm") {
          k8sPushHelm(props.project, props.chartVer, props.cmAddr)
        }
      }
      stage("deploy") {
        try {
          container("helm") {
            k8sUpgrade(props.project, props.addr)
          }
          container("kubectl") {
            k8sRollout(props.project)
          }
          container("golang") {
            k8sProdTestGolang(props.addr)
          }
        } catch(e) {
          container("helm") {
            k8sRollback(props.project)
          }
        }
      }
    }
  }
}
Due to differences between OpenShift and other Kubernetes flavors, you'll have to explore the file called Jenkinsfile.oc. It contains a few OpenShift-specific differences we commented earlier.
As you can see, the content of Jenkinsfile is a pipeline similar to the one we previously created in Jenkins. Soon we'll discover how to tell Jenkins to use that file instead. For now, we'll explore the differences between the pipeline we defined in Jenkins and the one available in Jenkinsfile.
On the first inspection, you might say that both pipelines are the same. Take a closer look, and you'll notice that there are quite a few differences. They might be subtle, but they are important nevertheless.
The first difference is that there are no environment variables. Instead, there
is a single variable props. We'll have to fast forward to the build stage to see
its usage.
We added a set of new steps to the build stage. We are using readProperties to read the build-config.properties file and store interpolated values to the props variable. There is a bug in Jenkins that prevents us from using absolute paths so before we readProperties, we copy the file from /etc/config/ to the current directory.
If you go back to the podTemplate definition, you'll notice that the helm container has a mount to the directory /etc/config. Further down, the same volume is defined as configMap. In other words, we're injecting the build-config.properties file as Kubernetes ConfigMap and using its content to interpolate all the variables we need.
You don't have to use ConfigMap. It could be a Secret, or it could be a file located in the code repository. It does not matter how the file gets there, but that it contains the values we'll need for our pipeline. Those are the same ones we defined previously as environment variables. In my opinion, that's a much more elegant and easier way to define them. If you do not like the idea of a properties file, feel free to continue using environment variables as we did in previous iterations of the pipeline.
The next significant difference is that we changed git steps with checkout scm. Later on, we'll establish a connection between pipeline jobs and repositories and branches, and Jenkins will know which repository, which branch, and which commit to pull. Until now, we were always pulling HEAD of the master branch, and that is, obviously, apparently. We'll see how checkout scm works later on. For now, just remember that Jenkins will know what to pull with that instruction.
The step directly below checkout scm features the usage of readProperties step we declared earlier. Since we specified interpolate: true, Jenkins converted each property into a different variable or, to be more precise, a separate map entry.
We're leveraging that with steps like k8sBuildImageBeta(props.image) where props.image is one of the interpolated property keys.
The rest of the pipeline is the same as what we had before, except that environment variables are replaced with props.SOMETHING variables.
There is one more important difference though. Two of the stages (release and deploy) are now enveloped in an if ("${BRANCH_NAME}" == "master") block. That allows us to control which parts of the pipeline are always executed, and which will run only if the branch is master. You might choose different conditions. For our use case, the logic is straightforward. If a commit (or a merge) is done to master, we want to execute the whole pipeline that, ultimately, upgrades the production release. All the other branches (typically feature branches), should only validate whether the commit works as expected. They should not make a (production) release, nor they should deploy to production.
Please replace Jenkinsfile with Jenkinsfile.oc, commit the change, and push it to the forked repository. You'll have to repeat the same step for all the branches.
Now that we know that our pipeline needs a ConfigMap named go-demo-3-build, our next step will be to create it. We already have a YAML file in the application's repository.
1 cat ../go-demo-3/k8s/build-config.yml
The output is as follows.
kind: ConfigMap
apiVersion: v1
metadata:
  creationTimestamp: 2016-02-18...
  name: build-config
  namespace: go-demo-3-build
data:
  build-config.properties: |
    project=go-demo-3
    image=vfarcic/go-demo-3
    domain=acme.com
    addr=go-demo-3.acme.com
    cmAddr=cm.acme.com
    chartVer=0.0.1
If you focus on the build-config.properties data entry, you'll notice that it contains similar values as those we used before as environment variables. Obviously, we won't be able to create the ConfigMap as-is since we need to replace acme.com with the address and vfarcic with your Docker Hub user. We'll use a bit of sed magic to modify the YAML before passing it to kubectl.
 1  cat ../go-demo-3/k8s/build-config.yml
 2      | sed -e "[email protected]@$ADDR@g"
 3      | sed -e "s@vfarcic@$DH_USER@g"
 4      | kubectl apply -f - --record
We'll replace the Jenkins job we used so far with a different kind, so our next step is to delete it.
1 open "http://$JENKINS_ADDR/job/go-demo-3/"
Please click the Delete Pipeline link and confirm the action.
Now we are ready to create a job in the way we should have done it all along if we didn't need a playground that allows us to modify a pipeline easily.
1 open "http://$JENKINS_ADDR/blue/create-pipeline"
Please select GitHub, and you'll be asked for Your GitHub access token. If you do NOT have a token at hand, please click the Create an access token here link, and you will be redirected to the page in GitHub that is already preconfigured with all the permissions the token needs. All you have to do is type Token description. Anything should do. Feel free to type jenkins if today is not your creative day. Click the Generate token button at the bottom.
You'll see the newly generated token. Make sure to copy it and, optionally, save it somewhere. This is the first, and the last time you will see the value of the token.
Go back to Jenkins UI, paste the token into the Your GitHub access token field, and click the Connect button.
Next, we need to select the organization. You might have multiple entries if you are an active GitHub user. Choose the one where you forked go-demo-3 repository.
Once you selected the organization, you'll see the list of all the repositories you own. Select go-demo-3. If there are too many, you can use the Search... field to filter the results.
The only thing left is to click the Create Pipeline button, and Jenkins will start creating new jobs. There will be one for each branch. You should, as a minimum, see three; master, feature-3, and feature-4. If we add a Webhook to our GitHub repository, Jenkins would be notified every time we create a new branch, and it would create a corresponding job. Similarly, when we delete a branch, the job would be removed as well.
Unfortunately, we might not be able to create a Webhook for our examples. At least, not for all of you. Those that are running a local cluster using Docker for Mac or Windows, minikube, or minishift, do not have an IP that is reachable from GitHub. Since I don't want to discriminate against those that run a cluster locally from those running it in one of the Cloud providers, I'll skip providing detailed instructions. Instead, when you translate lessons learned from this book into your production cluster, please follow the instructions from GitHub Webhook: Pipeline Multibranch (https://support.cloudbees.com/hc/en-us/articles/115003019232-GitHub-Webhook-Pipeline-Multibranch) (jump to the Validate GitHub WebHook section). Google is your friend if you prefer using GitLab, Bitbucket, or some other Git solution.
Going back to Jenkins...
The first build of each job that corresponds to a different branch or a pull request is running. You can click on the Branches tab if you are interested only in jobs based on branches. Similarly, you can click on the Pull Requests tab to see the PRs. I did create a few pull requests in the vfarcic/go-demo-3 repository, but they were not transferred to your fork. For now, you'll need to trust me when I say that new jobs will be created for each PR, as long as there is a GitHub Webhook that will notify Jenkins when you create them.
The communication between GitHub and Jenkins goes both ways. On the one hand, GitHub is notifying Jenkins whenever we created a new branch, commit something, or if we perform any other action configured through Webhooks. On the other hand, Jenkins will notify GitHub with a status of a build. A good example is a pull request. If we'd have one, would see that the state of the corresponding build would be available in PRs screen. We'd see both the activity while the build is running, as well as the outcome once it's finished.

Please note that each of the jobs based on different branches are now using checkout scm in their pipelines. Since now Jenkins keeps tracks of repositories, branches, and commits, there is no need for us to be explicit through steps like git. When a job is triggered by a commit, and Jenkins is notified via a webhook, it'll make sure it is that specific commit that is checked out. This by itself is a significant advantage of using Jenkins' multistage builds. Please note that when triggered manually, checkout scm will checkout the latest commit of the branch and the repository the job is pointing at.
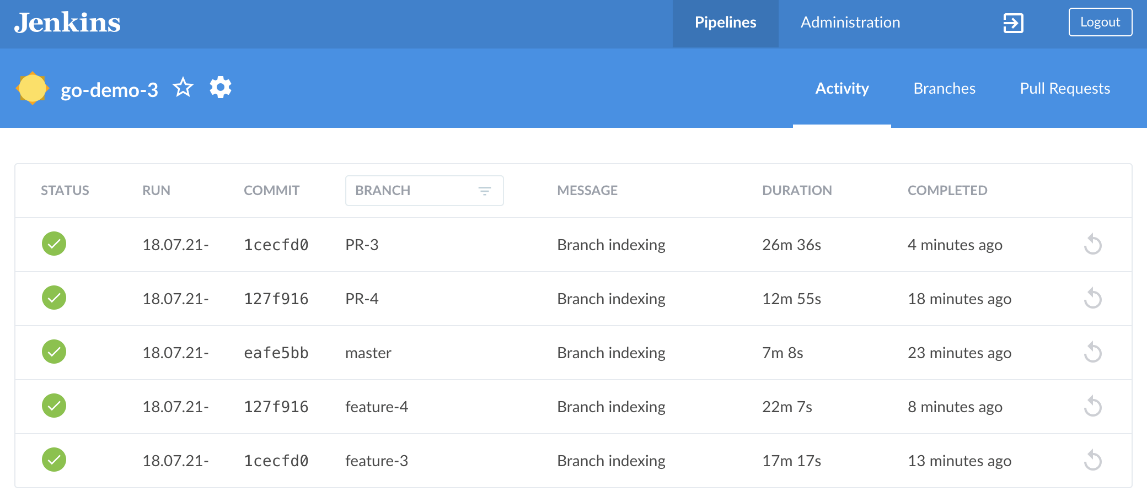
The Activity tab shows all the builds, independently whether they come from a branch or a pull request.
We have a problem though. The go-demo-3-build Namespace does not have enough capacity to run more than one build at a time. I did my best to keep ResourceQuotas and overall cluster capacity to a minimum so that the cost for those running in Cloud is as small as possible. For those running a local cluster, we have limits of your laptops which we are probably already stretching to the limit.
Small capacity of our cluster and quotas is not really a big deal if we have enough patience. One of the builds is running while others are waiting in a queue. Once the first build is finished, the second one will start, and then the third, all the way until all the builds are completed. So, we'll have to be patient.
Please wait until a build of a feature branch is finished (for example, feature-3 or feature-4). Click on the row that represents that build and observe the stages. You'll notice that there are only two (build and func-test). The second half of the pipeline (release and deploy) was not executed since the if condition did not evaluate to true.
Similarly, once the build of the master branch is finished, enter inside it and observe that all the stages were executed thus upgrading our production release. Feel free to go to your cluster and confirm that a new Helm revision was created and that new Pods are running. Similarly, a new image should be available in Docker Hub.