
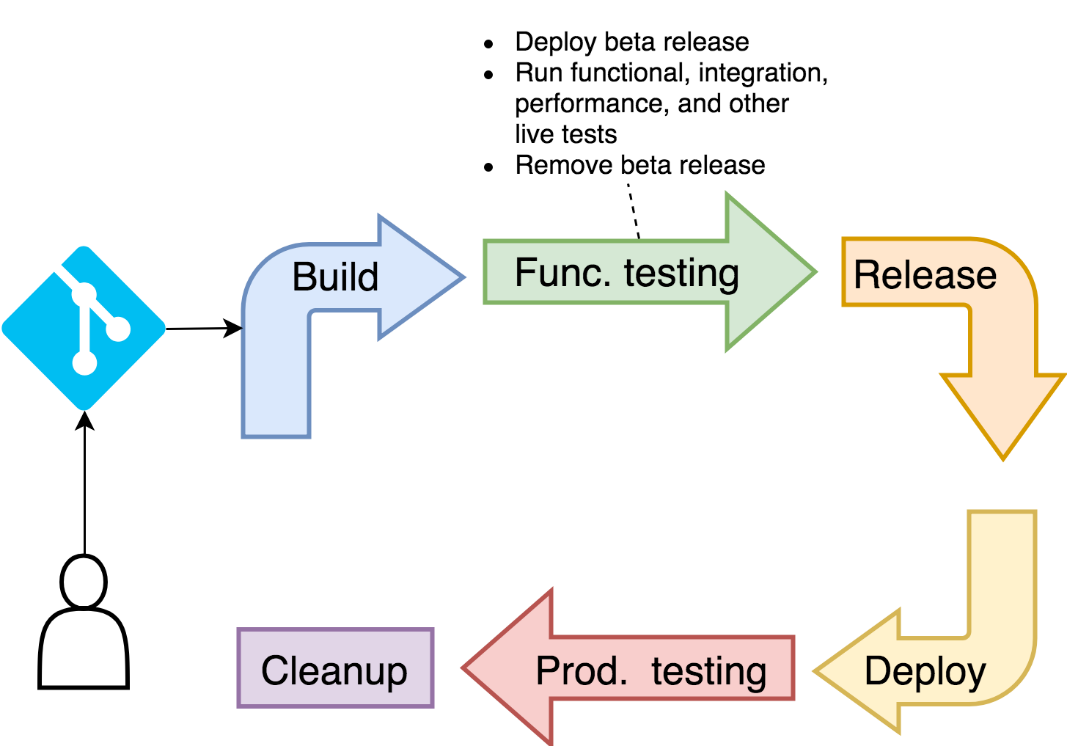
Which steps do we need to execute in the functional testing phase? We need to deploy the new release of the application. Without it, there would be nothing to test. All the static tests were already executed when we built the image, so everything we do from now on will need a live application.
Deploying the application is not enough, we'll have to validate that at least it rolled out successfully. Otherwise, we'll have to abort the process.
We'll have to be cautious how we deploy the new release. Since we'll run it in the same cluster as production, we need to be careful that one does not affect the other. We already have a Namespace that provides some level of isolation. However, we'll have to be attentive not to use the same path or domain in Ingress as the one used for production. The two need to be accessible separately from each other until we are confident that the new release meets all the quality standards.
Finally, once the new release is running, we'll execute a set of tests that will validate it. Please note that we will run functional tests only. You should translate that into "in this stage, I run all kinds of tests that require a live application." You might want to add performance and integration tests as well. From the process point of view, it does not matter which tests you run. What matters is that in this stage you run all those that could not be executed statically when we built the image.
If any step in this stage fails, we need to be prepared to destroy everything we did and leave the cluster in the same state as before we started this stage. We'll postpone exploration of rollback steps until one of the next chapters. I'm sure you know how to do it anyway. If you don't, I'll leave you feeling ashamed until the next chapter.
As you probably guessed, we'll need to go into the kubectl container for at least some of the steps in this stage. It is already running as part of the cd Pod.
Remember, we are performing a manual simulation of a CDP pipeline. We must assume that everything will be executed from inside the cluster, not from your laptop.
 1  kubectl -n go-demo-3-build
 2      exec -it cd -c kubectl -- sh
The project contains separate definitions for deploying test and production releases. For now, we are interested only in prior which is defined in k8s/build.yml.
1 cat k8s/build.yml
We won't comment on all the resources defined in that YAML since they are very similar to those we used before. Instead, we'll take a quick look at the differences between a test and a production release.
1 diff k8s/build.yml k8s/prod.yml
The two are almost the same. One is using go-demo-3-build Namespace while the other works with go-demo-3. The path of the Ingress resource also differs. Non-production releases will be accessible through /beta/demo and thus provide separation from the production release accessible through /demo. Everything else is the same.
It's a pity that we had to create two separate YAML files only because of a few differences (Namespace and Ingress). We'll discuss the challenges behind rapid deployments using standard YAML files later. For now, we'll roll with what we have.
Even though we separated production and non-production releases, we still need to modify the tag of the image on the fly. The alternative would be to change release numbers with each commit, but that would represent a burden to developers and a likely source of errors. So, we'll go back to exercising "magic" with sed.
 1  cat k8s/build.yml | sed -e
 2      "s@:latest@:1.0-beta@g" |
 3      tee /tmp/build.yml
We output the contents of the /k8s/build.yml file, we modified it with sed so that the 1.0-beta tag is used instead of the latest, and we stored the output in /tmp/build.yml.
Now we can deploy the new release.
 1  kubectl apply
 2      -f /tmp/build.yml --record
 3
 4  kubectl rollout status deployment api
We applied the new definition and waited until it rolled out.
Even though we know that the rollout was successful by reading the output, we cannot rely on such methods when we switch to full automation of the pipeline. Fortunately, the rollout status command will exit with 0 if everything is OK, and with a different code if it's not.
Let's check the exit code of the last command.
1 echo $?
The output is 0 thus confirming that the rollout was successful. If it was anything else, we'd need to roll back or, even better, quickly fix the problem and roll forward.
GKE uses external load balancer as Ingress. To work properly, the type of the service related to Ingress needs to be NodePort. Since most of the other Kubernetes flavors do not need it, I kept it as ClusterIP (the default type). We'll have to patch the service. Please execute the command that follows:
kubectl -n go-demo-3-build patch svc api -p '{"spec":{"type": "NodePort"}}'
Since OpenShift does not support Ingress (at least not by default), we'll need to add a Route. Please execute the commands that follow:
exit
kubectl -n go-demo-3-build exec -it cd -c oc -- sh
oc apply -f k8s/build-oc.yml
We exited kubectl container, entered into oc, and deployed the route defined in k8s/build-oc.yml.
The only thing missing in this stage is to run the tests. However, before we do that, we need to find out the address through which the application can be accessed.
Please change hostname to ip in the command that follows. The jsonpath should be {.status.loadBalancer.ingress[0].ip}. GKE Ingress spins up an external load balancer, and it might take a while until the IP is generated. Therefore, you might need to repeat the modified command that follows until you get the IP.
Please open a separate terminal session and execute minikube ip. Remember the output. Change the command that follows to ADDR=[...]/beta where [...] is the IP you just retrieved.
Please change the command that follows to ADDR=$(oc -n go-demo-3-build get routes -o jsonpath="{.items[0].spec.host}").
 1  ADDR=$(kubectl -n go-demo-3-build
 2      get ing api
 3      -o jsonpath="{.status.loadBalancer.ingress[0].hostname}")/beta
 4
 5  echo $ADDR | tee /workspace/addr
 6
 7  exit
We retrieved the hostname from Ingress with the appended path (/beta) dedicated to beta releases. Further on, we stored the result in the /workspace/addr file. That way we'll be able to retrieve it from other containers running in the same Pod. Finally, we exited the container since the next steps will require a different one.
Let's go inside the golang container. We'll need it to execute functional tests.
 1  kubectl -n go-demo-3-build
 2      exec -it cd -c golang -- sh
Before we run the functional tests, we'll send a request to the application manually. That will give us confidence that everything we did so far works as expected.
1 curl "http://$(cat addr)/demo/hello"
We constructed the address using the information we stored in the addr file and sent a curl request. The output is hello, world!, thus confirming that the test release of application seems to be deployed correctly.
The tests require a few dependencies, so we'll download them using the go get command. Don't worry if you're new to Go. This exercise is not aimed at teaching you how to work with it, but only to show you the principles that apply to almost any language. In your head, you can replace the command that follows with maven this, gradle that, npm whatever.
1 go get -d -v -t
The tests expect the environment variable ADDRESS to tell them where to find the application under test, so our next step is to declare it.
1 export ADDRESS=api:8080
In this case, we chose to allow the tests to communicate with the application through the service called api.
Now we're ready to execute the tests.
1 go test ./... -v --run FunctionalTest
The output is as follows.
=== RUN   TestFunctionalTestSuite
=== RUN   TestFunctionalTestSuite/Test_Hello_ReturnsStatus200
2018/05/14 14:41:25 Sending a request to http://api:8080/demo/hello
=== RUN   TestFunctionalTestSuite/Test_Person_ReturnsStatus200
2018/05/14 14:41:25 Sending a request to http://api:8080/demo/person
--- PASS: TestFunctionalTestSuite (0.03s)
    --- PASS: TestFunctionalTestSuite/Test_Hello_ReturnsStatus200
(0.01s)
    --- PASS: TestFunctionalTestSuite/Test_Person_ReturnsStatus200
(0.01s)
PASS
ok      _/go/go-demo-3  0.129s
We can see that the tests passed, and we can conclude that the application is a step closer towards production. In a real-world situation, you'd run other types of tests or maybe bundle them all together. The logic is still the same. We deployed the application under test while leaving production intact, and we validated that it behaves as expected. We are ready to move on.
Testing an application through the service associated with it is a good idea, if for some reason we are not allowed to expose it to the outside world through Ingress. If there is no such restriction, executing the tests through a DNS which points to an external load balancer, which forwards to the Ingress service on one of the worker nodes, and from there load balances to one of the replicas, is much closer to how our users access the application. Using the "real" externally accessible address is a better option when that is possible, so we'll change our ADDRESS variable and execute the tests one more time.
 1  export ADDRESS=$(cat addr)
 2
 3  go test ./... -v --run FunctionalTest
Docker for Mac or Windows cluster is accessible through localhost. Since localhost has a different meaning depending on where it is invoked, the tests will fail by trying to access the application running inside the container from where we're running the tests. Please ignore the outcome and stick with using Service names (for example, api) when running tests on Docker for Mac or Windows.
We're almost finished with this stage. The only thing left is to exit the golang container, go back to kubectl, and remove the application under test.
 1  exit
 2
 3  kubectl -n go-demo-3-build
 4      exec -it cd -c kubectl -- sh
 5
 6  kubectl delete
 7      -f /workspace/k8s/build.yml
The Route we created through build-oc.yml is still not deleted. For the sake of simplicity, we'll ignore it (for now) since it does not occupy almost any resources.
We exited the golang container and entered into kubectl to delete the test release.
Let's take a look at what's left in the Namespace.
1 kubectl -n go-demo-3-build get all
The output is as follows.
NAME  READY STATUS  RESTARTS AGE
po/cd 4/4   Running 0        11m
Our cd Pod is still running. We will remove it later when we're confident that we don't need any of the tools it contains.
There's no need for us to stay inside the kubectl container anymore, so we'll exit.
1 exit