
One of the significant disadvantages of the script we used inside my-k8s-job is that it runs in the same Namespace as Jenkins. We should separate builds from Jenkins and thus ensure that they do not affect its stability.
We can create a system where each application has two namespaces; one for testing and the other for production. We can define quotas, limitations, and other things we are used to defining on the Namespace level. As a result, we can guarantee that testing an application will not affect the production release. With Namespaces we can separate one set of applications from another. At the same time, we'll reduce the chance that one team will accidentally mess up with the applications of the other. Our end-goal is to be secure without limiting our teams. By giving them freedom in their own Namespace, we can be secure without impacting team's performance and its ability to move forward without depending on other teams.
Let's go back to the job configuration screen.
1 open "http://$JENKINS_ADDR/job/my-k8s-job/configure"
Please click the Pipeline tab and replace the script with the one that follows.
 1  podTemplate(
 2      label: "kubernetes",
 3      namespace: "go-demo-3-build",
 4      serviceAccount: "build",
 5      yaml: """
 6  apiVersion: v1
 7  kind: Pod
 8  spec:
 9    containers:
10    - name: kubectl
11      image: vfarcic/kubectl
12      command: ["sleep"]
13      args: ["100000"]
14    - name: oc
15      image: vfarcic/openshift-client
16      command: ["sleep"]
17      args: ["100000"]
18    - name: golang
19      image: golang:1.12
20      command: ["sleep"]
21      args: ["100000"]
22    - name: helm
23      image: vfarcic/helm:2.8.2
24      command: ["sleep"]
25      args: ["100000"]
26  """
27  ) {
28      node("kubernetes") {
29          container("kubectl") {
30              stage("kubectl") {
31                  sh "kubectl version"
32              }
33          }
34          container("oc") {
35              stage("oc") {
36                  sh "oc version"
37              }
38          }
39          container("golang") {
40              stage("golang") {
41                  sh "go version"
42              }
43          }
44          container("helm") {
45              stage("helm") {
46                  sh "helm version --tiller-namespace go-demo-3-build"
47              }
48          }
49      }
50  }
The only difference between that job and the one we used before is in podTemplate arguments namespace and serviceAccount. This time we specified that the Pod should be created in the go-demo-3-build Namespace and that it should use the ServiceAccount build.
If everything works as expected, the instruction to run Pods in a different Namespace should provide the separation we crave, and the ServiceAccount will give the permissions the Pod might need when interacting with Kube API or other Pods.
Please click the Save button to persist the change of the Job definition.
Next, we'll open Jenkins' BlueOcean screen and check whether we can run builds based on the modified Job.
 1  open
    "http://$JENKINS_ADDR/blue/organizations/jenkins/my-k8s-job/activity"
Please click the Run button, and select the row with the new build. You'll see the same Waiting for next available executor message we've already seen in the past. Jenkins needs to wait until a Pod is created and is fully operational. However, this time the wait will be longer since Jenkins will not be able to create the Pod.
The fact that we defined that the Job should operate in a different Namespace will do us no good if such a Namespace does not exist. Even if we create the Namespace, we specified that it should use the ServiceAccount build. So, we need to create both. However, that's not where our troubles stop. There are a few other problems we'll need to solve but, for now, we'll concentrate on the missing Namespace.
Please click the Stop button in the top-right corner or the build. That will abort the futile attempt to create a Pod, and we can proceed and make the necessary changes that will allow us to run a build of that Job in the go-demo-3-build Namespace.
As a minimum, we'll have to make sure that the go-demo-3-build Namespace exists and that it has the ServiceAccount build which is bound to a Role with sufficient permissions. While we're defining the Namespace, we should probably define a LimitRange and a ResourceQuota. Fortunately, we already did all that in the previous chapters, and we already have a YAML file that does just that.
Let's take a quick look at the build-ns.yml file available in the go-demo-3 repository.
1 cat ../go-demo-3/k8s/build-ns.yml
We won't go through the details behind that definition since we already explored it in the previous chapters. Instead, we'll imagine that we are cluster administrators and that the team in charge of go-demo-3 asked us to apply that definition.
 1  kubectl apply
 2      -f ../go-demo-3/k8s/build-ns.yml
 3      --record
The output shows that the resources defined in that YAML were created.
Even though we won't build a continuous deployment pipeline just yet, we should be prepared for running our application in production. Since it should be separated from the testing Pods and releases under test, we'll create another Namespace that will be used exclusively for go-demo-3 production releases. Just as before, we'll apply the definition stored in the go-demo-3 repository.
 1  cat ../go-demo-3/k8s/prod-ns.yml
 2
 3  kubectl apply
 4      -f ../go-demo-3/k8s/prod-ns.yml
 5      --record
We're missing one more thing before the part of the setup related to Kubernetes resources is finished.
So far, we have a RoleBinding inside the jenkins Namespace that provides Jenkins with enough permissions to create Pods in the same Namespace. However, our latest Pipeline wants to create Pods in the go-demo-3-build Namespace. Given that we are not using ClusterRoleBinding that would provide cluster-wide permissions, we'll need to create a RoleBinding in go-demo-3-build as well. Since that is specific to the application, the definition is in its repository, and it should be executed by the administrator of the cluster, just as the previous two.
Let's take a quick look at the definition.
1 cat ../go-demo-3/k8s/jenkins.yml
The output is as follows.
apiVersion: rbac.authorization.k8s.io/v1
kind: RoleBinding
metadata:
  name: jenkins-role-binding
  namespace: go-demo-3-build
  labels:
    app: jenkins
roleRef:
  apiGroup: rbac.authorization.k8s.io
  kind: ClusterRole
  name: cluster-admin
subjects:
- kind: ServiceAccount
  name: jenkins
  namespace: jenkins
The binding is relatively straightforward. It will bind the ServiceAccount in the jenkins Namespace with the ClusterRole cluster-admin. We will reduce those permissions in the next chapter. For now, remember that we're creating a RoleBinding in the go-demo-3-build Namespace and that it'll give ServiceAccount jenkins in the jenkins Namespace full permissions to do whatever it wants in the go-demo-3-build Namespace.
Let's apply this last Kubernetes definition before we proceed with changes in Jenkins itself.
 1  kubectl apply
 2      -f ../go-demo-3/k8s/jenkins.yml
 3      --record
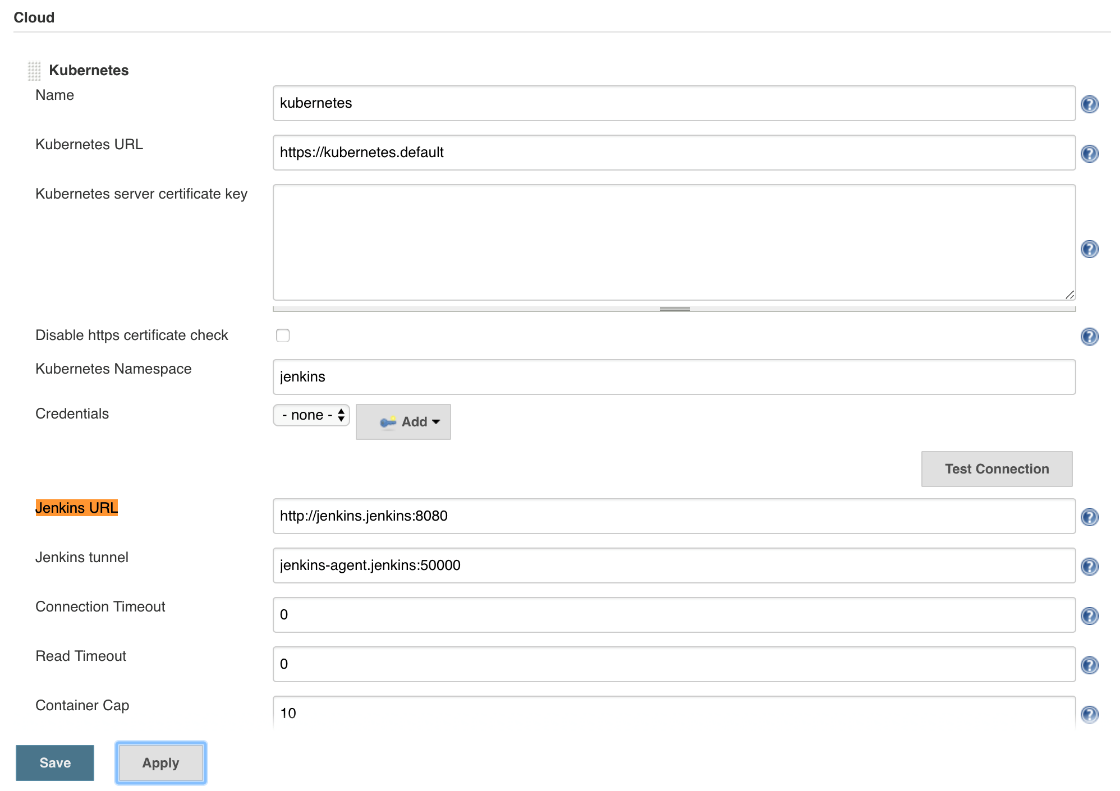
The next issue we'll have to solve is communication between Jenkins and the Pods spun during builds. Let's take a quick look at the configuration screen.
1 open "http://$JENKINS_ADDR/configure"
If you scroll down to the Jenkins URL field of the Kubernetes section, you'll notice that it is set to http://jenkins:8080. Similarly, Jenkins tunnel is jenkins-agent:50000. The two values correspond to the names of the Services through which agent Pods will establish communication with the master and vice versa. As you hopefully already know, using only the name of a Service allows communication between Pods in the same Namespace. If we'd like to extend that communication across different Namespaces, we need to use the [SERVICE_NAME].[NAMESPACE] format. That way, agent Pods will know where to find the Jenkins Pod, no matter where they're running. Communication will be established even if Jenkins is in the jenkins Namespace and the agent Pods are in go-demo-3-build, or anywhere else.
Let's change the config.
Please scroll to the Kubernetes section, and change the value of the Jenkins URL field to the address of the Service http://jenkins.jenkins:8080. Similarly, change the Jenkins tunnel field to jenkins-agent.jenkins:50000. Don't forget to click the Save button.
Our troubles are not yet over. We need to rethink our Helm strategy.
We have Tiller running in the kube-system Namespace. However, our agent Pods running in go-demo-3-build do not have permissions to access it.
We could extend the permissions, but that would allow the Pods in that Namespace to gain almost complete control over the whole cluster. Unless your organization is very small, that is often not acceptable. Instead, we'll deploy another Tiller instance in the go-demo-3-build Namespace and tie it to the ServiceAccount build. That will give the new tiller the same permissions in the go-demo-3 and go-demo-3-build Namespaces. It'll be able to do anything in those, but nothing anywhere else.
That strategy has a downside. It is more expensive to run multiple Tillers than to run one. However, if we organize them per teams in our organization by giving each a separate Tiller instance, we can allow them full freedom within their Namespaces without affecting others. On top of that, remember that Tiller will be removed in Helm v3, so this is only a temporary fix.
 1  helm init --service-account build
 2      --tiller-namespace go-demo-3-build
The output ends with the Happy Helming! message, letting us know that Tiller resources are installed. To be on the safe side, we'll wait until it rolls out.
 1  kubectl -n go-demo-3-build
 2      rollout status
 3      deployment tiller-deploy

Now we are ready to re-run the job.
 1  open
    "http://$JENKINS_ADDR/blue/organizations/jenkins/my-k8s-job/activity"
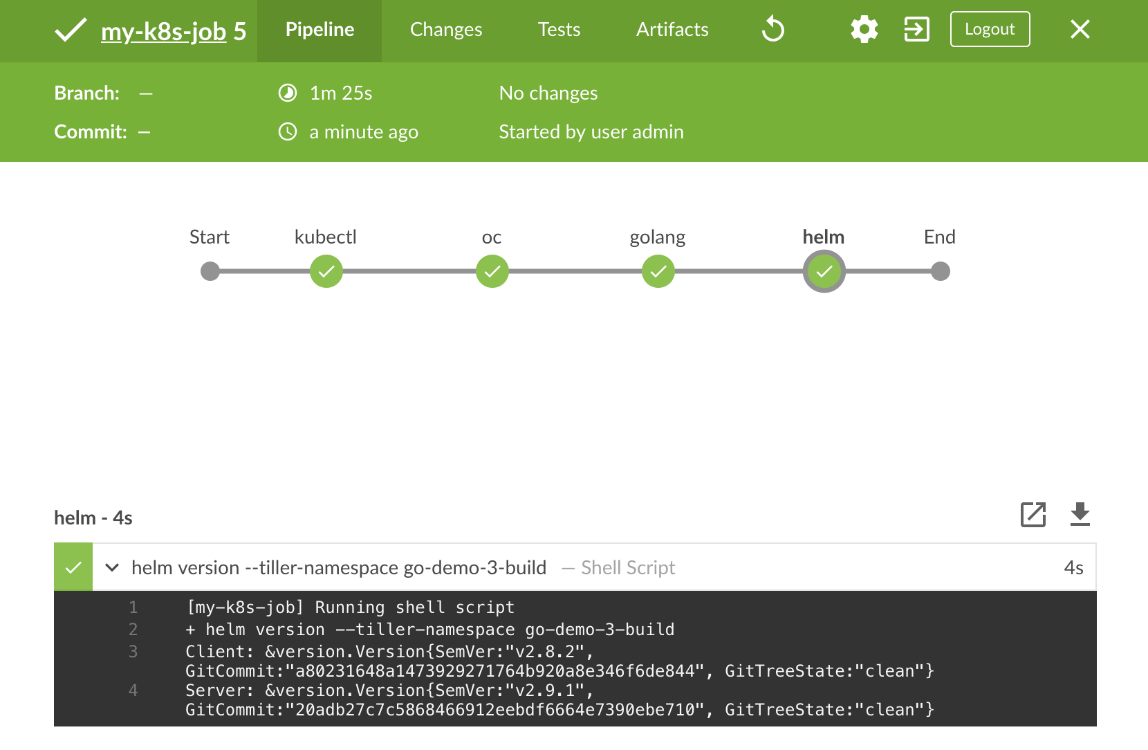
Please click the Run button followed with a click to the row of the new build.
While waiting for the build to start, we'll go back to the terminal and confirm that a new jenkins-slave-... Pod is created.
 1  kubectl -n go-demo-3-build
 2     get pods
The output is as follows.
NAME              READY STATUS  RESTARTS AGE
jenkins-slave-... 5/5   Running 0        36s
tiller-deploy-... 1/1   Running 0        3m
If you do not see the jenkins-slave Pod, you might need to wait for a few moments, and retrieve the Pods again.
Once the state of the jenkins-slave Pod is Running, we can go back to Jenkins UI and observe that it progresses until the end and that it turns to green.
We managed to run the tools in the separate Namespace. However, we still need to solve the issue of building container images.