
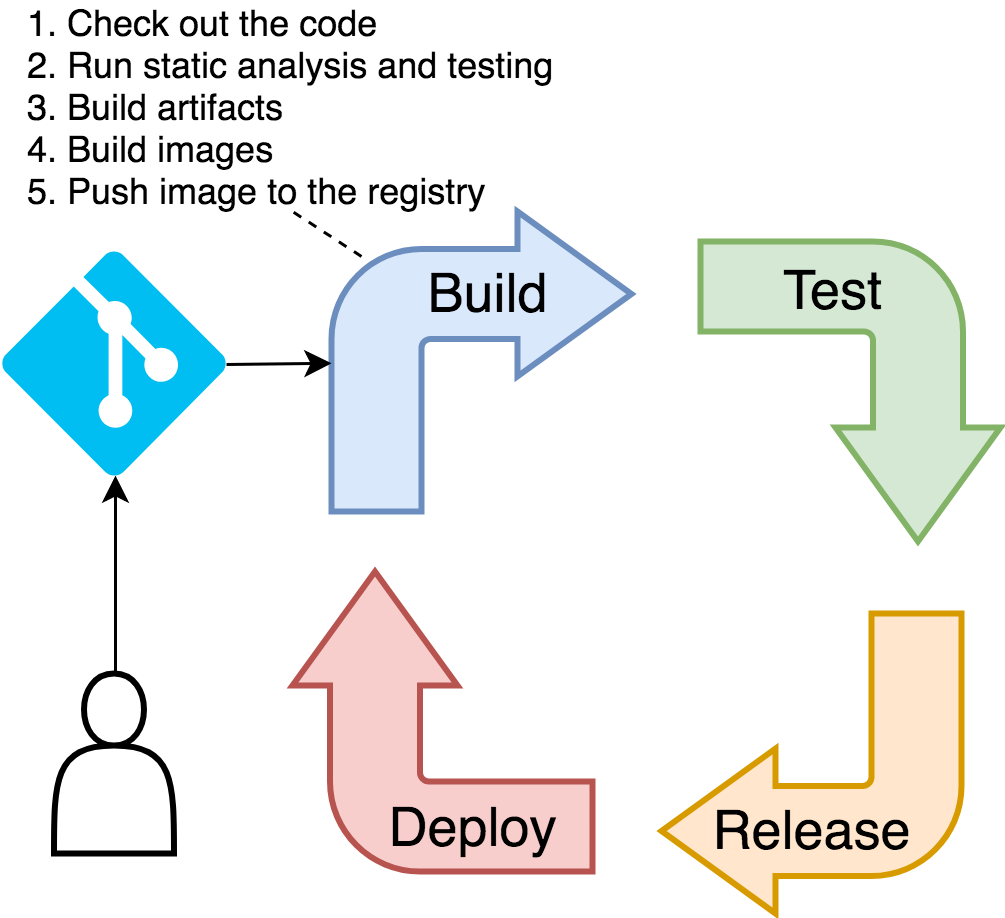
The primary function of the build stage of the continuous deployment pipeline is to build artifacts and a container image and push it to a registry from which it can be deployed and tested. Of course, we cannot build anything without code, so we'll have to check out the repository as well.
Since building things without running static analysis, unit tests, and other types of validation against static code should be illegal and punishable by public shame, we'll include those steps as well.
We won't deal with building artifacts, nor we are going to run static testing and analysis from inside the pipeline. Instead, we'll continue relying on Docker's multistage builds for all those things, just as we did in the previous chapters.
Finally, we couldn't push to a registry without authentication, so we'll have to log in to Docker Hub just before we push a new image.
There are a few things that we are NOT going to do, even though you probably should when applying the lessons learned your "real" projects. We do NOT have static analysis. We are NOT generating code coverage, we are NOT creating reports, and we are not sending the result to analysis tools like SonarQube (https://www.sonarqube.org/). More importantly, we are NOT running any security scanning. There are many other things we could do in this chapter, but we are not. The reason is simple. There is an almost infinite number of tools we could use and steps we could execute. They depend on programming languages, internal processes, and what so not. Our goal is to understand the logic and, later on, to adapt the examples to your own needs. With that in mind, we'll stick only to the bare minimum, not only in this stage but also in those that follow. It is up to you to extend them to fit your specific needs.
Let's define the steps of the build stage as a Jenkins job.
1 open "http://$JENKINS_ADDR"
From the Jenkins home screen, please click the New Item link from the left-hand menu. The script for creating new jobs will appear.
Type go-demo-3 as the item name, select Pipeline as the job type and click the OK button.
Once inside job's configuration screen, click the Pipeline tab in the top of the screen and type the script that follows inside the Script field.
 1  import java.text.SimpleDateFormat
 2
 3  currentBuild.displayName = new SimpleDateFormat("yy.MM.dd").format
    (new Date()) + "-" + env.BUILD_NUMBER
 4  env.REPO = "https://github.com/vfarcic/go-demo-3.git"
 5  env.IMAGE = "vfarcic/go-demo-3"
 6  env.TAG_BETA = "${currentBuild.displayName}-${env.BRANCH_NAME}"
 7
 8  node("docker") {
 9    stage("build") {
10      git "${env.REPO}"
11      sh """sudo docker image build
12        -t ${env.IMAGE}:${env.TAG_BETA} ."""
13      withCredentials([usernamePassword(
14        credentialsId: "docker",
15        usernameVariable: "USER",
16        passwordVariable: "PASS"
17      )]) {
18        sh """sudo docker login
19          -u $USER -p $PASS"""
20      }
21      sh """sudo docker image push
22        ${env.IMAGE}:${env.TAG_BETA}"""
23    }
24  }
Since we already went through all those steps manually, the steps inside the Jenkins job should be self-explanatory. Still, we'll briefly explain what's going on since this might be your first contact with Jenkins pipeline.
First of all, the job is written using the scripted pipeline syntax. The alternative would be to use declarative pipeline which forces a specific structure and naming convention.
Personally, I prefer the latter. A declarative pipeline is easier to write and read, and it provides the structure that makes implementation of some patterns much easier. However, it also comes with a few limitations. In our case, those limitations are enough to make the declarative pipeline a lousy choice. Namely, it does not allow us to mix different types of agents, and it does not support all the options available in podTemplate (for example, namespace). Since scripted pipeline does not have such limitations, we opted for that flavor, even though it makes the code often harder to maintain.
What did we do so far?
We imported SimpleDateFormat library that allows us to retrieve dates. The reason for the import becomes evident in the next line where we are changing the name of the build. By default, each build is named sequentially. The first build is named 1, the second 2, and so on. We changed the naming pattern so that it contains the date in yy.MM.dd format, followed with the sequential build number.
Next, we're defining a few environment variables that contain the information we'll need in the pipeline steps. REPO holds the GitHub repository we're using, IMAGE is the name of the Docker image we'll build, and TAG_BETA has the tag the image we'll use for testing. The latter is a combination of the build and the branch name.
Before we proceed, please change the REPO and the IMAGE variables to match the address of the repository you forked and the name of the image. In most cases, changing vfarcic to your GitHub and Docker Hub user should be enough.
The node block is where the "real" action is happening.
By setting the node to docker, we're telling Jenkins to use the agent with the matching name or label for all the steps within that block. The mechanism will differ from one case to another. It could match the VM we created with Vagrant, or it could be a dynamically created node in AWS or GCP.
Inside the node is the stage block. It is used to group steps and has no practical purpose. It is purely cosmetic, and it's used to visualize the pipeline.
Inside the stage are the steps. The full list of available steps depends on the available plugins. The most commonly used ones are documented in the Pipeline Steps Reference (https://jenkins.io/doc/pipeline/steps/).
As you'll see, most of the pipeline we'll define will be based on the sh: Shell Script (https://jenkins.io/doc/pipeline/steps/workflow-durable-task-step/#sh-shell-script) step. Since we already determined almost everything we need through commands executed in a terminal, using sh allows us to copy and paste those same commands. That way, we'll have little dependency on Jenkins-specific way of working, and we'll have parity between command line used by developers on their laptops and Jenkins pipelines.
Inside the build stage, we're using git to retrieve the repository. Further on, we're using sh to execute Docker commands to build an image, to login to Docker Hub, and to push the image.
The only "special" part of the pipeline is the withCredentials block. Since it would be very insecure to hard-code into our jobs Docker Hub's username and password, we're retrieving the information from Jenkins. The credentials with the ID docker will be converted into variables USER and PASS which are used with the docker login command. Besides the apparent do-not-hard-code-secrets reason, the primary motivation for using the withCredentials block lies in Jenkins' ability to obfuscate confidential information. As you'll see later on, the credentials will be removed from logs making them hidden to anyone poking around our builds.
Now that we had a brief exploration of our first draft of the pipeline, the time has come to try it out.
Please click the Save button to persist the job.
We'll use the new UI to run the builds and visualize them.
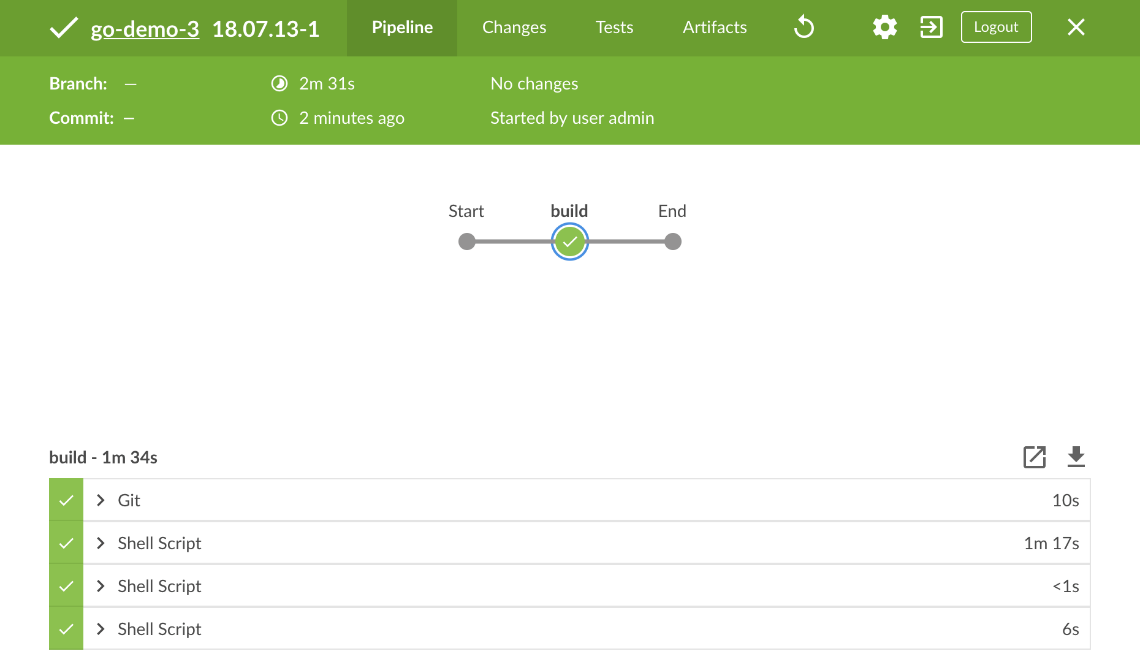
Click the Open Blue Ocean link from the left-hand menu, followed with the Run button.
Once the build starts, a new row will appear. Click it to enter into the details of the build and to observe the progress until it's finished and everything is green.
Let's check whether Jenkins executed the steps correctly. If it did, we should have a new image pushed to our Docker Hub account.
 1  export DH_USER=[...]
 2
 3  open "https://hub.docker.com/r/$DH_USER/go-demo-3/tags/"
Please replace [...] with your Docker Hub username.
You should see a new image tagged as a combination of the date, build number (1), and the branch. The only problem so far is that the branch is set to null. That is the expected behavior since we did not tell Jenkins which branch to retrieve. As a result, the environment variable BRANCH_NAME is set to null and, with it, our image tag as well. We'll fix that problem later on. For now, we'll have to live with null.
Now that we finished defining and verifying the build stage, we can proceed to the functional testing.