
40. THE NOSE AND CHEEKS
![]()
LIKE COMPOSITION, POSING the face and body is about creating the visual sensation of depth. This is an important concept to keep in mind as we move through the rest of this chapter. When it comes to the face, two components that create visual depth (and are often the most posed) are the cheeks and the nose.
When the face is turned directly toward the camera, known as a full view (Figure 40.1), it showcases the least amount of depth, especially if the lighting is behind the photographer rather than to the side, resulting in shadows that fall behind the subject. As the head turns to one side or the other, the viewer will see better how the face is structured, how large or small the nose is, how round and how high the cheeks are, and so on (Figure 40.2). Although many portraits are made with the portrait subject directly facing the camera, I also encourage you to turn the head a bit to create this sense of depth. How much do you need to turn it? That depends on the face, and everyone is different in this regard. However, it is an unwritten rule to not turn your subject’s face so much that the nose moves past the camera-opposite cheek (Figure 40.3 and Figure 40.4). This introduces the nose as being more prominent than it should be and it breaks up the nice line of the cheek. Furthermore, turning the head too far might make the subject look relatively strained in an awkward position.
Additionally, one posing consideration to make for cheeks is how they are horizontally angled in the portrait. Imagine a headshot of someone directly facing the camera (Figure 40.5). If she held her head level, her cheeks would be even across, from one to the other. Now, imagine she slightly tilted her head to one side, raising one cheek higher than the other (Figure 40.6). Doing so might have added just a bit of emotional and visually suggestive power to the portrait, depending on whether the tilt was combined with a smile or a somber expression. Of course, dramatically tilting the head to one side can be awkward (picture an owl turning its head upside down), so it’s best to coach your subject to tilt their head with moderation. This slight tilt can be extremely useful in evoking whimsy, playfulness, and joy, just as much as it can be to suggest sternness and malevolence. It’s also not relegated to just portraits where the subject is looking straight at the camera, so be ready to employ this simple but powerful technique in a variety of shots and perspectives.
One of the most noticeable parts of the human body is the nose. Everyone’s nose is different, and it is one of the visual characteristics that we use to identify others. Despite all the great things noses do for us, they’re often the issue of contempt for some portrait subjects. Folks with large noses or short, upturned noses tend to be more sensitive about how their nose appears in portraits, and while nothing is necessarily wrong with their face, it’s an understandable concern. When a subject is worried about their nose, it’s best to seriously consider how best to approach easing their anxiety.

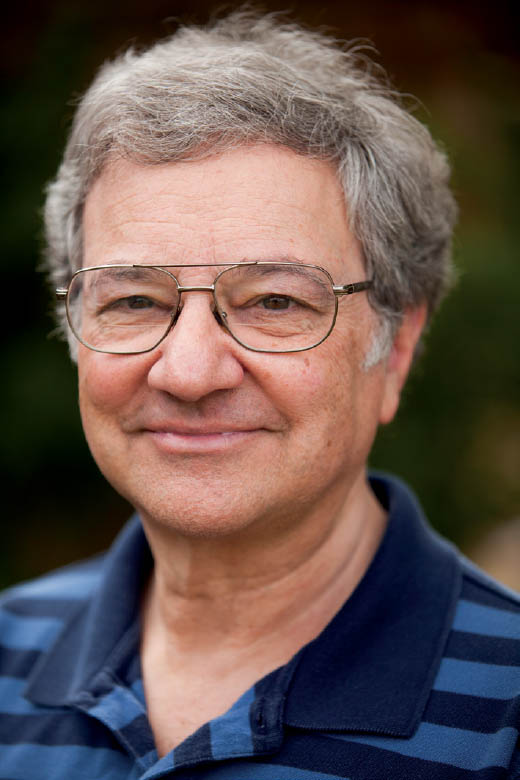
40.1 A full-view of the face, in which it is turned directly toward the camera, is largely dependent upon shadow to showcase any dimension the face has.
ISO 200; 1/125 sec.; f/1.4; 50mm
40.2 Rotating the face allows the viewer to see exactly how the face is constructed, it’s depth, and an overall sense of how dimensional it is relative to everything else in the frame, especially the subject’s own form.

40.3 It’s a best practice to avoid photographing a subject’s nose extended past the camera-opposite cheek. The face loses quite a bit of dimension and depth in doing so, and it can sometimes make the nose seem unnecessarily larger than it really is.
ISO 200; 1/1250 sec.; f/2; 90mm
40.4 Keeping the nose within the confines of the subject’s two cheeks is often considered more flattering for the subject. It reduces the size of the nose without sacrificing how it is situated relative to other parts of the face.
40.5 A tight headshot in which the cheek bones are kept level with the top and bottom edges of the frame.
ISO 400; 1/250 sec.; f/2; 90mm
40.6 Slightly tilting the head to one side creates an unlevel line from one cheek to the other, helps enhance the diagonal line moving from the lower left to the top right of the frame, and slightly boosts the image’s personality.
Although there is no definitive rule or approach to solving every perceivable issue that might arise when it comes to noses, it is to your benefit as the photographer to ensure the nose is not distracting from the portrait itself. Have your subject turn his head to one side and the other to see how light plays on the face (the nose in particular). Also, see if there is an especially useful angle for tighter shots (portraits in which the nose is a more prominent structure). Here are remedies that portrait photographers regularly employ:
- 1 Use a longer focal length. We’ve already covered how wide focal lengths (anything wider than 50mm) distort your portrait subject. The nose is especially susceptible to distortion. The closer you push a wide focal length in, the worse the distortion will be. Even 50mm can be too wide in some cases. For tighter shots, I favor longer focal lengths like 85mm or even 200mm (Figure 40.7). Not only are these great portrait focal lengths, they help compress the nose into the face a bit—flattening it, so to speak—and reducing how pronounced it is compared to the surrounding facial features.
- 2 Have subjects with longer noses turn their face toward the camera. Doing so will reduce the visible length of the subject’s nose, something many people are sensitive about (Figure 40.8 and Figure 40.9).
- 3 Have subjects with larger, wider noses turn their face slightly away from the camera. In doing so, you end up using the end of the nose to cover up small or large parts of the camera-opposite nostril (Figure 40.10).
- 4 Don’t shoot from too high or too low of an angle. If your subject is sensitive about his long nose, then shooting from a higher angle down on him will make the nose appear even longer since the tip of the nose will visually dip down into the upper lip and mouth, depending on how drastic of an angle you take. Consider photographing your subject from their eye level instead. Inversely, portrait subjects with shorter, more up-turned noses are best photographed from slightly above, reducing the amount of the bottom side of their nose is in view (Figure 40.11).
40.7 Using a telephoto focal length, I was able to avoid visual distortion of the subject’s face, as well as compress his features a bit, one being his nose, which appears smaller due to the angle of which his head is turned, the flatter lighting, and the optical perspective.
ISO 100; 1/400 sec.; f/2.8; 125mm
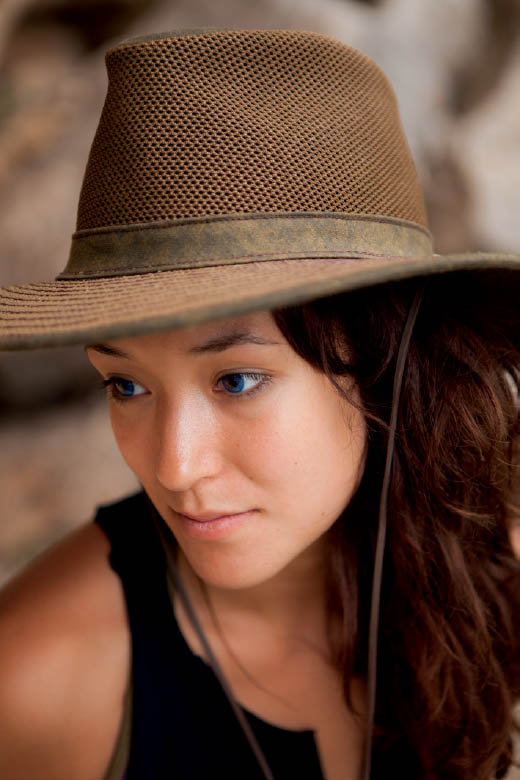
40.8 The further a subject’s face is turned away from the camera, the longer her nose will appear.
ISO 100; 1/160 sec.; f/2.8; 70mm

40.9 Although this subject does not have a uniquely long nose, turning her head more into the camera (yet still angled off a bit), diminishes the size of her nose, allowing it to recede into the face simply due to her face’s orientation to the camera.

40.10 The subject’s nose is a bit wider than average, so I turned his face slightly to one side, which subtly moves one nostril farther away from the camera and more into the shadow side of his face, thus mitigating any distraction his nose may cause in the shot while still maintaining his face’s characteristic appearance.
ISO 200; 1/250 sec.; f/1.4; 35mm
40.11 Shooting your subject from below, among other things, allows the viewer to look up his nose. Although the angle might work well with some subjects, some might not enjoy the viewer having a peek up their nostrils.
ISO 100; 1/1000 sec.; f/2.8; 51mm
- 5 Use non-dimensional lighting. Shooting with direct front, directionally diffused, or diffused lighting reduces the visual dimension of the nose due to lack of shadows. (Figure 40.12) Diffused light is very effective for this since there are essentially no shadows to speak of with this type of light. Direct front lighting works well if the subject, again, is turned more toward the camera than away.
Keep in mind that all noses are different, and aside from the generally unacceptable wide-angle, up-the-nose shot, portraiture aims to make the subject look as good and comfortable as they can possibly appear. It’s important that you remain conscientious of how your subject feels about their nose and how they might feel about it after seeing their portraits. It’s best not to point out any issues that your trained eye might see; rather, coach them into posing for your shot according to these tips and the experience you pick up after photographing several people with varying nose structures. This goes for all human anatomy, but it is particularly important for noses.

40.12 Soft, diffused or directionally diffused lighting reduces the amount of shadow the nose throws across a subject’s face, further diminishing its size.
ISO 200; 1/500 sec.; f/2.8; 155mm
Avoid Double Chins
The chin, arguably, is not the most important part of the human face. It is, however, a visibly recognizable part of the body. We all know folks that have fairly strong, defined chins, as well as those that have “no chin” at all. Most folks exist somewhere in between, and many are aware of the ill effects of the dreaded double chin!
A double chin is sometimes a result of simple head and facial anatomy, especially for heavier set portrait subjects (however, it is most definitely not always a factor of weight). At other times, a double chin appears when one of two things happens. First, double chins have a higher chance of being pronounced when you photograph your subject from below (Figure 40.13). Portrait subjects have a tendency to look at the camera, and when the camera is below them, they angle their head down, forcing the chin back into their neck. This increases the potential for skin to fold onto itself around the neck or bunch up and bulge just behind the chin. The solution? Avoid photographing your subject from below, especially for tighter framed shots. Instead, shoot from eye level or slightly above, which forces the subject to stretch the skin behind the chin rather than compress it (Figure 40.14). Having the subject look up at times slims the face as well, which is a welcome approach to posing for many subjects.
Secondly, double chins appear when the subject naturally compresses his chin into this neck (Figure 40.15). This is not unlike the issue described in the previous paragraph, but I want to encourage you to stay aware of how the subject naturally poses his chin. Males sometimes stand at attention, which pushes the chin back into the neck. If you see this occurring, coach the subject to relax their chin, slightly push it out (joke about how it might feel awkward at first), and even tilt their head to the side to take their mind off the reason you might be repositioning their chin (Figure 40.16).
I’ve never known a situation where a double chin was desirable by the client. Unless there is a specific reason for tolerating it, be aware of it in your frame, and you’ll be able to avoid potentially negative comments from the subject later about how they look in your portraits. As easy as it is to spot a double chin, it’s just as easy to reduce them given your position or the subject’s posture.

40.13 For many subjects, shooting from a low angle forces them to look down on the camera. This in turn can result in a double chin appearing, even for subjects that would be considered fairly trim.
ISO 400; 1/900 sec.; f/2; 90mm

40.14 Raising the angle of the camera to or just above eye level forces the subject to tilt their heads upward, greatly reducing the presence of a double chin simply because the subject had to stretch their neck out to look up.

40.15 Although this is not a gender-specific issue, some male subjects suffer from a double chin because of how they push their chin back while trying to pose properly or stand correctly during the shoot.
ISO 400; 1/350 sec.; f/2; 90mm

40.16 I was able to reduce the subject’s double chin by simply coaching him to elongate his neck and push his chin slightly forward. I also shot from a slightly higher angle than the previous portrait.