
12. ADDING KEYWORDS TO YOUR IMAGES
![]()
ADDING KEYWORDS TO your images is one of the most tedious parts of the organizational process in Lightroom. More often than not, photographers refuse to add keywords during the start of the process, and then the job becomes exponentially harder as you try to create some sort of order later on.
The truth is, adding keywords to images is a fairly easy process as long as you incorporate generic keyword usage during the import stage, and then go back in and selectively add keywords to the images once they are inside the library. You can use tools like the Painter tool and keyword sets to make the process of adding keywords to your images a little bit more tolerable.
During the import process, you’ll see that you have a Keywording panel in the right-hand column. In this area, I suggest adding keywords that generically explain the shoot. Don’t get too caught up in the individual details of the pictures; the point here is to add some keywords that describe the overall shoot at the point of import. This way, if you forget to add keywords later on in the process, you at least have some keywords already attached to the pictures.
Once you’ve imported your images, the keywords you added during import will appear in the Keywording panel in the Library module (Figure 12.1). Single-click on one of the images, and you will see the keywords appear in the text field. At this point, you can single-click on an image, or shift-click a series of images, and go into the keyword field and add any additional keywords you want to use.
Lightroom keeps a list of frequently used keywords directly under the text field, and you can add them to the selected images by simply clicking on them (Figure 12.2). This takes some of the sting out of adding keywords.

Figure 12.1 Add some generic keywords to your images during the import process, just in case you don’t do it later. You can always get more specific later on.
As you start working with different genres of photography, you’ll notice that various photography topics have keywords in common. This is a great way for you to use keyword sets in Lightroom. By default, Lightroom has a series of preset keyword sets that you can select from. Select an option from the Keyword Set drop-down menu in the Keywording panel, and you will see all of the related keywords for that set (Figure 12.3). For example, selecting a keyword set for weddings will give you keywords like “Bride,” “Wedding Party,” “Pre-Ceremony,” and “Groom.” You can add these keywords by selecting an image or multiple images and single-clicking on the keywords you want to use.
If you want to create your own keyword set, you can click on the Keyword Set dropdown menu and select Edit Set from the list (Figure 12.4). This will allow you to add a series of up to nine keywords to an individual set (Figure 12.5). Once you’ve input the keywords, click on the Preset drop-down menu at the top of the dialog, select Save Current Settings as New Preset, and give the new preset a name (Figure 12.6). This new preset will now be available in the Keyword Set drop-down menu.

Figure 12.2 This list of keywords will be different depending on what keywords you enter in the text field.

Figure 12.3 Select a preset from the Keyword Set drop-down menu to see keywords related to that topic.

Figure 12.4 Select Edit Set to create your own keyword set.

Figure 12.5 You can add up to nine keywords to a keyword set.

Figure 12.6 Give your new keyword set a name so you can find it again later.
There is an even easier way for you to apply keywords. In the toolbar at the bottom of the Library module, you’ll see a little spray can (Figure 12.7). This is the Lightroom Painter tool, and it allows you to “paint” different types of data onto individual pictures. You can use it to apply keywords, labels, flags, ratings, develop settings, and more, but in this instance, we want to focus on keywords.
Click on the Painter tool, and you’ll see that your cursor turns into a spray can. To the right of the Painter tool icon, select Keywords from the Paint drop-down menu. To the right of the menu, you will see a field where you can type in a series of keywords that you can paint onto your pictures.
If you hover your cursor over the eyedropper and press the Shift key, you’ll notice that you can access keyword sets from this window (Figure 12.8). When you select a keyword set from the drop-down menu, you will see all of the associated keywords for that keyword set in the list below it. You can then select individual keywords that you want to add to the Painter tool.
Once you’ve added all the keywords you want to use to the field next to the Painter tool, you can scroll through your images and apply the keywords by clicking on a picture, or clicking and dragging across a series of pictures in the list. If you’ve done this correctly, when you click on an image, you should see a message that says Assigned Keywords, followed by the keywords you added to the Painter tool (Figure 12.9).
If you want to remove the keywords from an image, Option-click (Mac) or Alt-click (PC) on the picture with the Painter tool, and the keywords that you’ve applied to the image will be removed.

Figure 12.7 The Painter tool is a great tool to use for keywording.

Figure 12.8 Hold down this Shift key as you hover your cursor over the eye-dropper, and you’ll have access to keyword sets.
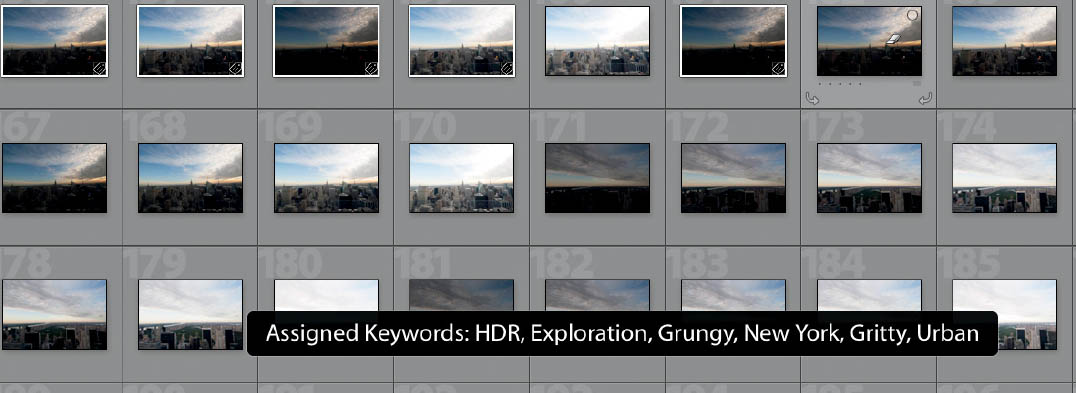
Figure 12.9 Assigning keywords in the Library module with the Painter tool.