26. SNOWBOUND
![]()
IN MY HONEST opinion, winter is the worst time of year and cold climates are my personal frigid hell on earth. If the beach is my happy place, a snowbank is my stab-me-through-the-eye-with-an-icicle-because-it-can’t-possibly-get-any-worse-than-this worst nightmare. Sadly, I am not yet wealthy enough to spend all winter flying from luxurious tropical paradise to luxurious tropical paradise. Luckily, I was born into an era of down coats, convertible mittens, and toe warmers, so I push past my icy misery, bundle up, and go shoot! Can you feel the enthusiasm? Because I’m trying really hard here.
Gear Selection
The best lens for shooting in cold weather and snow is the most versatile lens. There are technical reasons—I’ve read that changing lenses in cold weather can potentially lead to condensation and damage to the interior of your camera. For me, the reason to pick a lens and stick with it is much simpler. Cold fingers are less precise and more likely to drop things.
A good zoom lens will give you the greatest flexibility without requiring you to dig in your bag, swap gear, or expose the inside of your camera to the elements. If possible, choose a fairly fast zoom lens. Some of my favorite subjects in the snow are macro shots of frost, icicles, and other snowy details (Figure 26.1), so it’s helpful to have the ability to shoot with a shallow depth of field. Anything between f/1.8 and f/3.5 can work beautifully. Whatever lens you choose, make sure that your diopter is dialed in so you can accurately focus by hand. Autofocus gets slow and clunky if your camera gets cold enough.
Lens hoods are a must-have snow day accessory. They’ll protect the front of the lens from water droplets and falling snow (i.e., fluffy water droplets) and will help prevent any unwanted lens flare caused by sunlight reflecting off snowy surfaces.

26.1 Rhododendron encased in ice, Paris, Illinois
ISO 250; 1/320 sec.; f/2.8; 50mm
A polarizing filter is a great accessory to carry when shooting snowy scenes in bright sunlight—literally every surface will be painfully reflective, so a polarizer will help bring back the contrast and detail on surfaces and help pop the sky (Figure 26.2).
Because I so thoroughly loathe the cold weather, the most important gear considerations for me aren’t purely equipment based. My go-to outfit for time spent shooting outdoors involves warm/waterproof boots, multiple pairs of warm socks, leggings, pants, thermal bib overalls, long-sleeved shirt, sweatshirt, down coat, infinity scarf (no ends to get tangled on gear or blow in front of your lens), two hats, and gloves/mittens (usually two pairs). I’m certain this outfit looks goofy as hell, but it allows me to navigate past my wintery angst and stay out for a couple of hours at a time. I like to keep warmers in my pockets so I can keep my fingers from falling off in between shots.

26.2 Crater Lake National Park, Oregon
ISO 160; 1/2000 sec.; f/3.5; 10mm
Special Considerations
The biggest potential source of frustration when photographing in the cold is the temperature. The second biggest potential source of frustration is the camera thinking it’s in charge. In very bright scenes—such as a landscape filled with snow—the camera’s sensor has a hard time determining accurate settings. More often than not, you’ll have to override what your camera believes the best exposure to be. In snowy scenes, I tend to deliberately overexpose by between one and two stops. It seems counterintuitive to make a bright scene even brighter, but in an abundantly snowy scene, the camera has a tendency to underexpose, resulting in very dark images (Figures 26.3 and 26.4).
While I generally shoot most landscapes with Auto White Balance and then tweak color later in post-processing (oh, the beauty of shooting RAW), I usually set the white balance manually on snowy days. Very often the camera pushes snow scenes toward a blue cast. Although that can be used effectively in small doses to evoke a feeling of coldness, I usually prefer a warmer look that is closer to how the scene appears in real life (Figures 26.5 and 26.6).
Unfortunately, there is no perfect color temperature/white balance that will work across all snowy situations. Be careful to make slight and incremental adjustments to avoid overcorrecting blue snow into yellow snow—and, as I hope you’ve learned by now, if the snow is yellow, don’t eat it.
Because snow is so bright and reflective, you’ll generally be able to shoot freely without needing to boost your ISO or slow down your shutter speed to get enough light in your shot. In a heavy snowstorm, you’ll be able to freeze the falling snow in place, adding atmosphere to your shots. Consider using a tripod and a slightly longer exposure to capture streaks of falling snow (Figure 26.7)—don’t keep the shutter open too long or the falling snow won’t register in the image.
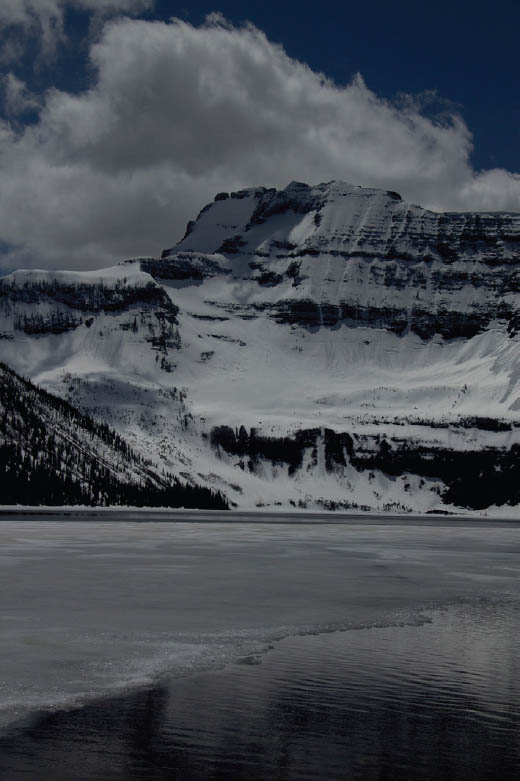
26.3 This shot was perfectly exposed according to the camera. It’s much too dark. Waterton Lakes National Park, Alberta, Canada
ISO 125; 1/1250 sec.; f/14; 41mm

26.4 Here’s the same shot with a little Lightroom love. I increased the exposure significantly. Waterton Lakes National Park, Alberta, Canada
ISO 125; 1/1250 sec.; f/14; 41mm

26.5 Here’s the shot straight out of camera—underexposed and with a blue cast. Kensico Reservoir, Kensico, New York
ISO 125; 1/125 sec.; f/13; 45mm

26.6 Same shot with color and exposure correction. Kensico Reservoir, Kensico, New York
ISO 125; 1/125 sec.; f/13; 45mm
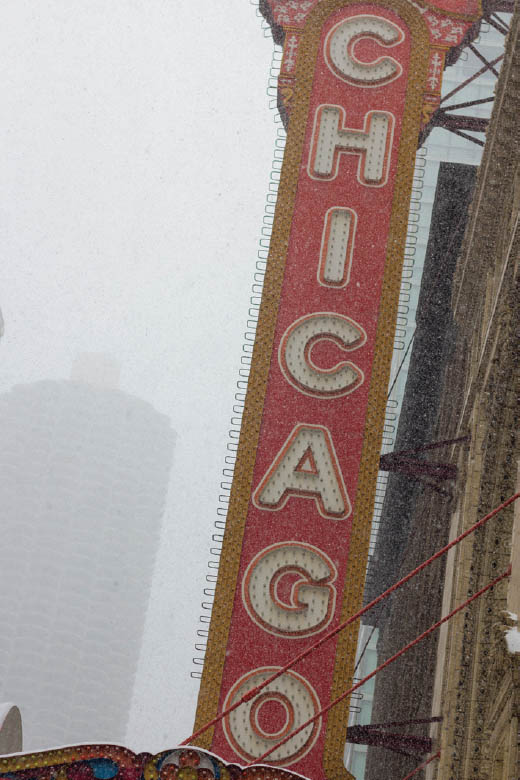
26.7 Because it was snowing heavily and the flakes were really big, I was able to get away with a faster shutter speed. Normally I’d shoot falling snow between 1/80 sec and 1/25 sec. Chicago, Illinois
ISO 125; 1/320 sec.; f/3.2; 50mm
Intentional Composition
When you approach snowy landscape, the first thing you should consider is where to walk—or more specifically, where not to. If you’re lucky enough to happen upon a fresh, unmarred field of snow, it would be a shame to mess it up by tromping about. Shoot the wide scene first. Exhaust all the full-scene possibilities before trudging in the scene for closeups or detail shots.
If there are other photographers around, remember the golden rule—don’t be a jerk. Do the courteous thing and make sure you won’t be in their way or mess up their shots by walking into the scene. Unfortunately, many photographers won’t be as considerate as you are. Plan ahead. Before a big snowfall, I like to determine where I’ll be shooting and show up during or just after the snow stops falling. If there’s an overnight snow, I go out at sunrise. Whatever it takes to capture the untouched scene.
Because snow tends to unify the the landscape under a smooth, monotone surface, I like to seek out sources of contrast—like trees, fences, or statues. A well-placed person in a colorful parka can help break up the monotony and make your photos pop. Snowscapes are at their most dramatic when the sun is low in the sky and the shadows are long (Figure 26.8).

26.8 Paris, Illinois
ISO 200; 1/1250 sec.; f/5.6; 17mm

26.9 Pritzker Pavilion, Chicago, Illinois
ISO 100; 1/100 sec.; f/4; 17mm
If you do go out shooting in the midst of a snowfall, the lighting will likely be even and flat from the cloud cover, so you’ll have to rely on subject matter and framing to bring interest to your images. Try visiting a marsh, beach, or forest for more unique snowscapes. Cities will often become totally deserted as people (the smart ones anyway) opt to stay indoors, providing you with the perfect opportunity to capture traditionally busy places under rare peaceful conditions (Figure 26.9).
Many types of landscapes lend themselves very well to black-and-white photography, and snowscapes are a prime example. Strong contrasts in natural elements like stark tree branches and abundant negative space can be artfully employed to create dramatic black-and-white photos. While you shoot, pay careful attention to shape, contrast, and detail to ensure that your photographs will look their best when converted to black and white (Figures 26.10 and 26.11).
The goal is to deliberately shoot for black-and-white conversion rather than employing grayscale to “save” a blah image. That said, black and white is always a great option if you haven’t managed to get out in time for the freshest snow. In cities especially, snow turns brown pretty quickly, so a black-and-white conversion is a good option when the snow isn’t looking so fresh.

26.10 Crater Lake National Park, Oregon
ISO 160; 1/500 sec.; f/5.6; 75mm

26.11 Hurricane Ridge, Olympic National Park, Washington
ISO 125; 1/125 sec.; f/16; 190mm