31. MACRO AND FLORAL
![]()
MACRO PHOTOGRAPHY IS typically defined as an image where a small subject is represented larger than actual size (2:1), though 1:2 or 1:1 representation is often considered macro as well. Without focusing too much on the nitty-gritty way that macro scale is determined (it has to do with the distance to the subject, the size of your subject, the size of your sensor, and other horrific math-based concepts), I think we can agree that sometimes the most engaging photographic subjects come in miniscule form.
Macro and floral photography are extremely similar, so this lesson will apply to both subjects. Whether you’re seeking to highlight the tiniest lizard of the Costa Rican jungle or the delicate cherry blossoms of Japan, macro photography techniques are an important addition to a travel photographer’s arsenal.
Gear and Accessories
You can find a variety of options on the market to help you achieve the visual enlargement of your subject. Many zoom lenses advertise that they can be used for macro, and in many situations they certainly can be, though it’s rare to find a zoom lens that will offer 1:1 magnification. I have used a zoom lens quite effectively with tiny subjects—especially subjects that you can’t get particularly close to (Figure 31.1)—but have had far more success with prime lenses offering a very close focusing distance.
There are quite a few inexpensive lenses on the market that will work admirably on their own for macro photography (Figure 31.2), such as Canon’s inexpensive 50mm 1.8, or 40mm 2.8, which each cost under $200 and are versatile lenses for many non-macro scenarios as well.
If you are hoping to adapt your current lens inventory to work well in macro situations, you have a variety of options. An extension tube is a useful accessory for many travel scenarios (Figure 31.3). It is attached between the camera body and the lens, and it allows the lens to focus closer and obtain an increased magnification.
Extension tubes are relatively inexpensive and are available in a variety of magnification levels. Many have electronic connections that will allow your camera to continue managing the focusing and aperture adjustment features. If you purchase an extension tube without electronic connections (much less expensive), you will want to use a lens with a manual aperture ring or accept being locked into shooting at the widest aperture offered by your lens. There is some light loss with extension tubes, so plan to adjust your shutter speed or ISO accordingly. Despite these small inconveniences, extension tubes can have beautiful results for macro photography and are well worth investigating (Figure 31.4).
Another option is a magnification filter. Also referred to as “closeup lenses,” these are screwed on to the front element of your lens and are a lot like a magnifying glass. Magnifying filters will often have increased distortion and chromatic aberration because you’re introducing another piece of curved glass to the mix, but they can still have pleasing results (Figure 31.5). When you first screw on the filter, if you’re having trouble getting it to focus, try moving much closer to your subject—closer than you would expect . . . potentially closer than you feel comfortable with. Keep in mind that you’ll need to shoot with a narrower aperture in order to keep more than a sliver of your subject in focus.

31.1 Ometepe, Nicaragua
ISO 1600; 1/160 sec.; f/6.3; 142mm

31.2 Garfield Park Conservatory, Chicago, Illinois
ISO 100; 1/1250 sec.; f/3.2; 50mm

31.3 Vivitar Extension Tube

31.4 Plumeria, Virgin Gorda, British Virgin Islands
ISO 100; 1/5000 sec.; f/1.8; 100mm

31.5 Chicago Botanic Garden, Glencoe, Illinois
ISO 500; 1/250 sec.; f/3.5; 50mm
Refining Your Technique
When I shoot macro, I have a few specific techniques and settings that I frequently use. These are my personal best practices that I’ve come to rely on.
- Focusing: Focus manually or you’ll set up a macro shot and have your AF fight with you and jump around through the image. In macro, AF is frustrating AF.
- Tripod: When possible, use one. Tripods allow you to play with your settings while maintaining your composition until you get the shot just right. A tripod will also let you play with focus stacking (taking multiple shots with varied points of focus to be combined in post-processing for a completely in-focus shot at even the widest apertures).
- Depth of field: When it comes to macro, aperture isn’t the only thing that affects your DOF. Using a longer lens will result in a shallower DOF. Moving the lens closer to the subject will result in a shallower DOF. Shallow DOF in other photographic applications can often refer to a matter of feet, but with macro, shallow DOF is often a matter of millimeters. To keep more of your subject in focus, shoot at an f/8 or narrower (Figure 31.6).
- Lighting: I prefer even lighting for macro and floral photography. If the lighting is far from even, consider using a fabric diffuser or a ring flash.
- Wind: Wind is a macro photographer’s worst enemy. The slightest breeze can move your subject out of range or out of focus. To combat this issue, you can purchase special clamps to help hold flowers and leaves in place when shooting, or block the wind as much as possible with your body and shoot with a faster shutter speed.
Composing the Image
Even with the tiniest subjects, the usual compositional concepts apply. Fill the frame with intention, paying attention to each corner and cropping out distractions. If your subject is less than exciting in extreme closeup, consider adjusting the light to make it more dynamic. Backlight is beautiful for making flower petals glow and pop (Figure 31.7). Not only will the early hours of the day often provide gorgeous backlight opportunities, but the presence of dew will add beauty and interest to your photos. In the absence of dew, you can always use a spray bottle to get some water drops involved; just try not to leave water droplets on leaves or flowers in the bright sun because they can magnify the light and burn the plant.

31.6 Dragonfly, Cape Cod, Massachusetts
ISO 400; 1/640 sec.; f/9; 300mm

31.7 Falmouth, Massachusetts
ISO 400; 1/4,000 sec.; f/5, 180mm
One of my favorite techniques in macro and floral photography is to fill the frame by showing only a portion of the subject (Figure 31.8). This shifts it from another “oh, look, a flower” shot to a “wow, look at the elegant curve of those stamens” (I promise that sounded less creepy in my head). While you’re shooting, consider the shape and form of your subject and how it might look in black and white. Try limiting your DOF and underexposing to throw out-of-focus areas into shadow for a moody and unique macro (Figure 31.9).
Just remember that the minutiae of a location are just one portion of the travel story you’re trying to tell, and be sure to provide wider contextual shots of your subject as well.

31.8 Sea fan, Virgin Gorda, British Virgin Islands
ISO 100; 1/3200 sec.; f/64; 15mm
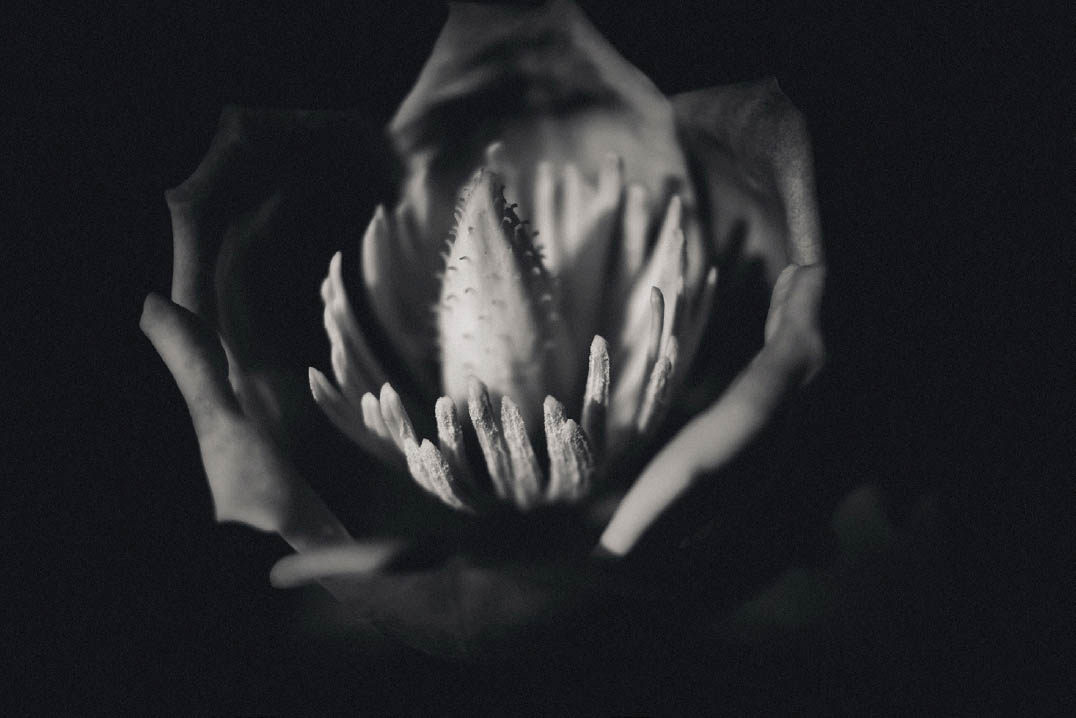
31.9 Paris, Illinois
ISO 100; 1/2000 sec.; f/2.8; 24mm