
Importing Media into Final Cut Pro X
Importing media into Final Cut Pro X is straightforward and trouble-free and this takes place in what is called the Media Import window. More often than not you will import media either (i) directly from the camera or the media card which has recorded the images in-camera (ii) from hard drive.
Often when importing from hard drive the media will already have been converted to a QuickTime format; if so Final Cut Pro X will recognize the files straight away. In cases where files are not recognized, or a camera is not seen by Final Cut Pro X, then you need to either convert the original media to QuickTime (often conversion software is supplied by the camera manufacturer to do this)—or you may need to download a driver or plug-in to enable Final Cut Pro X to see the device or media card and convert the content. Most of the major codecs and formats are supported by Final Cut Pro X. If your camera/media format are not supported you will need to do research online to find the best way to get the files into a form which can be seen and worked with by Final Cut Pro X.
Understanding the Final Cut Pro X file structure
We will cover organization of media in depth in the next chapter. For the moment it is important to understand a few essentials.
When importing media you need to import these files into an Event—an Event is a container, similar to a folder, where all of your media and Project(s) are stored. Media can be video files, music, still images, graphics and any of the components which you work with in building a movie. The Project refers to your edited Timeline—the place where you have ordered and structured the media to build your movie.
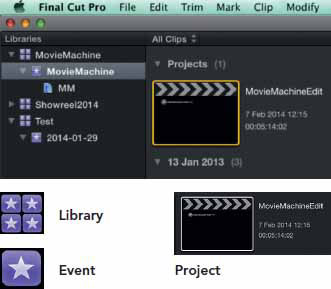
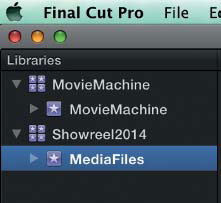
As already described—Events are the place where you store and organize your media; the Project is where the content is edited and structured—all of the Events, Projects and Media live within what is know as the Library. You can and will have many different Libraries to work with. Think of a Library as being the place where everything is stored, the Event being the shelves in the Library—the place where everything is organized—and the Project, represents each of the individual books in a Library—in the case of Final Cut Pro X, each of the movies you have edited.
Therefore, the organizational structure in Final Cut Pro X is hierarchical: the Library is the almighty place where everything to do with your work is filed away. Inside the Library are your Events which contain media and edited Projects. You can have more than one Project stored within a Library and as many Events as you wish.
I would suggest, for ease of knowing where things are, that when working on a specific movie, which could be a documentary, a TV program, a wedding, a feature, an advertisement—whatever it is, create a new Library. You then organize the media within the Library, inside of Events, and then do further fine-detailed organizing of the footage with other tools provided within Final Cut Pro X.
![]()
The Library is represented by 4 stars inside of boxes
Create a Library and Importing Media
You need at least one Library open to work within Final Cut Pro X.
1 Choose File—New—Library.
2 Name the Library.
3 Define where the Library is to be stored on hard drive and save it!

The last point is particularly important—defining where the Library is to be stored. This is important for two reasons: (i) You need to know where the Library has been stored so you can find the Library and access this whenever you need to work with it (ii) depending how you have set things up in preferences, the location of the Library will directly affect where your media is stored.
In Preferences, if you choose Copy to Library Storage Location then all media will be self-contained within the Library bundle on hard drive.
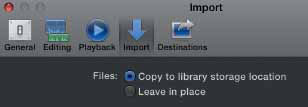
If you choose Leave in Place then the Library will reference to the media, wherever this is stored.
![]()
Library Bundle as stored on hard drive.
On the left hand side of the Browser you will visually see the Library you have created in the location where you defined for this to be stored.
The Library is referred to as a Bundle as it contains the information of your entire project or projects, with media or references to the media. It not just a file on drive—it is a Bundle.
Within the Final Cut Pro X interface the Library you have created appears to the left of the Browser.

Note: By default an Event is created within the Library and this is date stamped. You can click and overtype to rename the Event as you wish.
It is only once you have created the Library that you are ready to begin the Import Process.

To Import Media either press the large Import Media Button, or Control-click on the Library or Event and select Import Media.
There are several ways to invoke the Import Media command and each of these will take you to the same place, which is the Media Import window.
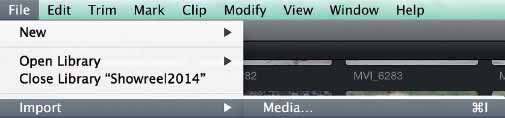
1 Choose the File—Menu and select Import Media (shortcut Command + i).
2 Control-click either Library or Event and choose Import Media.

3 Press the Import Media button in the Event Browser interface.
![]()
4 Far left and middle of the main Final Cut Pro X interface, click the Arrow Button which will open the Media Import window.
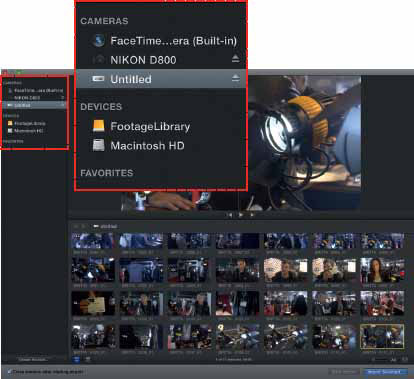
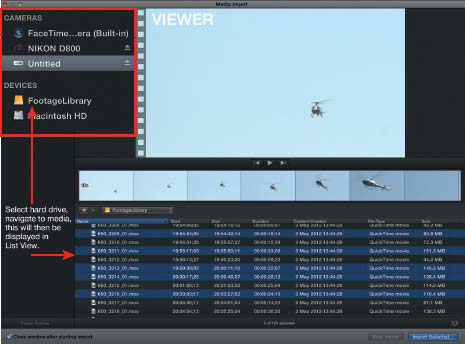
This image shows the Media Window with Cameras and Devices to the left of the interface.
The Media Import window, as the name implies, is the place where you bring media into Final Cut Pro X, either from Camera or Devices or external hard drive. Be aware when referring to camera, this also means the media cards used inside of cameras.
Click on the left of the Media Import Window and select a Camera or Device.
In the case of the example to the left there are three camera options:
(i) FaceTime—record live off the built-in camera in the MacBook Pro.
(ii) Nikon D800—media card from DSLR.
(iii) Untitled—this is a Sony S×S card denoted by the S×S icon.
![]()
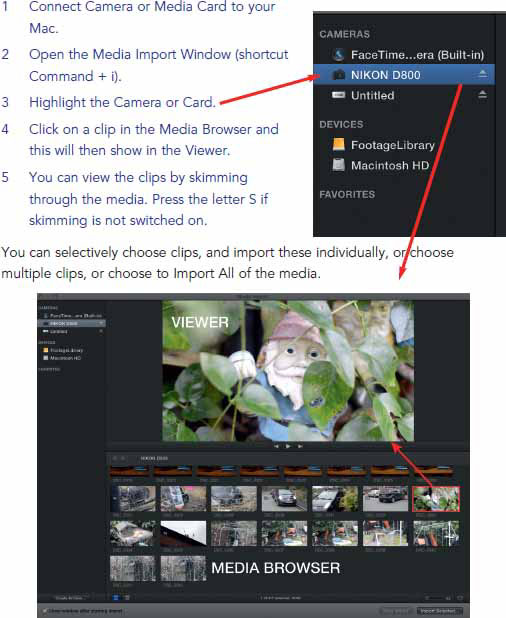
Importing from Camera or Media Card
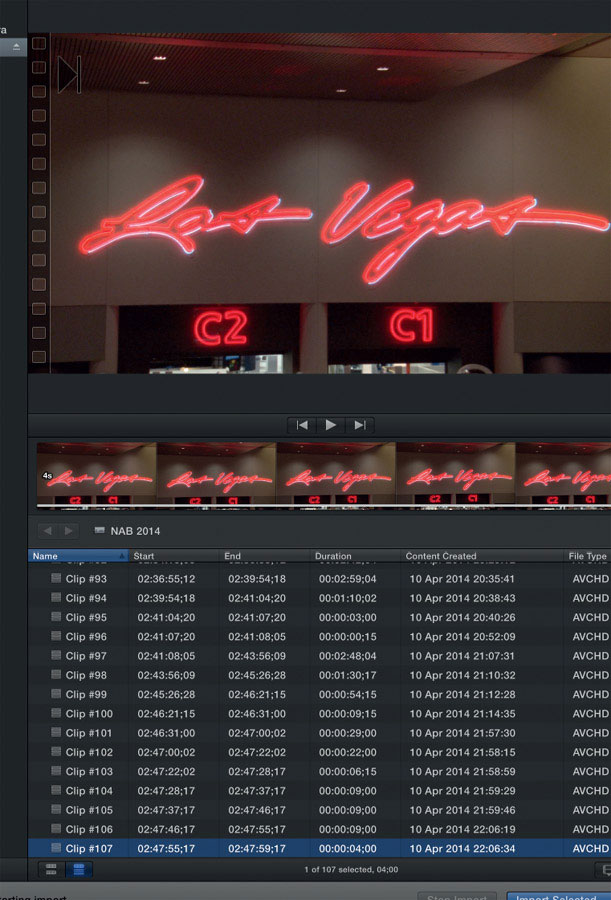
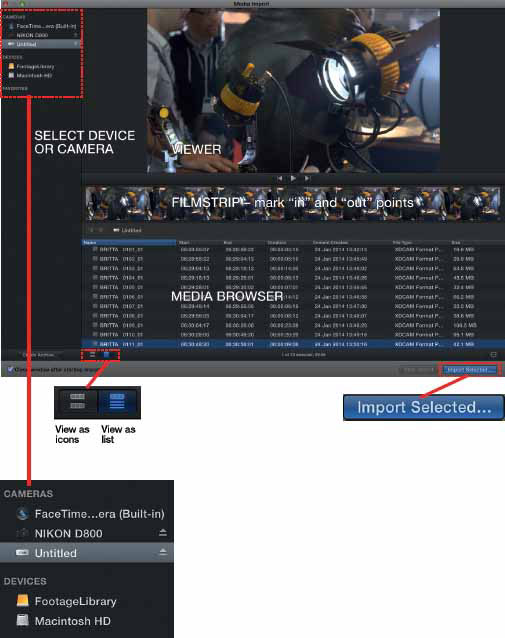
As written, the Media Import window is the place where you bring media into Final Cut Pro X from camera, device, media card or hard drive. When accessing media from camera or media cards, in most cases, it is as simple as connecting the camera or media card, inside of a card reader, to the computer. You then open up the Media Import window, select the clips you wish to import—and then press the Import Selected button. Below is a run-through of the process.
The simplest way to get the media onto the hard drive is to press the Import All command (at the bottom right of the Camera Import window). All of the clips will then be written to the hard drive where the Events folder is located. Note: you need to have Copy Media to Event Folder checked in Import Preferences.
![]()

You can also be selective about which clips are transferred. For a single clip, click to highlight the clip of choice and press Import Selected.
![]()
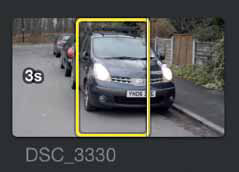
You can highlight a section of a single clip to import by either dragging the yellow ends to mark the range of media you wish to import or pressing the letter “i” for in and “o” for out to define the beginning and end points.
To import multiple clips, press the Command key (immediately left of the space bar) and click to highlight those clips you wish to import. Once the clips are highlighted, press Import Selected.
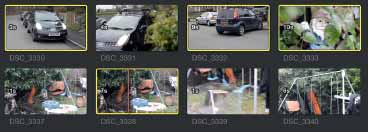
![]()
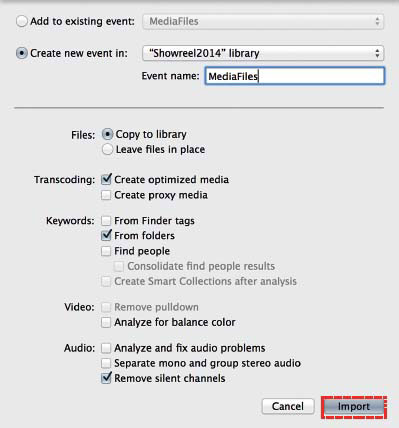
Regardless of whether you choose to import a single clip, a section of a clip, multiple clips, or all of the clips, you need to define some crucial details before the media is written to drive.
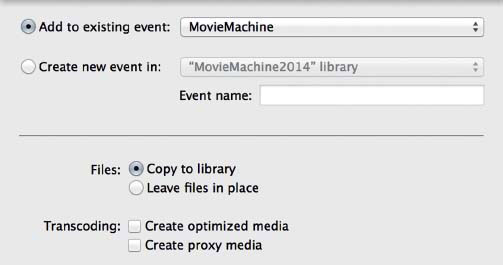
You now have a choice—you can either add the clips you are importing to an existing Event; or you can choose to create a New Event.

Always remember, media is filed away inside of Events which live inside of a Library. Therefore, it is advisable to have created a named Library with an Event before you begin the Import Process.
If you do choose to create a new Event you need to choose the Library in which the Event will be stored. You also need to name the Event.
Effectively you are telling Final Cut Pro X where you wish the media to be filed away, so you can then access this within the Browser.
The other hugely important instruction you need to give to Final Cut Pro X is to define where the media files are to be stored. The media files can be stored within the Library itself, as described earlier, this is a Managed Library. Or you can Leave in Place which means Final Cut Pro X will then reference to the media.

Above: media files will be copied into the Library you have defined.
These options, provided on import, are very similar to those options given in the Import area of Preferences. You will encounter these choices time and time again working in Final Cut Pro X, so it is worth getting to know the choices and how to deal with them!
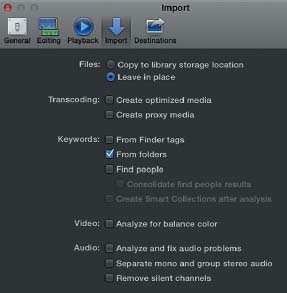
There are other important choices to consider—again these mirror options already presented when you set up the Import Preferences.
You need to choose if you wish to create Optimized Media. Some say this option should always be left on—therefore if Final Cut Pro X decides the codec is computationally difficult to work with, then the media files will be transcoded to ProRes which is ideal for Final Cut Pro X to edit and output. Be aware that transcoding of files will take time to generate and will consume hard drive space.
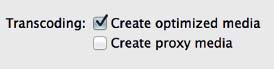
Often I will choose to leave the Create optimized media option off—you can always choose to transcode at a later stage if you wish, and, the truth is, Final Cut Pro X does an admirable job of editing and playing back most modern codecs. Therefore the option is always there to transcode at any stage, whether you selected for this to be done on import or not.
The rest of the options I leave switched off. Most of the time I’m not using Proxy media—and if I choose to use Proxy media I can generate these files when I need them, rather than on Import. I leave the other options off as I don’t wish for the editing software to Analyze for color balance, to Find people, or to work on my audio. These are all things I can do myself.
Once you have defined the choices press Import and the Import files will be written to hard drive, into the Event you specified, within the Library you have chosen.
![]()
Importing Media from Hard Drive
The process of importing media which already exists on hard drive is very similar to bringing in from Camera or Media card, however, there are a few key differences.
First, you cannot bring in a portion of a clip, the entire clip is imported. Beyond this, when bringing in media which already exists inside of a folder you can choose to define Keyword Collections by name of the Folder.
This same option—where Keywords are defined by Folders, is also found in the Import Preferences. This means that the name of the folder will be assigned to the collection of clips you are importing. The usefulness and relevance of Keywording will become clear in Chapter 4.
To import media from hard drive involves opening up the Media Import Window and then navigating from the hard drive to the media you wish to import.
1 Open Media Import Window (shortcut Command + i).
2 Select the hard drive, in Devices, and navigate to the media you wish to import.
3 Highlight the clips you wish to Import or you can Import All. Clips are displayed in List View. When importing from hard drive Icon View is unavailable.
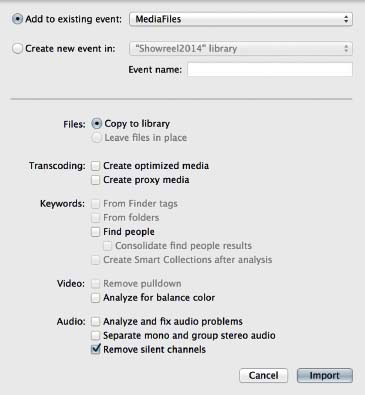
The familiar window will now appear where you need to define important details.
You will recognize these choices from importing from Card or Camera.
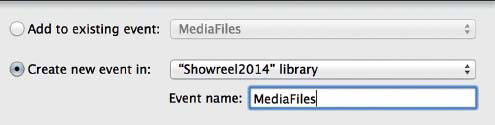
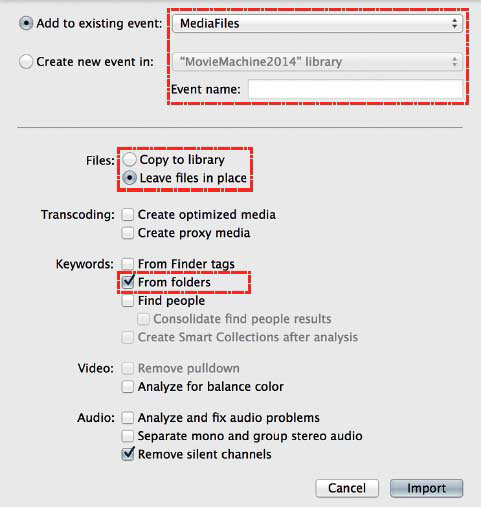
Most important, choose if you are to Add the media to an existing Event—or if you wish to create a new Event, and if so, where this will be located.
Equally important, decide if you want the files to be copied to the Library or choose Leave in Place.
To reinforce what has already been written, choose to Leave in Place—this means no media is copied and the files are then referenced to in the location where they currently exist. If you choose this option it is vital that you know where the media is located and make sure that it doesn’t get moved or deleted! If this happens you can lose the files forever.
I leave Keywords: From Folders selected. This is very useful for organizing media. It is advisable to therefore name folders which you are importing with an appropriate name as this information will then be included as the name of the Keyword Collection. Much more on Keywording coming up!
![]()
The other choices I leave unchecked.
4 Press Import and the files will be brought into Final Cut Pro X and, if required, will then be copied and written to drive.

When you import media, you will get a display showing the files are being processed.
![]()
The Dashboard shows when the computer is working.
Look to the Dashboard and bang in the center of the interface—if you see a spinning wheel, you will know media is being processed. It may be that rendering is taking place, the computer may be generating thumbnails, or media may be transcoding. The Dashboard indicator will display a spinning circle or show a percentage symbol to show that work is being done in the background.
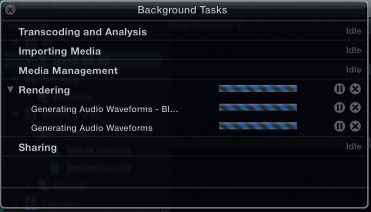
Click on the spinning wheel in the Dashboard to reveal which processes are taking place.

There is a third way to bring in media: Final Cut Pro X enables capture from DV, DVCAM, or HDV tape.
For those who shoot these formats, or those who have an archive to be accessed, this facility enables the media to be transferred to a hard drive. The transfer facility is basic but effective.
1 Plug your camera into the Mac with a FireWire cable or with a Thunderbolt to FireWire adapter.
2 Set the camera to VTR mode, then turn it on. Check that the camera is outputting the format you wish to capture, that is, DV/DVCAM or HDV. If the camera is not set correctly, Final Cut Pro X will not see the video signal.
3 Turn your attention to Final Cut Pro X and press the camera icon or choose Import from Camera from the File menu.
4 The Media Import window will open.
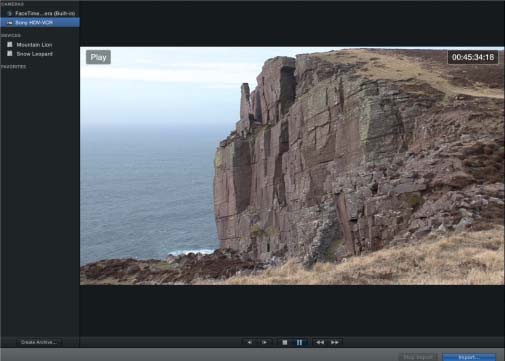
Note: You can see that the FireWire device is recognized as it will appear in the list of cameras. You can also capture live from the built-in camera when using a laptop and record direct to hard drive.
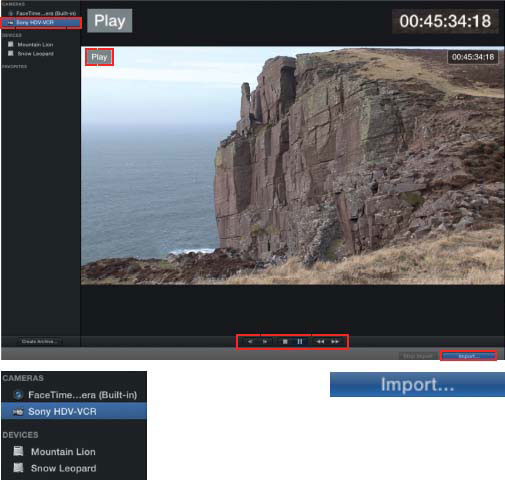
5 Play the tape using the virtual VTR controller. Alternatively, use the Space Bar for start/stop, the letter J to spool backward (press J up to five times to spool) and the letter L to spool forwards (again incrementally up to five taps of the L key).

Press Import and you will see the familiar window prompting you to define several fields of information.
As with previous importing you need to define if the media is to be added to an Existing Event or if you wish to create a new Event; do you wish to copy files into the selected Library or another location; and other details such as whether you wish to create Proxy Media. By now these should be familiar choices.
Importing to Events by dragging
There is a fourth and final way to import media into Final Cut Pro X. This only works for media which already exists on hard drive.
You can literally drag and drop files from a location on hard drive, be it an entire folder or individual clips, direct onto an Event. The files will then be added to the Event—with the options for how the media is handled, in terms of Media Storage, Transcoding and other options being defined by the choices you made when you set the Import Preferences.
This is possibly the most simple way of bringing media into Final Cut Pro X and the method I use regularly. Simply locate media files on hard drive, drag these onto an Event to the left of the Browser, and these will then be included with media within the Event. Drag entire folders of media to an Event and the same applies and, if you have selected Keywords: From Folders in Import Preferences, the name of the folder will then determine the naming of the Keyword Collection.
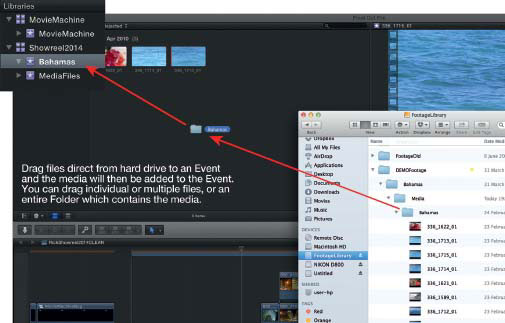

In the above example an entire folder is dragged into an Event—Events live inside of a Library and within an Event is where the detailed work of cataloguing the media takes place.