

Organizational concepts within Final Cut Pro X
The critical thing to understand when it comes to organization within Final Cut Pro X is that the structure of Library—Events—Keywords and Projects is the foundation of all organization within Final Cut Pro X.
The Library is the master area at the top of the organizational level. This is saved to hard drive, so that you can locate it when you need it.

My method is to save the Library to the same hard drive where the media exists. Most of the time my media already exists on hard drive and therefore when media is imported I choose Leave files in place. By saving the Library to the same external drive as the media, I ensure that both Library and Media exist in the same place.
![]()
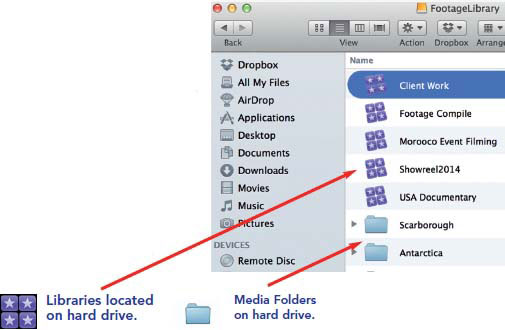
Anytime I need to open a Library in Final Cut Pro X, I simply connect up the drive, which contains the Library and the Media, and double click the Library to open it. The result is the Library, with Events, Projects and Media, opens in Final Cut Pro X.
I will often have many different Libraries on a given hard drive and many media folders.

Within each of the Libraries are Events and Keyword Collections. The Events are collections of media which you have imported, whereas Keyword Collections are those same collections organized into more accessible, defined areas—a similar concept to working with Bins in other NLE applications.
My method of working is to create a Library for a particular job or edit—for example, I may be editing a training video for one client—that becomes a Library; for another client I’m editing a documentary—that is another Library; for another client a promotional video—that becomes another Library.
Projects are stored inside of the Events; the Events are stored within a Library. Projects can be accessed within the Library or the Event in which they were created. The Projects are the edited timelines of media which make up your edits.
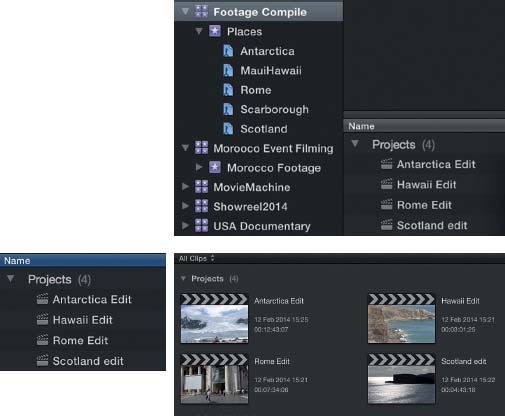
Projects, along with media, can be viewed in List View or Icon View by pressing the controls at the bottom of the Event Library.
![]()
Essentially, the file system provided within Final Cut Pro X, for Library—Events—Keyword Collections and Projects, gives you a sophisticated way to work with large quantities of media in an ordered way.
For now I’m outlining concepts. There is no correct or incorrect way to manage how you work—so long as you are organized and can access the media to edit your movies. Final Cut Pro X provides the means for you to be exceptionally organized and gives you tools to edit to the highest levels. It is for you to build your own systems and make the software work for you.
Creating Libraries, Events and Projects

You can only create a Library from the File menu top-left of the Final Cut Pro X interface. Choose New—Library.
There is no shortcut to do this and no other way than by going to the File menu.
I suspect the reason there is only one way to achieve this, with no shortcut, is because Apple wants the editor to consider carefully when creating a Library. You don’t want Libraries scattered all over the place—these are master places which include the entire foundation and structure of your project, media, or references to media, and everything connected with it. Therefore, when creating a Library consider how the Library will used. Better to be organized at the beginning rather than having to sort out a mess later on.

Control-click in an Event to show menu choices.
Creating Events and Projects can also be done from the File menu, or control-click in the Events Browser and choose the appropriate option. You can also use shortcuts:
Command + N New Project.
Alt/Option + N New Event.
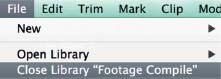
You can also close a Library or several Libraries. The rule is at least one Library must be open at any given time. It can make perfect sense to work with only a single Library open, for the very reason that all Projects and related media will then be before you, without the confusion of other Libraries. You do not need to work with multiple Libraries open unless you choose to.

Control-click a Library and choose Close Library or choose this command from the File menu
However, you do need to know how to find and track down Libraries which you do not have open.
By default Final Cut Pro X returns to the state you left it when you last quit. So if you had 5 Libraries open, next time you open Final Cut Pro X, the same 5 Libraries will open—assuming the drives and media are connected to your Mac.
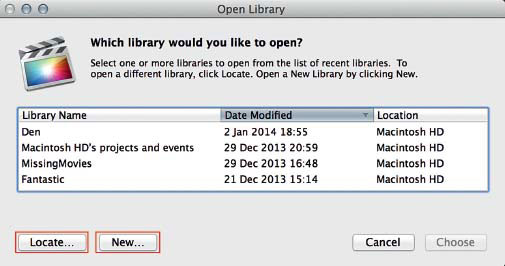
To open and access available Libraries choose File—Open Library—and the most recent Libraries opened will be listed before you.
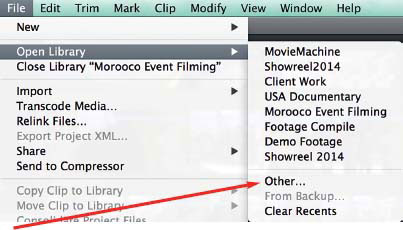
Press Other and the Open Library window will appear, giving you access to available Libraries. At this point you can choose a Library from the list in front of you, or choose New to create a New Library, or press Locate to manually navigate to a Library you wish to open.
To close a Library click the Library to highlight then either: (i) Choose File—Close Library (ii) Control-click the Library and select the command Close Library.
![]()
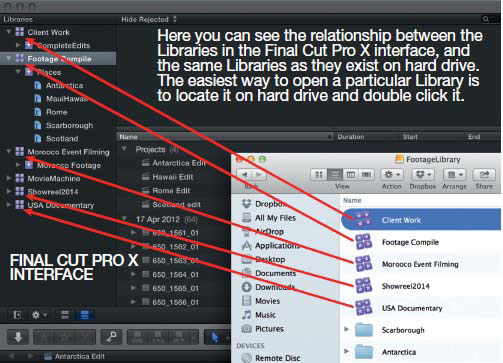
Perhaps the easiest way to open a Library, already mentioned and the way I work, is to locate the Library at the Finder level—this means on hard drive, or wherever it is located, and simply double-click the Library Bundle. The Library will then open in Final Cut Pro X and you can access all the Events with media and Projects within the Library.
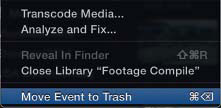
You can easily delete an Event—simply Control-click on the Event and choose Move Event to Trash.
To remove a Project Control-click the Project and choose Move to Trash.

To remove a Keyword Collection Control-click the Keyword Collection and choose Delete Keyword Collection.
![]()
The only way to delete a Library is to locate the Library on hard drive, drag it to the Trash, and then empty the Trash. It is best to quit Final Cut Pro X before doing this.
If the concepts of Libraries, Events, Projects and Keyword Collections are abstract and confusing, the meaning of these will soon become clear as we begin the process of organizing media using Events and Keyword Collections.
Getting practical: hands-on reviewing and organizing of footage
To make the editing process efficient and streamlined, you need to be organized. Organization is the key to building, refining, and sculpting a film. You need to know where those clips are, how to access them, and how to get them into the Timeline to hit the mark every time. There are many tools within Final Cut Pro X to help you to organize your footage. The process of getting organized begins with reviewing your footage.
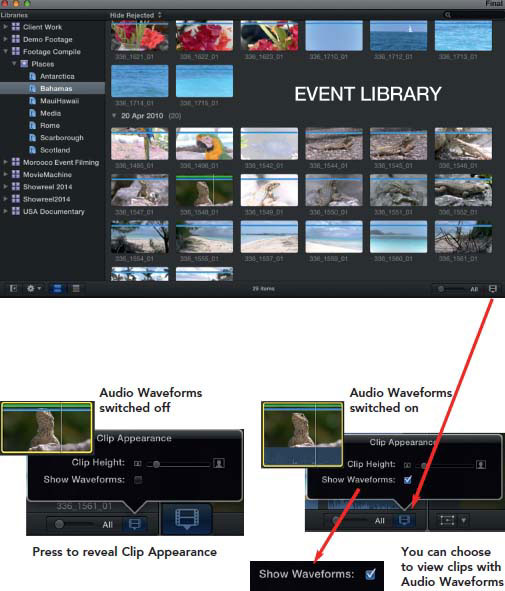
You can change the display of clips within the Browser. Click the icon bottom right which will display the control to switch on or off Audio Waveforms. This only works in icon view.
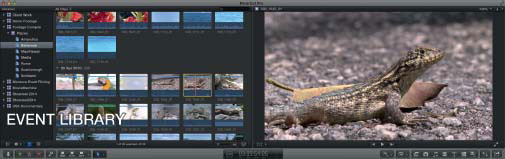
1 Select an Event in the Event Library and click any of the clips in the Event. The clip you select will then show in the Viewer.
2 Press the Space Bar and the clip will play. Press the Space Bar again to stop.
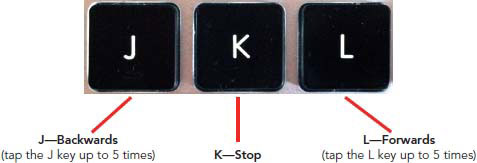
3 You can also use the letters J, K, and L to review footage. By tapping J or L, the footage will play, then speed up, incrementally, each time you press the key (up to five taps).
4 Perhaps the easiest way to look through a clip is to use the Skimming function. Simply point the curser towards any of the clips in the Event Library and drag across it. You will see the clip zip past in fast motion in the Viewer as you drag. If this doesn’t work, press the letter S to activate Skimming.

Drag across clips in the Event Library and see the result in the Viewer.
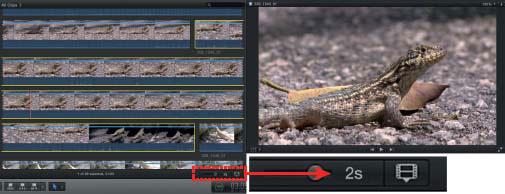
Expand the filmstrip size using the controls bottom right of the Event Library. This gives you fine control while skimming over a clip.
• S: Skimming (toggles on/off).
• Shift + S: Skimming without audio (toggle on/off).
Use the above shortcuts or use the Skimming controls in the middle/right of the interface.

Note: When using the Skimming feature you can drag across several clips; you don’t need to do this one at a time.
With several clips lined up in the Event Library, skim across as many as you wish to view—you will then see the footage displayed in the Viewer as you skim.
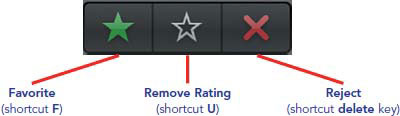
The ability to rate your footage provides a fantastic means to weed out the good footage from the bad. Clips can be marked as Favorites, Rejects, or left unrated.
You don’t have to rate your footage. If you have a photographic memory and can remember everything by the sheer power of thought, then fantastic for you; however, most of us need to constantly review the media to remind us where everything is. Being able to mark specific clips as good or bad can be very useful.
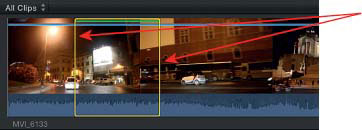
Below the Event Library, notice two stars and a red cross. These are your rating tools.
Highlight a clip in the Event Viewer and skim through it. Decide whether the clip is one you want to use or is one you want to reject.
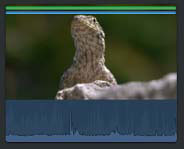
Green line indicates Favorite.
If it is a clip you wish to mark as a Favorite, press the green star below the Event Library or press the letter F. If you are in Filmstrip view, a green line will appear within the clip. If you are in List view—click the triangle to the left of the clip you marked and Favorite will be marked below the clip.


Red line indicates Reject.
Should you wish to mark a clip as a Reject press the red X or the Delete key. In Filmstrip view, the clip is marked red; in List view, this is indicated below the clip as a red X.
Note: The blue line you can see marked in each of the clips represents that a Keyword has been added to that clip. More on Keywording coming up!
There is a good reason to go to the effort of marking clips as Favorites or Rejects.
Click the drop-down menu in the top left corner of the Event Viewer interface and you see options to sort media within the Event.
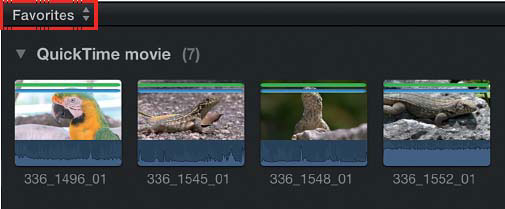
You can choose to Hide Rejected clips, immediately eliminating anything from view which you have marked as Rejected.

You can also choose to show only Favorites—those clips you have marked as being good takes.
Alternatively, you can choose to only show the Rejected media—perhaps you are deep into editing and need just one more shot … so you start looking through the media which you initially rejected.
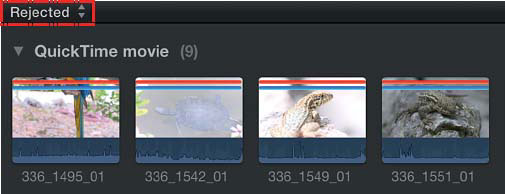
I’m sure the advantages are clear of being able to rate and show only the Favorites or hide the Rejected clips. Effectively what Apple has created is a functional database geared to define footage as good or bad.
Remember to reset to All Clips, as the setting you choose will remain until you change it, even when you move between different Events.
![]()
You can choose to use or reject this functionality. I find it useful and it gets much deeper than simply marking clips as Favorites or Rejects.
Not only can you mark Favorites and Rejects, you can also selectively mark sections within clips as Favorites or Rejects, and then use the sort options to show only the portions of the clip you specify.
This is particularly useful when dealing with long clips. For example, a 20-minute interview can be marked up at the most relevant places, or a three-hour conference record could be marked for the highlights of the piece only.
Here’s how it works:
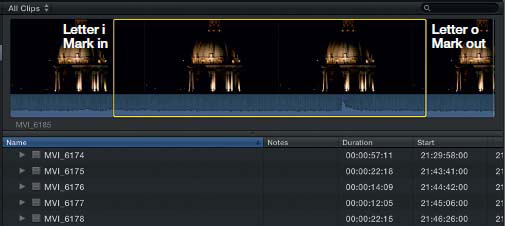
1 Skim through a clip in the Events Browser.
2 Click on the clip then drag the yellow range markers to define the area you wish to select. Alternatively, use the letter “i” for in and “o” for out to define the area.
Drag the yellow range markers to define the range within the clip or press the letters I O F in succession to mark a range selection.
3 Press F to mark this section as a Favorite or press the Delete key to mark as Rejected. Alternatively, use the green star for Favorite and red cross for Reject.
As you mark the sections, observe that only the portions you defined are marked as a Favorite or Reject.

Multiple favourites marked within a single clip
A mixture of Favorites and Rejects can be marked within a single clip.

Note the different views: List view (above) and filmstrip (left). Favorites and rejects are clearly marked.
You can then selectively display Favorites or Rejects from the filtering choices at the top right of the Event Viewer.

It should be clear that the ability to mark clips and sections within clips as
Favorites or Rejects, and then be able to sort this information, is of tremendous benefit, particularly when you are dealing with a lot of media, or when many long takes have been recorded. You can mark entire takes as good or bad or sections within takes.
This ability to mark and sort is one of the great strengths of Final Cut Pro X.
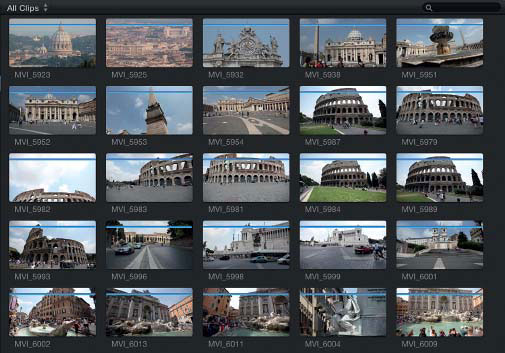
In all the images shown so far, each of the clips have had names assigned by the camera during filming.
None of these numbers mean very much, other than being a sequential naming of the clips.
Final Cut Pro X offers a powerful means to name and then search through all of the named clips. You can also easily add comments which can be searched, and, if you wish, you can Batch Rename clips. In terms of being organized, this is of huge importance. You can quickly search through all of the Events on your computer to locate any of the named clips.
Labeling clips is easy. You can work in either Filmstrip or List view.
1 Click on a clip to highlight, then click on the naming area so you can overtype.
2 Type a name relevant to the clip.
3 Press return.
4 Repeat the process for other clips in the Event which you wish to rename.

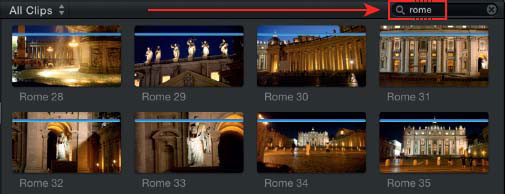
In the following images, there are several different views of a lizard. Each has been individually named by following the above steps. The real magic is in the search abilities of Final Cut Pro X. Each of the clips that has been named is searchable; therefore, if we key in the word “lizard” into the search criteria in the top right of the Browser, then any matching items will be found.
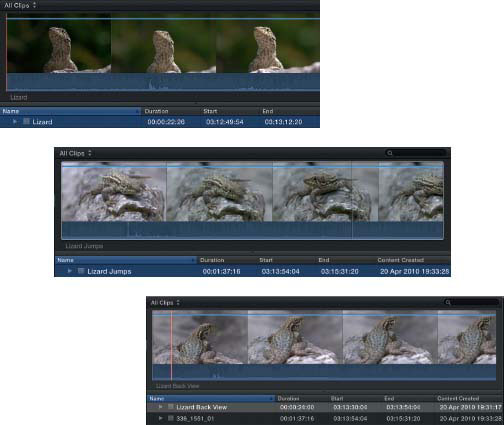
Each of the clips has been named so that it can be searched through using the database capabilities of Final Cut Pro X.
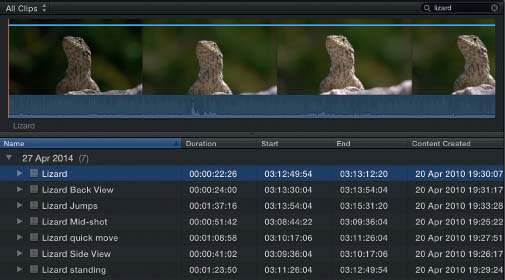
Key in the search criteria (top right of the Events Browser) and matching items will be displayed in either List or Filmstrip view.
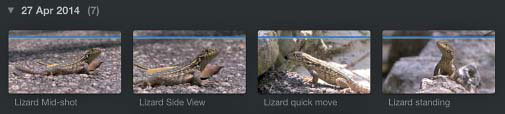
Above: the search criteria displayed in Filmstrip view.
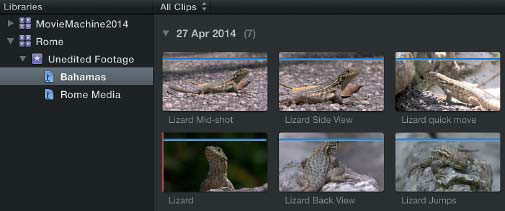
It is important to be aware that every time you search, the results will be displayed according to whether you click a Library or an Event or a Keyword Collection.
You therefore selectively display the media you choose to look at. Editing is about honing in on what you need, and avoiding that which is not needed.
By effectively naming clips enables us to then use the Search ability within Final Cut Pro X to pin-point exactly what is needed.
Notes can be just as useful as adding name labels to your clips. Quite often, when scanning through footage, I will stop and add a quick comment to a clip. It may be as simple as “great shot” or “definitely use,” or something more specific like “nice, light—evening,” or perhaps “use in end sequence.”
Anything that will stick in my memory which I can then key into the search field to retrieve the shot when I need it.
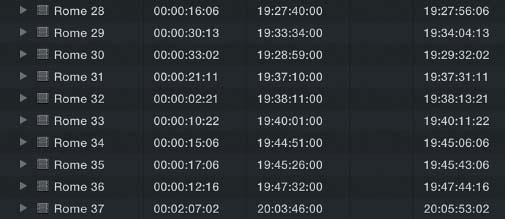
Go into List view in the Events Browser; observe that there are several columns extending to the right. Control-click and add the column titled Notes.

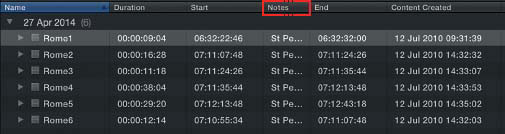
Control click to add the column titled Notes.
Click and drag so the Notes column sits next to the Name column.
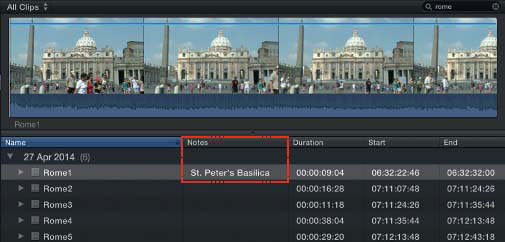
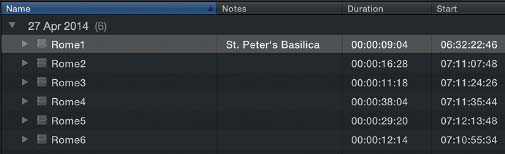
Click in the Notes column (to the right of any of the clips) and type information. You can enter anything from a single word to detailed descriptions.
Everything you type becomes searchable. Once you have entered information for several clips, then type a word you wish to search for into the Search Criteria area, at the top right of the Events Browser.
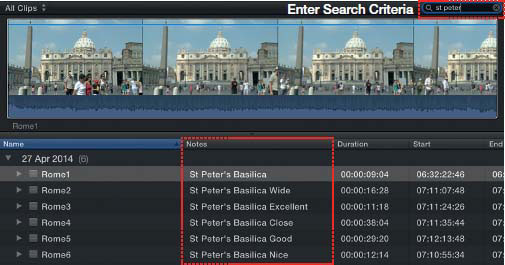
All of the information entered as notes is searchable.
The clips with matching results will then be displayed for you to work with.
Note how the order of search takes place. If you click on a Library then the Library will be searched; click on an Event and the Event will be searched; likewise, click on a Keyword Collection and the Keyword Collection will be searched.
You have powerful database capabilities at your fingertips to search through notes and clip names, provided you go to the effort of organizing and marking up your footage.
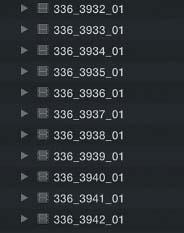
The ability to Batch Rename clips in Final Cut Pro X is a fantastic means for the editor to organize their footage, not just because naming conventions like 013_0251_01 for camera originals is meaningless and useless, but also because clips which you have renamed are searchable.

Batch renaming enables you to set the naming convention and then instruct Final Cut Pro to rename the clips you have chosen. Once done, you can search through all of the Events stored within a Library to access all of the clips which you have renamed. This is a fantastic way to give meaningful names to your media for quick access, and to see at a glance, in either List or Filmstrip view, what the names of each of the clips refer to.
1 To Batch Rename clips, you need to first set the naming convention. Press the icon to open the Inspector or shortcut Command + 4.
![]()
2 To the bottom of the Info tab of the Inspector, click Apply Custom Name then scroll to Edit.
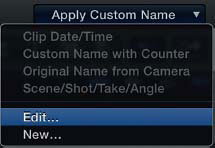
3 You will be greeted with a very complicated window, shown below. Click to choose the second option on the left, which is Custom Name with Counter.

4 Click in the Custom Name box and type the naming convention you wish to use. Notice the increments you define will start at the number 1 unless you choose otherwise.
5 Now highlight a number of clips in any of your Events.

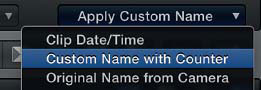
6 Go to the Info tab of the Inspector and at the bottom select Apply Custom Name—then choose Custom Name with Counter.
![]()
The clips which you highlighted have then been renamed in the Event.
7 Repeat the process to change the naming preset and then you can Batch Rename other groups of clips. You can now search through all of the clips on any of the drives connected to your Mac.

8 Click to highlight a Library, Event or Keyword Collection. Type the search criteria into the top right of the Browser. You can then view the clips that match your search term.
Clips that match the search criteria can then be viewed in either Filmstrip or List view. You therefore have a very simple means to Batch Rename clips and search through all of your Events to find exactly what you want, according to the naming structure you have chosen.
If you want to get really sophisticated with the organization of your media, step into the world of Keywording. I think of rating footage, or marking Favorites and Rejects, as being a simple way to organize your footage. Keywording gives you far greater power.
Do not feel under pressure to keyword. Many editors are happy to break footage into labeled events, perhaps rate or define sections as Favorites, and leave it at that. The power of Keywording is that within a single Event you can break your footage into defined sections, known as Keyword Collections. Think of Keyword Collections as a means to file footage away, or to break it into manageable, accessible groups.
Keywording can be applied to an entire clip, a range within a clip, or a group of clips.
Adding Keywords is done through what is known as the Keyword Editor.
1 Press Command + K to open the Keyword Editor or press the Key symbol to the middle left of the Final Cut Pro X interface.
![]()
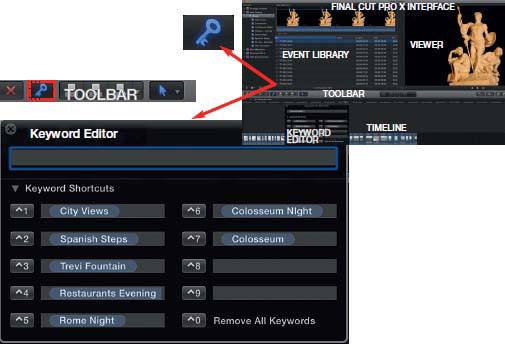
Press Command + K or press the Key symbol to the left of the Toolbar to open the Keyword Editor
![]()
Click the triangle to reveal Keyword Shortcuts.
The Keyword Editor will open in front of you. This may or may not have Keywords entered into it depending on whether or not you have used this before.
2 Highlight a clip or a group of clips which you wish to apply the Keyword to.

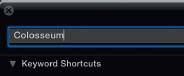
3 Type the Keyword into the Keyword Editor, then press Return. The Keyword will then be applied to the media you selected.
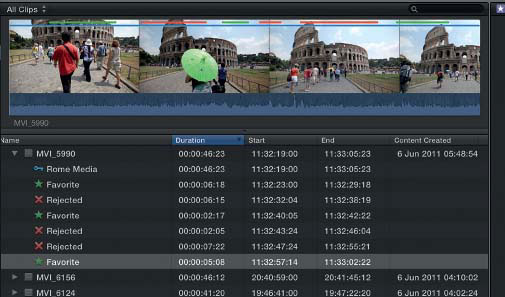
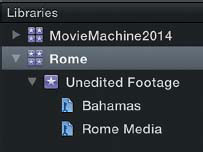
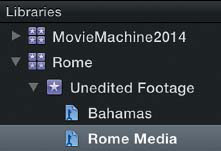
In the case to the left there are many Keyword collections all contained within a single Event.

Essentially all of the media contained in the Event—Rome—has been broken down into smaller collections to make locating specific media easier to achieve.
![]()
A blue line through each of the clips indicates that a Keyword has been applied.
Keywords can also be added using shortcuts. First, open the Keyword Editor, then press the triangle to reveal the list of Keywords; the short-cut is located to the left of each of the Keywords. As you type a few letters relevant Keywords will appear.
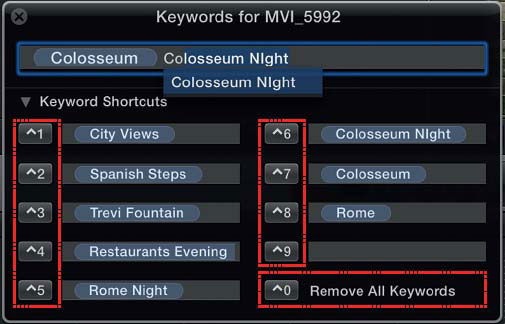
Shortcut to enter Keywords Control + 1 through to 9
Shortcut to clear all Keywords Control + 0
Type to enter Keywords or use the shortcuts. Highlight a clip or clips in the Browser and press shortcut Control + 1 through to 9 to quickly add the Keywords already entered into the Keyword editor.
To clear Keywords from media with Keywords already applied, highlight a clip or group of clips and press Control + 0 this deletes all Keywords. This works whether the Keyword Editor is open or not.
To remove Keywords from the shortcut area of the Keyword Editor click on the Keyword within the editor and press delete.
When many Keyword Collections have been added, you end up with many categories, defined by yourself, where media is filed away. Be aware, Keyword Collections apply to a single Event, therefore, it can make sense to put all related media, or even all the media for a project into a single Event, and then break it up into Keyword Collections.
Keywording can be applied to groups of clips, individual clips, or a range within a clip.
You can selectively apply a Keyword to part of a clip by marking a Range before applying the Keyword.
To apply a Keyword to a range in a clip, highlight the Clip, use the yellow range selectors to define the area in the clip, then apply the Keyword.
As stated earlier, you do not have to Keyword your media. However, once you understand the concept of Keywording you will find, particularly on a project with lots of media, that this can be a great timesaver. Once upon a time, the only way to log your footage was to write notes, watch footage in real time, and jot down timecode numbers. Keywording provides a sophisticated means to log your footage, file it away, and retrieve it when you need to get to it quickly.
In summary, notice an entire chapter, more than 20 pages, has been devoted to organization. This is because it is essential for the editor to be organized. You can’t edit a production effectively without being organized.
Many years ago, in tape suites, the method was a paper edit with burnt-in timecode as a reference. The producer would come into the edit suite with pages of notes after having worked through the raw material in an offline suite or even viewing on VHS tape. Edit suites were expensive, so the time needed in these rooms was minimized.
Now, we have a world of tools to prepare, organize, and edit our media. The temptation may be to skip the organizing and sorting of footage, avoid Keywords, adding notes or clip names. My view is that it is counterproductive for you not to be organized. I use a combination of all the methods described: Keywording, Batch Renaming, and adding notes to clips. This proves to be incredibly useful throughout the editing process. I regard the organization phase as laying the foundation for the edit. Spend the time getting organized and the rest of the edit will fall together.