
Editing is, without doubt, one of the most wonderfully creative art forms of the twentieth century, and has evolved into a universal means of expression in the twenty-first century. Previously, editing was restricted to those who worked in TV stations, those who worked in the film industry, and independent filmmakers, groups, and companies. Now, it’s a totally different scene. Twenty-first century editing gives the tools to anyone to create amazingly high-quality video.
Jump back 30 or 40 years. Unless you were a professional, or rich, you were most likely going to be working with Super 8. Super 8 was affordable, accessible, and referred to as spaghetti by those in the industry. The size of the frame was one-quarter that of 16 mm, which, itself, was one-quarter that of 35 mm. So working with Super 8 was not only fiddly and awkward, the quality suffered.
Working with Final Cut Pro X the quality does not suffer! This is a capable editing system which outputs many high-end codecs, including ProRes at either standard, HQ, LT, or even ProRes 4:4:4. ProRes is a high-quality mastering format with several levels of quality:
ProRes LT: |
100 Mbps |
ProRes standard: |
145 Mbps |
ProRes HQ: |
220 Mbps |
ProRes 4:4:4: |
Cinema quality |
ProRes XQ: |
500 Mbps used for mastering and high-end cinema work |
ProRes 4:4:4 is cinema quality—get that? This is a big deal. Back in the days of editing Super 8 or 16 mm anyone would have jumped at this opportunity.
The fact that Final Cut Pro X can produce cinema quality is a big deal! Back in the days of editing Super 8 or 16 mm many would have jumped at this opportunity!
Regardless of the level at which you work, the mechanics behind post-producing your movie are the same.
Before we begin editing, let us quickly run through the process. Whether you’re editing a home movie or a feature film, the process is the same.
i |
|
ii |
Review and look at the footage, get to know it, file it, and categorize it so you can extract what you need. |
iii |
Do a picture edit, meaning cut it all together. Often, a soundtrack and picture edit are built at the same time. |
iv |
Attend to audio—do what you can to make it sound good. |
v |
Add effects. This may also be done during the editing process. Effects can be as simple as a basic title to complex, multilayered effects which have been carefully built and constructed. Final Cut Pro X offers a wide range of pre-built and customizable effects. |
vi |
Output—you may need to output a high-resolution QuickTime file, an H.264 encode, DVD, or Blu-ray. The means to output at a professional level is fully provided. |
So far, we have covered importing footage to hard drive, reviewing, and organizing the footage.
Now, the time has come to start the editing process.
This is a very simple and essential procedure. You need to create a project—your movie, your edit, your Timeline—whatever you want to call it, the Project contains all the information which makes up the edited content.
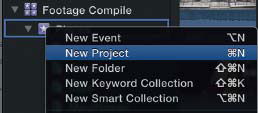
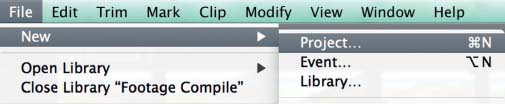
1 Control-click on a Library or an Event and choose New Project, or, highlight the Event and choose File—New Project. You will then be prompted to name the Project and confirm the Event where the Project will exist.

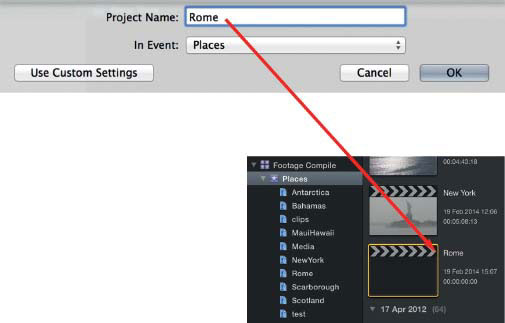
Overtype to name the Project and define the Event where the Project will be located.
2 Click OK. Notice the Project is located in both the Event in which it was created and also the Library in which the Event exists. At this stage the Project appears blank, because it doesn’t contain any media yet.
This is the easy way to create a project—the project attributes will be determined by the first clip which is then edited into project Timeline.
![]()
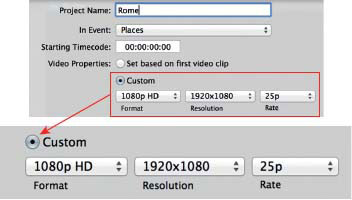
Easy is not always best! If you choose Use Custom Settings a window will open and you then have more control over project attributes such as Format, Resolution and Frame-rate.

You need to know what format and frame rate you wish to output. In the world of HD, there are two main standards: 1280 x 720 or 1920 x 1080 (often called 720P and 1080P), and each of these can run at different frame rates.
By letting Final Cut Pro X automatically set the video properties based on the first clip, this means, if you edit a 1920 x 1080 clip as the first clip into the
Timeline, the result will be you will be editing a 1920 x 1080 project (at the frame rate of the first clip dropped into the Timeline).
If the first clip is 1280 x 720, then you will effectively be setting the project to be a 1280 x 720 project. It may be that you are working with 4:3 DV footage—again, if the first clip is set to this standard, then that is the image size which will be set.
![]()
Very often projects are made up of a mixture of footage—some HD, some SD, and perhaps a mixture of widescreen and standard aspect ratio. Furthermore, some footage may be shot at 25 frames per second, other footage at 29.97, and perhaps some at 24P. If you let the computer set the video properties automatically, then you need to make sure the first clip you edit into the Timeline is of the frame size and frame rate you wish to output to.
The idea of letting the computer set the video properties automatically is designed to make life easy, not complex. If all or the majority of the footage you are working with is of one standard, then allowing this to be set automatically can be a good idea.
There are times when it is advantageous to set the video properties manually. This gives you power to define the format, frame size, and frame rate.
I often choose to work this way. By manually setting up the project you can define details such as format, resolution, and frame rate.
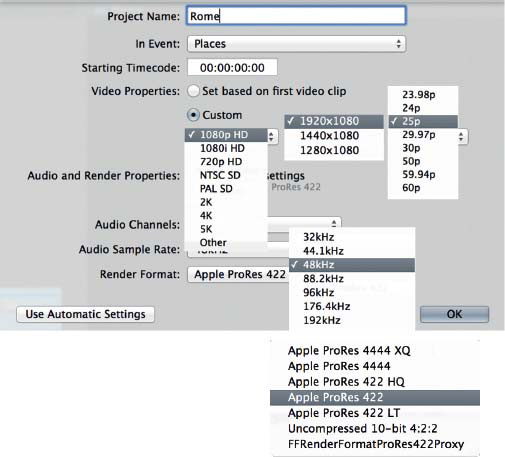
You can also choose to manually set up the audio and you can define the render format.
If these settings, numbers, frame rates, and different standards are
completely confusing to you, then you need to stick to automatic. For those who have a good technical understanding of video production, setting up a project manually can often be the best way forward.
Once the project settings have been chosen, make sure the project is named, and press OK. You are now ready to move onto your first edit.
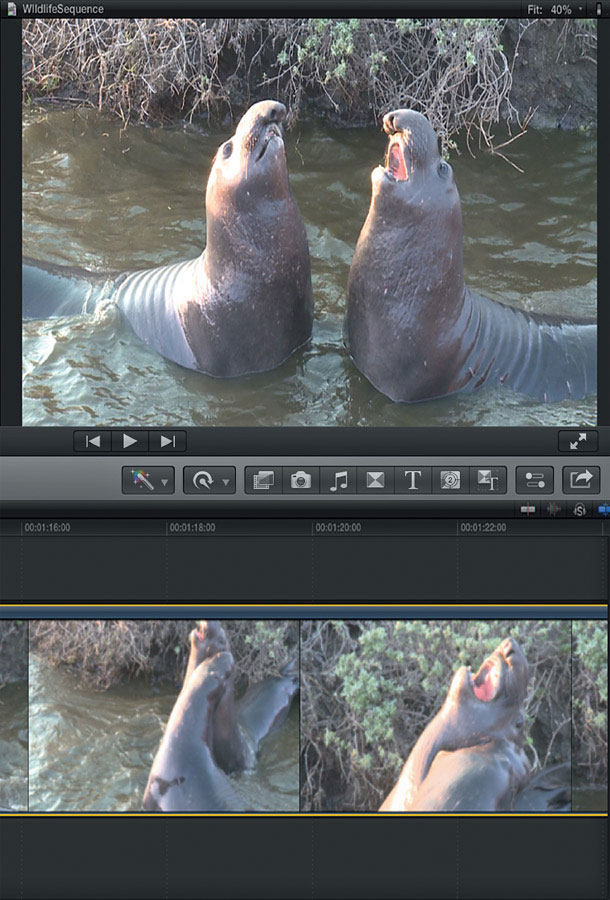
As already described, there are three areas you need to work among: the Events Library, the Viewer, and the Timeline.
You access clips in the Events Library, you watch these in the Viewer, and then you edit into the Timeline; and it is there the building blocks which represent the clips of your edit are organized.
1 Choose a clip inside one of the events.
2 Click on the clip and skim through it (press S if Skimming does not work).
3 Define a range within the clip by dragging either of the yellow ends or by pressing I and O.
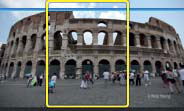
Press “i” to mark in. Press “o” to mark out.

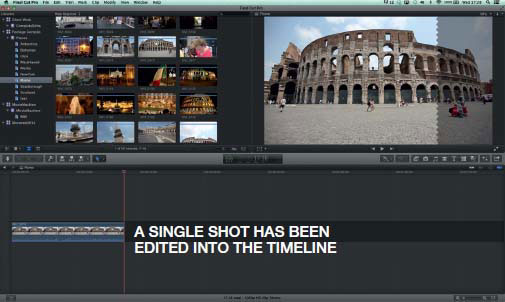
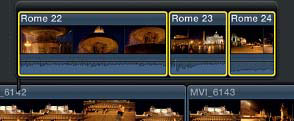
4 Once a range is defined, look to the empty Timeline. Press the letter E. You will see the shot you highlighted in the Events Browser has been edited into the Timeline. How this is represented in the Timeline is determined by the view you have set for the Clip Appearance.
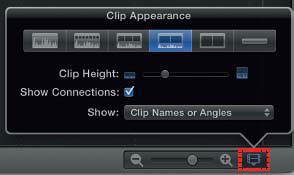
Click bottom right of the Timeline to reveal options for Clip Appearance.
5 Repeat the procedure—select a shot, view by skimming, mark a range, press the letter E (for Edit or for End) and the next shot will be edited to the end of the Timeline. This type of edit is referred to as an Append edit.

6 Repeat the procedure until you will have several shots cut together in the Timeline.
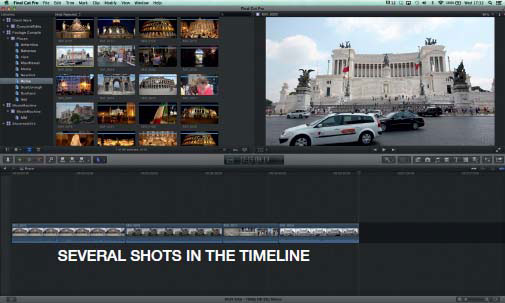
Note: If you highlight several clips in the Browser and press E, then these are edited in order direct into the Timeline.

Highlight clips and edit these direct into the Timeline.
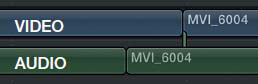
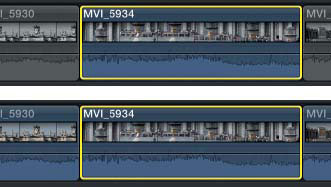
Notice that each clip is made up of video and audio. Video and audio are locked together, indicating the synchronization of image and sound.
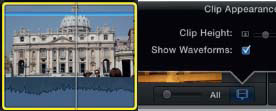
Switch on Show Waveforms in Clip Appearance.

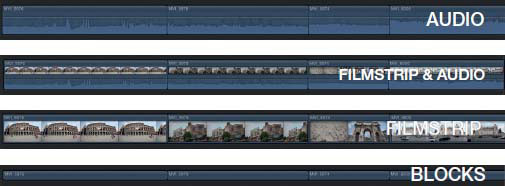
Clips in the Timeline can be displayed in several different ways according to your choice for clip appearance.

Click the icon bottom right of the Timeline to reveal options for Clip Appearance.
Sliding Clips around in the Timeline
You will now have several clips in the Timeline. These are in the order which you edited them. This ordering can quickly and easily be rearranged.
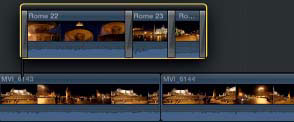
You can use the slider bottom right on the Timeline window to adjust the spread of the clips in the Timeline. This only affects the appearance, not duration.
![]()
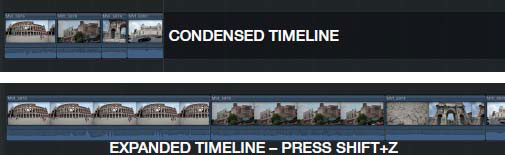
Press Shift + Z to fit the entire contents of the Timeline into the available space. Doing this makes it easy to get an overview of everything that has been edited into the Timeline.
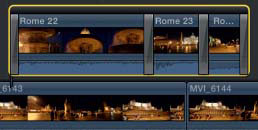
To rearrange the shots simply click on a clip, drag it to a new position within the Timeline between two other clips, and release your mouse button. The clip will slide into place and the edits around it will slide left or right to accommodate. This is what Apple calls the Magnetic Timeline.
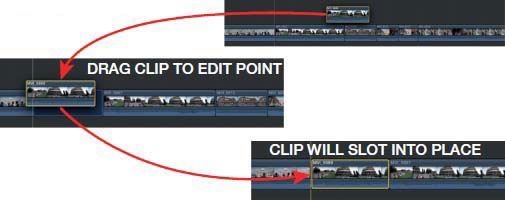
Drag a clip to a new position within the Timeline.
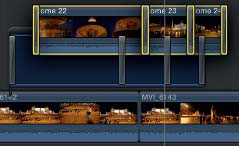
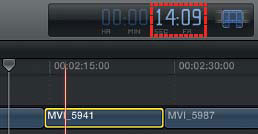
As well as dragging to rearrange, you can also adjust the duration of a clip by clicking to select and then dragging the yellow indicator on the end of the clip in either direction.
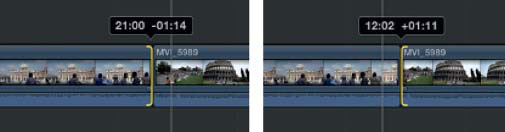
Extend/reduce clips by dragging left or right.
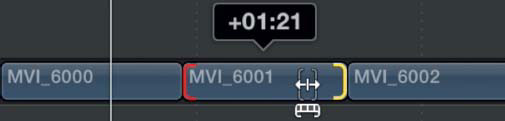
You can make the clip shorter from either end, essentially trimming away media, or, if media is available, you can extend the edit from either the beginning or the end, and therefore make it longer. An indicator will display in seconds and frames the change in duration.
It is important to understand the concept of available media. The representation in the Timeline of a clip refers to a media file which exists on the hard drive. Much of the time while editing you will use a portion of a shot but not the whole shot—there is still media available on the hard drive which can be accessed. If the full duration of the clip has been used, then there is no further media to draw on. You will know when you reach the limit of available media as you will not be able to extend the clip further. The yellow bracket will turn red to indicate that you have run out of media.

Each clip is made up of video and audio that is locked together. This will be obvious if you have set the clip appearance to Filmstrip view with waveforms visible. To edit to a high level, you need to be able to separate video from audio at will. Any professional editor knows this. Your film needs to be built from the ground up with attention to the soundtrack as well as the picture edit. Picture and sound do not always need to stick together.

Separating audio from video is a fundamental need and enables you to then create a separate sound and picture edit. Sometimes picture and sound need to be locked; sometimes they need to be separated.
1 Click to highlight the clip with which you wish to work.
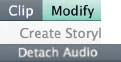
2 Go to the Clip menu—at the top of the interface, click and scroll to Detach Audio (shortcut: Control/Shift + S).
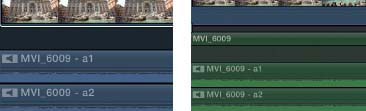
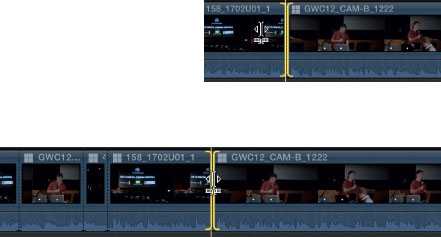
3 The result will be obvious. Audio, represented in green, now appears separate from video. The Filmstrip view represents the video.
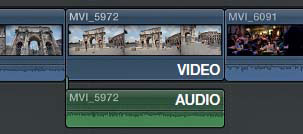

One can see clearly that the audio is separated from the video. If you click to select the audio, you can move this independent to the video.
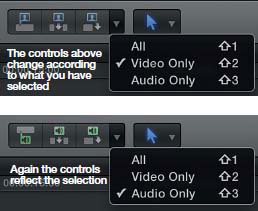
Look to the point where the video and audio are joined. This shows the audio is connected to the video. Whenever you move the video clip, the connected audio will move with it. If you select Audio Only, then you can move this independent of video.
![]()
For simple editing leaving video and audio locked together—for more involved editing one needs greater flexibility.
You can also access the audio components, which means the individual tracks of audio.
Choose the Clip menu at the top of the interface and scroll to Expand Audio Components. You will then see the expanded audio tracks for you to access.
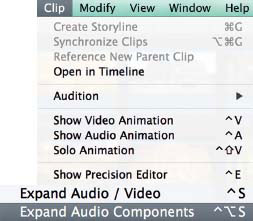
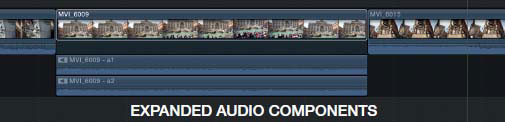
Being able to access the individual tracks of audio is important. Most professional cameras will record 2 separate tracks of audio through twin XLRs, and some camera operators will set the camera mic to record to one channel and external mic to the other channel. Being able to mix audio between the tracks and to silence one track while keeping the other track live is essential. This is how most of us have been working for years.
You can expand the Audio Components for clips where audio is combined or for audio which has been detached.
The Concept of Connected Clips
Final Cut Pro X provides several different ways to edit. The first method we discussed is invoked by pressing the letter E. This is called an Append edit—this edits shots onto the end of the Timeline. Therefore, what you are adding to the Timeline does not interfere with existing content in the Timeline.
The next type of edit creates what is called a Connected Clip. The Connect edit places a clip above another clip; it can be seen as a super-impose edit. The uses for Connected Clip will become clear as we get deeper into the editing process. To perform a Connect edit, press the letter Q.
1 Mark a range within a clip within an event. Alternatively, click to select the entire clip.
Either mark the entire clip or a range within the clip.
2 In the Timeline, click to position where you want the edit to take place. I suggest you keep Skimming on. If need be, press S or the icon which toggles Skimming on/off.
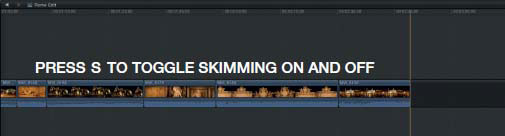
Note: With Skimming switched on the edit will take place wherever the Skimmer is positioned. With Skimming switched off edits take place wherever the Playhead is positioned.
3 With the Skimmer positioned where you want the edit to take place, press the letter Q.
The clip selected in the Browser is then edited into the Timeline. The result is the clip is positioned one level up from the video which already exists. Notice the clip is attached to the clip beneath it—it is connected.
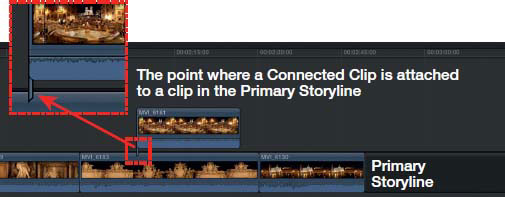
Connected Clips are always edited either above or below what is called the Primary Storyline. The Primary Storyline is indicated in a dark shade of gray in the Timeline.
I think of the Primary Storyline as being the main story—this is the hardcore structure of your edit. What you add above as video, and below as audio, is secondary to the main story. It is as if the Primary Storyline is the foundation of your movie, with the rest being built from there.

4 Edit several Connected Clips into the Timeline.
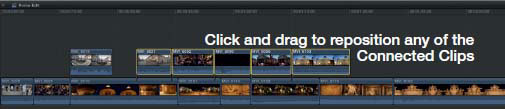
5 Click to select a Connected Clip and it can be moved and positioned. If you collide with another Connected Clip, then the clip you are moving will shift up a level, on top of the one it collides with.
Position Connected Clips wherever you wish by dragging.
Connected Clips can be positioned above or below the Primary Storyline. Most often you will see video as Connected Clips above the Primary Storyline, and audio below; however, there is no reason why you can’t position video and/or audio above or below the Primary Storyline. They can be dragged to either location.
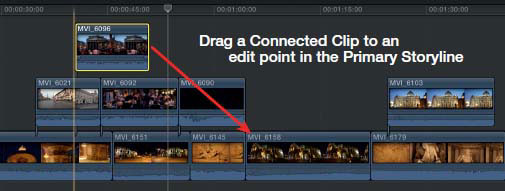
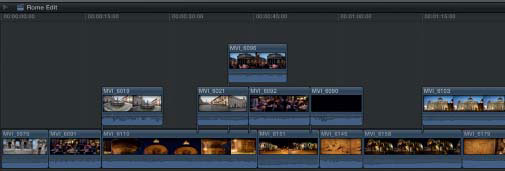
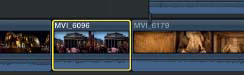
To move a Connected Clip into the Primary Storyline drag it to the point where two clips meet; then the clip you are positioning will slide into place.

Drag the Connected Clip between two clips in the Primary Storyline.
The clip will then slide into place.

To drag a clip from the Primary Storyline and make it into a Connected Clip simply drag it up or down. This then becomes a Connected Clip and the gap in the Primary Storyline closes; this is the Magnetic Timeline in action.
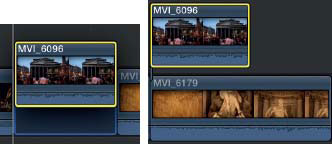
Furthermore, when dragging Connected Clips vertically you can prevent the clip from moving horizontally by holding down the Shift key while you drag.
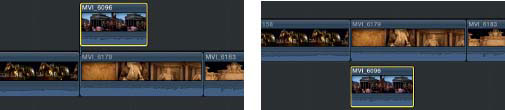
Hold Shift + Drag to move the Connected Clip vertically; this maintains horizontal positioning.
Directing the Flow of Video and Audio
So far we have done two types of edits:
1 The letter E, which is the Append edit; this edits clips directly onto the end of the Timeline.
2 The letter Q, which does a Connected Clip edit above or below the Primary Storyline.
It can be a real problem to do an edit and then have audio competing from two separate tracks. You need to be able to silence audio at will.
There are two ways: first, edit the picture only so the audio doesn’t actually get edited into the Timeline; second, once audio has been edited, set the level to zero so that the audio cannot be heard.
Let’s start with editing picture only without audio.
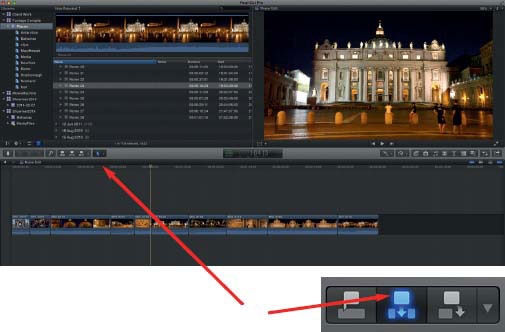
In the Toolbar in the middle of the interface, there are three icons which relate to the editing process.
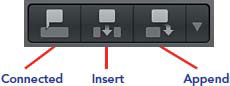
These are for:
1 Connected Clip, which we already discussed.
2 Insert, still to be discussed.
3 Append, which we already covered.
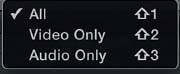
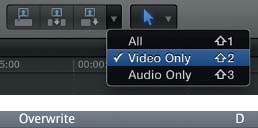
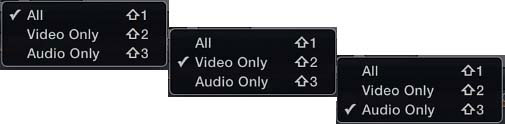
The drop-down arrow reveals choices to switch video and/or audio on or off.
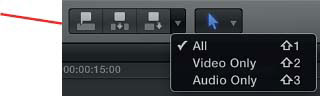
Quickly and easily you can choose to edit All (both video and audio) or Video Only or Audio Only.
The ability to channel video and audio separately or together is what is needed to fulfill the needs of the creative process. Since image and sound were first cut together editors throughout the world have been doing the same thing over and over, be it on film, tape, spinning disc, solid state, or whatever the medium may be. The means to achieving results changes with each turn of technology, yet the needs and the essential techniques are the same.
Editing Video Only or Audio Only is the means to achieving the results needed for professional-level work. You can edit the picture over an inter-view and hear the existing soundtrack; you can introduce traffic sound, for example, to cover up an audio join; you can add sound effects, music, narration, or a video cutaway without affecting the soundtrack. This is how editors work.
Notice the shortcuts—embed this in your brain to speed up the process:
• Shift + 1: Video and Audio.
• Shift + 2: Video Only.
• Shift + 3: Audio Only.
You can fly through the editing process directing the edit so only video, audio, or both are edited at will.
When editing you always have a choice—to push media forward and therefore extend the overall duration of the Timeline, or to add media to the Timeline without affecting the duration (meaning the duration stays the same), that is, the content is edited over existing media.
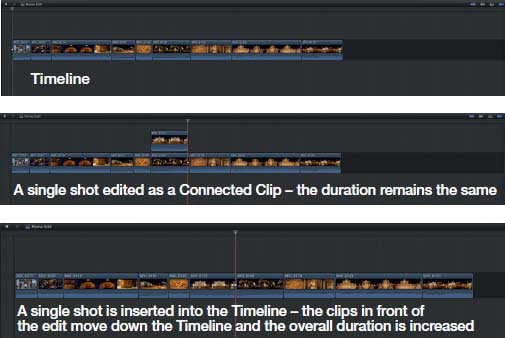
Think of it like film—you have a piece of film which you are going to edit to another piece of film. You have a choice: join the film to another piece of film and make the entire edit longer (Insert edit) or take a piece of film out of the existing edit, the exact duration of the film you are adding; thus keeping the overall duration the same (Overwrite or Connected edit).
For the moment, let’s concentrate on Insert editing.
1 Select a clip within an event; either choose the entire clip or mark a range.
2 Click in the Timeline where you want the edit to take place.
3 Press the letter W or press the Insert symbol on the tool bar.
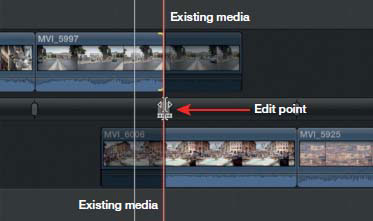
Notice what takes place: the edit is cut into the Primary Storyline, and all media after the edit is pushed forward. The overall duration of the Timeline has been made longer.

Above: Before the edit.
![]()
Above: After the Insert edit—the duration of the Timeline has been increased.
Every time you do an Insert edit that is how it works—it increases overall duration and pushes the clips further down the Timeline, away from the edit point.
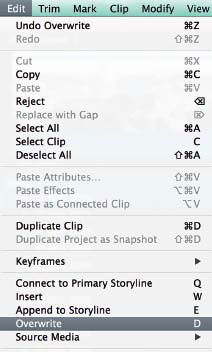
Overwrite editing is the opposite of Insert editing.
Insert editing makes the Timeline longer and pushes everything forward, whereas Overwrite editing does not affect the duration at all. As the name suggests, using this type of edit writes over a portion of the Timeline.
Use the Edit menu to access Overwrite edit, or use the shortcut, which is the letter D.
1 Select or mark a Range in a clip within an event.
2 Click in the Timeline and position the Skimmer or Playhead where you want the Overwrite edit to take place.
3 Select to write Video and Audio, Video Only, or Audio Only.
4 Press the letter D or choose Overwrite from the Edit menu.
Notice the change to the Timeline where the media has been overwritten, however, the duration of the Timeline remains unchanged.
5 Observe the result: a portion of the content in the Primary Storyline has been written over with media you marked in the Event Viewer.
6 Position the Skimmer in the Timeline and press the space bar to play.
Marking a Range in the Timeline
Just as you can mark a range in the clips in the Event Viewer, you can also mark a range in the Timeline. This lets you define the duration of the content which can be edited into the Timeline, and this applies to the different types of edits such as Connected, Insert, and Overwrite.

A range can be marked in the Timeline in three ways:
1 Click on a clip in the Timeline and the entire clip will then be marked as a Range.
2 Use the letters “i” for in and “o” for out to mark the beginning and end.
3 Alternatively, press the letter R and drag within the Primary Storyline to set the range. A range can also be marked within any of the single Connected Clips.

The duration of the range marked in the Timeline overrides the range marked in any of the clips in the Browser. This means if you mark a two-second range in a clip in an event and then mark four seconds in the Timeline, the four-second duration will apply. If there aren’t four seconds of media available then the media which is available will be edited into the Timeline.
While editing, I constantly bounce between the Timeline and Event Library. Points will be marked in the Timeline, something else marked in the Event Viewer. Press Insert, Overwrite or Add to the Timeline as a Connected Clip. Detach the audio and delete the audio. It all happens very quickly.
You need to get into the flow of editing. Processes and technical functions need to become second nature so you hit the keys already lining up in your mind for the next action, constantly reviewing, trimming, adding to, and deleting sound and picture. The ability to mark a range in the Timeline is a very important enabler for achieving precise results.
So, we have looked at four types of edits:
1 Append: E
2 Connected: Q
3 Insert: W
4 Overwrite: D
The above ways of editing are all incredibly useful for getting content into the Timeline. You can also drag clips directly into the Timeline.
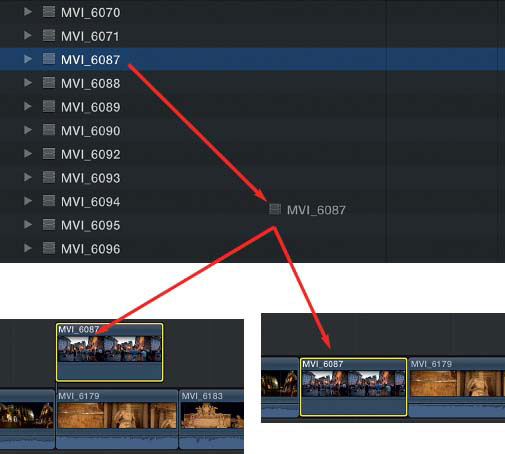
When dragging to the Timeline a Connected edit is performed by dragging above the Primary Storyline; an Insert edit will take place if you drag to the edit point where two clips meet; and a fifth kind of edit is offered if you drag a clip directly on top of a clip in the Primary Storyline—this called a Replace edit.
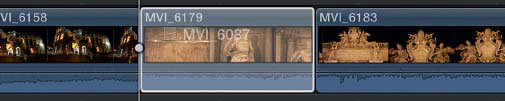
A contextual menu will appear offering several Replace options. Essentially, a Replace edit means to remove the shot that is already there and replace it with the shot you have chosen.
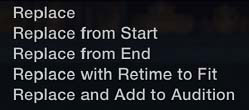
The difference between Replace and Overwrite is that Overwrite works to a defined duration, whereas Replace replaces one shot with another with the duration being defined by the shot you are editing into the Timeline. This is unless you choose, Replace with Retime to Fit, in which case the duration will be defined by the original shot, with the shot being edited being either slowed down or sped up to fit in the available space.
You can drag a Connected Clip above or below the Primary Storyline. If the clip is a video clip and you wish for the image to be visible, place the clip above the Primary Storyline. The only likely reason to drag video below the Primary Storyline would be to create a picture-in-picture, or to position a Chroma Key background (dealt with later). If you are dealing with audio it would make perfect sense to drag this below the Primary Storyline as a Connected Clip.
Mentioned earlier, but worth mentioning again, are the key combinations which make this a quick and simple operation:
• Option + 2 Video Only
• Option + 3 Audio Only
Remember—it is not only about getting content into the Timeline, it is about defining exactly what is to be edited: Video and Audio, Video Only, or Audio Only.
It should be obvious that Final Cut Pro X has been designed to be efficient and give you results quickly. Hit a few essential key combinations and in no time you have the content in the Timeline to build your film.
Next you need to access Tools, which give you precision to sculpt your edit into a fine-tuned masterpiece.
There are seven editing tools in Final Cut Pro X which you need to master:
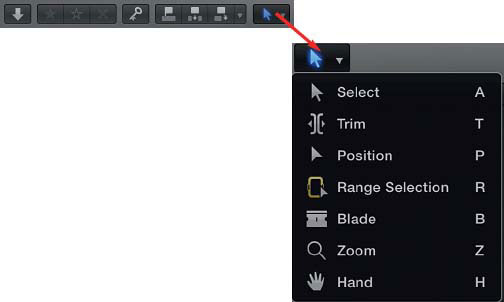
Click the arrow in the Toolbar to reveal the set of editing tools.
1 Select A
2 Trim T
3 Position P
4 Range Selection R
5 Blade B
6 Zoom Z
7 Hand H
These tools are powerful and provide the means to craft your edit. Consider these tools fine-tuning devices in bringing finesse to your edit.
Tools are accessed by selecting the drop-down arrow and then clicking the tool of choice, or you can use the shortcut letters. You can also temporarily select a tool by pressing a letter, for example B for Blade.
![]()
The tool is active while the letter is held and then returns to the tool which was last selected when you release the letter.
Select A: This is the home tool. Whatever task you perform with any of the other tools, always return to the Select tool. Simply press the letter A and the tool is then chosen. The Select tool allows you to pick up clips and rearrange them within the Timeline; you can also move Connected Clips; click with this tool on clips in the Timeline and its abilities become clear.
![]()
Position P: Press P and the Position tool is selected. This functions similar to the Select tool with one distinct advantage: whatever you choose and then reposition in the Primary Storyline overwrites that portion of the Timeline. You are free of the restrictions of the Magnetic Timeline; effectively, selecting the Position tool turns the Magnetic Timeline off, while choosing the Select tool A turns it on. With the Position tool selected, wherever you position a clip, or group of clips, will overwrite that area of the Timeline. If no content exists where you reposition the media, then this space becomes inhabited by the media.
![]()
Blade B: Press the letter B to select the Blade tool. This lets you slice through a clip, thereby breaking a clip into smaller chunks. You can then remove content by pressing the delete key, and the
![]()
![]()
Below: Highlight a clip or clips in the Timeline.
![]()
Below: Delete and clips move to fill the gap.
![]()
Below: Hold Shift and press Delete and a gap remains where the media existed.
Magnetic Timeline will then close the gap with the remaining clips; or, you can press Shift + Delete and the content is removed and a gap is left, leaving the duration of the Timeline unchanged. If you press Shift + B, the Blade then becomes a double-blade, enabling you to cut through multiple video or audio layers at the same time.
![]()
Shift + B for double-blade
Zoom Z: Expanding and contracting the Timeline are critical to editing in Final Cut Pro X. Sometimes you need to be zoomed right in on the Timeline for fine detailed work; other times you want to contract the Timeline to get an overview of the edit. Press the letter Z and this selects the Zoom tool. With Zoom selected, you can expand the Timeline by clicking with the magnifier. Where you click is the area that is expanded. Hold the Option key, while zooming, and then you can contract the Timeline. Press Shift + Z to condense the Timeline into the available space.
![]()
Hand H: Press the letter H and this gives you the ability to grab hold of the entire Timeline and move it forward or back. No media is moved when using this tool—it is the visual positioning of the Timeline that is affected. I find the Hand tool useful for manually working on specific areas within the Timeline, particularly when the Timeline is expanded beyond what you can view on the screen.
![]()
Range Selection: Lets you quickly and easily define a range. Press the letter R and drag in the Primary Storyline to mark a range, or within any of the Connected Clips. Also used to adjust audio (described later).
![]()
It is important to understand that tools are not used in isolation, they are used in combination with each other. Many times I will use the Select tool to juggle a few shots in the Timeline and then switch to the Zoom tool to zoom in close on a specific area. The Position tool would then be used to move a clip to overwrite another clip, using the Playhead as the point of reference for where the edit is to occur. This brings us to Snapping.
Snapping: This toggles on and off using the letter N. It can also be switched on and off by pressing the icon at the far right of the Timeline.
![]()
Snapping N toggles on/off.
When skimming through the Timeline, or when dragging the Scrubber Bar, with Snapping switched on the Skimmer/Scrubber Bar will snap to the edit points.
It is as if the Scrubber Bar and/or Skimmer is magnetically drawn to these—subtle enough that the edit point can be ignored, and strong enough that you can hit the exact point by feeling the hold as you connect to the edit point. This is Snapping.
Very useful. I leave Snapping switched on most of the time. It can also be useful to switch Snapping off so you can freely move through the Timeline without stopping at the edit points.
![]()
Snapping on.
![]()
Snapping off.

Up/down arrows move between edit points.
![]()
Horizontal arrows move forward a frame at a time; hold Shift + Arrow and move 10 frames at a time.
Another way to precisely find your way between edit points is by use of the forward and backward arrow keys. Press the up and down arrow keys and you will skip between edit points. Press the horizontal arrow keys and you move forward or backward, one frame at a time. If you hold Shift + Arrow (forward or backward) you skip forward/backward 10 frames with each press.
Between Snapping and the arrow keys I find myself able to precisely locate any point in the Timeline, quickly and accurately.
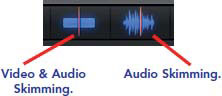
The letter S toggles Skimming on and off.
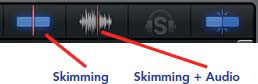
Shift + S toggles audio on/off while skimming.
Simply drag across media in the Events Browser or Timeline and the results will be obvious.
Skimming is a great feature for reviewing the footage in your Timeline and clips in the Events Browser, however, there are times when it can get in the way.
Therefore, it can be very useful to hit the letter S and switch Skimming off momentarily, or even for extended periods, while you then use the Scrubber Bar to work your way through the Timeline. Often, while editing, I will hover over the letter S, switching Skimming on/off as needed.

I’ve mentioned the Primary Storyline. Just to recap, this is indicated in the Timeline with a dark gray strip; everything else in the Timeline connects or becomes part of the Primary Storyline. The Primary Storyline is where the main action happens—it is where the movie is built. This does not diminish the importance of content which is secondary to the Primary Storyline. The point is that the bulk of editing takes place either in or connected to the Primary Storyline.

Every time you do an Insert edit, an Overwrite, or an Append edit, the result is then added to the Primary Storyline.
When you do a Connect edit (shortcut Q) the result is added to a Secondary Storyline (above or below the Primary Storyline).
Connected Clips are the ones which appear outside the Primary Storyline.
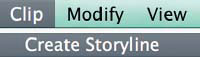
You can also create Secondary Storylines. Simply highlight one or more Connected Clips in the Timeline, and choose Create Storyline.

A Storyline is defined by a darker gray border around the clips. Dissolves can now be added between clips and the Storyline can be moved as a single unit.
Using the Select tool click and move the Secondary Storyline wherever you want it to be placed.
Why would you want to create a Secondary Storyline? There are several reasons:
1 A Storyline can be moved as a complete unit. It is much easier to move several clips together as a Storyline than as individual Connected Clips because as a Storyline they all move together. Just as Connected Clips are anchored to the Primary Storyline, so are Secondary Storylines. Secondary Storylines always connect to the Primary Storyline.
2 You can add dissolves or other transitions to the clips inside of a Storyline, whereas it is not possible to add dissolves and other transitions to Connected Clips. Be aware that clips which are combined into a Storyline will then have the same abilities, in terms of editing techniques that exist in the Primary Storyline.
The rules inside a Secondary Storyline are the same as in the Primary Storyline. The Magnetic Timeline works the same, and each of the tools performs the same function.
If you wish to return clips from being inside a Storyline back into Connected Clips, then highlight and drag the clips out of the Storyline. They will connect to the Primary Storyline where you release them.
Alternatively, drag clips out of a Secondary Storyline and into the Primary Storyline. These will then be inserted into the Primary Storyline at the edit point closest to where you release them.
There are several ways to trim media in the Timeline. A basic way to trim is to take the Blade tool, B, cut a clip in the Timeline, and then highlight and delete the media where you have cut. Working this way, if you press the Delete key the media will be removed and the rest of the Timeline will move to fill the space. If you press Shift + Delete, then a gap will be left equivalent to the media which has been removed.
![]()
![]()
Shift + B for double-blade.
You can also trim, using the Select tool, A, by dragging the edit points.

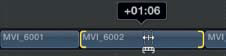
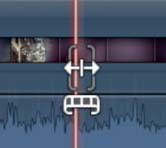
Hover over an edit point and the tools above are revealed: you can drag to extend or reduce clip durations in either direction according to available media.
Hover over an edit point, on either side where two clips meet, and notice that a tool appears with two opposite-facing arrows. There is small filmstrip down the bottom; indicators show which way the tool will operate. If you drag one way you can lengthen or extend the shot you have selected. You can do this from the beginning or end of the shot. The limits to how far you can extend the shot depend on how much media is available on the hard drive.

As you drag to extend or reduce the duration on either side of the edit point, the Viewer shows a visual indication of the outgoing and incoming frame.
Providing you have switched on Show Detailed Trimming Feedback in Preferences, a twin monitor display in the Viewer will visually show the changing edit point.
![]()
These two methods enable you to trim in a primitive way: you can slice with the blade, or you can drag the end or beginning point of an edit to lengthen or shorten a shot. These techniques are basic and effective.
For more refined editing, you need to access the Trim tool.
Press the letter T to select the Trim tool. This gives you more controls with which to work. With this tool you can perform Roll, Slip, and Slide edits.
![]()
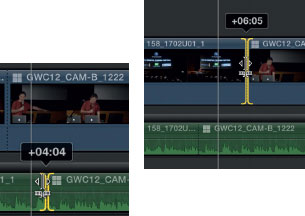
Roll edits: Press T to select the Trim tool. Click at an edit point between two clips. Drag the Trim tool from side to side and you see the edit point can be rolled in either direction according to available media. An indicator will show in seconds and frames changes to shot duration. When rolling edits, the shot is extended on one side and simultaneously reduced on the other side.
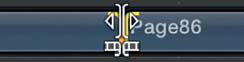
Press T to select the Trim tool.
The edit can be rolled left or right according to available media.
If you have detached audio from video it will be clear how useful this is.
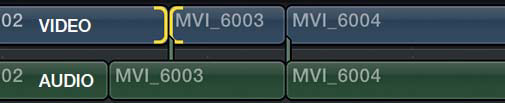
Above: Video has been rolled to the right of the audio, creating a split edit. This provides an effective way to offset video and audio.
You can conveniently roll an edit point without affecting the duration of the Timeline. Audio, if detached from video, is unaffected by Roll editing.
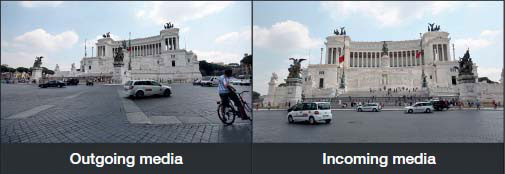
As you trim the results are reflected in the viewer.
As you trim, the Viewer will show the outgoing and incoming frames of the edit (provided you have switched on Show Detailed Trimming Feedback in Preferences). This applies to all functions in Trim mode.
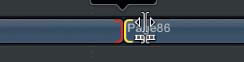
Slip edits: A Slip edit affects the portion of the clip which exists in the Timeline. While slipping the edit, adjusting the start and end point, you draw on the original media, which needs to be longer than the portion included in the Timeline for this type of edit to work. You adjust the clip within the confines of the existing duration.
Press T to choose the Trim Tool. Place your cursor in the center of a clip and drag the clip in either direction within the Timeline. According to available media, the clip content will then be adjusted; as you drag a visual display is shown of the outgoing and incoming frames (you need to make sure you have Show Detailed Trimming Feedback selected in Preferences).

Press T and click in the center of the clip.

Detailed trimming feedback is displayed as you drag.
Drag right or left to move the media within the confines of clip duration.
Press the Option key with the Trim tool selected and click in the center of a clip in the Timeline. You can move the selected clip in the Timeline left or right, extending or reducing those clips on either side of the edit, at the same time maintaining the duration of the edit you are moving. This gives you the means to reposition a clip within those on either side of it. The result is the clip you slide will eat into the clip on one side and extend the media from the other.
Press T and the Trim tool appears as above.
Press T and hold down the Option key to be able to perform Slide edits.
![]()
Clip in original position.
![]()
Drag to the left—notice the duration of the clip is unchanged, however, the clip on the left has been made shorter while the clip on the right has been made longer.
![]()
Drag to the right—the clip to the left is extended. The red indicates all available media has been used.
Note: This edit relies on surplus media on hard drive to be available from the clips on either side of the edit. If the Slide edit doesn’t work, reduce the length of the clips on either side of the clip you are sliding and this will create available media to work with.
It may not be immediately clear how useful all these trimming methods are. Let me say, without doubt, if you only use one of the techniques described above, learn how to perform Roll edits. This is as simple as pressing T to select the Trim tool, and then dragging the edit point to a new position. One side of the edit is extended while the edit on the opposite side is made shorter. I think of it as being like a giant film reel releasing film on one side and winding it onto the take-up spool on the opposite side. This lets you precisely adjust edit points while watching the visual feedback to show incoming and outgoing points. Furthermore, if you are working with audio separated from video, you can roll the edits for video without affecting the audio, which lets you do all sorts of magic in the editing.
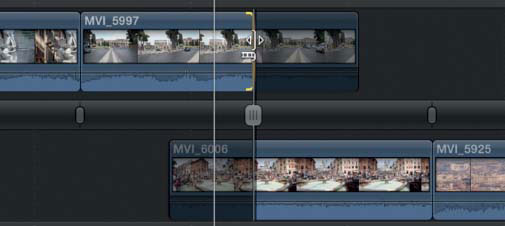
This is a fantastic device which lets you quickly view available media and then adjust the clips on either side of the edit point. It is used for fine-tuning your edits.
1 Press A for the Select tool.
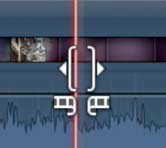
2 Double-click on an edit point in the Timeline.
The Precision Editor will now open, and you can see the existing media beyond the edit point, on either side, as being darkened. This media is referred to as “handles”. It exists on the hard drive and you can draw on this media to extend the edit if you wish.

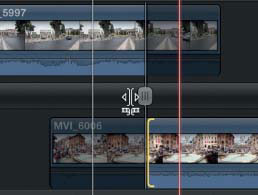
3 If you hover your cursor over one of the clips within the Precision Editor, the icon becomes a hand. You can use the hand to adjust the edit point by dragging. Note: this does affect the duration of the Timeline.
4 If you click on the edit point you can move the media by clicking or dragging to extend or reduce. Again, this will affect the duration of the edit.
5 You can also drag the center indicator and this will adjust the edit point without affecting the duration, essentially performing the same function as a Roll edit.
Note: If you separate video and audio, then you can move the edit point as described in point 5 and audio will remain unaffected.
In summary, within the Precision Editor you have three separate modes with which to fine tune your edit:
1 Use the hand to extend or reduce the media.
![]()
Hand
2 Click the media and extend as a range.

Click Media
3 Move the center indicator to perform the same function as a Roll edit.
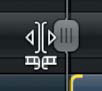
Center Indicator
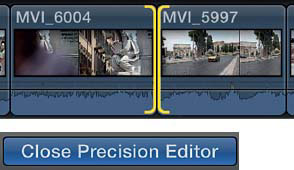
Experiment with these methods and it will become clear what the uses are.
To close a clip back to the normal collapsed-state, choose the Close Precision Editor button (bottom right of the Timeline) or double-click the Select tool A on the edit point and the Precision Editor disappears.
Trimming While Playing Back in the Timeline
One final way to trim media, this time while playing back in the Timeline. You can trim a clip which is stationary or “on the fly” while playing back your edit.
• Option + ] Trim end of current clip.
• Option + [ Trim beginning of current clip.

Press Option + ] The trim will take place where the Playhead is positioned. Note the difference in the Timeline below. The media forward of the trim point moves to close the gap.

Media moves back to close the gap.

Press Option + [ The trim will take place where the Scrubber Bar is positioned. Media preceding the Scrubber Bar moves forward to close the gap and the duration of the Timeline is reduced.

Media moves forward to close the gap.
By hitting the above key combinations, media is then cut from the end or the beginning of the clip where you are currently positioned. Media in the Timeline moves to close the gap and the duration of the Timeline is affected.
If you have audio separated from video, then different rules apply:
• Option + ] Video is trimmed, audio is not (audio detached).
• Option + [ Video is trimmed, audio is not (audio detached).

Option + ] Video is trimmed, audio is not (above).

Media moves back to close the gap and note, below, the audio from the trimmed clip continues beyond the trimmed video.

Option + [ Video is trimmed, audio is not.

Note: The audio now precedes the trim point.
Retiming is the word used in Final Cut Pro to describe fast or slow motion.
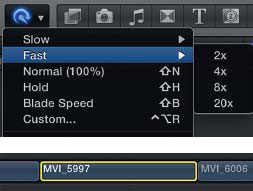
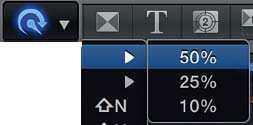
The controls for slow retiming read Slow 50%, 25%, and 10%, and the Fast controls are for 2x, 4x, 8x, and 20x. Don’t be deceived that these are limiting—you can have any speed you want!
1 Mark “in” and “out” points or highlight the clip you wish to adjust.
2 Choose the Retiming menu from the Toolbar. Apply the Slow or Fast setting of your choice.
3 Observe in the Timeline that a color indicator has been applied showing the speed as a percentage. The color blue is used to represent fast motion; orange for slow motion.

Drag the right end of the Retiming slider and the indicator will show precise speed changes as you drag. You can adjust the speed to the exact duration you require.
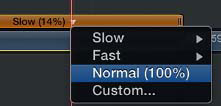
If you wish to reset back to 100% click the speed controls in the center of the clip and set to normal 100%.
Or choose Reset Speed from the dropdown menu under the Speed Control icon.

For best quality slow motion choose the Modify menu, choose Retime, Video Quality, Optical Flow. This is very simple to achieve and is accessed through the Retiming controls, or under the Modify menu at the top of the Final Cut Pro X interface.
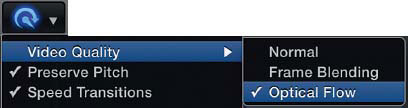
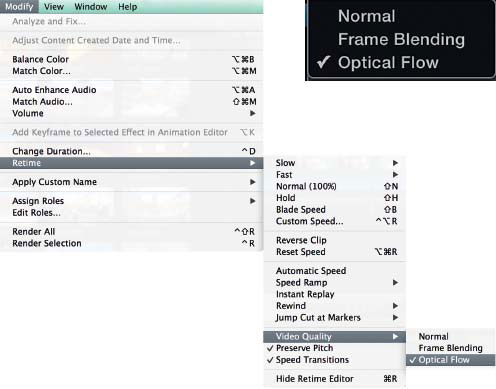
Rendering will take longer with Optical Flow switched on but the payback in terms of quality is worth it.
Choose Hide Retime Editor to hide the controls in the Timeline
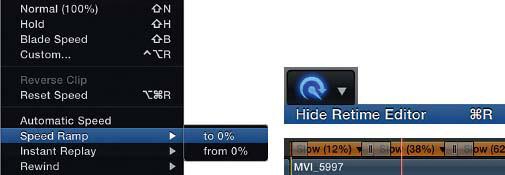
You can also choose to Ramp the speed which means the speed will vary incrementally from 100% to 0% or vice versa. Experiment with the controls as there is a lot on offer to work with.
This is easy and is found in the Retime Controls.
1 Click on a clip in the Timeline and park the Playhead on the frame you wish to freeze. Press the Retime button.
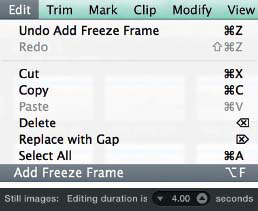
2 Choose the Edit Menu—scroll to Add Freeze Frame (Shortcut Option + F). The result is a freeze frame added to the point in the Timeline you defined. By default the freeze is 4 seconds. This is set in Edit Preferences.
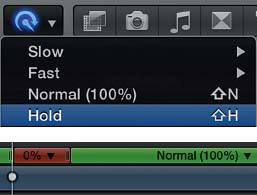
You can also create a freeze frame by parking the Playhead on a clip in the Timeline—then choose the Retime menu and scroll to Hold. A freeze is then created at this point in the Timeline—if you drag the end of where it reads zero per cent you can then increase or decrease the duration of the freeze.
You can then use the Blade to cut the freeze into smaller pieces and reposition as you wish.
You can easily change the duration of any of the shots in the Timeline.
1 Click to select a shot in the Timeline.
2 Choose the Modify menu and scroll to Change Duration (Control D).
3 Notice the center of the Toolbar is lit up in blue showing the current duration.

4 Type a new duration, for example for 5 seconds, type 500 followed by the Return key.
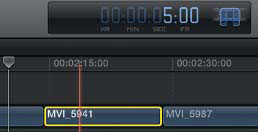
The new duration is applied to the clip. If you are making the duration shorter this will be applied, however, the maximum amount you can extend a clip is the amount of media that exists on the hard drive.
Setting the duration of the clip is versatile in that it does what it says, which is to set a clip to a predetermined duration; it also offers a quick way to check the duration of any clip in the Timeline. Just highlight a clip, press Control + D, and the duration is displayed in front of you.
When the Timeline gets busy and crowded with a lot going on, it can be incredibly useful to only listen to the audio from a specific clip or a few select clips and to mute everything else.
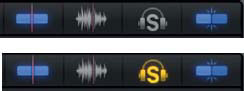
Solo button toggles on or off.
This is easily achieved by highlighting a clip or several clips and pressing the Solo button. This is located top right of the Timeline interface, and appears as an icon of the letter S wearing headphones (shortcut Option + S).
1 Highlight the clip you wish to solo.
2 Press the Solo button.
![]()
Yellow on. Gray off.
When a clip is solo you will only hear the audio of that clip and all the other clips are silent. This is indicated visually; all the other clips are grayed out.

You can selectively solo multiple clips if you wish.
Soloing can be particularly useful when working with multiple sound elements. You may have voice over, sound effects, and music. To combine all these elements you need to be able to adjust these independently to create a complete soundtrack, with cohesive elements that don’t fight against each other. When creating the audio soundtrack soloing is a powerful means to isolate a particular part of the soundtrack and adjust as needed.
You can also disable clips, which means to kill the audio and video from a particular clip or clips.
1 Using the Select A tool highlight a clip or group of clips in the Timeline.
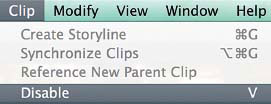
2 Choose the Clip menu and scroll to Disable or press the letter V.
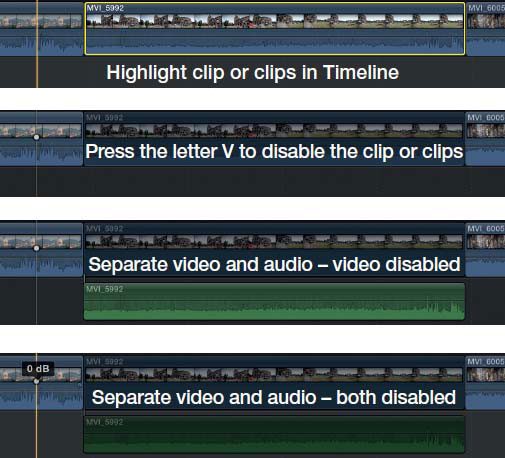
The clip or clips you have disabled remain in the Timeline, however they cannot be seen or heard.
It is very easy and quick to at any point press the letter V and disable a clip and then press V to enable it again. When you are working with multiple layers this can be very useful.
We’ve covered several concepts so far: the Events Library, Keywording, Connected Clips, and Primary and Secondary Storylines. Now, it is time for one more concept: Compound Clips.
Essentially, a Compound Clip is several clips, or even an entire Timeline of media, collapsed down into a single clip. The single clip is the Compound Clip.
Compound Clips can be expanded so that you can go back inside to access the media, which makes up the Compound Clip. If you wish, you can lose the Compound Clip entirely and return to the original expanded state of the media by choosing Break Apart Clip Items.
To create a Compound Clip:
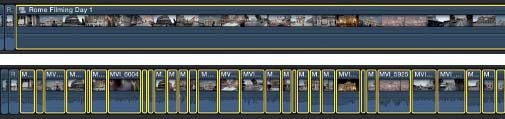
1 Highlight the clips in the Timeline which you wish to combine into a single clip.
![]()
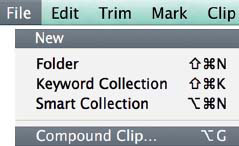
2 Choose New Compound Clip from the File menu at the top of the interface or press the shortcut, Option + G.
Observe the result, which is a single clip in the Timeline of the duration of all the highlighted clips which previously existed.
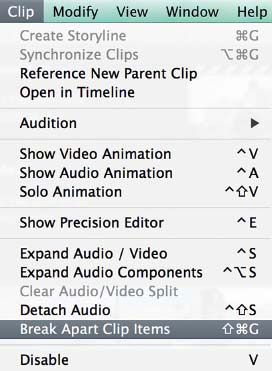
Choose Break Apart Clip Items to turn a Compound Clip into each of its individual components.
Double-click anywhere on the Compound Clip and you can see the individual clips; these can be adjusted, recut, and changed as you wish, and the changes are then reflected when playing back the Compound Clip.
To return to the Timeline, with the Compound Clip in position, click the arrow back button located top left of the Timeline.
![]()
To get rid of a Compound Clip so that the original, expanded media appears in the Timeline, highlight the Compound Clip and choose Break Apart Clip Items from the Clip menu (shortcut Command + Shift + G). This will return you to the edited clips and the Compound Clip will no longer be visible.
The huge advantage of working with Compound Clips is you can take a very busy, sophisticated edit, and reduce its size so that it is manageable. Too much information in the Timeline can be unwieldy to work with—to collapse it can make life simpler. A warning: don’t overuse Compound Clips and don’t put Compound Clips inside of Compound Clips. This has been known to stress out the computer!
Whizzing around the Timeline Using Markers
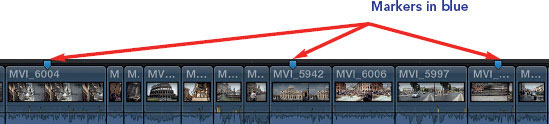
It can be useful to use Markers to pinpoint a location to which you can quickly return. A Marker can be left as a signpost anywhere in the Timeline, they can be color coded, and notes can be assigned to them.
1 Park the Skimmer anywhere in Timeline and press the letter M. This will leave a marker on the clip where you were positioned in the Timeline.

2 Go somewhere else in the Timeline and again press the letter M.

3 One more time repeat the process.
You should now have the Timeline with three separate Markers. You can move between the markers by pressing the following key combinations:
• Control + ’ Jump forward to next marker.
• Control + ; Jump backward to previous marker.
This is incredibly useful—it means at any time you can jump to a predetermined point in the Timeline. It is very simple to quickly move backwards or forwards.
Markers serve more purposes than simply to move around in the Timeline.
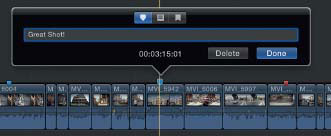
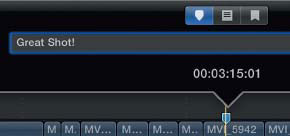
When setting a marker, instead of pressing M, press the letter M twice in quick succession. A dialog box will open, giving you the choice to enter details for the marker.
To do item in Red.
![]()
If you press Make to Do Item the marker will then visually stand out in the color red. This is easy to spot, even on a very busy Timeline.

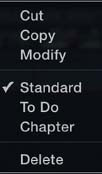
If you control-click on a Marker you get options to choose from. Notably, you can cut a Marker, to get rid of it, or mark as a To Do Item. Once you have completed a To Do Marker check the Completed Box and the To Do item will now turn green.
![]()
Marker
![]()
To Do
![]()
Chapter
![]()
If you press Shift + M while positioned on a Marker, or double-click a Marker, this will reveal the notes which have been entered.
I think of markers as being like pegs or beacons—you can home in very quickly exactly where you want to be.
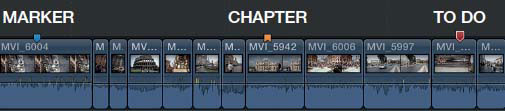
There are three types of Markers: Marker, To Do and Chapter. Chapter Markers are used in DVD authoring, To Do are temporary indicators for work still to be completed, and Markers are general purpose locators to take you to a specific place in the Timeline.
![]()
Click bottom left of the Timeline to show or hide the Timeline Index. This lets you jump from Marker to Marker.

Using the Timeline Index lets you easily and quickly move between Markers at the press of a button.
Reveal All the Clips Used in Your Project
If you want to see a quick overview of the media you have used in your project, meaning a complete listing of all the clips, then click the lower left of the Timeline on the Timeline Index icon—the list of clips will now appear in front of you.
![]()
Click this icon, located bottom left of the Timeline, to reveal the Timeline Index.
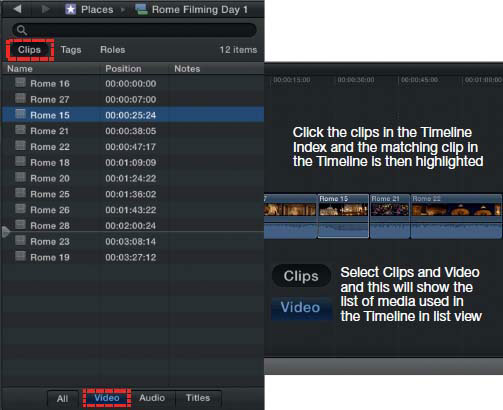
You can use the arrows to move up or down or click any of the clips to show in the Viewer; note as you click the selected clip is then highlighted in the Timeline.
Control-click the clip in the Timeline and select Reveal in the Event Browser to locate and/or match a frame to a clip (Shortcut Shift +F).
Locating Clips in the Event Library or on the Hard Drive
When I worked in online edit suites, filled with open-reel tape machines, spinning in sync, with an edit controller and vision mixer to make it all happen, we used to do a fair bit of match frame editing. This meant you would mark the “in” point on a source tape, and the exact frame would be spooled to on the original master tape. It was the quickest way to locate the original media and also very useful in effects creation.
In Final Cut Pro X, you have two facilities to help you track down media and to do a match frame edit if you wish. Control-click any clip in the Timeline and choose one of the following:
1 Control-click any clip in the Timeline. A menu will appear—scroll to Reveal in Browser.
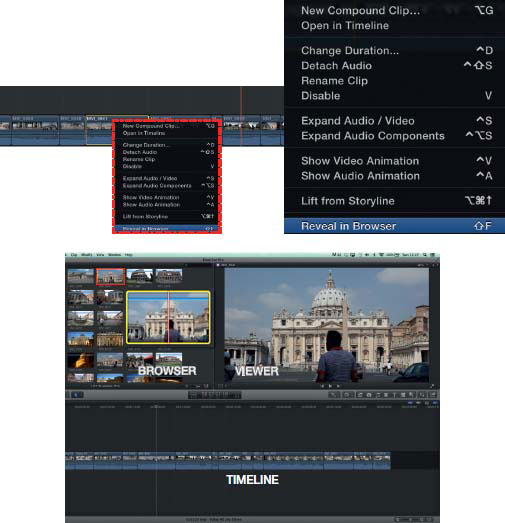
2 Control-click the Clip in the Event Browser and choose Reveal in Finder. This will now show where the clip is located on hard drive.
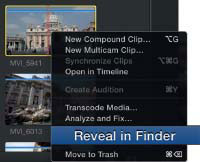
Both of the above are incredibly useful for tracking down your media within the project or on the drive, and enabling you to match the frame edit if you need to.
Any of the media in the Timeline can be cut, copied, or pasted, just like using a word processor. Clips can be copied and pasted within a project or between different projects.
• Command + X Cut
• Command + C Copy
• Command + V Paste
• Option + V Paste as Connected Clip
1 Highlight any clip or clips you wish to cut or copy.
2 Press Command + X to cut the clips or Command + C to copy the clips.
3 Reposition the Skimmer or click to position the Scrubber Bar and press Command + V. The media will then be pasted at the place you have decided.
4 If you wish to Paste as a Connected Clip then type Option + V. This clip is then positioned above for video, or below for audio.
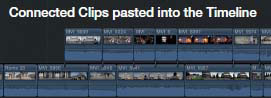
Note: When cutting from the Primary Storyline the clips to the right will move and close any gaps which have been created (the Timeline will be made shorter); when pasting into the Timeline the result is that of an Insert edit: any media after the Insert will be shunted down the Timeline to the right, and the Timeline will therefore increase in length. When pasting as Connected Clips the duration of the Timeline will remain unaffected.
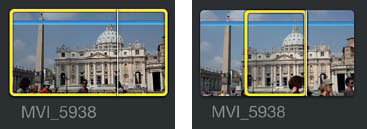
Show Used Media and Show Unused Media
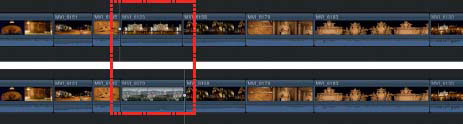
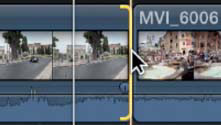
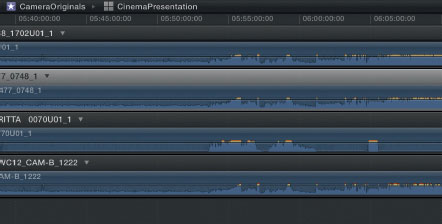
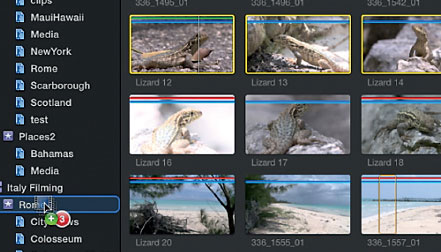
A fantastic feature, added to Final Cut Pro X 10.1, is the ability to Show Used Media. What this means is any media which has been edited into a project, is then displayed in the Events Viewer with an orange line to indicate which media has been used.
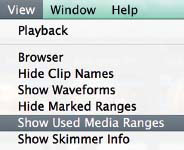
Go to the View menu and switch on Show Used Media Ranges. This is a toggle—to turn off select Hide Used Media Ranges.
![]()
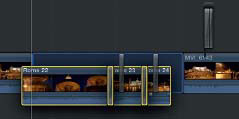
As you edit content into the Timeline you will see an orange line through each of the clips in the Event Library which have been used. The orange line is specific to the portion of media which has been used.
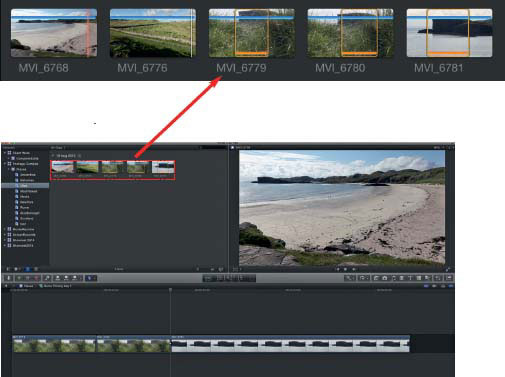
Orange bars represent Used Media in filmstrip view.
This is particularly useful as the editor can quickly see which media has not been used within an Event or Keyword Collection.
When editing, we are always looking for the best shots which we have not used. The process involves continually reaching into the reservoir of shots and extracting the best of the best, and compiling this in order to make a specific visual statement. By continually being able to see what media has been used is a big advantage.
Furthermore, you can also show only unused media within the Event Browser if you press Control + U. To return the Browser to the default setting, click in the upper left corner of the Browser and select All Clips.

![]()
Choose all clips top left of Browser.
Automatic Backups of Libraries, Events and Projects
While you are editing with Final Cut Pro X the software saves a copy of the Library, and all the Projects and Events within the Library, every 15 minutes. This can be a lifesaver if you need to go back in time to a previous version of an edit. You can choose from the available list, which is time stamped.
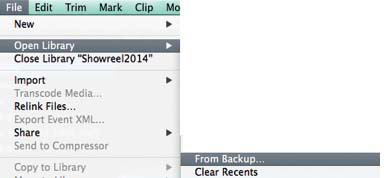
1 Highlight the Library you wish to open the Back up for.
2 Choose File—Open Library—From Backup.
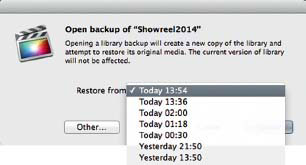
The list of backups for that Library will now be in front of you.
3 Click the Backup you wish to open and select Open.
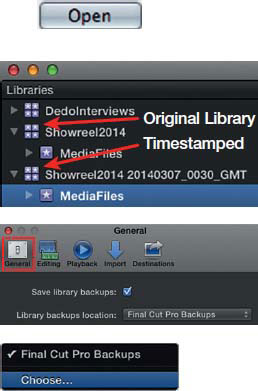
A new copy of the Library will now be created, which is Timestamped, while the Library you had been working with also remains open.
The copy of the Library which has been created is stored, on hard drive in the same location as the Library from which it was created.
Note: You can manually set the location for where the Backup files will be stored if you wish, though I tend to leave the settings at the default. By default the backups are stored in the User Movies folder on your boot hard drive.
While accessing the Library Backups is great to return to a previous version of the entire Library, it can be advantageous to duplicate your project while working to create a copy or version of the project to work with.
Control-click on a Project and access either of the commands:
(i) Duplicate Project.
(ii) Duplicate Project as Snapshot.
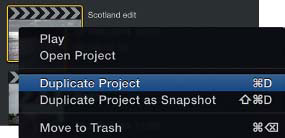
The commands are very similar and either will create a duplicate of your project. The difference being, if you use Compound Clips or Multicam Clips in more that one project—changes to the Compound or Multicam Clips will then affect the same Compound or Multicam Clips used within other Projects. This applies with the first command Duplicate Project.
By choosing Duplicate Project as Snapshot effectively grabs a moment in time; any changes to Compound or Multicam Clips will not affect other projects.
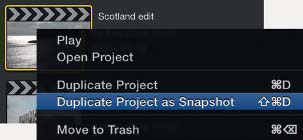

For myself—I usually choose Duplicate Project as Snapshot with the knowledge that this creates an independent duplicate to work with.
Whichever method you choose note that the duplicate will be Timestamped giving you the information as to when that particular version was created.
Not all content that is created is widescreen or standard aspect ratio. Sometimes unusual format sizes are required for conference venues, advertising, video walls, or vertical portrait monitors.
You need knowledge of the format and frame size you are going to be working with.
1 Choose File—New—Project.
2 Choose Custom Size in Video Properties.
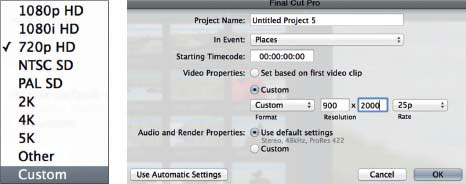
3 Key in values for image size and frame rate.
4 Press OK. You can now edit footage into the Timeline at the custom size which you have set.

Square

Vertical

Extreme widescreen/cinema
You can create square, vertical or extreme widescreen using custom setting. By adjusting the Transform controls you can then reframe the image within the custom frame you have set. More on Transform in the Effects chapter of this book!
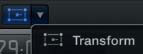
Transform Controls
As you have been editing you may have noticed the little white ball which appears within a clip as you work. This is known as the Active Clip Indicator and serves as a reference to show you where you are positioned within the Timeline.
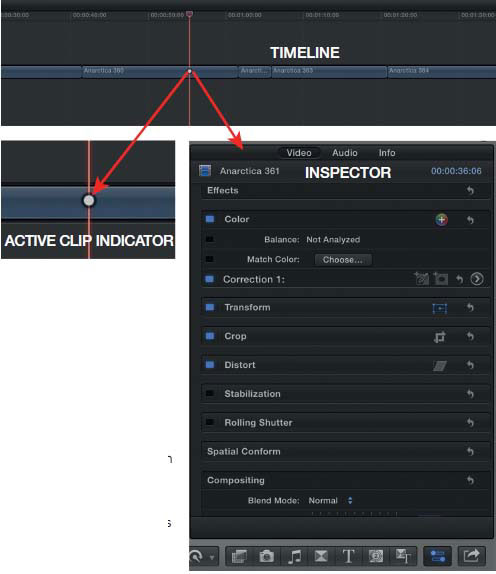
Furthermore, the Active Clip indicator also lets you know which clip is being displayed in the Inspector.
The properties of the clip can then be adjusted within the Inspector, in terms of video or audio, and the little white ball simply gives a clear indicator of which clip is being adjusted.
Auditioning gives you the means to quickly switch between different shots in the Timeline. I think of it as being like a giant carousel switching sources in real time though a giant projector …
1 Highlight a clip or range in the Timeline.
2 Highlight a clip or clips in the Event Browser.
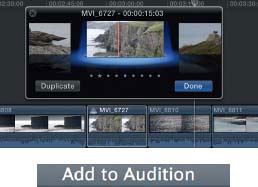
3 Drag the clips from the Event Browser on top of the clip in the Timeline wherever you choose and then select Add to Audition.
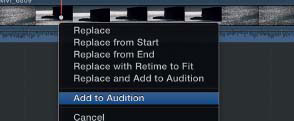
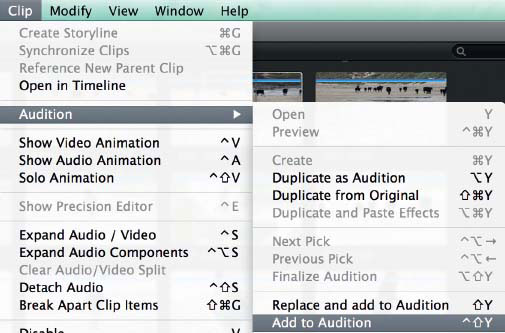
Alternatively, choose from the Clip menu at the top of the interface.
Notice a new spotlight icon appears to the left top of the clip to show that clips are ready to be Auditioned.
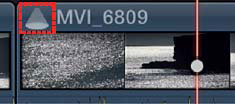
4 Press the letter Y to open the audition, or control-click on the clip and select this command.
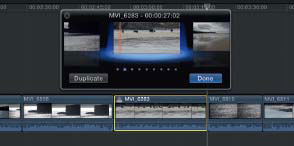
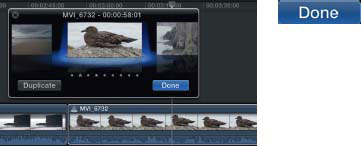
The Audition window will open in front of you. Position the Playhead and press the space bar to play.

Press Control + forward/back arrows to skip through the shots you have lined up in the Audition window.
When you find a shot you want included in the edit, press Done and the clip will drop into place.
If you want to add another clip or clips to the audition choose Add to Audition and continue the process. You can remove a clip from the Audition by selecting it and pressing the Delete key. Once you are done Control-click on the Audition and choose Finalize Audition.
![]()
Rendering is the process which takes place to build the frames of your movie for output. Rendering is not always required, however, when footage is manipulated and changed, then it does need to be rendered, not necessarily to play back, but for final output. Changes such as color correction, opacity changes, retiming, and stretching or cropping of the image, or adding titles, all require rendering.

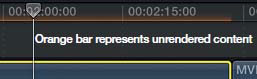
Whenever you see an orange bar at the top of the Timeline this means that the portion of media needs to be rendered.
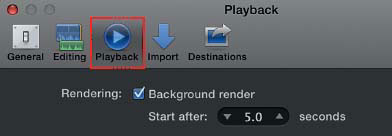
If you have Background Render switched on in Preferences, then rendering will begin within a few seconds. Final Cut waits for a lull in activity and then rendering kicks in …
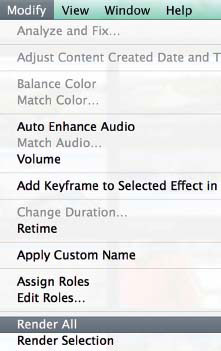
If you have Background switched off then you can manually start the render process by choosing the Modify menu and scrolling to:

![]()
• Render All: Control + Shift + R
• Render Selection: Shortcut Control + R
Much of the time I work with Background Rendering switched off in Preferences and manually render when I choose. This is useful for two reasons: (1) rendered files take up hard drive space, therefore avoiding rendering saves generating unnecessary render files (2) having Background Render fire up every time you stop for a few seconds can be distracting.
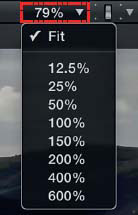
Adjusting represented size of image in viewer
Most of the time you are editing you should keep the display of the images set to Fit into the available viewing area.
1 Click the percentage symbol, top right of the Viewer.
2 Select Fit.
This fits the image into the available space for viewing. It can be advantageous to increase or decrease the size of the represented image for compositing work. This will be covered later in the Effects chapter.
Switching between Better Quality & Better Performance
A very useful command, found under Viewer Display Options—top right of the Viewer—is the ability to change the display resolution of the images as they are played back.
Essentially you can either choose Better Quality or Better Performance.
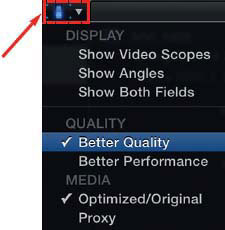
1 Click Viewer Display Options—top right of the Viewer.
2 Select Better Quality or Better Performance.
In an ideal world one would always work with Better Quality set, however, depending on the processing power of your Mac, the drives you are using, the amount of memory and which graphics card is installed in the machine—all these factors affect the ability of the system to playback the video content smoothly. Beyond that, and of huge importance, is the codec you are working with. Final Cut Pro X will work with many different codecs natively: all flavours of ProRes, XDCAM EX, DVCPro HD, DV, AVCHD—however, how well it plays back content native in those formats depends on the factors already mentioned.
I switch between Better Quality and Better Performance many times during the editing process. When I need to view something at full quality Better Quality is the choice—even if the playback is not perfectly smooth. For general editing, Better Performance can be the most suitable choice.
For best performance you may choose to render any unrendered content in the Timeline. However, many editors choose not to render and to work with the real time playback abilities of Final Cut Pro X. By choosing Better Performance rather than Better Quality often unrendered material will play back in real time.
Control + R—render range or highlighted clips in Timeline. Command Shift + R—render everything in the Timeline.
Other times, to view at full resolution, simply render the portion of the Timeline you wish to view and then you will get full resolution and smooth playback when choosing Better Quality.
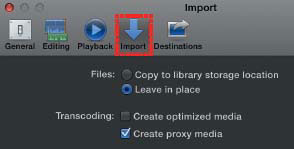
Right at the beginning of this book, in the Preferences, I discussed the idea of working with low resolution Proxy files. These files—the Proxies—can be generated by Final Cut Pro X.
(i) Set preferences to automatically generate Proxies on import. Then, each time you import media, by default Proxies will be generated.
(ii) Manually instruct Final Cut Pro X to generate Proxies once the media has been imported.
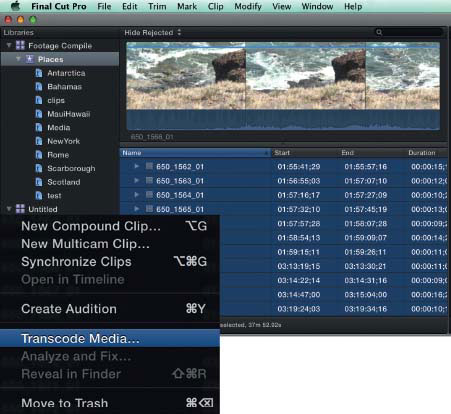
To manually transcode media to Proxy:
1 Highlight the media in the Event Library—if you wish to transcode all the media within the Library select all (Command + A).
2 Control click the Media and choose Transcode Media.
3 Choose Create Proxy.
![]()
Command + A to select all media within the Library.
Click the Dashboard (center of the interface) and the background tasks taking place will be revealed. Click the arrow next to Transcoding and Analysis to see what processes are taking place.
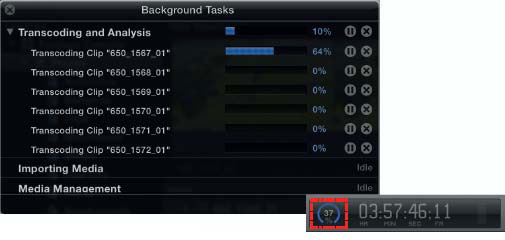
Click the Dashboard to reveal Background Tasks.
Note: The indicator in the Dashboard showing processing taking place.
The Proxies are an exact duplicate of the master media, at lower resolution, which means editing is quicker, smoother and snappier. Real time performance is better and rendering speeds along much faster than it would with the full resolution media.
The downside is the lower quality of the represented image. However at any time you can switch to full resolution with a simple command.
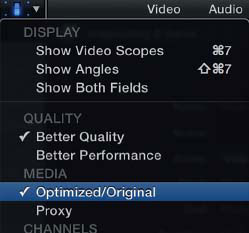
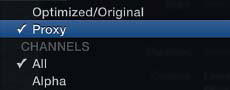
While editing, to switch between full resolution Optimized/Original Media and Proxy—choose Viewer Display Options—top right of the Viewer and then select either option: Optimized/Original or Proxy.
You can then choose to edit as Proxy (low resolution) or Optimized/Original (high resolution). The obvious method would be to do all the editing as Proxy and then when it comes to outputting, switch to Optimized/Original. This is important as if you do not set to Optimized/Original the output file will be encoded at Proxy resolution! Not very good if you are generating a master file.
Note: If at any time you see a red Missing Proxy indicator in the Event Browser, Viewer or Timeline, this means the Proxies have not been generated or have somehow become offline. The solution—generate the Proxies or switch to Optimized/Original media.

There are two ways to cut between multiple camera sources. The most efficient way, in terms of time, is to cut live. This requires each of the cameras to be plugged into a vision switcher which is then used to mix the program in real time.
The output of the vision switcher is then recorded or broadcast live.
The other way is to do it in postproduction using editing software such as Final Cut Pro X. The implementation of Multicam in Final Cut is the best I have seen. The process is reliable, streamlined, and offers power which simply isn’t found in other systems.
The success of your Multicam edit begins during the filming, well before you get into the edit suite.
Be aware—shooting multi camera is going to generate a lot of content. This in turn will use up a significant amount of hard drive space. If you shoot an hour performance, using three cameras, you will end up with 3 hours of footage. If you shoot for an hour on four separate cameras you will acquire four hours of footage. And this doesn’t include render material while editing, and masters which are output. Multicam takes up space and processing power.
In Final Cut Pro X you can then edit this footage native—depending on how powerful your computer is and which codec has been recorded—or, you can convert the camera footage into Proxies, enabling Final Cut Pro X to deal with this at low resolution, before you then switch to full resolution for output.
![]()
You can also set Final Cut Pro X, within Playback preferences, to Create Optimized media. This means, if the original codec is difficult to work with, Final Cut Pro X will then convert the footage to ProRes for editing.
![]()
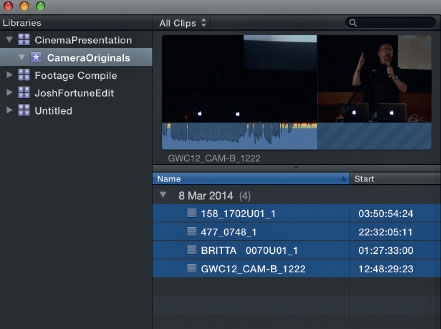
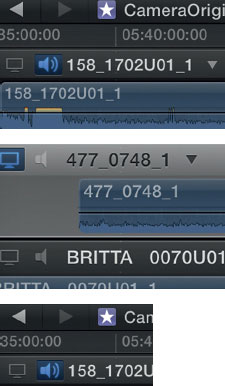
1 Organize the media you wish to work with using Multicam. I suggest you create a Library and within a single Event put the camera originals. Ideally all cameras will have been left running during recording, so there is only a single start and stop for each record. Each camera should have audio—even camera mic—of the live record.
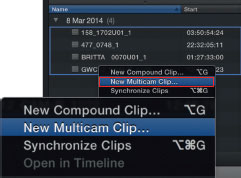
2 Highlight the media you wish combine into a Multicam Clip.
3 Control click any of the highlighted clips—a contextual menu will appear. Choose Create Multicam Clip.
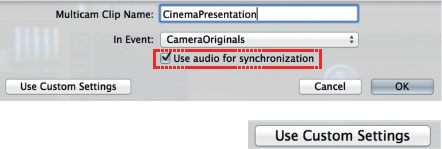
4 A window will now open. You need to enter a name for the Multicam Clip and define the Event where this will be stored. By default, this will be the Event where the clips you are combining are stored.
You can choose Use Audio for synchronization—and the software will then match the audio for each clip and then combine into a Multicam clip. This is an easy and effective method, providing you have continuous audio of decent quality for each of the clips.
If you don’t have continuous audio then you need to venture into Custom Settings and choose Angle Synchronization. Here sync clips by the First Marker on the Angle.
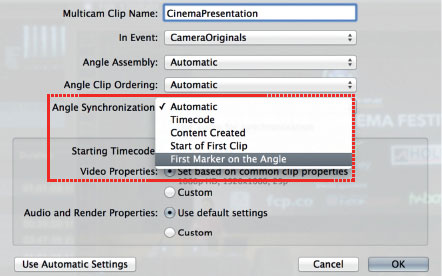
To manually sync by Start of First Clip or First Marker on the Angle, will require some preparation in advance before you get to the stage of creating a Multicam Clip.
By far the easiest method is to Use audio for synchronization.
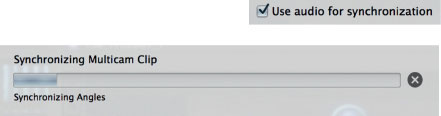
5 Wait while the computer checks though each of the clips and combines the different angles into a single clip—this is the Multicam clip. This process can take some time.
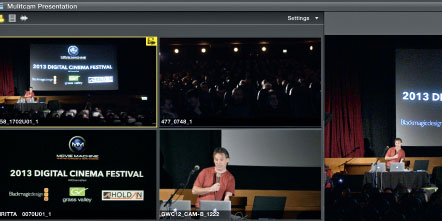
6 Once the Multicam clip has been created edit this into a Project in the same way as you would any other clip. To see the different angles you need to open what is called the Angle Viewer.
Shortcut to Angle Viewer: Shift + Command +7
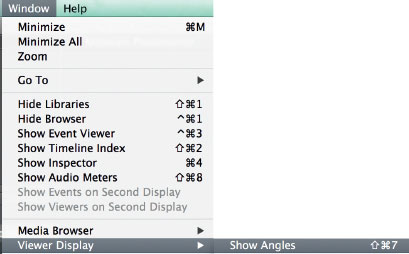
7 Select the Window Menu—scroll to Viewer Display—Show Angles.
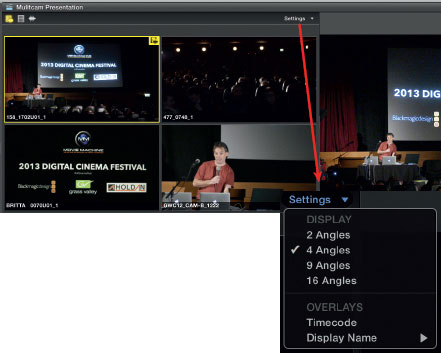
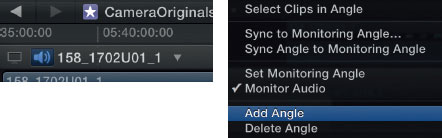
The Angle Viewer enables you to view each of the camera’s angles while you edit your Multicam project. You can set the view to the numbers of different angles you are working with. Choose the Setting drop down menu, top right of the Angle Viewer, and set this to the number of angles you wish to view.
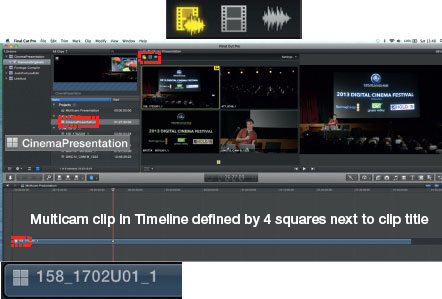
Multicam Clips work just like any other clip in Final Cut Pro X—the big difference being that contained within each Multicam clip are each of the angles for you to work with. I think of Multicam Clips as being similar to Compound Clips in that several clips are combined together to create a single clip—the Multicam Clip.

Multicam clips are represented by 4 squares.
When it comes to editing the Multicam Clip the process is straightforward.
1 Edit the Multicam Clip into a Project.
2 Open the Angle Viewer (Shift +Command+7)—and press Space Bar to play the content. If everything has synced correctly you will see the video and audio running together. If everything is not in sync you need to revisit the process of creating the Multicam Clip.
3 Look to the controls at the top of the Angle Viewer. You can choose to edit both audio and video, video only, or audio only. My method is to establish the best audio track, do an audio only cut of the best audio right at the beginning of the Timeline, and then select to edit video only.
![]()
Video & Audio
![]()
Video
![]()
Audio
4 Now open the Angle Viewer. Position the Playhead on the Multicam Clip and press the Space Bar to play. As the video plays click on the camera angle of choice in Angle Viewer and each edit will be recorded. Alternatively press the numbers on your keyboard—1, 2, 3 and 4 for the corresponding angle and you can cut your content live, just like you are operating a vision switcher in a TV studio control room.
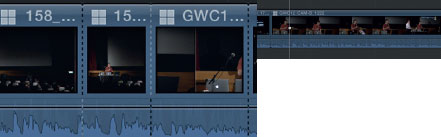
The cuts in the Timeline represent the changes in camera angles.
5 Play back your edit. You can now refine this using the trim tools. Select T for trim, and then slide the edit points and adjust as you wish. As the audio is continuous the audio remains unaffected.
6 Should you wish to manipulate the audio separate to the video you can choose to Detach the audio in the Multicam clip (choose Clip—Detach Audio.)
Detached audio is moved independent of audio using the Trim tool.
Audio is detached and video is moved independent of audio using the Trim tool.
There is another area that needs to be investigated and this is the Angle Editor. You enter the Angle Editor by double clicking anywhere on the Multicam Clip—or by Control clicking on the Multicam Clip and choosing Open in Angle Editor.

Double click the Multicam Clip in the Timeline to enter the Angle Editor or Control Click the Multicam Clip and select Open in Angle Editor.
The Angle Editor shows all of the clips which make up your Multicam Clip. The names on the clips above don’t mean a great deal, however, I could have manually numbered this as Camera 1, Camera 2, Camera 3 and Camera 4.
In the Angle Editor click to select angle, this will make it live, you can then adjust the color and other attributes in the Inspector. The changes you make will then apply to all use of that angle within the Multicam edit. You can also adjust the audio levels—the levels you set will then boost or lower the volume of that angle within the Multicam edit.
Select the audio icon to make this track live. This is for monitoring purposes. Set the level and this will then adjust the audio from this angle accordingly when cut to in the Multicam clip within the project.
Set the audio level by dragging the black line up or down.
Click the video symbol and you can adjust attributes about the video which will then appear in the Multicam Clip within the project.
For example, select the angle in the Angle Editor, adjust the color correction in the Inspector, and the results will then appear in the Multicam Clip within the Project.
To exit the Angle Editor, click the arrow back—top left of the Timeline window. You can then continue editing your Multicam project. Any changes you made within the Angle Editor will now be included within your edit. As mentioned, this could be changes to color correction of a particular angle or angles, changes to audio, you could add effects, and you can even include other angles and content within the Multicam Clip.
For example, you could create additional angles within the Angle Editor and drag content into this angle which you have created. Once the content is positioned within the angle—you can reposition and fine-tune as you wish in relation to the other existing angles. This could be tremendously useful when adding graphics to a presentation which has been recorded live. Furthermore, if you need to adjust any of the other Angles within the Angle Editor, click these to make the Angle live, and then drag the content to reposition as you wish. Be careful not to mess up the sync of items already in place!

Press the arrow to exit the Angle Editor and take you back to your Multicam edit.
This has been a quick overview of Multicam in Final Cut Pro X. This is tremendously powerful and effective. For many years I worked as a live director in television, cutting programs live to air. The implementation of Multicam in Final Cut Pro X is, without doubt, sophisticated and brilliantly thought-out. This software lets us do things we could have only dreamed of a few years ago …
Copying media between Libraries and Events
At any time you can drag media from Library to Library or Event to Event.
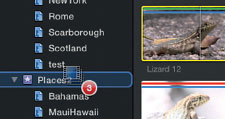
Highlight media contained within a Library—if you click and drag the media from one Event to another, the media is moved. This is to say that it will be removed from the original Event and placed into the second Event. If you want to leave the media in the original Event, and, at the same time, move to another Event, hold down the Option key and this will copy the media to the second Event while leaving the media at its original location.
Note the Plus sign to indicate that the 3 clips will be copied to the new location and also remain in the location from where they were dragged.
If you are working with media located on an external drive, then the links will be copied—in other words the media will be referenced to. You will get a warning to alert you to this.
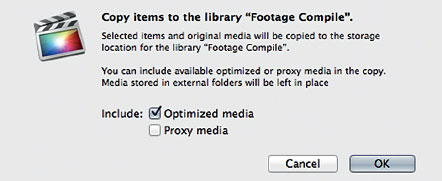
You can choose to create Optimized and/or Proxy Media. Each time you move media between Events in different Libraries you get this message.
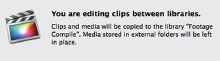
If you edit content between Libraries then the media will be copied, or, if you are working with external media then the links will be copied.
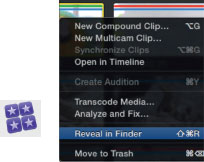
At any time you can locate the original media on hard drive by control clicking on a clip and choose Reveal in the Finder.
Furthermore, you can see the contents of a Library bundle by Control Clicking on the Library bundle and choosing Open Package Contents.
From the Finder, you can check the size of a Library to get an indication of how much media is stored within it.
Highlight the Library and press Command + I. This will reveal information about the Library bundle. Even Proxies, which are low resolution, can add considerably to the size of the Library.

The size of the Library will vary depending if the media is internal or external, and whether or not Proxies have been used.
If you wish to look inside the Library bundle to see what is contained inside of it—Control Click on the Library bundle and choose Open Package Contents.
The contents will be revealed and you can then open up the folders within the Bundle to see what media resides there. You can also see which media is referenced to as these appear as Aliases which link to the original media.

These Aliases point to the original media which is stored external to the Library.
Beware! Apple did not intend for users to be messing about in this area and you can damage or destroy the Library and all the Projects within it—or you could potentially delete media! There aren’t too many reasons why you need to go into this area so the best advice is to steer clear!
Organizing media in the Event Browser with Folders
By now you are well familiar with Libraries, Events and Projects—and how to edit content from Events into the Timeline.
When things get crowded in the Event Browser with many different Keyword collections it can be useful to file these away inside of Folders.
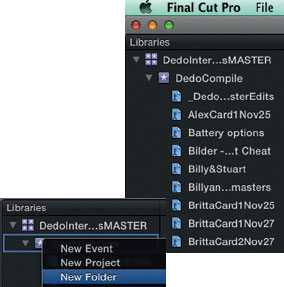
1 To create a Folder choose the File Menu—choose New—Folder. Alternatively, Control Click on an Event and choose New Folder (shortcut Shift+Command+N).
2 Name the Folder.
3 You can then drag Keyword collections into the Folder.
4 Create as many Folders as you wish inside of any Event. You can even group Folders inside of Folders.
The result is you can collapse a complicated unorganized structure into categories so you can locate just what you need. Between Keywords and Folders, and all the other organizational abilities in Final Cut Pro X, we have a powerful way to organize and retrieve our media.
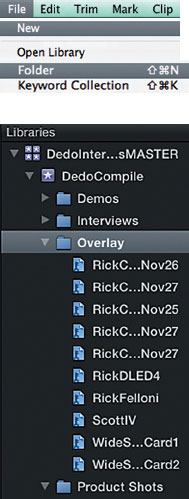
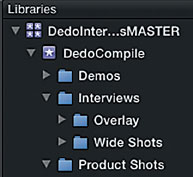
Just remember editing isn’t one thing, it’s everything; it is how you use the tools in combination with each other which will let you fly through the editing process and turn out the results.
There is still a huge amount to explore with Final Cut Pro X. For the moment, absorb the key concepts of how to organize media, how to get footage edited into the Timeline, and how to make it work in terms of pace and structure. Next we move on to audio production, where you make your production sound as good as it looks.