
Even though this is a separate chapter in the book, I want to make the point that sound mixing is not necessarily something which happens separate from the rest of the editing. I will mix sound as I cut picture. Sometimes, if I have the time, I’ll spend more time on the audio, which may well be after the picture edit is complete. Sometimes, when there is no time, I may call on some of the audio-functionality built into Final Cut Pro X to sort out any of the differences in levels between clips.
I’m old school. I like manual control over my audio so I know what is going on. However, I’m also on the cutting edge. I like to make use of new technology to better the end product and to make my life easier. Final Cut Pro X has some nice facilities to help you create a seamless audio mix.
The basics which one must run through, in terms of audio production, for producing any video or film include the following processes: (i) adjust audio levels (ii) add sound fades (iii) mix the sound to be music, narration, sound effects, or whatever (iv) balance any peaks or falls in the sound and check the output level (v) work with stereo pairs (vi) build multiple layers of audio and solo/disable audio at will (vii) synchronize audio, where a master record needs one or more cameras to be synced together (viii) keyframe audio fades, and (ix) pan tracks.
That’s enough for now. There could be more work beyond this, but the list above is pretty comprehensive in terms of the general tasks which need to be fulfilled.
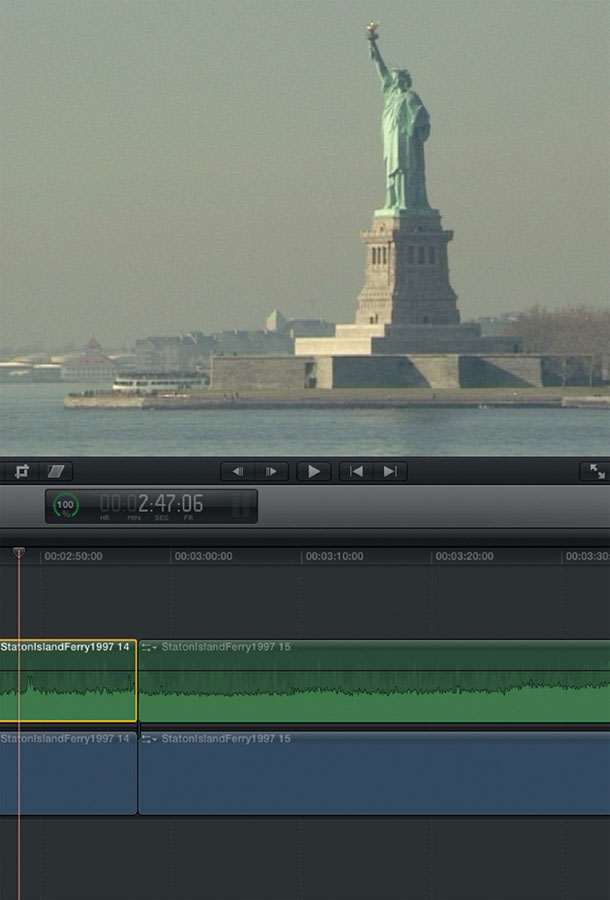
Just a reminder, clips inside Final Cut Pro X appear as video and audio combined in the same clip. By running through the options in Clip Appearance you can view only the audio information if you choose, or you have the option to show video thumbnails and audio combined.
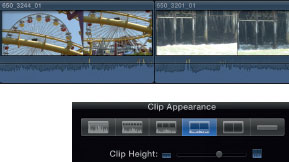

For the purpose of mixing sound, it can be useful to make the audio as large as possible by adjusting the clip height.
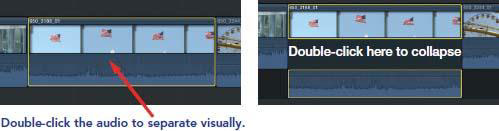
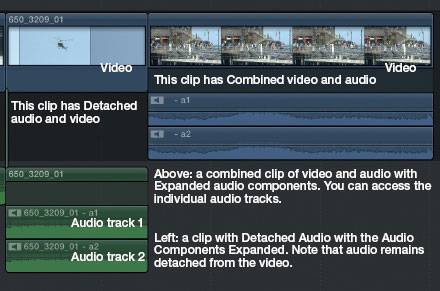
You can view separate video and audio by double-clicking the audio track to visually separate the two.
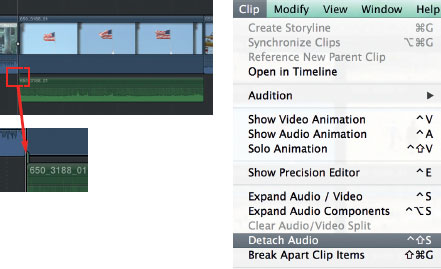
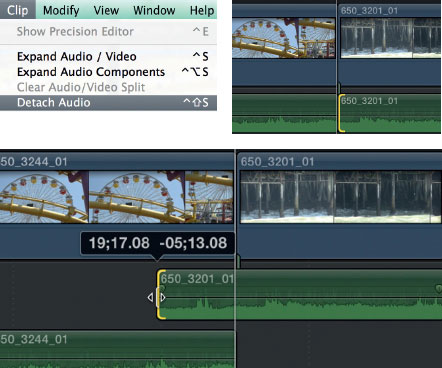
If you want to separate video and audio so that they are truly separate, highlight a clip and choose Detach Audio from the Clip menu.
The audio then becomes a Connected Clip to the video. Therefore, if the video is moved, the audio, which is connected to the video, will move with it. However, you also have the power to move the audio separate from the video just by clicking on it and dragging. If you wish to combine video and audio into a single clip, then highlight the elements and choose Compound Clip from the File menu.
Audio moved separate to video
For those who have used other editors, the familiar way to work with audio is to have two tracks to access. Most professional cameras record to two separate audio tracks, with separate XLR inputs; some even allow for four separate tracks.
![]()
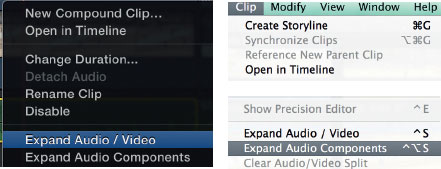
It is important to be able to access those tracks inside of Final Cut Pro X.
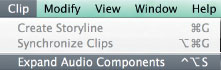
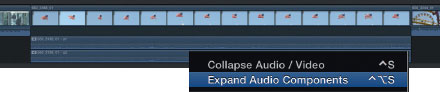
It is as simple as Control-clicking on the audio and selecting Expand Audio Components or the Clip menu and scroll to Expand Audio Components.
Adjust the Audio Level within a Clip
The basic job of adjusting audio levels from clip to clip is as simple as can be in Final Cut Pro X.
Make sure you have Clip Appearance set so that you can clearly see the audio waveforms. When mixing audio, I will often set the display to only show the audio waveform (the first choice in Clip Appearance).
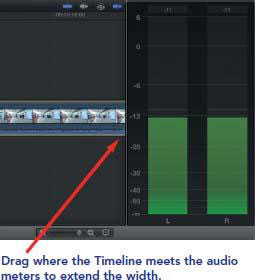
Switch on the audio meters so you can visually see the changes in the audio level.
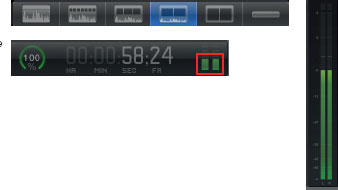
Audio meters
Press the Audio Meters icon in the Dashboard to show or hide the meters.
Green, during playback, shows the audio is good, yellow shows you are peaking, and red shows you are over-peaking and risk distortion.
The basic rule is don’t hit the red on the meters. I let my audio run at between −12 and −6 dB.
If you wish to make the audio display even larger, drag the Clip Height slider to increase or decrease the size.
Adjusting audio levels within a clip is simple:
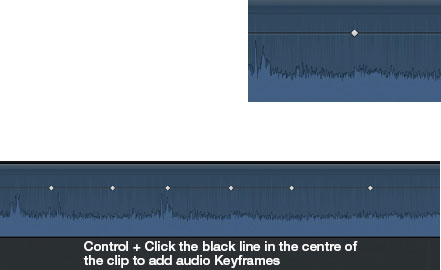
1 Use the Select Tool A and drag the black line in the center of the clip up or down.
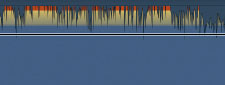
2 You will notice indicators in audio clips in the Timeline. Drag the black line in the clip up, raising the volume; when you release, the indicators will show yellow or red to indicate over-peaking. Adjust so the absolute peaks hit the yellow but not the red.
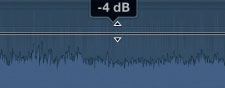
An indicator will show in dB how much you raise or lower the audio.
3 Check the playback on the audio meters to confirm these are correct.
You can also raise the audio level in small increments, on the fly during playback, by pressing Control + (volume up) or Control − (volume down). Simply highlight the clip and adjust the level as you listen to the result, again watching the audio meters as well as the clip indicators.
The audio fade has been with us forever and is the primary way of smoothing out bumps in the audio so you can create a montage of sound which blends seamlessly together. Sometimes you want an audio cut, sometimes you want a fade. A fade provides a gentle transition.
The audio can be faded very easily from the head or the tail:
1 Position your curser over a clip in the Timeline.
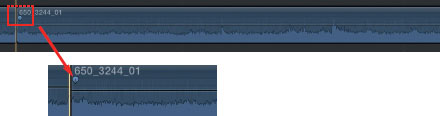
Hover over a clip in the Timeline and fade handles will appear.
2 Hover your curser over a clip in the Timeline. Look to the ends of the clip and notice at the beginning or end of the clip are handles, represented by a small dot.
3 Drag either of the handles and a fade is added to the audio. An indicator shows the fade duration as you drag.
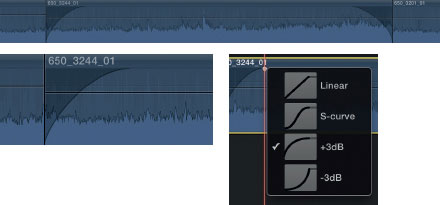
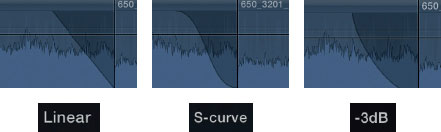
If you Control-click on the handle at the beginning or end of the shot, you are given options to change the shape of the fade. Experiment with these and listen to the result and choose that which is most suitable.
Fading Audio Using the Range Tool
You can also fade the audio within a clip using the Range Tool R. This provides an incredibly useful means to making fine adjustments to the audio within a single clip.
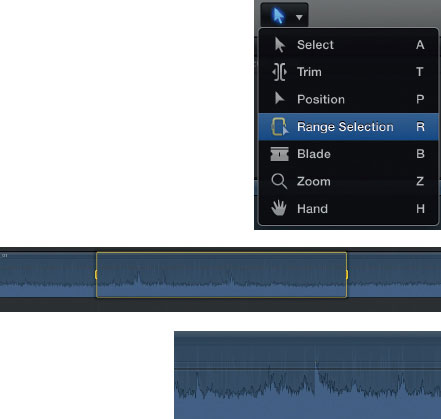
1 Press the letter R to select the Range tool or choose the drop down menu in the Toolbar.
2 Click with the Range tool and drag within a clip in the Timeline to define the area you wish to adjust.
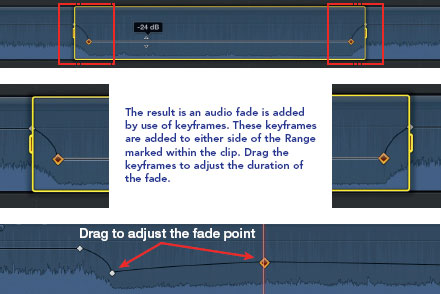
3 Once you have marked the range, click the black line in the center of the clip and drag this up to increase the audio level or drag down to reduce. An indicator will show the level of increase or decrease in dB as you drag. The result is that a fade is added to the beginning and end of the range. You can see the fade represented visually; furthermore, you can adjust the fade points by dragging.
To Keyframe means to change over time. You can plot points within the audio of a clip and make adjustments as you wish by dragging the fade points.
1 Hold down the Option key and click the black line within a clip. Notice a dot will be added to represent an audio Keyframe.
Repeat the process. Option + click to add as many points as you wish.
2 Grab any of the audio Keyframes and drag to adjust. You will visually see the fades plotted within the clip with an indicator showing the increase or decrease in dB.
3 Listen to hear the result, and watch the audio meters to confirm you don’t over-modulate.
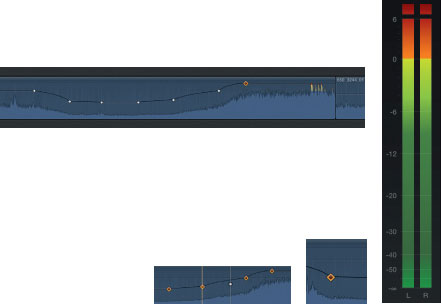
To remove any of the Keyframe points you have added, click the Keyframe point, which will then turn orange and press Delete on your keyboard. Press shift and click to highlight multiple Keyframe points—these can be then be moved together in the Timeline by dragging.
Along with the audio fade there is the audio mix, which is an overlapping fade between the two audio sources. This is one of the most used tools for creating a smooth-sounding mix. A quick audio fade, two or three frames, can be used to remove pops and clean up edits, whereas a longer audio fade can be used to introduce sounds to the mix so that nothing is jarring. When mixing audio, most of the time, the goal is not to alert the viewer to the mix; rather, it should be unnoticeable. Using audio fades can help us achieve this.
We can mix between two audio sources. To do this, we need at least two clips edited side-by-side in the Timeline with overlap, meaning more media must exist on the hard drive to draw upon to produce the fade. You can actually check available media by opening the Precision Editor. Double-click the edit point and available media, beyond that which has been used, appears transparent. Note: You cannot detach audio once the Precision Editor is open. This needs to be done first.

1 Make sure you have two clips cut together with audio detached.
2 With the Select A tool chosen, drag the audio from one of the clips toward the clip next to it. The clip which you are dragging toward will then shunt out of the way (it is important that the Select A tool is being used!).
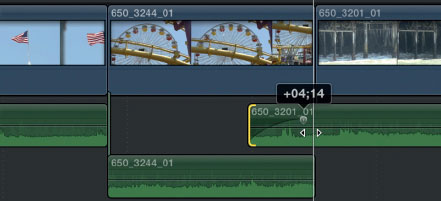
3 Drag the Fade Handles for the incoming and outgoing clips. Visual indicators show the duration of the fade as you drag. You can therefore quite easily plot an 8-frame or 12-frame audio fade. For precise control, expand the Timeline using the Zoom tool, Z; you can zoom right down to the subframe level if you wish! Play back and listen to confirm the result is what you want. You may also wish to Roll the video to follow or precede the audio transition.
There are several ways you can access the individual tracks recorded on location. As mentioned earlier, most professional cameras record two tracks of separate audio via XLR jacks.
Choosing to Expand Audio Components is a quick way to expand the individual audio tracks. You can then adjust the levels on each of the tracks, the pan controls, and apply audio effects. Once adjustments have been made you can select Collapse Audio Components and, once again, a single stereo pair will represent the two audio tracks. Any changes you have made while the audio components are open continue to take effect once the audio components have been collapsed.
You can Expand Audio Components with audio which has been detached and also with audio which is combined into a single clip with the video.
1 Control-click on a clip in the Timeline—choose Expand Audio Components. Alternatively choose the Clip menu and scroll to Expand Audio Components.
2 Adjust the audio within the individual audio tracks as you wish. The same rules apply for adding fades or adjusting audio levels, as with audio in clips which have not had the components expanded.

Once audio components have been expanded you can then adjust the individual tracks independently. These techniques are very useful, for example: often on location one channel will record camera mic and the other will record an external mic. By silencing the track with camera mic you can then quickly and easily keep only the audio which sounds best.
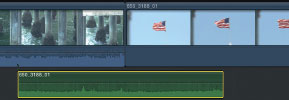
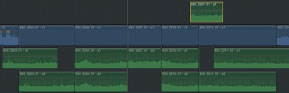
Note: Expanded Audio is shown in Blue, whereas Detached Audio is represented by Green.
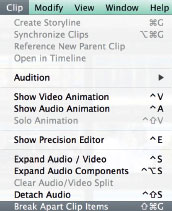
Another way to reveal the separate audio tracks is to choose the command Break Apart Clip Items. This will Detach Audio from video and break the audio into separate tracks.
You can select multiple clips in the Timeline and then select Break Apart Clip Items and the dual tracks are then available to access for each of the clips.
1 Highlight the clips in the Timeline you wish to work with.
![]()
2 Choose the menu Clip at the top of the interface and scroll to Break Apart Clip Items (shortcut: Shift + Command + G). You can then add fades and adjust the levels as you wish.
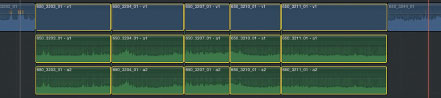
The result is each of the audio items become independent Connected Clips with the video remaining as the main clip in the Primary Storyline. You can therefore move audio separate to video—or if you move video the connected audio clips will then move with it. You can also choose to move single audio clips separate to everything else. These audio clips now function as connected clips and therefore the rules of working with Connected Clips apply.
You need to be careful not to lose sync—which is easy to do when moving audio independent of video.
Relationship of the Inspector to Audio Output
A key part of the interface which we have barely touched upon so far is the Inspector.
The Inspector can be accessed by pressing the Inspector symbol (right of the interface).
![]()
The shortcut Command + 4 will toggle the Inspector on or off.
The Inspector is a place where you can access many of the controls for editing, audio editing, effects production, and titling. The Inspector reacts to the clip you have selected; therefore, click the audio of a clip and Inspector displays the audio properties and choices. Choose the video and you can access controls which affect the video. Once we get onto effects production, you will see controls and parameters specific to this area.
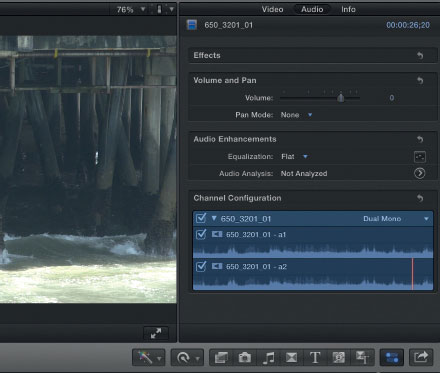
Click the audio of a clip in the Timeline and open up the Inspector window; press the Inspector icon on the interface or choose Command + F4.
![]()
The first video editing I ever did was working in a two-machine Betacam suite. Two-tape machines wired up, a player, and a recorder with an edit controller to control each of the machines. There was a Preview button and a Record button bang in the center. This was standard Beta, analogue half-inch tape, before Beta SP and way before DigiBeta hit the scene.
On Betacam, you could work with two tracks of audio: stereo, left or right. You could do a lot with two tracks—music on one, interview on the other, then do a mixdown to add some effects. It was primitive, but it worked, and we knocked out results which were broadcast every night on the six o’clock news, onlined in two-machine suites and fed out to the world.
In that two-machine suite was an audio mixer, so we could ride the levels and mix the audio live. At the top of the mixer were pan controls. It had the essential knobs—turn one way and audio could be directed to the left or the right channel, turn the other and you could balance the audio so that the master track fed equally to tracks 1 and 2 on the record machine.
That’s what pan controls do. This lets you mix audio evenly so the track you have chosen will play out of both the left and right channels, or, you can choose to direct the sound left or right or anything in between. This is the process by which the editor creates a stereo or mono mix.
It is important to be aware when setting the pan controls in Final Cut Pro X that you can work with audio where video and audio are represented as a single clip or you can work where the video and audio are Detached.
Furthermore, you can choose to work with the clip as two separate tracks, by using the Expand Audio Components command. You can then apply the pan controls to the individual tracks.
To set the audio pan controls in Final Cut Pro X:
1 Click on a clip in the Timeline.
2 Open the Inspector (Command + 4 to toggle on and off).

3 Click the second tab, Audio.
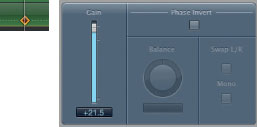
4 You can now choose a pan mode.

5 Choose Stereo Left/Right.
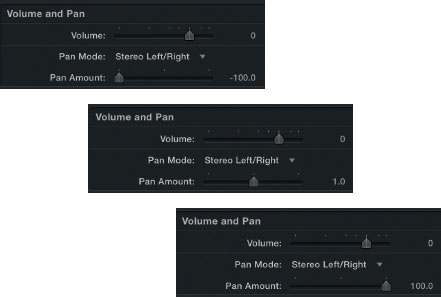
6 Use the slider to adjust the pan amount. Using this you can adjust the pan Left/Right and you can hear the result as you pan.
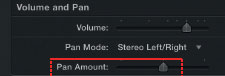
Drag the Pan Amount slider one way and you hear the audio out of the left speaker; drag the other way and sound comes from the right. Set the Pan control in the middle and sound is distributed equally through both speakers. The result is also reflected on the audio meters (press the Meters icon on the Dashboard in the Toolbar if these are not visible).
![]()
Press to reveal audio meters.
3 Be aware adjusting the pan for a single track of stereo audio is very different from adjusting the pan for individual tracks of audio. That is when you use Expand Audio Components, or Break Apart Clip Items; this will then let you access the individual tracks. I like to know the makeup of the audio tracks and much of the time I choose to work with dual audio tracks. I can quickly remove stray audio or camera mic by deleting a track or by silencing the audio. The best audio can then, if I choose, be panned to mono so the sound is equally heard out of the two speakers.
As mentioned earlier, adjusting pan controls was standard practice in edit suites over twenty years ago in broadcast tape suites. It gives you the means to control your audio, to produce a stereo or mono mix, and to get rid of unwanted sound.
Switching Audio Tracks On and Off in the Inspector
Audio tracks can be turned on or off in the Inspector simply by checking or unchecking the controls.
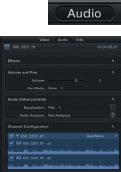
1 Click on a clip in the Timeline.

2 Look to the Inspector under the Audio tab. Notice at the bottom is an area called Channel Configuration—click the disclosure triangle to reveal the audio associated with the clip. This can be set to dual mono or stereo. Think of the representation in Channel Configuration, within the Inspector, as being a reflection of the audio in the Timeline.
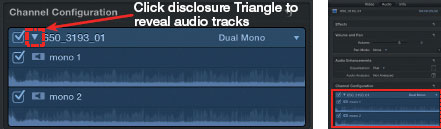
Above: Dual mono representation of the clip in the Inspector.
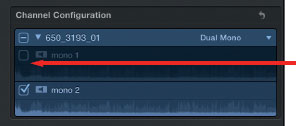
Left: Tracks can be muted by checking or unchecking the box to the left. This presents a quick way to silence the audio.
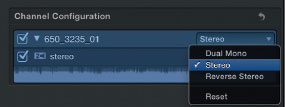
Left: If the Channel Configuration is changed to stereo, then the result is that one Track of audio, not two, is then visible in Channel Configuration.
Boosting Audio Levels with the Gain Filter
Many times audio is recorded on location at a lower level than is ideal. This can be fixed in the edit suite by boosting the audio. The means to adjust audio in the Timeline is limited to a maximum of +12 dB. When you need more volume, do the following:

1 Highlight the clip you wish to adjust in the Timeline. If you are working with separate video and audio, then highlight the audio.
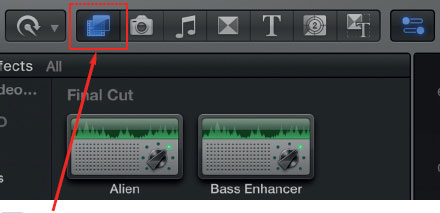
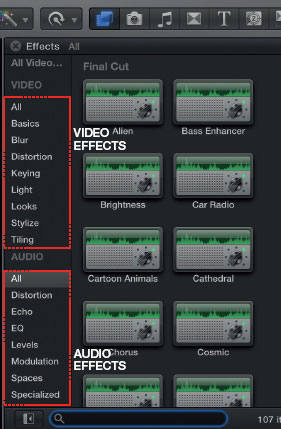
2 Open up Video and Audio Effects.
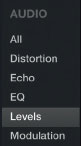
3 Scroll down so you can see the audio choices and click Levels.

Drag the Gain filter onto audio in the Timeline.
4 Locate the Gain filter. You then need to apply this to the clip you have highlighted by double-clicking the Gain icon or by dragging this onto the clip.
Drag the Gain filter onto audio in the Timeline.
The Effects window for audio and video is a pane which shows available effects, separated with video at the top and audio at the bottom.
Note the search dialog box at the bottom of the window. Key in the name of an effect, such as Gain, and the search results will be shown before you.
Once you learn the name of the effects you use most frequently you can then key in the info to find them very quickly.
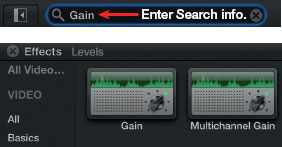
The search results are then displayed before you.
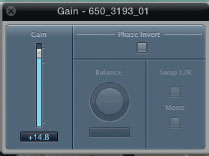
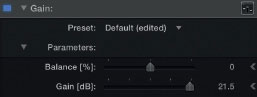
5 Once you have applied the Gain filter to a clip go to the Inspector, look to the audio controls, and under Effects is Gain. Click the arrow to reveal adjustable parameters and functionality.
6 Adjust the parameters. You can boost the overall volume considerably and you have other controls, including Pan control, and the ability to mono the track or swap channels.
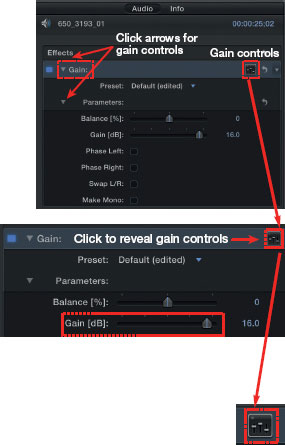
Drag the slider to increase or decrease the gain. Maximum gain is + 24 dB, plus you can increase audio in the Timeline by + 12 dB.
Keep an eye on the audio meters, particularly when boosting with Gain, as it is easy to completely over do it.
Using the Gain filter provides a quick way to increase the audio level. If you need even more level, then apply the Gain filter twice or as many times as you need to boost the audio to whatever level is required.
Once the effect is applied you can play your audio and adjust in real time to hear the result.
You can adjust the parameters within the Gain controls.

Getting inside the audio and then plotting keyframe points can be achieved by showing Audio Animation.
1 Apply the audio Gain filter to a clip in the Timeline.
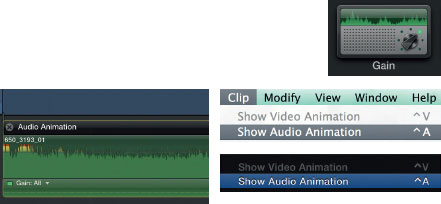
Control-click the Clip and choose Show Audio Animation.
2 Control click the clip to which you have applied the Gain filter and choose Show Audio Animation.
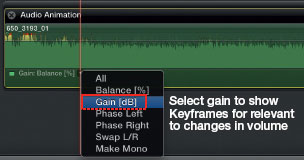
3 A strip is revealed at the base of the audio track. It is here the Keyframe points can be plotted.
4 Position the Skimmer and press Option Click to mark Keyframe points.
By default further Gain points are added when you move the Playhead and adjust the Gain controls.
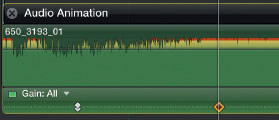
5 Drag the points within the Audio Animation area to raise or lower the gain or make changes to the parameters in the Inspector.
6 To Delete a Keyframe in the Animation Editor click the Audio Keyframe and press the Delete key.
7 Close Audio Animation when you are happy with the result.
Note: The images shown for this section have been for adjusting the audio Gain with Detached audio.

The process with combined video and audio is similar, though be aware that you will be applying Gain changes globally to the stereo or mono tracks. Parameters can be adjusted in the Channel Configuration area of the Inspector.

Automated Loudness: Setting Audio Levels Quickly
In general, I’m not a fan of automation, that is, to let Final Cut Pro X take care of tasks which I feel can be better managed manually.
However, there is a fantastic automated control in the Inspector which will boost or reduce the audio level of a clip so that it peaks correctly. You can use this method to sort out the audio levels for individual clips or an entire scene, simply by turning part of the Timeline into a Compound Clip.
1 Highlight the media you wish to work with.
2 Go to the Inspector and select the Audio tab.
3 Choose Audio Enhancements and click the arrow to the right.
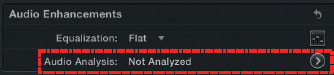
Click the arrow to take you into Audio Enhancements.
4 Check the control at the top—Loudness.
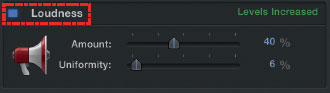
The result is that the audio level of the clip is now set to the correct level. You can also adjust Uniformity which affects the overall dynamic range in the audio.
I have used Audio Analysis to enhance audio many times when rushed, to quickly even out audio levels. As written earlier, take a group of several or many clips and turn these into a Compound Clip. Highlight the Compound Clip, go to the Inspector, and then select the audio controls. Click the arrow to the right of Audio Enhancements and check the box for Loudness.
This function works and it works well. However, beware—if music is in the mix some very strange results can occur, so I avoid using this where music is involved. Furthermore, I firmly believe that the best audio mix is the result of human ears listening and interacting to create a result; not the result of pressing a single button to iron out any audio shifts. Thus, I use this method sparingly. But when you’re in a hurry and need to get the job done and out the door really quickly, then you do what needs to be done!
EQing your audio has always been an essential part of the filmmaking process. Sometimes you need to get rid of hiss, other times the audio is too boomy, so the bass needs to be cut.
The Graphic Equalizer in Final Cut Pro X is easy to access and lets you boost and diminish frequencies by dragging and listening. The results play back in real time.
1 Click the clip in the Timeline you wish to adjust.
2 Go to the audio controls in the Inspector.
![]()
3 Go to Audio Enhancements and click the Equalization menu to reveal the choices. You can either leave this on flat, which leaves your audio untouched, or you can choose one of the options.

Graphic Equalizer
4 Click the icon to bring up the Graphic Equalizer.
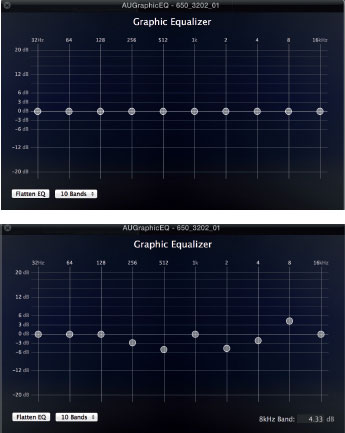
5 Drag the faders to adjust and listen to the result playing back in real time.
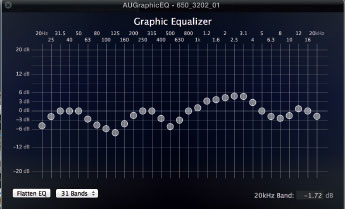
6 For more sophisticated EQing, you can choose a 31-band Graphic Equalizer.
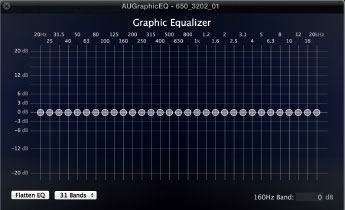
7 You can reset the faders by pressing Flatten EQ.
![]()