
Effects creation is where the action happens. You can combine many elements, composite images, and graphics together, add titles, transitions, and jazz up a production so that it is more than just cuts in a Timeline.
Furthermore, you can treat the images by applying video effects and, if you wish, you have access to a wide variety of prebuilt Templates. Truly remarkable results can be achieved, adjusted, and set according to your needs.
Beyond this is color correction, which offers the ability to sort out white balance issues, tweak the image to warm it up, cool it down, push the black levels, or increase/decrease the whites.
When I started cutting in the late 1980s such power would have been a dream.
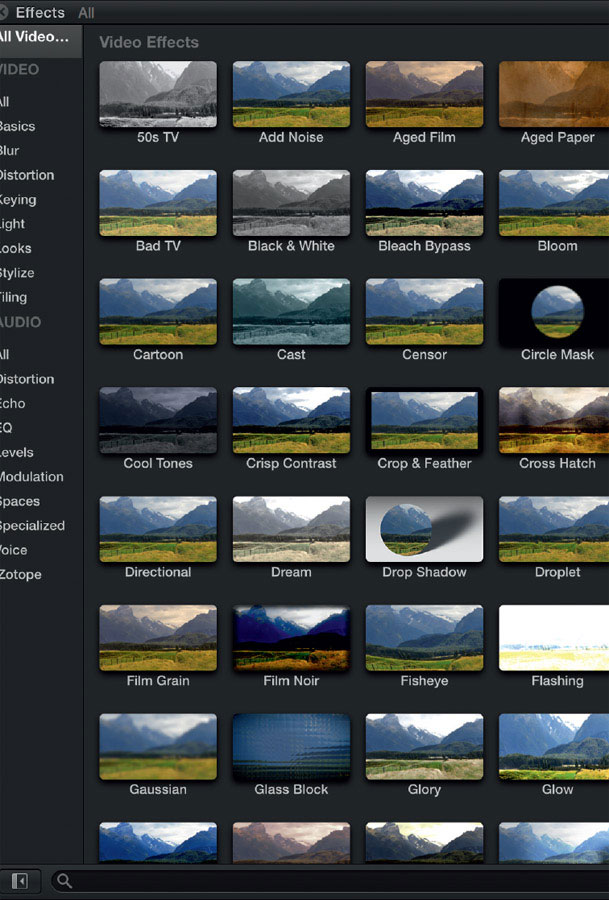
There are five types of effects we are going to be dealing with:
1 Video and audio effects: The effects change the image in terms of color, texture, brightness, and a host of other parameters. Audio too can be manipulated to adjust sound frequencies, level, pitch, and other settings.
2 Transitions: Transitions are applied between clips. The most common transition, the dissolve, is used in all types of productions from home movies to features films. Other wacky transitions can be drawn upon for impact or to add punch to a video.
3 Text: A tremendous amount of text options are offered within Final Cut Pro X for title creation. Everything from a simple static title, to customized moving titles, lower thirds, and captions can be quickly and easily created and positioned.
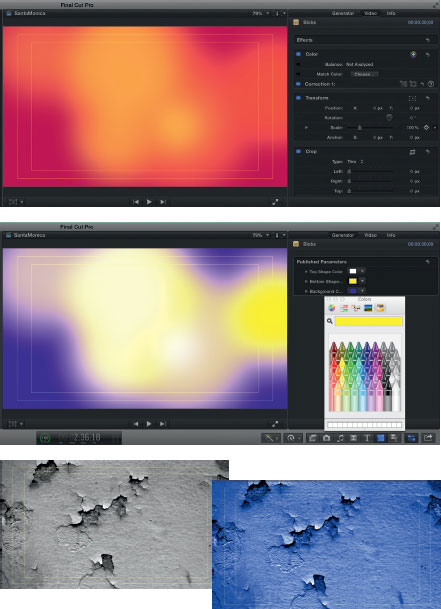
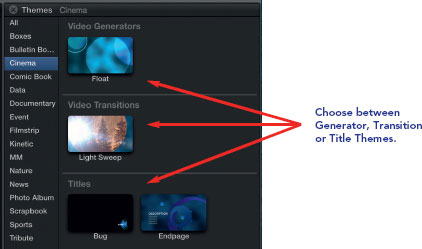
4 Generators: This refers to elements available inside Final Cut Pro X such as backgrounds, textures, and other elements to work with.
5 Themes: Themes are prebuilt moving backgrounds.
Each Theme is divided into two different sections: Video Transitions and Titles.
Themes with text can be customized, which means you can change the color, font, and look of the theme.
The title Themes work as Connected Clips, with the video elements being positioned below the Connected Clip. The video elements are then integrated into the overall graphic.
Transition Themes work between clips and therefore there needs to be existing media on either side of the edit for the Transition to work.
There is a great selection of effects from which to draw. You can treat your images to create many different looks. Essentially all the effects, video or audio, work in a similar way.
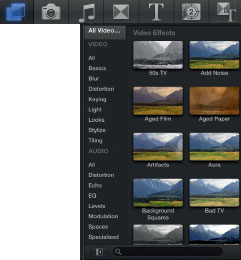
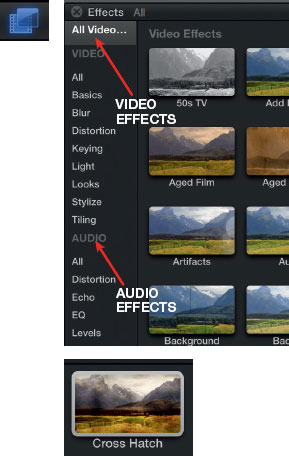
1 Click the Effects Browser icon (shortcut Command + 5). Look at the Effects Browser. There are separate headings for video and audio; click any of the headings to reveal the effects which are available, or choose All to see a complete listing of either video or audio effects.
Highlight a clip in the Timeline; select an effect and skim across to preview.
2 You can preview any of the effects. Click to highlight the clip in the Timeline to which you wish to apply the effect; then position your curser over the effect in the Effects Browser and skim over it. The results will show in the Viewer.

3 With the clip highlighted in the Timeline, double-click the effect of choice. The effect will then be applied. Alternatively, drag the effect from the Effects Browser to a clip and the effect will then be applied. Play it back to view the result.
4 To adjust the effect parameters, select the clip in the Timeline to which the clip has been applied and then look towards the Inspector (Command + 4 to show Inspector).
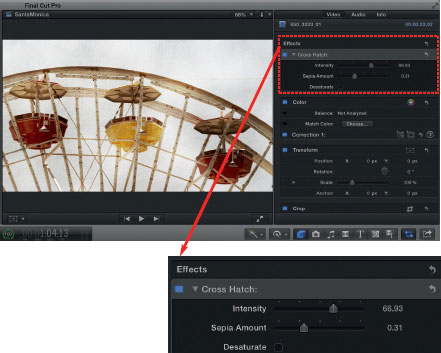
5 Under Video in the Inspector you will see Effects—here the choices to modify your effect are in front of you. You need to be aware that for prebuilt effects, the controls may be limiting. Regardless, there is still a lot that can be done. Experiment, get to know the options, and then you can put these effects to creative use when you need to add some sparkle to a production.
Note: You can easily switch the effect on and off in the Inspector by checking or unchecking the box next to the name of the effect. To remove the effect, click to highlight the effect in the Inspector and press the Delete key.
When working with audio effects, the procedure is the same: Highlight the clip, double-click the effect in the Effects Browser to apply, or use the drag and drop method.

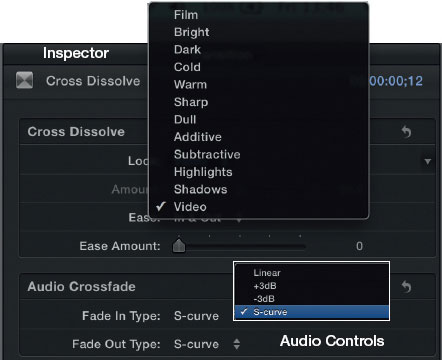
Click the audio of a clip in the Timeline—go to the Inspector and reveal the audio controls. The audio effects are powerful and the results are played back in real time. Therefore, you can adjust video or audio parameters as you play to see or hear the result.
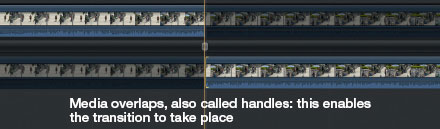
Transitions are applied at the edit point between two clips. For a transition to work, you must have media to draw upon from each of the clips on the hard drive, beyond the media which has been edited into the Timeline. For example, for a one second transition to take place, you need half a second of extra media for each clip, to be accessible on drive beyond that which you see in the Timeline.
![]()
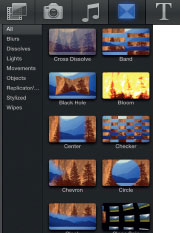
1 Press the Transitions Browser icon. You can reveal all of the transitions or view the different categories.
2 Choose a transition and drag and drop. This positions the transition onto an edit point between two clips.
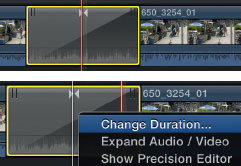
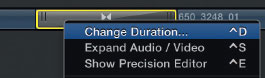
3 View the result. To change the duration, control-click and choose Change Duration.
Alternatively, click to highlight the transition and press Control + D, then enter the duration of choice into the Dashboard and hit Enter.
4 Select a transition in the Timeline. In the Inspector you have controls which will affect the look of the transition. Customize and play back to preview the results.
Note: When adding a dissolve, an audio dissolve will also be applied, if the video and audio are locked together as a single clip. If you have detached audio then a dissolve will only apply to the video.
There are an amazing variety of transitions. Obviously, these need to be used with discretion, so the results are tasteful and appealing. Used well, these transitions can add shine to a production which otherwise may be visually static.
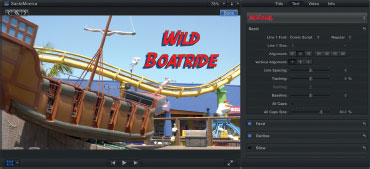
Once upon a time, a simple title would suffice to open a production. These days, moving text, animated text, 3D text, and floating text are the norm—the demand for complex text creation is something that the editor is expected to deliver.
There are a wide variety of text options offered in Final Cut Pro X, ranging from a simple static title to moving text which can be customized in many different ways.

Titles are divided into many different categories.
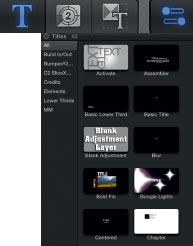
1 Select the Title icon in the Toolbar to reveal the Title Browser. As with the other effects areas we have looked at so far, you can choose All to see the entire range, or there are separate categories to chose from.
2 Double-click any of the text options and this will be added as a Connected Clip wherever the Skimmer or Playhead is positioned. You can also choose to drag and drop the title from the Title Browser to the position of your choice.
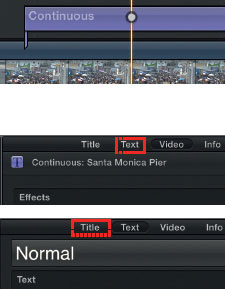
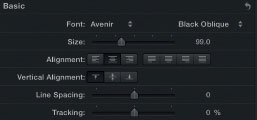
3 In the Timeline, click the title and look to the Inspector. Press Command + 4 to bring the Inspector into view. Look to the top of the Inspector and there are two tabs: Title and Text. You enter text in the Text tab and change parameters in the Title tab.
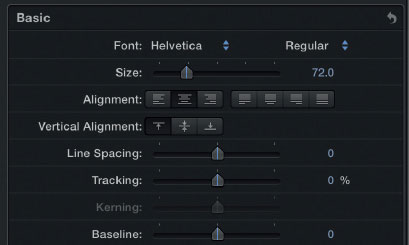
Here, you can enter the text you wish to work with and adjust parameters such as font, size, spacing, tracking and alignment.
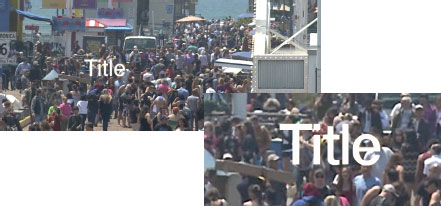
4 Look to the Viewer. Assuming you have clicked the text in the Timeline, the Viewer will display the word “Title” superimposed over the background image.
5 Overtype the text information within the Viewer or in the Inspector window.

6 Adjust attributes of the text in the Inspector.
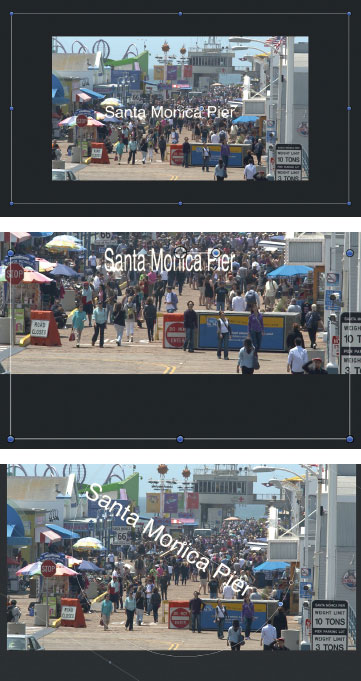
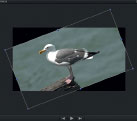
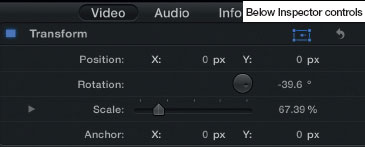
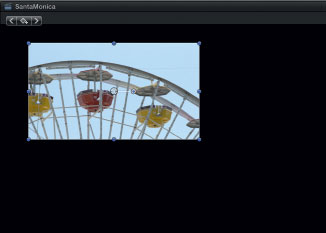
7 To reposition text in the Viewer, click the icon bottom left, which is a square with circles on the edges. This is referred to as Transform. With Transform enabled you can reposition the text by dragging in the Viewer, resize by dragging the corners towards or away from the center, rotate the text by grabbing the handle in the center, and squeeze the text by choosing the point on the edges of the frame.
![]()
Note: The Transform Effect function is not just for titles, it can be used to manipulate video images as well. You can reposition, stretch images vertically or horizontally, and rotate.
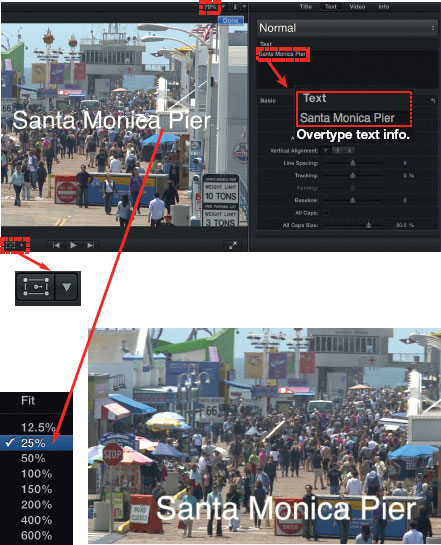
Click on the text in the Viewer and drag to reposition.
Size the image using the percentage values. Choose Fit to make the image use all of the available space in the Viewer, or you can enlarge or reduce the image within the frame. This is simply a visual representation and does not affect the actual size of the image.
Back in the days of film, this required an optical printer and tanks of chemicals to bring the image to life. Now we can make changes and play back in real time. This is a big deal!
Increase/decrease size.
Stretch/squeeze the image.
Rotate.
It is all well and good to have moving, animating, pulsating text, but sometimes you just want the words to sit on the screen, plain and simple.
1 In the Title Browser, select All to reveal all the text options.

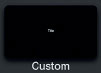
2 Locate Custom; you can search for it at the bottom of the Text Browser or scroll down the list until you find it. Apply this to the Timeline by double-clicking or dragging.
![]()
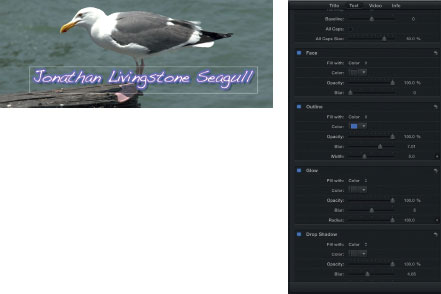
3 In the Timeline, click the title, go to the Inspector, and enter the text details in the text area. Choose a font, size, and alignment.
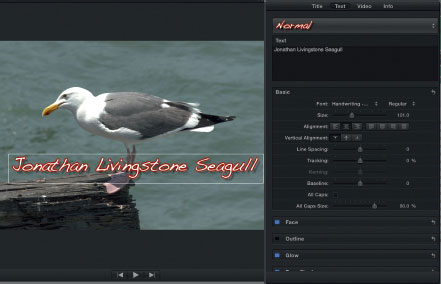
4 You can add color to the text. Check that Face is selected, choose the color, make a choice, and this will be reflected in the words that are on screen. You can also adjust the opacity and the blur.
5 You can also adjust outline, glow, and drop shadow.
Spend some time with text and you can customize the appearance of the words to a high level.
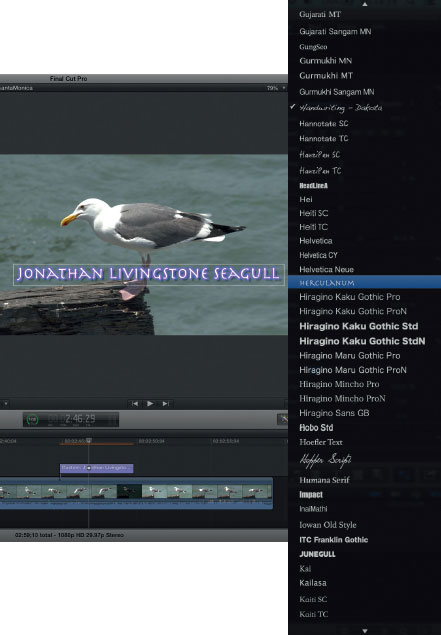
Note: When adjusting fonts you get a long list from which to choose. Each font is represented visually so you can gauge the appearance. If you scroll through the choice of fonts on screen, you will see the words changing so you know exactly how each font will appear.
Whenever you select a title, you have the option to radically change the appearance by drawing on a wide range of pre-built options inside of Final Cut Pro X. The choice is astounding, and the results are impressive. You can also customize the appearance in terms of font, color and many other attributes.
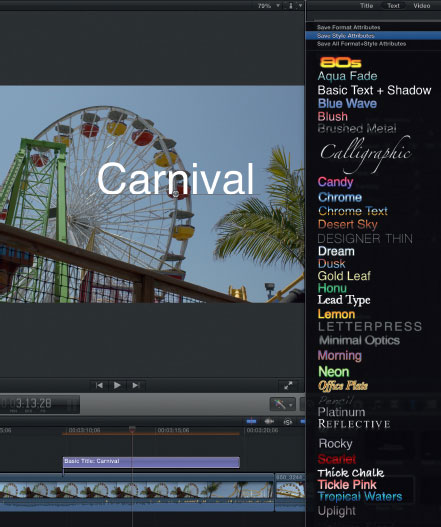
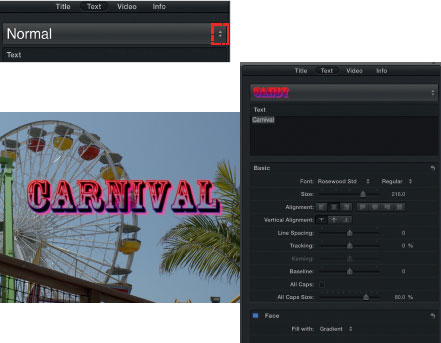
1 Drop a title into the Timeline; double-click it, and look to the Inspector.
2 The top of the Inspector in the text area will read “Normal” in large letters. Choose the drop-down menu to reveal the range of choices.
3 Drag between the choices and choose one of the options. Click and release to see the result.
Click arrows to the right to reveal list of text options.
4 You can now customize the Face, Outline, Glow, and Drop Shadow options.

Fading Titles On and Off and Adjusting Transparency
To fade titles is a basic requirement and this can be achieved quite easily:
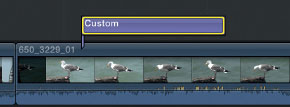
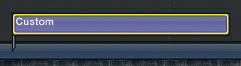
1 Choose Custom Title and apply it above a clip in the Timeline.
2 Click the title in the Timeline and refer to the Inspector. Type over the words.
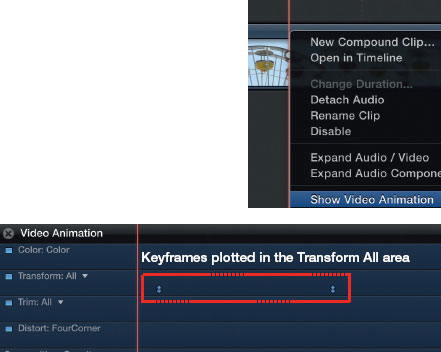
3 Control-click the title in the Timeline. Choose Show Video Animation (shortcut Control + V).
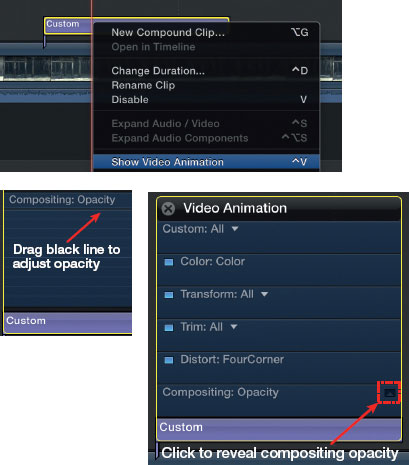
4 The Video Animation window will appear. Click the small arrow to the right of Compositing Opacity. This will open up the opacity controls.
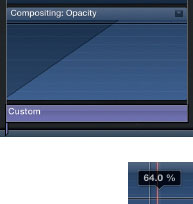
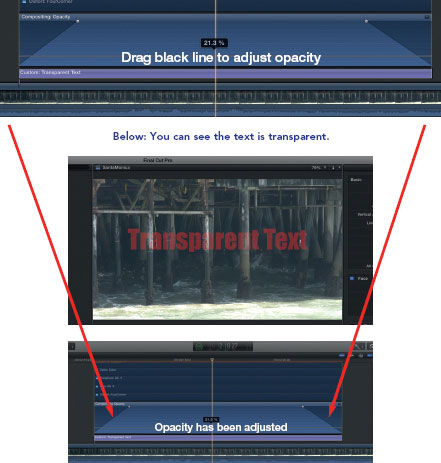
5 Drag the ends to program a fade from the beginning and/or end. As you drag, you can see a numeric representation of the duration of the fade. You can also drag down the Opacity slider to make the words transparent. As you drag, a percentage read-out indicates the change in opacity.
So you want to make your text move. You want it to start here and finish there. You wish to program a move so that the text follows a particular path. This can all be done in an elegant way with fine control by keyframing.
1 Place a title into the Timeline—I suggest using Custom Title.
2 Click the text in the Timeline, go to the Inspector or Viewer, and over- type the text as you require.
3 Using the settings in the Inspector, adjust the font, size, tracking, and any other parameters you wish to adjust. You can also adjust the face and add a glow, outline, or drop shadow.
4 In the Timeline, make sure the title is selected; at the bottom left of the Viewer press the Transform Effect icon.
5 You can now freely position the text by dragging. Position and size the text.
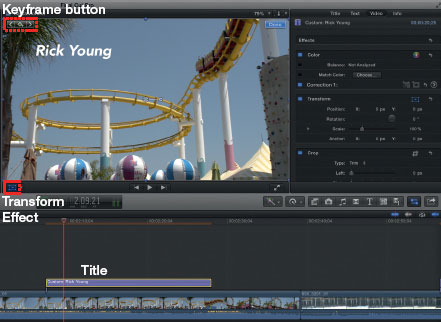
6 Position the Playhead in the clip in the Timeline at the location you want the animation (move) to begin. Mark a Keyframe by pressing the Keyframe button at the top left of the Viewer interface.
![]()
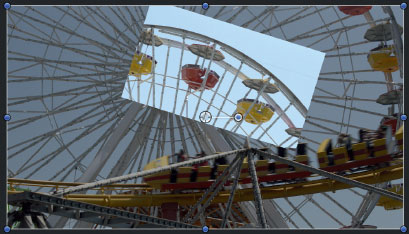
7 Move forward in the Timeline to where you want the next Keyframe to be added. Reposition the text, rotate it, scale it, whatever you wish to do. This will automatically add the next Keyframe.

Keyframe 1.
Keyframe 2. Note the red line indicating the path of the move.
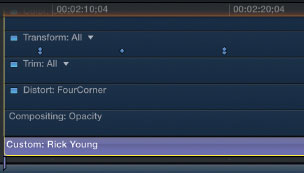
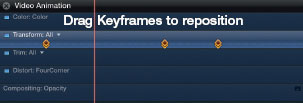
To see your Keyframes in the Timeline, Control-click the title and choose Show Video Animation (shortcut Shift + V). Look towards Transform All. Here you can see the Keyframes have been plotted.

You can jump Keyframe to Keyframe and forward or backward using the arrows at the top left of the Viewer.
![]()
Keyframes can be repositioned by dragging.
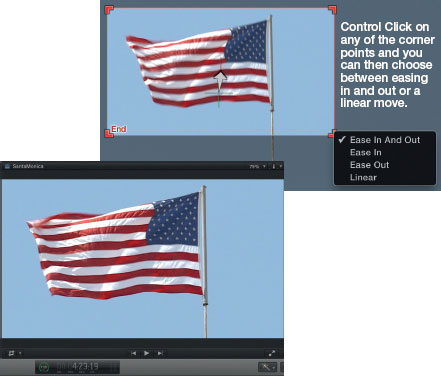
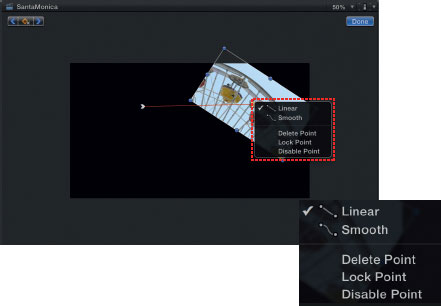
8 Control-click the Keyframe points in the Viewer and you can program the move to be smooth or linear.
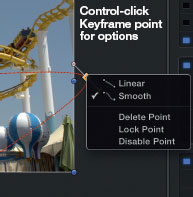
![]()
9 You can choose to lock a point, which means it cannot be dragged; it is fixed.
![]()
10 Option-click in the Keyframe editor to add further points. You can add as many Keyframes as you want.
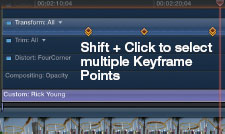
If you Shift + Click the Keyframe points you can then select multiple points at the same time. You can then drag the points, together, in either direction.
When working with text, you need to pay attention to the safe area for titles.
When showing video content on a television, as opposed to a computer monitor, you will likely encounter what is known in the industry as cutoff, or the Essential Message Area (EMA). This means that not all of the image is seen on the television screen. As the editor of a program, we need to allow for this.
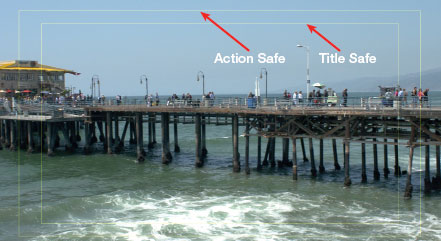
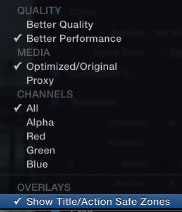
1 In the Viewer, choose the drop-down menu at the top right, scroll to the bottom, and switch on Show Title/Action Safe Zones.
2 Look to the Viewer. The outer lines represent Action Safe, while the inner lines represent Title Safe.
To ensure your titles are seen correctly off-air or on television monitors, position the words within the inside yellow lines.
For content that is not destined for broadcast or television viewing, you can disregard these safe areas; however, it is wise to adhere them, because if your content is shown on televisions then you know it will be safe.
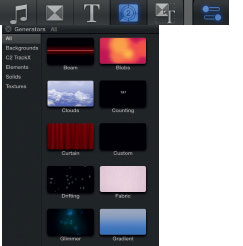
Generators provide prebuilt media inside of Final Cut Pro X. You can access the generators as a means of creating backgrounds, shapes, or texture to combine within your video compositions.
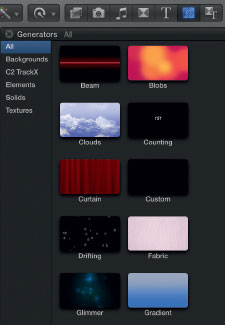
1 Click to reveal the Generators Browser.
2 You can choose to see all the generators which are available, or you can access the various categories.
3 Double-click a generator to add it to the Timeline and it will be inserted wherever the Skimmer or Playhead is positioned. Or you can drag and drop a generator, which can then be added to the Primary Storyline or as a Connected Clip.
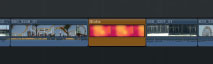
Generator inserted into the Primary Storyline.
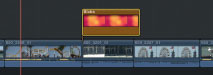
Generator as a Connected Clip.
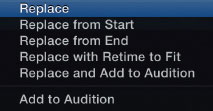
If you drag a generator between clips it is inserted; if you drag it onto a clip you have the choice to perform a Replace edit.
4 You can adjust the parameters of the generator in the Inspector and view changes in real time.
Note: Not all generators allow for adjustments.
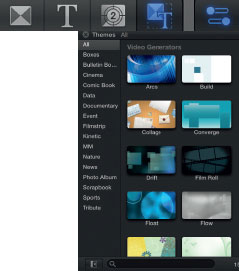
Themes can be either Titles, Generators or Transitions. If a Theme is a Title it works as a Connected Clip; if it is a transition then the theme is applied between two clips; if the Theme is a Generator this can function as a Connected clip or as a clip in the Primary Storyline.
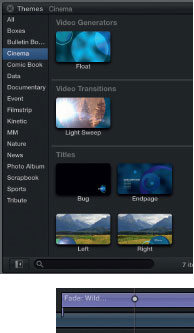
Themes combine graphical elements and text, and sometimes moving images. These are customizable but only to a point. You can change the text size and font, and, in some cases, you will choose moving images which will be integrated into the overall effect.
1 Click to reveal the Themes Browser.
2 You can view all Themes or scan through the various categories.
3 Double-click one of the title Themes or drag into position and this will be added to the Timeline as a Connected Clip.
4 Double-click the title and you can enter text details in the Inspector, or you can type directly into the Viewer. You can also adjust size, font, tracking, and other details.
Other Themes involve prebuilt graphics which include video and text.
The text can be customized in terms of font choice, size, spacing, and color scheme; however, the overall look of the theme and the programmed animation moves cannot be changed.
Working with Transition Themes
As mentioned earlier, Themes can be worked with as either titles or transitions. To work with Transition Themes:
1 Click to reveal the Themes Browser.
2 Select one of the transition themes; these are clearly labeled as Video Transitions.
3 Drag the Video Transition to the edit point between two clips and this will then be applied.
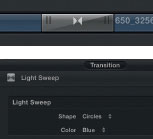
4 Click the transition to reveal options in the Inspector which can be customized.
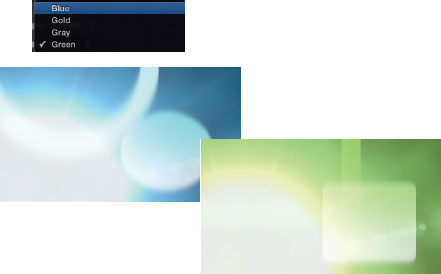
Colors can be manipulated and other attributes. These are prebuilt themes. As expected, the control is limited; regardless, eye-catching results can be achieved by experimenting with the different settings.
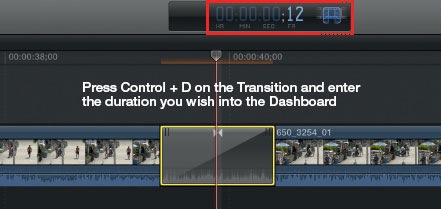
5 To set the transition duration, Control-click the Transition in the Timeline, and choose Change Duration (shortcut Control + D).
![]()
Control + D and enter duration.
Control-click and select Change Duration.
When working with Themes as Generators, these can be added as either Connected Clips or as a clip in the Primary Storyline. Therefore, the process of working with Generators is essentially the same as either Title or Transition themes, depending on whether the Generator is added to the Primary Storyline, or if it is inserted between two adjacent clips.
Generator Theme added as a Transition.
Generator Theme added as Connected Clip.
This has already been discussed in-depth in relation to text—the same rules apply to video images when using the Transform Effect Controls. Any shot in the Timeline can be quickly repositioned, resized, rotated, and distorted. Furthermore, changes can be Keyframed over time, meaning the image can be programmed to start in one position and end at another position.
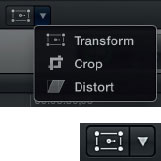
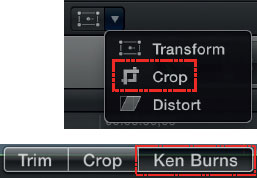
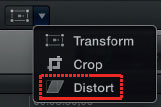
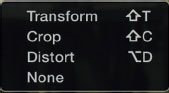
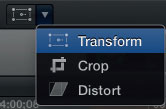
Look to the Viewer—at the bottom is a square with dots in each corner. Click the arrow next to this box to reveal the selection of choices for Transform, Crop and Distort.
1 Click any clip in the Timeline.
2 Press the Transform Effect button. You will see overlay controls appearing in the Viewer.
![]()
3 Click the drop-down menu top right of the Viewer and set the size of the image so it is reduced onscreen.
Increase/decrease size.
Stretch/squeeze the image.
Rotate.
4 Drag from any of the corners to increase or decrease the image size.

5 Drag from the center points on the outside frame and you can squeeze or stretch the image.
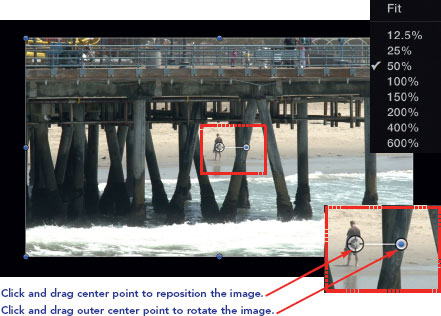
6 Click the blue dot attached to the center point and you can then rotate the image. If you drag the center point outward, the circle increases in size and this will give you fine control when rotating.
7 Click the center point to reposition the image anywhere inside or outside of the frame.
Reposition Rotate
Note: You can also access the Transform Controls in the video area of the Inspector.
If you wish to Keyframe the video to move over time, the procedure is the same as described earlier in this chapter when keyframing text.
![]()
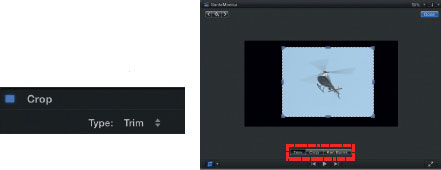
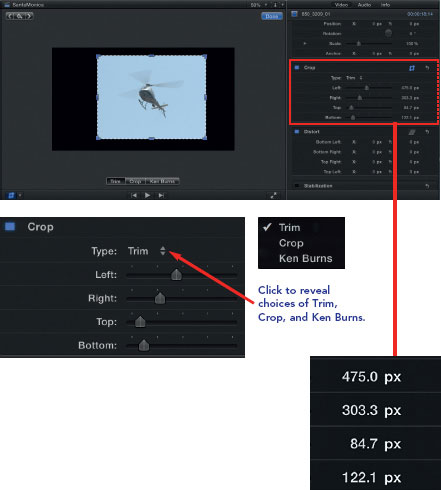
There are three options offered within the crop controls: Trim, Crop, and Ken Burns.
![]()
Trim: |
to trim the image means to slice away either vertically or horizontally. If the image is positioned over another image, where the image is trimmed will reveal the image below. |
Crop: |
means to select a portion of the image and increase this in size to fill the frame. While sizing, the aspect ratio remains constant; therefore, the area you define is always the correct shape to fill the screen. |
this refers to pan and zoom controls. Named after American film director Ken Burns, who used the effect of panning and zooming across still images—the effect is known for creating moves across still images, but it can just as well be used for moving images. |
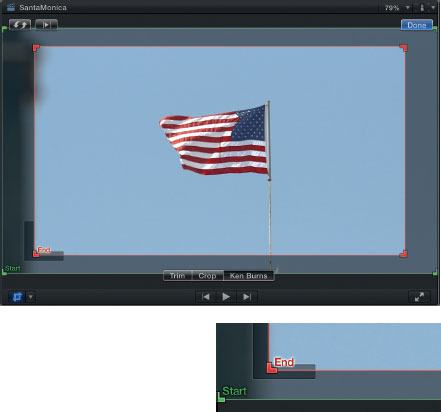
1 Highlight the clip in the Timeline.
2 Choose Crop and then select Trim.
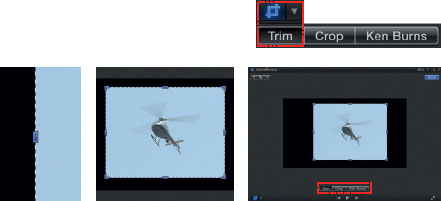
Drag edge to Trim.
3 Size the frame around the image by dragging or adjust the Trim controls in the Inspector.
4 Press done.
![]()
The result is the image shows exactly what you defined. When you trim an image in the Primary Storyline, then the result is black on-screen where you trimmed; if you trim a Connected Clip, where you have trimmed will be filled with the image below the Connected Clip, creating a picture-in-picture, or several picture-in-pictures if you are really creative.
You can also access the controls in the Inspector.
You can also trim by numbers. Highlight the number in the Inspector and overtype, or use the arrow up/down keys for fine adjustment. You can then view subtle changes as you tap the keys.
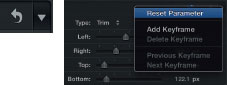
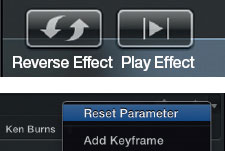
To reset back to the default, go to the Crop controls in the Inspector and choose the hooked arrow for reset or choose the drop-down menu and select Reset Parameter.
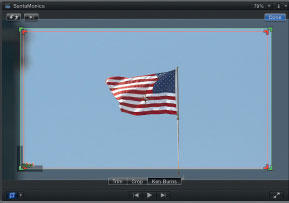
Adjusting crop is used to define an area of the image which will then fill the screen, whilst maintaining the original aspect ratio.
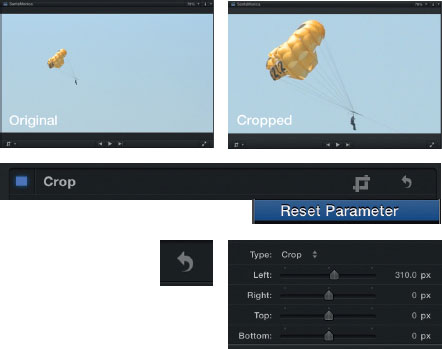
1 Highlight the clip you wish to crop in the Timeline.
2 Press the Crop Effect button on the lower left of the Viewer Interface.
3 Choose Crop.
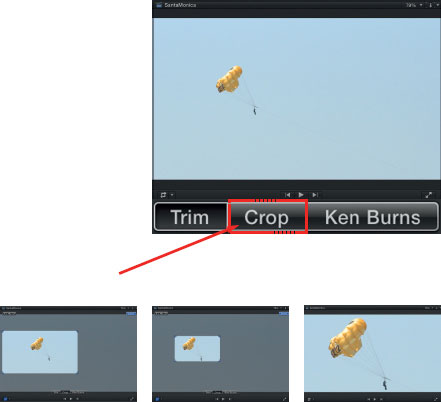
4 Drag to set the crop size or use the crop controls in the Inspector. You will notice that you are constrained to the aspect ratio of the video you are working with. You can then position, by dragging, the crop area over the image.
5 Press done. The result will be before you—the area you defined now fills the screen. Beware of a loss of quality by cropping as, essentially, you are blowing up the image, or, more precisely, cropping in on the image.
![]()
To reset the crop, go to the crop controls in the Inspector and choose the Reset arrow or drop-down menu and select Reset Parameter. You can also adjust the crop controls in the Inspector using the sliders or by entering numeric values.
Working with the Ken Burns Effect
As described earlier, Ken Burns is an American documentarian who made extensive use of panning and zooming over still images. This technique is easy to achieve inside of Final Cut Pro X using the controls provided.
1 Click to select a clip in the Timeline.
2 Click the Crop button in the lower left of the Viewer.
3 Click on the Ken Burns tab bottom center of the Viewer window.
4 Your image will now appear with a green box and a red box—each of these is used to set the start (green) and end (red) points.
5 Drag the edges of the green box to define the start point of the move. If you want all of the image, leave the green set to the outer edges of the image; if you wish to start already zoomed in to a portion of the image, then frame accordingly with the green box.
6 Drag the red box and size this to define the end of the move. If the red box is smaller than the green box, then you will zoom in to the image. If the red box is larger than the green box, the result will be a zoom out. Be aware you can also use the crop controls in the Inspector to make adjustments. While adjusting, the aspect ratio will be restricted to that of the frame you are working with.
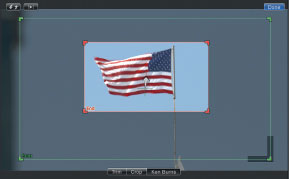
Left: the end frame shows the final frame which is now zoomed in on the original image.
7 Press the Done button and press Play to check the result.
![]()
You can program beautiful slow zooms or rapid moves in on a portion of the image. Beware with the Ken Burns effect in Final Cut Pro X that the start point is always the beginning of the shot and the end point is the end of the shot. Therefore, if you need greater control, such as having a static image to begin with and then zoom in to, then manual Keyframing would be needed to achieve the result.
Note: You can reverse the start and end points and reverse the direction of the effect. The second button is to play the effect.
To reset at any stage, go to the Crop controls in the Inspector and choose the Hooked Arrow for reset, or, the drop-down menu and then select Reset Parameter.
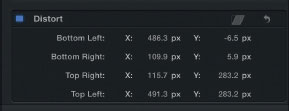
Back in the early 1990s, I was watching a demo at a tradeshow on a high-end paint system. The operator was demonstrating a technique known as corner pinning—a digital still was positioned and stretched by dragging each of the four corners. This ability is right there in Final Cut Pro X for you to access.
1 Highlight a clip in the Timeline.
2 Press Distort.
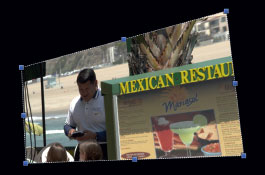
Using the distort controls enables you to reshape the image by dragging each of the corners.
3 Drag the corners and position as you wish. You can choose to crop the image and then distort as you wish.
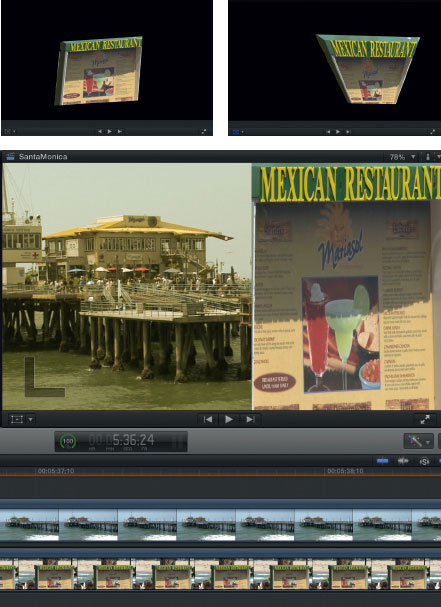
Above: Two layers composited together with the positioning of the sign done with the distort controls. A tint has been applied to the image on the left.
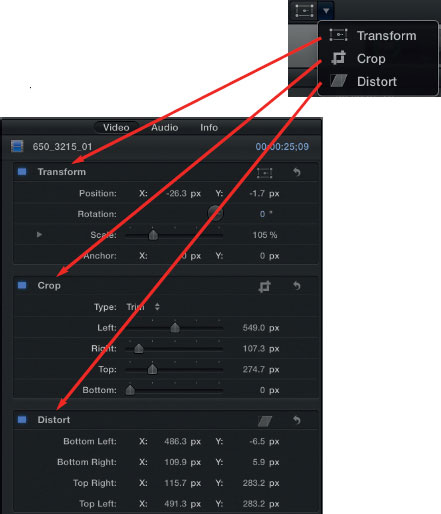
4 In the Distort Controls of the Inspector, you can key in numbers manually or highlight the numbers and use the arrows to increase or decrease the value.
The controls for Transform, Crop, and Distort as found at the bottom left of the viewer are also mirrored in the Inspector. Here, you can manually drag sliders or enter numeric values. If you enter numeric values, highlight the number and use the up/down arrows for subtle changes.
If you Control-click in the Viewer you can choose:
Transform: |
Shift + T |
Crop: |
Shift + C |
Distort: |
Option + D |
Keyframing has already been mentioned several times. It means to change over time.
You can Keyframe text, shapes, and moving images. You can also Keyframe the crop controls such as Transform, Crop, and Distort.
So far we have already covered Keyframing text and Keyframing audio. Let’s run through the process for Keyframing video:
1 Highlight a clip in the Timeline.
2 Click the Transform Effect button in the lower left of the Viewer.
3 Position the Playhead in the Timeline on the clip where you want the change to start. Resize and position the clip in the Viewer.
4 Click the Add Keyframe button; this will be your start Keyframe.
5 Move the Playhead forward in the Timeline.
6 Drag to adjust the size or positioning of the image. The next Keyframe will be marked automatically when you reposition the shot.

7 You may choose to position the clip you are Keyframing over a second layer of video (below). Therefore, the two images are composited together.
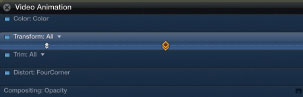
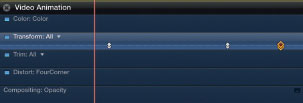
8 Play back the content in the Timeline and check the result. If you open the video animation controls (Control +V) and look to Transform All you can then see the Keyframes plotted. These can be dragged to extend or reduce the duration of the effect and further Keyframes can be added by pressing Option + Click in the Transform All area.
Click and drag the Keyframes to reposition.
Option + Click to manually add additional Keyframes.
Shift + Click to select multiple Keyframes and drag to reposition all the Keyframes together.
Control-click in Viewer to set Keyframe points as linear or smooth.
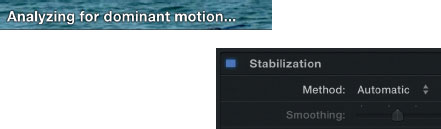
Built into Final Cut Pro X is the ability to add stabilization to any clip. This will remove minor shakes and can dramatically improve the usability of footage.
Simply click the clip in the Timeline, look to the Inspector, and switch on Stabilization (blue).
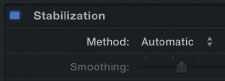
Wait while your footage is analyzed. Once this is done play back to check the results. You can then also switch between the different methods of Stabilization, each of these offer different options on fine-tuning the process. Tripod mode is particularly useful for removing all shake.
There are two types of keying available, both found in the Effects Browser of Final Cut Pro X. If you search for “key” both keyers will be found.
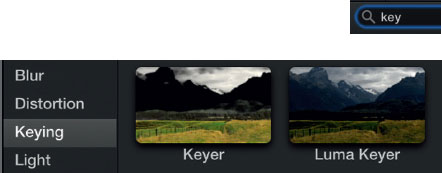
Chroma Key works on a specific color in the image. Often referred to as blue screen or green screen, a Chroma Key will be built from two layers: a background and a keying source. This enables you to key a person, on one layer, over a background on a separate layer.
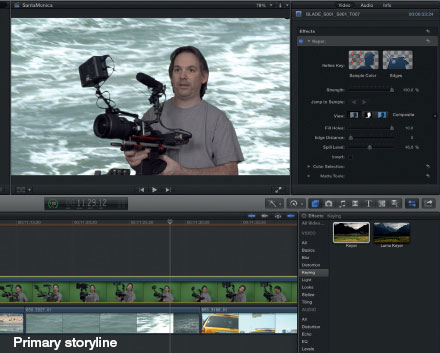
The Chroma keyer in Final Cut Pro X is what I refer to as a three-click Chroma keyer.
1 Drop the keyer on the clip in the Timeline.

2 Set key to matte.
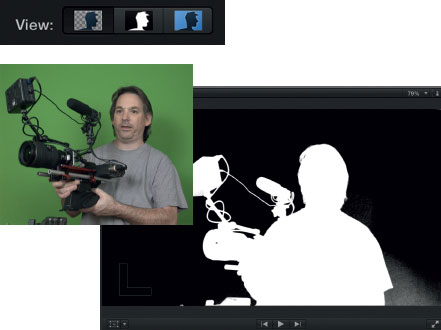
You can see the key is less than perfect. Spill to the bottom right of frame is visible.
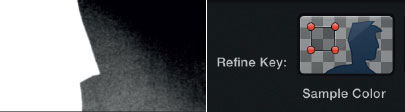
3 Refine the key. Go to the Inspector and choose Sample Color. This lets you draw a box over the troublesome area.
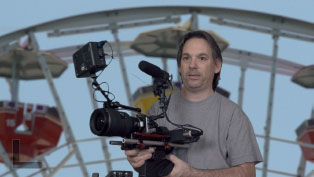
Once you are happy with the key it is then simple to change the background shot to see different results. You can change the background image size, blur the image, add filters, or change the color of the background image.
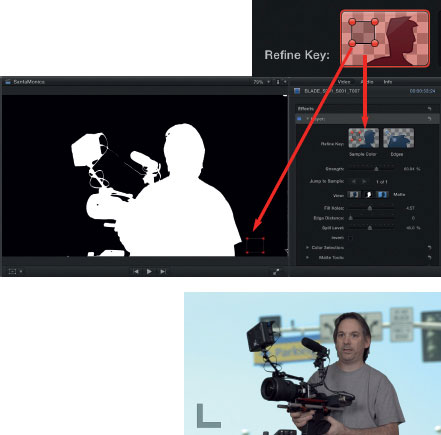
Use a matte to check the key is clean and refine the result as needed.
You can then play back the moving images in real time to check the results. It is therefore possible to create a completely different look with changes that take moments to implement and can then be manipulated however you wish.
The result can be an excellent key depending on how well shot the camera original is.
You can tweak other settings within the Inspector. From my experience, as long as your original material is well shot and lit you will have no trouble in getting a good key out of Final Cut Pro X.
Having worked with many keyers for over 25 years in this business I can truly say the keyer included with Final Cut Pro X is certainly one of the easiest to use and best of the Chroma keyers on the market.
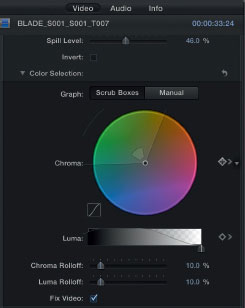
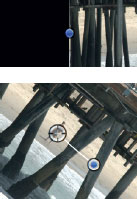
Luma Key is different to Chroma Key. It works on the amount of luminance in an image, or the difference between black and white. Luma Key used to be used in television stations to key white word graphics filmed off black card by a live camera over another live source. This example is primitive by today’s standards, but shows the history of this technique. Today, Luma Key is used in effects production and image composition.


Luma Keys work particularly well with images that have a lot of contrast or separation of black and white. Look to the image on the previous page. The wire is exclusively black and the other parts of the image are much lighter. This is the sort of image which will key well.
1 Position the two clips in the Timeline with the image to key above the image which is to be the background image.
2 Apply the Luma key to the video source.
![]()
3 Select matte so you can check the key level.
4 In the Inspector tweak the key using the Luma controls. You can invert the source if you wish.

5 Adjust the controls to clean up the key as much as possible.
6 Switch the matte off to view the keyed result and adjust controls in the Inspector as necessary.
Quite effective results can be achieved by Luma keying. The technique is useful for different types of effects production and provides a way to manipulate and composite images.
I’ve used many Luma keyers and, like the Chroma keyer, the Luma keyer in Final Cut Pro X is definitely one of the best.

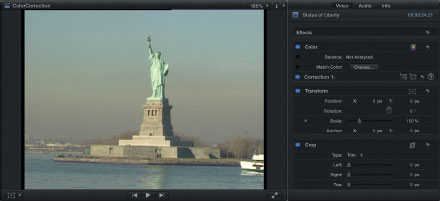
The color correction tools included Final Cut Pro X enable you to achieve results quickly so you can check out a variety of different looks. You can draw on different presets, and you can use dedicated controls to adjust the color, saturation, and exposure of an image. You can also choose to auto-color correct, though this is something which I tend to avoid as the results can be unpredictable.
Check the Balance option and Final Cut Pro X will auto-balance the color for you. As mentioned, I avoid this, as I believe the best results come from manual color correction. Regardless, for a very quick grade, auto-balance is an option.

Above: Original.

Above: Auto-balanced.
Now, let’s move on to manual color correction.
1 Highlight a clip in the Timeline.
2 Look to the Inspector to the color controls. Make sure auto-balance is switched off.
3 Check color correction is switched on (blue).
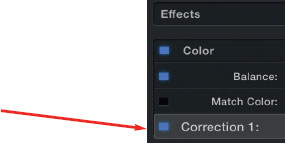
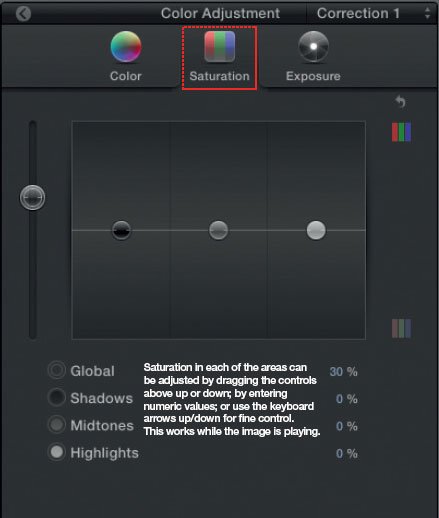
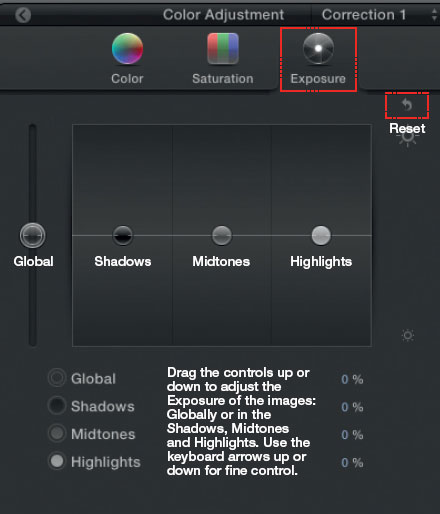
4 Press the arrow to the right of the Correction option and this will reveal three areas for color adjustment: color, saturation and exposure.

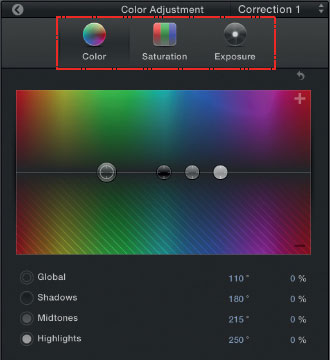
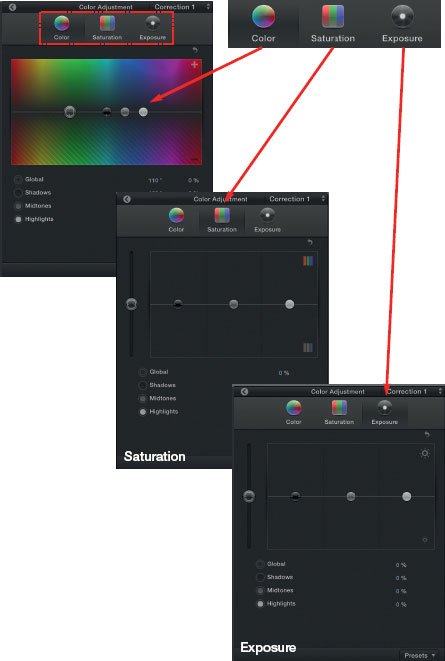
You have three panes to work with: color, saturation and exposure. Within each of these areas are the controls for color manipulation. When you change the controls you see the image update in real time in the Viewer.
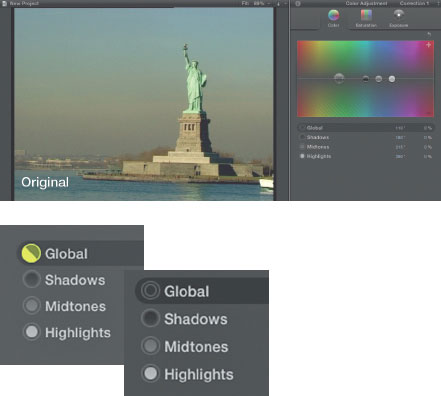
The Color Board is where you make adjustments to the color of the image. You can adjust the color globally, which means change the color across the entire image, or you can choose to be selective about which parts of the image are affected, by choosing to adjust the shadows, midtones, and highlights.
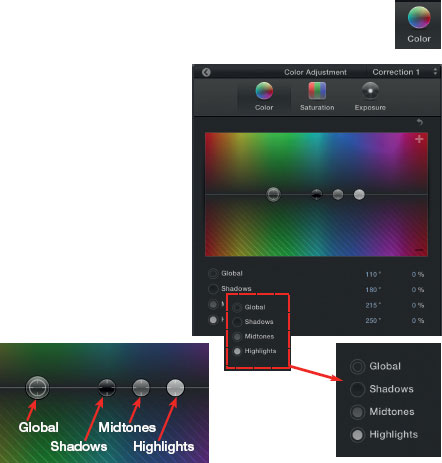
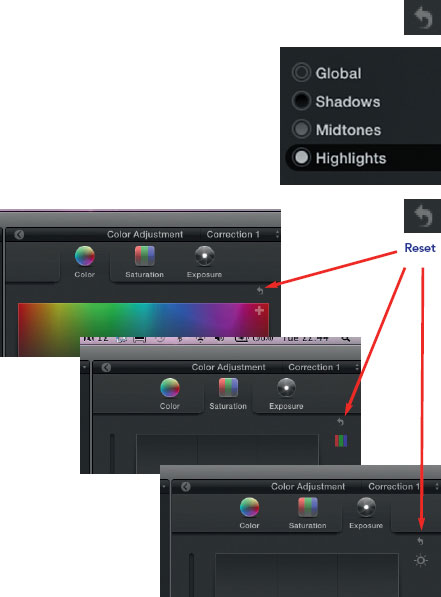
Each of the colors on the Color Board is controlled by the buttons lower left. You choose a button to adjust the image globally, or to target the shadows, midtones or highlights.
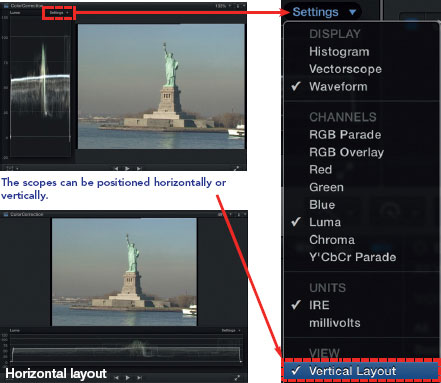
When color correcting, it can be very useful to turn on the video scopes where you can see a waveform monitor or vectorscope display of the image.
Choose the Window menu and scroll down to Show Video Scopes.
The Viewer will now split into two areas: (1) the video scopes and (2) the image you are viewing.
You can quickly toggle the scopes on or off by pressing Command +7.
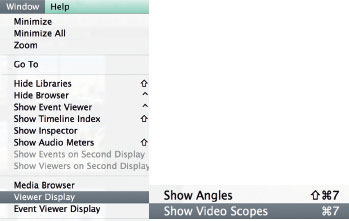
The scopes update in real time as the video plays and you can choose to show a histogram, waveform monitor or vectorscope.
Click settings and choose how you want to view the scopes.

Show Scopes shortcut: Command + 7
These are professional tools designed to monitor the video signal for broadcast output. If the destination of the content you are producing is for broadcast television, then the scopes are very important. If the content you are producing is to be viewed on computers, home systems, or the web, then you don’t need to adhere to broadcast standards. Regardless, this provides a scientific way to monitor the video signal for those who need to do this.
The main job of the Color Board is to enable you to adjust color either globally, meaning throughout the entire image, or to limit the color adjustments to the shadows, midtones or highlight parts of the image.
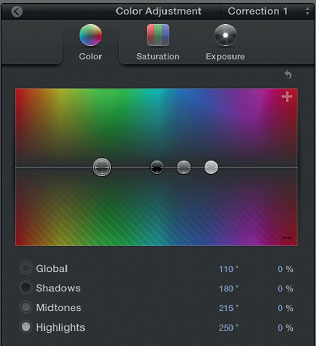
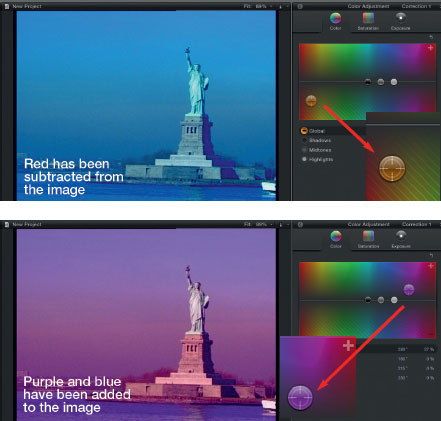
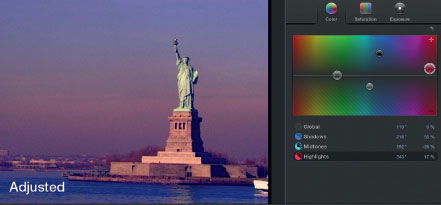
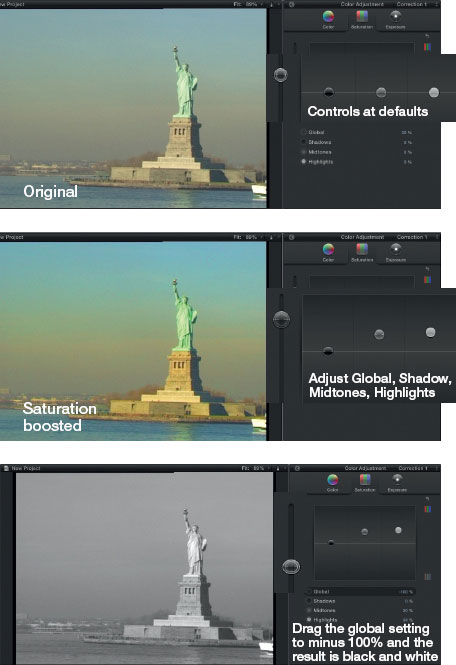
To adjust the overall color of the image click on the global control and drag it to different parts of the Color Board. The original image is then altered by the color adjustment you make. If you push to the top of the Color Board, the amount of color is increased; if you drop below the middle line and drag in the opposite direction, the amount of color is decreased.
Note: Instead of dragging a control, you can use the up or down arrows on the keyboard for fine adjustment. This also works while video is playing.
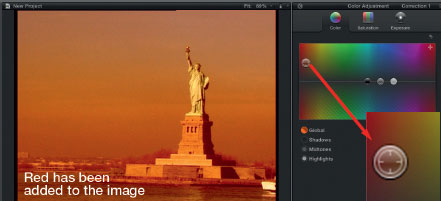
The positioning on the color board of the global control directly influences the look of the shot.
To reset to the original, press the Global button so it is highlighted, then press the Delete key.
This returns the image to its original state.
Working with the separate buttons for shadows, midtones and highlights lets you adjust the color for each of these areas.
Remember, use the up/down arrows for fine control. This works even while the image plays.
The process is very similar to that described for working with the Color Board. A master global slider is accessible on the left, with independent controls for shadows, midtones and highlights.
Changing the exposure is an effective tool in bringing out the best in an image. The obvious use is to correct under or overexposed images, and this is a valid use. However, it is not all about getting an image technically correct, it is also about what works best to produce the result you want to achieve. The look of an image can be considerably improved by tweaking the exposure.
The Exposure tools work the same as the process described when adjusting Saturation.

At the bottom right of each window in the Color Adjustment area are presets. You can also create saved custom presets.
Click this and a list will be revealed. These are color presets which can applied to your image. It is as simple as choosing a preset, applying it, and checking out the result.
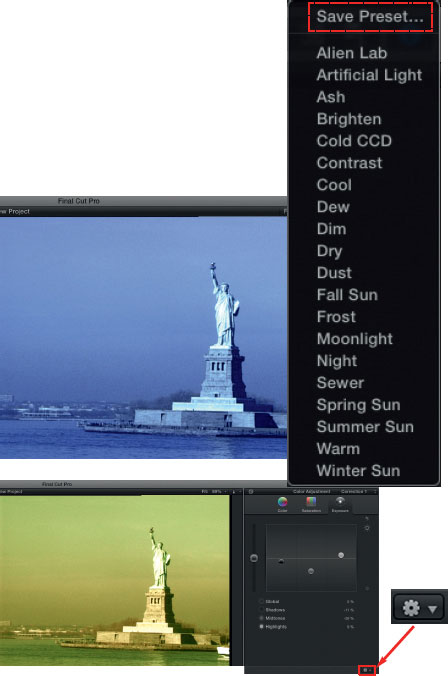
Once you have applied the preset you can then go into each of the areas: color, saturation and exposure and change the parameters.
Regardless of which areas you are working in you can reset to defaults by pressing the reset button. You can also highlight any of the circles used to adjust the colors within the color board and press delete, to reset that particular value. This is advantageous over the Reset button which resets all the parameters within a particular area. Think of the Reset button as being a global reset; and highlighting the adjustment circles and pressing Delete as being a more targeted or focused way of doing it.
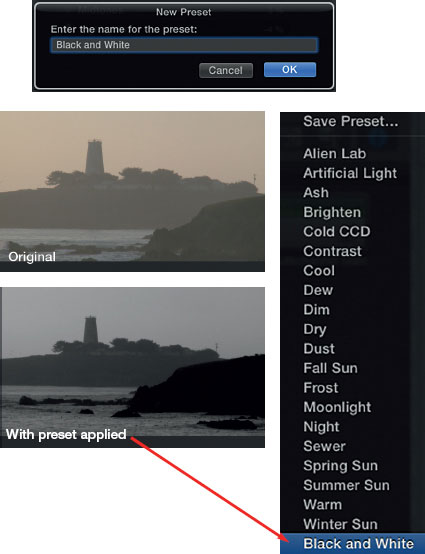
Once you have manually adjusted the settings, you can save this as a preset:
1 Click the gear icon bottom right of the Inspector and choose Save Preset.
![]()
2 Name the Preset. This will now appear at the bottom of the Preset List.
Effects production is a complex area. When you have gone to the effort of setting up all of the parameters of an effect, just as you want it to be, it is then simple to copy all of the settings and to apply these to another clip or to many clips.
This is very useful when you wish to apply the same audio level across many clips, or to position several images to a particular part of the frame. Simply Copy a clip in the Timeline (Command + C) and then choose Paste Attributes from the Edit menu. Choose the Attributes you wish to apply and select Paste.
1 Highlight a clip in the Timeline with applied Effects and Copy (Command + C). These effects could be a video or audio filter, positioning of an image with the transform, crop or distort functions, changes to transparency, color correction settings, or many other attributes.
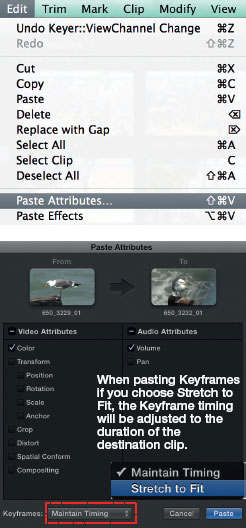
2 Highlight another clip or clips in the Timeline to which you wish to Paste the Attributes to. Select Paste Attributes from the edit menu.
The Paste Attributes window will now open. Notice this window is split into two areas: video and audio. You can therefore choose to apply video or audio attributes, or both.
A visual representation shows the clip from which the attributes have been copied, to the clip to which these attributes will be pasted to.
3 Click Paste, lower right of the Attributes window.
![]()
The attributes you highlighted in the window will now be applied to the clip or clips you have selected in the Timeline.
Using Paste Attributes can speed up your workflow as matching exact details can be tedious and time consuming.
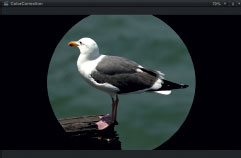
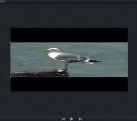
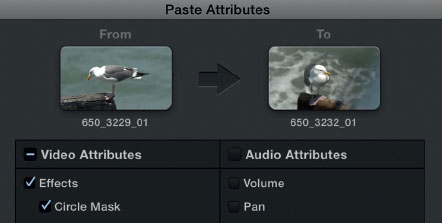
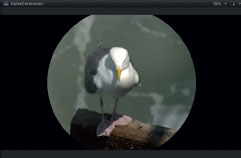
In the example of the bird on this page, the attributes of a Circle Mask have been copied and applied to two other clips.
To Paste Attributes from one clip to multiple clips:
1 Copy the Attributes from a clip in the Timeline.
2 Highlight several other clips in the Timeline and then select Paste Attributes.
The result is the original effect is then applied to all the clips you have selected.

There is another command found under the Edit menu which is Copy Effect. This enables you to copy all effect parameters and apply these to another clip without being selective about which attributes are being applied. In other words all attributes will be copied and then pasted.