Useful Information

Before you can push off, you need something to push against. Here is a quick review of some fundamental skills.
In order to make later techniques more approachable to users at all levels, this chapter provides an outline of the basics of working with layers in Photoshop. These are common activities and techniques that I consider essential for any Photoshop user at any level. In later parts of the book, if you come across a step or two that seems vague or assumes some prior knowledge that you lack, check back among these pages!
Layer Operations
At the heart of every technique in this book lie the interactions among image layers in Adobe Photoshop. This section lays out the fundamentals of working with layers.
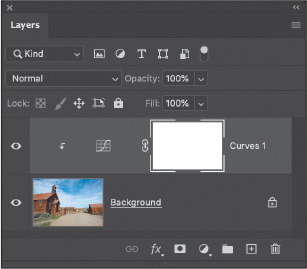
Adding Adjustment Layers
Part IV, “References” goes into deeper detail on adding adjustment layers to your document, but in the interest of getting you started quickly, let’s go over a few basics now. Open the Adjustments panel from the Window menu, and take a look at the 16 icons that identify each of the adjustment layers. Click one of these icons to add your chosen adjustment layer above whatever layer is currently selected.
Photoshop also has the option to apply adjustments directly to layer content, which “bakes” the changes you make into the layer itself. While adjustment layers behave like pass-through filters (meaning, information comes in, is adjusted in real time, then output visually to the canvas), Adjustments apply permanent changes to the layer content. Most of the time, you should use adjustment layers to preserve the ability to change settings later on, but at times when you may have no choice but to apply an adjustment directly and permanently.
Masking
When you first apply an adjustment layer, it comes with a layer pixel mask filled with white. By default, this means the adjustment affects everything below it; painting with gray or black on the mask hides the effect of the adjustment. Remember, white reveals and black conceals! Later in the book, you will see how to take advantage of selection techniques to create masks that can be applied to adjustment layers almost like magic.
You can also apply an adjustment to a mask directly, though you cannot use another adjustment layer. To work on an adjustment layer mask, hold Option (macOS)/Alt (Windows) and click the layer mask to see it on the canvas. Now you can work on the mask visually as if you were painting on a black-and-white image. Here is an example of using the highlights from a photograph as a mask.
Clipping Layers
While Photoshop normally sends layer information upwards through the stack so that all layers can interact equally, there is a trick for constraining the interactions between two layers. This is called clipping, and it is accomplished by holding down the Option/Alt key and hovering your pointer at the boundary between two layers in the Layers panel. The pointer changes to indicate that clicking at the boundary unites the two layers in a clipping group.
The upper (clipped) layer in a clipping group is constrained by the bottom (base) layer. The most typical example of this is clipping an image layer into a text layer, filling the text with the image. But my favorite way to use it is for visualizing crops. Use The Claw keyboard shortcut (see the “Stamp Merge Visible (The Claw)” section below) to create a stamped copy of the layer stack, and then clip the copy to a layer with a blank rectangle. The rectangle can be transformed to whatever size you like, and trying different sizes will nondestructively show you how your image will look using various crops and aspect ratios.
Channels
A few adjustment layers permit you to target a single color channel along with the composite of all three RGB channels. One adjustment layer, Channel Mixer, actually lets you swap information between channels. Direct access to each color channel provides a lot of flexibility in applying corrections and effects without requiring the use of multiple adjustment layers with masks to isolate the changes. Applying a Curves adjustment yields a particularly useful example, as you’ll see in the “Instant Image Enhancement” section in Part II’s “Dodge & Burn” chapter.
Blending Controls
Blending refers to combining layers visually, whether with blending modes (sometimes called blend modes) or changing opacity and fill. In both situations, it helps to have a point of reference. The layer that is being adjusted in some way by a blending mode, opacity, or fill change is referred to as the blend layer. The layer immediately beneath the blend layer is typically referred to as the base layer. However, I also use a more general term that encompasses everything below the blend layer: “the backdrop.” The backdrop is technically everything that is available to be combined with the blend layer.
The “Welcome” chapter explained the basic operation of blending modes and adjustment layers. The principal controls for these features are found near the top of the Layers panel: a menu for choosing blending modes and sliders for adjusting Opacity and Fill.
Blending Modes, Opacity, and Fill
As with normal layers, adjustment layers can use blending modes and respond to changes in Opacity and Fill. The results behave exactly as if you had duplicated a layer and changed the duplicate’s blending mode—something I refer to as a “self blend” because you are blending a layer with itself. But you also get the advantage of having the controls of the adjustment layer itself. This is perhaps one of the more powerful “hacks” you can perform in Photoshop because you get the benefits and controls of each capability—a true super power!
This technique is scattered throughout the book, so keep your eyes open.
Blending Options
To access a wider range of blending controls, open the Layer Style dialog box (Layer > Layer Style > Blending Options or double-click an active layer in the Layers panel away from the thumbnail or the layer name). This dialog box contains more than layer styles. Confusingly, two areas bear the label “Blending Options.” The area that concerns us is the central portion of the dialog box. At the top, the General Blending controls duplicate the Blend Mode menu and Opacity slider familiar from the Layers panel. Below that is the Advanced Blending area, which contains a Fill Opacity slider (duplicating the Fill slider on the Layers panel), and controls for channel knockouts (outside the scope of this book). In the bottom center of the dialog box you’ll find the much-venerated Blend If controls.
Blend If
There are a handful of features in Photoshop that turn out to be insanely useful while appearing to be fairly simple. One of my favorite examples of this is the Blend If control in the Blending Options area of the Layer Style dialog box. It’s amazingly useful, and knowledge of it is kind of a milestone that lets you know you’ve graduated to the next level of Photoshop mastery. You have probably seen or used it in a number of tutorials, especially intermediate to advanced lessons where blending shadows or highlights is called for. What you may not have seen before is how to turbocharge Blend If into a masking dynamo.
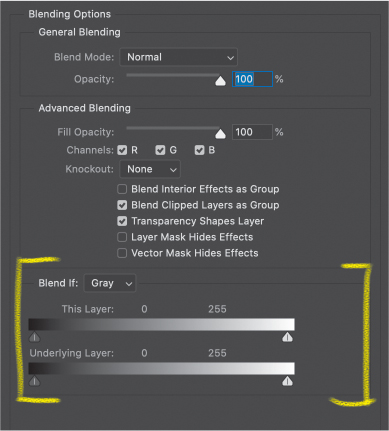
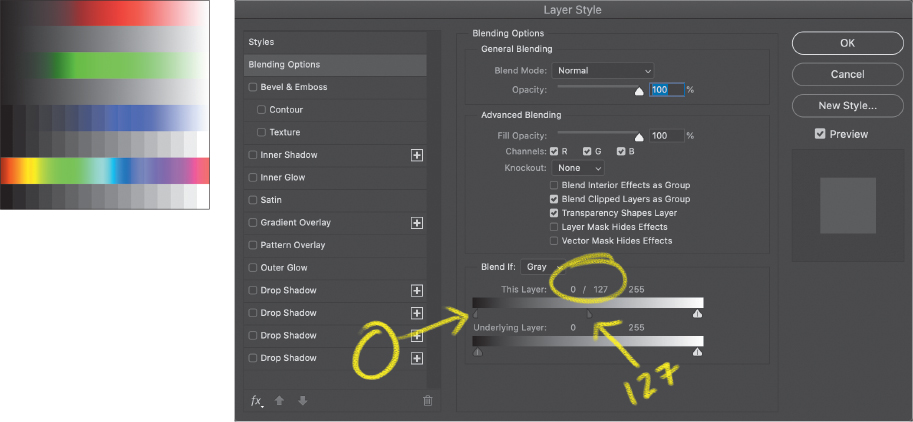
Let’s start with a little review of how Blend If works. Basically, Blend If gives you a way to combine information between two layers based on the brightness values of one of those layers. There are two sets of sliders that control the blending for the current layer or the information on underlying layers. You can split either set of sliders by holding the Option or Alt key while dragging the edge of the slider.
The sliders are like boundaries for luminosity on each of the layers. Everything between the sliders is kept visible, while everything outside of the sliders becomes transparent (or more properly, blended with the lower layers). When you split a slider, you are creating a gradient from transparent to opaque. Using Blend If on an image made up of gradients should help clarify how it works. In this example, the gradient layer (Blend) is above a transparent layer (base or backdrop), and the white Blend If sliders for This Layer are set to 190/210.

Note that the Blend If sliders let you choose what stays visible and what blends with the backdrop. Where a slider is split, the transition is a smooth gradient.
Blend If also works with color and includes a menu that allows you to choose each of the channels individually. Remember that channels are grayscale representations of how much color is in the final image, so the Blend If sliders act on the gray value of the channel itself. That means you can adjust each color channel independently, which gives you an approximate control of color in the blending. On the other hand, it does not give you complete control of arbitrary colors. In the end, you’re still effectively limited to sliders for the Red, Green, and Blue channels when chosen from the Blend If menu. There is no specific color-to-transparency blending option that gives you any deeper or discrete control over blending hues or midtones that should be blended. In fact, the channel sliders for Blend If are only occasionally used in photographic contexts.
Let’s look at a more dramatic example of how colors are affected by Blend If. This workbench image is a simple two-layer stack with the grayscale gradients on the lower layer, and the color gradient bars on the top layer. The top color bars start at black, go through a fully saturated color, then end with white to give them some brightness variation.
When I adjust the This Layer black slider to 127, the calculated luminosity of the color is blended (also called “knocked out” when it becomes effectively transparent) between 0 and 127.

Compare this with setting the Underlying Layer black slider to 127, which now uses the lower layer’s luminosity values to determine blending (which is called “punching through”).
This should make it more clear that Blend If is evaluating channel information, and not specific colors.
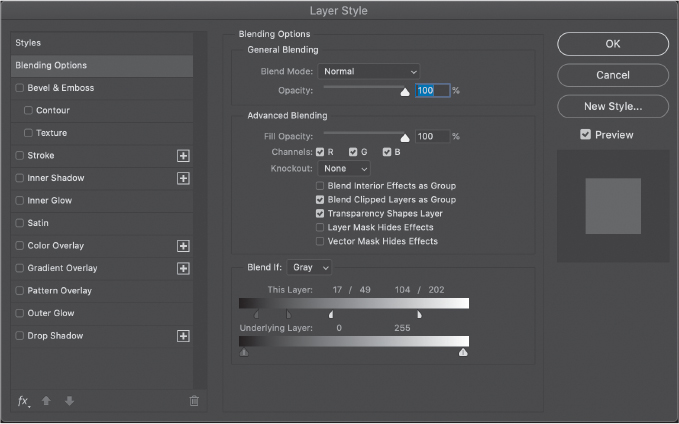
But since we know something about how Photoshop gives us control over color, we can develop a few workarounds. It turns out that the Blend If sliders are insensitive to the layer’s blending mode. That tells us that Blend If operates on the layer contents before any other blending occurs, giving you a way to preserve applied masks and blending effects regardless of blending mode. Let’s place a white-to-black gradient over a filled color layer, and then adjust the Blend If settings for the gradient layer.
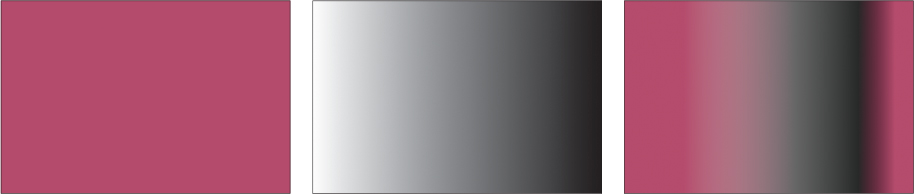
The third image is the result of using Blend If on the gradient layer (This Layer, Black: 17/49, White: 104/202).
If we then change the blending mode of the gradient layer to Overlay, only the portion of the layer left visible by the Blend If adjustments blends with the backdrop color.
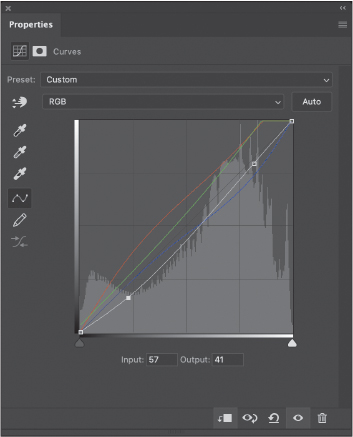
In this way, the Blend If results can be considered as if they were a mask created dynamically from the layer contents. Now let’s put a Curves layer on top of the layer stack and increase contrast.
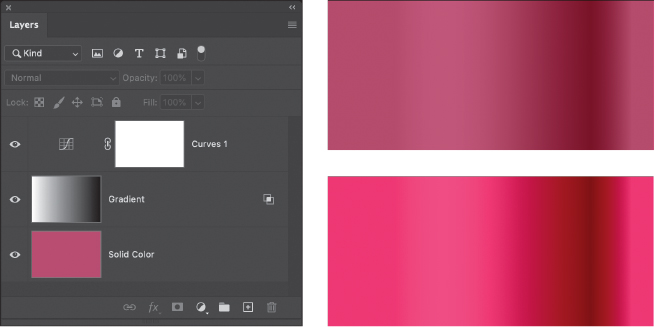
The Curves adjustment affects everything on the canvas, including the saturation of the color layer. Things change when we clip the Curves adjustment to the Gradient.

Notice that the gradient appears to have moved its position a bit as we saw in “Seeing Images as Data” in the “Welcome” chapter. But more importantly, the color is back to the original Overlay blending result. This is another way we can exploit Blend If as a dynamic masking tool. The clipped adjustment layer can be used to modify the Blend If results without affecting the blending mode results.

Going back to the color bars, let’s apply a clipped Hue/Saturation adjustment layer to replace the Curves adjustment. For this example, the color bars layer uses something different in the Blend If section: only the Red channel’s black slider is moved to 127. The other channels, including Gray, are not modified.
Notice that this is a very different result than setting the Gray channel black slider as we did previously. Finally, I set the Hue slider of the adjustment layer to −60.
The hues have indeed shifted, but the Blend If results have also changed! That reinforces the idea that colors presented on the screen have different luminosity values.
Honestly, I tend to file this one under “Stupid Photoshop Tricks” because there are many other ways to get similar results. The value of this demonstration is that it gives us some insight into not only Blend If, but into clipping as well. In particular, we now have a hint that clipping an adjustment layer that already has a blending mode allows us to change the way that layer interacts with layers beneath.
And that’s another level of control.
There is an important caveat: This trick does not work on values controlled by the Underlying Layer sliders, because those rely on information in the backdrop or base layer; the clipped adjustment will not affect those so the Blend If results won’t change.
So, one way to think about Blend If is as a comparison tool. Blend If lets you decide which values get shown on the canvas based on comparing luminosity values between the blend layer and the backdrop. If you’re interested in checking this out in more detail, read up on the example files in Part III, “Projects.”
“Trapping” Blend if Transparency
In practice, Blend If is generally employed to recover shadow or highlight details when using adjustment layers or blending a copy of an image with itself for enhancement by using one of the methods in the “Instant Image Enhancement” section of the “Dodge & Burn” chapter and to tweak texture blending as you’ll see in the “Effects” chapter (both are in Part II). But here’s a fun trick that is kind of secret and still pretty useful. Did you know you can “trap” the transparent area that results from using the Blend If sliders? In this way, you are able to create masks and selections where Blend If allows lower layer information to show through the current layer.
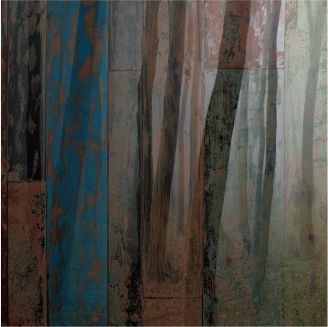
Let’s say I like the texture from this grainy wood and I want to use it with a picture of a creepy forest. I don’t want the fence colors, though. There are a few ways to solve the problem, but this one will definitely win you some points with other Photoshop users simply for being clever. With the fence photo on a layer above the forest, set the Blend If sliders for This Layer so that something of the lower layers is visible. Add a blank layer immediately above the texture layer, then select both the blended and the blank layer.

With both layers selected in the Layers panel, press Command+E/Ctrl+E to merge them. The new layer now has the transparency blending “baked” in. Option/Alt-click the new layer to load the transparency as a selection, then open the Channels panel and click Save Selection as Channel.
Now you can load that new selection and create a Curves adjustment layer. In this example, I set the Curves layer to Overlay blending mode and gave it a little boost.
An alternative to creating and merging with a blank layer is to convert the blended layer to a Smart Object. This needs to be done after adjusting the blending sliders so that the transparency becomes part of the rendered layer. There are some advantages to using a Smart Object. First, it’s a little faster than creating a blank layer, selecting, and merging. Second, and more importantly, the Smart Object method retains the ability to adjust the blending sliders. Merging the layers makes the blend permanent, and if you did not make a copy of your blend layer prior to merging, you’ll have to reimport the image.
With Photoshop 2020, we now have the ability to unpack a Smart Object into its original layers, which means changes are extremely easy.
A more flexible version of this approach is shown in the section “Gradient Map Luminosity Selection” in the “Selections & Masking” chapter in Part II.
Stamp Merge Visible (The Claw)
This is one of the earliest “hacks” I can recall learning about in Photoshop. There is no direct menu item for this trick (see Note), and you need all three modifier keys to make it work. Stamp Merge Visible is a way of taking a copy of everything you see on the canvas and making it into a single layer at the top of the visible layer stack—the stamped layer—but leaving all of the other layers intact.
Note
Thanks to my keenly investigative editor, I learned the official name for this trick is Merge A Copy Of All Visible Layers. As Victor points out, this would hardly fit in a menu!
It’s incredibly useful for all kinds of purposes, but here’s how you do it:
With everything visible that you want a copy of, press Opt+Shift+Cmd+E/Alt+Shift+Ctrl+E.
That’s it. I like to call it The Claw because you have to contort your hand to get it all at once. Try putting your fingers on each of the keys and see what shape your hand ends up in—maybe practice it for your next horror costume.
You should be aware of a few tricks to using it. For example, I sometimes find it can fail if the active layer is not currently visible, especially if it’s an adjustment layer. It’s also possible to create a copy underneath other layers, and thus alter the final canvas view. The shortcut is supposed to stamp a copy to the top of the layer stack, but I always add a blank layer to the top of my stack, and then use The Claw on it directly. It’s just habit at this point, but it also helps with organization.
You can use the stamped copy as a snapshot of sorts or as a way to compare before and after versions when you make a change to your image. I also like to use it when creating copies of my file for printing. Right-click the stamped layer in the panel, choose Duplicate Layer, then select Destination > Document > New. This creates a new document with the current document’s settings, including size and color space.
Several techniques in this book rely on making stamped copies of your canvas, especially for effects and heavy manipulations. It’s a great way to quickly build up variations, too—simply stamp a visible copy of one version, turn off visibility for the copy, make changes, and create another version. In the “Stamped Portrait” section in the “Effects” chapter in Part II, for example, you’ll use The Claw to create something to paint on. The more you think about it, the more useful this trick becomes.