
Chapter 19. Your Own Blogs, Web Sites, and Podcasts
Back in Ye Olden Days of Mass Communications, you had to wait for the radio to play what you wanted to hear, wait for your newspaper to arrive, and wait until after supper for Walter Cronkite to come on the CBS Evening News. Thanks to the great Web Stampede of the 1990s, that all changed. No longer did you have to wait—and more importantly, no longer were regular folks restricted to watching others deliver their news and entertainment.
Problem was, though, Web sites could be a hassle to create and maintain. If for some odd reason you didn’t want to master HTML, CSS, FTP, and a host of other techno-geekery, you were consigned, once again, to watching producers and broadcasters prance around on this new digital stage.
Not anymore. The three most popular forms of online self-expression—Web logs (blogs), Web pages, and podcasts (amateur radio shows)—are now about as technically complex as sending an email message.
Blogs
A blog is an online diary or journal. It looks like a series of short text blurbs that appear in descending chronological order on a Web page; links to monthly archives of older posts are on the page, too. (The term blog is a shortened version of Web log, so called because of its resemblance to a ship captain’s log—a written record of daily activities and documentation that describes a journey.)
Each blog post can be three screens deep or three lines long. Blogs can be about anything at all, from world politics to life as a retail clerk; from popular culture to penguins (Figure 19-1).

Some blogs have a commercial feel; they’re well written, garner national attention, and are on par with the best reporting in the news media today. Other blogs are poorly spelled and have a total readership of two, but they still give their owners a public forum to complain about gas prices.
Whatever its intention, a blog reflects the personal and unique viewpoint of its creator. Chapter 5 has more on how to find existing blogs that match your interests.
With an Internet connection, the right software, and something to say, anyone can create a blog.
Creating a Blog
Blogs have been going like gangbusters for several years now, largely because of the many free and easy-to-use blog-creation tools to choose from. Forget about file transfers and arcane text-formatting commands—a blog’s all typing, pointing, and clicking.
The precise steps for creating and running a blog vary depending on which blog-creation site you choose to use, but the process is roughly as follows:
Pick out a site to host your blog.
If you already have your own Web site (Section 19.3), you can buy blog software like Movable Type to use for composing your blog and posting your latest thoughts on your site.
If you don’t have your own Web site, free sites give you both software to make your blog and a place to put it on the Web. The big companies in this game—Blogger, Xanga, LiveJournal, and TypePad—are all discussed in this chapter.
America Online’s AOL Journals feature is available to AOL and AIM users; details on how to get started are at http://hometown.aol.com. Likewise, if you favor Microsoft’s MSN network, you can sign up for free blogspace at http://spaces.msn.com.
Social networking sites like Friendster, MySpace, and Facebook (Chapter 17) give their members room to blog, too. So, if you already belong to any of these sites, just do a quick search for blog and they’ll let you know how to get started.
Sign up for an account.
Opening a blog account is as easy as signing up for free Web-based email. Click the “Create an account” button or its equivalent on the site’s home page and fill in the requested information. You pick out your blog’s name here, too, which will later appear in its URL (Web address)—something like http://pipinggecko.blogspot.com, where pipinggecko is the name of your blog and blogspot is the name of the blogging service you’re using.
Choose a page template.
With the administrative stuff out of the way, you can move on to aesthetics. Most blog sites offer a handful of preformatted page designs to choose from. (Figure 19-2 shows some of the selections over at Blogger.com.) These templates explain why most blogs from these sites tend to look the same, but you can add little tweaks and photos here and there once you get rolling.
Write some posts.
Now you just need to provide your readers with something to read. Click the New Post button (or find a similarly named tab on your blogscreen) to open the composition area. Here, you can type a message and do light formatting chores like adding bold and italics to the text, dropping in a photo, and sticking in a link to another Web site.
Figure 19-2. Most free blogging sites give you a handful of page styles to choose from. Here, on Blogger, you can change the look of your blog even after it’s up and running; just log into your blog account, click Change Settings on your Blogger Dashboard page, and click the Template tab. You can edit your current settings and change basic things like the color of your navigation bar—or change its entire look by clicking the Pick New link and selecting a whole new template from Blogger’s stock.Most blog sites now offer a spell checker, which helps prevent embarrassing public typos. You can get a sneak peek at your post-in-progress by clicking the Preview button to make sure everything looks good. When you’re satisfied, click the Publish button to reveal your inner thoughts to any of the billions of people using the Web today.

The best blogs are the ones where their creators take the time to update them on a regular basis. (The most popular blogs tend to be the ones that are entertaining, snarky, and even mean-spirited, but that’s not so much a requirement as a sign of the times.)
Once people get hooked on your prose, they’re going to want steady doses of it. The Web’s already too cluttered with abandoned blogs that have three ancient posts on them and nothing more.
Tip
On most blogs, readers can make comments following your posts. If you don’t want to hear any sniping from the peanut gallery—or want to individually delete rude remarks in response to your postings—log into your blog account to disable the comments feature or delete specific comments. Blog sites that offer moderated comments allow you to screen the comments before they appear on your page and reject the ones that don’t pass muster.
Free Blog Sites
Now that you know what to expect if you’ve never blogged before, the next few pages describe some popular blog sites.
Blogger
With a clean, clear site design that gently guides you through the steps of blog creation, Blogger (www.blogger.com) is a great place to start out. Its tagline is “Push-Button Publishing,” and that about covers it (see Figure 19-3).

A click-through tour of the site shows off Blogger’s main features: easy-as-pie blog configuration (it permits photos and reader comments) and a thorough explanation of how to add posts from a cellphone.
Your actual site is hosted on a server (an industrial-strength computer that dishes out Web pages) that uses the blogspot Web address. That means your blog’s URL will be something like http://yournamehere.blogspot.com.
Tip
Blogger has a well-stocked Help section that can answer most common questions about using the site and service. Visit http://help.blogger.com to browse the Q&A section.
A small San Francisco company started Blogger in 1999, but Google bought the firm in 2002. Having the power of Google behind it gives Blogger a couple of nice perks. For one, you get great searching through the site and a link to the Google Blog Search site to find other blogs around town.
More importantly, though, you gain the ability to use Google’s AdSense program on your blog. AdSense can put automatic ads on your blog, relevant to the topic (flip back to Figure 19-1 for a look at a blog with such ads). And why on earth would you want to put ads on your blog? Because every time a reader clicks one, Google sends you money.
For example, if you blog about your life as a ski instructor in Aspen, AdSense might insert ads from ski-equipment manufacturers and local restaurants; you earn a dash of money each time someone clicks one of the ads. You can sign up for an AdSense account within Blogger when you log into your account. (To find out more about AdSense, go to http://help.blogger.com and click the link for Add-Ons.)
The Blogger Mobile service, meanwhile, lets you post photos and text from your Internet-enabled cellphone directly to your blog. When you snap a photo the world must see right now, send it from your phone to [email protected]; the pic pops up on the Web a few minutes later. (Insiders have a name for this mobile blogging: moblogging.) You don’t even need to download or install any extra software on your phone to use Blogger Mobile, but you do need a phone and a service plan that let you send text messages or picture mail.
If you don’t already have a blog, sending text or photos to [email protected] automatically creates a new blog for your stuff. Blogger sends a message back to your phone with instructions for finding your new blog on the Web; details are at www.blogger.com/mobile-start.g.
You can also send text and images to your page by email, using a special email address Blogger provides.
Finally, there’s AudioBlogger, which lets you call in audio commentary from your cellphone right to your blog—which could be really fun or really embarrassing, depending on your state of mind at the time. The number is +1 (415) 856-0205; long-distance charges may apply if you don’t live in the San Francisco area.
Xanga
Xanga (www.xanga.com) mixes online journals and diaries with social networking (Chapter 17). The result is a Weblog community that’s heavily favored by high school and college students. It’s a great place to post about anything and make new friends with other Xangans in the process.
Because blog posts can be deeply personal, the site offers a security feature that lets you “protect” journal entries by making a list of other Xanga members who have permission to read the posts.
As on other social networking sites, you can fill out a personal profile of yourself, and even add a link to your Xanga page from an AIM user profile to encourage instant message buddies to visit.
Accounts come in three flavors: Classic ( free), Premium ($25 per year), and Plus ($45). Classic account holders get limited design-tweaking capabilities plus 200 megabytes worth of photo storage. A Premium account gets you two gigabytes of photo storage and complete control over the look of your Xanga page. The Plus version jacks that up to unlimited photo storage. If you’re a paying member, you also get to ditch the banner ads that appear on the pages of the free account holders.
LiveJournal
LiveJournal (born in 1999) hosts millions of blogs from all corners of the globe. You can sign up for a free LiveJournal account at www.livejournal.com, which gives you basic templates where you can write your posts and add icons and small photos to express your current mood.
If you don’t want to do your post-making in a Web browser, you can download free desktop software for Windows and Macintosh systems from the site so you can blog without browsing. (The blogging software option is good if you have a dial-up connection or work in a yurt; your LiveJournal software options are at www.livejournal.com/download.)
LiveJournal also offers paid accounts ($20 a year) that offer a gigabyte of storage for photos, the ability to submit posts via email, and the freedom to add voice clips sent from any phone to your page. Holders of paid accounts also get more control over the look of their page, and they can create custom mood icons using their own pictures to accompany their posts. (Free account holders must choose from a selection of stock characters.)
Some key social networking features are included with LiveJournal, which makes it comparable to sites like Friendster and MySpace (see Chapter 17). For instance, members can search for other members by email address, instant message screen name, or school. You can also join community groups within LiveJournal that are devoted to certain subjects. Finally, the site also lets you set up a page of “friends” and then read all the new journal entries from your acquaintances in one place.
Note
Blogs are an excellent forum for self-expression, but remember not to give out too much information about yourself on your pages. You never know who’s reading. Vague generalities are fine (”Here in the center of Houston, it’s another 103-degree day…“), but it’s best to avoid specifics (”Here in my gorgeous six-bedroom house at 400 Webster Street in beautiful downtown Houston, I realized my Mercedes-Benz really needed a good waxing…“). When you create a blog, you potentially invite millions of people into your life, and you probably don’t know every one of them.
TypePad
LiveJournal’s parent company, Six Apart, also owns TypePad, a professional blog-creation and hosting service. (The same company sells the Movable Type blogging software, too.)
TypePad (www.typepad.com) is free—but only for 30 days. After that, you do have to pay, but for your money, you get slicker, more graphically pleasing page templates for your text, online photo-sharing, and cellphone blogging. You also get actual technical support from the site if you have a problem or a question. Still, if you want to try your hand at a blog, the free 30 days may be enough time to let you experiment and see if you want to stick with it.
TypePad offers three pricing plans. If you’re your blog’s sole author and you only want one Web log, TypePad’s Basic account costs $50 a year. If it’s just you and you want to have up to three different blogs because you have a lot to say, the price goes up to $90 a year for TypePad Plus.
The third option, TypePad Pro, is for big collaborative blogs with multiple folks posting—like DotMoms (http://roughdraft.typepad.com/dotmoms), in which 40 different mothers scattered all over the world contribute posts about their parenting experiences. Pro accounts, about $150 a year, also offer full-on HTML editing so you can really get in there and whip that page code into the shape you want. (HTML, short for HyperText Markup Language, is the underlying code used to design Web pages.)
Super-Simple Web Pages
Sometimes, a blog isn’t enough. If you really want to control the look and feel of your site, or if you want to do non-bloggy things like set up a shop that actually sells things online, you need to build your own Web site.
Creating your own Web pages and linking them together to form a site used to be a lot more work than dashing off a few pithy lines for a blog before breakfast. You had to do everything from writing the site’s text to troubleshooting broken links to fixing pages that displayed weirdly in different Web browsers.
These days, though, creating a simple Web site can be every bit as easy—and free—as maintaining a blog. Granted, it won’t be whiz-bang flashy or as sprawling as those monolithic Web beasts like Amazon.com or the BBC’s extraordinary news site. But you have to start somewhere.
The following pages describe two different scenarios:
Simple sites using automatic, free, or cheap, idiot-proof online Webcreation services.
More professional sites that require a lot more knowledge, skills, software, and money to design and maintain.
Google Page Creator
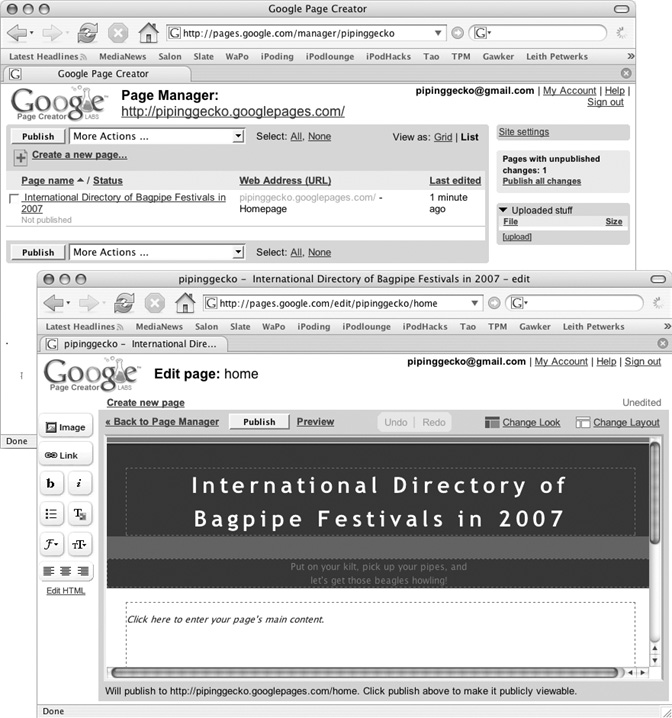
In addition to its Blogger site, Google is tinkering with full-on Web site creation, design, management, and hosting for its Gmail members. Google Page Creator, which was still in the testing phase in early 2006, gives you 100 megabytes of server space and an editing program that lets you design your own customized pages without having to hack around in the underlying HTML code. If you have a Gmail account, you can sign up and start making Web pages at http://pages.google.com.
The Page Manager screen (Figure 19-4, top) that greets you when you log in is your starting point for making and managing your own Web pages. Click the “Create a new page” link to start constructing your first point-and-click Web page with Google.
As shown in Figure 19-4, bottom, Google Page Creator gives you a screen full of boxes to fill with text and a vertical panel of tools along the side of the page to style that text. You can add photographs, graphics, and links to other Web pages with toolbar buttons, too. Click the Preview button at the top of the Page Creator window to make sure your site looks good.
When you’re ready to release your brand-new page into the wilds of the Web, click the Publish button on the Page Creator page. Your new Web site lives at an address that combines your Gmail account name with Google Pages, as in http://yournamehere.googlepages.com.
After you’ve whipped up a few Web pages, you see all of them listed in the Page Manager for easy access and further editing. Using the Page Manager, you can also delete pages from your site and send out a message from your Gmail account to announce the address of your new site.
Tip
Wherever you find Google, Microsoft is never far behind. Microsoft Office Live offers a huge collection of online tools including a site-building service that works just like Google Page Creator. And Microsoft’s version comes with something you won’t get from Google: free registration of your own domain name. See Section 20.2.1 for more on Office Live.
Homestead
Host to more than 12 million Web sites since 1998, Homestead (www.homestead.com) is another company that can get your personal Web site up and running with a minimum of complications. Homestead offers hosting, plus tools and templates for do-it-yourself page design; monthly fees start at about $10, which gets you a basic 10-page Web site and 25 megabytes of space to store it on Homestead’s servers.
Site packages for small business owners are available, too. These deals—priced at $20 for the Gold package with 100 megabytes of disk space or $50 a month for Platinum service with 300 megabytes of storage—include an unlimited number of pages within your site, the ability to process PayPal transactions (Section 7.2.2.1), and site-matching email addresses. Click the Packages link on the main Homestead page to see a comparison chart of all the plans.
All of Homestead’s subscription plans offer full access to the company’s QuickSite Design Gallery—2,000 prebuilt Web sites just waiting for you to pick one and pop in your own text and pictures, no HTML assembly required.
Once you select your site design, you can use the SiteBuilder tool to drag and drop your own content onto the pages. (The SiteBuilder software works only with Windows, but Mac folks can customize their sites with the online Site-Builder Lite tool that works with the Firefox browser; the Safari browser isn’t supported by Homestead.)
Homestead walks you through the site creation and publishing process once you sign up. You can get a free 30-day trial of the service before you commit to a package to see if it suits your needs.
Yahoo GeoCities
If you just have a few pages in mind for your site, a free account at Yahoo’s GeoCities (http://geocities.yahoo.com) might provide all the room you need. With the free option, you get 15 megabytes of server space for your pages. (That’s an enormous amount of space for text-based Web pages. Graphics, movies, and other goodies fill it up much faster.) You also get PageWizard and PageBuilder tools to help you customize the provided page templates.
Of course, even free stuff has a price somewhere; in this case, it’s banner ads that get slapped on your pages. And as noted previously, you don’t have much choice when it comes to your domain name: your Web site address will look something like www.geocities.com/yournamehere34245.
If you want more room, more control, or want to add a shopping feature to sell your handcrafted Honda hubcaps, GeoCities has some more sophisticated options. For $5 or $9 a month, you can get an ad-free site with either 500 megabytes or 2 gigabytes of space.
As a separate service, Yahoo also has Web-hosting packages available for small businesses. They include a choice of your own domain name, 1,000 business email addresses for your army of salespeople and employees to use, product catalog templates, shopping cart software, and the ability to process credit card transactions or PayPal payments; hosting prices start at $40 a month. There’s more information at http://smallbusiness.yahoo.com/merchant.
.Mac and iWeb
If you have a Macintosh, a .Mac account (Section 14.1.4.4), and the iLife software that’s included on every Mac, you can make your own Web sites in a flash. The iLife suite (version ’06 and later) comes with a program called iWeb, which lets you build blogs and Web pages with startlingly few clicks.
As shown in Figure 19-5, you can turn iWeb’s canned design templates to make a multipage site containing your own text; drag and drop digital pictures, movies, and audio files onto the pages to spice them up with multimedia. Once you publish the site to the Web, the software shows you the Web address for your new site.

Professional Web Sites
There are super-simple, Web-based services ideal for the casual Web designer who just wants to publish the Little League schedule or present the minutes of the latest PTA meeting. But if you want to make your site look professional, you’ll have to do a little more rooting around.
This process can get so technical, in fact, that many small business wind up hiring a professional Web designer to do the job. If you’re interested in creating a professional-looking site, here’s what the job entails:
Figuring out what’s on it. If you’re going to have a Web site, you need something to go on it: not just text, but also visual elements like pictures, graphics, and logos. You should also start thinking of a name for your site so you can figure out whether the Web address you want is available. (It probably comes as no surprise that virtually all the most popular one-word addresses—cars.com, sports.com, and ragu.com—are already taken.)
Web editing software. You need a program that lets you create, design, and check each Web page before you hang it up online for all to see; such programs range in price from free to several hundred dollars. The cost factor is often inversely proportional to the amount of work you need to do yourself; if you go low budget, expect to get a little less handholding and a little more code-wrangling.
If you want to learn HTML (Section 19.3.1.1), you can make Web pages with programs that come preinstalled on your PC or Mac. But there are easier software tools to use. Nvu (www.nvu.com ) is a good freebie Web page editor; Dreamweaver (www.macromedia.com) will set you back around $400, but you’ll be using the same tool the pros use. Both programs work on PCs and Macs.
A Web host. Every Web site resides on a server somewhere—a computer that’s running 24 hours a day and connected to a superfast Internet connection, so that dozens or thousands of people can be viewing your Web site simultaneously.
Delivery system. Once you’ve created your pages, you need a way to get them off your computer and onto the Web server. In most cases, you upload your pages using your Web browser or a file transfer protocol ( FTP) program. FTP software is specially designed to heft files from one computer to another. Some popular Windows FTP programs include CuteFTP (www.cuteftp.com) and WS_FTP (www.ipswitch.com); Mac OS X folks have programs like Fetch (http://fetchsoftworks.com) and CaptainFTP (http://captain-ftp.xdsnet.de) at their disposal.
Phase 1: Design Your Web Site
When it comes to actually designing, coding, and creating the Web pages that will be part of your site, a wide selection of software awaits.
Professional Web designers work in code. They manipulate strings of computer programming gobbledygook in a Web-description language known as HTML. If you wandered by their desks, you’d never guess that all that typewritten text on their screens was actually supposed to look like the Wal-Mart home page.
Ordinary humans, however, are frequently better off using a program that lets you design a Web page by dragging text and graphics around the screen; the program generates the HTML code automatically, behind the scenes.
Text editors
It turns out that a Web page, when you get right down to it, is little more than a page of text. It’s filled with codes that, as noted above, the pros type out by hand. (Graphics, movies, and other non-text items aren’t actually part of the Web page. The text codes tell those things where to appear, but they’re actually stored separately on the Web site.)
So, if you know the HTML language, you don’t need any fancy software at all. If you’re a do-it-yourself type, you can’t get any more DIY than using Notepad (for Windows) or TextEdit (Mac). Just choose Start → All Programs → Accessories → Notepad on your PC, or Applications → TextEdit on your Mac.
Tip
And what if you don’t know HTML but would like to? For a quick course in HTML 101, visit the ever-helpful Webmonkey site for free classes and cheat sheets (www.webmonkey.com). Once you’ve created the HTML document in a text editor, save your file with an .htm or .html extension. Believe it or not, you can then preview your work by opening the page in your Web browser.
Tip
You can even design a Web page in Microsoft Word (or any other word-processing program). Just format and dress up the document as you like, complete with graphics, and then choose File → Save as Web Page. The results look OK for pages that are mostly text; things can start to look a little funky once you add graphic elements, charts, or tables, however.
WYSIWYG (drag-and-drop) programs
WYSIWYG stands for “what you see is what you get,” which means that you design your Web page as though it’s in a graphics program. You get easy-to-use design features and tools to manage your site’s pages and get them up on the Web. The best part about these programs? They generate the HTML code for you.
Nvu. Nvu a free, open-source program (that is, written by volunteer collaborators via the Internet), combines some of the graphical goodness and ease of a Web-editing program like Dreamweaver with the freeness of Notepad and TextEdit. Not only does it provide buttons that quickly and correctly add photos, forms, links, and tables to your pages, it can upload your pages to your host server with a click (see Section 19.3.3).
You can preview your pages right in the program’s window (Figure 19-6) and even run its built-in spell checker to help keep those embarrassing typos at home where they belong. Nvu is available for both Windows and Macintosh. (www.nvu.com)
HTML-Kit. It won’t win any beauty contests for best user interface, but the free HTML-Kit program for Windows makes up for any esthetic shortcomings by letting you customize it to the hilt. The program’s Web site has tutorials to help you get started, and the software itself includes handy features like a live preview that shows you your developing Web page as you type away in the text editor window. (www.html-kit.com)
Microsoft FrontPage. If you’re already a wiz at Word, Excel, PowerPoint, or other Microsoft programs, FrontPage for Windows should have a shorter learning curve than other Web software. The program’s graphics and layout tools let you push and pull elements around the page until you like the look. You can create master templates for all your site’s pages, so when you change an element on the master page, all the other pages take the change, too. FrontPage costs $200 by itself, although it comes with some versions of Microsoft Office. (www.microsoft.com/frontpage)
Figure 19-6. The free Nvu (pronounced “new view”) software takes much of the pain out of Web page creation. As shown in the foreground, you can use its toolbar to style text and add images by clicking, instead of having to type all that stuff shown in the background, which is what Web page code really looks like. The tabs at the bottom of the Nvu window let you see your page in its various stages.Adobe GoLive. Sure, it costs $400, but it’s available for Windows and Macintosh and integrates well with Adobe’s flagship graphics programs, like Photoshop and Illustrator. Using a palette full of visual tools, you can build complicated Web pages soaking in multimedia. A map displays all your site’s pages and how they link to each other. (www.adobe.com)
Dreamweaver. Many Web-design professionals do their heavy lifting in Dreamweaver, which costs $400 for Windows and Macintosh. For new Web-site builders, Dreamweaver comes with a full suite of tutorials to help you understand how to construct your pages and add video or animation. If you want to do a lot of animation, you can also get Dreamweaver bundled with the Flash program (Section 3.4.4) along with a few other Web-design tools in a $1,000 suite called Studio 8. (www.macromedia.com)

If you’re not sure what kind of software you want to use, how many pages your site will have, or even how much server space you think you may need to rent from your Web host, a bit of advanced planning can help. That’s where wireframes and flow charts come in.
A wireframe is a rough layout of your Web pages, with the places for text and images sketched in. A flow chart is an architectural map of your entire site, showing each separate page and where each page links, so you can see the big picture at a glance.
You don’t have to get fancy software to make wireframes and flow charts—in fact, you can sketch them out on cocktail napkins if you want. They’re just there to give you an idea of how much work you have ahead of you and help you decide what tools you need to get the job done.
Phase 2: Find a Web Host
Before you can put your Web site up on the Internet, you should line up a host for your future home on the Web—a company that will be responsible for keeping your site connected to the Internet at all times. The web host will park it on a high-speed computer (a server) that’s fast enough to serve up your page to hundreds of visitors at once.
You have a few options here, including free Web space or extra space your Internet provider may have granted you as part of your monthly Internet subscription. Web hosting firms like Go Daddy (www.godaddy.com) and Network Solutions (www.networksolutions.com) specialize in renting Web server space for a monthly or annual fee.
You’ll also need a domain name, which is the “.com” or “.org” part of the Web address—for example, www.smithsonian.org or http://moisttowelettemuseum.com. If you go with a Web hosting firm, its reps will usually help you pick out and pay for a domain name (more details in Section 19.3.2.2).
On the other hand, if you’ve opted for free Web space on a super-simple service like the ones described back in Section 19.2, you generally won’t have to deal with getting a domain name; in fact, you couldn’t choose one if you wanted to. Your Web site’s address will incorporate the company that’s providing the space. If it’s Earthlink, for example, and your Web site is called SalsaFiend, your address will be www.earthlink.com/~salsafiend.
Using Web space from your ISP
Your Internet service provider may supply you with 10 or 20 megabytes of free space for your own personal Web pages. Check the paperwork you got when you signed up, or your ISP’s Web site, to see if that was part of the deal. Most big providers, like Earthlink, Comcast, and Verizon, provide enough space for a small site.
Here again, you won’t be allowed to choose your own domain name (like www.picklepuss.com or whatever). If you put up some pages through your Comcast account, you’ll get a URL like www.home.comcast.net/picklepuss.
Using Web space from a hosting company
If you need more space or want more flexibility for your Web site, there’s no shortage of companies out there that will gladly rent you some room on their servers for less than $10 a month. Once you buy space from them, such companies supply the information you need to upload your Web site to their servers, like passwords and directions.
If you don’t have a domain name for your site yet, you can even buy an all-in-one domain name/hosting package from a company like Register.com (www.register.com), Go Daddy (www.godaddy.com), Dotster (www.dotster.com ), and Network Solutions (www.networksolutions.com).
Each offers a selection of hosting plans for everything from personal sites to major e-commerce operations. Because you’re buying a domain name to go with your site, you can also check its availability to see if it’s in use. You can look up, say, www.corndoghut.com, to see if anyone has nabbed it yet.
When shopping for Web space, consider these factors:
Data transfer limit. Also known as bandwidth, this is the amount of information your site is allowed to send each month—namely, copies of your Web pages into the browsers of your site’s eager readers/fans/customers. Ask the hosting company what happens if your site gets really popular and you exceed your bandwidth limit; do they temporarily shut you down or just charge you more money? (If this happens to you, temporarily shutting down is the much less expensive option.)
Disk space. If the 10 or 20 megabytes from your ISP isn’t enough room to hold all your pages and graphics, how much space do you actually need? If you’ve already built all your site’s pages and have them all in a folder, check the folder’s size. In Windows, right-click the folder, choose Properties, and then look at the “Size on Disk” figure. On the Mac, Control-click (or right-click) a folder and then choose Get Info to see its size. Be sure to take into account any new pages or sections you may want to add to your site in the future.
Price. You shouldn’t pay more than $10 or $15 a month in hosting fees for a small site. If the price is higher, find out why; see if the company is tossing in tools and features you don’t need.
Phase 3: Publish Your Web Site
Once you’ve designed your pages and lined up a service to host them, you have to transfer the former to the latter. This is where those FTP programs mentioned back in Section 19.3.1 come into play.
File transfer programs are designed to deliver batches of files from one computer to another in one fell swoop. When you upload your Web site’s files, you’re basically telling the FTP program where you want to move your files (to your Web host’s computer), and then pointing the program to the files or folders on your machine that you want to transfer.
Before you can upload your Web site’s files to your host server, your FTP program will ask you for three data points that your chosen Web host company must supply:
The host address. This is the address of the server that will harbor your site. The address usually looks something like ftp.mywebhost.com.
Your user name. This is whatever you picked when you signed up for the account. If you’re using free Web space from your ISP, it’s often the part of your email address before the @ sign.
Your password. If you’re using your ISP’s Web space, this is probably the same password you use for email. If not, it’s whatever you picked when you signed up with your Web-hosting company. Passwords are important here because they keep strangers from changing your site’s pages.
These three nuggets of info get you into your own assigned directory on your Web host’s server. Then you just need to upload the HMTL files and images you created for your Web site to that directory.
The buttons and commands may vary slightly with the FTP program you use, but look for a Put File or Transfer File option. This command lets you select the files on your hard drive to be copied over to the Web server that you’re now connected to through your FTP program.
Once you upload your pages to your rented space on the host’s server, your brand new Web site is live for the world to see. When you need to make changes to pages or add new ones, upload the corrected or new files to the same folder on your Web server.
Tip
Even if you hire professional Web designers to create and upload your pages for your site, you don’t have to drag them (and their invoices) back in for every little text update. Services like Edit.com let you fix your pages, add new text and images, update links, and more, right in your own Web browser. Service plans start at $25 for unlimited editing per month; if you don’t change your site all that much, you can also pay a flat $25 for one-time, 24-hour window-site updates. You can get more information and a demonstration of how it works at www.edit.com.
Podcasts
Podcasts, as you may recall from Chapter 11, are radio-style audio shows, usually created by amateurs. Chapter 11 also reveals where to find podcasts and subscribe to them so you never miss your favorite shows.
But the real fun is making your own podcasts for the whole world to hear.
The best shows deliver regular doses of insightful commentary on a subject, whether it’s about books, Macintosh computers, the Green Bay Packers, or movies. Average Joes and Janes, previously living in utter obscurity, have developed cult podcast followings who can’t get enough of their quirky, funny, or just bizarre personalities. (There are also plenty of corporate, slickly produced podcasts, of course.)
You don’t need a fancy recording studio, a sound-mixing board, or pricey professional programs to make your own podcast. You can make one with just a microphone, some inexpensive software, and something to say.
To answer the software question, you can pursue either of two avenues:
Use a special podcast-making program. These programs handle the entire process, from recording and editing your podcast to posting it to the Internet. The downside: they cost money.
Do-it-yourself. This approach can save you money but cost you in convenience. The point is that it’s also possible to create and upload a podcast using the software that’s already on your computer, although it requires more steps.
The following pages describe both approaches.
Tip
No matter which software you use to record your audio show, don’t worry if you make a mistake, cuss, or flub a line during your time in front of the microphone; you can always go back and edit that stuff out before you post the thing. All the audio programs described in the next few pages let you go back and fix things. Besides, lots of podcasters leave in that good stuff, on the premise that podcasts are meant to be real, human, and imperfect.
All-in-One Podcast Programs
Becoming a podcaster involves two technological steps. First, you have to record and edit the actual audio show and save it as an audio file. Second, you have to attach something called an RSS feed file—a file that supplies information required by podcast receiver programs (Section 11.6.1), like the name of the file, the date it was published, and where to download a copy.
If you’re willing to invest in dedicated podcasting software, you can record, edit, and publish your podcast all in one program. Here are a couple of them:
ePodcast Creator. This $90 program works with Windows 2000 and XP and helps you record and edit multiple audio tracks. Once the podcast is complete, the program creates the RSS feed and uploads the new podcast to your server. There’s a free trial version and free podcasting tutorials at www.industrialaudiosoftware.com; a professional version called ePodcast Producer offers more audio-editing features and costs $250.
Podcast Factory. M-Audio’s Podcast Factory provides everything you need to get rolling, all in one box: desktop microphone; audio interface box for connecting the microphone, headphones, or musical instruments to the computer’s USB port; and audio-mixing software that also supplies RSS feeds and publishes your podcasts. The Podcast Factory kit (shown in Figure 19-7) works with Windows XP and Mac OS X and costs about $180; there’s more info at www.m-audio.com.

GarageBand
GarageBand, Apple’s music studio program, comes on every new Mac; you can also buy it as part of Apple’s iLife software suite (iMovie, iPhoto, and so on). GarageBand’s enormous library of musical instrument sound clips and loops makes it easy to compose your own instrumental work—and you can even plug your own guitar or keyboard into your Mac and add yourself to the mix.
GarageBand 3 and later, in fact, is loaded with special features that are expressly tailored for podcast creation. You can easily add artwork (still images that pop up on the listeners’ iPod screens at designated points in the audio), URLs (which listeners can click to visit relevant Web sites if they’re listening at their computers), sound effects, background music, and even canned “studio audience” audio clips like laughter and applause.
Here’s a quick guide to get you up and recording your very first podcast:
Figure out what microphone you’ll use.
Most Macintosh models, including the iMac, eMac, and all laptops, have microphones built into the screens. Power Macs can accommodate USB microphones (sold separately).
If your Mac doesn’t have a built-in microphone or even a sound-in port, an audio-interface box like Griffin Technology’s iMic (www.griffintechnology.com) or M-Audio’s Fast Track USB (www.m-audio.com) connect to your computer’s USB port. These boxes provide ports for a microphone and headphones for use while recording.
Before you begin recording, open System Preferences. Click the Sound icon, click the Input tab, and make sure the proper sound source is selected (“Built-in Microphone” or “iMic,” for example).
Open GarageBand and choose File → New → New Podcast Episode.
As shown in Figure 19-8, GarageBand offers a ready-made podcast playpen with basic vocal tracks and sound effects ready to go. (If you have an older version of GarageBand, choose New Track → Real Instrument → Vocals, where there are several presets that can alter your vocalizing. Turning on the checkboxes for Gate and Compressor can help cut down on background noise and smooth out the sound of your voice.)
Check the recording levels.
“Testing 1…2…3.” Experiment with your microphone’s sound levels and adjust the volume settings in GarageBand—and on your audio-interface box—until you sound as clear and undistorted as possible. The dancing level meters should approach the red-colored danger zone without crossing over at the loudest parts.
Start talking.
Keep your mouth close to the microphone for consistent sound and don’t worry if you flub a word here and there. You can always rerecord the parts you messed up or edit them out.
Dress up the recording.
For example, you know how so many people listen to podcasts on their iPods, right? Well, most iPods these days have color screens. And the really cutting-edge podcasts give you something to see as you listen.
GarageBand, starting with version 3, lets you plant photos or other still images at specified points in the show; the iPod displays them on the screen when the audience plays back your podcast. (They’ll also see this artwork when playing the show in iTunes, on their computers.)
To add artwork in GarageBand 3, choose Control → Media Browser to open the Media Browser window. It lists all the photos, movies, and, audio files you can add to your GarageBand projects, including songs from iTunes and pictures from iPhoto. Drag the photos you want to use to the Episode Artwork well in the GarageBand window, as shown at the bottom of Figure 19-8.
Figure 19-8. Top: To get the tape rolling on your podcast, choose File → New and click the button to make a new podcast episode. Bottom: As you create your podcast in GarageBand, you can jazz up your vocal track with sound effects, background music, and artwork by simply dragging and dropping things where you want them. When you’re all done, choose Share → “Export Podcast to Disk” to send your finished file out of GarageBand and onto your computer so you can upload it to a Web site. The Share menu gives you other destinations for your podcast as well: You can send it right into your own copy of iTunes or send it to iWeb where you can prepare it for posting on your iWeb site.Don’t miss the radio show-style sound effects, either: crowds cheering, clapping, laughing, and chortling, plus musical “stingers” (quickie sounds often used on radio talk shows as audio punctuation indicating a transition between segments), and other sound effects. You get to them by choosing Control → Loop Browser (or pressing
 -L). Click the category (Stingers, Jingles, or whatever) to see the selection of audio clips, and double-click the name of the loop file (Cartoon Space Boing is a fun one) to hear it. If you decide you like the sound, add it to your audio tracks by dragging your chosen loop to the part of your podcast timeline where you want the sound effect to occur.
Export your show.
Once you’ve added your sound effects, fixed your slip-ups, and perfected your podcast, save your finished file. Now you’re ready to take your podcast out of GarageBand and release it into the wilds of the Web. If you have iLife ’06 with the iWeb program and a .Mac account (Section 14.1.4.4), all you need to do is choose Share → Send Podcast to iWeb, as shown in the bottom of Figure 19-8. Once you put it on an iWeb page and click the Publish button, your show is beamed up to the Internet.
If you don’t have iWeb or .Mac, you can export your podcast and put it up on the Web site of your choosing. To do so, choose Share → Export Podcast to Disk, pick your landing folder, and click Save. You now have a podcast file to send on its way. You can also export your podcast right into your own iTunes library and give it a spin; choose Share → Send Podcast to iTunes to make it so.

Tip
Apple has a whole Web page of tips and suggestions on making podcasts with GarageBand, and there’s also a link to a free Chapter Tool, which lets you insert Web links, pictures, and chapter markers into your files: http://www.apple.com/support/garageband/podcasts/recording.
Do-It-Yourself Podcast Programs
The programs described on the previous pages handle both the audio recording and all that RSS/XML distribution business. But to save a little money and get a little more mileage out of your technical expertise, you can also assemble a low-cost podcast studio from off-the-shelf software “parts.” That is, you’ll use one program to record the audio, and a second one to dress it up as a podcast and upload it to the Web.
Note
If your computer didn’t come with a microphone, you can usually find a selection of external mics at your local computer store or Radio Shack.
Recording the audio (Windows)
Believe it or not, you can use the Sound Recorder program that comes with Windows to record your show (choose Start → Programs → Accessories → Entertainment → Sound Recorder). But the shareware archives on the Web are bursting with more flexible and robust programs for recording your own MP3 files. Search software-download sites like www.hitsquad.com, www.download.com, or www.tucows.com, and you’ll find plenty of audio-recording programs to sample.
FASoft’s n-Track Studio, for example, is a versatile recording and mixing program that you can sample for free at www.fasoft.com and buy for about $50. Once you record yourself using the program, you can export the result in any of several audio-file formats, including WAV and MP3. (MP3 is the best option, though, because it’s the standard format for podcast files. MP3 files are relatively small files, and they work on every pocket music player alive.)
Once you have your audio file the way you want it, you’re ready to distribute it as a proper podcast. Jump to Section 19.4.2.2 for instructions on posting your podcast.
Tip
Got a microphone but no sound port? If you don’t have a sound-in port on your computer, you can do it the USB way with the iMic from Griffin Technology. The iMic works with both PCs and Macs through the USB port, as described in Section 19.4.1.1. If you don’t have the microphone either, consider the $40 MicFlex from MacMice (www.macmice.ca), a flexible microphone that plugs right into the USB port.
Recording the audio (Macintosh)
If you have GarageBand—it’s been included on every Mac since 2004—use that; later versions, in particular, are ideal for making podcasts, as described in Section 19.4.1.1.
Otherwise, plenty of inexpensive Macintosh shareware programs for audio recording await you on the Web; visit www.osxaudio.com, for example, or www.hitsquad.com/smm/mac/recording . Two popular shareware programs for audio recording for Mac OS X are Amadeus II ($30) and Audiocorder ($20). (Both are available through links on this book’s “Missing CD” page at www.missingmanuals.com.)
Publishing the podcast
Once you’ve created an MP3 file of your podcast episode, you have to upload it to your Web site, blog, or wherever you want your listeners to find your audio file. To do so, you need to publish it in a format that incorporates an RSS feed.
You can find many programs for Windows and Macintosh that automate the process of uploading your audio files all wrapped up in a nice RSS feed. For example, try Podifier (www.podifier.com) or FeedForAll (www.feedforall.com),shown in Figure 19-9. Each program walks you through the steps for publishing your podcast and RSS feed to your Web site or blog, where your adoring fans are clamoring.

The Podcasting News site, a wonderful place to learn all about podcasting, has a lengthy list of feed-publishing programs and services for both Windows and Mac pod-jockeys. If you’re in search of even more software to make the whole getting-my-voice-heard-on-the-Web part of the podcast process easier, check out www.podcastingnews.com/topics/Podcasting_Software.html.
And, if you happen to blog with Blogger (Section 19.1.2.1), Podcasting News has an illustrated tutorial showing how you can create your own RSS feed with services like FeedBurner’s SmartCast service (www.feedburner.com); you can find it directly at www.podcastingnews.com/articles/Make_Podcast_Blogger.html.