Chapter 7: Exposing Your Pods with Services
After reading the previous chapters, you now know how to deploy Docker applications on Kubernetes by building Pods that can contain one container or multiple containers for more complex applications. You also know that it is possible to decouple applications from their configuration by using Pods and configmaps together, and Kubernetes is also capable of storing your sensitive configurations thanks to Secret objects.
The good news is that with these three resources, you can start deploying applications on Kubernetes properly and get your first app running on Kubernetes. However, you are still missing something important: you need to be able to expose Pods to end users or even to other Pods within the Kubernetes cluster. This is where Kubernetes services come in, and that's the concept we're going to discover now!
In this chapter, we'll learn about a new Kubernetes resource kind called Service. Since Kubernetes services are a quite big topic with a lot of things to cover, this chapter is going to be quite big with a lot of information. But after you master these services, you're going to be able to expose your Pods and get your end users to your apps!
Services are also a key concept to master high availability (HA) and redundancy in your Kubernetes setup. In a word: it is crucial to master them to be effective with Kubernetes!
In this chapter, we're going to cover the following main topics:
- Why would you want to expose your Pods?
- The NodePort service
- The ClusterIP service
- The LoadBalancer service
- Implementing ReadinessProbe
- Securing your Pods using the NetworkPolicy object
Technical requirements
To follow along with the examples in this chapter, make sure you have the following:
- A working Kubernetes cluster (whether this is local or cloud-based has no importance)
- A working kubectl command-line interface (CLI) configured to communicate with the Kubernetes cluster
Why would you want to expose your Pods?
In the previous chapters, we discussed the microservice architecture, which offers to expose your functionality through REpresentational State Transfer (REST) application programming interfaces (APIs). These APIs rely completely on the HyperText Transfer Protocol (HTTP) protocol, which means that your microservices must be accessible via the web, and thus via an Internet Protocol (IP) address on the network.
In this section, we will explain what Services are in Kubernetes. Next, we'll explain what they're used for and how they can help you expose your Pod-launched microservices.
Understanding Pod IP assignment
To understand what Services are, we need to talk about Pods for a moment once again. On Kubernetes, everything is Pod management: Pods host your applications, and they have a special property. Kubernetes assigns them a private IP address as soon as they are created on your cluster. Keep that in mind because it is super important: each Pod created in your cluster has its unique IP address assigned by Kubernetes.
To illustrate this, we'll start by creating an nginx Pod. We're using an nginx Pod here, but in fact, it would be the same for any type of Pod, no matter which Docker image is used to create it.
Let's do that using the declarative way with the following YAML Ain't Markup Language (YAML) definition:
# ~/new-nginx-pod.yaml
apiVersion: v1
kind: Pod
metadata:
name: new-nginx-pod
spec:
containers:
- image: nginx:latest
name: new-nginx-container
ports:
- containerPort: 80
As you can see from the previous YAML, this Pod called new-nginx-pod has nothing special and will just launch a container named new-nginx-container based on the nginx:latest Docker image.
Once we have this YAML file, we can apply it using the following command to get the Pod running on our cluster:
$ kubectl create -f ~/new-nginx-pod.yaml
pod/new-nginx-pod.yaml created
As soon as this command is called, the Pod gets created on the cluster, and as soon as the Pod is created on the cluster, Kubernetes will assign it an IP address that will be unique.
Let's now retrieve the IP address Kubernetes assigned to our Pod. To do that, we can use the kubectl get pods command to list the Pods. In the following code snippet, please note the usage of the -o wide option that will display the IP address as part of the output:
$ kubectl get pods -o wide
NAME READY STATUS AGE IP NODE
new-nginx-pod 1/1 Running 5s 10.0.102.212 wkn1
Please note that the IP address is added to the output of the command only because we're adding the -o wide option. Otherwise, the IP address is not present in the shorter output version. In our case, the IP address is 10.0.102.212. This IP will be unique on my cluster and is assigned to this unique Pod.
Of course, if you're following along on your cluster, you will have a different IP. This IP is a private IP version 4 (v4). It only exists in the Kubernetes cluster. If you try to type this IP into your web browser, you won't get anything because this idea does not exist on the public internet—it only exists within your Kubernetes cluster.
Depending on the cloud platform and container network interface (CNI) you use, this network might be an Amazon Web Services (AWS), Google Cloud Platform (GCP), or Azure virtual private cloud (VPC), or the basic flat network used by Kubernetes. In all cases, this principle is the same: each Pod is assigned its own IP address, and that is an absolute rule.
At this point, you must understand that all Pods get a unique IP address as soon as they are created on the cluster and that this IP address is a private one. If that sounds clear to you, we can move on with this important topic: we will now discover that this IP address assignment is dynamic, and the issues it can cause at scale.
Understanding Pod IP assignment is dynamic
Now that you're aware that Kubernetes assigns an IP address to each Pod when it is created, you must know that its IP address assignment is a dynamic one.
Indeed, these IP addresses are not static, and if you delete and recreate a Pod, you're going to see that the Pod will get a new IP address that's totally different from the one used before. And if that is the case, even if the Pod is recreated with the exact same YAML configuration.
To demonstrate that, let's delete the Pod and recreate it using the same YAML file, as follows:
$ kubectl delete -f ~/new-nginx-pod.yaml
pod/new-nginx-pod.yaml deleted
$ kubectl create -f ~/new-nginx-pod.yaml
pod/new-nginx-pod.yaml created
We can now run once more the kubectl get pods -o wide command to figure out that the new IP address is not the same as before, as follows:
$ kubectl get pods -o wide
NAME READY STATUS AGE IP NODE
new-nginx-pod 1/1 Running 5s 10.0.102.104 wkn1
Now, the IP address is 10.0.102.104. This IP is different from the one we had before, 10.0.102.212.
As you can see, when a Pod is destroyed and then recreated, even if you recreate it with the same name and the same configuration, it's going to have a different IP address.
The reason is that technically, it is not really the same Pod but two different Pods: that is why Kubernetes assigns two completely different IP addresses. Now, imagine you wrote a script to do some actions on that nginx Pod using its IP address to communicate with it. If that Pod gets deleted and recreated for some reason, then your script is broken.
Never hardcode a pod's IP addresses in your application code
In a world where you were in a production environment, this would be a real problem: microservice applications are designed to interact with each other through the HTTP protocol, which relies on Transmission Control Protocol (TCP)/IP.
So, in any form, you need to be able to find a way to establish a reliable way to retrieve a pod's IP addresses at any time.
The golden rule here is to never rely on the IP address of a Pod to access it directly. As Pods can be easily deleted, recreated, or rescheduled to another worker node, hardcoding IP addresses is a bad idea: if a Pod is destroyed and then recreated, any application that needs to communicate with it would no longer be able to call it because the IP assigned would resolve nothing.
There are very concrete cases that we can give where this problem can arise, as follows:
- A Pod running an A microservice has a dependency and calls a B microservice that is running as another Pod on the same Kubernetes cluster.
- An application running as a Pod needs to retrieve some data from a MySQL server also running as a Pod on the same Kubernetes cluster.
- An application uses a Redis cluster as a caching engine deployed in multiple Pods on the same cluster.
- Your end users access an application by calling an IP address, and that IP changes because of a Pod failure.
- You set up a Domain Name System (DNS) server that uses a pod's IP address as DNS entries.
Any time you have an interconnection between services or—more widely—any network communication, this problem will arise.
The solution to this issue is the usage of the Service resource kind.
This new object will act as an intermediate object that will remain on your cluster. Services are not meant to be destroyed, and they recreate often. In fact, they can remain on your cluster long-term without causing any issue. They are meant to act as a proxy in between. In fact, they are the core object for networking and load balancing in Kubernetes.
Understanding how services route traffic to Pods
Kubernetes services are not Docker containers or Pods. Kubernetes services are resources running within your Kubernetes cluster, and they are used to create appropriate IPTABLES to ensure the traffic is properly redirected to backend Pods.
The idea is simple: just as Pods get a dynamic IP address at creation time, each service gets a static DNS that can be resolved from anywhere on the cluster. That static DNS entry will never change if the service remains on the cluster. You'll simply tell each service which Pod they should serve traffic to, and that's pretty much it.
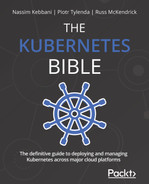
In one word: you can consider a service as a proxy with a static DNS name you place in front of your Pods to serve traffic to. This way, you get a static and reliable way to access your Pods, as depicted in the following screenshot:
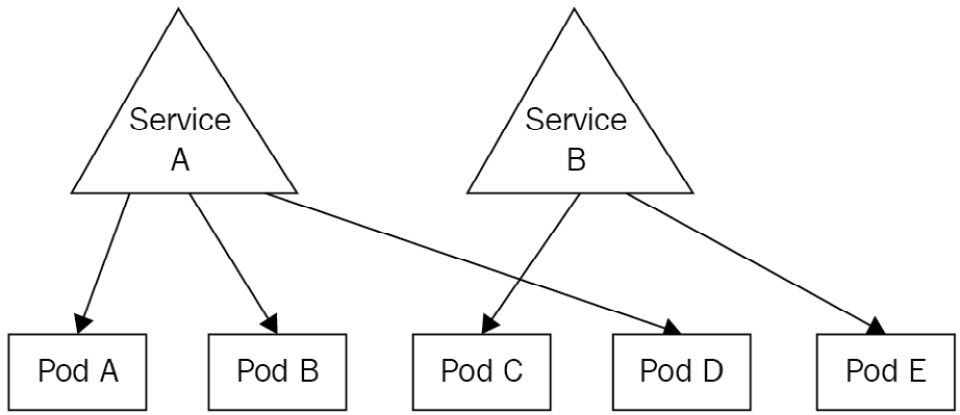
Figure 7.1 – Service A is exposing Pods A, B, and D, whereas Service B is exposing Pods C and E
In fact, Services are deployed to Kubernetes as a resource kind, and just as with most Kubernetes objects, you can deploy them to your cluster using interactive commands or declarative YAML files.
To keep things simple and to sum up: you can consider Services to be load balancers internal to your Kubernetes cluster, built to provide a consistent and static network gateway to your Pod.
When you create a Service, you'll have to give it a name. This name will be used by Kubernetes to build a DNS name that all Pods on your cluster will be able to call. This DNS entry will resolve to your Service, which is supposed to remain on your cluster. The only part that is quite tricky at your end will be to give a list of Pods to expose to your services: we will discover how to do that in this chapter. Don't worry—it's just configuration based on labels and selectors.
Once everything is set up, you can just reach the Pods by calling the service. This service will receive the requests and forward them to the Pods. And that's pretty much it!
Understanding round-robin load balancing in Kubernetes
Kubernetes services, once configured properly, can expose one or several Pods. When multiple Pods are exposed by the same Pod, the requests are evenly load-balanced to the Pods behind the service using the round-robin algorithm, as illustrated in the following screenshot:

Figure 7.2 – Service A proxies three requests to the three Pods behind it. At scale, each service will receive 33% of the requests received by the service
Scaling applications becomes easy. Adding more Pods behind the service will be enough. As the Kubernetes service has round-robin logic implemented, it can proxy requests evenly to the Pods behind it.
If the preceding Pod had four Pods, then, each of them would receive roughly 25% of all the requests the service received. If 50 Pods were behind the service, each of them would receive roughly 2% of all the requests received by the service. That's pretty much it. All you need to understand is that services are behaving like load balancers you can find on the cloud by following the round-robin algorithm.
Let's now discover how you can call a service in Kubernetes from another Pod.
Understanding how to call a service in Kubernetes
When you create a Service in Kubernetes, it will be attached two very important things, as follows:
- An IP address that will be unique and specific to it (just as Pods get their own IP)
- An automatically generated DNS name that won't change and is static
You'll be able to use any of the two in order to reach the service, which will then forward your request to the Pod it is attached to. Most of the time, though, you'll call the service by its generated domain, which is easy to determine and predictable. Let's discover how Kubernetes assigns DNS names to services.
Understanding how DNS names are generated for services
The DNS name generated for a service is derived from its name. For example, if you create a Service named my-app-service, its DNS name will be my-app-service.default.svc.cluster.local.
This one is quite complicated, so let's break it into smaller parts, as follows:

This table should help you distinguish all the parts of the domain name. The two moving parts are the two first ones, which are basically the service name and the namespace where it lives. The DNS name will always end with the .svc.local string.
So, at any moment, from anywhere on your cluster, if you try to use curl or wget to call the my-app-service.default.svc.cluster.local address, you know that you'll reach your service.
That name will resolve to the service as soon as it's executed from a Pod within your cluster. But by default, services won't proxy to anything if they are not configured to retrieve a list of Pods they will proxy. We will now discover how to do that!
How services get a list of the Pods they service traffic to
When working with services in Kubernetes, you will often come across the idea of exposing your Pods.
Indeed, this is the terminology Kubernetes uses to tell that a service is proxying network traffic to Pods. We say a service is exposing Pods. That terminology is everywhere: your colleagues may ask you one day: "Which service is exposing that Pod?" The following screenshot shows Pods being exposed:
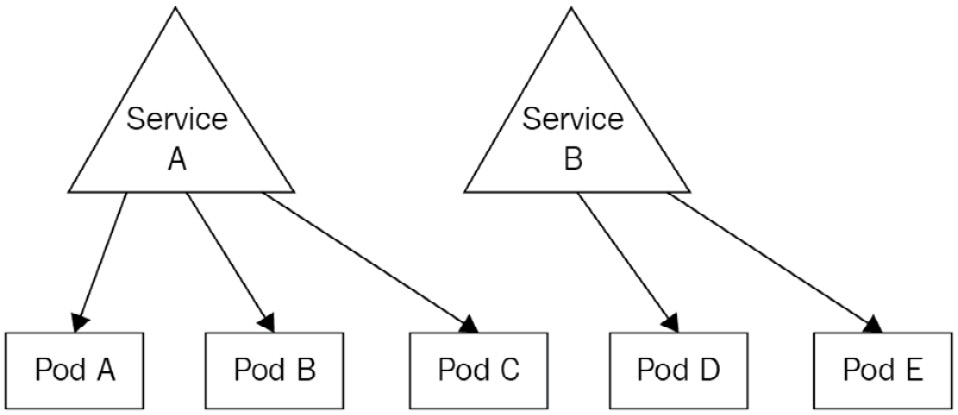
Figure 7.3 – Here, Pods A, B, and C are exposed by service A, whereas Pods D and E are exposed by service B
That terminology is also the one used by kubectl and the one used in Kubernetes official documentation in general. You can successfully create a Pod and a service to expose it using kubectl in literally one command, using the --expose parameter. The following example will create an nginx Pod with a service exposing it.
For the sake of this example, we will also need to provide a port to the command to tell on which port the service will be accessible:
$ kubectl run nginx --image nginx:latest --expose --port 80
service/nginx created
pod/nginx created
Let's now list the Pods and the services using kubectl to demonstrate that the following command created both objects:
$ kubectl get pods
NAME READY STATUS RESTARTS AGE
nginx 1/1 Running 0 2m44s
$ kubectl get services
NAME TYPE CLUSTER-IP EXTERNAL-IP PORT(S) AGE
nginx ClusterIP 10.98.191.187 <none> 80/TCP 2m28s
nginx ClusterIP 10.98.191.187 <none> 80/TCP 2m9s
As you can see based on the output of the command, both objects were created.
We've said earlier that Services can find Pods they have to expose based on Pods' labels. That being said, the nginx Pod we just created surely has some labels. To show them, let's run the kubectl get pods nginx --show-labels command. In the following snippet, pay attention to the --show-labels parameter, which will display the labels as part of the output:
$ kubectl get pods nginx --show-labels
NAME READY STATUS RESTARTS AGE LABELS
nginx 1/1 Running 0 3m27s run=nginx
As you can see, an nginx Pod was created with a label called run, with a value of nginx. Let's now describe the nginx service. It should have a selector that matches this label. The code is illustrated here:
$ kubectl describe svc nginx
Name: nginx
Namespace: default
Labels: <none>
Annotations: <none>
Selector: run=nginx
Type: ClusterIP
IP: 10.98.191.187
Port: <unset> 80/TCP
TargetPort: 80/TCP
Endpoints: 172.17.0.8:80
I did remove some lines of the output to make it shorter. But you can clearly see that the service has a line called Selector that matches the label assigned to the nginx Pod. This way, the link between the two objects is made. We're now 100% sure that the service can reach the nginx Pod and that everything should work normally.
Though it works, I strongly advise you to never do that in production. Indeed, services are very customizable objects, and the --expose parameter is hiding a lot of their features. Instead, you should really use declarative syntax and tweak the YAML to fit precise needs.
Let's demonstrate that by using the dnsutils Docker image.
Using the dnsutils Docker image to debug your services
One very nice image to discover is the dnsutils one. It is extremely useful to debug your service.
Indeed, as your services are created within your cluster, it is often hard to access them, especially if our Pod is meant to remain accessible only within your cluster, or if your cluster has no internet connectivity, and so on.
In this case, it is good to deploy a Pod in your cluster with just some binaries installed into it to run basic networking commands such as wget, nslookup, and so on. One image that meets this need well is the dnsutils one. You can easily test your services using this image.
Here, we're going to curl the nginx Pod home page by calling the service that is exposing the Pod. That service's name is just nginx. Hence, we can forge the DNS name Kubernetes assigned to it: nginx.default.svc.cluster.local.
If you try to reach this Uniform Resource Locator (URL) from a Pod with your cluster, you should successfully reach the nginx home page. Let's run the following command to launch the dnsutils Pod on our cluster:
$ kubectl apply -f https://k8s.io/examples/admin/dns/dnsutils.yaml
pod/dnsutils created
Let's now run a kubectl get pods command in order to verify the Pod was launched successfully, as follows:
$ kubectl get pods/dnsutils
NAME READY STATUS RESTARTS AGE
dnsutils 1/1 Running 0 56s
That's perfect! Let's now run a nslookup command against the service DNS name, as follows:
$ kubectl exec -ti dnsutils -- nslookup nginx.default.svc.cluster.local
Server: 10.96.0.10
Address: 10.96.0.10 # This address is only resolvable from within the Kubernetes cluster, via local kube-dns or CoreDNS.
Name: nginx.default.svc.cluster.local
Address: 10.98.191.187
Everything looks good. Let's now run a wget command to check if we can retrieve the nginx home page, as follows:
$ kubectl exec -ti dnsutils -- wget nginx.default.svc.cluster.local
Connecting to nginx.default.svc.cluster.local (10.98.191.187:80)
index.html 100% |*******************************| 615 0:00:00 ETA
The wget command seems to have downloaded the index.html file properly. I can now display its content using cat, like this:
$ kubectl exec -ti dnsutils -- cat index.html
<html>
<head>
<title>Welcome to nginx!</title>
<style>
html { color-scheme: light dark; }
body { width: 35em; margin: 0 auto;
font-family: Tahoma, Verdana, Arial, sans-serif; }
</style>
</head>
<body>
<h1>Welcome to nginx!</h1>
Everything is perfect here! We successfully called the nginx service by using the dnsutils service, as illustrated in the following screenshot:

Figure 7.4 – The dnsutils Pod is used to run wget against the nginx service to communicate with the nginx Pod behind the service
Keep in mind that you need to deploy a dnsutils Pod inside the cluster to be able to debug the service. Indeed, the nginx.default.svc.cluster.local DNS name is not a public one and can be only accessible from within the cluster.
Let's explain why you should not use the --expose flag to expose your Pods now.
Why you shouldn't use the --expose flag
The --expose flag should not be used to create services because you won't get much control over how the service gets created. By default, --expose will create a ClusterIP service, but you may want to create a NodePort service.
Defining the service type is also possible using the imperative syntax, but in the end, the command you'll have to issue is going to be very long and complex to understand. That's why I encourage you to not use the --expose flag and stick with declarative syntax for complex objects such as services.
Let's now discuss how DNS names are generated in Kubernetes when using services.
Understanding how DNS names are generated for services
If you understood everything we said before, you now know that Kubernetes services-to-pod communication relies entirely on labels on the Pod side and selectors on the service side.
If you don't use both correctly, communication cannot be established between the two.
The workflow goes like this:
- You create some Pods and you set some labels arbitrarily.
- You create a service and configure its selector to match the Pods' labels.
- The service starts and looks for Pods that match its selector.
- You call the service through its DNS or its IP (DNS is way easier).
- The service forwards the traffic to one of the Pods that matches its labels.
If you look at the previous example achieved using the imperative style with the --expose parameter, you'll notice that the Pod and the services were respectively configured with proper labels (on the Pod side) and selector (on the service side), which is why the Pod is successfully exposed.
We're almost done with Services theory, but I strongly advise you to not use the --expose parameter. The reason is that services are complex objects with a lot of configurations accessible behind the scenes, and to access all the possible options, it is better to write YAML files.
Besides that, you must understand now that there is not one but several types of services in Kubernetes. Indeed, the Service object can be configured to achieve different types of Pod exposure, and the --expose parameter only allows for the simplest one. Using the --expose parameter is good for tests, but do remember that you should always use YAML files to really have access to all features of Kubernetes.
That being said, let's now explain the different types of services in Kubernetes.
Understanding the different types of services
There are several types of services in Kubernetes.
Although there is only one kind called Service in Kubernetes, that kind can be configured differently to achieve different results.
Fortunately for us, no matter which type of service you choose, the goal remains the same: to expose your Pods using a single static interface.
Each type of service has its own function and its own use, so basically, there's one service for each use case. A service cannot be of multiple types at once, but you can still expose the same Pods by two services' objects with different types… as long as the services' objects are named differently so that Kubernetes can assign different DNS names.
In this chapter, we will discover the three main types of services, as follows:
- NodePort: This one binds a port from an ephemeral port range of the host machine (the worker node) to a port on the Pod, making it available publicly. By calling the port of the host machine, you'll reach the associated Kubernetes Pod. That's the way to reach your Pods for traffic coming from outside your cluster.
- ClusterIP: The ClusterIP service is the one that should be used for private communication between Pods within the Kubernetes cluster. This is the one we experimented with in this chapter and is the one created by the --expose flag by default. This is certainly the most used of them all because it allows inter-communication between Pods: as its name suggests, it has a static IP that is set cluster-wide. By reaching its IP address, you'll be redirected to the Pod behind it. If more than one Pod is behind it, the ClusterIP service will provide a load-balancing mechanism following the round-robin algorithm. Even if this service type is called ClusterIP, we generally call it by its generated DNS name.
- LoadBalancer: The service of the LoadBalancer type is quite complex. It will detect the cloud computing platform the Kubernetes cluster is running on and will create a load balancer on the cloud. If you're running on AWS, it will create an Elastic Load Balancer (ELB). If you run vanilla Kubernetes, it will just create nothing… This service is useless outside of a cloud platform. In general, people tend to prefer to use other services such as Terraform to provision their cloud infrastructure, making this service certainly the least used of them all.
As all of this might seem a little bit unclear to you, let's immediately dive into the first type of service—the NodePort one.
As mentioned earlier, this one is going to be super useful to access our Pods from outside the cluster, by attaching Pods to the worker node's port.
The NodePort service
Now that we are aware of the theory behind the concept of services in Kubernetes, we will start by discovering the first type, which is NodePort.
NodePort is a Kubernetes service type designed to make Pods reachable from a port available on the host machine, the worker node. In this section, we're going to discover this type of port and be fully focused on NodePort services!
Why do you need NodePort services?
We're now going to discover exactly where the NodePort services sit and what they do in your Kubernetes cluster.
The first thing to understand is that NodePort services allow us to access a Pod running on a worker node, on a port of the worker node itself. After you expose Pods using the worker node, you'll be able to reach the Pods if you know the IP address of your worker node and the port of the NodePort service in this format:
<WORKER_NODE_IP_ADDRESS>:<PORT_DECLARED_IN_NODE_PORT_SVC>.
Let's illustrate all of this by declaring some Kubernetes objects.
Most of the time, the NodePort service is used as an entry point to your Kubernetes cluster. In the following example, I will create two Pods based on the containous/whoami Docker image available on the Docker Hub, which is a very nice Docker image that will simply print the container hostname.
I'll create two Pods so that I get two containers with different hostnames, and I'll expose them using a NodePort service.
Creating two containous/whoami Pods
Let's start by creating two Pods without forgetting about adding one or more labels because we will need labels to tell the service which Pods it's going to expose.
I'm also going to open the port on the Pod side. That won't make it exposed on its own, but it will open a port the service will be able to reach. The code is illustrated here:
$ kubectl run whoami1 –image=containous/whoami –port 80 –labels="app=whoami"
pod/whoami1 created
$ kubectl run whoami1 –image=containous/whoami –port 80 –labels="app=whoami"
pod/whoami2 created
Now, I can run a kubectl get pods command in order to verify that our two Pods are correctly running. I can also add the --show-labels parameter in order to display the labels as part of the command output, as follows:
$ kubectl get pods --show-labels
NAME READY STATUS RESTARTS AGE LABELS
whoami1 1/1 Running 0 5m4s app=whoami
whoami2 1/1 Running 0 4m59s app=whoami
Everything seems to be okay! Now that we have two Pods created with a label set for each of them, we will be able to expose them using a service. We're now going to discover the YAML manifest file that will create the NodePort service to expose these two Pods.
Understanding NodePort YAML definition
Unlike most Kubernetes clusters, it is impossible to create services of the NodePort type using the declarative way. And since services are quite complex resources, it is better to create them using a YAML file rather than direct command input.
Here is the YAML file that will expose the whoami1 and whoamo2 Pods using a NodePort service:
# ~/nodeport-whoami.yaml
apiVersion: v1
kind: Service
metadata:
name: nodeport-whoami
spec:
type: NodePort
selector:
app: whoami
ports:
- nodePort: 30001
port: 80
targetPort: 80
This YAML can be difficult to understand because it refers to three different ports as well as a selector block.
Before explaining the YAML file, let's apply it and check if the service was correctly created afterward, as follows:
$ kubectl create -f nodeport-whoami.yaml
service/nodeport-whoami created
$ kubectl get services
NAME TYPE CLUSTER-IP EXTERNAL-IP PORT(S) AGE
nodeport-whoami NodePort 10.98.159.88 <none> 80:30001/TCP 77s
The previous kubectl get services command indicated that the service was properly created!
Now, let's discuss the selector block, which is an important one: it basically instructs the NodePort service which Pods it will expose. selector stands for label selector. Without it, your service won't do anything. Here, we're telling the service to expose all the Pods that have a label with an key app containing the whoami value, which makes our two whoami1 and whoami2 Pods exposed through this service.
Then, we have under the key type as a child key of spec. This is where we specify the type of our service. When we create ClusterIP or LoadBalancer services, we will have to update this line. Here, we're creating a NodePort service, so that's fine for us.
The last thing that is quite hard to understand is that ports block. Here, we define a map of multiple port combinations. We indicated three ports, as follows:
- nodePort
- port
- targetPort
The first one is the easiest one to understand. It is basically the port on the host machine/worker node you want this NodePort service to be accessible from. Here, we're specifying port 30001, which makes this NodePort service accessible from port 30001 on the IP address of the worker node. You'll be reaching this NodePort service and the Pods it exposes by calling the following address: <WORKER_NODE_IP_ADDRESS>:30001.
This NodePort setting cannot be set arbitrarily. Indeed, on default Kubernetes installation, it can be a port from the 30000 - 32767 range.
The second port specified in YAML is just called port: this setting indicates the port of the NodePort service itself. It can be hard to understand, but NodePort services do have a port of their own too, and this is where you specify it. You can put whatever you want here if it is a valid port.
The third and last one is called targetPort. As you can imagine, targetPort is the port of the targeted Pods. It is where the application runs: the port where the NodePort will forward traffic to the Pod found by the selector mentioned previously.
Here is a quick diagram to sum all of this up:
Figure 7.5 – The three ports involved for NodePort setup—nodePort is on the worker node, port is on the service itself, whereas targetPort is on the top
That setup is complex because of the naming. Pay attention to where the three open ports sit to make sure to not confuse the three of them.
For convenience and to reduce complexity, the NodePort service port and target port (the Pods' port) are often defined to the same value.
Making sure NodePort works as expected
To try out your NodePort setup, the first thing to do is to retrieve the public IP of your machine running it. In my example, I'm running a single-machine Kubernetes setup with minikube locally. On AWS, GCP, or Azure, your worker node might have a public IP address or a private one if you access your node with a virtual private network (VPN).
Based on your setup, keep in mind that the IP address you use must be the one of the worker nodes directly.
On minikube, the easiest way to retrieve the IP address is to issue the following command:
$ minikube ip
192.168.64.2
Now that I have the IP address of my worker node, I must retrieve the worker node's port used by the NodePort service.
Now that I have all the information, I can open a web browser and enter the following URL to access the NodePort service and the Pods running. You should see the round-robin algorithm in place and reaching whoami1 and then whoami2, and so on. The NodePort service is doing its job!
Is this setup production-ready?
There's no answer to this question because it depends on your setup.
NodePort provides a way to expose Pods to the outside world by exposing them on a worker node port. With the current setup, you have no HA: if our two Pods were to fail, you have no way to relaunch them automatically, so your service won't be able to forward traffic to anything, resulting in a poor experience for your end user.
Another problem is the fact that the choice of port is limited. Indeed, by default, you are just forced to use a port in the 30000-32767 range, and as it's forced, it will be inconvenient for a lot of people. Indeed, if you want to expose an HTTP application, you'll want to use port 80 or 443 of your frontal machine and not a port for 30000-32767, because all web browsers are configured with port 80 and 443 as standard HTTP and HTTP Secure (HTTPS) ports.
The solution to this consists of using a tiered architecture. Indeed, a lot of Kubernetes architects tend to not expose a NodePort service as the first layer in an architecture but to put the Kubernetes cluster behind a reverse proxy, such as the AWS Application Load Balancer, and so on. Two other concepts of Kubernetes are Ingress and IngressController objects: these two objects allow you to configure a reverse proxy such as nginx or HAProxy directly from Kubernetes objects and help you in making your application publicly accessible as the first layer of entry to Kubernetes. But this is way beyond the scope of Kubernetes services.
Listing NodePort services
Listing NodePort services is achieved through the usage of the kubectl command-line tool. You must simply issue a kubectl get services command to fetch the services created within your cluster.
Please note that the plural form services, as well as the shorter alias svc, works too for all operations related to services. Unfortunately, there is currently no command that allows us to fetch services based on their type.
That being said, let's now discover how we can update NodePort services to have them do what we want.
Adding more Pods to NodePort services
If you want to add a Pod to the pool served by your Services, things are very easy. In fact, you just need to add a new Pod that matches the label selector defined on the Service—Kubernetes will take care of the rest. The Pod will be part of the pool served by the Service. In case you delete a Pod, it will be deleted from the pool of services as soon as it enters the Terminating state.
Kubernetes handles service traffic based on Pods' availability—for example, if you have three replicas of a web server and one goes down, creating an additional replica that matches the label selector on the service will be enough. You'll discover later in Chapter 11, Deployment – Deploying Stateless Applications, that this behavior can be entirely automated.
Describing NodePort services
Describing NodePort services is super easy and is achieved with the kubectl describe command, just as with any other Kubernetes object.
Deleting NodePort services
Deleting a service, whether it is a NodePort service or not, should not be done recurrently. Indeed, whereas Pods are supposed to be easy to delete and recreate, services are supposed to be for the long term. Indeed, they provide a consistent way to expose your Pod, and deleting them will impact how your applications can be reached.
Therefore, you should be careful when deleting services: it won't delete the Pods behind it, but they won't be accessible anymore!
Here is the command to delete the service created to expose the whoami1 and whoami2 Pods:
$ kubectl delete svc/nodeport-whoami
deleted
You can run a kubectl get svc command now to check that the service was properly destroyed, and then access it once more through the web browser by refreshing it. You'll notice that the application is not reachable anymore, but the Pods will remain on the cluster. Pods and services have completely independent life cycles. If you want to delete Pods, then you'll need to delete them separately.
You probably remember the kubectl port-forward command we already used when we created an nginx Pod and tested it to display the home page. You may think NodePort and kubectl port-forward are the same thing, but they are not. Let's explain quickly the difference between the two.
NodePort or kubectl port-forward?
It might be tempting to compare NodePort services with the kubectl port-forward command because so far, we used these two methods to access a running Pod in our cluster using a web browser. But still, these two methods are completely different things—they have nothing to do one with another and shouldn't be confused.
The kubectl port-forward command is a testing tool, whereas NodePort services are for real use cases and are a production-ready feature.
Keep in mind that kubectl port-forward must be kept open in your terminal session for it to work. As soon as the command is killed, the port forwarding is stopped too, and your application becomes inaccessible from outside the cluster once more. It is only a testing tool meant to be used by the kubectl user and is just one of the useful tools bundled into the kubectl CLI.
NodePort, on the other hand, is really meant for production use and is a long-term production-ready solution. It doesn't require kubectl to work and makes your application accessible to anyone calling the service, provided the service is properly configured and Pods correctly labeled.
Simply put: if you just need to test your app, go for kubectl port-forward. If you need to expose your Pod to the outside world for real, go for NodePort. Don't create NodePort for testing, and don't try to use kubectl port-forward for production! Stick with one tool for each use case!
Now, we will discover another type of Kubernetes service called ClusterIP. This one is probably the most used of them all, even more than the NodePort type!
The ClusterIP service
We're now going to discover another type of service called ClusterIP.
ClusterIP is, in fact, the simplest type of service Kubernetes provides. With a ClusterIP service, you can expose your Pod so that other Pods in Kubernetes can communicate with it via its IP address or DNS name.
Why do you need ClusterIP services?
The ClusterIP service type greatly resembles the NodePort service type, but they have one big difference: NodePort services are meant to expose Pods to the outside world, whereas ClusterIP services are meant to expose Pods to other Pods inside the Kubernetes cluster.
Indeed, ClusterIP services are the services that allow different Pods in the same cluster to communicate with each other through a static interface: the ClusterIP Service object itself.
ClusterIP answers the exact same need for static DNS name or IP address we had with the NodePort service: if a Pod fails, is recreated, deleted, relaunched, and so on, then Kubernetes will assign it another IP address. ClusterIP services are here to remediate this issue, by providing an internal DNS name only accessible from within your cluster that will resolve to the Pods defined by the label selector.
As the name ClusterIP suggests, this service grants a static IP within the cluster! Let's now discover how to expose our Pods using ClusterIP! Keep in mind that ClusterIP services are not accessible from outside the cluster—they are only meant for inter-Pod communication.
How do I know if I need NodePort or ClusterIP services to expose my Pods?
Choosing between the two types of services is extremely simple, basically because they are not meant for the same thing.
If you need your app to be accessible from outside the cluster, then you'll need a NodePort service, but if you need your app to be accessible from inside the cluster, then you'll need a ClusterIP service. It's as simple as that! ClusterIP services are also good for stateless applications that can be scaled, destroyed, recreated, and so on. The reason is that the ClusterIP service will maintain a static entry point to a whole pool of Pods without being constrained by a port on the worker node, unlike the NodePort service.
Contrary to NodePort services, ClusterIP services will not take one port of the worker node, and thus it is impossible to reach it from outside the Kubernetes cluster.
Keep in mind that nothing prevents you from using both types of services for the same pool of Pods. Indeed, if you have an app, that should be publicly accessible, but also privately exposed to other Pods, then you can simply create two services, one NodePort service and one ClusterIP service.
In this specific use case, you'll simply have to name the two services differently so that they won't conflict when creating them against kube-apiserver. Nothing else prevents you from doing so!
Listing ClusterIP services
Listing ClusterIP services is easy. It's basically the same command as the one used for NodePort services. Here is the command to run:
$ kubectl get svc
As always, this command lists the services with their type added to the output.
Creating ClusterIP services using the imperative way
Creating ClusterIP services can be achieved with a lot of different methods. Since it is an extremely used feature, there are lots of ways to create these, as follows:
- Using the --expose parameter (the imperative way)
- Using a YAML manifest file (the declarative way)
The imperative way consists of using the –expose method. This will create a ClusterIP service directly from a kubectl run command, for example. In the following example, I will create an nginx-clusterip Pod as well as a ClusterIP Pod to expose them both at the same time. Using the –expose parameter will also require defining a ClusterIP port. ClusterIP will listen to make the Pod reachable. The code is illustrated here:
$ kubectl run nginx-clusterip --image nginx --expose --port 80
service/nginx-clusterip created
pod/nginx-clusterip created
As you can see, I get both a Pod and a service to expose it. Let's describe the service.
Describing ClusterIP services
Describing ClusterIP services is the same process as describing any type of object in Kubernetes and is achieved using the kubectl describe command. You just need to know the name of the service to describe to achieve that.
Here, I'm going to the ClusterIP service created previously:
$ kubectl describe svc/nginx-clusterip
Name: nginx-clusterip
Namespace: default
Labels: <none>
Annotations: <none>
Selector: run=nginx-clusterip
Type: ClusterIP
IP Family Policy: SingleStack
IP Families: IPv4
IP: 10.96.89.255
IPs: 10.96.89.255
Port: <unset> 80/TCP
TargetPort: 80/TCP
Endpoints: 10.244.120.79:80
Session Affinity: None
Events: <none>
What I really like here is that the output of this command shows us the Selector block, which shows that the ClusterIP service was created by the --expose parameter with the proper label configured. This label matches the nginx-clusterip Pod we created at the same time. To be sure about that, let's display the labels of the said Pod, as follows:
$ kubectl get pods/nginx-clusterip --show-labels
NAME READY STATUS RESTARTS AGE LABELS
nginx-clusterip 1/1 Running 0 4m1s run=nginx-clusterip
As you can see, the selector on the service matches the labels defined on the Pod. Communication is thus established between the two. I'll now call the ClusterIP service directly from another Pod on my cluster.
Since my ClusterIP service is named nginx-clusterip, I know that it is reachable at this address: nginx-clusterip.default.svc.cluster.local.
Let's reuse the dnsutils container, as follows:
$ kubectl exec -ti dnsutils -- wget nginx.default.svc.cluster.local
Connecting to nginx.default.svc.cluster.local (10.98.191.187:80)
index.html 100% |*******************************| 615 0:00:00 ETA
Using the wget command, we have downloaded the index.html file properly. I can now display its content using cat, as follows:
$ kubectl exec -ti dnsutils -- cat index.html
<html>
<head>
<title>Welcome to nginx!</title>
<style>
html { color-scheme: light dark; }
body { width: 35em; margin: 0 auto;
font-family: Tahoma, Verdana, Arial, sans-serif; }
</style>
</head>
<body>
<h1>Welcome to nginx!</h1>
Looks good! The ClusterIP service correctly forwarded my request to the nginx Pod, and I do have the nginx default home page. The service is working!
We did not use containous/whoami as a web service this time, but keep in mind that the ClusterIP service is also doing load balancing internally following the round robin algorithm. If you have 10 Pods behind a ClusterIP service and your service received 1,000 requests, then each Pod is going to receive 100 requests.
Let's now discover how to create a ClusterIP service using YAML.
Creating ClusterIP services using the declarative way
ClusterIP services can also be created using the declarative way by applying YAML configuration files against kube-apiserver.
Here's a YAML manifest file we can use to create the exact same ClusterIP service we created before using the imperative way:
# ~/clusterip-service.yaml
apiVersion: v1
kind: Service
metadata:
name: nginx-clusterip
spec:
type: ClusterIP # Indicates that the service is a ClusterIP
ports:
- port: 80 # The port exposed by the service
protocol: TCP
targetPort: 80 # The destination port on the pods
selector:
run: nginx-clusterip
Take some time to read the comments in the YAML, especially the port and targetPort ones.
Indeed, ClusterIP services have their own port independent of the one exposed on the Pod side. You reach the ClusterIP service by calling its DNS name and its port, and the traffic is going to be forwarded to the destination port on the Pods matching the labels and selectors.
Keep in mind that no worker node port is involved here. The ports we are mentioning when it comes to ClusterIP scenarios have absolutely nothing to do with the host machine!
Deleting ClusterIP services
Deleting ClusterIP services is the same process as deleting any type of object in Kubernetes. You just need to know the name of the service and to pass it to the kubectl delete svc command, as follows:
$ kubectl delete svc/my-service
service/my-service deleted
This way, the service gets deleted from the Kubernetes cluster. Keep in mind that deleting the cluster won't delete the Pods exposed by it. It is a different process; you'll need to delete Pods separately. We will now discover one additional resource related to ClusterIP services, which are headless services.
Understanding headless services
Headless services are derived from the ClusterIP service. They are not technically a dedicated type of service (such as NodePort), but they are an option from ClusterIP.
Headless services can be configured by setting the .spec.clusterIP option to None in a YAML configuration file for the ClusterIP service. Here is an example derived from our YAML file previously:
# ~/clusterip-headless.yaml
apiVersion: v1
kind: Service
metadata:
name: nginx-clusterip-headless
spec:
clusterIP: None
type: ClusterIP # Indicates that the service is a ClusterIP
ports:
- port: 80 # The port exposed by the service
protocol: TCP
targetPort: 80 # The destination port on the pods
selector:
run: nginx-clusterip
A headless service roughly consists of a ClusterIP service without load balancing and without a pre-allocated ClusterIP address. Thus, the load-balancing logic and the interfacing with the Pod are not defined by Kubernetes.
Since a headless service has no IP, you are going to reach the Pod behind it directly, without the proxying and the load-balancing logic. What the headless service does is return you the DNS names of the Pods behind it so that you can reach them directly. There is still a little load-balancing logic here, but it is implemented at the DNS level, not as a Kubernetes logic.
When you use a normal ClusterIP service, you'll always reach one static IP address allocated to the service and this is going to be your proxy to communicate with the Pod behind it. With a headless service, the ClusterIP service will just return the DNS names of the Pods behind it and the client will have the responsibility to establish a connection with the DNS name of its choosing.
It can be hard to think of a concrete use case for this, and honestly, headless services are not used as much as normal ClusterIP services. They are still helpful when you want to build connectivity with clustered stateful services such as Lightweight Directory Access Protocol (LDAP). In that case, you may want to use an LDAP client that will have access to the different DNS names of the Pods hosting the LDAP server, and this can't be done with a normal ClusterIP service since it will bring both a static IP and Kubernetes' implementation of load balancing. That's the kind of scenario when headless services are helpful.
Let's now briefly introduce another type of service called LoadBalancer.
The LoadBalancer service
LoadBalancer services are a very interesting service to explain because this service relies on the cloud platform where the Kubernetes cluster is provisioned. For it to work, it is thus required to use Kubernetes on a cloud platform that supports the LoadBalancer service type.
Explaining the LoadBalancer services
Not all cloud providers support the LoadBalancer service type, but we can name a few that do support it, as follows:
- AWS
- GCP
- Azure
- OpenStack
The list is not exhaustive, but it's good to know that all three major public cloud providers are supported.
If your cloud provider is supported, keep in mind that the load-balancing logic will be the one implemented by the cloud provider: you cannot control how the traffic will be routed to your Pods from Kubernetes; you will have to know how the load-balancer component of your cloud provider works. Consider it as a third-party component implemented as a Kubernetes kind.
Should I use the LoadBalancer service type?
This question is difficult to answer but a lot of people tend to not use a LoadBalancer service type for a few reasons.
The main reason is that LoadBalancer services are near impossible to configure from Kubernetes. Indeed, if you must use a cloud provider, it is better to configure it from the tooling provided by the provider rather than from Kubernetes.
The LoadBalancer service type is a generic way to provision a LoadBalancer service but does not expose all the advanced features that the cloud provider may provide. Let's take the example of AWS. This cloud provider has three LoadBalancer components, as follows:
- Classic Load Balancer
- Application Load Balancer
- Network Load Balancer
All these three offerings differ. Their usage, configurations, and behaviors are not the same from one to another. The LoadBalancer service type, when used on an AWS-backed Kubernetes cluster, will create a Classic Load Balancer: you have no way to create an Application Load Balancer or a Network Load Balancer from the Kubernetes Service object.
Just to Say
A lot of configurations are hidden, and you won't have access to all the features your cloud provider offers. That's why you should avoid using the LoadBalancer service and stick to different tooling such as Terraform or the CLI.
Implementing ReadinessProbe
ReadinessProbe, along with LivenessProbe, is an important aspect to master if you want to provide the best possible experience to your end user. We will first discover how to implement ReadinessProbe and how it can help you to ensure your containers are fully ready to serve traffic.
Why do you need ReadinessProbe?
Readiness probes are technically not part of services, but I think it is important to discover this feature alongside Kubernetes services.
Just as with everything in Kubernetes, ReadinessProbe was implemented to bring a solution to a problem. This problem is this: how to ensure a Pod is fully ready before it can receive traffic, possibly from a service?
Indeed, Services obey a simple rule: they serve traffic to every Pod that matches their label selector. As soon as a Pod gets provisioned, if this pod's labels match the selector of a service in your cluster, then this service will immediately start forwarding traffic to it. This can lead to a simple problem: if the app is not fully launched, because it has a slow launch process or requires some configuration from a remote API, and so on, then it might receive traffic from services before being ready for it. The result would be a poor user experience (UX).
To make sure this scenario never happens, we can use what we call a readiness probe, which is an additional configuration to add to Pods' configuration.
When a Pod is configured with a readiness probe, it can send a signal to the control plane that it is not ready to receive traffic, and when a Pod is not ready, services won't forward any traffic to it. Let's see how we can implement a readiness probe.
Implementing ReadinessProbe
ReadinessProbe implementation is achieved by adding some configuration data to a Pod YAML manifest. It has nothing to do with the Service object itself. By adding some configuration to the container spec in the Pod object, you can basically tell Kubernetes to wait for the Pod to be fully ready before it can receive traffic from services.
ReadinessProbe can be of three different types, as outlined here:
- Command—You issue a command that should complete with exit code 0, indicating the Pod is ready.
- HTTP—You issue an HTTP request that should complete with a response code >= 200 and < 400, which indicates the Pod is ready.
- TCP—You issue a TCP connection attempt. If the connection is established, the Pod is ready.
Here is a YAML file configuring a nginx Pod with a readiness probe of type HTTP:
# ~/nginx-pod-with-readiness-http.yaml # ~/nginx-pod-with-readiness-http.yaml
apiVersion: v1
kind: Pod
metadata:
name: nginx-pod-with-readiness-http
spec:
containers:
- name: nginx-pod-with-readiness-http
image: nginx
readinessProbe:
initialDelaySeconds: 5
periodSeconds: 5
httpGet:
path: /ready
port: 80
As you can see, we have two important inputs under the readinessProbe key, as follows:
- initialDelaySeconds, which indicates the number of seconds the probe will wait before running the first health check.
- periodSeconds, which indicates the number of seconds the probe will wait between two consecutive health checks.
Indeed, the readiness probe will be replayed regularly, and the interval between two checks will be defined by the periodSeconds parameter.
In our case, our ReadinessProbe will run an HTTP call against the /ready path. If this request receives an HTTP response code >= 200 and < 400, then the probe will be a success and the Pod will be considered healthy.
ReadinessProbe is important. In our example, the endpoint being called should really test that the application is really in such a state that it can receive traffic. So, try to call an endpoint that is relevant to the state of the actual application. For example, you can try to call a page that will open a MySQL connection internally to make sure the application is capable of communicating with its database if it is using one, and so on. If you're a developer, do not hesitate to create a dedicated endpoint that will just open connections to the different backends to be fully sure that the application is ready for real.
The Pod will then join the pool being served by the service and will start receiving traffic. ReadinessProbe can also be configured as TCP and commands, but we will keep these examples for LivenessProbe. Let's discover them now!
What is LivenessProbe and why do you need it?
LivenessProbe resembles ReadinessProbe a lot. In fact, if you already used some cloud providers before, you might already have heard about something called health checks. So, in other words, LivenessProbe is basically a health check.
Basically, liveness probes are used to determine whether a Pod is in a broken state or not, and the usage of LivenessProbe is especially suited for long-running processes such as web services. Indeed, imagine a situation where you have a service forwarding traffic to three Pods and one of them is broken. Services cannot detect that on their own, and they will just continue to serve traffic to the three Pods, including the broken one. In such situations, 33% of your request will inevitably lead to an error response, resulting in a poor UX, as illustrated in the following screenshot:
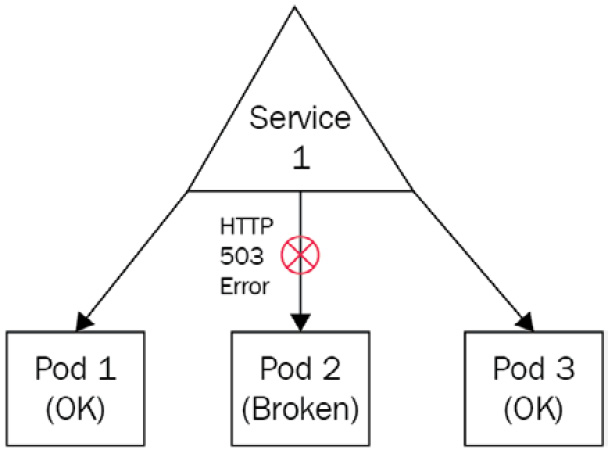
Figure 7.6 – One of the Pods is broken but the service will still forward traffic to it
You want to avoid such situations, and to do that, you need a way to detect situations where Pods are broken, plus a way to kill such a container so that it goes out of the pool of Pods being targeted by the service.
LivenessProbe is the solution to this problem and is implemented at the Pod level. Be careful because LivenessProbe cannot repair a Pod: it can only detect that a Pod is not healthy and command its termination. Let's see how we can implement a Pod with LivenessProbe.
Implementing LivenessProbe
LivenessProbe is a health check that will be executed on a regular schedule to keep track of the application state in the long run. These health checks are executed by the kubelet component and can be of three types, as outlined here:
- Command, where you issue a command in the container and its result will tell whether the Pod is healthy or not (exit code = 0 means healthy)
- HTTP, where you run an HTTP request against the Pod, and its result tells whether the Pod is healthy or not (HTTP response code >= 200 and < 400 means the Pod is healthy)
- TCP, where you define a TCP call (a successful connection means the Pod is healthy)
Each of these three liveness probes will require you to input a parameter called periodSeconds, which must be an integer. This will tell the kubelet component the number of seconds to wait before performing a new health check. You can also use another parameter called initialDelaySeconds, which will indicate the number of seconds to wait before performing the very first health check. Indeed, in some common situations, a health check might lead to flagging an application as unhealthy just because it was performed too early. That's why it might be a good idea to wait a little bit before performing the first health check, and that parameter is here to help.
LivenessProbe configuration is achieved at the Pod YAML configuration manifest, not at the service one. Each container in the Pod can have its own livenessProbe.
Here is a configuration file that checks if a Pod is healthy by running an HTTP call against a /healthcheck endpoint in an nginx container:
# ~/nginx-pod-with-liveness-http.yaml
apiVersion: v1
kind: Pod
metadata:
name: nginx-pod-with-liveness-http
spec:
containers:
- name: nginx-pod-with-liveness-http
image: nginx
livenessProbe:
initialDelaySeconds: 5
periodSeconds: 5
httpGet:
path: /healthcheck
port: 80
httpHeaders:
- name: My-Custom-Header
value: My-Custom-Header-Value
Please pay attention to all sections after the livenessProbe blocks. If you understand this well, you can see that we will wait 5 seconds before performing the first health check, and then, we will run one HTTP call against the /healthcheck path on port 80 every 5 seconds. One custom HTTP header was added. Adding such a header will be useful to identify our health checks in the access logs. Be careful because the /healthcheck path probably won't exist in our nginx container and thus, this container will never be considered healthy because the liveness probe will result in a 404 HTTP response. Keep in mind that for an HTTP health check to succeed, it must answer an HTTP >= 200 and < 400. 404 being out of this range, the answer Pod won't be healthy.
You can also use a command to check if a Pod is healthy or not. Let's grab the same YAML configuration, but now, we will use a command instead of an HTTP call in the liveness probe, as follows:
# ~/nginx-pod-with-liveness-command.yaml
apiVersion: v1
kind: Pod
metadata:
name: nginx-pod-with-liveness-command
spec:
containers:
- name: nginx-pod-with-liveness-command
image: nginx
livenessProbe:
initialDelaySeconds: 5
periodSeconds: 5
exec:
command:
- cat
- /hello/world
If you check this example, you can see that this one is much simpler than the HTTP one. Here, we are basically running a cat /hello/world command every 5 seconds. If the file exists and the cat command completes with an exit code equal to 0, then the health check will succeed. Otherwise, if the file is not present, the health check will fail, and the Pod will never be considered healthy and will be terminated.
We will now complete this section by discovering one last example with a TCP livenessProbe. In this situation, we will attempt a connection to a TCP socket on port 80. If the connection is successfully established, then the health check will pass, and the container will be considered ready. Otherwise, the health check will fail, and the Pod will be terminated eventually. The code is illustrated in the following snippet:
# ~/nginx-pod-with-liveness-tcp.yaml
apiVersion: v1
kind: Pod
metadata:
name: nginx-pod-with-liveness-tcp
spec:
containers:
- name: nginx-pod-with-liveness-tcp
image: nginx
livenessProbe:
initialDelaySeconds: 5
periodSeconds: 5
tcpSocket:
port: 80
Using TCP health checks greatly resembles HTTP ones since HTTP is based on TCP anyway. But having TCP as a liveness probe is nice especially if you want to keep track of an application that is not based on using HTTP as protocol and using that command is irrelevant to you, such as health-checking an LDAP connection, for example.
Using ReadinessProbe and LivenessProbe together
You can use ReadinessProbe and LivenessProbe together in the same Pod. There is nothing wrong with that since ReadinessProbe is here for you to prevent a Pod from joining a service before being ready to serve traffic, and LivenessProbe is here to kill a Pod that has become unhealthy.
So, they are configured almost the same way—they don't have the exact same purpose, and it is fine to use them together. Please note that both probes share these parameters:
- initialDelaySeconds: The number of seconds to wait before the first probe execution
- periodSeocnds: The number of seconds between two probes
- timeoutSeconds: The number of seconds to wait before timeout
- successThreshold: The number of successful attempts to consider a Pod is ready (for ReadinessProbe) or healthy (for LivenessProbe)
- failureThreshold : The number of failed attempts to consider a Pod is not ready (for ReadinessProbe) or ready to be killed (for LivenessProbe)
We now have discovered ReadinessProbe and LivenessProbe, and we can now move on to our final section, which introduces the control of network flow in Kubernetes using the NetworkPolicy object. You will see that you can build a kind of network firewall directly in Kubernetes so that you can prevent Pods from being able to reach one another.
Securing your Pods using the NetworkPolicy object
The NetworkPolicy object is the last resource kind we need to discover as part of this chapter to have an overview of services in this chapter. NetworkPolicy will allow you to define network firewalls directly implemented in your cluster.
Why do you need NetworkPolicy?
When you have to manage a real Kubernetes workload in production, you'll have to deploy more and more applications onto it, and it is possible that these applications will have to communicate with each other.
Achieving communication between applications is really one of the fundamental objectives of a microservice architecture. Most of this communication will be done through the network, and the network is forcibly something that you want to secure by using firewalls.
Kubernetes has its own implementation of network firewalls called NetworkPolicy. This is a new resource kind we are going to discover. Say that you want one nginx resource to be accessible on port 80 from a particular IP address and to block any other traffic that doesn't match these requirements. To do that, you'll need to use NetworkPolicy and attach it to that Pod.
NetworkPolicy brings three benefits, as follows:
- You can build egress/ingress rules based on Classless Inter-Domain Routing (CIDR) blocks.
- You can build egress/ingress rules based on Pods labels and selectors (just as we've seen before with services' and Pods' association).
- You can build egress/ingress rules based on namespaces (a notion we will discover in the next chapter).
Lastly, keep in mind that for NetworkPolicy to work, you'll need to have a Kubernetes cluster with a CNI plugin installed. CNI plugins are generally not installed by default on Kubernetes. If you're using minikube, the good news is that it has an integration with Calico, which is a CNI plugin with NetworkPolicy support implemented out of the box. You just need to relaunch minikube this way:
$ minikube start --network-plugin=cni --cni=calico
If you're using Kubernetes on top of a cloud platform, I suggest you read the documentation of your cloud provider in order to verify which CNI options your cloud platform offers and whether it implements NetworkPolicy support.
Understanding Pods are not isolated by default
This is something extremely important to understand. By default, in Kubernetes, Pods are not isolated. It means that any Pod can be reached by any other Pod without any constraint.
All Pods you have deployed so far can be reached by any other Pod in the cluster. If you don't use NetworkPolicy, Pods will remain just like that: accessible by everything without any constraint. Once you attach the NetworkPolicy to a Pod, the rules described on the NetworkPolicy will be applied to the Pod.
To establish communication between two Pods associated with network policies, both sides must be open. It means Pod A must have an egress rule to Pod B, and Pod B must have an ingress rule from Pod A; otherwise, the traffic will be denied. The following screenshot illustrates this:
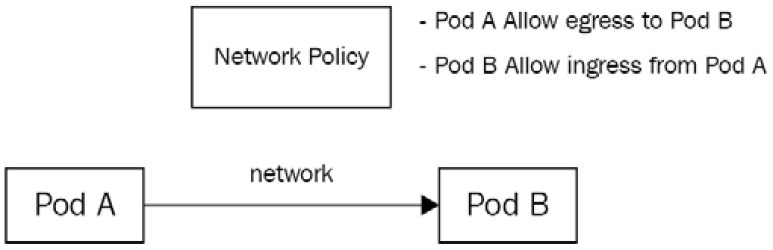
Figure 7.7 – One of the Pods is broken but the service will still forward traffic to it
Keep that in mind that you'll have to troubleshoot NetworkPolicy because it can be the root cause of a lot of issues. Let's now configure a NetworkPolicy between two Pods by using labels and selectors.
Configuring NetworkPolicy with labels and selectors
First, let's create two nginx Pods to demonstrate our example. I'll create the two Pods with two distinct labels so that they become easier to target with the NetworkPolicy, as follows:
$ kubectl run nginx-1 --image nginx --labels 'app=nginx-1'
pod/nginx-1 created
$ kubectl run nginx-2 --image nginx --labels 'app=nginx-2'
pod/nginx-2 created
$ kubectl get pods -o wide
nginx-1 1/1 Running 0 30s 172.17.0.12 minikube
nginx-2 1/1 Running 0 30s 172.17.0.13 minikube
Now that the two Pods are created with distinct labels. I could use the -o wide flag to get the IP address of both Pods. If you follow along, your IP addresses will be different. Now, I can run a curl command from the nginx-1 Pod to reach the nginx-2 Pod, to confirm that by default, network traffic is allowed because no NetworkPolicy is created at this point. The code is illustrated here:
$ kubectl exec nginx-1 -- curl 172.17.0.13
<html>
<head>
<title>Welcome to nginx!</title>
<style>
html { color-scheme: light dark; }
body { width: 35em; margin: 0 auto;
font-family: Tahoma, Verdana, Arial, sans-serif; }
</style>
</head>
<body>
<h1>Welcome to nginx!</h1>
…
As you can see, I correctly receive the nginx home page from the nginx-2 Pod. Now, I'll add NetworkPolicy to nginx-2 to explicitly allow traffic coming from nginx-1. Here is how to proceed with the YAML code:
# ~/nginx-2-networkpolicy.yaml
apiVersion: networking.k8s.io/v1
kind: NetworkPolicy
metadata:
name: nginx-2-networkpolicy
spec:
podSelector:
matchLabels:
app: nginx-2 # Applies to which pod
policyTypes:
- Ingress
ingress:
- from:
- podSelector:
matchLabels:
app: nginx-1 # Allows calls from which pod
ports:
- protocol: TCP
port: 80
Let's apply this NetworkPolicy, as follows:
$ kubectl create -f nginx-2-networkpolicy.yaml
networkpolicy.networking.k8s.io/nginx-2-networkpolicy created
Now, let's run the same curl command we did before, as follows:
$ kubectl exec nginx-1 -- curl 172.17.0.13
<html>
<head>
<title>Welcome to nginx!</title>
<style>
html { color-scheme: light dark; }
body { width: 35em; margin: 0 auto;
font-family: Tahoma, Verdana, Arial, sans-serif; }
</style>
</head>
<body>
<h1>Welcome to nginx!</h1>
…
As you can see, it works just like it did before. Why? For the following two reasons:
- nginx-2 now explicitly allows ingress traffic on port 80 from nginx-1; everything else is denied.
- nginx-1 has no NetworkPolicy, and thus, egress traffic to everything is allowed for it.
Keep in mind that if no NetworkPolicy is set on the Pod, the default behavior applies—everything is allowed for the Pod. Now, let's update the NetworkPolicy attached to the Pod to change the allowed port from 80 to 8080 by updating the file and applying it against the cluster, as follows:
$ kubectl apply -f nginx-2-networkpolicy.yaml
networkpolicy.networking.k8s.io/nginx-2-networkpolicy configured
Now, let's run the curl command from the nginx-1 Pod once more, as follows:
$ kubectl exec nginx-1 -- curl 172.17.0.13:80
curl: (28) Failed to connect to 10.244.120.77 port 80: Connection timed out
command terminated with exit code 28
As you can see, the curl command failed with a timeout. The reason is that the traffic is blocked by the NetworkPolicy, and thus, the curl command never reaches the nginx-2 Pod.
Again, there are two reasons for that, as outlined here:
- There is still no NetworkPolicy set to the nginx-1 Pod, so egress is opened.
- We have a NetworkPolicy on the nginx-2 Pod, allowing ingress traffic on port 8080 from Pod nginx-1.
Since curl is trying to reach the nginx-2 Pod on port 80, the traffic is blocked. Let's now try to run curl to make a call against port 8080, which is the one allowed by the NetworkPolicy, to see what happens. Here's the code we need to execute:
$ kubectl exec nginx-1 -- curl 172.17.0.13:8080
curl: (7) Failed to connect to 172.17.0.13 port 8080: Connection refused
command terminated with exit code 7
As you can see, no timeout this time. The traffic reaches the nginx-2 Pod, but since nothing is listening on port 8080 on nginx-2, then we have a Connection refused error.
I strongly encourage you to take the habit of using NetworkPolicy along with your Pod. Lastly, please be aware that NetworkPolicy can also be used to build firewalls based on CIDR blocks. It might be useful especially if your Pods are called from outside the cluster. Otherwise, when you need to configure firewalls between Pods, it is recommended to proceed with labels and selectors as you already did with the services' configuration.
Summary
This chapter was dense and contained a huge amount of information on networking in general when applied to Kubernetes. Services are just like Pods: they are the foundation of Kubernetes, and mastering them is crucial to being successful with the orchestrator.
Overall, in this chapter, we discovered that Pods have dynamic IP assignment, and they get a unique IP address when they're created. To establish a reliable way to connect to your Pods, you need a proxy called Service in Kubernetes. We've also discovered that Kubernetes services can be of multiple types and that each type of service is designed to address a specific need. We've also discovered what ReadinessProbe and LivenessProbe are and how they can help you in designing health checks to ensure your pods gets traffic when they are ready and live.
Lastly, we discovered how to control traffic flow between Pods by using an additional object called NetworkPolicy that behaves like a networking firewall within the cluster.
We've now discovered most of the Kubernetes fundamentals, but there are still some missing pieces that you need to discover. In the next chapter, we're going to cover another important aspect of Kubernetes called namespaces. We've already discussed them a little bit during this chapter, and if you've read it carefully, you should be aware that up to now, we have somehow used a namespace called default.