Chapter 10: Running Production-Grade Kubernetes Workloads
In the previous chapters, we have focused on containerization concepts and the fundamental Kubernetes building blocks, such as Pods, Jobs, and ConfigMaps. Our journey so far has covered mostly single-machine scenarios, where the application requires only one container host or Kubernetes Node. For production-grade Kubernetes container workloads, you have to consider different aspects, such as scalability, high availability (HA), and load balancing, and this always requires orchestrating containers running on multiple hosts.
Briefly, container orchestration is a way of managing multiple containers' life cycles in large, dynamic environments—this can range from provisioning and deploying containers to managing networks, providing redundancy and HA of containers, automatically scaling up and down container instances, automated health checks, and telemetry (log and metrics) gathering. Solving the problem of efficient container orchestration at cloud scale is not straightforward—this is why Kubernetes exists!
In this chapter, we will cover the following topics:
- Ensuring HA and fault tolerance (FT) on Kubernetes
- What is ReplicationController?
- What is ReplicaSet and how does it differ from ReplicationController?
Technical requirements
For this chapter, you will need the following:
- A Kubernetes cluster deployed. You can use either a local or a cloud-based cluster, but in order to fully understand the concepts, we recommend using a multi-node, cloud-based Kubernetes cluster.
- The Kubernetes command-line interface (CLI) (kubectl) installed on your local machine and configured to manage your Kubernetes cluster.
Kubernetes cluster deployment (local and cloud-based) and kubectl installation have been covered in Chapter 3, Installing Your First Kubernetes Cluster.
You can download the latest code samples for this chapter from the official GitHub repository at https://github.com/PacktPublishing/The-Kubernetes-Bible/tree/master/Chapter10.
Ensuring HA and FT on Kubernetes
First, let's quickly recap on how we define HA and FT and how they differ. These are key concepts in cloud applications that describe the ability of a system or a solution to be continuously operational for a desirably long length of time. From a system end user perspective, the aspect of availability, alongside data consistency, is usually the most important requirement.
High Availability
In short, the term availability in systems engineering describes the percentage of time when the system is fully functional and operation for the end user. In other words, it is a measure of system uptime divided by the sum of uptime and downtime (which is basically total time). For example, if, in the last 30 days (720 hours), your cloud application had 1 hour of unplanned maintenance and was not available to the end user, it means that the availability measure of your application is ![]() . Usually, to simplify the notation when designing systems, the availability will be expressed in so-called nines: for example, if we say that a system has availability of five nines, it means it is available at least 99.999% of the total time. To put this into perspective, such a system can have only up to 26 seconds per month of downtime! These measures are often the base indicators for defining service-level agreements (SLAs) for billed cloud services.
. Usually, to simplify the notation when designing systems, the availability will be expressed in so-called nines: for example, if we say that a system has availability of five nines, it means it is available at least 99.999% of the total time. To put this into perspective, such a system can have only up to 26 seconds per month of downtime! These measures are often the base indicators for defining service-level agreements (SLAs) for billed cloud services.
The definition of HA, based on that, is relatively straightforward, although not precise— a system is highly available if it is operational (available) without interruption for long periods of time. Usually, we can say that five nines availability is considered the gold standard of HA.
Achieving HA in your system usually involves one or a combination of the following techniques:
- Eliminating single points of failure (SPOF) in the system: Usually achieved by components' redundancy.
- Failover setup, which is a mechanism that can automatically switch from the currently active (possibly unhealthy) component to a redundant one.
- Load balancing, which means managing traffic coming into the system and routing it to redundant components that can serve the traffic. This will, in most cases, involve proper failover setup and component monitoring and telemetry.
Let's introduce a related concept of FT, which is also important in distributed systems such as applications running on Kubernetes.
Fault Tolerance
Now, FT can be presented as a complement to the HA concept: a system is fault-tolerant if it can continue to be functional and operating in the event of the failure of one or more of its components. Achieving full FT means achieving 100% HA, which in many cases requires complex solutions actively detecting faults and remediating the issues in the components without interruptions. Depending on the implementation, the fault may result in a graceful degradation of performance that is proportional to the severity of the fault. This means that a small fault in the system will have a small impact on the overall performance of the system while serving requests from the end user.
HA and FT for Kubernetes applications
In the previous chapters, you have learned about the concept of Pods and how you can expose them to external traffic using Services (Chapter 7, Exposing Your Pods with Services). Services are Kubernetes objects that expose a set of healthy Pods using a single network address that remains fixed and stable for the lifetime of the Service. Internally, inside the Kubernetes cluster, the Service will make its Pods addressable using a cluster Internet Protocol (IP) address. These cluster-internal IP addresses are virtual IPs managed by a kube-proxy component on each node as a set of iptables rules on Linux Nodes or Host Networking Service (HNS) policies on Windows Nodes. Externally, there are multiple approaches offered by Kubernetes that are described in Chapter 7, Exposing Your Pods with Services, but in cloud environments, you will most often expose a service behind a cloud load balancer (LB). An external LB integrates with your cluster using a plugin implementation specific to each cloud service provider, in the Kubernetes cloud-controller-manager component. In this way, the microservices or workloads running on Kubernetes can achieve request load balancing to healthy Pods, which is a necessary building block to HA.
Services are required for load balancing requests to Pods, but we haven't yet covered how to maintain multiple replicas of the same Pod object definition that are possibly redundant and allocated on different nodes. Kubernetes offers multiple building blocks to achieve this goal, outlined as follows:
- A ReplicationController object—the original form of defining Pod replication in Kubernetes.
- A ReplicaSet object—the successor to ReplicationController. The main difference is that ReplicaSet has support for set-based requirement selectors for Pods.
- A Deployment object—another level of abstraction on top of ReplicaSet. Provides declarative updates for Pods and ReplicaSets, including rollouts and rollbacks. Used for managing stateless microservices and workloads.
- A StatefulSet object—similar to Deployment but used to manage stateful microservices and workloads in the cluster. Managing state inside a cluster is usually the toughest challenge to solve in distributed systems design.
- A DaemonSet object—used for running a singleton copy of a Pod on all (or some) of the nodes in the cluster. These objects are usually used for managing internal services for log aggregation or Node monitoring.
In the next sections, we will cover ReplicationController and ReplicaSets. The more advanced objects, such as Deployment, StatefulSet, and DaemonSet, will be covered in the next chapters.
Important note
This chapter covers HA and FT for Kubernetes workloads and applications. If you are interested in how to ensure HA and FT for Kubernetes itself, please refer to the official documentation at https://kubernetes.io/docs/tasks/administer-cluster/highly-available-master/. Please note that in managed Kubernetes offerings in the cloud, such as Azure Kubernetes Service (AKS), Amazon Elastic Kubernetes Service (EKS), or Google Kubernetes Engine (GKE), you are provided with highly available clusters and you do not need to manage the master nodes yourself.
What is ReplicationController?
Achieving HA and FT requires providing redundancy of components and proper load balancing of incoming traffic between the replicas of components. Let's take a look at the first Kubernetes object that allows you to create and maintain multiple replicas of the Pods in your cluster: ReplicationController. Please note that we are discussing ReplicationController mainly for historical reasons as it was the initial way of creating multiple Pod replicas in Kubernetes. We advise you to use ReplicaSet whenever possible, which is basically the next generation of ReplicationController with an extended specification API.
Tip
The Controller objects in Kubernetes have one main goal: to observe the current and the desired cluster state that is exposed by the Kubernetes API server and command changes that attempt to change the current state to the desired one. They serve as continuous feedback loops, doing all they can to bring clusters to the desired state described by your object templates.
ReplicationController has a straightforward task—it needs to ensure that a specified number of Pod replicas (defined by a template) are running and healthy in a cluster at any time. This means that if ReplicationController is configured to maintain three replicas of a given Pod, it will try to keep exactly three Pods by creating and terminating Pods when needed. For example, right after you create a ReplicationController object, it will create three new Pods based on its template definition. If, for some reason, there are four such Pods in the cluster, ReplicationController will terminate one Pod, and if by any chance a Pod gets deleted or becomes unhealthy, it will be replaced by a new, hopefully healthy, one.
Tip
You can think of ReplicationController as a container analog of process or service supervisors from operating systems, such as systemd or supervisor on Linux systems. You just define how many Pod replicas you want to have in the cluster, and let the ReplicationController object do the job of keeping them running in all circumstances!
Creating a ReplicationController object
In order to create a ReplicationController object, we will need to use declarative management of objects using the kubectl command. Imperative commands for creating ReplicationController objects are not available and even if they were, it would be not advised to use them—declarative management using YAML files (manifests) for object configuration is much easier for more complex Kubernetes objects. Additionally, it perfectly fits all recommended paradigms such as Infrastructure-as-Code (IaC).
Let's first create an example YAML manifest file for our example ReplicationController object. This ReplicationController object will have a simple task: maintain three replicas of an nginx Pod with specific metadata labels. The nginx-replicationcontroller.yaml example file should have the following content:
apiVersion: v1
kind: ReplicationController
metadata:
name: nginx-replicationcontroller-example
spec:
replicas: 3
selector:
app: nginx
environment: test
template:
metadata:
labels:
app: nginx
environment: test
spec:
containers:
- name: nginx
image: nginx:1.17
ports:
- containerPort: 80
There are three main components of the ReplicationController specification, as outlined here:
- replicas: Defines the number of Pod replicas that should run using the given template and matching label selector. Pods may be created or deleted in order to maintain the required number.
- selector: A label selector, which defines how to identify Pods that the ReplicationController object owns or acquires. Note that this may have a consequence of acquiring existing bare Pods by ReplicationController if they match the selector! By bare Pods, we mean any Pods in the cluster that were created directly using the kubectl run command.
- template: Defines the template for Pod creation—this has exactly the same structure as you have already learned about in Chapter 4, Running Your Docker Containers. Labels used in metadata must match selector.
Now, let's apply the ReplicationController manifest to the cluster using the kubectl apply command, as follows:
$ kubectl apply -f ./nginx-replicationcontroller.yaml
You can immediately observe the status of your new ReplicationController object named nginx-replicationcontroller-example using the following command:
$ kubectl get replicationcontroller/nginx-replicationcontroller-example
NAME DESIRED CURRENT READY AGE
nginx-replicationcontroller-example 3 3 2 8s
Tip
When using the kubectl commands, you can use the rc abbreviation instead of typing replicationcontroller.
As you can see, the ReplicationController object has already created three Pods, and two of them are already in a Ready state.
Similarly, you can describe the state of your ReplicationController object to get more details by using the kubectl describe command, as follows:
$ kubectl describe rc/nginx-replicationcontroller-example
And if you would like to get the Pods in your cluster, use the following command:
$ kubectl get pods
NAME READY STATUS ...
nginx-replicationcontroller-example-btz5t 1/1 Running ...
nginx-replicationcontroller-example-c6sl6 1/1 Running ...
nginx-replicationcontroller-example-xxl7f 1/1 Running ...
You will see that the ReplicationController object has indeed created three new Pods. If you are interested, you can use the kubectl describe pod <podId> command in order to inspect the labels of the Pods and also see that it contains a Controlled By: ReplicationController/nginx-replicationcontroller-example property that identifies our example ReplicationController object.
Tip
If you would like to know how the Pods are distributed among the Kubernetes Nodes, you can use the kubectl get pods -o wide command.
Testing the behavior of ReplicationController
To demonstrate the agility of our ReplicationController object, let's now delete one of the Pods that are owned by the example ReplicationController object. You can find the names using the usual kubectl get pods command. In our case, we will be deleting the nginx-replicationcontroller-example-btz5t Pod using the following kubectl delete command:
$ kubectl delete pod/nginx-replicationcontroller-example-btz5t
Now, if you are quick enough, you will be able to see from using the kubectl get pods command that the nginx-replicationcontroller-example-btz5t Pod is being terminated and ReplicationController is immediately creating a new one in order to match the target number of replicas!
If you want to see more details about events that happened in relation to our example ReplicationController object, you can use the kubectl describe command, as illustrated in the following code snippet:
$ kubectl describe rc/nginx-replicationcontroller-example
...
Type Reason Age From Message
---- ------ ---- ---- -------
Normal SuccessfulCreate 33m replication-controller Created pod: nginx-replicationcontroller-example-c6sl6
Normal SuccessfulCreate 33m replication-controller Created pod: nginx-replicationcontroller-example-btz5t
Normal SuccessfulCreate 33m replication-controller Created pod: nginx-replicationcontroller-example-xxl7f
Normal SuccessfulCreate 112s replication-controller Created pod: nginx-replicationcontroller-example-gf27c
The nginx-replicationcontroller-example-gf27c Pod is a new pod that was created in place of the terminated nginx-replicationcontroller-example-btz5t Pod.
Scaling ReplicationController
It is possible to modify an existing ReplicationController object and change the replicas property in the specification to a different number. This process is called scaling—if you increase the number of replicas, you are scaling up (or, more precisely, scaling out), and if you decrease the number of replicas, you are scaling down. This is a basic building block of rolling upgrades and rollbacks—you will learn more about this in the next chapters. More generally, this is how horizontal scaling of your component (packaged as a pod) can be performed.
To illustrate how horizontal scaling of Pods works at a high level, please take a look at the following diagram:

Figure 10.1 – Horizontal scaling of Kubernetes Pods
Let's first scale up our example ReplicationController object. Open the nginx-replicationcontroller.yaml file and modify the replicas property to 5, as follows:
...
spec:
replicas: 5
...
Now, we need to declaratively apply the changes to the cluster state. Use the following kubectl apply command to do this:
$ kubectl apply -f ./nginx-replicationcontroller.yaml
To see that the number of Pods controlled by the ReplicationController object has changed, you can use the kubectl get pods or kubectl describe rc/nginx-replicationcontroller-example commands.
Tip
You can achieve similar results using the kubectl scale rc/nginx-replicationcontroller-example --replicas=5 imperative command. In general, such imperative commands are recommended only for development or learning scenarios.
Similarly, if you want to scale down, you need to open the nginx-replicationcontroller.yaml file and modify the replicas property to 2, as follows:
...
spec:
replicas: 2
...
Again, declaratively apply the changes to the cluster state. Use the following kubectl apply command to do this:
$ kubectl apply -f ./nginx-replicationcontroller.yaml
At this point, you can use the kubectl get pods or kubectl describe rc/nginx-replicationcontroller-example commands to verify that the number of Pods has been reduced to just 2.
Important note
In real-world scenarios, if you would like to roll out a new version of your component (Pod), you would need to have two ReplicationController objects (one for the old version of the component, and another one for the new version) and scale them up and down in a coordinated manner. As this process is quite complex, Kubernetes provides more advanced abstractions, such as Deployment and StatefulSet objects.
Deleting ReplicationController
Lastly, let's take a look at how you can delete a ReplicationController object. There are two possibilities, outlined as follows:
- Delete ReplicationController together with Pods that it owns—this is performed by first scaling down automatically.
- Delete ReplicationController and leave the Pods unaffected.
To delete the ReplicationController object together with Pods, you can use the regular kubectl delete command, as follows:
$ kubectl delete rc/nginx-replicationcontroller-example
You will see that the Pods will first get terminated, and then the ReplicationController object is deleted.
Now, if you would like to delete just the ReplicationController object, you need to use the --cascade=orphan option for kubectl delete, as follows:
$ kubectl delete rc/nginx-replicationcontroller-example --cascade=orphan
After this command, if you inspect which Pods are in the cluster, you will still see all the Pods that were owned by the nginx-replicationcontroller-example replication controller. These Pods can now, for example, be acquired by another ReplicationController object that has a matching label selector.
Congratulations — you have successfully created your first ReplicationController object in a Kubernetes cluster! Now, it is time to introduce a close relative of ReplicationController, called ReplicaSet.
What is ReplicaSet and how does it differ from ReplicationController?
Let's introduce another Kubernetes object: ReplicaSet. This is very closely related to ReplicationController, which we have just discussed. In fact, this is a successor to ReplicationController, which has a very similar specification API and capabilities. The purpose of ReplicaSet is also the same—it aims to maintain a fixed number of healthy, identical Pods (replicas) that fulfill certain conditions. So, again, you just specify a template for your Pod, along with appropriate label selectors and the desired number of replicas, and Kubernetes ReplicaSetController (this is the actual name of the controller responsible for maintaining ReplicaSet objects) will carry out the necessary actions to keep the Pods running.
Now, what are the differences between ReplicaSet and ReplicationController? We have summarized these here:
- Most importantly, ReplicaSet allows more advanced, set-based (inclusion, exclusion) label selectors. For example, you can easily define a selector so that it matches when a Pod has environment=test or environment=dev labels, but exclude those that have an environment=prod label. For ReplicationController, it is only possible to use simple equality-based label selectors.
- ReplicaSet is a powerful building block of other Kubernetes objects such as Deployment and HorizontalPodAutoscaler (HPA) objects. Deployment objects provide a way of declarative management of ReplicaSets, doing staged rollouts and rollbacks.
- For ReplicationController, you could achieve a similar Pod update rollout using the kubectl rolling-update imperative command. However, this command is now deprecated.
- In general, you can expect that in the future, ReplicationController will be eventually deprecated.
The bottom line—always choose ReplicaSet over ReplicationController. However, you should also remember that using bare ReplicaSets is generally not useful in production clusters, and you should use higher-level abstractions such as Deployment objects for managing ReplicaSets. We will introduce this concept in the next chapter.
Creating a ReplicaSet object
First, let's take a look at the structure of an nginx-replicaset.yaml example YAML manifest file that maintains three replicas of an nginx Pod, as follows:
apiVersion: apps/v1
kind: ReplicaSet
metadata:
name: nginx-replicaset-example
spec:
replicas: 3
selector:
matchLabels:
app: nginx
environment: test
template:
metadata:
labels:
app: nginx
environment: test
spec:
containers:
- name: nginx
image: nginx:1.17
ports:
- containerPort: 80
There are three main components of the ReplicaSet specification, as follows:
- replicas: Defines the number of Pod replicas that should run using the given template and matching label selector. Pods may be created or deleted in order to maintain the required number.
- selector: A label selector that defines how to identify Pods that the ReplicaSet object owns or acquires. Again, similar to the case of ReplicationController, please take note that this may have a consequence of existing bare Pods being acquired by ReplicaSet if they match the selector!
- template: Defines a template for Pod creation. Labels used in metadata must match the selector label query.
These concepts have been visualized in the following diagram:
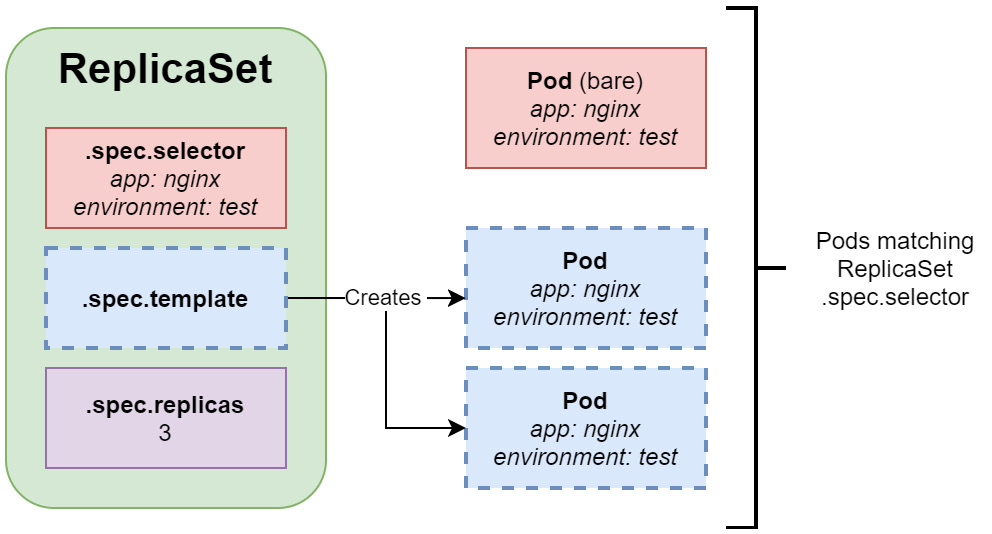
Figure 10.2 – Kubernetes ReplicaSet
As you can see, the ReplicaSet object uses .spec.template in order to create Pods. These Pods must match the label selector configured in .spec.selector. Please note that it is also possible to acquire existing bare Pods that have labels matching the ReplicaSet object. In the case shown in Figure 10.2, the ReplicaSet object only creates two new Pods, whereas the third Pod is a bare Pod that was acquired.
In the preceding example, we have used a simple, equality-based selector specified by spec.selector.matchLabels. A more advanced, set-based selector can be defined using spec.selector.matchExpressions—for example, like this:
...
spec:
replicas: 3
selector:
matchLabels:
app: nginx
matchExpressions:
- key: environment
operator: In
values:
- test
- dev
...
This specification would make ReplicaSet still match only Pods with app=nginx, and environment=test or environment=dev.
Important note
When defining ReplicaSet, .spec.template.metadata.labels must match spec.selector, or it will be rejected by the API.
Now, let's apply the ReplicaSet manifest to the cluster using the kubectl apply command, as follows:
$ kubectl apply -f ./nginx-replicaset.yaml
You can immediately observe the status of your new ReplicaSet object named nginx-replicaset-example using the following command:
$ kubectl describe replicaset/nginx-replicaset-example
...
Replicas: 3 current / 3 desired
Pods Status: 3 Running / 0 Waiting / 0 Succeeded / 0 Failed
...
Similarly, as in the case of ReplicationController, you can use the kubectl get pods command to observe the Pods that are managed by the ReplicaSet object. If you are interested, you can use the kubectl describe pod <podId> command in order to inspect the labels of the Pods and also see that it contains a Controlled By: ReplicaSet/nginx-replicaset-example property that identifies our example ReplicaSet object.
Tip
When using kubectl commands, you can use an rs abbreviation instead of typing replicaset.
Testing the behavior of ReplicaSet
Just as in the previous section about ReplicationController, you can experiment with the kubectl delete pod command to observe how ReplicaSet reacts to the sudden termination of a Pod that matches its label selector.
Now, let's try something different and create a bare Pod that matches the label selector of our ReplicaSet object. You can expect that the number of Pods that match the ReplicaSet will be four, so ReplicaSet is going to terminate one of the Pods to bring the replica count back to three.
First, let's create a simple bare Pod manifest file named nginx-pod-bare.yaml, as follows:
apiVersion: v1
kind: Pod
metadata:
name: nginx-pod-bare-example
labels:
app: nginx
environment: test
spec:
containers:
- name: nginx
image: nginx:1.17
ports:
- containerPort: 80
The metadata of Pod must have labels matching the ReplicaSet selector. Now, apply the manifest to your cluster using the following command:
$ kubectl apply -f nginx-pod-bare.yaml
Immediately after that, check the events for our example ReplicaSet object using the kubectl describe command, as follows:
$ kubectl describe rs/nginx-replicaset-example
...
Events:
Type Reason Age From Message
---- ------ ---- ---- -------
...
Normal SuccessfulDelete 29s replicaset-controller Deleted pod: nginx-pod-bare-example
As you can see, the ReplicaSet object has immediately detected that there is a new Pod created matching its label selector and has terminated the Pod.
Tip
Similarly, it is possible to remove Pods from a ReplicaSet object by modifying their labels so that they no longer match the selector. This is useful in various debugging or incident-investigation scenarios.
Scaling ReplicaSet
For ReplicaSet, we can do a similar scaling operation as for ReplicationController in the previous section. In general, you will not perform manual scaling of ReplicaSets in usual scenarios. Instead, the size of the ReplicaSet object will be managed by another, higher-level object such as Deployment.
Let's first scale up our example ReplicaSet object. Open the nginx-replicaset.yaml file and modify the replicas property to 5, as follows:
...
spec:
replicas: 5
...
Now, we need to declaratively apply the changes to the cluster state. Use the following kubectl apply command to do this:
$ kubectl apply -f ./nginx-replicaset.yaml
To see that the number of Pods controlled by the ReplicaSet object has changed, you can use the kubectl get pods or kubectl describe rs/nginx-replicaset-example commands.
Tip
Exactly as in the case of ReplicationController, you can achieve similar results using the kubectl scale rs/nginx-replicaset-example --replicas=5 imperative command. In general, such imperative commands are recommended only for development or learning scenarios.
Similarly, if you would like to scale down, you need to open the nginx-replicaset.yaml file and modify the replicas property to 2, as follows:
...
spec:
replicas: 2
...
Again, declaratively apply the changes to the cluster state. Use the following kubectl apply command to do this:
$ kubectl apply -f ./nginx-replicaset.yaml
At this point, you can use the kubectl get pods or kubectl describe rs/nginx-replicaset-example commands to verify that the number of Pods has been reduced to just 2.
Using Pod liveness probes together with ReplicaSet
Sometimes, you may want to consider a Pod unhealthy and requiring a container restart, even if the main process in the container has not crashed. For such cases, Kubernetes offers different types of probes for containers to determine whether they need to be restarted or whether they can serve the incoming traffic. We will quickly demonstrate how you can use liveness probes together with ReplicaSet to achieve even greater resilience to failures of containerized components.
Tip
Kubernetes provides more container probes, such as readiness probes and startup probes. If you want to learn more about them and when to use them, please refer to the official documentation at https://kubernetes.io/docs/concepts/workloads/pods/pod-lifecycle/#container-probes.
In our example, we will create a ReplicaSet object that runs nginx Pods with an additional liveness probe on the main container, which checks whether an HTTP GET request to the / path responds with a successful HTTP status code. You can imagine that, in general, your nginx process running in the container will always be healthy (until it crashes), but it doesn't mean that the Pod can be considered healthy. If the web server is not able to successfully provide content, it means that the web server process is running but something else might have gone wrong, and this Pod should no longer be used. We will simulate this situation by simply deleting the /index.html file in the container, which will cause the liveness probe to fail.
First, let's create a YAML manifest file named nginx-replicaset-livenessprobe.yaml for our new nginx-replicaset-livenessprobe-example ReplicaSet object with the following content:
apiVersion: apps/v1
kind: ReplicaSet
metadata:
name: nginx-replicaset-livenessprobe-example
spec:
replicas: 3
selector:
matchLabels:
app: nginx
environment: test
template:
metadata:
labels:
app: nginx
environment: test
spec:
containers:
- name: nginx
image: nginx:1.17
ports:
- containerPort: 80
livenessProbe:
httpGet:
path: /
port: 80
initialDelaySeconds: 2
periodSeconds: 2
The highlighted part of the preceding code block contains the liveness probe definition and is the only difference between our earlier ReplicaSets examples. The liveness probe is configured to execute an HTTP GET request to the / path at port 80 for the container every 2 seconds (periodSeconds). The first probe will start after 2 seconds (initialDelaySeconds) from the container start.
Tip
If you are modifying an existing ReplicaSet object, you need to first delete it and recreate it in order to apply changes to the Pod template.
Now, apply the manifest file to the cluster using the following command:
$ kubectl apply -f ./nginx-replicaset-livenessprobe.yaml
Verify that the Pods have been successfully started using the following command:
$ kubectl get pods
Now, you need to choose one of the ReplicaSet Pods in order to simulate the failure inside the container that will cause the liveness probe to fail. In the case of our example, we will be using a Pod with the name nginx-replicaset-livenessprobe-example-2qbhk.
To simulate the failure, run the following command. This command will remove the index.html file served by the nginx web server and will cause the HTTP GET request to fail with a non-successful HTTP status code:
$ kubectl exec -it nginx-replicaset-livenessprobe-example-2qbhk -- rm /usr/share/nginx/html/index.html
Inspect the events for this Pod using the kubectl describe command, as follows:
$ kubectl describe pod/nginx-replicaset-livenessprobe-example-2qbhk
...
Events:
Type Reason Age From Message
---- ------ ---- ---- -------
...
Normal Created 20s (x2 over 3m53s) kubelet Created container nginx
Warning Unhealthy 20s (x3 over 24s) kubelet Liveness probe failed: HTTP probe failed with statuscode: 403
Normal Killing 20s kubelet Container nginx failed liveness probe, will be restarted
Normal Started 19s (x2 over 3m53s) kubelet Started container nginx
As you can see, the liveness probe has correctly detected that the web server became unhealthy and restarted the container inside the Pod.
However, please note that the ReplicaSet object itself did not take part in the restart in any way—the action was performed at a Pod level. This demonstrates how individual Kubernetes objects provide different features that can work together to achieve improved FT. Without the liveness probe, the end user could be served by a replica that is not able to provide content, and this would go undetected!
Deleting a ReplicaSet object
Lastly, let's take a look at how you can delete a ReplicaSet object. There are two possibilities, outlined as follows:
- Delete the ReplicaSet object together with the Pods that it owns—this is performed by first scaling down automatically.
- Delete the ReplicaSet object and leave the Pods unaffected.
To delete the ReplicaSet object together with the Pods, you can use the regular kubectl delete command, as follows:
$ kubectl delete rs/nginx-replicaset-livenessprobe-example
You will see that the Pods will first get terminated and then the ReplicaSet object is deleted.
Now, if you would like to delete just the ReplicaSet object, you need to use the --cascade=orphan option for kubectl delete, as follows:
$ kubectl delete rs/nginx-replicaset-livenessprobe-example --cascade=orphan
After this command, if you inspect which Pods are in the cluster, you will still see all the Pods that were owned by the nginx-replicaset-livenessprobe-example ReplicaSet object. These Pods can now, for example, be acquired by another ReplicaSet object that has a matching label selector.
Summary
In this chapter, you have learned about the key building blocks for providing High Availability (HA) and Fault Tolerance (FT) for applications running in Kubernetes clusters. First, we have explained why HA and FT are important. Next, you have learned more details about providing component replication and failover using ReplicationController and ReplicaSet, which are used in Kubernetes in order to provide multiple copies (replicas) of identical Pods. We have demonstrated the differences between ReplicationController and ReplicaSet and eventually explained why using ReplicaSet is currently the recommended way to provide multiple replicas of Pods.
The next chapters in this part of the book will give you an overview of how to use Kubernetes to orchestrate your container applications and workloads. You will familiarize yourself with concepts of the most important Kubernetes objects, such as ReplicaSet, Deployment, StatefulSet, or DaemonSet, and in the next chapter, we will focus on the next level of abstraction over ReplicaSets: Deployment objects. You will learn how to deploy and easily manage rollouts and rollbacks of new versions of your application.
Further reading
For more information regarding ReplicationController and ReplicaSet, please refer to the following Packt Publishing books:
- The Complete Kubernetes Guide, by Jonathan Baier, Gigi Sayfan, and Jesse White (https://www.packtpub.com/virtualization-and-cloud/complete-kubernetes-guide)
- Getting Started with Kubernetes – Third Edition, by Jonathan Baier and Jesse White (https://www.packtpub.com/virtualization-and-cloud/getting-started-kubernetes-third-edition)
- Kubernetes for Developers, by Joseph Heck (https://www.packtpub.com/virtualization-and-cloud/kubernetes-developers)
- Hands-On Kubernetes on Windows, by Piotr Tylenda (https://www.packtpub.com/product/hands-on-kubernetes-on-windows/9781838821562)
You can also refer to the excellent official Kubernetes documentation (https://kubernetes.io/docs/home/), which is always the most up-to-date source of knowledge about Kubernetes in general.