Chapter 12: StatefulSet – Deploying Stateful Applications
In the previous chapter, we explained how you can use a Kubernetes cluster to run stateless workloads and applications and how to use Deployment objects for this purpose. Running stateless workloads in the cloud is generally easier to handle, as any container replica can handle the request without taking any dependencies on the results of previous operations by the end user. In other words, every container replica would handle the request in an identical way; all you need to care about is proper load balancing.
However, stateless workloads are only the easier part of running cloud applications. The main complexity is in managing the state of applications. By state, we mean any stored data that the application or component needs to serve the requests and it can be modified by these requests. The most common example of a stateful component in applications is a database – for example, it can be a relational MySQL database or a NoSQL MongoDB database. In Kubernetes, you can use a dedicated object to run stateful workloads and applications: StatefulSet. When managing StatefulSet objects, you will usually need to work with PVs which have been covered in Chapter 9, Persistent Storage in Kubernetes. This chapter will provide you with knowledge about the role of StatefulSet in Kubernetes and how to create and manage StatefulSet objects to release new versions of your stateful applications.
In this chapter, we will cover the following topics:
- Introducing the StatefulSet object
- Managing StatefulSet
- Releasing a new version of an app deployed as a StatefulSet
- StatefulSet best practices
Technical requirements
For this chapter, you will need the following:
- Kubernetes cluster deployed. You can use either a local or a cloud-based cluster, but to fully understand the concepts, we recommend using a multi-node, cloud-based Kubernetes cluster. The cluster must support the creation of PersistentVolumeClaims – any cloud-based cluster will be sufficient, or locally, for example, minikube with a k8s.io/minikube-hostpath provisioner.
- A Kubernetes CLI (kubectl) installed on your local machine and configured to manage your Kubernetes cluster.
Kubernetes cluster deployment (local and cloud-based) and kubectl installation have been covered in Chapter 3, Installing Your First Kubernetes Cluster.
You can download the latest code samples for this chapter from the official GitHub repository at https://github.com/PacktPublishing/The-Kubernetes-Bible/tree/master/Chapter12.
Introducing the StatefulSet object
You may wonder why running stateful workloads in the distributed cloud is generally considered harder than stateless ones. In classic three-tier applications, all the states would be stored in a database (data tier or persistence layer) and there would be nothing special about it. For SQL servers, you would usually add a failover setup with data replication, and in case you require superior performance, you would scale vertically by simply purchasing better hardware for hosting. Then, at some point, you might think about clustered SQL solutions, introducing data sharding (horizontal data partitions). But still, from the perspective of a web server running your application, the database would be just a single connection string to read and write the data. The database would be responsible for persisting a mutable state.
Important note
Remember that every application as a whole is, in some way, stateful unless it serves static content only or just transforms user input. But this does not mean that every component in the application is stateful. A web server that runs the application logic will be a stateless component, but the database where this application stores user input and user sessions will be a stateful component.
We will first explain how you approach managing state in containers and what we actually consider an application or system state.
Managing state in containers
Now, imagine how this could work if you deployed your SQL server (single instance) in a container. The first thing you would notice is that after restarting the container, you would lose the data stored in the database – each time it is restarted, you get a fresh instance of the SQL server. Containers are ephemeral. This doesn't sound too useful for our use case. Fortunately, containers come with the option to mount data volumes. A volume can be, for example, a host's directory, which will be mounted to a specific path in the container's filesystem. Whatever you store in this path will be kept in the host filesystem even after the container is terminated or restarted. In a similar way, you can use NFS share or a cloud-managed disk instance as a volume. Now, if you configure your SQL server to put its data files in the path where the volume is mounted, you achieve data persistence even if the container restarts. The container itself is still ephemeral, but the data (state) is not.
This is a high-level overview of how the state can be persisted for plain containers, without involving Kubernetes. But before we move on to Kubernetes, we need to clarify what we actually regard as a state.
If you think about it, when you have a web server that serves just simple static content (which means it is always the same, as a simple HTML web page), there is still some data that is persisted, for example, the HTML files. However, this is not state: user requests cannot modify this data, so previous requests from the user will not influence what is the result of the current request. In the same way, configuration files for your web server are not their state or log files written on the disk (well, that is arguable, but from the end user's perspective, it is not).
Now, if you have a web server that keeps user sessions and stores information about whether the user is logged in, then this is indeed the state. Depending on this information, the web server will return different web pages (responses) based on whether the user is logged in. Let's say that this web server runs in a container – there is a catch whether it is the stateful component in your application. If the web server process stores user sessions as a file in the container (warning: this is probably quite a bad design), then the web server container is a stateful component. But if it stores user sessions in a database or a Redis cache running in separate containers, then the web server is stateless, and the database or Redis container becomes the stateful component.
This is briefly how it looks from a single container perspective. We need now to zoom out a bit and take a look at state management in Kubernetes Pods.
Managing state in Kubernetes Pods
In Kubernetes, the concept of container volumes is extended by PersistentVolumes (PVs), PersistentVolumeClaims (PVCs), and StorageClasses (SCs), which are dedicated, storage-related objects. PVC aims to decouple Pods from the actual storage. PVC is a Kubernetes object that models a request for the storage of a specific type, class, or size – think of saying I would like 10 GB of read/write-once SSD storage. To fulfill such a request, a PV object is required, which is a piece of real storage that has been provisioned by the cluster's automation process – think of this as a directory on the host system or cloud-managed disk. PV types are implemented as plugins, similarly to volumes in Docker. Now, the whole process of provisioning PV can be dynamic – it requires the creation of an SC object and for this to be used when defining PVCs. When creating a new SC, you provide a provisioner (or plugin) with specific parameters, and each PVC using the given SC will automatically create a PV using the selected provisioner. The provisioners may, for example, create cloud-managed disks to provide the backing storage. On top of that, containers of a given Pod can share data using the same PV and mount it to their filesystem.
This is just a brief overview of what Kubernetes provides for state storage. We have covered this in more detail in Chapter 9, Persistent Storage in Kubernetes.
On top of the management of state in a single Pod and its containers, there is the management of state in multiple replicas of a Pod. Let's think about what would happen if we used a Deployment object to run multiple Pods with MySQL Server. First, you would need to ensure that the state is persisted on a volume in a container – for this, you can use PVs in Kubernetes. But then you actually get multiple, separate MySQL servers, which is not very useful if you would like to have high availability and fault tolerance. If you expose such a deployment using a service, it will also be useless because each time, you may hit a different Pod and get different data. So, you arrive either at designing a multi-node failover setup with replication between the master and replicas or a complex cluster with data sharding. In any case, your individual MySQL Server Pod replicas need to have a unique identity and, preferably, predictable network names so that the Nodes and clients can communicate.
Tip
When designing your cloud-native application for the Kubernetes cluster, always analyze all the pros and cons of storing the state of the application as stateful components running in Kubernetes. Generally, it is easier to outsource the hard part of managing such components to dedicated, cloud-managed services (for example, Amazon S3, Azure CosmosDB, or Google Cloud SQL). Then, the Kubernetes cluster can be used just for running stateless components.
This is where StatefulSet comes in. Let's take a closer look at this Kubernetes object.
StatefulSet and how it differs from a Deployment object
Kubernetes StatefulSet is a similar concept to a Deployment object – it also provides a way of managing and scaling a set of Pods, but it provides guarantees about the ordering and uniqueness (unique identity) of the Pods. In the same way as Deployment, it uses a Pod template to define what each replica should look like. You can scale it up and down and perform rollouts of new versions. But now, in StatefulSet, the individual Pod replicas are not interchangeable. The unique, persistent identity for each Pod is maintained during any rescheduling or rollouts – this includes Pod name and its cluster DNS names. This unique, persistent identity can be used for clearly identifying PVs that are assigned to each Pod, even if replaced following a failure. For this, StatefulSet provides another type of template in its specification named volumeClaimTemplates. This template can be used for the dynamic creation of the PVCs of a given SC. By doing this, the whole process of storage provisioning is fully dynamic – you just create a StatefulSet and the underlying storage objects are managed by the StatefulSet controller.
Tip
Cluster DNS names of individual Pods in StatefulSet remain the same, but their cluster IP addresses are not guaranteed to stay the same. This means that if you need to connect to individual Pods in the StatefulSet, you should use cluster DNS names.
Basically, you can use StatefulSet for applications that require the following:
- Persistent storage managed by the Kubernetes cluster (this is the main use case, but not the only one)
- Stable and unique network identifiers (usually DNS names) for each Pod replica
- Ordered deployment and scaling
- Ordered, rolling updates
As you can see, StatefulSets can be seen as a more predictable version of a Deployment object, with the possibility to use persistent storage provided by PVCs. To summarize, the key differences between StatefulSet and Deployment are as follows:
- StatefulSet ensures a deterministic (sticky) name for Pods, which consists of <statefulSetName>-<ordinal>. For Deployments, you would have a random name consisting of <deploymentName>-<podTemplateHash>-<randomHash>.
- For StatefulSet objects, the Pods are started and terminated in a specific and predictable order while scaling the ReplicaSet.
- In terms of storage, Kubernetes creates PVCs based on volumeClaimTemplates of the StatefulSet specification for each Pod in the StatefulSet and always attaches this to the Pod with the same name. For Deployment, if you choose to use persistentVolumeClaim in the Pod template, Kubernetes will create a single PVC and attach the same to all the Pods in the deployment. This may be useful in certain scenarios, but is not a common use case.
- You need to create a headless Service object that is responsible for managing the deterministic network identity (cluster DNS names) for Pods. The headless Service allows us to return all Pods IP addresses behind the service as DNS A records instead of a single DNS A record with a ClusterIP Service. A headless Service is only required if you are not using a regular service. The specification of StatefulSet requires having the Service name provided in .spec.serviceName.
Now, let's take a look at a concrete example of StatefulSet that deploys nginx Pods with the backing of persistent storage.
Managing StatefulSet
To demonstrate how StatefulSet objects work, we will modify our nginx deployment and adapt it to be a StatefulSet. A significant part of the StatefulSet specification is the same as for Deployments. As we would like to demonstrate how automatic management of PVCs works in StatefulSet objects, we will use volumeClaimTemplates in the specification to create PVCs and PVs, which the Pods will consume. Each Pod will internally mount its assigned PV under the /usr/share/nginx/html path in the container filesystem, which is the default location of nginx files that are served over HTTP. In this way, we can demonstrate how the state is persisted, even if we forcefully restart Pods.
Important note
The example that we are going to use in this chapter is for demonstration purposes only and is meant to be as simple as possible. If you are interested in complex examples, such as deploying and managing distributed databases in StatefulSets, please take a look at the official Kubernetes blog post about deploying the Cassandra database: https://kubernetes.io/docs/tutorials/stateful-application/cassandra/. Usually, the main source of complexity in such cases is handling the joining and removal of Pod replicas when scaling the StatefulSet.
We will now go through all the YAML manifests required to create our StatefulSet and apply them to the cluster.
Creating a StatefulSet
First, let's take a look at the StatefulSet YAML manifest file named nginx-statefulset.yaml (the full version is available in the official GitHub repository for the book: https://github.com/PacktPublishing/Kubernetes-for-Beginners/blob/master/Chapter12/01_statefulset-example/nginx-statefulset.yaml):
apiVersion: apps/v1
kind: StatefulSet
metadata:
name: nginx-statefulset-example
spec:
replicas: 3
serviceName: nginx-headless
selector:
matchLabels:
app: nginx-stateful
environment: test
# (to be continued in the next paragraph)
The first part of the preceding file is very similar to the Deployment object specification, where you need to provide the number of replicas and a selector for Pods. There is one new parameter, serviceName, that we will explain shortly.
The next part of the file concerns specification of the Pod template that is used by the StatefulSet:
# (continued)
template:
metadata:
labels:
app: nginx-stateful
environment: test
spec:
containers:
- name: nginx
image: nginx:1.17
ports:
- containerPort: 80
volumeMounts:
- name: nginx-data
mountPath: /usr/share/nginx/html
command:
- /bin/sh
- -c
- |
echo "You have been served by Pod with IP address: $(hostname -i)" > /usr/share/nginx/html/index.html
nginx -g "daemon off;"
# (to be continued in the next paragraph)
If you look closely, you can observe that the structure is the same as for Deployments. Also, the last part of the file contains volumeClaimTemplates, which is used to define templates for PVC used by the Pod:
# (continued)
volumeClaimTemplates:
- metadata:
name: nginx-data
spec:
accessModes: [ "ReadWriteOnce" ]
resources:
requests:
storage: 1Gi
As you can see, in general, the structure of the StatefulSet spec is similar to Deployment, although it has a few extra parameters for configuring PVCs and associated Service objects. The specification has five main components:
- replicas: Defines the number of Pod replicas that should run using the given template and the matching label selector. Pods may be created or deleted to maintain the required number.
- serviceName: The name of the service that governs StatefulSet and provides the network identity for the Pods. This Service must be created before StatefulSet is created. We will create the nginx-headless Service in the next step.
- selector: A label selector, which defines how to identify Pods that the StatefulSet owns. This can include set-based and equality-based selectors.
- template: Defines the template for Pod creation. Labels used in metadata must match the selector. Pod names are not random and follow the <statefulSetName>-<ordinal> convention.
- volumeClaimTemplates: Defines the template for PVC that will be created for each of the Pods. Each Pod in the StatefulSet object will get its own PVC that is assigned to a given Pod name persistently. In our case, it is a 1 GB volume with the ReadWriteOnce access mode. This access mode allows the volume to be mounted for reads and writes by a single Node only. We did not specify storageClassName, so the PVCs will be provisioned using the default SC in the cluster. PVC names are not random and follow the <volumeClaimTemplateName>-<statefulSetName>-<ordinal> convention.
Tip
The default SC in your cluster is marked with the storageclass.kubernetes.io/is-default-class annotation. Whether you have a default SC, and how it is defined, depends on your cluster deployment. For example, in the Azure Kubernetes Service cluster, it will be an SC named default that uses the kubernetes.io/azure-disk provisioner. In minikube, it will be an SC named standard that uses the k8s.io/minikube-hostpath provisioner.
The specification also contains other fields that are related to rolling out new revisions of StatefulSet – we will explain these in more detail in the next section.
Apart from that, in our Pod template, we have used a similar override of the command for the nginx container, as in the case of Deployment in the previous chapter. The command creates an index.html file in /usr/share/nginx/html/ with information about what the IP address of the Pod is that serves the request. After that, it starts the nginx web server with the standard entry point command for the image.
Next, let's have a look at our headless Service named nginx-headless. Create a nginx-headless-service.yaml file with the following content:
apiVersion: v1
kind: Service
metadata:
name: nginx-headless
spec:
selector:
app: nginx-stateful
environment: test
clusterIP: None
ports:
- port: 80
protocol: TCP
targetPort: 80
The specification is very similar to the normal Service that we created previously for the Deployment, the only difference is that it has the value None for the clusterIP field. This will result in the creation of a headless Service, nginx-headless. A headless Service allows us to return all Pods' IP addresses behind the Service as DNS A records instead of a single DNS A record with a clusterIP Service. We will demonstrate what this means in practice in the next steps.
Lastly, let's create a LoadBalancer Service YAML manifest file, nginx-client-service.yaml. This Service will allow us to reach the StatefulSet from an external network using a web browser:
apiVersion: v1
kind: Service
metadata:
name: nginx-client
spec:
selector:
app: nginx-stateful
environment: test
type: LoadBalancer
ports:
- port: 80
protocol: TCP
targetPort: 80
The preceding specification is the same as we previously used for the Deployment demonstration. The only difference is the name, which is now nginx-client.
With all the YAML manifest files, we can start deploying our example StatefulSet! Perform the following steps:
- Create a headless Service, nginx-headless, using the following command:
$ kubectl apply -f ./nginx-headless-service.yaml
- Create a LoadBalancer Service, nginx-client, using the following command:
$ kubectl apply -f ./nginx-client-service.yaml
- Create a StatefulSet object, nginx-stateful-example, using the following command:
$ kubectl apply -f ./nginx-statefulset.yaml
- Now, you can use the kubectl describe command to observe the creation of the StatefulSet object:
$ kubectl describe statefulset nginx-statefulset-example
- Alternatively, you can use sts as an abbreviation for StatefulSet when using the kubectl commands.
- If you use the kubectl get pods command, you can see that the three desired Pod replicas have been created. Note that this can take a bit of time as the Pods have to get the PVs provisioned based on their PVCs:
$ kubectl get pods
NAME READY STATUS RESTARTS AGE
nginx-statefulset-example-0 1/1 Running 0 7m
nginx-statefulset-example-1 1/1 Running 0 5m
nginx-statefulset-example-2 1/1 Running 0 4m
Please note the ordered, deterministic Pod naming – this is the key for providing a unique identity to the Pods in the StatefulSet object.
- If you describe one of the Pods, you will see more details about the associated PV and PVC:
$ kubectl describe pod nginx-statefulset-example-1
...
Volumes:
nginx-data:
Type: PersistentVolumeClaim (a reference to a PersistentVolumeClaim in the same namespace)
ClaimName: nginx-data-nginx-statefulset-example-1
...
Events:
Type Reason Age From Message
---- ------ ---- ---- -------
Normal Scheduled 7m default-scheduler Successfully assigned default/nginx-statefulset-example-1 to aks-nodepool1-77120516-vmss000001
Normal SuccessfulAttachVolume 7m attachdetach-controller AttachVolume.Attach succeeded for volume "pvc-6b2b1ad8-5b08-4d3e-bac9-6f7ec7de7d40"
Normal Pulled 6m kubelet Container image "nginx:1.17" already present on machine
Normal Created 6m kubelet Created container nginx
Normal Started 6m kubelet Started container nginx
As you can see, the PVC used by this Pod is named nginx-data-nginx-statefulset-example-1. Additionally, right after the Pod was scheduled on its target Node, the PV, pvc-6b2b1ad8-5b08-4d3e-bac9-6f7ec7de7d40, has been provisioned based on the PVC and attached to the Pod. After that, the actual container, which internally mounts this PV, has been created.
- Using the kubectl get command, we can reveal more details about the PVC:
$ kubectl get pvc nginx-data-nginx-statefulset-exaNAME STATUS VOLUME CAPACITY ACCESS MODES STORAGECLASS AGE
nginx-data-nginx-statefulset-example-1 Bound pvc-6b2b1ad8-5b08-4d3e-bac9-6f7ec7de7d40 1Gi RWO default 43m
- And finally, let's take a look at the PV that was provisioned:
$ kubectl describe pv pvc-6b2b1ad8-5b08-4d3e-bac9-6f7ec7de7d40
...
Source:
Type: AzureDisk (an Azure Data Disk mount on the host and bind mount to the pod)
DiskName: kubernetes-dynamic-pvc-6b2b1ad8-5b08-4d3e-bac9-6f7ec7de7d40
DiskURI: /subscriptions/cc9a8166-829e-401e-a004-76d1e3733b8e/resourceGroups/mc_k8sforbeginners-rg_k8sforbeginners-aks_eastus/providers/Microsoft.Compute/disks/kubernetes-dynamic-pvc-6b2b1ad8-5b08-4d3e-bac9-6f7ec7de7d40
...
In our example, as we are demonstrating this using Azure Kubernetes Service, the PV was provisioned using AzureDisk, and you can also see the actual resource ID that you can find in Azure Portal.
We have successfully created the StatefulSet object and now it is time to verify whether it works as expected in a basic scenario. Please follow these steps:
- Get the external IP address of the nginx-client Service so that we can use it to access via a web browser:
$ kubectl describe svc nginx-client
...
LoadBalancer Ingress: 104.45.176.241
...
- In our example, it is 104.45.176.241, and we will use it in subsequent steps. Navigate to http://104.45.176.241 in your favorite web browser:
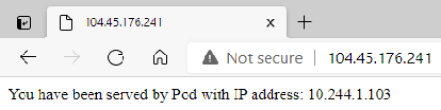
Figure 12.1 – Successful request to the nginx web server running in StatefulSet
If you refresh the page a few times (with the browser cache disabled), you will notice that you are served by three different Pods. This is as expected – we are currently running three Pod replicas in our StatefulSet object.
We will now take a quick look at how the headless Service behaves.
Using the headless Service and stable network identities
Let's do an experiment that demonstrates how the headless Service is used to provide stable and predictable network identities for our Pods:
- Create an interactive busybox Pod and start the Bourne shell process. The following command will create the Pod and immediately attach your terminal so that you can interact from within the Pod:
$ kubectl run -i --tty busybox --image=busybox:1.28 --rm --restart=Never -- sh
- First, we need to check how our normal service, nginx-client, with ClusterIP assigned, is resolved by the cluster DNS:
$ nslookup nginx-client
Server: 10.0.0.10
Address 1: 10.0.0.10 kube-dns.kube-system.svc.cluster.local
Name: nginx-client
Address 1: 10.0.147.198 nginx-client.default.svc.cluster.local
As you would expect, the response from DNS is that we have A record that points to the service ClusterIP 10.0.147.198.
- Perform a similar check for the headless Service, nginx-headless:
$ nslookup nginx-headless
Server: 10.0.0.10
Address 1: 10.0.0.10 kube-dns.kube-system.svc.cluster.local
Name: nginx-headless
Address 1: 10.244.1.103 nginx-statefulset-example-0.nginx-headless.default.svc.cluster.local
Address 2: 10.244.0.77 nginx-statefulset-example-1.nginx-headless.default.svc.cluster.local
Address 3: 10.244.1.104 nginx-statefulset-example-2.nginx-headless.default.svc.cluster.local
In this case, we have received three A records that point directly to Pod IP addresses. Additionally, they have CNAME records in the form of <podName>-<serviceName>.<namespace>.svc.cluster.local. So, the difference here is that a Service that has ClusterIP will get load balancing to a virtual IP level (which, on Linux, is usually handled at a kernel level by iptables rules configured by kube-proxy) whereas, in the case of the headless Service, the responsibility for load balancing or choosing the target Pod is on the client making the request.
- Having predictable FQDNs for Pods in the StatefulSet gives us the option to send the requests directly to individual Pods, without guessing their IP addresses or names. Let's try getting the contents served by the nginx-statefulset-example-0 Pod using its short DNS name provided by the headless Service:
$ wget http://nginx-statefulset-example-0.nginx-headless && cat index.html
Connecting to nginx-statefulset-example-0.nginx-headless (10.244.1.103:80)
...
You have been served by Pod with IP address: 10.244.1.103
As expected, you have connected directly to the Pod IP address and have been served by the proper Pod.
- Now, we will show that this DNS name remains unchanged even if a Pod is restarted. The IP of the Pod will change, but the DNS name will not. What is more, the PV that is mounted will also stay the same, but we will investigate this in the next paragraphs. In another shell window, outside of the container, execute the following command to force a restart of the nginx-statefulset-example-0 Pod:
$ kubectl delete pod nginx-statefulset-example-0
- In the busybox shell, execute the same command for getting contents served by the nginx-statefulset-example-0 Pod:
$ rm index.html && wget http://nginx-statefulset-example-0.nginx-headless && cat index.html
Connecting to nginx-statefulset-example-0.nginx-headless (10.244.1.113:80)
...
You have been served by Pod with IP address: 10.244.1.113
You can see that we used the same DNS name to call the Pod. We have been served by a Pod with the same name, but now with a different IP address.
This explains how the headless Services can be leveraged to get a stable and predictable network identity that will not change when a Pod is restarted. You may wonder what the actual use of this is and why it is important for StatefulSet objects. There are a couple of possible use cases:
- Deploying clustered databases, such as etcd or MongoDB, requires specifying network addresses of other Nodes in the database cluster. This is especially necessary if there are no automatic discovery capabilities provided by the database. In such cases, stable DNS names provided by headless Services help to run such clusters on Kubernetes as StatefulSets. There is still the problem of changing the configuration when Pod replicas are added or removed from the StatefulSet during scaling. In some cases, this is solved by the sidecar container pattern, which monitors the Kubernetes API to dynamically change the database configuration.
- If you decide to implement your own storage solution running as StatefulSet with advanced data sharding, you will most likely need mappings of logical shards to physical Pod replicas in the cluster. Then, the stable DNS names can be used as part of this mapping. They will guarantee that queries for each logical shard are performed against a proper Pod, irrespective of whether it was rescheduled to another Node or restarted.
Finally, let's take a look at the state persistence for Pods running in StatefulSet.
State persistence
To demonstrate how persisting state in StatefulSets works, we will use the kubectl exec commands to introduce changes to the mounted PV. This is the easiest way in which we can show that the files are persisted during Pod restarts or reschedules – in real-world use cases, changes to the state would be done by the actual application, for example, a database container writing files to the container filesystem. Perform the following steps:
- Use the kubectl exec command to create a file named state.html in the /usr/share/nginx/html directory in each of three nginx Pod containers. This path is where the PV is mounted based on volumeClaimTemplates of the StatefulSet object:
$ kubectl exec -it nginx-statefulset-example-0 -- /bin/sh -c "echo State of Pod 0 > /usr/share/nginx/html/state.html"
$ kubectl exec -it nginx-statefulset-example-1 -- /bin/sh -c "echo State of Pod 1 > /usr/share/nginx/html/state.html"
$ kubectl exec -it nginx-statefulset-example-2 -- /bin/sh -c "echo State of Pod 2 > /usr/share/nginx/html/state.html"
- Navigate in your web browser to the external IP of the Service and the state.html file. In our example, it is http://104.45.176.241/state.html. You will see that you have been served one of the files that we created, depending on which Pod you have hit. If you refresh the page, with the cache disabled, you will see that the contents change depending on the Pod:
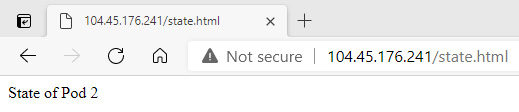
Figure 12.2 – Accessing the state.html file persisted in StatefulSet
- Use the kubectl get pods command to see the current IP addresses of the Pods in the StatefulSet object:
$ kubectl get pods -o wide
NAME ... IP ...
nginx-statefulset-example-0 ... 10.244.1.113 ...
nginx-statefulset-example-1 ... 10.244.0.77 ...
nginx-statefulset-example-2 ... 10.244.1.104 ...
- Now, let's simulate failure to our Pods and use the kubectl delete command in order to delete all three of them. This will cause them to be recreated by StatefulSet:
$ kubectl delete pod nginx-statefulset-example-0 nginx-statefulset-example-1 nginx-statefulset-example-2
pod "nginx-statefulset-example-0" deleted
pod "nginx-statefulset-example-1" deleted
pod "nginx-statefulset-example-2" deleted
- StatefulSet object will recreate the Pods in an ordered fashion, waiting for each of them to be ready. You can use the kubectl get command with an additional -w flag to follow the process in real time and eventually, you will be presented with all Pods being ready:
$ kubectl get pods -o wide -w
NAME ... AGE IP ...
nginx-statefulset-example-0 ... 3m58s 10.244.1.115 ...
nginx-statefulset-example-1 ... 3m49s 10.244.0.79 ...
nginx-statefulset-example-2 ... 92s 10.244.1.116 ...
- As you can see, the Pods have received new IPs. The containers that they are running are freshly created, but the existing PVC was used to mount PV to the containers. Once PVC is created by StatefulSet, it will not be deleted when you delete or scale the StatefulSet object. This ensures that data is not lost, unless you explicitly delete the PVC and PV yourself. If you navigate to the external IP of the Service for the StatefulSet object to get state.html, you will see that the file is still being served, even though it is not present in the original container image:

Figure 12.3 – Accessing the state.html file persisted in StatefulSet after the Pods restart
- Lastly, let's show that when accessing the state.html file via the headless Service, we are getting the same result:
$ kubectl run -i --tty busybox --image=busybox:1.28 --rm --restart=Never -- sh
If you don't see a command prompt, try pressing enter.
/ # wget http://nginx-statefulset-example-0.nginx-headless/state.html && cat state.html
Connecting to nginx-statefulset-example-0.nginx-headless (10.244.1.115:80)
...
State of Pod 0
This demonstration shows how StatefulSet can provide state and data persistence for your containerized applications using stable network identities and PVCs. Next, we will take a look at scaling the StatefulSet object.
Scaling StatefulSet
In the case of StatefulSets, you can do similar scaling operations as for Deployment objects by changing the number of replicas in the specification or using the kubectl scale imperative command. The new Pods will be automatically discovered as new Endpoints for the Service when you scale up, or automatically removed from the Endpoints list when you scale down.
However, there are a few differences when compared to Deployment objects:
- When you deploy a StatefulSet object of N replicas, the Pods during deployment are created sequentially, in order from 0 to N-1. In our example, during the creation of a StatefulSet object of three replicas, the first nginx-statefulset-example-0 Pod is created, followed by nginx-statefulset-example-1, and finally nginx-statefulset-example-2.
- When you scale up the StatefulSet, the new Pods are also created sequentially and in an ordered fashion.
- When you scale down the StatefulSet, the Pods are terminated sequentially, in reverse order, from N-1 to 0. In our example, while scaling down the StatefulSet object to zero replicas, the first nginx-statefulset-example-2 Pod is terminated, followed by nginx-statefulset-example-1, and finally nginx-statefulset-example-0.
- During scaling up of the StatefulSet object, before the next Pod is created in the sequence, all its predecessors must be running and ready.
- During scaling down of the StatefulSet object, before the next Pod is terminated in the reverse sequence, all its predecessors must be completely terminated and deleted.
- Also, in general, before any scaling operation is applied to a Pod in a StatefulSet object, all its predecessors must be running and ready. This means that if, during scaling down from four replicas to one replica, the nginx-statefulset-example-0 Pod were to suddenly fail, then no further scaling operation would be performed on nginx-statefulset-example-1, nginx-statefulset-example-2, and nginx-statefulset-example-3 Pods. Scaling would resume when the nginx-statefulset-example-0 Pod becomes ready again.
Tip
This sequential behavior of scaling operations can be relaxed by changing the .spec.podManagementPolicy field in the specification. The default value is OrderedReady. If you change it to Parallel, the scaling operations will be performed on Pods in parallel, similar to what you know from Deployment objects. Note that this affects only scaling operations. The way of updating StatefulSet object with updateStrategy of the RollingUpdate type does not change.
Equipped with this knowledge, let's scale up our StatefulSet declaratively:
- Open the nginx-statefulset.yaml manifest file and modify the number of replicas:
apiVersion: apps/v1
kind: StatefulSet
metadata:
name: nginx-statefulset-example
spec:
replicas: 5
...
- Apply the changes to the cluster using the kubectl apply command:
$ kubectl apply -f ./nginx-statefulset.yaml –record
statefulset.apps/nginx-statefulset-example configured
- If you now check the Pods using the kubectl get pods -w command, you will see the sequential, ordered creation of new Pods. The nginx-statefulset-example-4 Pod will not start creating until nginx-statefulset-example-3 has been created and becomes ready.
Similarly, if you check the output of the kubectl describe command for the StatefulSet object, you will see the following in the events:
$ kubectl describe sts nginx-statefulset-example
...
Events:
Type Reason Age From Message
---- ------ ---- ---- -------
Normal SuccessfulCreate 2m31s statefulset-controller create Pod nginx-statefulset-example-3 in StatefulSet nginx-statefulset-example successful
Normal SuccessfulCreate 117s statefulset-controller create Claim nginx-data-nginx-statefulset-example-4 Pod nginx-statefulset-example-4 in StatefulSet nginx-statefulset-example success
Normal SuccessfulCreate 117s statefulset-controller create Pod nginx-statefulset-example-4 in StatefulSet nginx-statefulset-example successful
You can achieve the same result using the imperative command, which is recommended only for development scenarios:
$ kubectl scale sts nginx-statefulset-example --replicas=5
statefulset.apps/nginx-statefulset-example scaled
- To perform the scaling down of our StatefulSet object declaratively, simply modify the nginx-statefulset.yaml manifest file and change the number of replicas:
apiVersion: apps/v1
kind: StatefulSet
metadata:
name: nginx-statefulset-example
spec:
replicas: 2
...
- Apply the changes to the cluster using the kubectl apply command:
$ kubectl apply -f ./nginx-statefulset.yaml --record
You can achieve the same result using imperative commands by executing the following command:
$ kubectl scale sts nginx-statefulset-example --replicas=2
If you describe the StatefulSet object, you will see in the events that the scaling down is reflected:
$ kubectl describe sts nginx-statefulset-example
...
Events:
Type Reason Age From Message
---- ------ ---- ---- -------
Normal SuccessfulDelete 61s (x2 over 32m) statefulset-controller delete Pod nginx-statefulset-example-3 in StatefulSet nginx-statefulset-example successful
Normal SuccessfulDelete 30s statefulset-controller delete Pod nginx-statefulset-example-2 in StatefulSet nginx-statefulset-example successful
Of course, if you scale the StatefulSet object back to three replicas, and attempt to get state.html for the nginx-statefulset-example-2 Pod replica, you will get the expected, persisted file contents. PVs and PVCs are not deleted during any Pod operations in the StatefulSet object.
Next, we will demonstrate how you can delete a StatefulSet object.
Deleting a StatefulSet
To delete a StatefulSet object, there are two possibilities:
- Delete the StatefulSet together with Pods that it owns.
- Delete the StatefulSet and leave the Pods unaffected.
In both cases, the PVCs and PVs that were created for the Pods using volumeClaimTemplates will not be deleted. This ensures that state data is not lost accidentally unless you explicitly clean up the PVCs and PVs.
Important note
Currently, there is a Kubernetes Enhancement Proposal (KEP) 1847 that proposes a way of requesting the automatic deletion of PVCs for StatefulSet object. This KEP is likely to appear in future releases. You can find more details at https://github.com/kubernetes/enhancements/tree/33e16e4d192153d8b41d1e5d91659612d6d633f4/keps/sig-apps/1847-autoremove-statefulset-pvcs.
To delete the StatefulSet object together with Pods, you can use the regular kubectl delete command:
$ kubectl delete sts nginx-statefulset-example
You will see that the Pods will be terminated first, followed by the StatefulSet object. Please note that this operation is different from scaling down the StatefulSet object to zero replicas and then deleting it. If you delete StatefulSet object with existing Pods, there are no guarantees regarding the order of termination of the individual Pods. In most cases, they will be terminated at once.
Optionally, if you would like to delete just the StatefulSet object, you need to use the --cascade=orphan option for kubectl delete:
$ kubectl delete sts nginx-statefulset-example --cascade=orphan
After this command, if you inspect what Pods are in the cluster, you will still see all the Pods that were owned by the nginx-statefulset-example StatefulSet.
Lastly, if you would like to clean up PVCs and PVs after deleting the StatefulSet object, you need to perform this step manually.
Important note
Please note that if you want to perform verifications of state persistence after exercising the new version rollout in the next section, you should not yet delete the PVCs. Otherwise, you will lose the state.html files stored in the PVs.
Use the following command:
$ kubectl delete pvc nginx-data-nginx-statefulset-example-0 nginx-data-nginx-statefulset-example-1 nginx-data-nginx-statefulset-example-2
This command will delete PVCs and associated PVs.
Next, let's take a look at releasing new versions of apps deployed as StatefulSets and how StatefulSet revisions are managed.
Releasing a new version of an app deployed as a StatefulSet
We have just covered the scaling of StatefulSets in the previous section by making changes to the .spec.replicas number in the specification. Everything you have learned about sequential and ordered changes to the Pods plays an important role in rolling out a new revision of a StatefulSet object when using the RollingUpdate strategy. There are many similarities between StatefulSets and Deployment objects – we have covered the details of Deployment updates in Chapter 11, Deployment – Deploying Stateless Applications. Making changes to the StatefulSet Pod template (.spec.template) in the specification will also cause the rollout of a new revision for StatefulSet. Usually, you will change the image used by the Pod container to a new version – this is how you perform the release of a new version of an app deployed as StatefulSet.
StatefulSets support two types of update strategies that you define using the .spec.updateStrategy.type field in the specification:
- RollingUpdate: The default strategy, which allows you to roll out a new version of your application in a controlled way. This is slightly different to the RollingUpdate strategy known from Deployment objects. For StatefulSet, this strategy will terminate and recreate Pods in a sequential and ordered fashion and make sure that the Pod is recreated and in a ready state before proceeding to the next one.
- OnDelete: This strategy implements the legacy behavior of StatefulSet updates prior to Kubernetes 1.7. However, it is still useful! In this type of strategy, the StatefulSet will not automatically update the Pod replicas by recreating them. You need to manually delete a Pod replica to get the new Pod template applied. This is useful in scenarios when you need to perform additional manual actions or verifications before proceeding to the next Pod replica. For example, if you are running a Cassandra cluster or etcd cluster in a StatefulSet, you may want to verify whether the new Pod has correctly joined the existing cluster following removal of the previous version of the Pod. Of course, it is possible to perform similar checks using the Pod template life cycle postStart and preStop hooks while using the RollingUpdate strategy, but this requires more sophisticated error handling in the hooks.
Let's now take a closer look at the RollingUpdate strategy, as it is the most important and the most commonly used update strategy for StatefulSets. The key thing about this is that the strategy respects all the StatefulSet guarantees that we explained in the previous section regarding scaling. The rollout is done in reverse order, for example, the first Pod, nginx-statefulset-example-2, is recreated with the new Pod template, followed by nginx-statefulset-example-1, and finally nginx-statefulset-example-0.
If the process of rollout fails (not necessarily the Pod that was currently recreated), the StatefulSet controller is going to restore any failed Pod to its current version. This means that Pods that have already received a successful update to the current version will remain at the current version, whereas the Pods that have not yet received the update will remain at the previous version. In this way, the StatefulSet attempts to always keep applications healthy and consistent. However, this can also lead to broken rollouts of StatefulSets. If one of the Pod replicas never becomes running and ready, then the StatefulSet will stop the rollout and wait for manual intervention. Applying the template again to the previous revision of StatefulSet is not enough – this operation will not proceed as StatefulSet will wait for the failed Pod to become ready. The only resolution is manual deletion of the failed Pod and then the StatefulSet can apply the previous revision of the Pod template.
Lastly, the RollingUpdate strategy also provides the option to execute staged rollouts using the .spec.updateStrategy.rollingUpdate.partition field. This field defines a number for which all the Pod replicas that have a lesser ordinal number will not be updated, and, even if they are deleted, they will be recreated at the previous version. So, in our example, if partition were to be set to 1, this means that during the rollout, only nginx-statefulset-example-1 and nginx-statefulset-example-2 would be updated, whereas nginx-statefulset-example-0 would remain unchanged and running on the previous version. By controlling the partition field, you can easily roll out a single canary replica and perform phased rollouts. Please note that the default value is 0, which means that all Pod replicas will be updated.
Now, we will release a new version of our nginx web server using the RollingUpdate strategy.
Updating StatefulSet
We will now demonstrate how to do a rollout of a new image version for a Pod container using the StatefulSet YAML manifest file that we created previously:
- Make a copy of the previous YAML manifest file:
$ cp nginx-statefulset.yaml nginx-statefulset-rollingupdate.yaml
- Ensure that you have RollingUpdate strategy type and partition set to 0. Please note that if you have attempted to create the StatefulSet object with a different strategy first, you will not be able to modify it without deleting the StatefulSet beforehand:
apiVersion: apps/v1
kind: StatefulSet
metadata:
name: nginx-statefulset-example
spec:
replicas: 3
serviceName: nginx-headless
podManagementPolicy: OrderedReady
updateStrategy:
type: RollingUpdate
rollingUpdate:
partition: 0
...
template:
...
spec:
containers:
- name: nginx
image: nginx:1.17
These values are the default ones, but it is worth specifying them explicitly to understand what is really happening.
- Apply the manifest file to the cluster:
$ kubectl apply -f ./nginx-statefulset-rollingupdate.yaml --record
When the StatefulSet is ready in the cluster, we can now roll out a new version of the nginx container image for our StatefulSet object. To do that, please perform the following steps:
- Modify the container image used in the StatefulSet Pod template to nginx:1.18:
apiVersion: apps/v1
kind: StatefulSet
metadata:
name: nginx-statefulset-example
spec:
...
template:
...
spec:
containers:
- name: nginx
image: nginx:1.18
- Apply the changes to the cluster using the following command:
$ kubectl apply -f ./nginx-statefulset-rollingupdate.yaml --record
statefulset.apps/nginx-statefulset-example configured
- Immediately after that, use the kubectl rollout status command to see the progress in real time. This process will be a bit longer than in the case of Deployment objects because the rollout is performed in a sequential and ordered fashion:
$ kubectl rollout status sts nginx-statefulset-example
Waiting for partitioned roll out to finish: 0 out of 3 new pods have been updated...
Waiting for 1 pods to be ready...
Waiting for 1 pods to be ready...
Waiting for partitioned roll out to finish: 1 out of 3 new pods have been updated...
Waiting for 1 pods to be ready...
Waiting for 1 pods to be ready...
Waiting for partitioned roll out to finish: 2 out of 3 new pods have been updated...
Waiting for 1 pods to be ready...
Waiting for 1 pods to be ready...
partitioned roll out complete: 3 new pods have been updated...
- Similarly, using the kubectl describe command, you can see events for the StatefulSet that demonstrate precisely what the order of Pod replica recreation was:
$ kubectl describe sts nginx-statefulset-example
...
Events:
Type Reason Age From Message
---- ------ ---- ---- -------
Normal SuccessfulDelete 3m12s statefulset-controller delete Pod nginx-statefulset-example-2 in StatefulSet nginx-statefulset-example successful
Normal SuccessfulCreate 2m34s (x2 over 12m) statefulset-controller create Pod nginx-statefulset-example-2 in StatefulSet nginx-statefulset-example successful
Normal SuccessfulDelete 2m25s statefulset-controller delete Pod nginx-statefulset-example-1 in StatefulSet nginx-statefulset-example successful
Normal SuccessfulCreate 105s (x2 over 13m) statefulset-controller create Pod nginx-statefulset-example-1 in StatefulSet nginx-statefulset-example successful
Normal SuccessfulDelete 99s statefulset-controller delete Pod nginx-statefulset-example-0 in StatefulSet nginx-statefulset-example successful
Normal SuccessfulCreate 64s (x2 over 13m) statefulset-controller create Pod nginx-statefulset-example-0 in StatefulSet nginx-statefulset-example successful
As expected, the rollout was done in reverse order. The first Pod to recreate was nginx-statefulset-example-2, followed by nginx-statefulset-example-1, and finally nginx-statefulset-example-0. Also, because we have used the default partition value of 0, all the Pods were updated. This is because all ordinal numbers of Pod replicas are greater than or equal to 0.
- Now we can verify that the Pods were recreated with the new image. Execute the following command to verify the first Pod replica in the StatefulSet object:
$ kubectl describe pod nginx-statefulset-example-0
...
Containers:
nginx:
Container ID: docker://031627cbea4c60194f7a2774ef965 ad52f6460f07bc44f7b426ff74a4ccad479
Image: nginx:1.18
- And finally, we can verify that the state was persisted because the existing PVCs were used for the new Pods. Please note that this will only work properly if you haven't deleted the PVCs for the StatefulSet manually in the previous section:
$ kubectl run -i --tty busybox --image=busybox:1.28 --rm --restart=Never -- sh
If you don't see a command prompt, try pressing enter.
/ # wget http://nginx-statefulset-example-0.nginx-headless/state.html && cat state.html
Connecting to nginx-statefulset-example-0.nginx-headless (10.244.1.135:80)
...
State of Pod 0
As you can see, the rollout of a new version of nginx was completed successfully and the state has been persisted even though the Pods were recreated.
Tip
You can change the StatefulSet container image imperatively using the kubectl set image sts nginx-statefulset-example nginx=nginx:1.18 --record command. This approach is only recommended for non-production scenarios. In general, StatefulSets are much easier to manage declaratively than imperatively.
Now, we will show how you can use the partition field to do a phased rollout with a canary. Assume we would like to update the nginx image version to 1.19. You would like to make sure that the change is working properly in your environment, using a canary deployment, which is a single Pod replica updated to the new image version. Please refer to the following steps:
- Modify the nginx-statefulset-rollingupdate.yaml manifest file so that the Pod container image version is nginx:1.19 and the partition number is equal to current replicas, in our case 3:
apiVersion: apps/v1
kind: StatefulSet
metadata:
name: nginx-statefulset-example
spec:
replicas: 3
serviceName: nginx-headless
podManagementPolicy: OrderedReady
updateStrategy:
type: RollingUpdate
rollingUpdate:
partition: 3
...
template:
...
spec:
containers:
- name: nginx
image: nginx:1.19
When the partition number is the same as the number of replicas, we can apply the YAML manifest to the cluster and no changes to the Pods will be introduced yet. This is called staging a rollout.
- Apply the manifest file to the cluster:
$ kubectl apply -f ./nginx-statefulset-rollingupdate.yaml --record
statefulset.apps/nginx-statefulset-example configured
- Now, let's create a canary for our new version. Decrease the partition number by one to 2 in the manifest file. This means that all Pod replicas with an ordinal number of less than 2 will not be updated – in our case, the nginx-statefulset-example-2 Pod only, and all others will remain unchanged:
apiVersion: apps/v1
kind: StatefulSet
metadata:
name: nginx-statefulset-example
spec:
replicas: 3
serviceName: nginx-headless
podManagementPolicy: OrderedReady
updateStrategy:
type: RollingUpdate
rollingUpdate:
partition: 2
...
- Apply the manifest file to the cluster again:
$ kubectl apply -f ./nginx-statefulset-rollingupdate.yaml --record
statefulset.apps/nginx-statefulset-example configured
- Use the kubectl rollout status command to follow the process. As expected, only one Pod will be recreated:
$ kubectl rollout status sts nginx-statefulset-example
Waiting for 1 pods to be ready...
partitioned roll out complete: 1 new pods have been updated...
- If you describe the nginx-statefulset-example-1 and nginx-statefulset-example-2 Pods, you can see that the first one is using the old version of the image, whereas the second is using the new one:
$ kubectl describe pod nginx-statefulset-example-1
...
Containers:
nginx:
Container ID: docker://031627cbea4c60194f7a2774ef965 ad52f6460f07bc44f7b426ff74a4ccad479
Image: nginx:1.18
...
$ kubectl describe pod nginx-statefulset-example-2
...
Containers:
nginx:
Container ID: docker://1c3b1e4dc7bb048d407f8aef2da91 8bf8ef2a8e8c2258b53b847c06bff2efbc5
Image: nginx:1.19
...
- At this point, you would like to perform verifications and smoke tests on your canary. For that, we will try getting the state.html file directly via the headless Service:
$ kubectl run -i --tty busybox --image=busybox:1.28 --rm --restart=Never -- sh
If you don't see a command prompt, try pressing enter.
/ # wget http://nginx-statefulset-example-2.nginx-headless/state.html && cat state.html
Connecting to nginx-statefulset-example-2.nginx-headless (10.244.1.139:80)
...
State of Pod 2
- Canary looks good, so we can continue with a phased rollout of our new version. For a phased rollout, you may use any lower partition number in the manifest. You can do a few small, phased rollouts or just proceed with a full rollout. Let's do a full rollout by decreasing partition to 0:
apiVersion: apps/v1
kind: StatefulSet
metadata:
name: nginx-statefulset-example
spec:
replicas: 3
serviceName: nginx-headless
podManagementPolicy: OrderedReady
updateStrategy:
type: RollingUpdate
rollingUpdate:
partition: 0
...
- Apply the manifest file to the cluster again:
$ kubectl apply -f ./nginx-statefulset-rollingupdate.yaml --record
statefulset.apps/nginx-statefulset-example configured
- Observe the next phase of the rollout using the kubectl rollout status command:
$ kubectl rollout status sts nginx-statefulset-example
Waiting for partitioned roll out to finish: 1 out of 3 new pods have been updated...
Waiting for 1 pods to be ready...
Waiting for 1 pods to be ready...
Waiting for partitioned roll out to finish: 2 out of 3 new pods have been updated...
Waiting for 1 pods to be ready...
Waiting for 1 pods to be ready...
partitioned roll out complete: 3 new pods have been updated...
As you can see, the phased rollout to the nginx:1.19 image version was completed successfully.
Tip
It is possible to do phased rollouts imperatively. To do that, you need to control the partition number using the kubectl patch command, for example, kubectl patch sts nginx-statefulset-example -p '{"spec":{"updateStrategy":{"type":"RollingUpdate","rollingUpdate":{"partition":3}}}}'. However, this is much less readable and error prone than declarative changes.
We will now take a look at how you can do rollbacks of StatefulSets.
Rolling back StatefulSet
In the previous Chapter 11, Deployment – Deploying Stateless Applications, we have described how you can do imperative rollbacks to Deployments. For StatefulSets, you can do exactly the same operations. To do that, you need to use the kubectl rollout undo commands. However, especially for StatefulSets, we recommend using a declarative model for introducing changes to your Kubernetes cluster. In this model, you usually commit each change to the source code repository, and performing rollback is very simple and involves just reverting the commit and applying the configuration again. Usually, the process of applying changes is performed as part of the CI/CD pipeline for the source code repository, instead of manually applying the changes by an operator. This is the easiest way to manage StatefulSets, and generally recommended in Infrastructure-as-Code and Configuration-as-Code paradigms.
Important note
When performing rollbacks to StatefulSets, you must be fully aware of the consequences of operations such as downgrading to an earlier version of the container image while persisting the state. For example, if your rollout to a new version has introduced data schema changes to the state, then you will not be able to safely roll back to an earlier version unless you ensure that the downward migration of state data is implemented!
In our example, if you would like to roll back to the nginx:1.18 image version for our StatefulSet, you would either modify the YAML manifest file manually or revert the commit in your source code repository if you use one. Then, all you would need to do is execute the kubectl apply command to the cluster.
In the last section, we will provide you with a set of best practices for managing StatefulSets in Kubernetes.
StatefulSet best practices
This section summarizes known best practices when working with StatefulSet objects in Kubernetes. The list is by no means complete, but is a good starting point for your journey with Kubernetes.
Use declarative object management for StatefulSets
It is a good practice in DevOps world to stick to declarative models for introducing updates to your infrastructure and applications. Using the declarative way of updates is the core concept for paradigms such as Infrastructure-as-Code and Configuration-as-Code. In Kubernetes, you can easily perform declarative updates using the kubectl apply command, which can be used on a single file or even a whole directory of YAML manifest files.
Tip
To delete objects, it is still better to use imperative commands. It is more predictable and less prone to errors. The declarative deletion of resources in the cluster is useful only in CI/CD scenarios, where the whole process is entirely automated.
The same principle applies also to StatefulSets. Performing a rollout or rollback when your YAML manifest files are versioned and kept in a source control repository is easy and predictable. Using the kubectl rollout undo and kubectl set image deployment commands is generally not recommended in production environments. Using these commands gets much more complicated when more than one person is working on operations in the cluster.
Do not use the TerminationGracePeriodSeconds Pod with a 0 value for StatefulSets
The specification of Pod allows you to set TerminationGracePeriodSeconds, which informs kubelet how much time it should allow for a Pod to gracefully terminate when it attempts to terminate it. If you set TerminationGracePeriodSeconds to 0, this will effectively make Pods terminate immediately, which is strongly discouraged for StatefulSets. StatefulSets often need graceful cleanup or preStop life cycle hooks to run before the container is removed, otherwise there is a risk that the state of StatefulSet will become inconsistent.
Scale down StatefulSets before deleting
When you delete a StatefulSet and you intend to reuse the PVCs later, you need to ensure that the StatefulSet terminates gracefully, in an ordered manner, so that any subsequent redeployment will not fail because of an inconsistent state in PVCs. If you perform the kubectl delete operation on your StatefulSet, all the Pods will be terminated at once. This is often not desired and you should first scale down the StatefulSet gracefully to zero replicas and then delete the StatefulSet itself.
Ensure state compatibility during StatefulSet rollbacks
If you ever intend to use StatefulSet rollbacks, you need to be aware of the consequences of operations such as downgrading to an earlier version of the container image while persisting the state. For example, if your rollout to a new version has introduced data schema changes in the state, then you will not be able to safely roll back to an earlier version unless you ensure that the downward migration of state data is implemented. Otherwise, your rollback will just recreate Pods with the older versions of the container image and they will fail to start properly because of incompatible state data.
Do not create Pods that match an existing StatefulSet label selector
It is possible to create Pods with labels that match the label selector of some existing StatefulSet. This can be done using bare Pods or another Deployment or ReplicaSet. This leads to conflicts, which Kubernetes does not prevent, and makes the existing StatefulSet believe that it has created the other Pods. The results may be unpredictable and, in general, you need to pay attention to how you organize your labeling of resources in the cluster. It is advised to use semantic labeling – you can learn more about this approach in the official documentation: https://kubernetes.io/docs/concepts/configuration/overview/#using-labels.
Summary
This chapter has demonstrated how to work with stateful workloads and applications on Kubernetes using StatefulSets. You first learned what the approaches to persisting state in containers and in Kubernetes Pods are and, based on that, we have described how a StatefulSet object can be used to persist the state. Next, we created an example StatefulSet, together with a headless Service. Based on that, you learned how PVCs and PVs are used in StatefulSets to ensure that the state is persisted between Pod restarts. Next, you learned how you can scale the StatefulSet and how to introduce updates using canary and phased rollouts. And finally, we provided you with a set of known best practices when working with StatefulSets.
In the next chapter, you will learn more about managing special workloads where you need to maintain exactly one Pod per each Node in Kubernetes – we will introduce a new Kubernetes object: DaemonSet.
Further reading
For more information regarding StatefulSets and persistent storage management in Kubernetes, please refer to the following Packt books:
- The Complete Kubernetes Guide, by Jonathan Baier, Gigi Sayfan, Jesse White (https://www.packtpub.com/virtualization-and-cloud/complete-kubernetes-guide)
- Getting Started with Kubernetes – Third Edition, by Jonathan Baier, Jesse White (https://www.packtpub.com/virtualization-and-cloud/getting-started-kubernetes-third-edition)
- Kubernetes for Developers, by Joseph Heck (https://www.packtpub.com/virtualization-and-cloud/kubernetes-developers)
- Hands-On Kubernetes on Windows, by Piotr Tylenda (https://www.packtpub.com/product/hands-on-kubernetes-on-windows/9781838821562)
You can also refer to the excellent official Kubernetes documentation (https://kubernetes.io/docs/home/), which is always the most up-to-date source of knowledge regarding Kubernetes in general.