Chapter 15: Launching a Kubernetes Cluster on Amazon Web Services with Amazon Elastic Kubernetes Service
In the previous chapter, we took our first steps with launching a Kubernetes cluster in a public cloud. Now we know what the Google Cloud Platform (GCP) Kubernetes offering looks like, we are going to move on to the Amazon Elastic Kubernetes Service (EKS) by Amazon Web Services (AWS).
In this chapter, you will learn what is needed to do to set up an AWS account, installing the supporting toolsets on macOS, Windows, and also Linux before finally launching and interacting with an Amazon EKS cluster.
We will be covering the following topics:
- What are AWS and Amazon EKS?
- Preparing your local environment
- Launching your Amazon EKS cluster
- Deploying a workload and interacting with your cluster
- Deleting your Amazon EKS cluster
Technical requirements
To following along with this chapter, you will need an AWS account with a valid payment attached to it.
Following the instructions in this chapter will incur a cost and it is important that you terminate any resources you launch once you have finished with them.
All prices quoted in this chapter are correct at the time of writing this book, and we recommend that you review the current costs before you launch any resources.
What are AWS and Amazon EKS?
There is a very good chance you have already heard of AWS, as not only is it one of the first public cloud providers, but also, at the time of writing, it has the largest market share.
AWS
As you may have already guessed, AWS is owned and operated by Amazon. Amazon, the retailer, first started to dabble with cloud services way back in 2000 when they started to develop and deploy application programming interfaces (APIs) for their retail partners to consume.
Off the back of this work, Amazon realized that they would need to build a better and more standardized infrastructure platform to not only host the services they had been developing but to also ensure that they could quickly scale, as more of the Amazon retail outlet was consuming more of the software services and was growing at an expediential rate.
Chris Pinkham and Benjamin Black wrote a white paper in 2003 that was approved by Jeff Bezos in 2004, which described an infrastructure platform where compute and storage resources can all be deployed programmatically.
The first public acknowledgment of AWS's existence was made in late 2004; however, the term was used to describe a collection of tools and APIs that would allow third parties to interact with Amazon's retail product catalog rather than what we know today.
It wasn't until 2006 that a rebranded AWS was launched, starting in March with the Simple Storage Service, or S3 for short, which was a service that allowed developers to write and serve individual files using a web API rather having to write and read from a traditional local filesystem.
The next service to launch, Amazon Simple Queue Service (SQS), had formed part of the original AWS collection of tools—this was a distributed message system that again could be controlled and consumed by developers using an API.
The final service launched in 2006 was a beta of the Amazon Elastic Compute Cloud service, or Amazon EC2 for short, which was limited to existing AWS customers—again, you could use the APIs developed by Amazon to launch resources.
This was the final piece of the puzzle for Amazon, and they now had the foundations of a public cloud platform they could use not only their own retail platform on but also sell space to other companies and the public, such as you and me.
If we fast forward from 2006, when there were three services, to the time of writing, which is late 2020, there are now over 170 services available. All of these 170+ services stick to the core principles that were laid out in the white paper written in 2003 each service is software-defined, meaning that all a developer has to do is to make a simple API request to launch, configure, and in some cases consume before finally being able to make a request terminate the service.
Tip
Services that are prefixed with Amazon are services that are standalone, unlike ones that are prefixed with AWS, which are services that are designed to be used alongside other AWS services.
Long gone are the days of having to order a service, have someone build and deploy, then hand it over to you—this takes deployment times down to seconds from what sometimes could take weeks.
Rather than discuss all 170+ services, which would be a collection of books all by itself, we should discuss the service we are going to be looking at in this chapter.
Amazon EKS
While AWS was the first of the major public cloud providers, it was one of the last to launch a standalone Kubernetes service. Amazon EKS was first announced in late 2017 and became generally available in the United States (US) East (N. Virginia) and US West (Oregon) regions in June 2018.
The service is built to work with and take advantage of other AWS services and features, such as the following:
- AWS Identity and Access Management (IAM): This service allows you to take control of and manage both end-user and programmatic access to other AWS services.
- Amazon Route 53: This is Amazon's Domain Name System (DNS) service. EKS can use it as a source of DNS for clusters, which means that service discovery and routing can easily be managed within your cluster.
- Amazon Elastic Block Storage (EBS): If you need persistent block storage for the containers running within your Amazon EKS instance, then it is provided by the same service used to provide block storage for the rest of your EC2 compute resources.
- EC2 Auto Scaling: Should your cluster need to scale, then the same technology to scale your EC2 instances is employed.
- Multi Availability Zones (AZs): The Amazon EKS management layer, as well as cluster nodes, can be configured to be spread across multiple AZs within a given region to bring high availability (HA) and resilience to your deployment.
Before we launch our Amazon EKS cluster, we are going to have to download, install, and configure a few tools.
Preparing your local environment
There are two sets of command-line tools we are going to install, but before we do, we should quickly discuss the steps to sign up for a new AWS account. If you already have an AWS account, then you can skip this task and move straight on to the Installing the AWS command-line interface section.
Signing up for an AWS account
Signing up for an AWS account is a straightforward process, as detailed here:
- Head over to https://aws.amazon.com/ and then click on the Create an AWS account button, which can be found in the top right of the page.
Important note
While Amazon offers a free tier for new users, it is limited to certain services, instance sizing, and also for 12 months. For information on the AWS Free Tier, see https://aws.amazon.com/free/.
- Fill out the initial form that asks for an email address, your preferred password, and the AWS account name.
- Once done, click on Continue and follow the onscreen instructions. These will involve you confirming both your payment details and also confirming your identity via an automated phone call.
Once you have your account created and enabled, you will be able to start using AWS services. In our case, we now need to install the command-line tools we will be using to launch our Amazon EKS cluster.
Installing the AWS command-line interface
Next on our list of tasks is to install the AWS command-line interface (CLI). As with the previous chapter, Chapter 14, Kubernetes Clusters on Google Kubernetes Engine, we will be targeting Windows, Linux, and also macOS, which we will be looking at first.
Installing on macOS
Installing the AWS CLI on macOS using Homebrew is as simple as running the following command:
$ brew install awscli
Once it's installed, running the following command:
$ aws --version
This will output the version of the AWS CLI, along with some of the support services it needs, as illustrated in the following screenshot:

Figure 15.1 – Checking the AWS CLI version number on macOS
Once it's installed, we can move on to the AWS CLI configuration section.
Installing on Windows
As with macOS, you can use a package manager to install the AWS CLI. As in Chapter 14, Kubernetes Clusters on Google Kubernetes Engine, we will be using Chocolatey. The command you need to run is shown here:
$ choco install awscli
Once using Chocolatey, running aws --version will give you similar output to what we saw on macOS, as illustrated in the following screenshot:

Figure 15.2 – Checking the AWS CLI version number on Windows
Once it's installed, we can move on to the AWS CLI configuration section.
Installing on Linux
While there are packages available for each distribution, the easiest way of installing the AWS CLI on Linux is to download and run the installer.
Important note
These instructions assume that you have the curl and unzip packages installed, if you don't, please install them using your distribution's package manager—for example, on Ubuntu, you would need to run sudo apt install unzip curl to install both packages.
To download and install the AWS CLI, run the following commands:
$ curl "https://awscli.amazonaws.com/awscli-exe-linux-x86_64.zip" -o "awscliv2.zip"
$ sudo ./aws/install
Once it's installed, you should be able to run aws --version, and you will get something like this:

Figure 15.3 – Checking the AWS CLI version number on Linux
Once installed, we can move on to the AWS CLI configuration section.
AWS CLI configuration
Once you have the AWS CLI installed and you have checked that it is running okay by issuing the aws --version command, you will need to link the CLI to your AWS account.
To do this, you will need to log in to the AWS console—this can be accessed at http://console.aws.amazon.com/. Once logged in, type IAM into the Find Services search box and click on the link to be taken to the Identity and Access Management (IAM) page. We need to create a user with programmatic access; to do this, follow these steps:
- Once the page has loaded, click on Users, which can be found under the Access Management section of the left-hand side menu.
- Enter the username—I will be using ekscluster—then select both the Programmatic access and AWS Management Console access types. If you select the latter option, you will be given the option of setting an autogenerated or custom password and can decide whether the password should be reset after the user logs in.
Personally, I set a custom password and unticked the option of resetting the password after the first login. To proceed to the next step, once you have set the details, click on the Next: Permissions button.
- Rather than create a group, we are going to simply grant our user an existing policy. To do this, select Attach existing policies directly and select the AdministratorAccess policy, then click on Next: Tags to proceed to the next step.
- As we are going to be removing this user at the end of the chapter, I am not going to enter any tags; however, you can, if you like. Click on the Next: Review button to move on to the final step.
- Once you have reviewed the information presented to you, click on the Create user button.
- Once the user has been created, click on the Download .csv button—this is the only time that the secret will be displayed, and once you close the page, you will have to generate a new one.
Once you have the secret, click on the Close button. We now have the credentials we can use to authenticate our AWS CLI against our AWS account.
Return to your terminal and then run the following command to create a default profile:
$ aws configure
This will ask for a few bits of information, as follows:
- AWS access key identifier (ID): This is the access key ID from the comma-separated values (CSV) file we downloaded.
- AWS secret access key: This is the key from the CSV file.
- Default region name: I entered us-east-1.
- Default output format: I left this blank.
To test that everything is working, you can run the following command:
$ aws ec2 describe-regions
This will list the AWS regions that are available, and the output should look like something like this:

Figure 15.4 – Testing the AWS CLI
Now we have the AWS CLI installed and configured to talk to our account, we need to install the next command-line tool.
Installing eksctl, the official CLI for Amazon EKS
While it is possible to launch an Amazon EKS cluster using the AWS CLI, it is complicated and there are a lot of steps. To get around this, Weaveworks have created a simple command-line tool that generates an AWS CloudFormation template and then launches your cluster.
Tip
AWS CloudFormation is Amazon's Infrastructure-as-Code (IaC) definition language that lets you define your AWS resources in such a way that they be can be deployed across multiple accounts or repeatedly in the same one. This is useful if you have to keep spinning up an environment—for example, as part of a continuous integration (CI) build.
Installation couldn't be easier—macOS users can run the following commands to install using Homebrew:
$ brew tap weaveworks/tap
$ brew install weaveworks/tap/eksctl
Windows users can use the following command:
$ choco install eksctl
All Linux users have to do is download the precompiled binaries and copy them into place, as follows:
$ curl --silent --location "https://github.com/weaveworks/eksctl/releases/latest/download/eksctl_$(uname -s)_amd64.tar.gz" | tar xz -C /tmp
$ sudo mv /tmp/eksctl /usr/local/bin
Once installed, you should be able to run eksctl version to get the version number. We are now ready to launch our cluster.
Launching your Amazon EKS cluster
For our test, we are going to use the defaults built into the eksctl command. These will launch an Amazon EKS cluster with the following attributes:
- In the us-west-1 region.
- With two worker nodes, using the m5.large instance type.
- Uses the official AWS EKS Amazon Machine Image (AMI).
- In its own virtual private cloud (VPC), which is Amazon's networking service.
- With an automatically generated random name.
So, without further ado, let's launch our cluster by running the following command:
$ eksctl create cluster
You might want to go and make a drink or catch up on emails, as this process can take around 30 minutes to complete.
If you are not following along, here is the output I got when running the command. First of all, some basic information is displayed about the version of eksctl and which region will be used:
[i] using region us-east-1
Now, by default, eksctl uses the us-west-2 region; however, as we set us-east-1 as the default when we configured the AWS CLI, it has used that setting. Next up, it will give some information on the networking and AZs it will be deploying resources into, as illustrated in the following code snippet:
[i] setting availability zones to [us-east-1e us-east-1a]
[i] subnets for us-east-1e - public:192.168.0.0/19 private:192.168.64.0/19
[i] subnets for us-east-1a - public:192.168.32.0/19 private:192.168.96.0/19
It will now give details of which version of the AMI it is going to use, along with the Kubernetes version that image supports, as follows:
[i] nodegroup "ng-6cd00965" will use "ami-0f4cae6ae56be18ee" [AmazonLinux2/1.18]
[i] using Kubernetes version 1.18
Now it knows all of the elements, it is going to create a cluster and with it make a start on the deployment, as follows:
[i] creating EKS cluster "attractive-sheepdog-1607259336" in "us-east-1" region with un-managed nodes
[i] will create 2 separate CloudFormation stacks for cluster itself and the initial nodegroup
[i] if you encounter any issues, check CloudFormation console or try 'eksctl utils describe-stacks --region=us-east-1 --cluster=attractive-sheepdog-1607259336'
As you can see, it has called my cluster attractive-sheepdog-1607259336; this will be referenced throughout the build. By default, logging is not enabled, as we can see here:
[i] CloudWatch logging will not be enabled for cluster "attractive-sheepdog-1607259336" in "us-east-1"
[i] you can enable it with 'eksctl utils update-cluster-logging --enable-types={SPECIFY-YOUR-LOG-TYPES-HERE (e.g. all)} --region=us-east-1 --cluster=attractive-sheepdog-1607259336'
Now is the point where we wait, and the following messages are displayed:
[i] Kubernetes API endpoint access will use default of {publicAccess=true, privateAccess=false} for cluster "attractive-sheepdog-1607259336" in "us-east-1"
[i] 2 sequential tasks: { create cluster control plane "attractive-sheepdog-1607259336", 3 sequential sub-tasks: { no tasks, create addons, create nodegroup "ng-6cd00965" } }
[i] building cluster stack "eksctl-attractive-sheepdog-1607259336-cluster"
[i] deploying stack "eksctl-attractive-sheepdog-1607259336-cluster"
Once deployed, it will download the cluster credentials and configure kubectl, as follows:
[✓] saved kubeconfig as "/Users/russ.mckendrick/.kube/config"
[i] no tasks
[✓] all EKS cluster resources for "attractive-sheepdog-1607259336" have been created
[i] adding identity "arn:aws:iam::687011238589:role/eksctl-attractive-sheepdog-160725-NodeInstanceRole-1FZFP968TXZG9" to auth ConfigMap
The final step is to wait for the nodes to become available, as is happening here:
[i] nodegroup "ng-6cd00965" has 0 node(s)
[i] waiting for at least 2 node(s) to become ready in "ng-6cd00965"
[i] nodegroup "ng-6cd00965" has 2 node(s)
[i] node "ip-192-168-23-50.ec2.internal" is ready
[i] node "ip-192-168-50-107.ec2.internal" is ready
Now we have both nodes online and ready, it is time to display a message confirming that everything is ready, as follows:
[i] kubectl command should work with "/Users/russ.mckendrick/.kube/config", try 'kubectl get nodes'
[✓] EKS cluster "attractive-sheepdog-1607259336" in "us-east-1" region is ready0
Now that the cluster is ready, let's do as the output suggests and run kubectl get nodes. As expected, this gives us details on the two nodes that make up our cluster, as illustrated in the following screenshot:

Figure 15.5 – Viewing the two cluster nodes
Now we have a cluster up and running, let's launch the same workload we launched when we launched our Google Kubernetes Engine (GKE) cluster.
Deploying a workload and interacting with your cluster
If you recall from the last chapter, we used the Guestbook example from the GCP GKE examples' GitHub repository.
First, we are going to deploy the workload before we then explore the web-based AWS console. Let's make a start on our Guestbook deployment.
Deploying the workload
Even though we are our cluster is running on AWS using Amazon EKS, we are going to be using the same set of YAML Ain't Markup Language (YAML) files we used to launch our workload in GKE. Follow these next steps:
- As before, our first step is launching the Redis Leader deployment and service using the following commands:
$ kubectl apply -f https://raw.githubusercontent.com/GoogleCloudPlatform/kubernetes-engine-samples/master/guestbook/redis-leader-deployment.yaml
$ kubectl apply -f https://raw.githubusercontent.com/GoogleCloudPlatform/kubernetes-engine-samples/master/guestbook/redis-leader-service.yaml
- Once the Redis Leader deployment and service have been created, we need to launch the Redis Follower deployment, as follows:
$ kubectl apply -f https://raw.githubusercontent.com/GoogleCloudPlatform/kubernetes-engine-samples/master/guestbook/redis-follower-deployment.yaml
$ kubectl apply -f https://raw.githubusercontent.com/GoogleCloudPlatform/kubernetes-engine-samples/master/guestbook/redis-follower-service.yaml
- Once Redis is up and running, it's time to launch the frontend deployment and service using the following commands:
$ kubectl apply -f https://raw.githubusercontent.com/GoogleCloudPlatform/kubernetes-engine-samples/master/guestbook/frontend-deployment.yaml
$ kubectl apply -f https://raw.githubusercontent.com/GoogleCloudPlatform/kubernetes-engine-samples/master/guestbook/frontend-service.yaml
- After a few minutes, we will be able to run the following command to get information on the service we have just launched, which should include details on where to access our workload:
$ kubectl get service frontend
You will notice that this time, the output is slightly different from the output we got when running the workload on GKE, as we can see in the following screenshot:

Figure 15.6 – Getting information on the frontend service
As you can see, rather than an Internet Protocol (IP) address, we get a Uniform Resource Locator (URL). Copy that into your browser.
Once you have opened the URL, given that we have used exactly the same work, you won't be surprised to see the Guestbook application, as shown in the following screenshot:

Figure 15.7 – The Guestbook application with a few test messages
Now we have our workload up and running, let's take a look at what we can see through the AWS console.
Exploring the AWS console
In this section, we are going to try to take a look at our newly deployed workload using the AWS console. First, we need to log in, as follows:
- Open https://console.aws.amazon.com/. If you are still logged in from when we generated the IAM credentials, you will need to log out as we will not be using our main AWS user for this part of the chapter.
- Once logged out, open the CSV file that we downloaded during the AWS CLI configuration section of the chapter and then copy and paste the console login link into your browser. Enter the credentials for the ekscluster user we created earlier in the AWS CLI configuration section of this chapter. If you selected the option to reset the password when the user first logs in, then you will be prompted to do so now.
Important note
You may be thinking to yourself: Why are we using a different user to log in to the AWS console, as my main user has full access? There is a good reason for this—when eksctl launched our cluster, there was a line that said adding identity. This granted permissions to the user that were used to create a cluster to be able to interact with the cluster using AWS services. This means that we will be able to view workloads and the like within the AWS console. If you were to use your regular user, then you would not have permission to see any of the details we are about to look at within the AWS console, due to the cluster not knowing about your main user.
- Next, make sure that the region we have launched our cluster in is selected. The region selector can be found in the top right next to the Support drop-down menu—make sure that US East (N. Virginia) us-east-1 is selected.
- Once you have the region selected, enter EKS into the Services menu and you will be taken to the Amazon Container Services page, as illustrated in the following screenshot:

Figure 15.8 – The Amazon Container Services page
- Next, click on the Clusters link underneath the Amazon EKS entry in the left-hand side menu, as illustrated in the following screenshot:

Figure 15.9 – Listing the Amazon EKS clusters
Clicking on the cluster name, which in my case is attractive-sheepdog-1607259336, will take you to the cluster view.
- The initial Overview tab will show you the nodes within the cluster. The next option is Workloads—clicking this will take you to the workloads view.
- By default, it will show you all of the Kubernetes namespaces, including the system ones—selecting the default namespace in the All Namespaces dropdown will display just the workloads we have launched, as illustrated in the following screenshot:

Figure 15.10 – Viewing the workloads in the default namespace
- Clicking on one of the deployments will give you more information on the deployment—this includes details of the pods, configuration, and so on. However, as you click around, you will find that all you can really do is view information on the services; there are no graphs, logging output, or anything that gives more than a basic overview of our workloads.
- The final section is Configuration; again, this gives basic information on our cluster and not a lot more.
Moving away from the EKS service page and going to the EC2 service section of the AWS console will display the two nodes, as illustrated in the following screenshot:
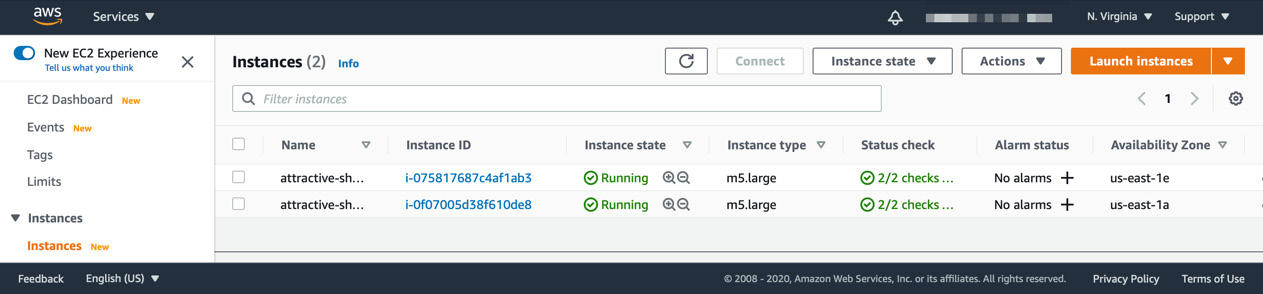
Figure 15.11 – Viewing the EC2 instances
Here, you will be able to drill down and find out more information on the instance, including its central processing unit (CPU), random-access memory (RAM), and network utilization; however, this is only for the instance itself and not for our Kubernetes workload.
- Selecting Load Balancers from the Load Balancing section of the left-hand side menu will show you the elastic load balancer that was launched and configured when we applied the frontend service, as illustrated in the following screenshot:

Figure 15.12 – Viewing the elastic load balancer
- The final AWS service we are using is AWS CloudFormation, so entering CloudFormation in the Services menu and clicking on the link will take you to the CloudFormation service page.
Here, you will see two stacks, one for the EKS nodes—these are our two EC2 instances—and then one for the EKS cluster, which is our Kubernetes management plane. These stacks are illustrated in the following screenshot:

Figure 15.13 – Viewing the AWS CloudFormation stacks
- Selecting one of the stacks will give you details on what happened when the stack was launched. It will list all of the many resources that were created during the launch of the Amazon EKS cluster using eksctl.
- If you select a template and then view it in the designer, you can even see the template that was generated by eksctl with a visual representation. The following screenshot gives a view of the simpler of the two stacks:

Figure 15.14 – Viewing the AWS CloudFormation template in the designer
That is about all we can see in the AWS console. As we have seen, while Amazon EKS is relatively simple to launch using eksctl, its level of integration with the AWS console is somewhat lacking compared to the GKE cluster we launched in the previous chapter.
While we were able to explore and view our workload, we could not interact with too much; also, the feedback on the cluster is tied into the basic monitoring offered by the Amazon EC2 service.
Once you have finished your Amazon EKS cluster, you can delete it.
Deleting your Amazon EKS cluster
You can delete your cluster by running the following command, making sure to replace the cluster name with that of your own:
$ eksctl delete cluster --name attractive-sheepdog-1607259336
Deleting the cluster does not take as long to run as when we launched it; in fact, it takes around 5 minutes. As before, eksctl gives you details on what it is doing as it deletes the resources, starting with the same details on when we launched the cluster, as illustrated in the following code snippet:
[i] eksctl version 0.33.0
[i] using region us-east-1
Then, it provides details on the cluster, as follows:
[i] deleting EKS cluster "attractive-sheepdog-1607259336"
[i] deleted 0 Fargate profile(s)
The first thing that is updated is the local kubectl configuration, as we can see here:
[✓] kubeconfig has been updated
Then, any resources that have been launched as part of deploying workloads onto our cluster are removed, as follows:
[i] cleaning up AWS load balancers created by Kubernetes objects of Kind Service or Ingress
Then, the two AWS CloudFormation stacks are removed, which in turn removes all of the resources they created and configured, as illustrated in the following code snippet:
[i] 2 sequential tasks: { delete nodegroup "ng-6cd00965", delete cluster control plane "attractive-sheepdog-1607259336" [async] }
[i] will delete stack "eksctl-attractive-sheepdog-1607259336-nodegroup-ng-6cd00965"
[i] waiting for stack "eksctl-attractive-sheepdog-1607259336-nodegroup-ng-6cd00965" to get deleted
[i] will delete stack "eksctl-attractive-sheepdog-1607259336-cluster"
[✓] all cluster resources were deleted
At this point, our cluster has been completely deleted.
Important note
Please double-check the EC2, EKS, and CloudFormation sections in the AWS console to ensure that all services have been correctly deleted as you will be charged for any orphaned or idle resources that have been left behind. While this is an unlikely scenario, it is best to double-check now rather than receive an unexpected bill at the end of the month.
So, how much would our Amazon EKS cluster have cost us to run for a month?
There are two sets of costs that we need to take into account—the first is for the Amazon EKS cluster itself. It is US Dollars (USD) $0.10 per hour for each Amazon EKS cluster you create; however, each Amazon EKS cluster can run multiple node groups, so you shouldn't have to launch more than one per region—so, the cluster itself comes in around $72 per month.
Now, added to the EC2 cluster nodes, which in our case would have cost around $70 each, this means that the total cost to run our cluster for a month would be around $212—and I say around because there are then charges for bandwidth and also for the AWS Elastic Load Balancing (ELB) service, which will increase the cost of our workload further.
Summary
In this chapter, we discussed the origins of AWS and also Amazon EKS before walking through how to sign up for an account and how to install and configure the two command-line tools required to easily launch an Amazon EKS cluster.
Once our cluster was up and running, we deployed the same workload as when we launched our GKE cluster. We did not have to make any allowances for the workload running on a different cloud provider—it just worked, even deploying a load balancer using the AWS native load balancing service.
We did, however, find that EKS is not as integrated with the AWS console as the Google service we looked at, and also learned that we had to install a second command-line tool to easily launch our cluster due to the complications of trying to do so using the AWS CLI. This would have been around eight steps, and that assumes that the Amazon VPC configuration and IAM roles had been created and deployed.
Personally, this lack of integration and complexity when it comes to launching and maintaining clusters compared to other providers would put me off running my Kubernetes workloads on Amazon EKS.
In the next chapter, we are going to look at launching an Azure Kubernetes Service (AKS) cluster on Microsoft Azure, which will be the last of the three public providers we will be covering.
Further reading
Here are links to more information on some of the topics and tools we have covered in this chapter:
- AWS: https://aws.amazon.com/
- Amazon EKS: https://aws.amazon.com/eks/
- The AWS CLI: https://aws.amazon.com/cli/
- eksctl: https://eksctl.io/
- Weaveworks: https://www.weave.works/
- Official documentation: https://docs.aws.amazon.com/eks/latest/userguide/what-is-eks.html