Chapter 11: Deployment – Deploying Stateless Applications
The previous chapter introduced two important Kubernetes objects: ReplicationController and ReplicaSet. At this point, you already know that they serve similar purposes in terms of maintaining identical, healthy replicas (copies) of Pods. In fact, ReplicaSet is a successor of ReplicationController and, in the most recent versions of Kubernetes, ReplicaSet should be used in favor of ReplicationController.
Now, it is time to introduce the Deployment object, which provides easy scalability, rolling updates, and versioned rollbacks for your stateless Kubernetes applications and services. Deployment objects are built on top of ReplicaSets and they provide a declarative way of managing them – just describe the desired state in the Deployment manifest and Kubernetes will take care of orchestrating the underlying ReplicaSets in a controlled, predictable manner. Alongside StatefulSet, which will be covered in the next chapter, it is the most important workload management object in Kubernetes. This will be the bread and butter of your development and operations on Kubernetes! The goal of this chapter is to make sure that you have all the tools and knowledge you need to deploy your stateless application components using Deployment objects, as well as to safely release new versions of your components using rolling updates of deployments.
This chapter will cover the following topics:
- Introducing the Deployment object
- How does a Deployment object manage revisions and version rollout?
- Deployment object best practices
Technical requirements
For this chapter, you will need the following:
- A Kubernetes cluster that's been deployed. You can use either a local or cloud-based cluster, but to fully understand the concepts shown in this chapter, we recommend using a multi-node, cloud-based Kubernetes cluster.
- The Kubernetes CLI (kubectl) must be installed on your local machine and configured to manage your Kubernetes cluster.
Kubernetes cluster deployment (local and cloud-based) and kubectl installation were covered in Chapter 3, Installing Your First Kubernetes Cluster.
You can download the latest code samples for this chapter from the official GitHub repository: https://github.com/PacktPublishing/The-Kubernetes-Bible/tree/master/Chapter11.
Introducing the Deployment object
Kubernetes gives you out-of-the-box flexibility when it comes to running different types of workloads, depending on your use cases. Let's have a brief look at the supported workloads to understand where the Deployment object fits, as well as its purpose. When implementing cloud-based applications, you will generally need the following types of workloads:
- Stateless: Applications and services that are stateless, by definition, do not have any modifiable client data (state) that is needed for further operations or sessions. In the container-based world, what we mean by stateless containers or Pods is that they do not store any application state inside the container or attached volume. Imagine that you have two different nginx containers serving the same purpose: the first one stores some data coming from user requests in a JSON file inside the container, while the second one stores data in MongoDB that's running in a separate container. Both serve the same purpose, but the first one is stateless and the second one is not stateless (in other words, it's stateful). However, our small application, as a whole, is not stateless because some of its components are stateful. In the first case, the nginx container is the stateful component, while in the second case, the MongoDB container is the stateful component. Stateless workloads are easy to orchestrate, scale up and down, and, in general, are simple to manage. In Kubernetes, Deployment objects are used to manage stateless workloads.
- Stateful: In the case of containers and Pods, we call them stateful if they store any modifiable data inside themselves. A good example of such a Pod is a MySQL or MongoDB Pod that reads and writes the data to a persistent volume. Stateful workloads are much harder to manage – you need to carefully manage sticky sessions or data partitions during rollouts, rollbacks, and when scaling. As a rule of thumb, try to keep stateful workloads outside your Kubernetes cluster if possible, such as by using cloud-based Software-as-a-Service database offerings. In Kubernetes, StatefulSet objects are used to manage stateful workloads. Chapter 12, StatefulSet – Deploying Stateful Applications, provides more details about these types of objects.
- Batch: This type of workload is anything that performs job or task processing, either scheduled or on demand. Depending on the type of application, batch workloads may require thousands of containers and a lot of nodes – this can be anything that happens in the background. Containers that are used for batch processing should also be stateless, to make it easier to resume interrupted jobs. In Kubernetes, Job and CronJob objects are used to manage batch workloads. Chapter 4, Running Your Docker Containers, provides more details about these types of objects.
- Node-local: In many cases, Kubernetes cluster operations require periodic maintenance of Nodes or system log aggregation for each Node. Usually, such workloads are not user-facing but are crucial to the proper functionality of each Node in the cluster. In Kubernetes, DaemonSet objects are used to manage node-local workloads. Chapter 13, DaemonSet – Maintaining Pod Singletons on Nodes, provides more details about these types of objects.
With this brief summary regarding the different types of workloads in Kubernetes, we can dive deeper into managing stateless workloads using Deployment objects. In short, they provide declarative and controlled updates for Pods and ReplicaSets. You can declaratively perform operations such as the following by using them:
- Perform a rollout of a new ReplicaSet.
- Change the Pod template and perform a controlled rollout. The old ReplicaSet will be gradually scaled down, whereas the new ReplicaSet will scale up at the same rate.
- Perform a rollback to an earlier version of the Deployment object.
- Scale ReplicaSet up or down, without needing to make any changes to the Pod definition.
- Pause and resume the rollout of the new ReplicaSet, if there is a need to introduce fixes.
In this way, Deployment objects provide an end-to-end pipeline for managing your stateless components running in Kubernetes clusters. Usually, you will combine them with Service objects, as presented in Chapter 7, Exposing Your Pods with Services, to achieve high fault tolerance, health monitoring, and intelligent load balancing for traffic coming into your application.
Now, let's have a closer look at the anatomy of the Deployment object specification and how to create a simple example deployment in our Kubernetes cluster.
Creating a Deployment object
First, let's take a look at the structure of an example Deployment YAML manifest file, nginx-deployment.yaml, that maintains three replicas of an nginx pod:
apiVersion: apps/v1
kind: Deployment
metadata:
name: nginx-deployment-example
spec:
replicas: 3
selector:
matchLabels:
app: nginx
environment: test
minReadySeconds: 10
strategy:
type: RollingUpdate
rollingUpdate:
maxUnavailable: 1
maxSurge: 1
template:
metadata:
labels:
app: nginx
environment: test
spec:
containers:
- name: nginx
image: nginx:1.17
ports:
- containerPort: 80
As you can see, the structure of the Deployment spec is almost identical to ReplicaSet, although it has a few extra parameters for configuring the strategy for rolling out new versions. The specification has four main components:
- replicas: Defines the number of Pod replicas that should run using the given template and matching label selector. Pods may be created or deleted to maintain the required number. This property is used by the underlying ReplicaSet.
- selector: A label selector, which defines how to identify Pods that the underlying ReplicaSet owns. This can include set-based and equality-based selectors. In the case of Deployments, the underlying ReplicaSet will also use a generated pod-template-hash label to ensure that there are no conflicts between different child ReplicaSets when you're rolling out a new version. Additionally, this generally prevents accidental acquisitions of bare Pods, which could easily happen with simple ReplicaSets. Nevertheless, Kubernetes does not prevent you from defining overlapping pod selectors between different Deployments or even other types of controllers. However, if this happens, they may conflict and behave unexpectedly.
- template: Defines the template for Pod creation. Labels used in metadata must match our selector.
- strategy: Defines the details of the strategy that will be used to replace existing Pods with new ones. You will learn more about such strategies in the following sections. In this example, we showed the default RollingUpdate strategy. In short, this strategy works by slowly replacing the Pods of the previous version, one by one, by using the Pods of the new version. This ensures zero downtime and, together with Service objects and readiness probes, provides traffic load balancing to pods that can serve the incoming traffic.
Important Note
The Deployment spec provides a high degree of reconfigurability to suit your needs. We recommend referring to the official documentation for all the details: https://kubernetes.io/docs/reference/generated/kubernetes-api/v1.19/#deploymentspec-v1-apps.
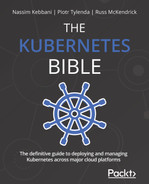
To better understand the relationship of Deployment, its underlying child ReplicaSet, and Pods, please look at the following diagram:
Figure 11.1 – Kubernetes Deployment
As you can see, once you have defined and created a Deployment, it is not possible to change its selector. This is desired because otherwise, you could easily end up with orphaned ReplicaSets. There are two important actions that you can perform on existing Deployment objects:
- Modify template: Usually, you would like to change the Pod definition to a new image version of your application. This will cause a rollout to begin, according to the rollout strategy.
- Modify replicas number: Just changing the number will cause ReplicaSet to gracefully scale up or down.
Now, let's declaratively apply our example Deployment YAML manifest file, nginx-deployment.yaml, to the cluster using the kubectl apply command:
$ kubectl apply -f ./nginx-deployment.yaml --record
Using the --record flag is useful for tracking the changes that are made to the objects, as well as to inspect which commands caused these changes. You will then see an additional automatic annotation, kubernetes.io/change-cause, which contains information about the command.
Immediately after the Deployment object has been created, use the kubectl rollout command to track the status of your Deployment in real time:
$ kubectl rollout status deployment nginx-deployment-example
Waiting for deployment "nginx-deployment-example" rollout to finish: 0 of 3 updated replicas are available...
Waiting for deployment "nginx-deployment-example" rollout to finish: 0 of 3 updated replicas are available...
Waiting for deployment "nginx-deployment-example" rollout to finish: 0 of 3 updated replicas are available...
deployment "nginx-deployment-example" successfully rolled out
This is a useful command that can give us a lot of insight into what is happening with an ongoing Deployment rollout. You can also use the usual kubectl get or kubectl describe commands:
$ kubectl get deploy nginx-deployment-example
NAME READY UP-TO-DATE AVAILABLE AGE
nginx-deployment-example 3/3 3 3 6m21s
As you can see, the Deployment has been successfully created and all three Pods are now in the ready state.
Tip
Instead of typing deployment, you can use the deploy abbreviation when using kubectl commands.
You may also be interested in seeing the underlying ReplicaSets:
$ kubectl get rs
NAME DESIRED CURRENT READY AGE
nginx-deployment-example-5549875c78 3 3 3 8m7s
Please take note of the additional generated hash, 5549875c78, in the name of our ReplicaSet, which is also the value of the pod-template-hash label, which we mentioned earlier.
Lastly, you can see the pods in the cluster that were created by the Deployment object using the following command:
$ kubectl get pods
NAME READY STATUS RESTARTS AGE
nginx-deployment-example-5549875c78-5srkn 1/1 Running 0 11m
nginx-deployment-example-5549875c78-h5n76 1/1 Running 0 11m
nginx-deployment-example-5549875c78-mn5zn 1/1 Running 0 11m
Congratulations – you have created and inspected your first Kubernetes Deployment! Next, we will take a look at how Service objects are used to expose your Deployment to external traffic coming into the cluster.
Exposing Deployment Pods using Service objects
Service objects were covered in detail in Chapter 7, Exposing Your Pods with Services, so in this section, we will provide a brief recap about the role of Services and how they are usually used with Deployments. Services are Kubernetes objects that allow you to expose your Pods, whether this is to other Pods in the cluster or end users. They are the crucial building blocks for highly available and fault-tolerant Kubernetes applications, since they provide a load balancing layer that actively routes incoming traffic to ready and healthy Pods.
The Deployment objects, on the other hand, provide Pod replication, automatic restarts when failures occur, easy scaling, controlled version rollouts, and rollbacks. But there is a catch: Pods that are created by ReplicaSets or Deployments have a finite life cycle. At some point, you can expect them to be terminated; then, new Pod replicas with new IP addresses will be created in their place. So, what if you have a Deployment running web server Pods that need to communicate with Pods that have been created as a part of another Deployment such as backend Pods? Web server Pods cannot assume anything about the IP addresses or the DNS names of backend Pods, as they may change over time. This issue can be resolved with Service objects, which provide reliable networking for a set of Pods.
In short, Services target a set of Pods, and this is determined by label selectors. These label selectors work on the same principle that you have learned about for ReplicaSets and Deployments. The most common scenario is exposing a Service for an existing Deployment by using the same label selector. The Service is responsible for providing a reliable DNS name and IP address, as well as for monitoring selector results and updating the associated Endpoint object with the current IP addresses of the matching Pods. For internal cluster communication, this is usually achieved using simple ClusterIP Services, whereas to expose them to external traffic, you can use the NodePort Service or, more commonly in cloud deployments, the LoadBalancer Service.
To visualize how Service objects interact with Deployment objects in Kubernetes, please look at the following diagram:

Figure 11.2 – Client Pod performing requests to the Kubernetes Deployment, exposed by the ClusterIP Service
This diagram visualizes how any client Pod in the cluster can transparently communicate with the nginx Pods that are created by our Deployment object and exposed using the ClusterIP Service. ClusterIPs are essentially virtual IP addresses that are managed by the kube-proxy service (process) that is running on each Node. kube-proxy is responsible for all the clever routing logic in the cluster and ensures that the routing is entirely transparent to the client Pods – they do not need to be aware if they are communicating with the same Node, a different Node, or even an external component. The role of the Service object is to define a set of ready Pods that should be hidden behind a stable ClusterIP. Usually, the internal clients will not be calling the Service pods using the ClusterIP, but they will use a DNS short name, which is the same as Service name; for example, nginx-service-example. This will be resolved to the ClusterIP by the cluster's internal DNS service. Alternatively, they may use a DNS Fully Qualified Domain Name (FQDN) in the form of <serviceName>.<namespaceName>.svc.<clusterDomain>; for example, nginx-service-example.default.svc.cluster.local.
Important Note
For LoadBalancer or NodePort Services that expose Pods to external traffic, the principle is similar as internally, they also provide a ClusterIP for internal communication. The difference is that they also configure more components so that external traffic can be routed to the cluster.
Now that you're equipped with the necessary knowledge about Service objects and their interactions with Deployment objects, let's put what we've learned into practice!
Creating a Service declaratively
In this section, we are going to expose our nginx-deployment-example Deployment using the nginx-service-example Service object, which is of the LoadBalancer type, by performing the following steps:
- Create an nginx-service.yaml manifest file with the following content:
apiVersion: v1
kind: Service
metadata:
name: nginx-service-example
spec:
selector:
app: nginx
environment: test
type: LoadBalancer
ports:
- port: 80
protocol: TCP
targetPort: 80
The label selector of the Service is the same as the one we used for our Deployment object. The specification of the Service instructs us to expose our Deployment on port 80 of the cloud load balancer, and then route the traffic from target port 80 to the underlying Pods.
Important Note
Depending on how your Kubernetes cluster is deployed, you may not be able to use the LoadBalancer type. In that case, you may need to use the NodePort type for this exercise or stick to the simple ClusterIP type and skip the part about external access. For local development deployments such as minikube, you will need to use the minikube service command to access your Service. You can find more details in the documentation: https://minikube.sigs.k8s.io/docs/commands/service/.
- Now, use the kubectl get or kubectl describe command to gather information about, and the status of, our new service and associated load balancer:
$ kubectl describe service nginx-service-example
...
LoadBalancer Ingress: 40.88.196.15
…
Events:
Type Reason Age From Message
---- ------ ---- ---- -------
Normal EnsuringLoadBalancer 10m service-controller Ensuring load balancer
Normal EnsuredLoadBalancer 11m service-controller Ensured load balancer
Please note that creating the external cloud load balancer may take a bit of time, so you may not see an external IP address immediately. In this case, the external IP is 40.88.196.15.
Tip
You can use the svc abbreviation in the kubectl commands instead of typing service.
- Now, navigate to your favorite web browser and open the address for your Service; for example http://40.88.196.15 (your address will be different, depending on the output of the kubectl describe command). With that, we have exposed port 80, which is a simple HTTP endpoint, not HTTPS, which is a secure version of HTTP. For demonstration purposes, this is enough, but for production workloads, you need to ensure you have set up properly HTTPS for your load balancer and inside the cluster. You should see the default nginx welcome page, served by one of the three Pods in our Deployment object:

Figure 11.3 – Web page served by nginx running in Deployment pods
This shows how Services are used to expose Deployment Pods to external traffic. Now, let's perform an experiment that demonstrates how internal traffic is handled by Services for other client Pods:
- Create an interactive busybox Pod and start the Bourne shell process. The following command will create the Pod and immediately attach it to your terminal so that you can interact with it from within the Pod:
$ kubectl run -i --tty busybox --image=busybox --rm --restart=Never -- sh
- When the container shell prompt appears, download the default web page served by nginx Pods in the deployment. Use the nginx-deployment-example Service name as the short DNS name:
$ wget http://nginx-service-example && cat index.html
- Alternatively, you can use DNS FQDN:
$ rm ./index.html
$ wget http://nginx-service-example.default.svc.cluster.local && cat index.html
- In both cases, you will see the same HTML source code for our default web page.
- Use the exit command to exit the session and automatically remove the busybox Pod.
Now, we will quickly show you how to achieve a similar result using imperative commands to create a Service for our Deployment object.
Creating a Service imperatively
A similar effect can be achieved using the imperative kubectl expose command – a Service will be created for our Deployment object named nginx-deployment-example. Use the following command:
$ kubectl expose deployment --type=LoadBalancer nginx-deployment-example
service/nginx-deployment-example exposed
This will create a Service with the same name as the Deployment object; that is, nginx-deployment-example. If you would like to use a different name, as shown in the declarative example, you can use the --name=nginx-service-example parameter. Additionally, port 80, which will be used by the Service, will be the same as the one that was defined for the Pods. If you want to change this, you can use the --port=<number> and --target-port=<number> parameters.
Please note that this imperative command is recommended for use in development or debugging scenarios only. For production environments, you should leverage declarative Infrastructure-as-Code and Configuration-as-Code approaches as much as possible.
Role of readiness, liveness, and startup probes
In Kubernetes, there are three types of probes that you can configure for each container running in a Pod:
- Readiness probe: This is used to determine whether a given container is ready to accept traffic. A Pod is considered ready only if all its containers are ready. Pods that are not ready will be removed from Service Endpoints until they become ready again. In other words, such Pods will not be considered while load balancing traffic via Service. This is the most important probe from the Service object's perspective – setting it up properly ensures that the end users will experience zero downtime during rollouts and rollbacks, and also during any failures of individual Pods.
- Liveness probe: This is used to detect whether a container needs to be restarted. This can help in situations where a container has been stuck in a deadlock or other issues, where the container process is alive but unable to operate properly. Restarting the container may increase the availability of Pods in that case. We briefly covered this probe in Chapter 10, Running Production-Grade Kubernetes Workloads, as it complements the role of ReplicaSet.
- Startup probe: This is an additional probe that's used for determining whether a container has been fully started – the readiness and liveness probes are disabled until this probe returns successfully. This is especially useful for containers that have a long startup time due to some initialization. In this way, you can avoid premature kills being made by the liveness probe.
All these probes are incredibly useful when you're configuring your Deployments – always try to predict possible life cycle scenarios for the processes running in your containers and configure the probes accordingly for your Deployments.
Probes can have different forms. For example, they can be running a command (exec) inside the container and verifying whether the exit code is successful. Alternatively, they can be HTTP GET requests (httpGet) to a specific endpoint of the container or attempting to open a TCP socket (tcpSocket) and checking if a connection could be established. Usually, httpGet probes are used on dedicated health endpoints (for liveness) or ready endpoints (for readiness) that are exposed by the process running in the container. These endpoints would encapsulate the logic of the actual health or readiness check.
Please note that, by default, no probes are configured on containers running in Pods. Kubernetes will serve traffic to Pod containers behind the Service, but only if the containers have successfully started, and restart them if they have crashed using the default always-restart policy. This means that it is your responsibility to figure out what type of probes and what settings you need for your particular case. You will also need to understand the possible consequences and caveats of incorrectly configured probes – for example, if your liveness probe is too restrictive and has timeouts that are too small, it may wrongfully restart your containers and decrease the availability of your application.
Now, let's demonstrate how you can configure a readiness probe on our Deployment and how it works in real time.
Important Note
If you are interested in the configuration details for other types of probes, please refer to the official documentation: https://kubernetes.io/docs/tasks/configure-pod-container/configure-liveness-readiness-startup-probes/. We have only covered the readiness probe in this section as it is the most important for interactions between Service objects and Deployment objects.
The nginx Deployment that we use is very simple and does not need any dedicated readiness probe. Instead, we will arrange the container's setup so that we can have the container's readiness probe fail or succeed on demand. The idea is to create an empty file called /usr/share/nginx/html/ready during container setup, which will be served on the /ready endpoint by nginx (just like any other file) and configure a readiness probe of the httpGet type to query the /ready endpoint for a successful HTTP status code. Now, by deleting or recreating the ready file using the kubectl exec command, we can easily simulate failures in our Pods that cause the readiness probe to fail or succeed.
Please follow these steps to configure and test the readiness probe:
- Delete the existing Deployment using the following command:
$ kubectl delete deployment nginx-deployment-example
- Copy our previous YAML manifest for the Deployment:
$ cp nginx-deployment.yaml nginx-deployment-readinessprobe.yaml
- Open the file and modify the following parts of the manifest:
apiVersion: apps/v1
kind: Deployment
metadata:
name: nginx-deployment-example
spec:
...
template:
...
spec:
containers:
- name: nginx
image: nginx:1.17
ports:
- containerPort: 80
command:
- /bin/sh
- -c
- |
touch /usr/share/nginx/html/ready
echo "You have been served by Pod with IP address: $(hostname -i)" > /usr/share/nginx/html/index.html
nginx -g "daemon off;"
readinessProbe:
httpGet:
path: /ready
port: 80
initialDelaySeconds: 5
periodSeconds: 2
timeoutSeconds: 10
successThreshold: 1
failureThreshold: 2
There are multiple parts changing in the Deployment manifest, all of which have been highlighted. First, we overridden the default container entry point command using command and passed additional arguments. command is set to /bin/sh to execute a custom shell command. The additional arguments are constructed in the following way:
- -c is an argument for /bin/sh that instructs it that what follows is a command to be executed in the shell.
- touch /usr/share/nginx/html/ready is the first command that's used in the container shell. This will create an empty ready file that can be served by nginx on the /ready endpoint.
- echo "You have been served by Pod with IP address: $(hostname -i)" > /usr/share/nginx/html/index.html is the second command that sets the content of index.html to information about the internal cluster Pod's IP address. hostname -i is the command that's used to get the container IP address. This value will be different for each Pod running in our Deployment.
- nginx -g "daemon off;". Finally, we execute the default entrypoint command for the nginx:1.17 image. This will start the nginx web server as the main process in the container.
Important Note
Usually, you would perform such customization using a new Docker image, which inherits from the nginx:1.17 image as a base. The method shown here is being used for demonstration purposes and shows how flexible the Kubernetes runtime is.
The second set of changes we made in the YAML manifest for the Deployment were for the definition of readinessProbe, which is configured as follows:
- The probe is of the httpGet type and executes an HTTP GET request to the /ready HTTP endpoint on port 80 of the container.
- initialDelaySeconds: This is set to 5 seconds and configures the probe to start querying after 5 seconds from container start.
- periodSeconds: This is set to 2 seconds and configures the probe to query in 2-second intervals.
- timeoutSeconds: This is set to 10 seconds and configures a number of seconds, after which the HTTP GET request times out.
- successThreshold: This is set to 1 and configures the minimum number of consecutive success queries of the probe before it is considered to be successful once it has failed.
- failureThreshold: This is set to 2 and configures the minimum number of consecutive failed queries of the probe before it is considered to have failed. Setting it to a value that's greater than 1 ensures that the probe is not providing false positives.
To create the deployment, follow these steps:
- Apply the new YAML manifest file to the cluster using the following command:
$ kubectl apply -f ./nginx-deployment-readinessprobe.yaml --record
- Use the kubectl describe command to get the external load balancer IP address of the nginx-deployment-example Service, which we created at the beginning of this section and is still running (if you are recreating the Service, you may need to wait until it has been configured):
$ kubectl describe svc nginx-service-example
...
LoadBalancer Ingress: 52.188.43.251
...
Endpoints: 10.244.0.43:80,10.244.1.50:80,10.244.1.51:80
We will use 52.188.43.251 as the IP address in our examples. You can also see that the service has three Endpoints that map to our Deployment Pods, all of which are ready to serve traffic.
- Navigate to http://52.188.43.251 in your favorite web browser. Please turn off web browser caching while making these requests to avoid any cached responses to your queries. In Chrome, you can simply do this for your current tab by opening Developer Tools by pressing F12 and checking the Disable Cache checkbox. Press F5 to refresh. You will notice that the responses iterate over three different Pod IP addresses. This is, because our Deployment has been configured to have three Pod replicas. Each time you perform a request, you may hit a different Pod:
You have been served by Pod with IP address: 10.244.0.43
... (a few F5 hits later)
You have been served by Pod with IP address: 10.244.1.51
... (a few F5 hits later)
You have been served by Pod with IP address: 10.244.1.50
- You can cross-check this with the kubectl get pod command to see the actual addresses of the Pods:
$ kubectl get pod -o wide
NAME READY STATUS RESTARTS AGE IP ...
nginx-deployment-example-85cd4b66f-94r4q 1/1 Running 0 11m 10.244.1.51 ...
nginx-deployment-example-85cd4bb66f-95bwd 1/1 Running 0 11m 10.244.1.50 ...
nginx-deployment-example-85cd4bb66f-ssccm 1/1 Running 0 11m 10.244.0.43 ...
- Now, let's simulate a readiness failure for the first Pod. In our case, this is nginx-deployment-example-85cd4bb66f-94r4q, which has an IP address of 10.244.1.51. To do this, we need to simply delete the ready file inside the container using the kubectl exec command:
$ kubectl exec -it nginx-deployment-example-85cd4bb66f-94r4q -- rm /usr/share/nginx/html/ready
- The readiness probe will now start to fail, but not immediately! We have set it up so that it needs to fail at least two times, and each check is performed in 2-second intervals. So, if you are quick, you can go to your web browser and try refreshing the external address of our Service a few times. However, you may still see that you were served by 10.244.1.51. Later, you will notice that you are only served by two other Pods that are still ready.
- Now, if you describe the nginx-service-example Service, you will see that it only has two Endpoints available, as expected:
$ kubectl describe svc nginx-service-example
...
Endpoints: 10.244.0.43:80,10.244.1.50:80
- In the events for the Pod, you can also see that it is considered not ready:
$ kubectl describe pod nginx-deployment-example-85cd4bb66f-94r4q
...
Events:
Type Reason Age From Message
---- ------ ---- ---- -------
Warning Unhealthy 2m21s (x151 over 7m21s) kubelet Readiness probe failed: HTTP probe failed with statuscode: 404
- We can push this even further. Delete the ready files in the other two Pods (nginx-deployment-example-85cd4bb66f-95bwd and nginx-deployment-example-85cd4bb66f-ssccm, in our case) to make the whole Service fail:
$ kubectl exec -it nginx-deployment-example-85cd4bb66f-95bwd -- rm /usr/share/nginx/html/ready
$ kubectl exec -it nginx-deployment-example-85cd4bb66f-ssccm -- rm /usr/share/nginx/html/ready
- Now, when you refresh the web page, you will see that the request is pending and that eventually, it will fail with a timeout. We are now in a pretty bad state – we have a total readiness failure for all the Pod replicas in our Deployment!
- Finally, let's make one of our Pods ready again by recreating the file. You can refresh the web page so that the request is pending and, at the same time, execute the necessary command to create the ready file:
$ kubectl exec -it nginx-deployment-example-85cd4bb66f-ssccm -- touch /usr/share/nginx/html/ready
- After about 2 seconds (this is the probe interval), the pending request in the web browser should succeed and you will be presented with a nice response from nginx:
You have been served by Pod with IP address: 10.244.0.43
Congratulations – you have successfully configured and tested the readiness probe for your Deployment Pods! This should give you a good insight into how the probes work and how you can use them with Services that expose your Deployments.
Next, we will take a brief look at how you can scale your Deployments.
Scaling a Deployment object
The beauty of Deployments is that you can almost instantly scale them up or down, depending on your needs. When the Deployment is exposed behind a Service, the new Pods will be automatically discovered as new Endpoints when you scale up, or automatically removed from the Endpoints list when you scale down. The steps for this are as follows:
- First, let's scale up our Deployment declaratively. Open the nginx-deployment-readinessprobe.yaml YAML manifest file and modify the number of replicas:
apiVersion: apps/v1
kind: Deployment
metadata:
name: nginx-deployment-example
spec:
replicas: 10
...
- Apply these changes to the cluster using the kubectl apply command:
$ kubectl apply -f ./nginx-deployment-readinessprobe.yaml --record
deployment.apps/nginx-deployment-example configured
- Now, if you check the Pods using the kubectl get pods command, you will immediately see that new Pods are being created. Similarly, if you check the output of the kubectl describe command for the Deployment, you will see the following in the events:
$ kubectl describe deploy nginx-deployment-example
...
Events:
Type Reason Age From Message
---- ------ ---- ---- -------
Normal ScalingReplicaSet 21s deployment-controller Scaled up replica set nginx-deployment-example-85cd4bb66f to 10
- You can achieve the same result using the imperative command, which is only recommended for development scenarios:
$ kubectl scale deploy nginx-deployment-example --replicas=10
deployment.apps/nginx-deployment-example scaled
- To scale down our Deployment declaratively, simply modify the nginx-deployment-readinessprobe.yaml YAML manifest file and change the number of replicas:
apiVersion: apps/v1
kind: Deployment
metadata:
name: nginx-deployment-example
spec:
replicas: 2
...
- Apply the changes to the cluster using the kubectl apply command:
$ kubectl apply -f ./nginx-deployment-readinessprobe.yaml --record
- You can achieve the same result using imperative commands. For example, you can execute the following command:
$ kubectl scale deploy nginx-deployment-example --replicas=2
If you describe the Deployment, you will see that this scaling down is reflected in the events:
$ kubectl describe deploy nginx-deployment-example
...
Events:
Type Reason Age From Message
---- ------ ---- ---- -------
Normal ScalingReplicaSet 5s deployment-controller Scaled down replica set nginx-deployment-example-85cd4bb66f to 2
Deployment events are very useful if you want to know the exact timeline of scaling and the other operations that can be performed with the Deployment object.
Important Note
It is possible to autoscale your deployments using HorizontalPodAutoscaler. This will be covered in Chapter 20, Autoscaling Kubernetes Pods and Nodes.
Next, you will learn how to delete a Deployment from your cluster.
Deleting a Deployment object
To delete a Deployment object, you can do two things:
- Delete the Deployment object, along with the Pods that it owns. This can be done by first scaling down automatically.
- Delete the Deployment object and leave the other Pods unaffected.
To delete the Deployment object and its Pods, you can use the regular kubectl delete command:
$ kubectl delete deploy nginx-deployment-example
You will see that the Pods get terminated and that the Deployment object is then deleted.
Now, if you would like to delete just the Deployment object, you need to use the --cascade=orphan option for kubectl delete:
$ kubectl delete deploy nginx-deployment-example --cascade=orphan
After executing this command, if you inspect what pods are in the cluster, you will still see all the Pods that were owned by the nginx-deployment-example Deployment.
How does a Deployment object manage revisions and version rollout?
So far, we have only covered making one possible modification to a living Deployment – we have scaled up and down by changing the replicas parameter in the specification. However, this is not all we can do! It is possible to modify the Deployment's Pod template (.spec.template) in the specification and, in this way, trigger a rollout. This rollout may be caused by a simple change, such as changing the labels of the Pods, but it may be also a more complex operation when the container images in the Pod definition are changed to a different version. This is the most common scenario as it enables you, as a Kubernetes cluster operator, to perform a controlled, predictable rollout of a new version of your image and effectively create a new revision of your Deployment.
Your Deployment uses a rollout strategy, which can be specified in a YAML manifest using .spec.strategy.type. Kubernetes supports two strategies out of the box:
- RollingUpdate: This is the default strategy and allows you to roll out a new version of your application in a controlled way. This type of strategy uses two ReplicaSets internally. When you perform a change in the Deployment spec that causes a rollout, Kubernetes will create a new ReplicaSet with a new Pod template scaled to zero Pods initially. The old, existing ReplicaSet will remain unchanged at this point. Next, the old ReplicaSet will be scaled down gradually, whereas the new ReplicaSet will be scaled up gradually at the same time. The number of Pods that may be unavailable (readiness probe failing) is controlled using the .spec.strategy.rollilngUpdate.maxUnavailable parameter. The maximum number of extra Pods that can be scheduled above the desired number of Pods in the Deployment is controlled by the .spec.strategy.rollilngUpdate.maxSurge parameter. Additionally, this type of strategy offers automatic revision history, which can be used for quick rollbacks in case of any failures.
- Recreate: This is a simple strategy that's useful for development scenarios where all the old Pods have been terminated and replaced with new ones. This instantly deletes any existing underlying ReplicaSet and replaces it with a new one. You should not use this strategy for production workloads unless you have a specific use case.
Tip
Consider the Deployment strategies as basic building blocks for more advanced Deployment scenarios. For example, if you are interested in Blue/Green Deployments, you can easily achieve this in Kubernetes by using a combination of Deployments and Services while manipulating label selectors. You can find out more about this in the official Kubernetes blog post: https://kubernetes.io/blog/2018/04/30/zero-downtime-deployment-kubernetes-jenkins/.
Now, we will perform a rollout using the RollingUpdate strategy. The Recreate strategy, which is much simpler, can be exercised similarly.
Updating a Deployment object
First, let's recreate the Deployment that we used previously for our readiness probe demonstration:
- Make a copy of the previous YAML manifest file:
$ cp nginx-deployment-readinessprobe.yaml nginx-deployment-rollingupdate.yaml
- Ensure that you have a strategy of the RollingUpdate type, called readinessProbe, set up and an image version of nginx:1.17. This should already be set up in the nginx-deployment-readinessprobe.yaml manifest file, if you completed the previous sections:
apiVersion: apps/v1
kind: Deployment
metadata:
name: nginx-deployment-example
spec:
replicas: 3
...
minReadySeconds: 10
strategy:
type: RollingUpdate
rollingUpdate:
maxUnavailable: 1
maxSurge: 1
template:
...
spec:
containers:
- name: nginx
image: nginx:1.17
...
readinessProbe:
...
- In this example, we are using maxUnavailable set to 1, which means that we allow only one Pod out of three, which is the target number, to be unavailable (not ready). This means that, at any time, there must be at least two Pods ready to serve traffic. Similarly, maxSurge set to 1 means that we allow one extra Pod to be created above the target number of three Pods during the rollout. This effectively means that we can have up to four Pods (ready or not) present in the cluster during the rollout. Please note that it is also possible to set up these parameters as percentage values (such as 25%), which is very useful in autoscaling scenarios. Additionally, minReadySeconds (which is set to 10) provides an additional time span for which the Pod has to be ready before it can be announced as successful during the rollout.
- Apply the manifest file to the cluster:
$ kubectl apply -f ./nginx-deployment-rollingupdate.yaml --record
With the deployment ready in the cluster, we can start rolling out a new version of our application. We will change the image in the Pod template for our Deployment to a newer version and observe what happens during the rollout. To do this, follow these steps:
- Modify the container image that was used in the Deployment to nginx:1.18:
apiVersion: apps/v1
kind: Deployment
metadata:
name: nginx-deployment-example
spec:
...
template:
...
spec:
containers:
- name: nginx
image: nginx:1.18
- Apply the changes to the cluster using the following command:
$ kubectl apply -f ./nginx-deployment-rollingupdate.yaml --record
deployment.apps/nginx-deployment-example configured
- Immediately after that, use the kubectl rollout status command to see the progress in real time:
$ kubectl rollout status deployment nginx-deployment-example
Waiting for deployment "nginx-deployment-example" rollout to finish: 2 out of 3 new replicas have been updated...
Waiting for deployment "nginx-deployment-example" rollout to finish: 2 of 3 updated replicas are available...
deployment "nginx-deployment-example" successfully rolled out
- The rollout will take a bit of time because we have configured minReadySeconds on the Deployment specification and initialDelaySeconds on the Pod container readiness probe.
- Similarly, using the kubectl describe command, you can see the events for the Deployment that inform us of how the ReplicaSets were scaled up and down:
$ kubectl describe deploy nginx-deployment-example
...
Events:
Type Reason Age From Message
---- ------ ---- ---- -------
Normal ScalingReplicaSet 3m56s deployment-controller Scaled up replica set nginx-deployment-example-85cd4bb66f to 3
Normal ScalingReplicaSet 3m22s deployment-controller Scaled up replica set nginx-deployment-example-54769f6df8 to 1
Normal ScalingReplicaSet 3m22s deployment-controller Scaled down replica set nginx-deployment-example-85cd4bb66f to 2
Normal ScalingReplicaSet 3m22s deployment-controller Scaled up replica set nginx-deployment-example-54769f6df8 to 2
Normal ScalingReplicaSet 3m5s deployment-controller Scaled down replica set nginx-deployment-example-85cd4bb66f to 0
Normal ScalingReplicaSet 3m5s deployment-controller Scaled up replica set nginx-deployment-example-54769f6df8 to 3
- Now, let's take a look at the ReplicaSets in the cluster:
$ kubectl get rs
NAME DESIRED CURRENT READY AGE
nginx-deployment-example-54769f6df8 3 3 3 6m44s
nginx-deployment-example-85cd4bb66f 0 0 0 7m18s
- You will see something interesting here: the old ReplicaSet remains in the cluster but has been scaled down to zero pods! The reason for this is that we're keeping the Deployment revision history – each revision has a matching ReplicaSet that can be used if we need to roll back. The number of revisions that are kept for each Deployment is controlled by the .spec.revisionHistoryLimit parameter – by default, it is set to 10. Revision history is important, especially if you are making imperative changes to your Deployments. If you are using the declarative model and always committing your changes to a source code repository, then the revision history may be less relevant.
- Lastly, we can check if the Pods were indeed updated to a new image version. Use the following command and verify one of the Pods in the output:
$ kubectl describe pods
...
Containers:
nginx:
Container ID: docker://a3ff03abf8f76e0d128f5561b6b8fd0c7a355f0fb8a4d3d9ef45ed9 ee8adf23c
Image: nginx:1.18
This shows that we have indeed performed a rollout of the new nginx container image version!
Tip
You can change the Deployment container image imperatively using the kubectl set image deployment nginx-deployment-example nginx=nginx:1.18 --record command. This approach is only recommended for non-production scenarios, and it works well with imperative rollbacks.
Next, you will learn how to roll back a deployment.
Rolling back a Deployment object
If you are using a declarative model to introduce changes to your Kubernetes cluster and are committing each change to your source code repository, performing a rollback is very simple and involves just reverting the commit and applying the configuration again. Usually, the process of applying changes is performed as part of the CI/CD pipeline for the source code repository, instead of the changes being manually applied by an operator. This is the easiest way to manage Deployments, and this is generally recommended in the Infrastructure-as-Code and Configuration-as-Code paradigms.
Tip
One very good example of using a declarative model in practice is Flux (https://fluxcd.io/), which is a project that's currently incubating at CNCF. Flux is the core of the approach known as GitOps, which is a way of implementing continuous deployment for cloud-native applications. It focuses on a developer-centric experience when operating the infrastructure by using tools developers are already familiar with, including Git and continuous deployment tools.
The Kubernetes CLI still provides an imperative way to roll back a deployment using revision history. Imperative rollbacks can also be performed on Deployments that have been updated declaratively. Now, we will demonstrate how to use kubectl for rollbacks. Follow these steps:
- First, let's imperatively roll out another version of our Deployment. This time, we will update the nginx image to version 1.19:
$ kubectl set image deployment nginx-deployment-example nginx=nginx:1.19 --record
deployment.apps/nginx-deployment-example image updated
- Using kubectl rollout status, wait for the end of the deployment:
$ kubectl rollout status deployment nginx-deployment-example
...
deployment "nginx-deployment-example" successfully rolled out
- Now, let's suppose that the new version of the application image, 1.19, is causing problems and that your team decides to roll back to the previous version of the image, which was working fine.
- Use the following kubectl rollout history command to see all the revisions that are available for the Deployment:
$ kubectl rollout history deploy nginx-deployment-example
deployment.apps/nginx-deployment-example
REVISION CHANGE-CAUSE
1 kubectl apply --filename=./nginx-deployment-rollingupdate.yaml --record=true
2 kubectl apply --filename=./nginx-deployment-rollingupdate.yaml --record=true
3 kubectl set image deployment nginx-deployment-example nginx=nginx:1.19 --record=true
- As you can see, we have three revisions. The first revision is our initial creation of the Deployment. The second revision is the declarative update of the Deployment to the nginx:1.18 image. Finally, the third revision is our last imperative update to the Deployment that caused the nginx:1.19 image to be rolled out. CHANGE-CAUSE is the contents of the kubernetes.io/change-cause annotation, which is added when you use the --record flag for your kubectl commands.
- The revisions that were created as a declarative change do not contain too much information in CHANGE-CAUSE. To find out more about the second revision, you can use the following command:
$ kubectl rollout history deploy nginx-deployment-example --revision=2
deployment.apps/nginx-deployment-example with revision #2
Pod Template:
...
Containers:
nginx:
Image: nginx:1.18
- Now, let's perform a rollback to this revision. Because it is the previous revision, you can simply execute the following command:
$ kubectl rollout undo deploy nginx-deployment-example
deployment.apps/nginx-deployment-example rolled back
- This would be equivalent of executing a rollback to a specific revision number:
$ kubectl rollout undo deploy nginx-deployment-example --to-revision=2
- Again, as in the case of a normal rollout, you can use the following command to follow the rollback:
$ kubectl rollout status deploy nginx-deployment-example
Please note that you can also perform rollbacks on currently ongoing rollouts. This can be done in both ways; that is, declaratively and imperatively.
Tip
If you need to pause and resume the ongoing rollout of a Deployment, you can use the kubectl rollout pause deployment nginx-deployment-example and kubectl rollout resume deployment nginx-deployment-example commands.
Congratulations – you have successfully rolled back your Deployment. In the next section, we will provide you with a set of best practices for managing Deployment objects in Kubernetes.
Deployment object best practices
This section will summarize known best practices when working with Deployment objects in Kubernetes. This list is by no means complete, but it is a good starting point for your journey with Kubernetes.
Use declarative object management for Deployments
In the DevOps world, it is a good practice to stick to declarative models when introducing updates to your infrastructure and applications. This is atthe core of the Infrastructure-as-Code and Configuration-as-Code paradigms. In Kubernetes, you can easily perform declarative updates using the kubectl apply command, which can be used on a single file or even a whole directory of YAML manifest files.
Tip
To delete objects, it is still better to use imperative commands. It is more predictable and less prone to errors. Declaratively deleting resources in your cluster is only useful in CI/CD scenarios, where the whole process is entirely automated.
The same principle also applies to Deployment objects. Performing a rollout or rollback when your YAML manifest files are versioned and kept in a source control repository is easy and predictable. Using the kubectl rollout undo and kubectl set image deployment commands is generally not recommended in production environments. Using these commands gets much more complicated when more than one person is working on operations in the cluster.
Do not use the Recreate strategy for production workloads
Using the Recreate strategy may be tempting as it provides instantaneous updates for your Deployments. However, at the same time, this will mean downtime for your end users. This is because all the existing Pods for the old revision of the Deployment will be terminated at once and replaced with the new Pods. There may be a significant delay before the new pods become ready, and this means downtime. This downtime can be easily avoided by using the RollingUpdate strategy in production scenarios.
Do not create Pods that match an existing Deployment label selector
It is possible to create Pods with labels that match the label selector of some existing Deployment. This can be done using bare Pods or another Deployment or ReplicaSet. This leads to conflicts, which Kubernetes does not prevent, and makes the existing deployment believe that it has created the other Pods. The results may be unpredictable and in general, you need to pay attention to how you label the resources in your cluster. We advise you to use semantic labeling here, which you can learn more about in the official documentation: https://kubernetes.io/docs/concepts/configuration/overview/#using-labels.
Carefully set up your container probes
The liveness, readiness, and startup probes of your Pod containers can provide a lot of benefits but at the same time, if they have been misconfigured, they can cause outages, including cascading failures. You should always be sure that you understand the consequences of each probe going into a failed state and how it affects other Kubernetes resources, such as Service objects.
There are a couple of established best practices for readiness probes that you should consider:
- Use this probe whenever your containers may not be ready to serve traffic as soon as the container is started.
- Ensure that you check things such as cache warm-ups or your database migration status during readiness probe evaluation. You may also consider starting the actual process of a warm-up if it has not been started yet, but use this approach with caution – a readiness probe will be executed constantly throughout the life cycle of a pod, which means you shouldn't perform any costly operations for every request. Alternatively, you may want to use a startup probe for this purpose.
- For microservice applications that expose HTTP endpoints, consider configuring the httpGet readiness probe. This will ensure that every basis is covered when a container is successfully running but the HTTP server has not been fully initialized.
- It is a good idea to use a separate, dedicated HTTP endpoint for readiness checks in your application. For example, a common convention is using /health.
- If you are checking the state of your dependencies (external database, logging services, and so on) in this type of probe, be careful with shared dependencies, such as databases. In this case, you should consider using a probe timeout, which is greater than the maximum allowed timeout for the external dependency – otherwise, you may get cascading failures and lower availability instead of occasionally increased latency.
Similar to readiness probes, there are a couple of guidelines on how and when you should use liveness probes:
- Liveness probes should be used with caution. Incorrectly configuring this probe can result in cascading failures in your services and container restart loops.
- Do not use liveness probes unless you have a good reason to do so. A good reason may be, for example, if there's a known issue with a deadlock in your application that has an unknown root cause.
- Execute simple and fast checks that determine the status of the process, not its dependencies. In other words, you do not want to check you status of your external dependencies in the liveness probe, since this can lead to cascading failures due to an avalanche of container restarts and overloading a small subset of Service Pods.
- If the process running in your container can crash or exit whenever it encounters an unrecoverable error, you probably do not need a liveness probe at all.
- Use conservative settings for initialDelaySeconds to avoid any premature container restarts and falling into a restart loop.
These are the most important points concerning probes for Pods. Now, let's discuss how you should tag your container images.
Use meaningful and semantic image tags
Managing deployment rollbacks and inspecting the history of rollouts requires that we use good tagging for the container images. If you rely on the latest tag, performing a rollback will not be possible because this tag points to a different version of the image as time goes on. It is a good practice to use semantic versioning for your container images. Additionally, you may consider tagging the images with a source code hash, such as a Git commit hash, to ensure that you can easily track what is running in your Kubernetes cluster.
Migrating from older versions of Kubernetes
If you are working on workloads that were developed on older versions of Kubernetes, you may notice that, starting with Kubernetes 1.16, you can't apply the Deployment to the cluster because of the following error:
error: unable to recognize "deployment": no matches for kind "Deployment" in version "extensions/v1beta1"
The reason for this is that in version 1.16, the Deployment object was removed from the extensions/v1beta1 API group, according to the API versioning policy. You should use the apps/v1 API group instead, which Deployment has been part of since 1.9. It is becoming a stable feature.
This also shows an important rule to follow when you work with Kubernetes: always follow the API versioning policy and try to upgrade your resources to the latest API groups when you migrate to a new version of Kubernetes. This will save you unpleasant surprises when the resource is eventually deprecated in older API groups.
Summary
In this chapter, you learned how to work with stateless workloads and applications on Kubernetes using Deployment objects. First, you created an example Deployment and exposed its Pods using a Service object of the LoadBalancer type for external traffic. Next, you learned how to scale and manage Deployment objects in the cluster. The management operations we covered included rolling out a new revision of a Deployment and rolling back to an earlier revision in case of a failure. Lastly, we equipped you with a set of known best practices when working with Deployment objects.
The next chapter will extend this knowledge with details about managing stateful workloads and applications. While doing so, we will introduce a new Kubernetes object: StatefulSet.
Further reading
For more information regarding Deployments and Services, please refer to the following Packt books:
- The Complete Kubernetes Guide, by Jonathan Baier, Gigi Sayfan, Jesse White (https://www.packtpub.com/virtualization-and-cloud/complete-kubernetes-guide).
- Getting Started with Kubernetes – Third Edition, by Jonathan Baier, Jesse White (https://www.packtpub.com/virtualization-and-cloud/getting-started-kubernetes-third-edition).
- Kubernetes for Developers, by Joseph Heck (https://www.packtpub.com/virtualization-and-cloud/kubernetes-developers).
- Hands-On Kubernetes on Windows, by Piotr Tylenda (https://www.packtpub.com/product/hands-on-kubernetes-on-windows/9781838821562).
- You can also refer to the excellent official Kubernetes documentation (https://kubernetes.io/docs/home/), which is always the most up-to-date source of knowledge for Kubernetes in general.