Sharing Your Images
How to Share Your Work with the World (or Just Your Sister. It’s Your Call)
SHUTTER SPEED: 1/6 sec | F-STOP: f/7.1 | ISO: 200 | FOCAL LENGTH: 24mm | LOCATION: State Theatre, Sydney, Australia
Back in the “old days,” the only way your image was going to been seen by more than your family, and the neighbors on either side of your house, was to somehow get “published” in a magazine or newspaper. However, that was just about impossible for most photographers because the periodicals were tightly controlled by a cartel of powerful photo editors, whose main delight in life was to send potential contributors a tersely worded letter letting them know, in no uncertain terms, that not only was their photo submission rejected by the publication, but that they should be embarrassed beyond measure to think that anyone, on any continent, would ever even consider publishing their work in any form. And, that the only thing left for them to do was to not only sell all of their equipment immediately, but to then track down the original sales clerk at the camera store who sold them this gear and admonish that clerk thoroughly for letting them even buy a camera in the first place, which was clearly the clerk’s lapse in judgement. I’m happy to say that today, things have changed, and now all those very same photo editors have become full-time parking attendants at the Westfield Garden State Plaza Mall in Paramus, New Jersey. True story.
Sharing an Image

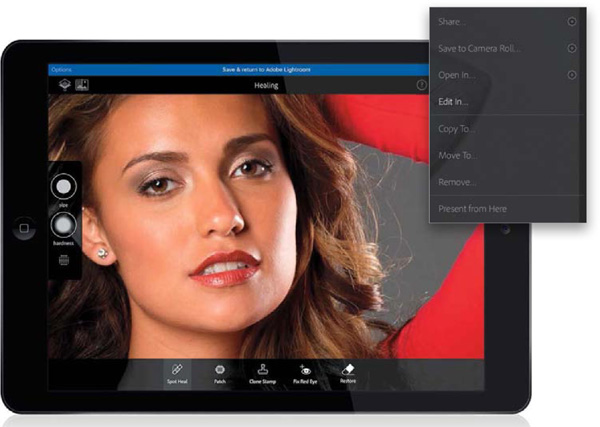
When you’re looking at an image in Loupe view, tap on the Collection Options icon in the top-right corner of the screen (the one with the arrow pointing up). At the top of the resulting pop-up menu, tap on Share, which brings up another pop-up menu with Image Size options (seen in the overlay here). Tap on your choice, and it’ll prepare the photo, and then a bunch of sharing options (depending on which device you’re on and which apps you have downloaded) will appear, which can range from emailing them, to texting, to sharing to Facebook, to saving them to your device. If you want to share multiple images from a collection, when viewing the collection, tap on the Collection Options icon, tap Share, then tap on the photos you want to share to select them (if they’re contiguous, you can just tap-and-drag across them). Once they’re selected, tap on the checkmark icon in the top-right corner, the Image Size dialog will appear, and then you’ll see the pop-up menu of sharing options after you make your choice.
Sharing a Collection

If you want to share an entire collection, you can do it by having Lightroom create a webpage for that collection, which you can then send a link to, to anyone you’d like (or even share it publicly on Facebook or Twitter). To do this, while looking at a collection, tap on the Collection Options icon in the top-right corner of the screen, then tap on Share Collection. This brings up a dialog where you first tap on Share to make it public, and then you can choose to jump to the webpage that has been created (so you can see it yourself first), or you can just share it via email, text message, etc. You can also stop sharing any collection the same way—when the dialog appears, tap Unshare, and it makes that collection private again.
Opening an Image in Another App

While viewing an image in Loupe view (or a collection in Grid view), if you choose Open In or Edit In from the Collection Options pop-up menu (tap on the icon with the arrow pointing up in the top-right corner of the screen), you can open the selected image in another app on your mobile device. When you do this, the first thing it asks is how large a file (resolution- wise) you want to send over to this external app—it’ll ask Small size or Maximum size (I always choose Maximum, unless I’m just experimenting). After you make your choice, it’ll prepare the image, and then another pop-up menu will appear with app options for you to open the image in. For example, if you have Adobe’s awesome Photoshop Fix app (shown here; it rocks and it’s free), you can take your image over there for things like removing spots or blemishes, or making some Liquify adjustments, and then the edited image comes right back to Lightroom Mobile automatically when you’re done. Which apps you can jump over to depend, of course, on which apps you already have installed on your phone or tablet. But, again, when you choose Open In or Edit In, after you make your Image Size choice, you’ll be presented with a list of apps you already have installed, so you’ll quickly see what your options are.
Share or Open with Metadata. Or Not

If you choose to share an image, or open it in another app (and that app supports metadata), you can choose to include (or not include) the metadata by tapping on the little gear icon to the right of the menu option. The Sidebar will pop out from the left, and here you can choose whether or not to share or open the image with metadata. If you’re opening multiple images in a collection in another app, or sharing them, you’ll find the gear icon in the top right of the Open In/Share screen (to the left of the checkmark icon) where you’re selecting which images to open/share. Tap on it there, and then make your Share with Metadata choice.
Create in Spark Page

Another way to share your images, with detailed text if you like, is to share a collection through Adobe’s Spark, which is a free app that, among other things, lets you create very rich, immersive stories online using words and images (this used to be named “Adobe Slate,” and you may have seen one or more stories I published there after taking a photo trip). It allows you, through the app, to create image stories, with a bit of motion, that makes communicating an idea or story really visual and fun. To share your collection as a Spark story, open the collection, tap on the Collection Options icon in the top-right corner of the screen (the one with the arrow pointing up), and then tap on Create in Spark Page. (Note: This is currently only available on the iPad.) It will then launch Adobe Spark (you’ll have to download the free app, if you don’t already have it, and you’ll have to log in with your Adobe ID so that it syncs your collections), where you’ll choose a template, start adding your text, reorder your images, and then share your story online (there are tutorials on Adobe’s website to help you learn Spark. Luckily, it uses professionally designed layout templates, so creating a Spark story is pretty simple).
Saving to Camera Roll (or Gallery)
If you edit an image in Lightroom Mobile, you can save a high-resolution version of that edited image to your phone’s or tablet’s Camera Roll (or Gallery on an Android device). When you’re done with your edits, tap on the Collection Options icon in the top-right corner of the screen (the one with the arrow pointing up), then tap on Save to Camera Roll (Save to Gallery on an Android), and you’re done.

View Images in Presentation Mode

We looked at this a bit when we talked about slide shows in Chapter 2, but this is important to know: If you want to hand someone your mobile device and let them swipe through your images in Lightroom, there’s always the chance that they might swipe up/down and change a star rating or a Pick flag for an image, or maybe they’ll accidentally tap on the icon that takes them to the adjustment tiles (ack!). That’s why Presentation mode was invented—it disables all that stuff, so you don’t have to worry about them accidentally changing anything. You enter Presentation mode by tapping on the collection you want, then tapping on the Collection Options icon in the top-right corner, and choosing Present (Slideshow on an Android) from the pop-up menu. When they hand your mobile device back to you, just tap the X in the upper-left corner to exit Presentation mode.
Viewing Images on Apple TV

SCOTT KELBY AND © ADOBE STOCK/SEMION
Start by going to your Apple TV, clicking on the App Store icon, searching for the free Lightroom app in the App Store, and then downloading it. It will now appear in your main Apple TV menu, right along with your other apps, like Hulu and HBO NOW and Crunchyroll. It will ask you to jump through some security hoops while connecting to your lightroom.adobe.com account (just follow the onscreen prompts—it’s easy). Once you’re connected, it will automatically display your synced collections, or at the top of the screen, you can click on All Photos to see all your images. To view a collection, move the Apple TV remote over the collection, click on it, and it shows the images inside that collection. If you click on an image, it puts the image in Loupe view. To zoom in, click on the photo. To zoom out, press the Menu button on your Apple TV remote (the Menu button acts like a Back button, so to get back to all your collections, you’d hit the Menu button on your remote again). If you scroll down with the remote, it brings up a filmstrip across the top of the screen, so you can jump directly to any image in a collection. You can also use the remote to swipe through your images, forward or backward. To see a slide show of the images in a collection, click the Play button on your Apple TV remote.

