
Chapter 5. Customizing Ubuntu for Performance, Accessibility, and Fun
One of the most appealing arguments for the adoption and use of Linux is the fact it can be customized according to users’ personal preferences. In this chapter, we look at the many ways the Unity desktop can be adapted to different users. Unity is a relatively new desktop, so we start by reviewing the terminology for the desktop. We then look at the default settings, including various ways to tweak them. Lenses were introduced in the Ubuntu 11.04 release; in the 16.04 LTS, a wide variety of Lenses are available. We examine some popular Lenses and how to use them. Different people use their computers in different ways, and for that reason we want to help you discover how to tweak your Unity desktop to best suit your needs.
While tweaking your desktop is a fun way to personalize your desktop experience, we also want to caution you about making changes without understanding what those changes will do. If you are unsure about making those changes, take some time to research them. At the end of this chapter, we identify some more resources to further your understanding of the Unity desktop.
In this chapter, we show you just a few of the Lenses that are available and explain how you can install them. At the end, we point out the resources that will get you started writing those Lenses as you go from novice to superuser. Let’s get ready to supercharge your Unity desktop!
Unity Terminology
When the Unity Launcher was introduced in the Ubuntu 11.04 release, a number of design goals were established. Specifically, the icons needed to be easy to find, running applications needed to be always visible, the focused application needed to be easily accessible, and the interface needed to be touch friendly. The Unity desktop certainly met with a mixed range of highly charged emotions from early adopters, and due to their passion and feedback, the desktop and its functionality have improved. Providing user feedback is one of the most important things an Ubuntu user can do for the project. At the end of this chapter, you will be given a list of resources to get you started on providing the developers with feedback.
In Ubuntu 16.04 Unity desktop, many new Unity Scopes are installed by default. These new Scopes allow the Dash to search in many more places, and they provide you with results from a wide variety of sources.
Unity also features the HUD (Heads Up Display) that users can use to search the menus of a focus (active) window or full application. HUD doesn’t replace your global menu, but rather is a feature that can be accessed by pressing the Alt key.
As we look at the parts that make up the Unity desktop, we’ll also explore the Unity Tweak Tool (Figure 5-1). Unity Tweak Tool is a third-party tool that allows users to configure and tune their Unity desktops. It also allows users to return to the default desktop settings, thereby undoing changes made earlier. To install Unity Tweak Tool through the GNOME Software Center, click the Software icon located in the Launcher. Once the software center opens, type Unity Tweak Tool into the search box and click Install (Figure 5-2).


You can also install the Unity Tweak Tool from the command line with the command sudo apt-get install unity-tweak-tool.
Following is the list of user interface (UI) terms for the parts of your Unity desktop; numbers 1 to 7 correspond to the numbers in Figure 5-3 and the words to Figure 5-4. Finally, Figure 5-5 shows the HUD.
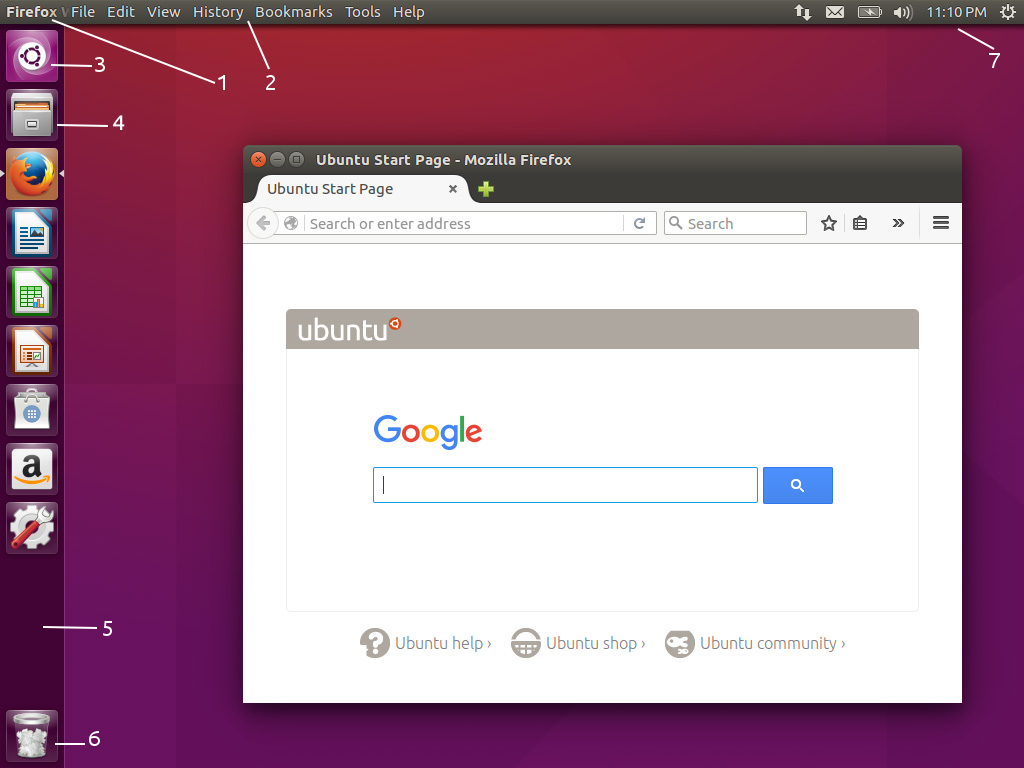


1. Windows Tile
2. Application Menu
3. Dash Icon, which opens what is shown in Figure 5-4, including:
a. Applications Lens
b. Files and Folders Lens
c. Videos Lens
d. Music Lens
e. Photos Lens
f. Social Network Messages Lens
4. Launcher Icons
5. Launcher
6. Trash
7. Indicators
8. HUD
Now that we have reviewed the terminology for your desktop, let’s look at those default settings.
The Ubuntu 16.04 release uses the 4.4 Linux kernel, based on the 4.4 upstream stable kernel.
The applications included in this release by default, but not necessarily locked to the Launcher, are Nautilus, GNOME Software Center, Firefox, Thunderbird, LibreOffice, Rhythmbox, Deja Dup Backup Tool, Shotwell, Transmission, Remmina (remote desktop client), GNOME Control Center (system settings), Gedit, and Totem.
As mentioned earlier, tweaking your Unity desktop can be done easily with tools like the Unity Tweak Tool, and some tweaks can be made using the Appearance tool. To get to the Appearance tool, click the Super key once and the Dash will open. In the search box, type “Appearance,” and then click on the Appearance icon to open this tool (Figure 5-6).

Appearance Tool
The Appearance tool is available by default and allows users to change the look and behavior of their Unity desktop. It opens to the Look tab (Figure 5-7) and allows you to change the background, theme, and Launcher icon size. The Behavior tab (Figure 5-8) allows you to change autohiding of the Launcher, the reveal location (where you need to put your mouse for the Launcher to reappear), and the reappear sensitivity levels. It also allows you to enable Workspaces as well as add a Show Desktop icon to the Launcher.


Unity Tweak Tool
As mentioned earlier, Unity Tweak Tool is a third-party tool, which was created by the Freyja Development Team. To find out more about the team, go to https://launchpad.net/~freyja-dev.
If you followed the instructions to download the Unity Tweak Tool earlier in this chapter, great. If not, you may want to do so now. This tool allows users to tweak four different areas of the Unity desktop.
Unity
Here, you will be able to change settings for the Launcher, Search, Panel, Switcher, Web Apps. and more.
The Launcher tab (Figure 5-9) allows you to change the color, transparency, icon size, autohiding, animations, and more.

The Search tab (Figure 5-10) allows you to change the blur of the Dash, and some other features as the display of suggestions, as well as recently used applications.

The Panel tab (Figure 5-11) allows you to change settings for the top panel. It includes transparency and the display of certain system-based indicators.

The Shifter tab (Figure 5-12) allows you to specify settings and shortcuts for the applications switcher.

On the Web Apps tab (Figure 5-13), you can decide whether you want to enable prompts for Web Apps and specify the preauthorized domains.

The Additional tab (Figure 5-14) allows you to change keyboard shortcuts as well as enable the HUD to remember previous commands.

Window Manager
The Window Manager allows you to customize how Ubuntu manages windows.
Appearance
The Appearance section allows you to change the system theme, icons, cursors, and default fonts, as well as the side where the close, minimize, and maximize buttons are located.
System
The System section allows you to set the default desktop icons, disable some features for security reasons, and set some scrolling options.
Play around with all these settings. Unity Tweak Tool is a very forgiving tool. If you don’t like the tweaks you are making, simply click the Restore Defaults button found on every tab, and you’ll be able to start your tweaking adventure all over again.
Compiz Config Settings Manager
Compiz Config Settings Manager is a configuration tool for Compiz with which you may want to become familiar. To get started with the Compiz Config Settings Manager, you will need to install it from the GNOME Software Center, launch it from the Launcher by clicking the Super key to bring up the Dash, and type “Compiz.” Click on the Compiz Config Settings Manager icon to launch this tool. The first time you open this manager, you will get a warning (Figure 5-15). Although it is an incredible tool, Compiz Config Settings Manager is not as forgiving as the Appearance and Unity Tweak tools. Users are cautioned to use Compiz (Figure 5-16) with care, as you may end up with an unusable desktop if you make too many errors.


When you open Compiz Config Settings Manager, you’ll notice that some of the categories have the boxes beside them checked. This is because those areas have been integrated with the Unity desktop.
Let’s take a closer look at the features offered with Compiz Config Settings Manager.
In the upper-left corner of the Main view, you’ll notice a search box (Figure 5-17). It can be used for quick and easy filtering of the plug-ins list using the text you type in the search box. The search box can also be used like a filter for the options on various plug-in pages.

The Advanced Search button at the lower-left corner of the Main view (as seen in Figure 5-18) allows you to filter through all the options of all the plug-ins. Please note this may take a while to load. Advanced Search allows you to search by name, long description, and the values you have set. Once you have a list, you can click on the plug-in and see which groups contain the option you searched for.
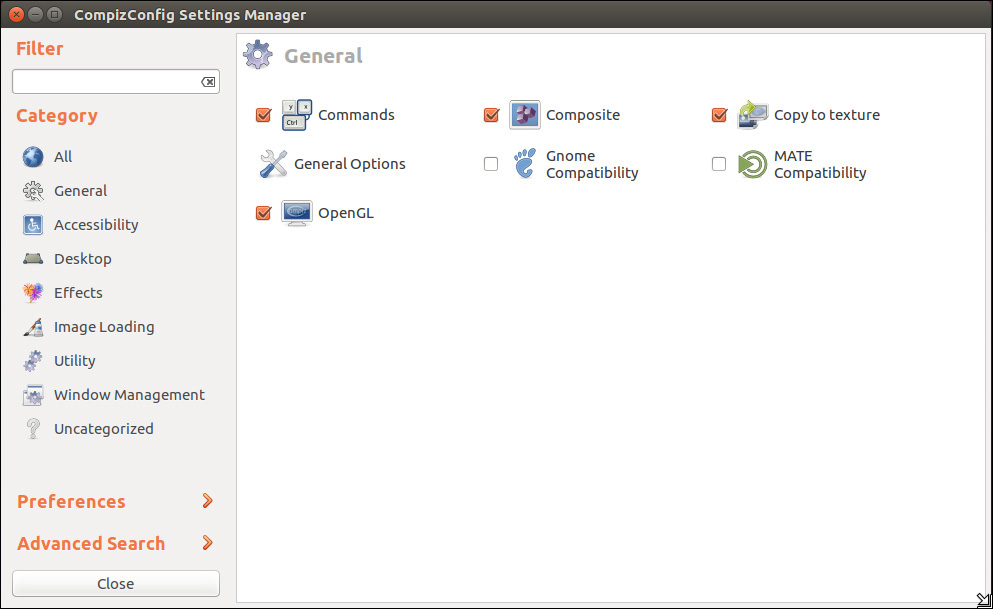
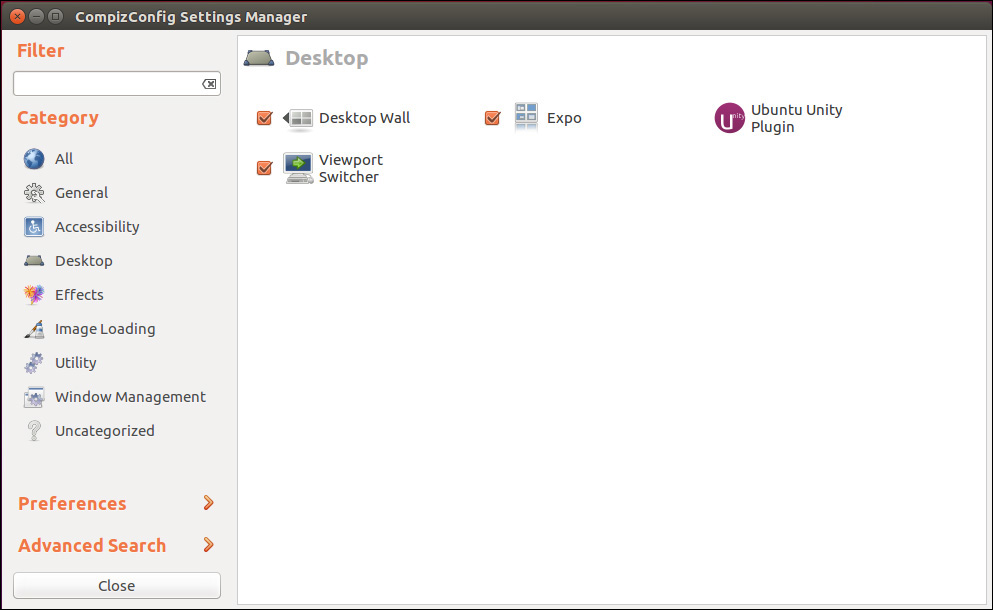
The plug-ins for the Compiz Config Settings Manager are divided into eight categories:
1. General: Contains the core plug-ins (Figure 5-18).
2. Accessibility: Contains plug-ins to make the desktop easier to use, especially for those individuals who have a reading or viewing disability (Figure 5-19). The Enhanced Zoom plug-in magnifies the whole screen on demand.

3. Desktop: Contains plug-ins to configure how the desktop behaves (Figure 5-20).
4. Effects: Contains plug-ins to configure various animations and effects, such as Fading Windows (Figure 5-21).

5. Extras: Contains plug-ins that serve a minor or ambiance purpose like annotate.
6. Image Loading: Contains plug-ins that allow various image formats to be loaded (Figure 5-22).

7. Utility: Contains plug-ins that provide internal functionality like Regex Matching (Figure 5-23).

8. Window Management: Contains plug-ins that provide basic to advanced window treatment functionality, like moving windows (Figure 5-24).

To become more familiar with Compiz and the Compiz Config Settings Manager, go to www.compiz.org.
Unity Lenses and Scopes
The Dash is one of Unity’s main features. It allows users to search for information both locally and remotely using Lenses. Each Lens is responsible for one category of search results for the Dash.
By itself, the Lens is not very useful, because it doesn’t perform the search. Instead, the Lens relies on one or more Scopes, which are the actual search engines, to return the search results.
In the terminology section of Chapter 3, we looked at the music Lens. This Lens has two Scopes, which means that four processes are involved in searching the music category for content: the Dash, the Lens daemon, first Scope daemon, and second Scope daemon.
As a user, you won’t even notice the complex process the Lens performs to keep everything in sync. You can just enjoy the benefits of being able to quickly search various categories of information.
It seems that everyone has a favorite Unity Lens. By default, Unity comes with the following Lenses: Applications, Files, Music, and Video.
Additional Resources
In this chapter, we looked at three tools you can use to tweak your Unity desktop: Appearance, Unity Tweak Tool, and Compiz Config Settings Manager. Other tools and resources are available to help you personalize your desktop environment. A wealth of help and documentation is also available online. If you ever find yourself stuck, take a look at the Ubuntu Web site at www.ubuntu.com or the Ubuntu documentation at https://help.ubuntu.com, and make use of Ask Ubuntu, the forums, wiki, mailing lists, and IRC channels.
Summary
In this chapter we outlined several ways to customize your Ubuntu experience. Changing the Unity desktop from its default settings is not something everyone will want or need to do, but knowing how to do so is both useful and sometimes necessary.