
Chapter 6. Becoming an Ubuntu Power User
![]() Administering System and User Settings
Administering System and User Settings
![]() Understanding How Linux Stores and Organizes Files
Understanding How Linux Stores and Organizes Files
![]() Learning Unity Keyboard Shortcuts
Learning Unity Keyboard Shortcuts
![]() Compiling Software from Source
Compiling Software from Source
Ubuntu is relatively straightforward to set up and use for common day-to-day tasks. With time, though, most users want to learn how to be more efficient in performing their tasks on that computer. It is this efficiency—this elegance in the way tasks are performed—that forms the basis of the separation between beginners and power users. Those who are content to learn just enough to get a task done need not read this chapter. Those who want to perform these tasks more easily, more quickly, or more smoothly and with a deeper understanding of what they are doing and why are the target audience here. This chapter is not about customization; for that, see Chapter 5. This chapter is about understanding and learning how to use what you already have to its fullest potential.
Administering System and User Settings
To begin, search for Settings in the Dash and open System Settings (Figure 6-1).

From here you can adjust many aspects of your system, as shown in Figure 6-2.

Click an item to select it and modify its settings. When you are done, you may close the window or click All Settings in the upper-left corner to return to the menu. Some settings require you to unlock them by clicking the Unlock button at the upper-right corner and entering a password before you can modify their settings (Figure 6-3). You must have administrative privileges to do this.

User Settings
Let’s begin by taking a look at available user settings. Once you unlock the window shown in Figure 6-3, you can click the + symbol at the bottom left to add a new user, click the – symbol to delete a user, or click on a user account to modify its settings. Click on any item shown at the right to modify its settings, as in Figure 6-4.

Security & Privacy Settings
The Security & Privacy menu allows you to carefully manage which information is recorded about you when you use Ubuntu (Figure 6-5). For example, when you open programs, Ubuntu records what you use most often and will list it first in the Dash as you search. Most users appreciate this feature. However, in some instances, it could be insecure or undesirable. You can manage history, files, applications, and other privacy features here. You can even turn the entire feature off.

In the search tab of this menu, you will also find the option to toggle inclusion of online search results, including music for purchase, products, and more, in the Dash. By default, this option is turned off in 16.04; instead, searching will be performed only locally on your computer.
Default Settings
Default settings generally make sense for most users. But what if you want a different program to open when you try to play a certain media file? Click the Details icon in the System Settings menu to change from the default settings, as in Figure 6-6. Select different items from the menu at the left for other options.

Figure 6-6 Changing your default applications is easy: just make sure you install what you want to use before you try to tell Ubuntu to use it.
Understanding How Linux Stores and Organizes Files
If you have not used Linux before, the way that Linux stores and organizes files is likely to be new to you, because the layout is quite different from Windows and Mac OS X.
In the Windows world, each disk drive is labeled with an identifying letter such as C: for your hard disk and D: for the CD/DVD drive. In the Linux world, however, everything is part of the same filesystem organization. As such, if you have two or three hard disks, a CD drive, and a USB stick all plugged in, they will all be part of the same folder structure.
The diagram shown in Figure 6-7 should give you an idea of how everything hangs together.

Right at the top of the tree is the root folder, referred to as /. Inside this folder are a number of special system folders, each with a specific use. As an example, the /home folder contains a number of home directories for each user on the system. As such, the user account may have the home folder set to /home/jono (if your username is jono!).
Which Folder Does What? The folder structure in a modern Linux distribution such as Ubuntu was largely inspired by the original UNIX foundations that were created by men with large beards. Although you don’t really need to know what these folders do, because Ubuntu looks after the housekeeping for you, some of you may be interested in the more important folders. To help, we present the Linux folder hit list in Table 6-1.

Configuration Files In Table 6-1, /etc is described as storing systemwide configuration files for your computer. Aside from these files that affect everyone, there are also configuration files for each specific user. Earlier, when you customized Ubuntu’s look and feel, the settings were applied only to your current user account. So where are those settings stored?
Inside your home directory are a number of folders that begin with a dot (.), such as .config and .mozilla. These folders contain the configuration settings for user-specific applications. By default, these dot folders are hidden in the graphical file viewer because you rarely need to access them. You can view these hidden files and folders when you are viewing your home folder by clicking View > Show Hidden Files in the menu or by pressing Ctrl-H.
Using Windows Files on Another Partition
For those of you who spend a considerable amount of your life on Windows partitions, you may want to be able to access these partitions from Ubuntu. This is no problem, although you will need to edit a special configuration file to do this. Luckily, you need to edit this file only once, and then everything will be set up.
Ubuntu should automatically recognize any Windows partitions you have on your computer and set them up for you in the file manager; however, you may need to modify them or add your own. Search for Disks in the Dash and write down the partition numbers and filesystem for your Windows partitions. The partition number will look something like /dev/hdb1 or /dev/sdb1, and the filesystem will be either FAT, VFAT, or NTFS.
The next step is to create some mount points. When your Windows partitions are enabled, they are accessed via a particular folder in Ubuntu. This is called a mount point. As an example, if you have a mount point as /media/win1 and on your Windows partition you want to access your Work folder, you would access it from Ubuntu as /media/win1/work.
Mount points usually live in the /media folder. You can create a different mount point for each Windows partition. As an example, if you have three Windows partitions, run the following commands:
foo@bar:~$ sudo mkdir /media/win1
foo@bar:~$ sudo mkdir /media/win2
foo@bar:~$ sudo mkdir /media/win3
Now open up the following configuration file:
foo@bar:~$ sudo gedit /etc/fstab
The /etc/fstab file maps partition numbers to mount points. At the bottom of the file, add a line like this for each mount point:
/dev/hdb1 media/win1 vfat users,rw,owner,umask=000 0 0
You will need to change the partition number (the first column), mount point (second column), and filesystem (third column) for your relevant partitions.
Now reload /etc/fstab to enable the partitions:
foo@bar:~$ sudo mount -a
Some hard disk icons for the new partitions now appear.
Learning Unity Keyboard Shortcuts
Using a mouse or touchscreen is intuitive because of the direct interaction between your hand, your eyes, and the cursor, but for repeated actions, keyboard shortcuts enable you to work (and play) faster. There’s no need to take the time to pick up your hand, move it to a different spot on the desk or screen, click or tap something, move your hand back to the keyboard to type a few letters, go back to the mouse or screen, and so on. The more you can do from one place, the more efficient your actions will be. Here is a list of things you can do with Unity without moving your hands away from the keyboard. Of course, you don’t have to do things this way, but power users love to save time and energy, even if it means spending a little more time up front learning how; in the long term, the savings add up.
The Super key is used for several of the shortcuts. It is sometimes known as the Windows key. In the following tables, it is simply called Super.
Launcher
Table 6-2 lists keyboard shortcuts related to using the Launcher.

Dash
Table 6-3 lists keyboard shortcuts related to using the Dash.

Switching
Table 6-4 lists keyboard shortcuts related to switching between applications.

Windows
Table 6-5 lists keyboard shortcuts related to windows and their management.


Workspaces
Workspaces—that is, multiple “desktops” in one session—were disabled by default in versions 13.04 and beyond. To restore them, you must go into the system settings menu and select Appearance > Behavior. Select the option to “Enable workspaces” to display four workspaces and insert the workspace switcher into the Launcher.
Table 6-6 lists keyboard shortcuts related to using workspaces.

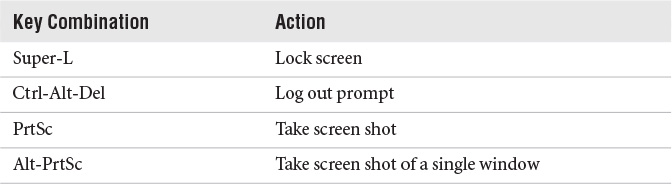
Other
You can add your own shortcuts by opening the settings menu and selecting Keyboard > Shortcuts.
Table 6-7 lists keyboard shortcuts that don’t fit in any of the previous categories.
Using the Terminal
Although Ubuntu is a desktop-driven OS, the system runs on a powerful and incredibly flexible command-line core. Inspired by more than 30 years of UNIX heritage, the command-line environment present on Linux systems enables you to perform some incredibly powerful tasks by stringing together different commands in different ways.
The philosophy behind UNIX is to create a large number of small tools, each of which is designed to do one task but do it incredibly well. As a quick example to whet your appetite, there is a command called ls that does nothing more than list files in a folder. Although listing files is its singular function in life, it has every option imaginable for listing files.
Now, ls is limited by itself, but it can be combined with other commands that have equal levels of flexibility to create impressively powerful combinations. To do this, a pipeline is created using the | symbol to connect these different commands. Pipelines can be constructed in any number of ways, and once the user has even a basic knowledge of what a few different commands do, stringing together a pipeline of commands can solve virtually any task you can imagine in quick and powerful ways.
It should be made 100 percent clear that using the command line is not an essential skill required to use Ubuntu, but it is a skill that can increase the flexibility of your computer for more advanced, customized tasks. Rather than cover the use of the Terminal here, we have included an excellent introduction to it in Chapter 7, and we strongly recommend that all who seek to become power users read it.
Working with Windows Programs
Although Linux offers an increasingly compelling platform for the desktop, some situations arise in which there is just no alternative other than an application written for Windows. This is generally the case with specific business applications, some educational tools, and many games. Luckily, there is a way you can run many of these applications on your Ubuntu desktop.
For more than 20 years, the Wine project team members have been working to create a free way to run Windows applications on Linux. While not every application works perfectly, and some don’t work at all, the number of programs that do work in Wine has dramatically increased and continues to do so. However, it is recommended that you thoroughly test the applications you want to run in Wine before you use them for important work. If you run into trouble, try consulting help resources, use virtualization to run Windows on top of Ubuntu, or search for a different application to use.
Install the Wine package from the GNOME Software Center or simply double-click an .exe file, and you will be prompted to install the package. You can configure Wine by searching for Wine Applications in the Applications Dash after clicking the Applications icon in the Launcher. Your C: drive will appear in your Places menu for easy access, and you will be able to uninstall Wine from the GNOME Software Center.
To run an application, simply double-click on the install .exe file. Once it is installed you will be able to search for Wine in the Dash.
Installing Software from PPAs
Sometimes software is not available in the Ubuntu repositories; perhaps it is too new, perhaps there is a new version available, or perhaps it is software that no one has had the opportunity to build and get approved for inclusion in the Ubuntu repositories. You can often find this software in a Personal Package Archive (PPA). The main Launchpad page for PPAs says, “Personal Package Archives (PPA) allow you to upload Ubuntu source packages to be built and published as an apt repository by Launchpad” (see https://launchpad.net/ubuntu/+ppas).
In short, a PPA is a small repository that contains software that is not found in the main Ubuntu repositories, perhaps for one of the reasons listed earlier or for other reasons. If a software package or version you want to install is not available from the main Ubuntu repositories, use your Web browser to search the main Launchpad site for the software and see if a PPA exists.
For our example, we install a bleeding-edge testing version of LibreOffice. Unless you absolutely need something offered from a PPA, we suggest you stick with packages from the Ubuntu repositories.
To add the PPA to your system, make a note of its location from the specific PPA’s Web page in Launchpad. In this case, the PPA is at ppa:libreoffice/ppa, as seen in Figure 6-8.

The easiest way to add the PPA is to use the terminal. Enter the following commands at the command line to add the LibreOffice PPA and to update your package manager’s listing:
$ sudo add-apt-repository ppa:libreoffice/ppa
$ sudo apt-get update
Then, you can access the contents of the PPA from your preferred package manager: GNOME Software Center, Synaptic, the command line, and so on.
If you later wish to remove the PPA, you can use this tool again but with the --remove option.
$ sudo add-apt-repository --remove ppa:libreoffice/ppa
$ sudo apt-get update
Finally, if you want to remove the PPA and downgrade back to the version of software you had before using the PPA, you can install and use the ppa-purge tool.
$ sudo apt-get install ppa-purge
$ sudo ppa-purge ppa:libreoffice/ppa
Compiling Software from Source
Some software cannot be found in any repository. The traditional way of installing software on Linux works just as well on Ubuntu. Download your software and put it in an otherwise empty directory. Sometimes, it will include installation instructions. If so, follow them. Most instructions will be the same as those listed here.
Before you can install a source code package, it must be compiled into a binary that your computer can run. For that, you need to install some packages that are not included by default. All you should need is included as a dependency of one package. Install it, and you should be all set.
$ sudo apt-get install build-essential
Next, browse to the directory where you placed the downloaded source code. It was most likely provided as a compressed archive, with a filename extension like tar.gz or tar.bz2. Decompress the archive with the appropriate command, depending on the filename extension:
$ tar -zxvf file.tar.gz

$ tar -xvjf file.tar.bz2
Next, build the package. This step checks whether you have the required dependencies installed and will tell you if you don’t—if not, you need to install them separately, by using Synaptic or via the command line with apt. This step will also build the package from source code into something installable.
$ make
Next, install the package. The traditional way is to use this command:
$ sudo make install
Although this technique works, there is a better method. Using make -install will install the package, but it will not use your package manager to do so. If you ever want to remove the package from your system, it can be quite a chore to figure out how. Instead, install the software with the following command:
$ sudo apt-get install checkinstall
Like any software installed from an official repository, it can be removed using your package manager:
$ sudo checkinstall
Summary
In this chapter, we looked at a variety of advanced subjects related to running and managing your Ubuntu system. Changing settings on your desktop, including addition of users and changes to security and privacy settings, was discussed. We then covered the basic structure of the file system and saw how to manually add windows files to be accessible from your desktop. Unity keyboard shortcuts were then covered in depth, and examples demonstrated how you can use them to be more efficient with your actions. We also touched upon installation of software from PPAs, which include newer versions, development versions, and other unpackaged software that does not come with Ubuntu. Finally, we looked at a possibility of running certain programs written for Microsoft Windows under Ubuntu and even compiling software from source code.