
Overview
By the end of this chapter, you will be able to perform filesystem-related operations (read, write, copy, move, and remove); read big files line by line and read CSV files one record at a time; download files via the browser using PHP; connect to MySQL RDBMS using PHP; create a database and a table, and insert records into a MySQL database using PHP; query, update, and delete data from MySQL DB using PHP; and secure MySQL queries using prepared statements in PHP.
Introduction
In the previous chapter, we saw how to deal with user input using PHP superglobals and applied sanitization and validation in order to secure the application. We also learned how to keep the user's session on the server and built a small application. In that application, we used the session to store data, which vanished with every session destroyed (or logout).
In this chapter, we will learn how we can store and read persistent data using PHP. Specifically, we will learn how to handle file I/O (open, read, and write) and disk operations (change the current directory, create a new file/directory, remove a file or directory, and so on). This is useful when you would like to use the filesystem for precious application logs, to generate all kinds of reports, to handle uploaded user images, and so on. We will also learn how to connect to a MySQL database and how to query the data, insert new records, and update or delete data from the database. This is helpful when you want to store data in a structured way, which can then be easily accessed by many other applications; for instance, user-specific data, such as a first name, a last name, an email address, and password hashes. And not only this – most probably, your application will perform data manipulation, on the data which will be stored somewhere to have it ready to read on request. This kind of data might represent elements of the business domain and could include product lists, prices, discount coupons, orders, subscriptions, and suchlike. We will deal with security in this chapter as well. Hence, we'll learn how we can protect our database against potentially malicious user input.
File I/O Handling
Filesystem operations are some of the most important in programming. We can enumerate session data storage in PHP; user-uploaded files, generated report files, cached data, logs – all of them utilize the filesystem. Of course, there are many other alternatives for persistent storage, but knowing how to operate the filesystem in a language is especially important due to its availability. It is basically present anywhere and can be used immediately.
Working with the filesystem, sometimes, you might want to read or write into a file that is stored in a known location relative to the script file location. For example, for a script that is created in the /app/demo/ directory that wants to read files from source/ relative to its location (in other words, /app/demo/source/), it would be better to know the script location.
This is different to the current working directory, because you may run the script from other locations as well. For example, if the current working directory is /root, you can run the script providing one of the following is present: the relative path, php ../app/demo/the-script.php, or the absolute path, php /app/demo/the-script.php. In this case, the current working directory is /root, while the script directory is /app/demo.
This leads to the next point. PHP offers some “magic constants”; values of which change across the scripts depending on where are they used. The list of magic constants is as follows:
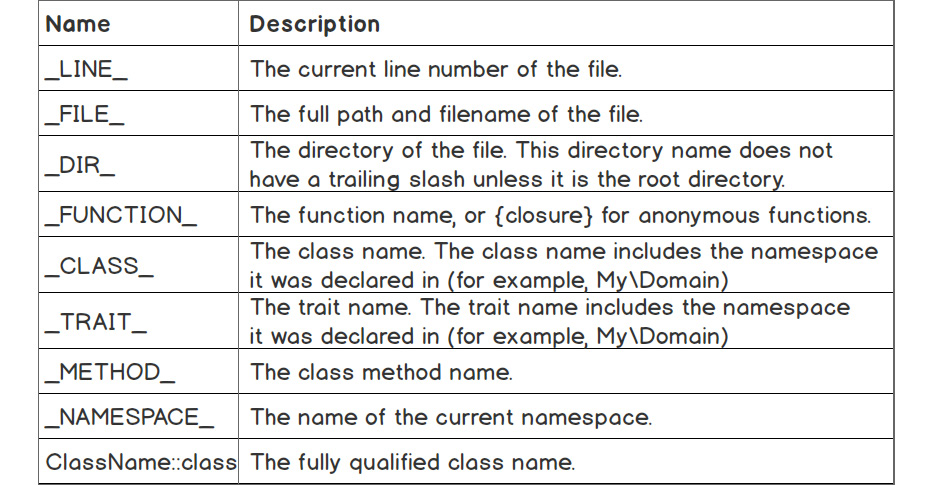
Figure 7.1: Magic constants and their descriptions
In our case, we would want to make use of the __DIR__ constant in the script. The directory the script would have to look into would be $lookupDir = __DIR__ . '/source';.
Reading Files with PHP
Dealing with files in PHP is one of the easiest things to do. PHP has several functions to handle file operations for creating, reading, and updating/editing. No additional installation is needed to use PHP filesystem functions.
A Simple File Read
One of the simplest functions to use for reading a file is file_get_contents(). This function can be used to fetch all the content of a file and put it into a variable, for example. The syntax is as follows:
file_get_contents (string $filename [, bool $use_include_path = FALSE [, resource $context [, int $offset = 0 [, int $maxlen ]]]])
- $filename: The first argument is required and should be a valid file path to read from.
- use_include_path: This is optional and tells file_get_contents to look for $Filename in the include_path list of directories.
- $context: This is optional and is a valid context resource created with stream_context_create().
- $offset: This is optional. The offset count begins on the original stream.
- $maxlen: This is an optional argument and denotes the maximum length of the data that is to be read. By default, it reads until the end of the file.
The file_get_contents() function reads the file content into memory before giving any output, until the entire file has been read. This is a drawback that makes this function unsuitable for use when the input file size is not known. In the case of large files, let's say in excess of 1 GB, the PHP process would very quickly fill the allocated RAM memory, and this would make the script crash. Therefore, this function is only suitable for use when the expected file size is smaller than the memory_limit configuration entry in PHP.
Exercise 7.1: A Simple File Read (All at Once)
Let's say you are required to develop a script that will be able to import a short list of users from a CSV format file into a current application.
First, let's prepare the environment:
- Create a sample directory in the current working directory.
- Download the CSV file called users_list.csv from the code repository and put it into the sample directory.
- In this exercise, we will invoke file_get_contents() by providing the path to the CSV file:
<?php echo file_get_contents(__DIR__ . '/sample/users_list.csv');
We are invoking the file_get_contents() function, specifying the file path, and what we are receiving is the full file content. For the file path, we are using the __DIR__ magic constant, which gets replaced with the file directory path at compile time.
Save the preceding PHP script in a file called file_get_contents.php in the parent directory of the sample directory.
- Run php file_get_contents.php in your Terminal:

Figure 7.2: Printing contents of the file
You will get the CSV file output, as above.
Reading Files with the fread Function
As discussed previously, the file_get_contents() function is not suitable for use on large files, since the entire file content is first read into memory, before any output, which would make the script very inefficient in terms of resource usage, as well as in terms of performance.
In the following exercise, we will explore some functions that will allow us to parse large files, keeping the system memory safe. This means we will use a technique that will allow us to read chunks of the file content at a time, which can be achieved using a group of PHP built-in functions, and a data stream PHP resource. A resource in PHP is a reference to the external resource; in our case, it will be a reference to a data stream resource (for example, a system file, or a URL).
fopen() is one of PHP's built-in functions, used to create stream resources in PHP. To achieve greater flexibility with regard to working with files (or any other data stream), we will use the fopen() function. The fopen() function accepts two required arguments, $filename being the first argument, and the access mode being the second one. The access mode describes the stream resource access type (read, write, read and write) and resolves to a set of instructions while creating the stream. It can have one of the following values:

Figure 7.3: Different access modes and their descriptions
You will notice the “file pointer” concept in the preceding table. You can think about this simple yet powerful concept in the same way as the cursor in a text file. So, for example, if we deal with the stream resource of a file with the Learning PHP fundamentals content, having the file pointer on position nine means it is located right before the word PHP. Reading the stream from that position until the end would result in the PHP fundamentals output.
The fopen() function returns a file pointer resource or false if the operation fails.
To read from the data stream, we will use the fread() function. This function requires two parameters, a resource variable being the first, and the length of bytes to read. It returns the read string or Boolean as false in the event of failure.
Other functions that can be used to read from stream resources are fgets() and fgetcsv(), to name a couple. fgets() returns a line from the file pointer; it requires the stream resource as the first parameter and accepts the optional read length (bytes) as the second parameter. fgetcsv() is similar to fgets() – it returns a line of data as an array containing the read CSV fields, except this line is parsed data as CSV (meaning more than one line of string data might be read, since one CSV field can contain multiline data). The fgetcsv() function accepts several parameters, but the required stream resource (the first parameter) is often enough to do a good job of parsing and returning CSV line data.
While reading from a stream, we might want to know when the end-of-file is hit. We can use the feof() function for this, which will test for the file pointer's presence at the end of the file (EOF). This function returns true if the file pointer is at EOF or errors occurred. It returns false otherwise.
Note
feof() returns false for invalid streams as well, so it is recommended to test your stream resource before invoking feof().
Exercise 7.2: Reading Files with the fread Function
Let's suppose you are asked to optimize your user's import script in order to work with large data files of the magnitude of tens of gigabytes:
- Create an fread.php file and insert the following content.
- First, we define the file path, and then use it when calling fopen() to get the file pointer resource. We check whether fopen() has returned the expected resource (not false). In the case of failure, the script will exit:
<?php
$filePath = __DIR__ . '/sample/users_list.csv';
$fileResource = fopen($filePath, 'r');
if ($fileResource === false) {
exit(sprintf('Cannot read [%s] file.', $filePath));
}
- Now, we will make use of the fread() function, which will read the file in chunks, allowing us to operate on small chunks of data in turn until the file is read completely. Next, we define the length to read, in bytes.
Note
To fine-tune this value, you should test it with a specific size range of files, depending on the usage.
We also define the iterations variable, to learn about the number of cycles when the file was read using the specified read length. Note that defining the $iterations variable is not necessary for production-grade code. We are including it here purely for educational purposes:
$readLength = 64;
$iterations = 0;
- Read from the $fileResource resource using fread() and test for EOF with feof() in the while loop:
while (!feof($fileResource)) {
$iterations++;
$chunk = fread($fileResource, $readLength);
echo $chunk;
}
- Finally, we close the file pointer resource, as we no longer need it, and print the number of iterations:
fclose($fileResource);
echo sprintf(“ %d iteration(s)”, $iterations);
- Run the file in your Terminal using the php fread.php command. The output will be as follows:

Figure 7.4: File output using fread file()
Since the file contains 65 characters and the chunk size was set to 64, the file was read twice. This means that, at the first iteration, fread() filled the memory with 64 bytes of data that was then returned and the occupied memory was freed; at the second iteration, fread() filled the memory with 1 byte (the remaining file content) before it returned this and freed the memory. The advantages of this approach are that we can operate with small pieces of content at a time, at each read iteration, using a small amount of memory resources, rather than loading the whole file in memory and then iterating and processing content line by line.
Benchmark File Reading
In previous examples, we saw the difference between the two approaches to reading a file, but here, you will evaluate metrics to benchmark each of the file reading methods.
We will use the same scripts but will add a number of measurements.
We will make use of the memory_get_peak_usage() function to retrieve the peak memory usage at some point, as the name suggests. This function accepts one optional argument, set to false by default when its value is not specified; you should set it to true when you want the allocated memory to be reported (which we will do in the following exercises), rather than the actual memory usage.
In the following exercises, we will make use of the DIRECTORY_SEPARATOR constant, which exists in PHP implicitly, and which is set with the directory separator as follows:
- Windows: the “” character
- Non-Windows: the “/” character
Exercise 7.3: Benchmark File Reading
In this exercise, we will evaluate metrics to benchmark each of the file reading methods:
- First, we will need a pretty big file, and we will generate it with the dd command.
Note
dd is a command-line utility for Unix and Unix-like operating systems that exists in any of these distributions.
- Run the following command to generate a file in sample/test-256-mb.txt that is full of zeroes, 256 MB in size:
dd if=/dev/zero of=sample/test-256-mb.txt count=1024 bs=262144
This file will most likely terminate the script that uses file_get_contents() to read it, since most PHP installations, by default, do not allow a memory limit of more than 128 MB per process. This limit is stored in the php.ini configuration file by default, under the memory_limit parameter, as previously indicated. Hence, we will create another file, 10 MB in size, using dd if=/dev/zero of=sample/test-10-mb.txt count=1024 bs=10240.
- Create file_get_contents-memory.php with the following content:
<?php file_get_contents(__DIR__ . DIRECTORY_SEPARATOR . $argv[1]);
echo sprintf(“-- memory %.2fMB -- ”, memory_get_peak_usage(true) / 1024 / 1024);
Here, we are making use of the first command-line argument ($argv[1]), which will be the file path to read, relative to the script path. We are adding the memory peak metric as well, using the memory_get_peak_usage() function.
- Run the following command to check the resource usage:
time php file_get_contents-memory.php sample/test-10-mb.txt
You should essentially get the following output:
--
memory 12.01MB
--
real 0m 0.03s
user 0m 0.02s
sys 0m 0.01s
Note
We have used the time Linux command here, which will run the command and print the resource usage.
The memory value of 12.01 MB in this example output is reported by the memory_get_peak_usage() function and it shows us that this is the RAM memory amount necessary for a PHP script to read a 10 MB file.
- Let's now run the same script, but for the bigger file:
time php file_get_contents-memory.php sample/test-256-mb.txt.
In the output, we will see an error message like this:
PHP Fatal error: Allowed memory size of 134217728 bytes exhausted (tried to allocate 268443680 bytes) in /app/file_get_contents-memory.php on line 1
As expected, trying to read a 256 MB file into memory fails because the limit of 128 MB per process is exceeded.
- Now, let's check the other approach, using fread() to read chunks of data from the file one at a time. Create a file called fread-memory.php and insert the following content. We store the $filePath variable based on the user's first input argument and we create the resource for that file path, stored under the $fileResource variable:
<?php
$filePath = __DIR__ . DIRECTORY_SEPARATOR . $argv[1];
$fileResource = fopen($filePath, 'r');
- If the resource is invalid, the script will be terminated:
if ($fileResource === false) {
exit(sprintf('Cannot read [%s] file.', $filePath));
}
- We store the second input argument in the $readLength variable, which will take the value of the second input argument, with a fallback to 4096 if the second argument is not present. This is the length in bytes that the fread() function will use to read from $fileResource. We also initiate the $iterations variable with a start value of zero:
$readLength = $argv[2] ?? 4096;
$iterations = 0;
- We read the entire file using the while loop, as in the previous exercise. The difference here is that the output of the fread() function is not used. For each iteration, we increment the $iterations variable as well:
while (!feof($fileResource)) {
$iterations++;
fread($fileResource, $readLength);
}
- Finally, we close the stream and print the number of iterations performed and the memory usage necessary to read the file:
fclose($fileResource);
echo sprintf(“-- %d iteration(s): memory %.2fMB -- ”, $iterations, memory_get_peak_usage(true) / 1024 / 1024);
What has changed from the previous file_get_contents-memory.php script is that we are reading chunks of data one at a time from the file, using the $readLength variable.
- Now, let's run some tests, reading the 10 MB file:
time php fread-memory.php sample/test-10-mb.txt
The output is as follows:
--
2561 iteration(s): memory 2.00MB
--
real 0m 0.05s
user 0m 0.02s
sys 0m 0.02s
As we can see, to read the entire 10 MB file, it took 2,561 read iterations of 4 KB (the second script argument is missing, and the default 4,096 bytes are set for the $readLength variable). The total duration of the script was 0.05 seconds, compared to 0.03 seconds when using file_get_contents(). The main difference to note is the memory usage – 2 MB, which is the minimum the PHP script allocates per process, compared to 12.01 MB when using the file_get_contents() function.
- What about reading a chunk of 1 MB instead of the default 4 KB? Let's run the following command with 1,048,576 bytes (which are the equivalent of 1 MB):
time php fread-memory.php sample/test-10-mb.txt 1048576
The output is now as follows:
--
11 iteration(s): memory 4.00MB
--
real 0m 0.03s
user 0m 0.02s
sys 0m 0.01s
Now, the entire 10 MB file read used only 11 iterations, with a peak of 4 MB of RAM memory. This time, the script took 0.03 seconds, as in the case of using the file_get_contents() function.
- And now, let's read the big file, which could not be read using file_get_contents(). Run the following command:
time php fread-memory.php sample/test-256-mb.txt
The output is as follows:
--
65537 iteration(s): memory 2.00MB
--
real 0m 0.30s
user 0m 0.16s
sys 0m 0.13s
In this case, the read length is 4 KB, and the complete file read required 65,537 iterations, using a peak of 2 MB of memory. The script took 0.3 seconds to read the entire file, which is not bad, but could be improved by increasing the read length to a bigger value; and this is what we will do in the next step.
- Now, run the same command, specifying the chunk size of 1 MB:
time php fread-memory.php sample/test-256-mb.txt 1048576
The output is now this:
--
257 iteration(s): memory 4.00MB
--
real 0m 0.08s
user 0m 0.02s
sys 0m 0.05s
As expected, the time needed to read the entire 256 MB file decreased (from 0.3 seconds to 0.08 seconds), since the read length is higher (1 MB versus 4 KB, resulting in peak memory usage of 4 MB versus 2 MB), and the number of iterations required decreased to 257.
Now, having a look at this data, we can come up with our own ideas as to what is happening behind the scenes. In the case of file_get_contents(), a peak of 12.01 MB memory is used reading the 10 MB file; that's because the whole file was loaded into memory using this approach. The 256 MB file caused the script shutdown because the limit of 128 MB was hit.
On the other hand, it seems the fread approach did pretty well, both in terms of duration and memory usage. Reading the 10 MB file in chunks of 4 KB, the script uses 2 MB of memory, compared to 12 MB in the case of file_get_contents, while the read time is significantly bigger (0.05 for fread() versus 0.03 for file_get_contents()). Reading the same file though, but in chunks of 1 MB, we get similar results in terms of performance, but we still use much less memory than in the case of file_get_contents (4 MB versus 12 MB).
Now, what happens when we increase the scale a bit? Reading the 256 MB file was not possible with file_get_contents() on account of exhausted memory. But look at the second approach – not only is the file read entirely but also, only 2 MB of memory is used for this process! It takes about 0.3 seconds to read, which is not very satisfactory, but let's see what happens when the read length is increased and, therefore, the number of iterations is decreased. We get much better results now – a read time of 0.08 seconds and a memory peak of 4 MB.
As you can see, the convenient way – using file_get_contents() – is more suitable for small or very small files, whereas dealing with large files requires you to use different approaches, such as fread(), which reads chunks of data; fgets(), which gets an entire line at a time from the file pointer; and fgetcsv(), which is similar to fgets() but, in addition, parses the CSV string line into an array with data.
Reading Files Line by Line
As indicated earlier, there are more ways to perform optimized reading from big files. In the following exercise, you will learn how to use PHP to read a file line by line. This helps especially when one entry record corresponds to one line, as in access or error logs, for example, so that reading the file allows one data record to be processed at a time.
Exercise 7.4: Reading Files Line by Line
In this exercise, we will open a file and read it line by line:
- Create a file called fgets.php and add the following content. As in the previous example, we define the file path and get the file pointer. In the event of failure, the script will exit with an error message:
<?php
$filePath = __DIR__ . '/sample/users_list.csv';
$fileResource = fopen($filePath, 'r');
if ($fileResource === false) {
exit(sprintf('Cannot read [%s] file.', $filePath));
}
- Next, we initialize the $lineNumber variable with the value 0. And then, as in the case of fread(), we perform iterations to read the data in slices. This time, using fgets(), we will get one line at a time. The line is then numbered and printed to output. At the end, we close the file resource pointer, since we no longer need it:
$lineNumber = 0;
while (!feof($fileResource)) {
$lineNumber++;
$line = fgets($fileResource);
echo sprintf(“Line %d: %s”, $lineNumber, $line);
}
fclose($fileResource);
echo PHP_EOL;
- Run the preceding script using the command-line tool, php fgets.php. The output will look like this:
Line 1: John,Smith,2019-03-31T10:20:30Z
Line 2: Alice,Smith,2019-02-28T12:13:14Z
Line 3:
As you will notice, we have a line without content – that is actually an empty line in a CSV file. Please pay attention when dealing with file lines when trying to process data; check for a non-empty line at least before proceeding with processing.
Reading CSV Files
The previous example shows a handy way to read one line at a time from a file. It turns out in our case that it's about a CSV file, a very simple one, with a comma as a delimiter, and that's pretty much it. But what if you have to deal with a complicated CSV document? Luckily, PHP provides a built-in function for that, called fgetcsv(). Using it, we can get one record at a time; that's right, one record, not one line, as the record can be spread over several lines, containing enclosed data (for example, multiline data wrapped between quotes).
Exercise 7.5: Reading CSV Files
In this exercise, we will read the data from CSV files:
- Create a file called fgetcsv.php and add the following content. As before, we declare the file path and get the file pointer. In the event of an error, the script will exit with an error message:
<?php
$filePath = __DIR__ . '/sample/users_list_enclosed.csv';
$fileResource = fopen($filePath, 'r');
if ($fileResource === false) {
exit(sprintf('Cannot read [%s] file.', $filePath));
}
- Then, we initialize the $recordNumber variable with the value 0; we will need it to print to output for each line. And we read one CSV record at a time using the fgetcsv() function, in a while loop, printing the record number and its content:
$recordNumber = 0;
while (!feof($fileResource)) {
$recordNumber++;
$line = fgetcsv($fileResource);
echo sprintf(“Line %d: %s”, $recordNumber, print_r($line, true));
}
fclose($fileResource);
echo PHP_EOL;
- Create a file called users_list_enclosed.csv inside the sample/ directory with the following content:
John,Smith,2019-03-31T10:20:30Z,”4452 Norma Lane
Alexandria
71302 Louisiana”
Alice,Smith,2019-02-28T12:13:14Z,”4452 Norma Lane
Alexandria
71302 Louisiana”
- Run the script with php fgetcsv.php and the output will look like this:

Figure 7.5: Printing the arrays
As you will notice, the fgetcsv() function does a very good job, parsing the CSV entries for us correctly. It does not matter whether the CSV content has a custom delimiter, enclosure, or escape character; all these parameters can be passed as function arguments to fgetcsv() to make the parser understand the format and perform the appropriate parsing
Downloading a File with PHP
We saw how we can make the script read the files using a variety of means in order to allow us to do something with that content. But there is also downloading, when we need the file to be read by the script and sent back to the user, as a response to the HTTP request, and we don't want the PHP process to overload the memory by doing this, something along the lines of reading in chunks and sending the user small pieces at a time. Fortunately, there is a function for that, which is called readfile(). This function reads the file and writes it directly to the output buffer. The readfile() function requires only the file path to read from. The other optional arguments are a Boolean, which tells the function to search for the file in the include_path of PHP, and a context stream resource as a third argument.
A context stream is a set of options for a specific wrapper (a piece of code that builds other code) that modify or enhance the behavior of a stream. For example, when we want to read a remote file, using FTP, we pass the file path as the first argument of the readfile() function, and a valid FTP context stream variable as a third argument. We will not use context streams in the following exercises.
Exercise 7.6: Downloading a File
In this exercise, we will download a file and save it to the specified destination using PHP:
- Create a file called download.php and insert the following content. First, we define the existing file path, and then proceed to set headers, where we make use of the filesize() function to return the file size in bytes for the file being downloaded, and basename(), which returns the last component of the path; in other words, it will cut the directory structure except for the file name. Finally, we call readfile() so that PHP can send the file back to the server and client, as a response to the HTTP request:
<?php
$filePath = 'sample/users_list.csv';
header('Content-Type: text/csv');
header('Content-Length: ' . filesize($filePath));
header(sprintf('Content-Disposition: attachment; filename=”%s”', basename($filePath)));
readfile($filePath);
Make sure you have started the built-in server in this directory (which is /app in my case) running php -S 127.0.0.1 in your Terminal, and that the file exists.
- Then, access the script at http://127.0.0.1:8080/download.php. You should then see a pop-up box asking where to save the CSV file, or it will save the file automatically to a set destination, depending on your browser's configuration:
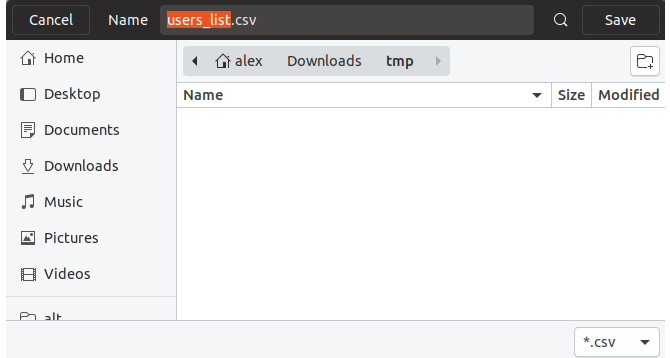
Figure 7.6: Downloading the CSV file
Note
One should check whether the file exists on disk or not and treat each case accordingly. When the file is missing, readfile() will output nothing and the browser might receive the output of the PHP script (output of download.php in our case).
Writing a File with PHP
Writing files with PHP is possible using a variety of methods, the majority involving the fwrite() and file_put_contents() built-in functions.
The fwrite() function accepts two required arguments, the first is the file pointer, and the second one is the string to write to the file. The function returns the number of bytes written or the Boolean false in the event of failure.
file_put_contents() is the equivalent of calling the fopen(), fwrite(), and fclose() sequence.
Note
When a file is written several times in a single PHP process, the fwrite() method is preferred, for performance reasons, since the stream resource is reused, and the file open and close operations (fopen() and fclose()) are avoided for each write as it happens with the file_put_contents() function. A good example of using fwrite() over file_put_contents() is the case of file loggers, when a PHP process might write several times in the same file during its lifetime.
The first required argument is the filename, and the second one is the data to write to the file. The data can be a string, a resource stream, or a single dimension array of strings, rows of which are written in sequence. The third argument is optional and accepts the flags for a write operation. This can be any combination of the following values:

Figure 7.7: Different flags for file_put_contents() function, and their descriptions
When using the fwrite method, we may want to use the same data stream resource to read from; for example, to move the pointer at the beginning of the file after writing, or to read the last N bytes of data. In this case, we would use the fseek() function. This function sets the file pointer (remember the cursor analogy before?) to a specific position. The function signature is as follows:
fseek(resource $handle, int $offset [, int $whence = SEEK_SET ]) : int
The new position, measured in bytes, is obtained by adding an offset to the position specified by $whence.
$whence values can be:
- SEEK_SET – Sets the position of the file pointer equal to offset bytes. This is the default option if none was specified.
- SEEK_CUR – Sets the position of the file pointer equal to the current location plus offset.
- SEEK_END – Sets the position of the file pointer equal to EOF plus offset.
Exercise 7.7: Writing to Files
In the following exercise, we will perform write operations in files using both of the fwrite() and file_put_contents() functions described previously:
- Create a file called write.php and insert the following content:
<?php
$fileFwrite = 'sample/write-with-fwrite.txt';
$fp = fopen($fileFwrite, 'w+');
$written = fwrite($fp, 'File written with fwrite().' . PHP_EOL);
First, we define the file path to write to, and then we open the file pointer using the fopen() function.
Note
Always make sure to have the directory structure created before trying to open or put content into a file. Following our example, you should make sure the sample/ directory exists in the current working directory.
- Next, we attempt to write to the file using the fwrite() function, storing the output in the $written variable:
if (false === $written) {
echo 'Error writing with fwrite.' . PHP_EOL;
} else {
echo sprintf(“> Successfully written %d bytes to [%s] with fwrite():”, $written, $fileFwrite) . PHP_EOL;
fseek($fp, 0);
echo fread($fp, filesize($fileFwrite)) . PHP_EOL;
}
If the write fails ($written is the Boolean false), then we print an error message and continue the script. Otherwise, we print the success message, indicating the number of bytes written. After that, in order to read from the file, we move the pointer at the beginning of the file, at position zero, using the fseek() function. Then, we just print the file content to test the written data.
- To test the second approach, we define the write-with-fpc.txt file inside the sample/ directory, and then call the file_put_contents() function in an attempt to write to the file, and store the output in the same $written variable:
$fileFpc = 'sample/write-with-fpc.txt';
$written = file_put_contents($fileFpc, 'File written with file_put_contents().' . PHP_EOL);
- As in the previous example, if we failed to write to the file, then we print an error message and continue the script. In the case of a successful write, we print the message indicating the number of bytes written into the file followed by the actual file content:
if (false === $written) {
echo 'Error writing with fwrite.' . PHP_EOL;
} else {
echo sprintf(“> Successfully written %d bytes to [%s] with file_put_contents():”, $written, $fileFwrite) . PHP_EOL;
echo file_get_contents($fileFpc) . PHP_EOL;
}
Note
The whole script can be referred at https://packt.live/2MCkeOJ.
- Run the script from the command line with php write.php. The output should look like this:

Figure 7.8: Writing into files using different methods
In this exercise, we wrote string sequences in two different files using two different methods – file_put_contents() and fwrite().
Congratulations! You just managed to write files using PHP.
Exercise 7.8: Appending Content in Files
We have seen how it is possible to write fresh content in files, but often, you just want to add to an existing file – think about some sort of log, for example. In this exercise, you will learn how it is possible to append content to a file, using PHP:
- Create a file called write-append.php and use the code from the previous exercise with two minor modifications. First, we want to change the fopen() mode, from w+ to a+ (from write and read to write-append and read):
$fp = fopen($fileFwrite, 'a+');
- Add the third parameter to the file_put_contents() function – the FILE_APPEND constant:
$written = file_put_contents($fileFpc, 'File written with file_put_contents().' . PHP_EOL, FILE_APPEND);
- Run the script from the command-line interface with php write-append.php and you will get the following result:

Figure 7.9: Result of the script
Running the script over and over again will print you the same success message, and, with each run, the number of sentences will increase in each file, due to the append instruction.
Appending content in files is very useful in the case of logging and generating content in files in order to perform further downloads, to name but a couple of use cases.
Other Filesystem Functions
PHP offers generous support when it comes to handling filesystems. All of the functions can be explored at https://packt.live/2MAsLmw. In addition, we will cover some of the most widely used filesystem functions in PHP.
Deleting a File with PHP
unlink() is the delete files function. It requires the file path as the first parameter and accepts an optional context stream. It returns TRUE if the file is deleted successfully, or FALSE otherwise.
Before deleting a file, it is good to check first whether the file path points to an actual file, and, to achieve this, we can use the is_file() function. This function requires only the file path as the first parameter. It returns TRUE if a file is located and is a regular file, otherwise FALSE.
Exercise 7.9: Deleting a File with PHP
When working with file content in PHP, it is highly likely that you will want to clean some older files. In this exercise, we will write code to delete a file using PHP:
- Create an empty file called to-delete.txt in the sample/ directory. This is the file we will delete with PHP.
- Create a file called delete.php, and insert the following code:
<?php
$filepath = 'sample/to-delete.txt';
if (is_file($filepath)) {
if (unlink($filepath)) {
echo sprintf('The [%s] file was deleted.', $filepath) . PHP_EOL;
} else {
echo sprintf('The [%s] file cannot be deleted.', $filepath) . PHP_EOL;
}
} else {
sprintf('The [%s] file does not exist.', $filepath) . PHP_EOL;
}
In this script, we check whether the file exists and is a regular file, using the is_file() function. In the case of a regular file, next, we test the file deletion; that is, the output of the unlink() function that is responsible for this, and then print the appropriate message based on the output. If the file does not exist, a message providing a notification of this will be printed.
- Run the script in the command-line interface. With php delete.php, you will notice the following output:
The [sample/to-delete.txt] file was deleted.
Running the script again will print the following:
The [sample/to-delete.txt] file does not exist.
This means the delete operation was indeed executed successfully.
In this exercise, when running the script for the first time, all the conditions were met in order to run file deletion, and the file was indeed deleted. When running the script for the second time, the script cannot find the file for the specified path, so the script returns the file does not exist message immediately, prior to exiting.
Moving Files with PHP
On occasion, you may need to move files to a new location, for example, to the archive. This might be the case with a database data dump or log files, to name but two. PHP provides a function for moving functionality, called rename(), which requires the actual file path as a first argument, and the target file path as a second argument. This function returns TRUE if successful and FALSE in the event of failure, and can be used for both files and directories.
Sometimes, the target directory might not yet exist and, in these cases, it is supposed to be created with the script. There is a function for creating directories, called mkdir(), which accepts the following arguments: the directory path to create, the mode (which is 0777, by default, meaning full permissions for any user), a recursive directory creation instruction, and the context resource.
Exercise 7.10: Creating Directories and Moving Files to the Archive
In this exercise, you will move a file to your local server, using PHP. Let's say you are assigned the task of creating a script that will move generated log files to an “archive location,” on a daily basis:
- Create an empty file called to-move.txt. This is the file we will move using PHP, considering it to be the generated log file.
- Create a file called move.php and insert the following content. First, we define the file path to move and the target directory that the file should be moved to. Then, we check whether the file path exists and is a regular file and, in the event of failure, the script will print an error message and will stop the execution:
<?php
$filePath = 'sample/to-move.txt';
$targetDirectory = 'sample/archive/2019';
if (!is_file($filePath)) {
echo sprintf('The [%s] file does not exist.', $filePath) . PHP_EOL;
return;
}
- Then, we check whether the target directory exists and is a directory, and if there's no such directory, then we will try to create one. A message is printed in this regard, letting you know that the directory is being created. Then, the mkdir() function is used to create the target directory, in a recursive fashion (setting the third parameter to true will instruct the script to create any parent directory if it's missing). If the action fails, then an error message is printed and the script stops the execution. Otherwise, the successful message, Done, is printed:
if (!is_dir($targetDirectory)) {
echo sprintf('The target directory [%s] does not exist. Will create... ', $targetDirectory);
if (!mkdir($targetDirectory, 0777, true)) {
echo sprintf('The target directory [%s] cannot be created.', $targetDirectory) . PHP_EOL;
return;
}
echo 'Done.' . PHP_EOL;
}
- Next, we will define the target file path, and this will comprise the target directory and the file base name. Then, the move process is effected by using the rename() function. A message is printed for both a successful or a failed operation:
$targetFilePath = $targetDirectory . DIRECTORY_SEPARATOR . basename($filePath);
if (rename($filePath, $targetFilePath)) {
echo sprintf('The [%s] file was moved in [%s].', basename($filePath), $targetDirectory) . PHP_EOL;
} else {
echo sprintf('The [%s] file cannot be moved in [%s].', basename($filePath), $targetDirectory) . PHP_EOL;
}
Note
The complete script file can be referred at : https://packt.live/35wmDmK.
- Run the script in the command-line interface, with php move.php. The output, during the first run, should look like this:
The target directory [sample/archive/2019] does not exist. Will create... Done.
The [to-move.txt] file was moved in [sample/archive/2019].
Checking the file tree, you will notice that the file has indeed moved:

Figure 7.10: Screenshot of the file tree
In addition to this, when running the script for the second time, you should get the following output:
The [sample/to-move.txt] file does not exist.
In this exercise, you succeeded in moving a file from one location to another, using PHP with its built-in filesystem functions, validating the input as well, so as to make sure that you were not attempting to move a non-existent file.
Copying Files Using PHP
Copying files is yet another straightforward task for which PHP offers support. The copy() function accepts two required arguments – the source file path and the destination path, and an optional one – the stream context. Using the copy() function is very useful in scenarios such as choosing your profile picture from a list of available pictures on the server (in this case, you want to leave the picture list intact, so you will only want to create a copy of the selected picture), or restoring files copied from a backup (again, you want to leave the original files intact, so copy() is again appropriate in this case).
Note
Using the copy() function, if the destination file exists already, it will be overwritten.
Exercise 7.11: Copying Files
You are required to write a script that will copy specific files to a backup location. The copied files should have the .bak extension prepended:
- Create an empty file called to-copy.txt inside the sample directory.
- Create the copy.php file with the following content:
<?php
$sourceFilePath = 'sample/to-copy.txt';
$targetFilePath = 'sample/to-copy.txt.bak';
if (!is_file($sourceFilePath)) {
echo sprintf('The [%s] file does not exist.', $sourceFilePath) . PHP_EOL;
return;
}
First, we define the source and target file paths, and then check whether the source file exists. If the source file does not exist, an error message is printed and the execution of the script stops.
- Next, we try to copy the file, using the copy() function. An appropriate message is printed, based on the copy() function response:
if (copy($sourceFilePath, $targetFilePath)) {
echo sprintf('The [%s] file was copied as [%s].', $sourceFilePath, $targetFilePath) . PHP_EOL;
} else {
echo sprintf('The [%s] file cannot be copied as [%s].', $sourceFilePath, $targetFilePath) . PHP_EOL;
}
Note
The complete script can be referred at https://packt.live/2plXtXu.
- Run the file in the command-line interface, with php copy.php, and check the results; in the event of a successful copy operation, you should get the following output:

Figure 7.11: Copying file successfully
- Change $sourceFilePath in the script to a non-existent file path (for example, wrong-file-path.txt) and run the script again. The output will be as follows:

Figure 7.12: Trying to copy a nonexistent file
As you can see, copying files with PHP turns out to be a pretty straightforward process.
In this exercise, you learned how to deal with files using PHP, starting with file create and write, and continuing with append, rewrite and delete, and copy and move, and then reading large files line by line and sending files to download.
Databases
In the previous section, we saw how we can use PHP to manipulate and store data in files. But when an application relies on structured data, it gets pretty complicated using the filesystem, especially when the application grows, and so does your data. Imagine a social media website, with tons of relationships between the data, including post comments, interests, friendships, groups, and a plethora of other linked data. Also, as your application grows, scalability is an important factor. This is when you want to use a database, to be able to query the data in different ways – ordered, filtered, partial data, combined data (joined), and, at the same time, in a very performant way. A database management system (DBMS) is used for performing operations on database data (create, read, update, and delete). Also, since different types of data are related to other data types in a database, you may want accuracy, consistency, and reliability for your data storage. In this case, you would prefer a relational DBMS.
MySQL is a Relational Database Management System (RDBMS) and is the most commonly used with PHP. It is very fast, reliable, easy to use (it uses Structured Query Language (SQL) queries), and it's free to use. It suits a wide range of applications, from small to large. It's very powerful, fast, secure, and scalable.
A MySQL database stores data in tables, just like any other relational database. A table is composed of related data, organized in rows (records) and columns (record fields).
PHP supports a wide variety of databases, such as MySQL, PostgreSQL, SQLite, MongoDB, MSSQL, and others, but, in this chapter, we will work with MySQL, as it's by far the most widely used database management system with PHP.
GUI Clients
Often, graphical user interface (GUI or “desktop applications”) clients are very useful when it comes to performing miscellaneous operations in a database, such as verifying data, altering tables or columns, exporting or importing data, and migrating a database.
For MySQL, three clients are recommended:
- MySQL Workbench: a desktop application; cross-platform; can be downloaded from https://packt.live/32iaZd6
- PhpMyAdmin: a browser application; can be downloaded from https://packt.live/2McXnu9
- Adminer: a lightweight browser application; can be downloaded from https://packt.live/35yBTzB
In addition, for screenshots, I'll use Workbench to test the data in MySQL Server, but any of these tools could be used.
Connecting to MySQL
To use MySQL Server with PHP, some extensions need to be installed. Usually, an extension is a component that exposes an Application Programming Interface (API) to the user, and which is used to perform specific tasks; in our case, a database-specific extension will be used to connect to MySQL, query update, and delete data, among other operations. In PHP, the two most commonly used extensions when working with MySQL are the mysqli and PDO extensions. These are very similar in terms of functionality and syntax, and, unless you need a specific feature from one of the extensions, choosing an extension to work with should not cause any difficulties. Just pick one.
Since PDO appears to be the most widely used option, we will pick this extension for further exercises.
PHP Data Objects (PDO) is a lightweight and lean interface for accessing databases with PHP.
To continue, make sure you have MySQL installed, as described in the preface. Furthermore, consider the MySQL server listening on 127.0.0.1, port 3306, with the username set to php-user and the password set as php-pass. Also, make sure you have the PDO extension and the pdo_mysql driver installed to facilitate the establishment of connections and send queries to the MySQL Server.
Note
The pdo_mysql driver is an extension that provides an interface to the aforementioned PDO extension. This driver is a component that makes communication with the MySQL Server possible, translating instructions between the two parties.
Checking for an enabled PHP extension in the Terminal is possible by running php -m to list all installed and enabled extensions or php -m | grep -i pdo to list only those entries that match the pdo string fragment. The latter should output these two entries:

Figure 7.13: Checking for the enabled extensions
Note
grep is a Unix function that searches for text in files or in string input, and returns the matching lines in output by default. The | (pipe) token is used to forward the previous command's output (php -m) to the next command, as input.
In order to proceed further, let's create a new directory where we will write the database-related exercises (for example, database).
Connecting to MySQL
Connections to MySQL are initiated by instantiating the PDO object. This accepts the database source (DSN) as the first argument, and optionally, the username, password, and PDO options, if required.
The syntax is as follows:
PDO::__construct(string $dsn [, string $username [, string $password [, array $options ]]])
Parameters:
- Data Source Name: Data Source Name (DSN) specifies the details required to connect to the database; for a MySQL connection, the prefix is mysql: followed by a list of key-value pairs separated by semicolons; these elements will be listed here.
- username: the username used to connect to the database.
- password: the password used to authenticate the username.
- options: an associative array of MySQL (driver-specific) connection options.
The DSN allows the following elements:
- host: the hostname where the database is located.
- port: the database server listens to this port number.
- dbname: the name of the database.
- charset: the character set for the connection (the data will be transferred using this character set).
- unix_socket: The MySQL Unix socket; to be used as an alternative to the host and port connection type.
By way of good practice, it is recommended to set the connection character set to utf8mb4; that will save you from further difficulties if you have to store and fetch UTF-8 characters using this connection (and you will have to, at some point).
One of the methods of the PDO class is getAttribute(), which returns a database connection attribute, such as server information and the connection status. The PDO::getAttribute() method requires and accepts only one parameter, the integer type; that is, one of the PDO::ATTR_* constants. For a complete list of PDO attributes and other constants, visit the official documentation page at https://www.php.net/manual/en/pdo.constants.php.
Exercise 7.12: Connecting to MySQL
In this exercise, you will connect to a MySQL server using PDO.
- Create a file called connect.php and add the following content. In our script, we first define the DSN for our MySQL database, pointing the host to 127.0.0.1 and the port to 3306:
<?php
$dsn = “mysql:host=127.0.0.1;port=3306;charset=utf8mb4”;
- Next, we set the PDO options, under the $options variable, where we specify the fetch mode, to have all the records fetched as an associative array by default. We would also want to set the error mode to Exceptions, to make it easier to handle query errors, but for now, we will make use of the PDO::errorCode() and PDO::errorInfo() methods:
$options = [
PDO::ATTR_DEFAULT_FETCH_MODE => PDO::FETCH_ASSOC,
// PDO::ATTR_ERRMODE => PDO::ERRMODE_EXCEPTION,
];
Note
We will learn about exceptions and error handling in the next chapter.
- In the next line, we invoke the PDO object, thereby creating a connection to the database, using the DSN defined previously, the username, password, and the aforementioned PDO option. If the connection is unsuccessful, an exception will be thrown (of the PDOException type) and the execution of the script will stop:
$pdo = new PDO($dsn, “php-user”, “php-pass”, $options);
- In the final step, we want to print the connection info, using the PDO::getAttribute() method:
echo sprintf(
“Connected to MySQL server v%s, on %s”,
$pdo->getAttribute(PDO::ATTR_SERVER_VERSION),
$pdo->getAttribute(PDO::ATTR_CONNECTION_STATUS)
) . PHP_EOL;
- Run the file in the command-line interface with php connect.php. When the connection is successful, the output will look like this:
Connected to MySQL server v5.7.23, on 127.0.0.1 via TCP/IP
In the event of a connection failure, the output will look like this:
PHP Fatal error: Uncaught PDOException: SQLSTATE[HY000] [1045] Access denied for user 'php-user'@'127.0.0.1' (using password: YES) in /app/connect.php:8
Stack trace:
#0 /app/connect.php(8): PDO->__construct('mysql:host=127....', 'php-user', 'wrongpwd', Array)
#1 {main}
thrown in /app/connect.php on line 8
In the event of a connection failure, it would be better to treat the error and fall back gracefully to a nice-looking error page, providing a user-friendly error message. In this case, though, we will leave the script as it is now because PHP exceptions will be covered in the next chapter.
Here, you made a connection to MySQL, with a username and password, using PDO, and you set some options as well, for the PDO object. You also printed the server version and connection status, from the PDO connection attributes.
Creating a Database
Now that we have learned how to establish a connection with a MySQL Server, let's move forward and see how we can create a database.
To do this, we will have to run SQL queries; this is where we get to use the PDO methods.
We will invoke the PDO::exec() method to send the SQL queries to MySQL Server. It requires and accepts only one parameter: the SQL query string, and returns the Boolean false in the event of an error, or the number of affected rows in the event of success.
Warning: Since this function can return a Boolean false and also 0 (zero), which evaluates to false, make sure you use the === or !== operator when testing the result, so as to avoid false positives when checking for errors.
In the event of a query failure (PDO::exec() returns false), we may invoke the PDO::errorInfo() method to get the error codes and the error message. This method returns a numeric array containing the following data:
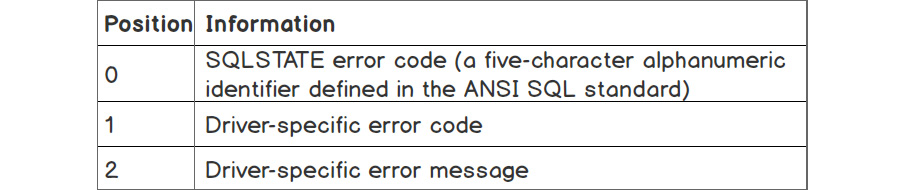
Figure 7.14: Description of the type of data in the array returned by the PDO::errorInfo()
The query to run in order to create a new database has the following syntax:
CREATE SCHEMA db_name, where db_name should be replaced with the name of the database you want to create.
Note
The CREATE SCHEMA string is an SQL statement. It can be executed in a SQL server using any SQL client. The syntax and more information can be found on the official documentation page at https://packt.live/32ewQSK.
Exercise 7.13: Creating a Database
In this exercise, we will create a database and run queries:
- Create a file called connection-no-db.php and insert the following code:
<?php
$dsn = “mysql:host=127.0.0.1;port=3306;charset=utf8mb4”;
$options = [
PDO::ATTR_DEFAULT_FETCH_MODE => PDO::FETCH_ASSOC,
];
$pdo = new PDO($dsn, “php-user”, “php-pass”, $options);
return $pdo;
This is similar to what we did in the previous exercise, except that instead of printing the connection information, we return the PDO instance. In this file, we do not specify a database name, since we have not yet created one.
- Create a file called create-schema.php and insert the following code. First, we require the PDO instance from the connection-no-db.php file we created previously:
<?php
/** @var PDO $pdo */
$pdo = require 'connection-no-db.php';
Then, we write our SQL query under the $sql variable, which will create a database with the name demo:
$dbname = 'demo';
$sql = “CREATE SCHEMA $dbname”;
- Run the query using the PDO::exec() method, and check for successful statement execution (the result is not a Boolean false). In the event of success, we print a simple success message. In the event of an error, we print the error message:
if ($pdo->exec($sql) !== false) {
echo “The database '$dbname' was successfully created.” . PHP_EOL;
} else {
list(, , $driverErrMsg) = $pdo->errorInfo();
echo “Error creating the database: $driverErrMsg” . PHP_EOL;
}
- Run the code from the command-line interface with php create-schema.php. When running the code for the very first time, you will get the following output:

Figure 7.15: Creating a schema successfully
Running the code successively, you will get the following error message:

Figure 7.16: Error in creating the schema
In this exercise, you learned how we can create a database and how to test for the successful execution of the SQL statement, CREATE SCHEMA.
Creating a Table
Let's now see how we can create a table that will actually hold the data in an organized way. We will use the CREATE TABLE SQL statement to achieve this. The syntax of this statement is more complex and also involves table column definitions.
Standard CREATE TABLE syntax is as follows:
CREATE TABLE [IF NOT EXISTS] tbl_name
(
col_name data_type [NOT NULL | NULL] [DEFAULT default_value] [AUTO_INCREMENT] [UNIQUE [KEY]] [[PRIMARY] KEY]
...
)
The parameters are as follows:
- tbl_name: The table name to be created.
- col_name: The column name.
- data_type: The type of data the column holds, such as date, timestamp, integer, string, and JSON. More information can be found at https://packt.live/32CWosP.
- default_value: The default value when the insert statement provides no data for this row column.
A sample CREATE TABLE query can be as follows:
CREATE TABLE users
(
id INT NOT NULL PRIMARY KEY AUTO_INCREMENT,
email VARCHAR(254) NOT NULL UNIQUE,
signup_time DATETIME DEFAULT CURRENT_TIMESTAMP NOT NULL
)
In this statement, we point to the table name – users, with three columns, as follows:
- id: An integer type; not null; a primary key with auto-incrementing; these constraints tell MySQL that the column is a primary key, meaning that it is unique in the table and will be used to identify unique records in the table. The AUTO_INCREMENT keyword tells MySQL that we want this value to be set automatically with an “auto-increment” value, which is the next higher integer after the last inserted record ID, when we do not specify it in our INSERT statements. This is helpful because we can execute INSERT statements without knowing which should be the next ID value.
- email: A variable-length character type with a maximum length of 254; not null; and unique among the records. In respect to this rule, when inserting another record with the same “email” value, the statement will be rejected by MySQL Server and an error will be returned.
- signup_time: A datetime type; defaulting to the current time; not null. Not specifying this value in the insert query will result in the current datetime value being set by MySQL Server.
Warning
Be aware that the “current datetime” will be the value set using the MySQL Server time zone offset, which may differ from the application server. For example, when you deploy your application on a server from a data center that is located in a different time zone to yours, it is possible that the system time zone of the remote server is set to the local time zone offset. You may want to make sure that your server's settings do not apply time offset – using the UTC time zone, or you may want to use a timestamp value instead of a human-readable date.
You can find the full syntax and more information at https://packt.live/2MAGloG.
Exercise 7.14: Creating the Table
In this exercise, we will learn how to select a database with PDO, and how to create a table using the PDO instance:
- Create a file called create-table.php and insert the following code. What we do, after getting the PDO instance, is to define the CREATE TABLE statement:
<?php
/** @var PDO $pdo */
$pdo = require 'connection-no-db.php';
$createStmt = “CREATE TABLE users
(
id INT NOT NULL PRIMARY KEY AUTO_INCREMENT,
email VARCHAR(254) NOT NULL UNIQUE,
signup_time DATETIME DEFAULT CURRENT_TIMESTAMP NOT NULL
)”;
After executing the statement, in the event of failure, the error message will be printed and execution or the script will stop. Otherwise, a success message will be printed to output:
if ($pdo->exec($createStmt) === false) {
list(, , $driverErrMsg) = $pdo->errorInfo();
echo “Error creating the users table: $driverErrMsg” . PHP_EOL;
return;
}
echo “The users table was successfully created.”;
- Run the script in the command-line interface with php create-table.php. Expect the following error output:

Figure 7.17: Error in creating the table
We get an error message, indicating that no database is selected. What we understand from this statement is that a MySQL server can store several databases, and, when executing a statement, we should indicate the database we want to run it into. To achieve this, we should either include the database name inside the SQL statements (for example, CREATE TABLE demo.users ...) or specify the database name inside DSN, before creating the connection to MySQL Server.
- Copy the connection-no-db.php file to connection.php and add the database name to DSN, inside the connection.php file. Replace the $dsn variable with the following value:
$dsn = “mysql:host=mysql-host;port=3306;dbname=demo;charset=utf8mb4”;
Note
We will require this connection.php file further, in all exercises, to reuse the code instead of typing this block of code in every file where we use the database connection.
- Require the connection.php file in the create-table.php script, instead of connection-no-db.php:
$pdo = require 'connection.php';
- Let's run our script once more: php create-table.php. Expect the following output:

Figure 7.18: Creating tables successfully
Great! You successfully created the first table in the demo database.
In this exercise, you learned how to select a database at connection time, and how to create a table in a SQL database. Notice that the queries begin with an action (CREATE) followed by the object type (schema/database or table), followed by the object definition where required. Also, you probably noticed that the column names are followed by the date type declaration (integer, string, date, and so on) and then by additional constraints (NOT NULL, PRIMARY KEY, UNIQUE, and so on).
As you can see, SQL statements are pretty descriptive and easy to learn and remember. So, let's advance with more exciting examples!
Inserting Data into a MySQL Database Table
Since we already know how to create a table in a MySQL database, let's add some data to it.
Before inserting data into a table, we must craft the script in such a way that the data to be inserted will match the table's column definition. This means we will not be able to store strings in a column defined with an integer data type. In such cases, MySQL Server will reject the query and will respond with an error. Also bear in mind, since most of the data will come from user input, that you should always validate it before sending it to a database server, and, at the same time, escape it properly, so as to avoid another security issue, called SQL injection, covered later in the chapter.
Standard INSERT statement syntax is as follows:
INSERT INTO tbl_name
(col_name [, col_name] ...)
VALUES (value_list) [, (value_list)] ...
Where value_list is:
value [, value] ...
Note
The number of values specified in value_list should match the col_name count. The complete syntax of the INSERT statement can be found on the official documentation page at https://packt.live/32fXkmP.
An example INSERT query may appear as follows:
INSERT INTO employees (email, first_name, last_name)
VALUES ('[email protected]','John','Smith'),
('[email protected]','Jane','Smith')
In this case, two rows will be inserted in the employees table, setting the values from VALUES to the corresponding position column from the column list; for example, [email protected] is assigned to the email column, and the John value is assigned to the first_name column.
Exercise 7.15: Inserting Data into a Table
In this exercise, we will become familiar with the INSERT statement, learning how we can add data to a table:
- Create a file called insert.php. After getting the PDO instance, we store the INSERT statement under the $insertStmt variable. This statement inserts the value [email protected] into the email column of the users table. We did not specify the ID value; therefore, it must be set automatically with the auto_increment value, which, for the first entry, would be 1. We are also missing the signup_time column, which, by default, will set the time when the record was added. Add the following code to the insert.php file:
<?php
/** @var PDO $pdo */
$pdo = require 'connection.php';
$insertStmt = “INSERT INTO users (email) VALUES ('[email protected]')”;
- If the statement execution fails, the script will print the error message and will not continue further; otherwise, the success message will be printed, including the ID of the row that was just inserted, using the PDO::lastInsertId() method:
if ($pdo->exec($insertStmt) === false) {
list(, , $driverErrMsg) = $pdo->errorInfo();
echo “Error inserting into the users table: $driverErrMsg” . PHP_EOL;
return;
}
echo “Successfully inserted into users table the record with id “ . $pdo->lastInsertId() . PHP_EOL;
- Run the script with php insert.php. The first output will be as follows:

Figure 7.19: Inserting a record into the table
- Run the script once more. Now, you should expect the following response in the output:

Figure 7.20: Duplicate entry error
This proves that the previous script execution succeeded, and that the UNIQUE constraint in the email column is working as expected.
- Let's now look at the data in the users table, using the Workbench client:

Figure 7.21: Checking the data in DB using the Workbench client
As expected, we have a single row, with id = 1, [email protected] for the email column, and the signup time set by MySQL Server at the time of the row insertion.
Congratulations on adding in the initial data to a database table! It was pretty easy. Now, knowing that we should work with user input, we must ensure that the script will run the queries in complete safety, avoiding SQL injection, which may lead to data leaks and system compromise.
SQL Injection
So, what is SQL injection anyway? SQL injection is one of the most common vulnerabilities in the wild web nowadays. It is a technique used to steal data, gain control of users' accounts, or destroy a database, and is performed by sending malicious query chunks via HTML form inputs.
To better understand this, here is a simple example of how you can drop a table using the SQL injection technique, given a query that accepts user input without sanitizing and/or validating it:
$rawInput = $_POST['email'];
$query = “INSERT INTO users (email) VALUES ($rawInput)”;
When the email input value is “”); DROP TABLE users; /**, then the query will become:
INSERT INTO users (email) VALUES (“”); DROP TABLE users; /**)
What happens is easy to understand; the INSERT statement is executed, adding an empty value to the email column, and then the query to drop the table is executed, making the users table vanish, while the /**) part is ignored, since /** marks the beginning of a comment in a SQL query.
Prepared Statements
In order to prevent SQL injection, we should escape the input data. PDO offers an alternative –so-called prepared statements (the PDOStatement class). These statements are templates and look like regular SQL queries, with the difference that, instead of values, they contain placeholders, which will be replaced with escaped values at execution time. The placeholders' mapping is done using the PDOStatement::bindParam() method, or by providing the mapping at execution time, as an argument of the PDOStatement::execute() method.
There are two types of placeholders:
- Positional placeholders, ?
Query example:
INSERT INTO users (email) VALUES (?);
- Named placeholders, with names prepended with a colon, :
Query example:
INSERT INTO users (email) VALUES (:email);
The use of prepared statements offers major benefits:
- The parameters of prepared statements should not be quoted, as this is handled by PDO automatically, while it will also handle the escaping of values when necessary. This means that you can be sure that no SQL injection is possible using prepared statements with placeholders.
- The query is sent and parsed only once by MySQL Server, meaning that the same statement can be executed many times, sending only the placeholders' data. This results in faster execution times and lower bandwidth usage.
Note
By default, PDO will emulate prepared statements as support for databases that don't have this feature and, if you want to benefit from genuine prepared statements in MySQL Server, you should set PDO::ATTR_EMULATE_PREPARES to false in the connection options.
Emulating prepared statements means that the query will not be sent to the server and checked when PDO::prepare() is invoked. Instead, PDO will escape the bind parameters from PDO::execute(), and will make the placeholders' replacements on its own. Then, the raw SQL query is sent to the database server, meaning that, this way, you do not benefit from performance optimizations that the database could carry out when using prepared statements that are then executed many times.
Using Prepared Statements
To obtain a prepared statement, you must invoke the PDO::prepare() method, providing the statement as a first argument. The output is an instance of the PDOStatement class (the prepared statement), which is then used to bind parameters' values and execute the statement.
PDO::bindParam() is used to bind prepared statements' parameters, and has the following syntax:
PDOStatement::bindParam(mixed $parameter, mixed &$variable [, int $data_type = PDO::PARAM_STR [, int $length [, mixed $driver_options ]]])
Accepted input parameters:
- parameter: The parameter identifier; for a prepared statement using named placeholders, this will be a parameter name of the form :name. For a prepared statement using question mark placeholders, this will be the one-indexed position of the parameter.
- variable: The name of the PHP variable to bind to the SQL statement parameter; be aware that this parameter is passed by reference, meaning that if we modify the variable before we execute the statement, the new value will be sent to the server when PDO::execute() is invoked.
- data_type: The data type for the parameter using the PDO::PARAM_* constants; for example, PDO::PARAM_INT.
- length: The length of the data type. To indicate that a parameter is an OUT parameter from a stored procedure, you must explicitly set the length.
- driver_options: Self-explanatory.
The PDO::bindParam() method returns true if successful, otherwise false.
To execute the prepared statement, use the PDO::execute() method. The syntax is the following:
PDOStatement::execute([array $input_parameters])
The only accepted parameter is an optional $input_parameters array with values for the statement placeholders. All values of the array are treated as PDO::PARAM_STR.
This method returns true if successful, otherwise false.
The following is a sample query using a prepared statement with positional placeholders:
$stmt = $pdo->prepare(“INSERT INTO users (email) VALUES (?)”);
$stmt->bindParam(1, $email);
$email = '[email protected]';
$stmt->execute();
$email = '[email protected]';
$stmt->execute();
Or it can be written as follows:
$stmt = $pdo->prepare(“INSERT INTO users (email) VALUES (?)”);
$stmt->execute(['[email protected]']);
$stmt->execute(['[email protected]']);
The following is a sample query using a prepared statement with named placeholders:
stmt = $pdo->prepare(“INSERT INTO users (email) VALUES (:email)”);
$stmt->bindParam(':email', $email);
$email = '[email protected]';
$stmt->execute();
$email = '[email protected]';
$stmt->execute();
Or it could be written as follows:
$stmt = $pdo->prepare(“INSERT INTO users (email) VALUES (:email)”);
$stmt->bindParam(':email', $email);
$stmt->execute([':email' => '[email protected]']);
$stmt->execute([':email' => '[email protected]']);
Notice that the $email variable is assigned to the :email placeholder only once, while its data changes twice, each change being followed by the execution of the statement. Each statement will send the current value of the $email variable, at that point of execution, this being possible as a result of using the variable reference in the PDO::bindParam() method, rather than passing the variable by value.
Exercise 7.16: Inserting Data Using Prepared Statements
In this exercise, you will create a script that inserts new user emails from user input, using prepared statements:
- Create a file called insert-prepared.php and add the following code. As before, we get the PDO instance, and then its prepare() method, providing the query template. In return, we get an instance of PDOStatement, which we store in the $insertStmt variable:
<?php
/** @var PDO $pdo */
$pdo = require 'connection.php';
$insertStmt = $pdo->prepare(“INSERT INTO users (email) VALUES (:email)”);
- Then, we invoke the execute() method of PDOStatement, providing the placeholder-value map. In this case, the value will be the first argument provided to the script at execution time. We check the result and, if unsuccessful, an error message is printed and the execution of the script stops. Otherwise, a successful message is printed:
if ($insertStmt->execute([':email' => $argv[1] ?? null]) === false) {
list(, , $driverErrMsg) = $insertStmt->errorInfo();
echo “Error inserting into the users table: $driverErrMsg” . PHP_EOL;
return;
}
echo “Successfully inserted into users table” . PHP_EOL;
- Run the script with php insert-prepared.php [email protected]. The output should be as follows:

Figure 7.22: Duplicate entry error
This is an expected error, because we have already added this email before, and the UNIQUE keyword ensures that no other entries will be added that have the same email address. For a table definition, please refer to Exercise 7.14, Creating the Table.
- Run the script with php insert-prepared.php [email protected]. This time, you should expect an output message similar to this:

Figure 7.23: Record inserted
Let's check the records using Workbench:
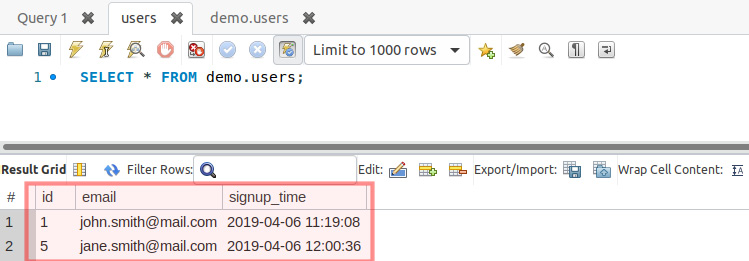
Figure 7.24: Records displayed by Workbench
It looks good. You have successfully run a prepared statement with PDO. You will notice that the ID of [email protected] is not 2, but 5. This is because the prepared statements that ran before, even the failed ones, increased the AUTO_INCREMENT value.
- Let's check the protection against SQL injection by running the script that includes the malicious query chunk:
php insert-prepared.php '””); DROP TABLE users; /**'
The output is similar to this:

Figure 7.25: Record inserted
Let's check the results using Workbench:
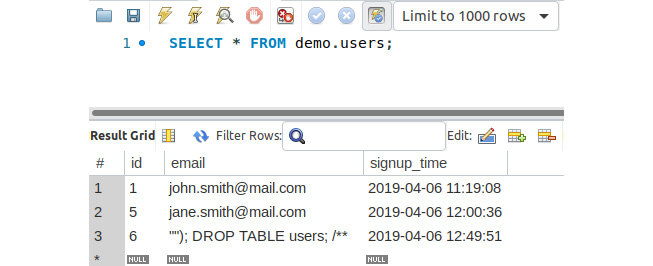
Figure 7.26: Displaying all records with the Workbench client
They look good. We are protected against SQL injection, but ended up with corrupt data, since the input was not validated nor sanitized before the query ran. Please refer to the Sanitizing and Validating the User Input section of Chapter 6, Using HTTP.
Fetching Data from MySQL
So far, you have learned how to create a database and a table, and also how to insert data into tables, in a secure manner. Now, it's time to fetch and display some data using PHP.
To accomplish this, we use the SELECT statement, which has the following minimal syntax:
SELECT column1 [, column2 …] FROM table
The preceding query would return all the records from the table since no limitation is set. It is therefore recommended (if not mandatory in some cases) to use the LIMIT clause in one of its forms:
- LIMIT row_count: will return the first row_count rows
- LIMIT offset, row_count: will return row_count rows starting with the offset position (for example, LIMIT 20, 10 will return 10 rows starting with position 20; another example, LIMIT 0, 10 is equivalent to LIMIT 10, since the offset is zero by default)
- LIMIT row_count OFFSET offset: identical to LIMIT offset, row_count
A part of the LIMIT clause, the SELECT statement is rich in clauses that can be used to filter, join, group, or sort data. You can check the SELECT statement syntax of the official documentation page at https://dev.mysql.com/doc/refman/5.7/en/select.html.
A very simple SELECT statement looks like this:
SELECT * FROM employees LIMIT 10;
This statement queries the first 10 records from the employees table.
Note
Using an asterisk, *, instead of column names in SELECT statements will make MySQL perform an additional lookup query to retrieve the column list of the queried table, and replace the * in the original query with this list of columns. This has a performance impact on SQL queries, which is not significant for low-traffic applications; yet it is considered good practice to specify the column list instead of *, irrespective of the project size or the estimated traffic load.
Now, let's examine, step by step, how we can get the data we want from a MySQL database, using various examples.
Exercise 7.17: Fetching Data from MySQL
In this exercise, you will learn how you can query data from a MySQL database in the most simplistic way, getting a slice of records in the result set, filtering the data, and ordering the data by a specific column:
- Create the select-all.php file and add the following code. We get the PDO instance and store the SELECT query in the $statement variable. Then, we invoke the query() method of the PDO object instance, and will either get as output a Boolean false, in the event of failure, or an instance of PDOStatement if successful:
<?php
/** @var PDO $pdo */
$pdo = require 'connection.php';
$statement = “SELECT * FROM users”;
$result = $pdo->query($statement);
- In the event of a query failure, we print the error message and interrupt the script execution. Otherwise, we print the All records line and iterate over all the result set records and print them, joining the record data using the tab delimiter:
if ($result === false) {
list(, , $driverErrMsg) = $pdo->errorInfo();
echo “Error querying the users table: $driverErrMsg” . PHP_EOL;
return;
}
echo “All records” . PHP_EOL;
while ($record = $result->fetch()) {
echo implode(“ ”, $record) . PHP_EOL;
}
- We repeat the operation with a slightly modified query, adding the LIMIT clause (and, without checking for query failure anymore), and we then print the Use LIMIT 2 line followed by all the records in the result set:
$result = $pdo->query(“SELECT * FROM users LIMIT 2”);
echo PHP_EOL . “Use LIMIT 2” . PHP_EOL;
while ($record = $result->fetch()) {
echo implode(“ ”, $record) . PHP_EOL;
}
- We run another query, using the WHERE clause to filter the result set and only return the records with an ID value greater than 3. Then, we print the Use WHERE id > 3 line followed by all the records in the result set:
$result = $pdo->query(“SELECT * FROM users WHERE id > 3”);
echo PHP_EOL . “Use WHERE id > 3” . PHP_EOL;
while ($record = $result->fetch()) {
echo implode(“ ”, $record) . PHP_EOL;
}
- Lastly, we run one more query, using the ORDER BY clause to sort the output by the id column in descending order. We print the Use ORDER BY id DESC line, followed by all the records in the result set:
$result = $pdo->query(“SELECT * FROM users ORDER BY id DESC”);
echo PHP_EOL . “Use ORDER BY id DESC” . PHP_EOL;
while ($record = $result->fetch()) {
echo implode(“ ”, $record) . PHP_EOL;
}
Note
The final file can be referred at https://packt.live/31daUWP.
- Run the script with php select-all.php. Expect the following output:

Figure 7.27: Fetching the records using different conditions
Congratulations! You successfully fetched data from the MySQL database in different ways: sorting, filtering, and slicing the entire data in the table.
By now, we have got a glimpse into the power of a database. This is just the beginning.
Updating Records in MySQL
To update records in MySQL, the UPDATE statement is used. This is usually used together with the WHILE clause to filter the rows to which the update is applied.
Warning
Not using WHERE in an UPDATE statement will cause the update to apply to all records in the table.
The PDOStatement::rowCount() method returns the number of rows affected by the last INSERT, UPDATE, or DELETE statement executed by the corresponding PDOStatement object.
Exercise 7.18: Updating Records in MySQL
In this exercise, you will learn how to perform an update to a MySQL database users table, setting the email [email protected] for a record with incorrect data in the email column (ID 6 in our case):
- Create a file called update.php and add the following code. First, we get the PDO instance and update parameters. We need the record id, which has to be updated, and this value will be retrieved from the first input argument of the script, defaulting to 0 (zero). We also need the updated value for the email column, which will be retrieved from the second input argument of the script. Note that these values can be retrieved from the $_POST superglobal, when the update action is performed using an HTML form in a web page:
<?php
/** @var PDO $pdo */
$pdo = require 'connection.php';
$updateId = $argv[1] ?? 0;
$updateEmail = $argv[2] ?? '';
- Then, we prepare the UPDATE statement using two placeholders – id and email:
$updateStmt = $pdo->prepare(“UPDATE users SET email = :email WHERE id = :id”);
- We execute the UPDATE statement, providing the placeholders' values map in an argument, and test the result; if unsuccessful, the error message will be displayed and the script will return (ending the execution). Otherwise, the success message is displayed:
if ($updateStmt->execute([':id' => $updateId, ':email' => $updateEmail]) === false) {
list(, , $driverErrMsg) = $updateStmt->errorInfo();
echo “Error running the query: $driverErrMsg” . PHP_EOL;
return;
}
echo sprintf(“The query ran successfully. %d row(s) were affected.”, $updateStmt->rowCount()) . PHP_EOL;
- Run the script with php update.php 6 [email protected] and check the result. The expected output is as follows:

Figure 7.28: Updating a record
- Let's check the result in Workbench:
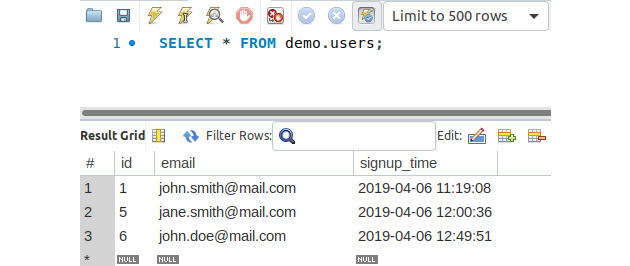
Figure 7.29: Displaying database table data using the Workbench client
The email for the record with the id 6 was changed to the value provided. It looks great! Note that if you have another id for the record with incorrect data in the email field, then you should use that id in step 2 when running the command.
- Now, let's see what happens when we run the UPDATE query for an ID that does not exist:
php update.php 16 [email protected];
Expect the following output:

Figure 7.30: Output of the UPDATE query
We end up with no row being affected by this query, and the logic seems pretty straightforward: the UPDATE statement filters the rows to update, using the conditions from the WHERE clause; in our case, filtering by id=16 resulted in no rows qualifying for an update.
Note
Trying to update a record column value with the same, identical value will result in no count for the affected row aggregation; in other words, PDOStatement::rowCount() will return 0 (zero).
Deleting Records from MySQL
To delete records from MySQL, we should use the DELETE statement. This is often (if not always) used together with the WHERE clause to indicate matching records to delete.
Warning
Failure to provide the WHERE clause in a DELETE statement will cause all records to be deleted from the table.
Usually, in the WHERE clause of a DELETE statement, the id columns are used. This is the case when a precisely indicated row is deleted. But the WHERE clause can be used to its full potential in DELETE statements as well. Let's say we want to delete records using a partial match for string columns. To achieve this, we will use the LIKE operator, which is simple, yet powerful, pattern matching. With this operator, we can use two wildcards:
- _ (underscore): matches exactly one character
- % (percent): matches any number of characters, including no characters
For example, LIKE php_ will match the php7 column value but will not match php or php70.
On the other hand, LIKE “php7%” will match php7, php70, but will not match php.
To know how many records were deleted, we will use the PDOStatement::rowCount() method mentioned before.
Exercise 7.19: Deleting Records from MySQL
In this exercise, you will learn how to delete records from MySQL using a partial match in the WHERE clause:
- Create a file called delete.php.
- First, we get the PDO instance, as usual, then retrieve the string to match from the input argument, and then we prepare the DELETE statement using the :partialMatch placeholder:
<?php
/** @var PDO $pdo */
$pdo = require 'connection.php';
$partialMatch = $argv[1] ?? '';
$deleteStmt = $pdo->prepare(“DELETE FROM users WHERE email LIKE :partialMatch”);
- We then execute the statement by passing the string from input and, in the event of an execution failure, we print the error message. Note that the :partialMatch pattern value is the $partialMatch variable value enclosed with %, meaning we will look for a match anywhere in the column value, be it at the beginning, the end, or somewhere inside the string value:
if ($deleteStmt->execute([':partialMatch' => “%$partialMatch%”]) === false) {
list(, , $driverErrMsg) = $deleteStmt->errorInfo();
echo “Error deleting from the users table: $driverErrMsg” . PHP_EOL;
return;
}
- If the statement executed successfully, then we want to know how many records were affected (deleted), and we will use the PDOStatement::rowCount() method for that. We store the value inside the $rowCount variable for further usage, and evaluate its value. If the value is 0 (zero), it means no records were deleted, and an appropriate message will be printed to output, including the lookup term (the partial match string). Otherwise, the success message will be printed, indicating the number of rows deleted for the lookup term:
if($rowCount = $deleteStmt->rowCount()){
echo sprintf(“Successfully deleted %d records matching '%s' from users table.”, $rowCount, $partialMatch) . PHP_EOL;
} else {
echo sprintf(“No records matching '%s' were found in users table.”, $partialMatch) . PHP_EOL;
}
Note
The full script can be referred at https://packt.live/2MCeswE.
- Run the file with php delete.php smith, and expect the following output:

Figure 7.31: Deleting records
- Run the preceding command once again. Now, you should expect the following output:

Figure 7.32: Error deleting data
- Check the records using Workbench:
Figure 7.33: Displaying database table data using the Workbench client
All the records matching smith have gone.
You successfully completed the deletion of records from the database table by matching them using the LIKE operator. For a complete list of operators, refer at https://packt.live/2OHMB0B.
The Singleton Pattern
The singleton pattern is a software design pattern that limits the instantiation of a class to a single instance. The idea of this pattern is to make the class itself responsible for its instantiation, which can be achieved by hiding the constructor method (for example, changing its visibility to private) and by defining a public static method that returns the sole instance of the class.
This is useful when precisely one object (the first instance) is needed to perform actions across the application. For a database connection class, this is particularly useful since it does not only limit multiple instantiations of the class but also avoids repetitive connection and disconnection operations with the MySQL Server, making the first established connection available across the application for the lifetime of a single request-response cycle.
To test (or demonstrate) the singleton implementation in PHP, a simple script file would be sufficient:
DatabaseSingleton.php
1 <?php
2
3 class DatabaseSingleton
4 {
5 private function __construct()
6 {
7 //$this->pdo = new PDO(...);
8 }
9
10 public static function instance()
11 {
12 static $instance;
13 if (is_null($instance)) {
14 $instance = new static;
15 }
16 return $instance;
17 }
18 }
Running the preceding script would always return the following:

Figure 7.34: Screenshot of the output
Note
When comparing objects using the identity operator (===), object variables are identical if, and only if, they refer to the same instance of the same class.
So far in this chapter, you have learned how to use a database, starting with the connection, creating a database and tables, before moving on to adding, querying, updating, and deleting records, and then to securing queries by using prepared statements and anonymous or named placeholders. Undoubtedly, MySQL has much more to offer—it merits an entire book, but the essentials were all briefly covered here.
Activity 7.1: Contact Management Application
You are required to build a website where users can create an account and then log in to manage a private list of contacts. The website will make use of databases to store user login data, as well as to store each user's contacts.
Along with the database functionality that you have learned in this chapter, you will be required to use functionality from previous chapters in order to build the website (for example, conditionals from Chapter 3, Control Statements; functions from Chapter 4, Functions; OOP from Chapter 5, Object-Oriented Programming; and form validation from Chapter 6, Using HTTP). You may need to refer to previous chapters for a reminder of how to implement the required functionality.
The required pages are as follows:
- Home page
- Login and Sign up pages
- Profile page
- Contacts list and add/edit contact form page
Layout and Briefing
The layout is as shown:
- The home page

Figure 7.35: Home page layout
There is a horizontal navigation bar at the top of the page, featuring the website title on the left, and the Login button on the right. After a successful login, the Login button will be replaced by the username, which will link to the Profile page, the Contacts page link, and the Logout link.
The content is a message with two call-to-action links: Sign up and Login.
The Login page will look as follows:
Figure 7.36: Authentication layout
The login is based on the username and password, so the content is a simple login form, with Username and Password fields, and a Login button. The last sentence is a Sign up call-to-action link.
After logging in, the user is redirected to the Profile page.
The Sign up page will look as follows:

Figure 7.37: Sign up page layout
The content is the Sign up form, with the following inputs:
- Username
- Password
- Password verify
The username is required to be at least three characters long, and just alphanumeric. The password should be at least six characters long and should be verified by a second password input at signup. Any form error should be displayed under the input where the data came from, for example:

Figure 7.38: Validation error
The registered accounts should also retain the signup date. After signing up, the user is redirected to the Profile page:
The Profile page will look as follows:
Figure 7.39: Profile page layout
This will contain a greeting, the profile data, and the session login time. While the username and signup date are stored in the database, the session login time can be stored in the current session.
The Contacts page will look as follows:
Figure 7.40: Contact page layout
The content is split into two: the contacts list and the contact add/edit form:

Figure 7.41: Edit and delete options for data
The contacts list will list the contact records, each record having the Edit and Delete links. If the list is empty, then display the appropriate message instead of rendering the empty table.
The contact form will have the following field names:
- Name: required; at least two characters
- Phone: optional; must only allow +-() 1234567890
- Email: required; must be validated
- Address: optional; maximum 255 characters
It should look similar to the following:
Figure 7.42: Contact form
Error messages for invalid data should be placed under the inputs from which the data emanated.
Accessing the Contacts page, the form is ready to use to create new contacts. Once the Edit button of a contact is pressed, then the contact info will be filled in the form; submitting the form updates the existing contact.
When an authenticated user accesses the Home page, Login page, or Sign up page, they will be redirected to the Profile page.
The default page title is Contacts list.
Now, where should you start? While, in most cases, frameworks are used to simplify the “getting started” process of each project, and since we will cover the frameworks in a later chapter, let's stick with our bootstrap example. Therefore, let's have the previous activity as a starting point for this one (please refer to the activity in Chapter 6, Using HTTP). Since the code of the current activity will change, you may want to create a copy of the code from the previous activity.
That having been said, I'll give you some guidelines here and there.
Steps to perform:
Let's see what is needed for the new requirements, compared to the previous activity:
- First, there are some new pages, such as Sign up and the Contacts list page, that require a template and the request handler (the function that will handle the HTTP requests for a particular URI).
- The Sign up handler will redirect authenticated users to the Profile page. Otherwise, it will print the signup form template and, in the case of a POST request, will handle the form. After successful signup, the user is authenticated and redirected to the Profile page.
- The Contacts handler first checks whether there is an authenticated user on the website; if not, it sends them the login form. This handler will print the current list of contacts and the Contact add/edit form. Also, this handler will be responsible for processing the submitted contact form data, and for deleting contact entries as well.
- To ensure this new functionality, a database is necessary, so it would be appropriate to use PDO with MySQL RDBMS; perhaps consider using a database component, to keep the PDO instance, and perform specific PDO operations in dedicated methods (functions).
- Since authentication is performed during login and after signup, now would be a good time to save the data authentication in a single place, such as a new component that we can call Auth, which may take care of other commonly used authentication-related tasks. The Auth component would deal mainly with the PHP session, setting the authenticated user ID and login timestamp in the session, getting the session login timestamp from the session, getting the user based on the user ID stored in the current session, and other authentication-related tasks.
- Then, since we will have to use a user's data across the website, it would probably be a good idea to create a model class (for example, User); this will contain a single row of data from the database, and may bundle some related functionality (such as checking the input password against the existing password hash). We will have the contacts in the database as well, but since we're only printing the contacts in a table or form, without using them for anything more across the website, maybe we can skip the Contact model.
- On top of this, some handlers will require some refactoring; for example, in the login handler, the data source should be changed, from an inline-defined array to a database. In the profile handler, all the profile picture lists and upload functionality will go away, together with the Support contact functionality – now, it will be a simple page displaying a user's data from the database.
Here are the steps to perform the activity:
- Create the new page templates – the Sign up and Contacts list pages.
- Create the request handlers for the Sign up and Contact pages.
- Add the Database component, where the PDO object will be invoked to operate with the MySQL server.
- Add the Auth component, which will take care of other commonly used authentication-related tasks (for example, check whether the user is logged in).
- Create the User class, as a table row model (in the src/models/ directory), which will bundle some related functionality (such as checking the input password against the existing password hash).
- Refactor the login handler to use the database as a data source for users.
- Refactor the profile handler to only fetch the user from the database and then send it to the template.
Note
The solution for this activity can be found on page 534.
Summary
In this chapter, you learned how to handle files with PHP, which includes creating, writing, reading, and other filesystem-related operations. You also performed some basic, yet powerful, operations against a MySQL database server, creating a database structure and inserting, modifying, and deleting data. Although it might look a bit complex or overwhelming at the beginning, remember: it's like riding a bike – once practiced enough, until you get comfortable with it, you will never forget it (and it will actually get you from point A to point B way faster). In the next chapter, we will cover the concept of error handling, which is essential to identify potential problems in an application, and prevent important details leaking out to your users in the form of nasty error messages.