
About
This section is included to assist the students to perform the activities present in the book. It includes detailed steps that are to be performed by the students to complete and achieve the objectives of the book.
Chapter 1: Introducing PHP
Activity 1.1: Displaying Query Strings in the Browser
Solution
- Create a file named movies.php.
- Capture query string data in the file to store the details of the movies, such as the name, the actors, and the release years:
<?php
$name = $_GET['movieName'];
$star = $_GET['movieStar'];
$year = $_GET['movieYear'];
?>
- Create a basic HTML structure and then display the captured query strings:
movies.php
8 <head>
9 <meta charset="UTF-8">
10 <meta name="viewport" content="width=device-width, initial-scale=1.0">
11 <meta http-equiv="X-UA-Compatible" content="ie=edge">
12 <title><?php echo $name; ?></title>
13 </head>
14 <body>
15 <div>
16 <h1>Information about <?php echo $name; ?></h1>
17 <p>
28 Based on the input, here is the information so far:
19 <br>
20 <?php echo $star . ' starred in the movie ' . $name .' which was released in year ' . $year; ?>
21 </p>
22 </div>
23 </body>
- Now, go to the Terminal and type the following command to start the built-in web server:
php -S localhost:8085
You should see a screen like the following:
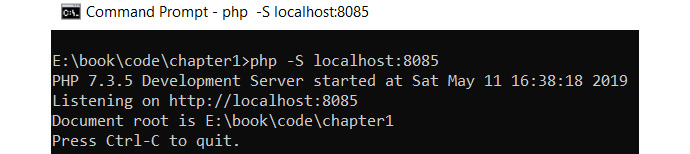
Figure 1.17: Starting the server
- After the web server is up and running, open the PHP page and append your query strings to the URL in your browser:
http://localhost:8085/movies.php?movieName=Avengers&movieStar=IronMan&movieYear=2019
You can change the values to anything you like to see how they will be displayed in the browser.
You should see a screen like the following:
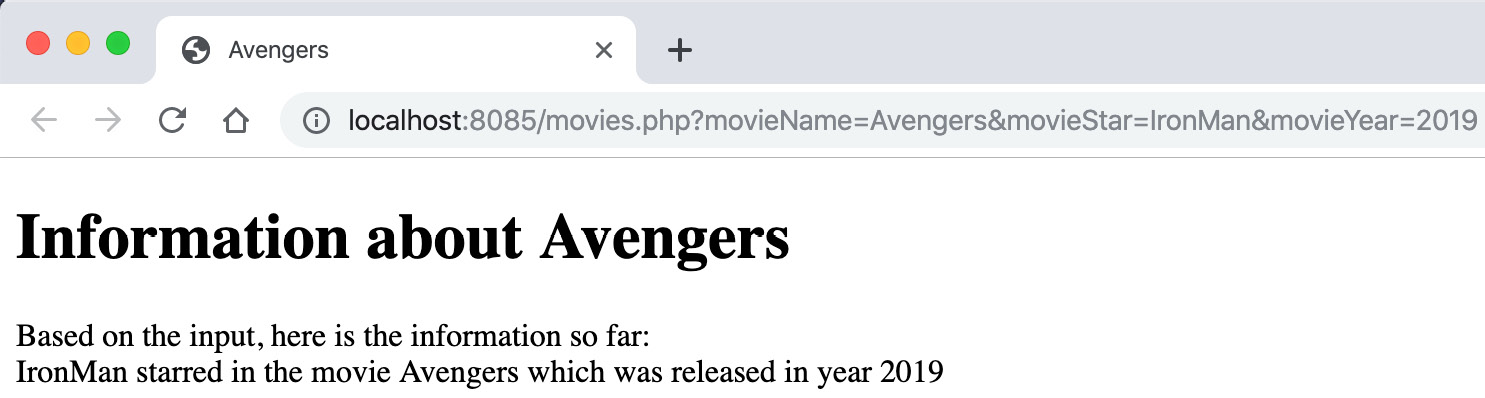
Figure 1.18: Printing the information about the movie
Note
Ensure that the port you have specified is not being used by any other application on your system.
Depending on the last few exercises, you should now be aware of how this code is working. Let's go through the query string and code.
The query string this time is movieName=Avengers&movieStar=IronMan&movieYear=2019. This means that the $_GET variable in PHP will have access to three different variables now, which are movieName, movieStar, and movieYear.
In the first three lines of code, we are extracting values for movieName, movieStar, and movieYear and assigning them to the $name, $star, and $year variables, respectively.
In the head section of HTML, we have a title. Inside it, we have used the echo statement to print the movie name, which will appear in the browser. Moving further down, we have an h1 element where we are printing the name again. After the h1 element is a p element, where we are creating a sentence dynamically. We have used the variables and the dot operator (.) to append different strings and variables to create a full sentence.
Chapter 2: Types and Operators
Activity 2.1: Printing the BMI of a User
Solution
- Create a new file called tracker.php. Then, open PHP and create a variable to store the name. You can assign a value directly, in other words, $name = 'Joe':
<?php
$name = 'Joe';
- Add variables for the weight and height; again, set a default value:
$weightKg = 80;
$heightCm = 180;
- Take the $heightCm variable, convert it to meters by dividing by 100, and then store the result:
$heightMeters = $heightCm/100;
- Square the height and store the result:
$heightSquared = $heightMeters * $heightMeters;
- Calculate the BMI by taking the weight and dividing it by the squared height:
$bmi = $weightKg / ($heightSquared);
- Display a message to the user showing the name and BMI result:
echo "<p>Hello $name, your BMI is $bmi</p>";
- Open the Terminal/Command Prompt and navigate to your chapter2 folder or where you stored tracker.php. Run the server by typing in this command:
php -S localhost:8085
Now, in a browser, go to http://localhost:8085/tracker.php.
You will see the following output:

Figure 2.11: Printing the BMI
In this activity, we've looked at assigning data to variables and performing calculations (divisions and multiplications). Then, we printed the end result to the screen.
Chapter 3: Control Statements
Activity 3.1: Creating a Movie Listing Script to Print Movies per Director
Solution
The steps to complete the activity are as follows:
- Create an activity-movies.php script and add the following nested array, which contains five directors with a list of the five movies associated with them:
<?php
$directors = [
"Steven Spielberg" => ["The Terminal", "Minority Report", "Catch Me If You Can", "Lincoln", "Bridge of Spies"],
"Christopher Nolan" => ["Dunkirk", "Interstellar", "The Dark Knight Rises", "Inception", "Memento"],
"Martin Scorsese" => ["Silence", "Hugo", "Shutter Island", "The Departed", "Gangs of New York"],
"Spike Lee" => ["Do the Right Thing", "Malcolm X", "Summer of Sam", "25th Hour", "Inside Man"],
"Lynne Ramsey" => ["Ratcatcher", "Swimmer", "Morvern Callar", "We Need To Talk About Kevin", "You Were Never Really Here"]
];
Here, we have an associative array, $directors, which contains five directors' names and each director is used as a key for the array. Also, each director's key has been assigned another associative array that contains five movie names.
- Using our previous knowledge of nested looping, loop through the nested array using two foreach loops, as follows. As in the following, add the loops after the $directors array:
foreach ($directors as $director => $movies) {
echo "$director's movies: " . PHP_EOL;
foreach ($movies as $movie) {
echo " > $movie " . PHP_EOL;
}
}
In the preceding example, we have a simple looping through a nested array. Since a foreach loop is a good choice to iterate through associative arrays, we have utilized foreach in both the inner and outer loop to print a formatted director's name along with the movies they directed on each new line.
- Run the PHP file from a Terminal or console with the following command:
php activity-movies.php
The preceding command outputs the following:
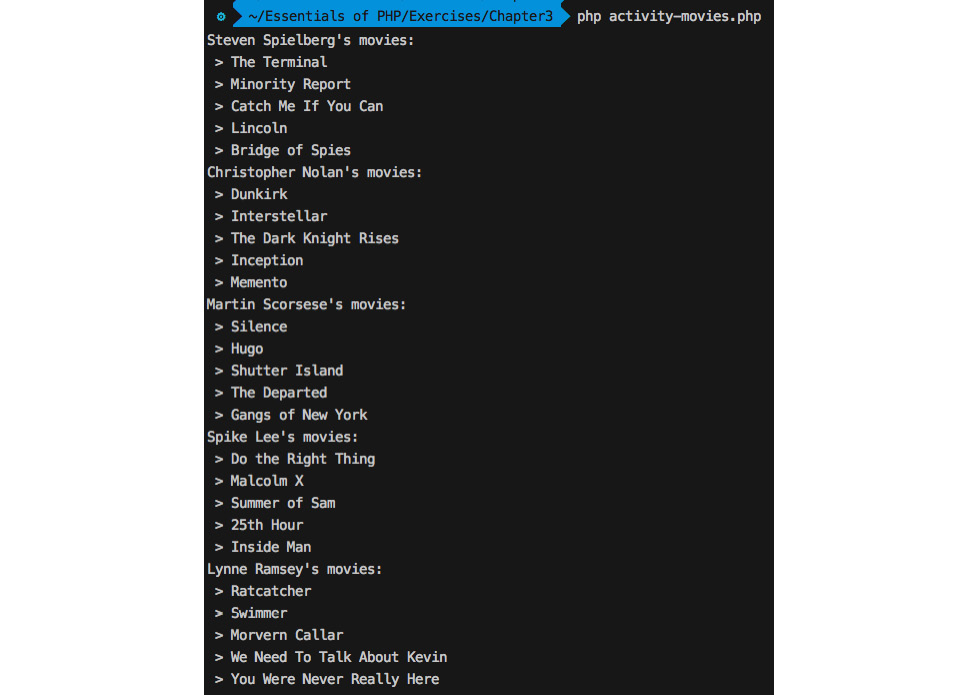
Figure 3.21: The activity movies script output with default arguments
The nested foreach loops do their job and iterate through the nested array to print the available movie names against the directors' names.
- Now, it's time to add some dynamic behavior to our looping technique so that we can control the iterations in both loops with command-line arguments. This means we will be taking two arguments from the command line, as follows:
php activity_movies.php 3 2
Here, the script name itself is an argument for a php command, hence, the first, second, and third arguments are activity-movies.php, 3, and 2 respectively. The second argument should control the number of directors to iterate and the third argument should control the number of movies to iterate.
Command-line arguments can be obtained using the $argv system variable, so we will be using $argv[1] and $argv[2] for the second and third arguments. Note that $argv[0] is the script name in this case.
- Add the following lines at the beginning of the script to add the command-line arguments:
<?php
$directorsLimit = $argv[1] ?? 5;
$moviesLimit = $argv[2] ?? 5;
- Here, ??, the null coalescing operator, has been used so that if $argv[1] or $argv[2] does not exist or is NULL, then we can assign a default number 5 to the $directorsLimit and $moviesLimit limit variables.
- Now we need to add two counters that will count the directors and movies to print so that we can maintain the number of directors and movies to print, supplied in the form of command-line arguments. Let's add the counters and the control statements to restrict the prints so that the nested loops look like the following:
$directorsCounter = 1;
foreach ($directors as $director => $movies) {
if ($directorsCounter > $directorsLimit) {
break;
}
echo "$director's movies: " . PHP_EOL;
$moviesCounter = 1;
foreach ($movies as $movie) {
if ($moviesCounter > $moviesLimit) {
break;
}
echo " > $movie " . PHP_EOL;
$moviesCounter++;
}
$directorsCounter++;
}
Here, we have added $directorsCounter before the outer loop and $moviesCounter before the inner loop. Both of them start counting from 1 and immediately inside the loops we have checked whether the directors or movies exceed the limits given in $directorsLimit and $moviesLimit respectively. If any of the counters become greater than their limit, we terminate the iteration using the break command.
At the beginning of each loop, we have used a condition expression in the if control to check that the counter doesn't exceed the limit, and at the very end of each loop, the corresponding counter gets incremented.
Note
The final file can be referred at: https://packt.live/35QfYnp.
- Now run the following command to see the directors and movies arguments in action:
php activity_movies.php 2 1
The preceding command should print one movie from each of the two directors, as follows:

Figure 3.22: The activity movies script output with custom arguments
- Test the preceding script with different arguments; that is, php activity-movies.php 2 3. As we have already assigned the default limit value to 5 in the limit variables, if no arguments are present in the command; that is, php activity-movies.php, it will complete all iterations to loop through the array elements.
- We can also try passing only the directors limit argument so that the movies limit stays at the default limit of 5. The following command will output all of the movies from the given number of directors:
php activity-movies.php 2
The output is as follows:
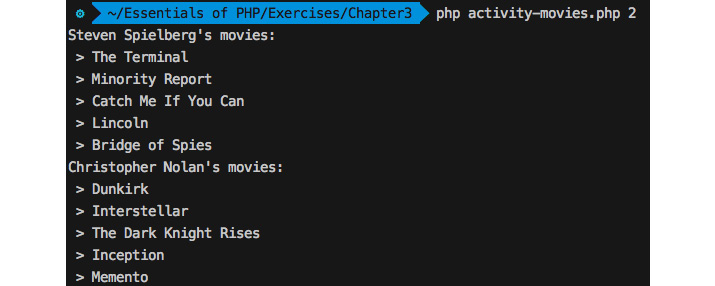
Figure 3.23: The activity movies script output with the first argument
Congratulations! You have used control statements and looping techniques to create a dynamic script that works based on command-line arguments. Control structures are used to control the execution of a program, hence we can leverage such structures to make decisions about things such as which branch of code to execute, to perform repetitive executions, to control the flow of iterations, and so on.
Chapter 4: Functions
Activity 4.1: Creating a Calculator
Solution
- Create a new file within the Chapter04 directory with the name activity.php.
- Start your script with the opening PHP tag and set the strict type to 1:
<?php
declare(strict_types=1);
- Now we can start by writing our factorial function in the same file:
activity.php
13 function factorial(int $number): float
14 {
15 $factorial = $number;
16 while ($number > 2) {
17 $number--;
18 $factorial *= $number;
19 }
20 return $factorial;
21 }
Let me explain what the function does. First of all, it takes an integer argument; we can be sure that it will always be an integer because we added a type hint and declared that we are using strict types. There are several ways in which you may have implemented the function, so don't let my solution put you off.
My take on it is that the first number in the calculation will have to be the input number – we store it in $factorial, which is the variable we will use to hold the result. Then, it is multiplied by $number - 1. This goes on until $number === 2;. The while condition runs for the last time when $number has become 3; it will then be decremented by 1 and multiplied with the $factorial variable. By the end, $factorial contains the result and is returned from the function.
Instead of $number--; using the post decrement operator, --, we could have written $number = $number -1;. Some people consider the latter to be a better practice because it is more explicit. I sometimes prefer to use the handy shortcuts that PHP has to offer. Because $number-- is on its own line as a single statement, we could have also written --$number. In this case, there is no difference.
The difference between the two operators is that with --$number, $number will be decremented before the statement runs, and with $number--, it will be decremented after the statement has been evaluated. In this case, there is no consequence of that difference.
- Next, we will define the sum function as follows:
/**
* Return the sum of its inputs. Give as many inputs as you like.
*
* @return float
*/
function sum(): float
{
return array_sum(func_get_args());
}
While we could have just looped over func_get_args(); and added all the numbers together to get the sum, there is already a built-in function in PHP that does just that. So, why not use it? That is what array_sum does: it adds up all the numbers in the input array you give it. The return keyword makes the function return the result.
If you wanted to validate each parameter to check whether it was numeric (using is_numeric), then looping over the arguments would have been better because you would do the check in the same iteration as the addition and throw an exception when the argument wasn't numeric.
- The last mathematical function we will define is the prime function:
activity.php
41 function prime(int $number): bool
42 {
43 // everything equal or smaller than 2 is not a prime number
44 if (2 >= $number) {
45 return false;
46 }
47 for ($i = 2; $i <= sqrt($number); $i++) {
48 if ($number % $i === 0) {
49 return false;
50 }
51 }
52 return true;
53 }
The prime function is definitely the most challenging of them all. The naive implementation would just try to determine the modulo of the $number input by all values that are smaller: when the modulo is 0, then it is not a prime number. However, it has already been proven that you only have to check all the numbers up to the square root of the input. In fact, you could check even fewer numbers, but we have not gone as far as that.
Now we know 1 is not a prime number so, if the number that is passed through is 1 then we return false early. This also rules out 0 and negative numbers. Prime numbers are positive by definition. Then, starting with 2, up until the square root of the $number input, we increment $i by 1 and check whether the modulo of the division of $number by $i is 0. If it is, $number is not a prime number and we again return false early. The modulo operator is written as % (the percentage symbol). In other words, when the $number modulo $i equals 0, $number is divisible by $i, and since $i is not equal to 1 and not equal to $number, $number is not a prime number.
- Our last major function that we will define is the performOperation function:
activity.php
59 function performOperation(string $operation)
60 {
61 switch ($operation) {
62 case 'factorial':
63 // get the second parameter, it must be an int.
64 // we will cast it to int to be sure
65 $number = (int) func_get_arg(1);
66 return factorial($number);
67 case 'sum':
68 // get all parameters
69 $params = func_get_args();
70 // remove the first parameter, because it is the operation
71 array_shift($params);
72 return call_user_func_array('sum', $params);
73 case 'prime':
74 $number = (int) func_get_arg(1);
75 return prime($number);
76 }
77 }
This function just switches between the three other functions based on the $operation case you give it as its first argument. Since one of the functions it delegates its work to accepts a varying amount of arguments, performOperation also has to accept a varying number of arguments.
You could also choose an implementation where you let performOperation have a second parameter, $number, which can then be passed exactly as it is to both factorial and prime. In that case, you only query func_get_args in the case of the sum operation. The approach you choose is not only a matter of taste, but also of performance. It is faster not to use func_get_args(), so the alternative approach would definitely be the fastest.
- Print the output as follows:
echo performOperation("factorial", 3) . PHP_EOL;
echo performOperation('sum', 2, 2, 2) . PHP_EOL;
echo (performOperation('prime', 3)) ? "The number you entered was prime." . PHP_EOL : "The number you entered was not prime." . PHP_EOL;
Here is the output:

Figure 4.18: Printing the results
Chapter 5: Object-Oriented Programming
Activity 5.1: Building a Student and Professor Object Relationship
Solution
The steps to complete the activity are as follows:
- Create a directory named activity1 to put all our activity content in it. This should be our working directory (you can cd to the directory).
- Create a directory named Student inside the activity1 directory to put the namespaced Student class in it.
- Create a PHP file called Student.php inside the Student directory.
- Declare a Student class where the Student class has been namespaced as Student and has two member attributes, $name and $title, which are student by default. The constructor method accepts the student's name as an argument. The argument is hinted with its desired type as string (anything other than string will produce an error) and assigns it to the $name property using $this->name. So, whenever we instantiate the Student class, we should call the class by its namespace, such as the new StudentStudent('Student Name') namespace:
<?php
namespace Student;
class Student
{
public $name;
public $title = 'student';
function __construct(string $name)
{
$this->name = $name;
}
}
- For the professor, create a directory called Professor under the activity1 directory.
- Inside the Professor directory, create a PHP file called Professor.php.
- Declare the Professor class with the Professor namespace at Professor.php. The Professor class is similar to Student but with an extra private attribute, $students, which will hold an array of students. The $students array is kept private so that the students' list can't be accessed outside of the Professor class. The default title for a professor is Prof., which has been assigned in the $title attribute. The constructor accepts hinted parameters, a name (accepts strings only), and the students (accepts arrays only) list as two arguments, and the first parameter, $name, has been assigned to the $name property using $this->name. We are using parameter type hints to ensure that no other types are passed:
<?php
namespace Professor;
class Professor
{
public $name;
public $title = 'Prof.';
private $students = array();
function __construct(string $name, array $students)
{
$this->name = $name;
}
}
- Also, we will use the instance of the Student class within the Professor namespace, so we need to import the Student class via the Student namespace in Professor.php, as follows:
<?php
namespace Professor;
use StudentStudent;
Here, after the Professor namespace declaration, we have imported the Student class via its Student namespace.
- We need to iterate through the array of students and check each of the objects – whether it is an instance of the Student class or not. If it is a valid student, then add it to the professor's $students array.
Add the following filtration in the Professor constructor for $students:
function __construct(string $name, array $students)
{
$this->name = $name;
foreach ($students as $student) {
if ($student instanceof Student) {
$this->students[] = $student;
}
}
}
Here, we have iterated through $students using a foreach loop and, inside, checked whether $student is an instance of the Student class, then added it to the $this->students array. So, only valid students can be added to the professor's student list.
- Now, add the following setter method in the Professor class in order to set the title:
public function setTitle(string $title)
{
$this->title = $title;
}
This one should be used to set the professor's title. If a professor is a Ph.D., then we set the title as Dr..
- Create a member method, printStudents(), as follows, in the Professor class, which will print the professor's title, name, the student count, and the list of students in the following:
public function printStudents()
{
echo "$this->title $this->name's students (" .count($this- >students). "): " . PHP_EOL;
$serial = 1;
foreach ($this->students as $student) {
echo " $serial. $student->name " . PHP_EOL;
$serial++;
}
}
Here, we have printed the professor's title, name, and the number of students. Again, we have used a foreach loop to iterate through the professor's private property, $students, and inside the loop we have printed each student's name. Also, for the sake of maintaining a serial order of the students, we have used the $serial variable starting from 1, which increments by one after each iteration in order to add a number before each student's name while printing.
- Create a PHP file called activity-classes.php inside the activity1 directory.
- Add the spl_autoload_register() function at the beginning of the file to load the Professor and Student classes automatically according to their namespaces:
<?php
spl_autoload_register();
Here, we haven't registered any class loader methods in the spl_autoload_register() function; rather, we have kept it as the default to load the classes according to their namespaces.
- Create a Professor instance, providing a name and a list of students that contains instances of Student in the constructor as follows:
$professor = new ProfessorProfessor('Charles Kingsfield', array(
new StudentStudent('Elwin Ransom'),
new StudentStudent('Maurice Phipps'),
new StudentStudent('James Dunworthy'),
new StudentStudent('Alecto Carrow')
));
Here, we have added a random amount of Student instances in an array and passed them to the Professor constructor. When we instantiate the Professor class as new ProfessorProfessor(), this namespaced class name tells the auto loader to load the Professor class from the Professor directory. This same namespaced class' loading technique is applied to the Student class as well. The new StudentStudent() namespace tells the autoloader to expect the Student class in the Student directory.
- Now, change the professor's title to Dr. using the corresponding setter method, as follows:
$professor->setTitle('Dr.');
- Print the output by invoking the printStudents() method with the Professor object:
$professor->printStudents();
Finally, the activity-classes.php looks like:
<?php
spl_autoload_register();
$professor = new ProfessorProfessor('Charles Kingsfield', array(
new StudentStudent('Elwin Ransom'),
new StudentStudent('Maurice Phipps'),
new StudentStudent('James Dunworthy'),
new StudentStudent('Alecto Carrow')
));
$professor->setTitle('Dr.');
$professor->printStudents();
- Run the PHP script using the following command:
php activity-classes.php
The output should look like the following:

Figure 5.30: Professor's students list
We have successfully obtained a list of a professor's students using OOP techniques. In this activity, we have practiced class attributes, access modifiers, methods, class declaration, class namespacing, object instantiation, autoloading namespaced classes, type hints in parameters, and object filtration using instanceof, and so on.
Chapter 6: Using HTTP
Activity 6.1: Creating a Support Contact Form
Solution
- The first thing that pops out is the login handling difference since we now have to authenticate random users, not just a single one. So, we will need a method to fetch the user data for the username that is being logged in. The method will return user data for the existing user (using the level and password hashes), or NULL if the user is not found. Since we will learn about databases in the next chapter, we will store the available user list in code, in the same way as the previous exercise:
Login.php
37 private function getUserData(string $username): ?array
38 {
39 $users = [
40 'vip' => [
41 'level' => 'VIP',
42 'password' => '$2y$10$JmCj4KVnBizmy6WS3I/bXuYM/yEI3dRg/IYkGdqHrBlOu4FKOliMa' // "vip" password hash
43 ],
- Then, the HandlersLogin::handle() method will slightly change the way it validates the authentication and the stored data in the user session. First, if we get user data for the provided username, this means we have a valid user from our database, and we can proceed further. The password match is performed as usual and, if we get a match, then we can proceed by adding the username and user data in the session. In the case of any failure (such as fetching the user from the database or a password match), we should prepare the errors that will be displayed in the HTML form:
$username = 'admin';
$passwordHash = '$2y$10$Y09UvSz2tQCw/454Mcuzzuo8ARAjzAGGf8OPGeBloO7j47Fb2v. lu'; // "admin" password hash
$formError = [];
$userData = $this->getUserData($formUsername);
if (!$userData) {
$formError = ['username' => sprintf('The username [%s] was not found.', $formUsername)];
} elseif (!password_verify($formPassword, $userData['password'])) {
$formError = ['password' => 'The provided password is invalid.'];
} else {
$_SESSION['username'] = $formUsername;
$_SESSION['userdata'] = $userData;
$this->requestRedirect('/profile');
return '';
}
Note
For convenience, generate password hash with command line using php -r "echo password_hash('admin', PASSWORD_BCRYPT);" command
- The login form doesn't require any changes; let's just remove the credentials hint for the admin user, under the Authenticate form title:
<div class="text-center mb-4">
<h1 class="h3 mb-3 mt-5 font-weight-normal">Authenticate</h1>
</div>
- Now the authentication part is covered. The user will be redirected to the Profile page after login, so they will have to see the layout presented previously.
The src/templates/profile.php file will have to be rebuilt from scratch. First, let's add the greetings and logout button part. While browsing Bootstrap's framework documentation, we came across alerts component, and we saw we could use this component for our current purpose:
<div class="row">
<div class="my-5 alert alert-secondary w-100">
<h3>Welcome, <?= $username ?>!</h3>
<p class="mb-0"><a href="/logout">Logout</a></p>
</div>
</div>
- Next, we have to add the support area, and divide it horizontally into two equal parts:
<div class="row">
<div class="col-sm-6">...</div>
<div class="col-sm-6">...</div>
</div>
Note
To learn more about grid system in Bootstrap, please follow this link: https://packt.live/31zF72E.
- We'll use a support contact form with the following specifications: two inputs of type text, for the name and email, and a text area input for the message. Each of these will have an associated <label> element and, if there are any errors, they will have to be printed under the input with erroneous data:
profile.php
15 <div class="form-label-group mb-3">
16 <label for="name">Name:</label>
17 <input type="text" name="name" id="name"
18 class="form-control <?= isset($formErrors['name']) ? 'is-invalid' : ''; ?>"
19 value="<?= htmlentities($_POST['name'] ?? ''); ?>">
20 <?php if (isset($formErrors['name'])) {
21 echo sprintf('<div class="invalid-feedback">%s</div>', htmlentities($formErrors['name']));
22 } ?>
23 </div>
- Since the standard-level user can only send the form once a day, trying to send more messages should result in an error message, which we may assign to the form level, and display it right on top of the form. Additionally, we may use the alert components again, this time using the danger red background:
<?php if (isset($formErrors['form'])) { ?>
<div class="alert alert-danger"><?= $formErrors['form']; ?></div>
<?php } ?>
- We also need to add the CSRF token to the form, for security purposes:
<input type="hidden" name="csrf-token" value="<?= $formCsrfToken ?>">
- On the submit button, we may want to add more form data, so that we can know for sure what form we have to process in the PHP scripts; this is very useful when many forms are added on a single HTML page and each form is sending data to the same URL:
<button type="submit" name="do" value="get-support" class="btn btn-lg btn-primary">Send</button>
- For the message list history, we may chose the card component, and print each of the message details. Each history entry will contain the form data (that is, the form key) and time when the form was sent (that is, the timeAdded key):
<?php foreach ($sentForms as $item) { ?>
<div class="card mb-2">
<div class="card-body">
<h5 class="card-text"><?= htmlentities($item['form'] ['message']) ?></h5>
<h6 class="card-subtitle mb-2 text-muted">
<strong>Added:</strong> <?= htmlentities($item['timeAdded']) ?></h6>
<h6 class="card-subtitle mb-2 text-muted">
<strong>Reply-to:</strong> <?= sprintf('%s <%s>', htmlentities($item['form']['name']), htmlentities($item['form']['email'])) ?>
</h6>
</div>
</div>
<?php } ?>
Note
The complete code in profile.php can be referred at: https://packt.live/2pvh0or.
- Now that we have the layout ready, let's proceed to the processing part in the HandlersProfile handler. First, what we have to add there is the processing form in the case of a POST request. The processContactForm() will return an array of errors when the form validation fails:
$formErrors = $this->processContactForm($_POST);
- If no errors are returned, it means that the form was validated and successfully saved; therefore, we can refresh the page.
Note
It is a good practice to reload the page (perform a redirect to the same page, which will result in a GET HTTP request) after a successful operation due to a POST request, in order to avoid subsequent submissions when the page is reloaded in the browser by the user.
The code is as follows:
if (!count($formErrors)) {
$this->requestRefresh();
return '';
}
- The data we have to send in the template is the username (the greeting); the form errors, if any; the form CSRF token; and the sent form's history:
return (new ComponentsTemplate('profile'))->render([
'username' => $_SESSION['username'],
'formErrors' => $formErrors ?? null,
'sentForms' => $_SESSION['sentForms'] ?? [],
'formCsrfToken' => $this->getCsrfToken(),
]);
- So far, we have referred to three methods that do not exist yet. Let's address them one by one, and start with getCsrfToken(). This method will return the CSRF token stored in the user session and, if it is not there, it will create and set one. To generate the token string, we can use the same approach we used in Exercise 6.9, Securing against CSRF:
private function getCsrfToken(): string
{
if (!isset($_SESSION['csrf-token'])) {
$_SESSION['csrf-token'] = bin2hex(random_bytes(32));
}
return $_SESSION['csrf-token'];
}
- The processContactForm() method is returning a list of form errors, so it has to validate the data first. A call to the validateForm() method should return the form with sanitized data and the list of errors, if any:
list($form, $errors) = $this->validateForm($data);
- If the $errors array is empty, then save the sanitized form data with extra information, such as the added time and added date (which is useful for checking whether standard-level users have already added one message in the current day). Again, since data persistence will be explored in the next chapter, we will use the means we have to store the data, and we will use the ephemeral session storage in this case. The forms will be stored under the sentForms key; therefore, $_SESSION['sentForms'] becomes the sent form's history:
$_SESSION['sentForms'][] = [
'dateAdded' => date('Y-m-d'),
'timeAdded' => date(DATE_COOKIE),
'form' => $form,
];
- The validateForm() method will start by checking the CSRF token:
if (!isset($data['csrf-token']) || $data['csrf-token'] !== $this->getCsrfToken()) {
$errors['form'] = 'Invalid token, please refresh the page and try again.';
}
- Then, we check for multiple submissions in the case of standard-level users:
if (($_SESSION['userdata']['level'] === 'STANDARD')
&& $this->hasSentFormToday($_SESSION['sentForms'] ?? [])
) {
$errors['form'] = 'You are only allowed to send one form per day.';
}
- The name validation requires a non-empty input as follows:
$name = trim($data['name'] ?? '');
if (empty($name)) {
$errors['name'] = 'The name cannot be empty.';
}
- The email validation is performed using the filter_var() function with the FILTER_VALIDATE_EMAIL validation:
if (empty($data['email'] ?? '')) {
$errors['email'] = 'The email cannot be empty.';
} elseif (!filter_var($data['email'], FILTER_VALIDATE_EMAIL)) {
$errors['email'] = 'The email address is invalid.';
}
- The message validation requires a message of at least 40 characters in length:
$message = trim($data['message'] ?? '');
if (!$message) {
$errors['message'] = 'The message cannot be empty.';
}
if (strlen($message) <= 40) {
$errors['message'] = 'The message is too short.';
}
- The sanitized form data is collected and stored in the $form variable, which is then returned with the $errors variable, as expected:
$form = [
'name' => $name,
'email' => $data['email'],
'message' => $message,
];
return [$form, $errors];
- We referenced yet another method: hasSentFormToday(). This method requires the form history as the first parameter, and what it does is iterate through the history and check whether there is a message that is registered on the current day. As soon as one message is found, it will return TRUE immediately:
private function hasSentFormToday(array $sentForms): bool
{
$today = date('Y-m-d');
foreach ($sentForms as $sentForm) {
if ($sentForm['dateAdded'] === $today) {
return true;
}
}
return false;
}
- What we have not covered yet is the requestRefresh() method. This method will call the requestRedirect() method providing the current request URI:
private function requestRefresh()
{
$this->requestRedirect($_SERVER['REQUEST_URI']);
}
Note
The final code in the handler Profile.php can be referred at: https://packt.live/2VREaRY.
- Now we can test our full implementation. Access the Profile page at http://127.0.0.1:8080/profile:

Figure 6.42: Authentication at the profile page
- Let's log in as a standard-level user by entering user for both Username and Password:
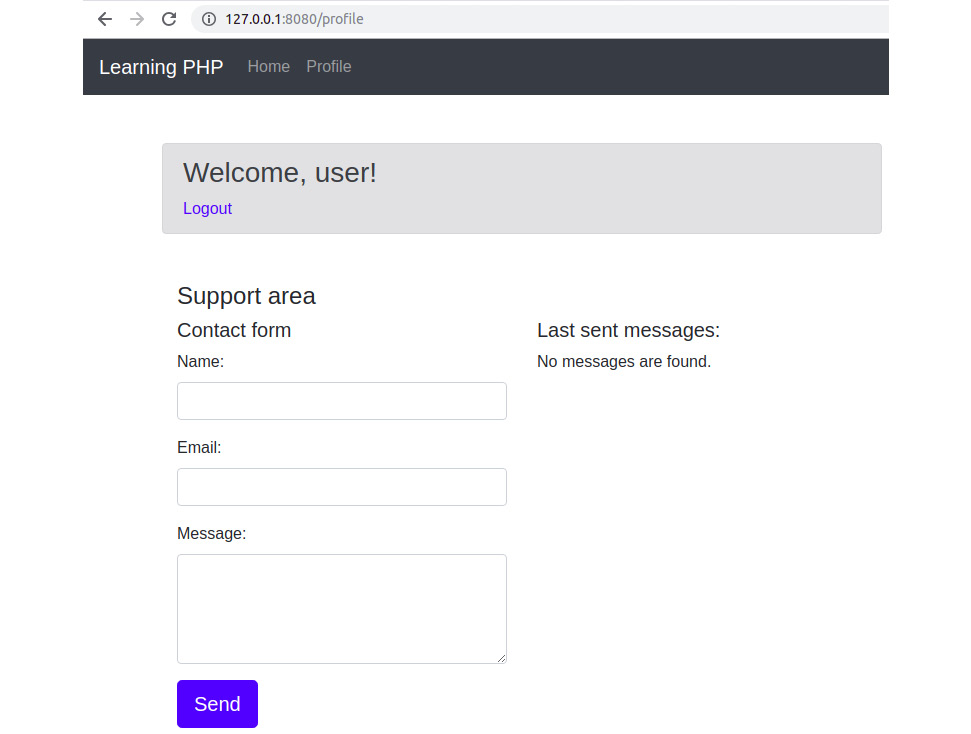
Figure 6.43: The login page
We are redirected to the Profile page and we can see the HTML elements we have worked on so far.
- By sending an empty form, we should get all the inputs marked with errors:

Figure 6.44: Sending an empty form
- By entering invalid@email for our email, and a short sentence as a message, we should get another error, such as Email address is invalid or The message is too short:
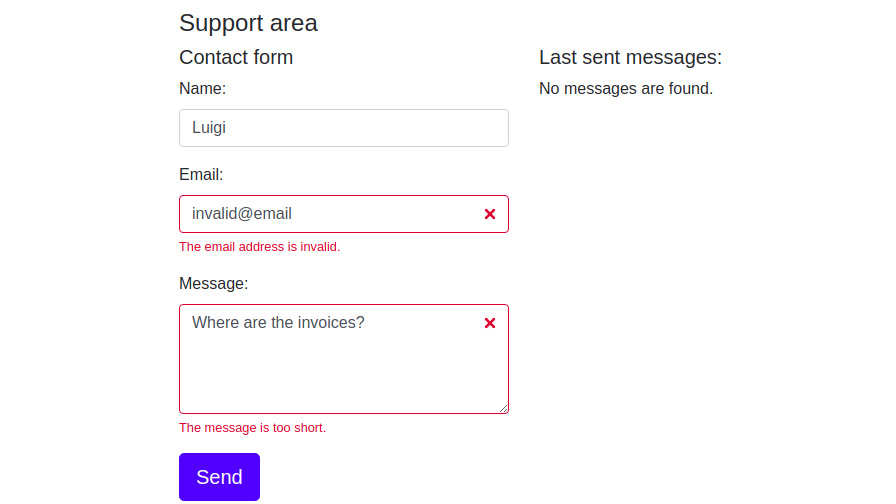
Figure 6.45: Messages for invalid input
- Sending valid data should result in a successful form-saving operation, and a listing in the Send messages list:
You could try this data:
Name: Luigi
Email: [email protected]
Message: I would like to be able to upload a profile picture. Do you consider adding this feature?
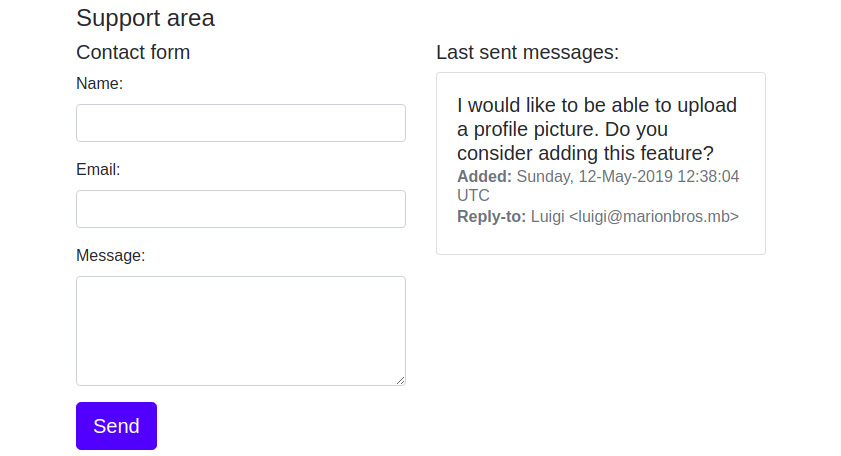
Figure 4.46: Displaying the list of the sent messages
- Trying to post more messages on the same day will result in an error:

Figure 6.47: Posting more messages results in an error
- Let's log out (to do this, click on the Logout button from the greeting header) and log in as a VIP-level user, using vip for Username and Password:

Figure 6.48: Welcome message for a VIP user
- Let's add the first message:
Name: Mario
Email: [email protected]
Message: I would like to be able to upload a profile picture. Do you consider adding this feature?
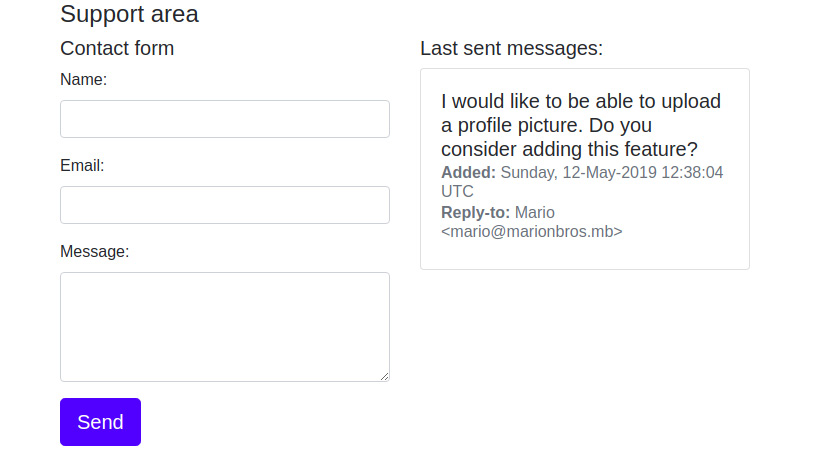
Figure 6.49: Adding the first message
It looks fine, as expected.
- Now, let's try to add another message; this time, we should be able to add messages without any limitations:
Name: Mario
Email: [email protected]
Message: Can I filter my order history by the payment method used to make the purchase?
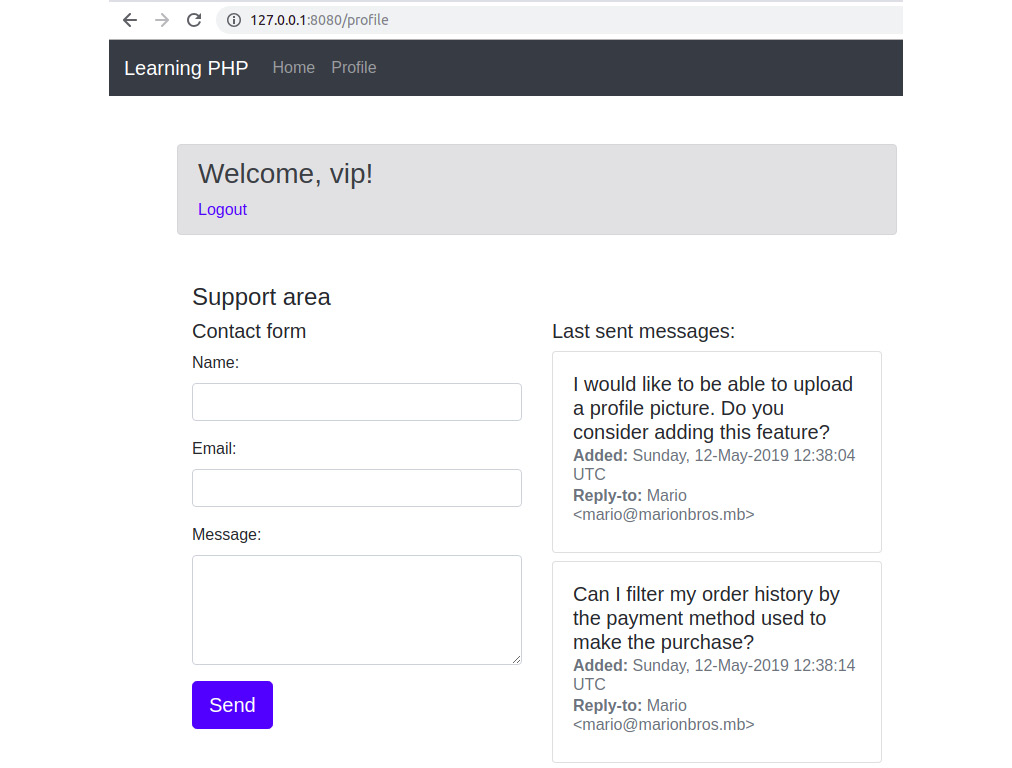
Figure 6.50: The output for adding messages without limitations
As you can see, we succeeded in adding another entry, as expected.
Chapter 7: Data Persistence
Activity 7.1: Contact Management Application
Solution
Let's discuss the new or changed items, from the most uncoupled ones to the most complex ones.
A good start here is the User model class since this class will be invoked on every page for authenticated users; let's put this file inside the src/models/ directory:
- Create the src/models/User.php file and add the following content.
- After declaring the namespace and imports (the use keyword), we define the properties of the User class, giving names similar to the column names of the users table from the database:
<?php
declare(strict_types=1);
namespace Models;
use DateTime;
class User
{
/** @var int */
private $id;
/** @var string */
private $username;
/** @var string */
private $password;
/** @var DateTime */
private $signupTime;
- Add the constructor method, which requires an input array that represents a record of the users table, and, for each class field, fetch the appropriate value from the input array; also add the getter methods:
User.php
21 public function __construct(array $input)
22 {
23 $this->id = (int)($input['id'] ?? 0);
24 $this->username = (string)($input['username'] ?? '');
25 $this->password = (string)($input['password'] ?? '');
26 $this->signupTime = new DateTime($input['signup_time'] ?? 'now', new DateTimeZone('UTC'));
27 }
28
29 public function getId(): int
30 {
31 return $this->id;
32 }
- Finally, add the method that will perform the password match, requiring the raw input value (the value submitted with the login form):
public function passwordMatches(string $formPassword): bool
{
return password_verify($formPassword, $this->password);
}
}
This class aims to be a representation of a database record from the users table. The constructor function will ensure that each field will get data of its own type. The following methods are simple getters, and the last method, Users::passwordMatches(), is a convenient way to validate the input passwords at login.
Since the User entity is strongly related to the authentication mechanism, let's see what the Auth component would look like.
- Create the src/components/Auth.php file.
- Declare the namespace, the imports, and add the userIsAuthenticated() and getLastLogin() methods that return information for the current session, in the Auth class. Add the following in the src/components/Auth.php file:
<?php declare(strict_types=1);
namespace Components;
use DateTime;
use ModelsUser;
class Auth
{
public static function userIsAuthenticated(): bool
{
return isset($_SESSION['userid']);
}
public static function getLastLogin(): DateTime
{
return DateTime::createFromFormat('U', (string)($_SESSION['loginTime'] ?? ''));
}
- Add the methods that return the User instance, when the user is authenticated:
public static function getUser(): ?User
{
if (self::userIsAuthenticated()) {
return Database::getUserById((int)$_SESSION['userid']);
}
return null;
}
- Add the methods that modify the session state by authenticating or de-authenticating a user:
public static function authenticate(int $id)
{
$_SESSION['userid'] = $id;
$_SESSION['loginTime'] = time();
}
public static function logout()
{
if (session_status() === PHP_SESSION_ACTIVE) {
session_regenerate_id(true);
session_destroy();
}
}
}
- Create the src/components/Database.php file and add the following content.
- Add the usual namespace declaration and imports:
<?php declare(strict_types=1);
namespace Components;
use ModelsUser;
use PDO;
use PDOStatement;
- Define the Database class and add the construct method. In construct is where you will instantiate the PDO object, establishing the database connection. To reuse the PDO object inside the Database class, you set it to the $pdo private field of the Database class:
class Database
{
public $pdo;
private function __construct()
{
$dsn = "mysql:host=mysql-host;port=3306;dbname=app;charset=utf 8mb4";
$options = [
PDO::ATTR_DEFAULT_FETCH_MODE => PDO::FETCH_ASSOC,
];
$this->pdo = new PDO($dsn, "php-user", "php-pass", $options);
}
- Add the instance() method to return the same instance of Database when this method is invoked (the singleton pattern):
public static function instance()
{
static $instance;
if (is_null($instance)) {
$instance = new static();
}
return $instance;
}
- Next, let's add users table-related methods, and let's start with addUser(); this method would require the username and the raw password as input parameters, and the return value would be the PDOStatement instance. Prepared statements will be used for all queries that involve user input data:
public function addUser(string $username, string $password): PDOStatement
{
$stmt = $this->pdo->prepare("INSERT INTO users ('username', 'password') values (:user, :pass)");
$stmt->execute([
':user' => $username,
':pass' => password_hash($password, PASSWORD_BCRYPT),
]);
return $stmt;
}
Note
It is advised to return the PDOStatement instance in this case, instead of Boolean true/false values, which indicate whether the operation succeeded, because the former can give more info in the event of a failed operation (for example, PDOStatement::errorInfo()).
- Add the two methods that query for the user from the database – the getUserByUsername() and getUserById() methods. As their names suggest, one method requires a username, and the other a numerical ID. Both of them will return the User instance when the queried record exists, or null otherwise:
Database.php
41 public function getUserByUsername(string $formUsername): ?User
42 {
43 $stmt = $this->pdo->prepare("SELECT * FROM users WHERE username = :username");
44 if ($stmt->execute([':username' => $formUsername]) && ($data = $stmt->fetch(PDO::FETCH_ASSOC))) {
45 return new User($data);
46 }
47 return null;
48 }
Notice the if (stmt->execute() && ($data = $stmt->fetch(PDO::FETCH_ASSOC))) { /* ... */ } expression. This is a combined expression that executes the evaluation-assignment-evaluation type of operations, and is identical to the following:
if (stmt->execute()) { // evaluation
$data = $stmt->fetch(PDO::FETCH_ASSOC); // assignment
if ($data) { // evaluation
/* ... */
}
}
While the latter block might look more readable, especially for beginner developers, the former expression might look cleaner, especially for seasoned developers. Both approaches are valid and, in the end, it's a matter of subjective preference.
- We are done with the users table; now, let's add some contact table-related queries. Add the getOwnContacts() method, which requires the user ID for which the contacts list is fetched. The PDOStatement instance will be returned in this case as well, as in the case of queries that change the state of a database (INSERT/UPDATE/DELETE). This approach is preferred, rather than an array of entries, because it gives a greater degree of flexibility in terms of how the data is fetched from PDOStatement after it is returned – as an associative array, as an instance of a class, and so on. Also, in the case of big result sets, it helps to avoid high memory usage or script failure on account of exhausted memory. Iterating over a big result set, loading, and then discarding the records from memory one at a time, is an approach that's way more friendly to memory usage than loading the entire result set in memory:
public function getOwnContacts(int $uid): PDOStatement
{
$stmt = $this->pdo->prepare("SELECT * FROM contacts WHERE user_id = :uid");
$stmt->bindParam(':uid', $uid, PDO::PARAM_INT);
$stmt->execute();
return $stmt;
}
- Add the getOwnContactById() method, which is useful when one record is fetched to fill the Edit Contact form. This method requires two parameters, the user ID that owns the contact, and the contact ID. The returned value is an associative array, if the record was found, or null otherwise:
public function getOwnContactById(int $ownerId, int $contactId): ?array
{
$stmt = $this->pdo->prepare("SELECT * FROM contacts WHERE id = :cid and user_id = :uid");
$stmt->bindParam(':cid', $contactId, PDO::PARAM_INT);
$stmt->bindParam(':uid', $ownerId, PDO::PARAM_INT);
if ($stmt->execute() && ($data = $stmt->fetch(PDO::FETCH_ASSOC)))
{
return $data;
}
return null;
}
- Add the addContact() method. This will require a list of parameters for each contacts table column, except the id column, the value of which is generated by MySQL. This method will return the PDOStatement instance:
Database.php
79 public function addContact(
80 int $ownerId,
81 string $name,
82 string $email,
83 string $phone,
84 string $address
85 ): PDOStatement
86 {
87 $stmt = $this->pdo->prepare("INSERT INTO contacts (user_id, 'name', phone, email, address) " .
88 "VALUES (:uid, :name, :phone, :email, :address)");
- Add the updateContact() method. This is similar to the addContact() method, except for the fact that it also requires the contact ID, used to match the record to update, together with the user ID. This method will return the PDOStatement instance:
Database.php
98 public function updateContact(
99 int $contactId,
100 int $ownerId,
111 string $name,
112 string $email,
113 string $phone,
114 string $address
115 ): PDOStatement
- Add the deleteOwnContactById() method, which requires the user ID that owns the contact, and the contact ID. The two input parameters will be used to match the record to be deleted. This method will return the PDOStatement instance:
public function deleteOwnContactById(int $ownerId, int $contactId): PDOStatement
{
$stmt = $this->pdo->prepare("DELETE FROM contacts WHERE id = :cid and user_id = :uid");
$stmt->bindParam(':cid', $contactId, PDO::PARAM_INT);
$stmt->bindParam(':uid', $ownerId, PDO::PARAM_INT);
$stmt->execute();
return $stmt;
}
- The Router component (src/components/Router.php file) will now cover the /signup and /contacts URIs as well. The highlighted part is the addition:
Router.php
1 <?php declare(strict_types=1);
2
3 namespace Components;
4
5 use HandlersContacts;
6 use HandlersSignup;
7 use HandlersLogin;
8 use HandlersLogout;
9 use HandlersProfile;
10 use HandlersSignup;
- In the case of the '/' route (home), a check for a currently authenticated user is performed and, in the event of a positive return, a redirect to /profile is requested. Otherwise, just return the home template:
Router.php
21 case '/profile':
22 return new Profile();
23 case '/login':
24 return new Login();
25 case '/logout':
26 return new Logout();
27 case '/':
28 return new class extends Handler
29 {
30 public function __invoke(): string
31 {
32 if (Auth::userIsAuthenticated()) {
33 $this->requestRedirect('/profile');
34 }
- Let's check the new and modified handlers. First, let's implement the Contacts page; this is the page that lists contacts and allows new entries to be added and existing ones to be edited. Create the src/handlers/Contacts.php file and add the following content. Declare the Handlers namespace and add the imports:
<?php declare(strict_types=1);
namespace Handlers;
use ComponentsAuth;
use ComponentsDatabase;
use ComponentsTemplate;
class Contacts extends Handler
{
- Add the handle() method, and start with an authentication check. If the user is not authenticated, then the login form is displayed; otherwise, the user is fetched:
public function handle(): string
{
if (!Auth::userIsAuthenticated()) {
return (new Login)->handle();
}
$user = Auth::getUser();
- Initialize the $formError and $formData variables as arrays; they will be used to collect useful info, such as the form data to fill in the HTML form, or error messages:
$formError = [];
$formData = [];
- In the case of the POST HTTP method, process the form (call a separate method, to improve the readability of the current method). If no errors are returned, then redirect user to the Contacts page (refresh the page):
if ($_SERVER['REQUEST_METHOD'] === 'POST') {
$formError = $this->processForm();
if (!$formError) {
$this->requestRedirect('/contacts');
return '';
}
$formData = $_POST;
}
- If the edit entry is found in a query string, then the form data will be the record from the database – a contact will be edited. The form data is rendered on the HTML page, on the Edit Contact form:
if (!empty($_GET['edit'])) {
$formData = Database::instance()->getOwnContactById ($user->getId(), (int)$_GET['edit']);
}
- If the delete entry is found in a query string, then the record will be deleted and a redirect to the Contacts page (refresh page) will be performed:
if (!empty($_GET['delete'])) {
Database::instance()->deleteOwnContactById($user->getId(), (int)$_GET['delete']);
$this->requestRedirect('/contacts');
return '';
}
- In the last part of the handle() method, the contacts template (the Contacts page) will be rendered, being provided with the data from the variables defined previously, and then returned:
return (new Template('contacts'))->render([
'user' => $user,
'contacts' => Database::instance()->getOwnContacts ($user->getId()),
'formError' => $formError,
'formData' => $formData,
]);
- Implement the aforementioned processForm() method. In the first part, validate the input data as requested:
Contacts.php
46 private function processForm(): array
47 {
48 $formErrors = [];
49 if (empty($_POST['name'])) {
50 $formErrors['name'] = 'The name is mandatory.';
51 } elseif (strlen($_POST['name']) < 2) {
52 $formErrors['name'] = 'At least two characters are required for name.';
53 }
54 if (!filter_var($_POST['email'] ?? '', FILTER_VALIDATE_EMAIL)) {
55 $formErrors['email'] = 'The email is invalid.';
56 }
- If the $formErrors array is empty, proceed with the contact update or insertion. To decide whether to insert a new record or to update the existing ones, the script will look for the ID parameter in the POST data, which will be the ID of the contact being edited. Finally, the $formErrors variable is returned:
if (!$formErrors) {
if (!empty($_POST['id']) && ($contactId = (int)$_POST['id'])) {
Database::instance()->updateContact($contactId, Auth::getUser()->getId(), $_POST['name'], $_POST['email'], $_POST['phone'] ?? '', $_POST['address'] ?? '');
} else {
Database::instance()->addContact(Auth::getUser()->getId(), $_POST['name'], $_POST['email'], $_POST['phone'] ?? '', $_POST['address'] ?? '');
}
}
return $formErrors;
}
- The Sign up page: This page is for adding new users to the database. Create the src/handlers/Signup.php file and add the following content. Declare the Handlers namespace and add the imports. Add the Sign up class with the handle() method. This method will check whether the user is already authenticated, in which case they will be redirected to the Profile page. In the case of POST requests, they will call the handleSignup() method to deal with the POST data. Finally, return the rendered signup-form template, providing the requisite data:
Signup.php
1 <?php
2 declare(strict_types=1);
3
4 namespace Handlers;
5
6 use ComponentsAuth;
7 use ComponentsDatabase;
8 use ComponentsTemplate;
- Add the handleSignup() method in order to process the sign up form data. First, validate the input data, as requested. If the validation is successful, proceed with the new record insertion and, if the query executes successfully, authenticate the new user and redirect them to the Profile page:
Signup.php
32 private function handleSignup(): ?array
33 {
34 $formError = null;
35 $formUsername = trim($_POST['username'] ?? '');
36 $formPassword = trim($_POST['password'] ?? '');
37 $formPasswordVerify = $_POST['passwordVerify'] ?? '';
38 if (!$formUsername || strlen($formUsername) < 3) {
39 $formError = ['username' => 'Please enter an username of at least 3 characters.'];
40 } elseif (!ctype_alnum($formUsername)) {
41 $formError = ['username' => 'The username should contain only numbers and letters.'];
42 } elseif (!$formPassword) {
43 $formError = ['password' => 'Please enter a password of at least 6 characters.'];
44 } elseif ($formPassword !== $formPasswordVerify) {
45 $formError = ['passwordVerify' => 'The passwords doesn't match.'];
46 } else {
47 $stmt = Database::instance() ->addUser(strtolower($formUsername), $formPassword);
- The Profile page is a simple page that will only display some user info and the current session login time. Open the Profile page handler – src/handlers/Profile.php – and make sure that only the handle() method remains, which would only print the Profile page. In the case of unauthenticated users, it will print the login form:
<?php
declare(strict_types=1);
namespace Handlers;
use ComponentsAuth;
use ComponentsTemplate;
class Profile extends Handler
{
public function handle(): string
{
if (!Auth::userIsAuthenticated()) {
return (new Login)->handle();
}
return (new Template('profile'))->render();
}
}
- The Logout page: This page logs the user out. Open the src/handlers/Logout.php file and make sure to use the Auth component to log the user out:
<?php
declare(strict_types=1);
namespace Handlers;
use ComponentsAuth;
class Logout extends Handler
{
public function handle(): string
{
Auth::logout();
$this->requestRedirect('/');
return '';
}
}
- Login page: This page authenticates the username and password. Open the src/handlers/Login.php file and make sure that the necessary adjustments are performed. The HandlersLogin::handle() method will redirect the authenticated users to the Profile page as well. Otherwise, it will perform the same flow as in the previous activity but will evaluate the data differently in each step. That's because it now uses the database as a source of data and the User model with a dedicated method to perform password validation (the differences are highlighted). So, in the case of a POST request, first, it retrieves the user from the database by calling Database::getUserByUsername() and then evaluates them (the $user value can be the User object or null). If no user was found and returned, an error message is set in the $formError variable. The next step is to validate the login password and, in the event of an error, to set the error message in the $formError variable. In the end, if all checkpoints have been passed, the authentication is made by calling the Auth::authenticate() method, and then redirecting to the Profile page. If the request was not of the POST type, or there was an error with the username or password, the login form template (Login page) is rendered and returned:
Login.php
1 <?php
2 declare(strict_types=1);
3
4 namespace Handlers;
5
6 use ComponentsAuth;
7 use ComponentsDatabase;
8 use ComponentsTemplate;
9
10 class Login extends Handler
11 {
12 public function handle(): string
13 {
14 if (Auth::userIsAuthenticated()) {
15 $this->requestRedirect('/profile');
16 return '';
17 }
- The entry point of the application (web/index.php) does not change the logic; it will just require the new script files (highlighted rows):
index.php
1 <?php
2 declare(strict_types=1);
3
4 use ComponentsRouter;
5 use ComponentsTemplate;
6
7 const WWW_PATH = __DIR__;
8
9 require_once __DIR__ . '/../src/components/Auth.php';
10 require_once __DIR__ . '/../src/components/Database.php';
11 require_once __DIR__ . '/../src/components/Template.php';
12 require_once __DIR__ . '/../src/components/Router.php';
13 require_once __DIR__ . '/../src/handlers/Handler.php';
14 require_once __DIR__ . '/../src/handlers/Login.php';
15 require_once __DIR__ . '/../src/handlers/Logout.php';
Now to the templates – let's see what has changed.
- Firstly, the main template – the src/templates/main.php file. The changes are highlighted and commented on further. The navbar has changed to Contacts list. As requested, the navbar links are Username (link to the Profile page), Contacts, and Logout for an authenticated user, and Login for an unauthenticated user. The default content is now replaced by the home template:
main.php
1 <?php use ComponentsAuth; ?>
2 <!doctype html>
3 <html lang="en">
4 <head>
5 <meta charset="utf-8">
6 <meta name="viewport" content="width=device-width, initial-scale=1, shrink-to-fit=no">
8 <title><?= ($title ?? '(no title)') ?></title>
- Now, the home template – the src/templates/home.php file. This template prints two links – Sign up and Login, as requested:
<div class="jumbotron">
<h1 class="display-4">Hello!</h1>
<p class="lead"><a href="/signup">Sign up</a> to start creating your contacts list.</p>
<p class="lead">Already have an account? <a href="/login">Login here</a>.</p>
</div>
- Now, the login-form template – the src/templates/login-form.php file. In this template, only the link to the "sign up" page (highlighted) was added:
login-form.php
1 <?php
2 /** @var array $formError */
3 /** @var string $formUsername */
4 ?>
5 <div class="d-flex justify-content-center">
6 <form action="/login" method="post" style="width: 100%; max-width: 420px;">
7 <div class="text-center mb-4">
8 <h1 class="h3 mb-3 mt-5 font-weight-normal">Authenticate</h1>
9 </div>
- Now, the signup-form template—the src/templates/signup-form.php file. This template is similar to the login template. The only differences are the form action (/signup), header title (Sign up), the extra input (Password verify), and the fact that the link points to the Login page:
signup-form.php
1 <?php
2 /** @var array $formError */
3 /** @var string $formUsername */
4 ?>
5 <div class="d-flex justify-content-center">
6 <form action="/signup" method="post" style="width: 100%; max-width: 420px;">
7 <div class="text-center mb-4">
8 <h1 class="h3 mb-3 mt-5 font-weight-normal">Sign up</h1>
9 </div>
- Now, the profile template – the src/templates/profile.php file. The Profile page template looks totally different to the one in the previous activity. Now, it simply outputs a welcoming message and some minimal user information: username, signup date, and session login time:
profile.php
1 <?php
2
3 use ComponentsAuth;
4
5 $user = Auth::getUser();
6 ?>
7
8 <section class="my-5">
9 <h3>Welcome, <?= $user->getUsername() ?>!</h3>
10 </section>
- Now, the contacts template, the contacts list – the src/templates/contacts.php file (the first part). The Contacts page template has two major areas: the contacts list, on the one hand, and the contacts form (with add/edit actions), on the other. Before rendering the contacts list, PDOStatement (stored in the $contacts variable) is "asked" about the number of rows and, if there are no rows, then the message No contacts is printed. If the row count returns at least one, then the table is printed, iterating over the results of $contacts, using the while loop. The Edit and Delete buttons are also printed for every contact. For the Delete button, a confirmation dialog is used, utilizing the onclick tag attribute and the confirm() JavaScript function:
contacts.php
1 <?php
2 /** @var PDOStatement $contacts */
3 /** @var array $formError */
4 /** @var array $formData */
5 ?>
6 <section class="my-5">
7 <h3>Contacts</h3>
8 </section>
- Now, the contacts template, the edit form – the src/templates/contacts.php file (the second part). The contacts add/edit form features four visible inputs (name, email, phone, and address), one hidden input (contact ID when editing, 0 otherwise), and the Save button:
33 <div class="col-12 col-lg-4">
34 <h4 class="mb-3">Add contact:</h4>
35 <form method="post">
36 <div class="form-row">
37 <div class="form-group col-6">
38 <label for="contactName">Name</label>
39 <input type="text" class="form-control <?= isset($formError['name']) ? 'is-invalid' : ''; ?>"
40 id="contactName" placeholder="Enter name" name="name"
41 value="<?= htmlentities($formData['name'] ?? '') ?>">
Thus, we have created a contact management system based on the concepts covered so far in the chapter.
Chapter 8: Error Handling
Activity 8.1: Improving the User Experience through the Handling System and User-Level Errors
Solution
- Create a file called factorial.php.
- First, add the exception handler that, in order to log the exceptions to the log file, will create a data stream resource using the fopen() function, which is assigned to the static variable, $fh:
$exceptionHandler = function (Throwable $e) {
static $fh;
if (is_null($fh)) {
$fh = fopen(__DIR__ . '/app.log', 'a');
if (!$fh) {
echo 'Unable to access the log file.', PHP_EOL;
exit(1);
}
}
- Format the log message and write to the log file, using the fwrite() function:
$message = sprintf('%s [%d]: %s', get_class($e), $e->getCode(), $e->getMessage());
$msgLength = mb_strlen($message);
$line = str_repeat('-', $msgLength);
$logMessage = sprintf(
"%s %s > File: %s > Line: %d > Trace: %s %s ",
$line,
$message,
$e->getFile(),
$e->getLine(),
$e->getTraceAsString(),
$line
);
fwrite($fh, $logMessage);
};
- Define the error handler, which will translate the errors to exceptions and forward these to the exception handler. This error handler is meant to collect all the system errors reported, which are required to be handled as an exception (to log to a file, in a specific format, in our case):
$errorHandler = function (int $code, string $message, string $file, int $line) use ($exceptionHandler) {
$exception = new ErrorException($message, $code, $code, $file, $line);
$exceptionHandler($exception);
if (in_array($code, [E_ERROR, E_RECOVERABLE_ERROR, E_USER_ERROR])) {
exit(1);
}
};
- Register both handlers, using set_error_handler() and set_exception_handler():
set_error_handler($errorHandler);
set_exception_handler($exceptionHandler);
- Create a list of custom exceptions, one for each validation rule:
class NotANumber extends Exception {}
class DecimalNumber extends Exception {}
class NumberIsZeroOrNegative extends Exception {}
- Create the printError() function, which will prepend (!) to the input message:
function printError(string $message): void
{
echo '(!) ', $message, PHP_EOL;
}
- Create the calculateFactorial() function, which will initially validate the input argument. If any validation fails, an appropriate exception will be thrown, including a detailed message regarding the validation failure:
function calculateFactorial($number): int
{
if (!is_numeric($number)) {
throw new NotANumber(sprintf('%s is not a number.', $number));
}
$number = $number * 1;
if (is_float($number)) {
throw new DecimalNumber(sprintf('%s is decimal; integer is expected.', $number));
}
if ($number < 1) {
throw new NumberIsZeroOrNegative(sprintf('Given %d while higher than zero is expected.', $number));
}
We use is_numeric() to check whether the input is an integer or a numeric string and throw a NotANumber exception if the validation fails. Then, we validate whether the input is a decimal number since we only want to allow integers. To achieve this, we have to "convert" the potential string numeral to one of integers or float types, and therefore we multiply the number with the numeric 1 so that PHP will convert the input automatically for us. Another way of checking whether we are dealing with decimals is to look for decimal separators in the input, using the built-in strpos() function. In the case of a decimal value, we throw a DecimalNumber exception. Then, if the input number is lower than 1, we throw a NumberIsZeroOrNegative exception. At this step, validation ends, and we can proceed with the computation.
- Once validation is complete, proceed to the factorial number calculation, and then return it:
$factorial = 1;
for ($i = 2; $i <= $number; $i++) {
$factorial *= $i;
}
return $factorial;
}
A for loop is used to multiplicate the $factorial variable through its iterations until $i reaches the $number input value provided.
Note
We use the $factorial *= $i; notation, which is equivalent to the more verbose one—$factorial = $factorial * $i;
- Consider input arguments starting with the second element, since the first one is the script name. If no input arguments are provided, then print the error message asking for an input argument:
$arguments = array_slice($argv, 1);
if (!count($arguments)) {
printError('At least one number is required.');
- Otherwise, iterate through the input arguments and invoke the calculateFactorial() function, the result of which will be printed:
} else {
foreach ($arguments as $argument) {
try {
$factorial = calculateFactorial($argument);
echo $argument, '! = ', $factorial, PHP_EOL;
The calculateFactorial() function is wrapped in a try block since we are expecting an exception to be thrown, which we want to catch eventually. Remember that we have to display an output value for each input argument, so, in the event of errors for one argument, we want to be able to continue to advance the script to the next argument.
- Catch any of the custom exceptions defined previously and print the error message:
} catch (NotANumber | DecimalNumber | NumberIsZeroOrNegative $e) {
printError(sprintf('[%s]: %s', get_class($e), $e->getMessage()));
- Catch any other exception and send this to the exception handler to log to a file and print a generic error message that will highlight the current argument for which the unexpected exception was thrown:
} catch (Throwable $e) {
printError("Unexpected error occured for [$argument] input number.");
$exceptionHandler($e);
}
}
}
- Execute the following command:
php factorial.php;
The output is as follows:

Figure 8.38: Executing the script without an argument
Since no arguments were passed to the script, the appropriate error message is printed on the screen.
- Run the script with php factorial.php 1 2 3 20 21 -1 4.2 4th four; expect the following output:

Figure 8.39: Printing a factorial for integer values
In this case, a list of arguments was provided, starting with 1 and ending in four. As expected, for each argument, a new line is printed, containing either the response or the error. An interesting line here is the one for the argument 21, for which we got an Unexpected error message, without giving many details. We should look in the log file to see some relevant data:

Figure 8.40: Data for the input value "21"
The complaint here concerns a float type being returned by the calculateFactorial() function, while int is expected. That's because the resulting factorial number for 21 (51090942171709440000) is higher than the maximum integer the PHP engine can handle (php -r 'echo PHP_INT_MAX;' would output 9223372036854775807), and so is converted to a float type and is presented in scientific notation (5.1090942171709E+19). Since the calculateFactorial() function has declared int as a return type, the returned float type value has caused a TypeError, and now we may decide to apply an extra condition to input arguments, limiting the maximum number to 20, throwing a custom exception when the number is higher, or to check the type of factorial in calculateFactorial() before the value is returned, and throw a custom exception as well.
In this activity, you managed to improve the user experience by printing pretty messages to user output, even for unexpected errors. Also, in the case of unexpected errors, the messages were logged to a log file so that the developer could check on them and, based on that data, reproduce the issue, and then come up with a fix or an improved solution for the script.
Chapter 9: Composer
Activity 9.1: Implementing a Package to Generate a UUID
Solution
- Run the following command:
composer require ramsey/uuid
The output is as follows:
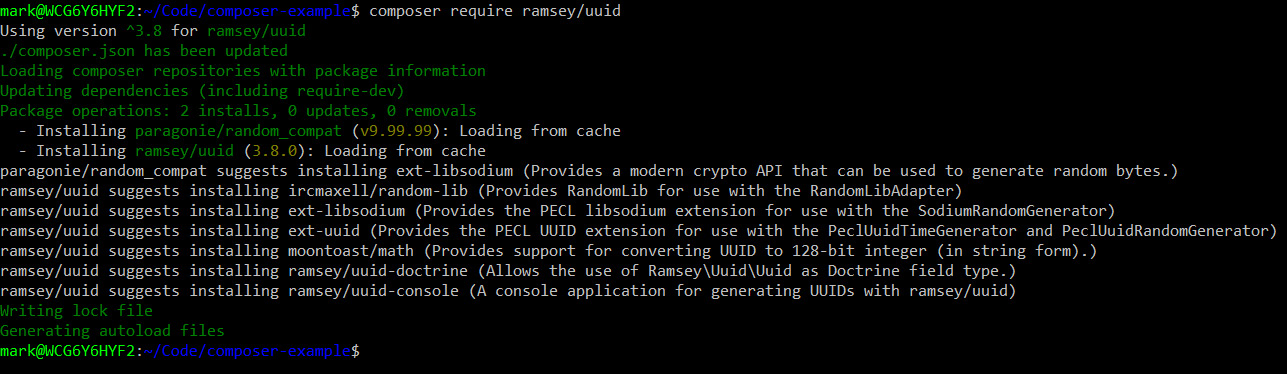
Figure 9.17: Requiring the packages
- List the packages in your vendor directory using the following command:
ls -lart vendor
The output is as follows:
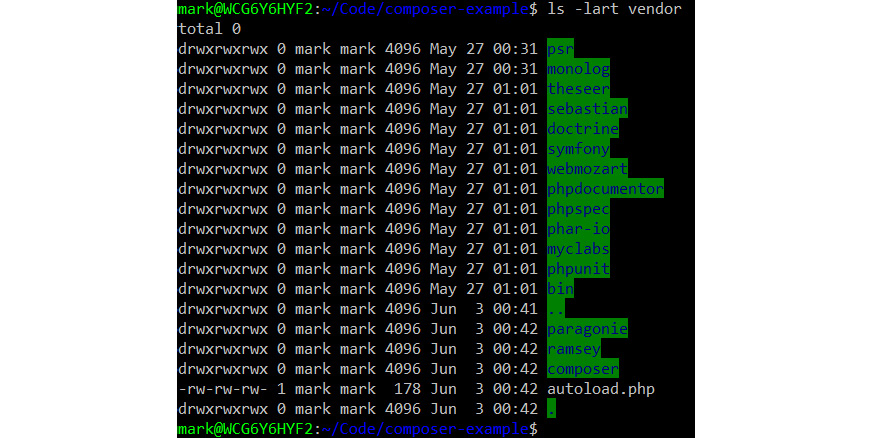
Figure 9.18: Listing the packages
- Edit Example.php to add a use ramsey/uuid/uuid statement, and add a method similar to printUuid() as follows:
Example.php
1 <?php
2
3 namespace Packt;
4
5 use MonologLogger;
6 use RamseyUuidUuid;
7
8 class Example
9 {
10 protected $logger;
11 public function __construct(Logger $logger)
12 {
13 $this->logger = $logger;
14 }
- Edit your index.php file to add the call to printUuid():
<?php
require 'vendor/autoload.php';
use MonologLogger;
use MonologHandlerStreamHandler;
use PacktExample;
$logger = new Logger('application_log');
$logger->pushHandler(new StreamHandler('.logs/app.log', Logger::INFO));
$e = new Example($logger);
$e->doSomething();
$e->printUuid();
- Run php index.php. The UUID generated will be different to the one in the screenshot, but should follow a similar format:

Figure 9.19: Printing the UUID
Chapter 10: Web Services
Activity 10.1: Making Your Own POST Request to httpbin.org
Solution
- Create a httpbin.php file in the guzzle-example directory. Require the Composer autoload file and import the Guzzle Client class:
<?php
require 'vendor/autoload.php';
use GuzzleHttpClient;
- Instantiate a new Guzzle Client by passing the httpbin address:
$client = new Client(['base_uri'=>'http://httpbin.org/']);
- Inside a try…catch block, make a POST request to the /response-headers endpoint. Add an Accept header set to application/json and set two query parameter key-value pairs, with first as John and last as Doe:
try
{
$response=$client->request('POST', '/response-headers',[
'headers'=>[
'Accept'=>'application-json'
]
'query'=> [
'first'=>'John',
'last'=>'Doe'
]
]);
- Check whether the HTTP status code is not 200, and if so, throw an exception:
if ($response->getStatusCode()!==200){
throw new Exception("Status code was {$response->getStatusCode()}, not 200");
}
- Parse the response body into an object using json_decode() and store it in a variable:
$responseObject=json_decode($response->getBody()->getContents());
- Output a string, The web service responded with, concatenated with the first and last properties from the response object:
echo "The web service responded with {$responseObject->first} {$responseObject->last}".PHP_EOL;
}
catch(Exception $ex)
{
echo "An error occurred: ".$ex->getMessage().PHP_EOL;
}
- Run the script and see whether the output contains John Doe:

Figure 10.13: The output of the script