
Overview
By the end of this chapter, you will be able to describe the different error levels in PHP; use a custom error handler; trigger and log error messages; catch fatal errors at shutdown; explain how exceptions work in PHP; define, use, and catch multiple exception classes; and register a top-level exception handler.
Also, in this chapter, you will trigger so-called user-level error messages and how they can be helpful. In the last part, you will learn about exceptions and how they can be used to control script flow.
Introduction
In the previous chapter, you were presented with the ways in which PHP can be used to interact with a filesystem in order to process uploaded files, write in text files, and create files and directories, to name but a few aspects. Also, you were shown how a SQL server can be used with PHP to manipulate structured data, such as user accounts or a contacts list.
Handling errors in an application is very important and keeping an eye on them leads to early bug detection, performance improvements, and the overall robustness of the application. Errors can be triggered to signal a number of malfunctions—missing data, bad syntax, deprecated features, and more, and can bring a halt to the script process, depending on severity. For example, when a database connection is not possible, the application would emit a fatal error, which could be handled by writing in a log file, sending an alert email to maintainers/developers with rich trace information (such as connection details), and a nice, user-friendly message would be displayed on user output (a browser, for example). On a social media website, for example, when a user tries to add a comment to a post that has been deleted in the interim (or made inaccessible), an error would be shown providing notification of the failure to add the comment.
Errors in PHP
Errors and error handlers in software programming are a priceless concept that helps developers to identify failure points at the application compile-time or at runtime. They can signal different levels of severity. Hence, the script could emit a fatal error that causes the process to stop, it could emit warnings that point to possible misuse of the script, and it could also emit some notifications hinting at code improvements (for example, using an uninitialized variable in an operation). Therefore, errors are grouped in different levels, based on severity—fatal errors, warnings, notices, and debug messages, to name but a few. All these messages are usually collected to persistent storage, in a process called logging. The most accessible logging method is writing to a file on a local filesystem, and this is the default method for most (if not all) applications. These logs are read by developers to identify issues or look for other specific information, such as memory usage or SQL query response times. Modern applications, like those based on the cloud, do not retain the application logs on the filesystem; instead, they send them out to specialized log handling applications.
In PHP, errors are handled and logged using a series of built-in functions. They facilitate the tailoring of error handling and logging to suit an application's needs by registering custom error handlers or setting error reporting for a specific range of levels.
Since these functions are incorporated in the PHP core, no other extensions need to be installed in order to use them. The settings in the php.ini configuration file, or the use of functions such as ini_set() at runtime, affect the behavior of these functions.
Some of the most frequently encountered errors and widely used logging configuration options are listed in the following table:
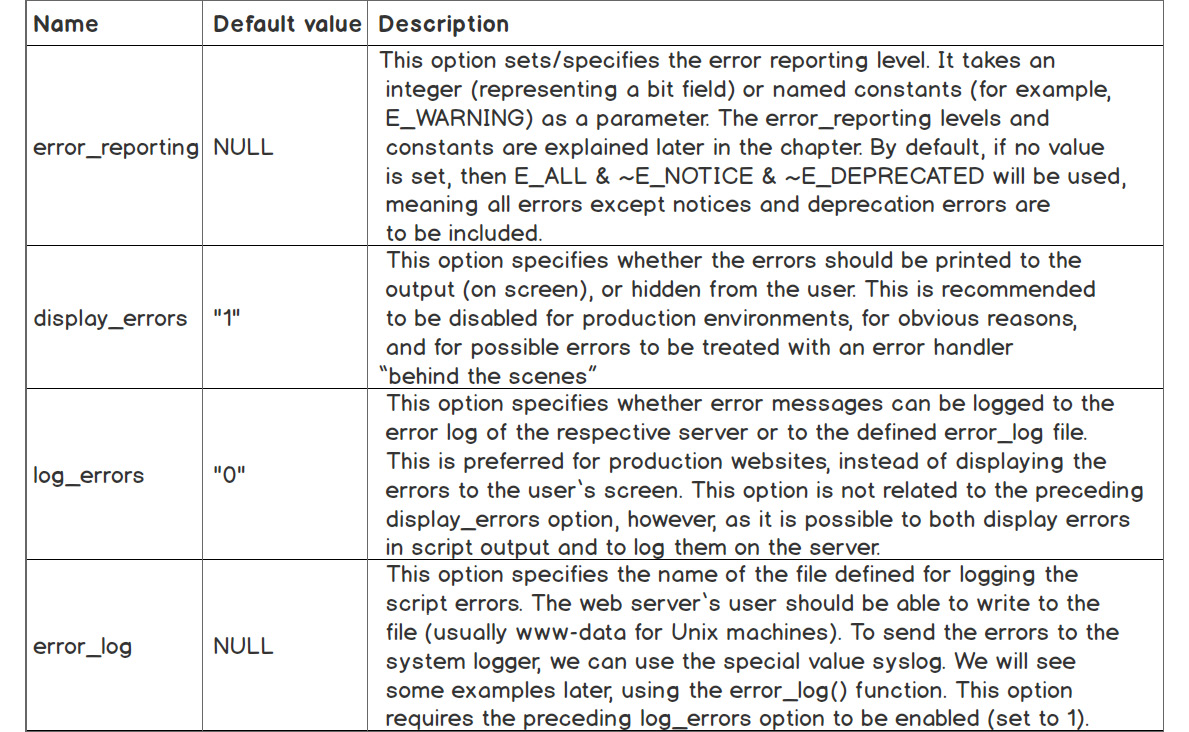
Figure 8.1: Common error and logging configurations
It is always better to check these values after you install a certain version of PHP and set appropriate values. Of course, special attention should be paid to the PHP settings on the production server. If you prefer to change a configuration value at runtime, the ini_set() function can be used as follows:
ini_set('display_errors', 'Off');
However, it is better to have all the configurations in files only. For example, in the case of setting the display_errors to "Off", to hide any error message from the user output, should the script fail to compile before the setting is reached and read, then the errors will be displayed to the user.
Let's now say a few words about "compile-time" and "runtime." PHP runs in two major stages, the first being compilation, and the second, interpretation:
- In the first stage—the compile-time, PHP parses the script file and builds the so-called machine code. This is the raw binary format that is run by the machine (the computer and server) and is not human-readable. This step can be cached using tools such as Opcache or APC, which is recommended on account of the huge performance boost it brings.
- In the second stage—the runtime, the machine code is actually executed.
Also, in order to communicate with the server on which PHP runs, it uses a server application programming interface (otherwise known as a server API, aka SAPI). For example, running PHP from the command line (in the Terminal), the command-line interface (CLI) SAPI would be used. For web traffic, Apache2 SAPI may be used (as a module in the Apache2 server), or FastCGI Process Manager (FPM) SAPI with the NGINX server. These are the most commonly used interfaces for PHP, and they are installed as needed, each containing their own configuration files, which usually import the main/default configuration and are extended with their own specific configuration files. We will talk about configuration files a bit later.
Here are the most common predefined constants for error messages:
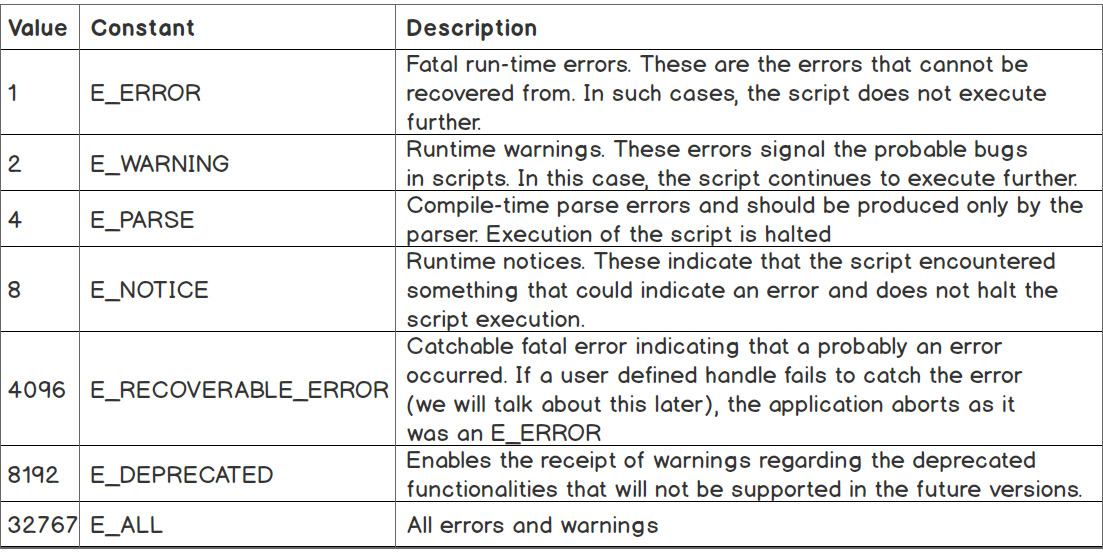
Figure 8.2: Predefined constants for error messages
These errors are generated and reported by the PHP engine and will be reported in error handlers that we will encounter later. To change the error reporting level in PHP, the error_reporting() function, which requires only one parameter – the decimal number used as the bit mask (a bit mask is a binary sequence used in this case to match a triggered error message level), can be used. The error_reporting() function parameter is often used as a bitwise expression between two or more error-level constants. For example, if we only want to report errors and warnings, we would invoke error_reporting(E_ERROR | E_WARNING); at script runtime. Using bitwise expressions is also allowed for error_reporting entries in INI configuration files.
Apart from these, there are some other error codes (including constants) that are used in user scripts to generate errors on request.
Here is the list of predefined constants for user-level generated error messages, using the PHP function, trigger_error():
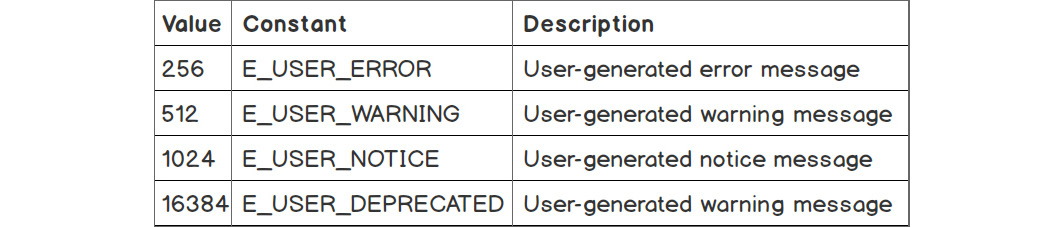
Figure 8.3: Predefined constants for user-level generated error messages
These are useful when the developer wants to report something in a given context but does not want to halt the execution of the script. For example, when you refactor a component by "removing" a function, among other operations (in your application code or in a PHP library that you manage), you might prefer to include an E_USER_DEPRECATED level message in the function to remove, pointing to the preferred alternative, rather than just removing the function, thereby increasing the chances of calls to undefined function error messages that would stop your script.
To set custom PHP settings before runtime, it's sufficient to add the custom configuration file inside the INI (configuration) directory of PHP. To find this directory, you should run php --ini; the output will be something like this:
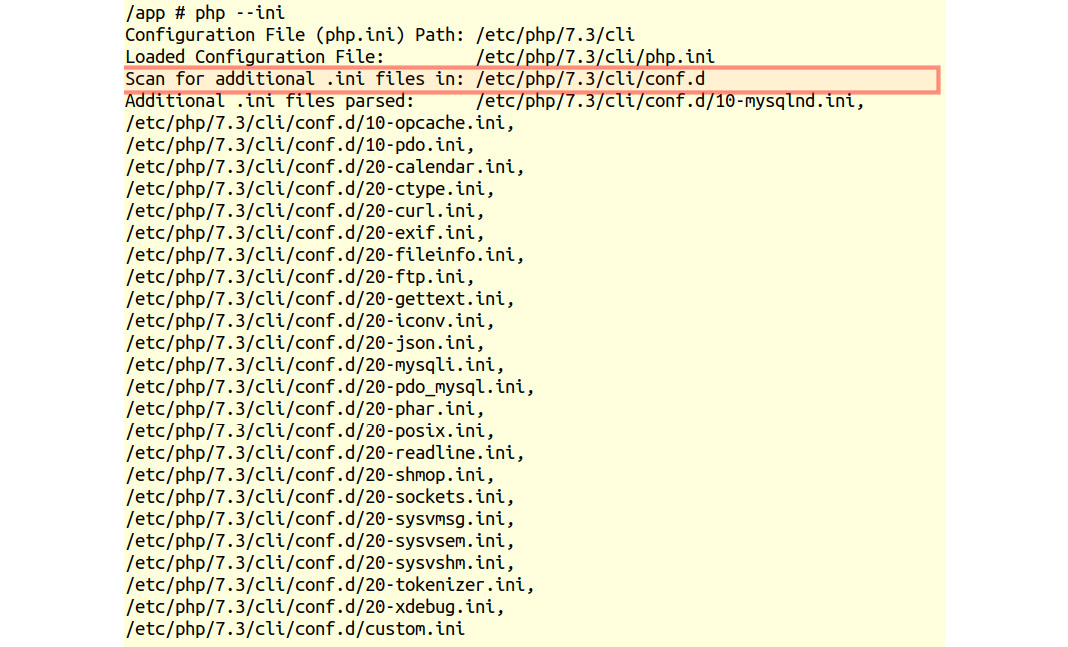
Figure 8.4: Output of the php-ini command
Note
The --ini option scans and loads all the .ini files within each directory.
Look for Scan for additional .ini files, and there you will find the directory where your settings should go.
You should make sure to add the custom configuration file for both CLI and FPM modes, if the configuration directories used are separate among them.
Note
If the preceding directory contains /cli/ in its path, this means that the configuration only applies to the CLI, and you should look for the FPM directory on the same level as the CLI and add the custom configuration there too.
Next, please make sure that you have set the following values related to errors and logs in PHP in a custom INI file.
Create the /etc/php/7.3/cli/conf.d/custom.ini file and set the following values:
error_reporting=E_ALL
display_errors=On
log_errors=Off
error_log=NULL
Although we could make use of an error_log configuration to log everything in a file, we will leave this job to a logger component that will be able to handle multiple outputs instead of a single one – sending logs in a file, to a log server, to Slack, and so on.
You should make a clear distinction between error reporting and handling and logging these errors.
Furthermore, the preceding PHP configuration values will be considered set.
Running a quick check, using ls -ln /etc/php/7.3/cli/conf.d, we should get the following:

Figure 8.5: Listing the configuration files under the folder
As you will notice, the configuration for installed modules is linked to the common configuration file from /etc/php/7.3/mods-available/, as discussed previously.
Handling Errors
By default, PHP will output the error messages to user output (on the browser screen when accessing the program through a browser, or in the Terminal/commander when run in a command-line interface). This should be changed in the early stages of application development so that, after publishing the app, you can be certain that no error messages will be leaked to the user, because it would look unprofessional and may occasionally scare the end user. The application errors should be treated in such a way that the end user will not see some possible faults when they occur (such as failing to connect to the cache service), or user-friendly error messages pertaining to the operation that it was not possible to execute (for example, the inability to add a comment while connection to the database is not possible).
The Default Error Handler
PHP uses a default error handler, provided no other error handler is specified by the user (developer), that simply outputs the error message to the user output, be it the browser or the Terminal/commander. This message contains the error message itself, the filename, and the line number where the error was triggered. By checking whether the default error handler in action is enough to run in a command-line interface with, php -r 'echo $iDontExist;', you will get the following output:
PHP Notice: Undefined variable: iDontExist in Command line code on line 1
Such types of error may be output from all over the application, for a variety of reasons: undefined variables, using strings as an array, attempting to not open an existing (or without read permissions) file, calling missing methods on an object, and so on. Even if you set up a custom error handler and do not show the end user such errors, it is best practice to resolve rather than hide them. Designing your application to avoid such error triggering will make your application more performant, more robust, and less prone to bugs.
Using a Custom Error Handler
We always want to manage the reported errors in our application, instead of outputting them in response. For this, we have to register our own error handler, and we will use the built-in function, set_error_handler().
The syntax is as follows:
set_error_handler(callable $error_handler [, int $error_types = E_ALL | E_STRICT ])
The first argument is a callable, while the second argument will specify the levels for which this handler will be invoked.
A callable is a function that will be run at a certain point in execution, being fed an expected list of parameters. For example, by running the following PHP code, php -r 'var_dump(array_map("intval", [ "10", "2.3", "ten" ]));', the array_map() function will invoke the intval() function for each element of the array parameter, ("10", "2.3", "ten"), providing the element value; as a result, we get an array of the same length, but with integer values:
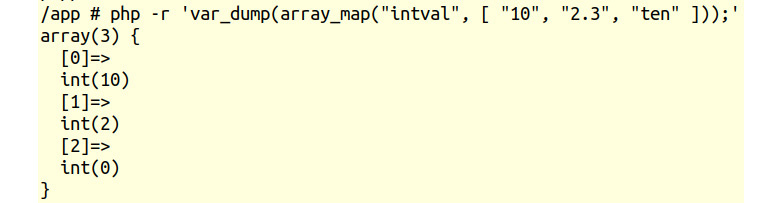
Figure 8.6: Passing values to a function
The type of callable can be a declared function, a function variable (an anonymous function), an instantiated class method, a class static method, or a class instance implementing the __invoke() method.
If the error raised is of a different type to the one specified in set_error_handler(), then the default error handler will be invoked. Also, the default handler will be invoked when the custom error handler returns the Boolean FALSE. The handler will only be used for specified $error_types parameters, regardless of the error_reporting value.
The error handler should have the following signature:
handler(int $errno, string $errstr [, string $errfile [, int $errline [, array $errcontext]]]): bool
The arguments are as follows:
- $errno (integer): points to the error level of the message
- $errstr (string): is the error message itself
- $errfile (string): the file path where the error happened
- $errline (integer): the line number in the file where the error occurred
- $errcontext (array): a list of all variables available at the time the error occurred in $errfile at $errline, as name-value pairs in the associative array
Exercise 8.1: Using a Custom Error Handler
So far, we have learned about error codes and some configurations for error reporting using the default error handler. In this exercise, we will register a custom error handler and learn how we can use it:
- Create a file called custom-handler.php and add the following content. First, we define the error handler – an anonymous function stored in the $errorHandler variable, which will print the current date and time, the message, the filename, the line number, and the error code in a format of our choosing:
<?php
$errorHandler = function (int $code, string $message, string $file, int $line) {
echo date(DATE_W3C), " :: $message, in [$file] on line [$line] (error code $code)", PHP_EOL;
};
- Then, we register the error handler defined previously for all types of errors, using the set_error_handler() function:
set_error_handler($errorHandler, E_ALL);
- Finally, we write an expression that should trigger some error messages at runtime – a division operation, the variables of which are not yet defined:
echo $width / $height, PHP_EOL;
- Execute the following command in the Terminal:
php custom-handler.php
The output is as follows:

Figure 8.7: Output of the program
So, we have two Undefined variable (code 8) errors and a Division by zero (code 2) error. And, on the last line, we got NAN – not-a-number, since division by zero doesn't make sense. Looking at the predefined constants table, we can see that the code 2 error is a warning, while the code 8 error is a notification.
Congratulations! You have just used your first customized error handler.
Now, let's see how you could use it better than just printing the errors onscreen. Do you recall that you don't want the visitors of your website to see all this stuff? So, instead of printing, let's just log them (write) in a file.
As indicated earlier, the reason for logging the errors (or other kinds of messages) in files is to have them recorded in persistent storage so that they can be read at any time, by anybody with access to the server, even when the application is not running. This is particularly useful since many errors might arise once end users "exploit" the application, and logging turns out to be an appropriate way to check errors occurring after such usage.
Exercise 8.2: Logging with the Custom Error Handler
Logging errors on a filesystem is just one of the many other logging methods, and it's probably the simplest. In this exercise, we will see how we can use the error handler to write in a log file, in the simplest way possible:
- Create a file called log-handler.php and add the following content.
- The custom error handler will create a data stream resource using fopen(), if this has not already been done, using the "append" (a) flag. The target is the app.log file in the script directory. The stream is cached for subsequent calls, using the static keyword to initialize the $stream variable. The stream being written to is effected using the fwrite() function, and the message format is the same as in the previous exercise:
<?php
$errorHandler = function (int $code, string $message, string $file, int $line) {
static $stream;
if (is_null($stream)) {
$stream = fopen(__DIR__ . '/app.log', 'a');
}
fwrite(
$stream,
date(DATE_W3C) . " :: $message, in [$file] on line [$line] (error code $code)" . PHP_EOL
);
};
- Then, the error handler is set for all error types again, followed by the test arithmetical expression that will trigger the errors:
set_error_handler($errorHandler, E_ALL);
echo $width / $height, PHP_EOL;
- Now, run the file in the command-line interface with the following command:
php log-handler.php
This time, as output, we only get NAN, as expected, since we are logging the errors in the app.log file:

Figure 8.8: Output showing the NAN value
- Check the app.log file content; you should discover the following:

Figure 8.9: Contents of the log file
As you can see, the script output looks cleaner now, while in the log file, we have only error log messages. The end user does not see any under-the-hood errors, and the log file contains only the information relevant to the errors themselves.
Using fopen() in this example, we did not check whether it successfully opened and returned the stream resource, with the probability of failing to do so being very small, since the script will create the file in the same directory where it itself resides. In a real-world application, where the target file might have a directory path that does not exist on disk yet, or no write permission for that location, and so on, you should treat all these failure cases in the way you consider the best, either by halting script execution, outputting to standard error output, by ignoring the error, and so on. My personal approach, in many cases, is to output to standard error output, having a health checker set up, which, at its invocation, will report the logger issue. But in cases where the logging component is considered vital (legal or business constraints), then you may decide to prevent the application from running at all in the case of logging issues.
Triggering a User-Level Error
Sometimes, depending on the purpose, it is useful to trigger errors in a script. For example, module refactoring would result in deprecated methods or inputs, and deprecation errors would be appropriate until the application that relies on that module completes the migration, instead of just removing the methods of the old API.
To achieve this, PHP provides the trigger_error() core function, and the syntax is the following:
trigger_error( string $error_msg [, int $error_type = E_USER_NOTICE ] ): bool
The first parameter is the error message and is required. The second parameter is the level of the error message and is optional, E_USER_NOTICE being the default value.
Before we continue, let's set up an error handler that we will include in further exercises. We will call this file error-handler.php, and its content will be the following:
<?php
$errorHandler = function (int $code, string $message, string $file, int $line) {
echo date(DATE_W3C), " :: $message, in [$file] on line [$line] (error code $code)", PHP_EOL;
if ($code === E_USER_ERROR) {
exit(1);
}
};
set_error_handler($errorHandler, E_ALL);
return $errorHandler;
First, we define the error handler—an anonymous function that will print the error message on the screen, and then, for the fatal error, E_USER_ERROR, it will halt the execution of the script with exit code 1. This is a handler we can use in production, or for command-line scripts since the output is printed onscreen, the script is halted in the event of fatal errors, and also the exit code would be non-zero (meaning the script did not complete successfully).
Then, we set the error handler for all types of errors and return it so that it can eventually be used by the script that invokes this file.
Exercise 8.3: Triggering Errors
In this exercise, you will trigger some errors in the script, purposely, only when specific conditions are met. In order to continue, please make sure you created the error handler file described previously since it will be used in this and in the following exercises.
In this particular simple script, we aim to return the square root of the input argument:
- Create a file called sqrt.php and add the following content. First, we include the error handler file that we created previously, to have our custom error handler set. Then, we check for the first argument presence and, if not there, we use trigger_error() to output the error message that will halt the execution of the script since we use E_USER_ERROR for the second parameter. If the first input argument exists, we store it in the $input variable for convenience:
<?php
require_once 'error-handler.php';
if (!array_key_exists(1, $argv)) {
trigger_error('This script requires a number as first argument', E_USER_ERROR);
}
$input = $argv[1];
- Next, there's a list of input validation and sanitization. First, we check whether the input is a number, and if it's not, we then trigger the error that halts the script:
if (!is_numeric($input)) {
trigger_error(sprintf('A number is expected, got %s', $input), E_USER_ERROR);
}
- The second validation is against the float number. Notice that we use the $input * 1 expression trick (because the input is a numerical string) to convert to either an integer or float.
Since the input is a string, we need to make use of some functions to either convert it to the expected type (an integer, in our case) or to test its matching type by parsing it. We made use of the is_numeric() function that tells whether the input looks like a number, but to test whether the string input looks like a decimal, we will have to do this little trick of multiplying by 1, since what PHP does, in this case, is to convert the variables involved in the operation depending on the context; in our case, in the arithmetical multiplication operation, PHP would convert both operands to either a float or integer type. For example, "3.14" * 1 will result in a floating-point number with a value of 3.14:

Figure 8.10: Floating point output
If the input is a float, then use the round() function to round half up to the input value and assign the value to the same $input variable; also trigger a warning error letting users know that decimal numbers are not allowed for this operation. This constitutes an error that will not halt the script:
if (is_float($input * 1)) {
$input = round($input);
trigger_error(
sprintf(
'Decimal numbers are not allowed for this operation. Will use the rounded integer value [%d]',
$input
),
E_USER_WARNING
);
}
- And, in the end, we check whether the number provided is negative. If it's negative, then we simply use the absolute value, with the help of the abs() function. Also, we trigger a warning error to provide a notification that negative numbers are not allowed to run in this script, an error that will not halt the execution of the script:
if ($input < 0) {
$input = abs($input);
trigger_error(
sprintf(
'A negative number is not allowed for this operation. Will use the absolute value [%d].',
$input
),
E_USER_WARNING
);
}
- In the last part of the script, we finally executed and printed the square root of the input:
echo sprintf('sqrt(%d) = ', $input), sqrt((float)$input), PHP_EOL;
- Run this script in the command-line interface:
php sqrt.php;
You will get the following output:

Figure 8.11: Error message
In this case, the first condition was not met, since the first argument was not provided. Therefore, the script was halted after the error message was printed.
- Now, execute the following command:
php sqrt.php nine;
The output is as follows:

Figure 8.12: Error on adding text as a value
Just like in the previous example, the script was halted because of E_USER_ERROR (code 256) due to invalid input; that would be condition number two – the input must be a number.
- Now, run the following command:
php sqrt.php -81.3;
The output will be as follows:

Figure 8.13: Output of the command
The first line is an error message (a warning – error code 512) that provides a notification of the fact that the -81.3 input value was altered, and now the rounded value, -81, will be used to allow the script to continue.
The second line is another warning that notices the sign change for the input value, so instead of the negative -81, it will use the absolute value, 81, allowing the script to execute further.
Finally, on the last line, we get the processing output, sqrt(81) = 9. This is the only line we would get if we give 81 as an input argument instead of -81.3, due to the correct format of the input. Of course, any number can be used, so by running php sqrt.php 123, we get sqrt(123) = 11.090536506409 as output:

Figure 8.14: Printing the square root of 123
As you can see, in this exercise, we made use of user-triggered errors that were handled by our custom error handler. The E_ERROR and E_USER_ERROR error types will cause the script to be halted immediately on account of their nature. Also, you saw that warnings show that the script did not execute following the ideal path; the input data was altered, or some assumptions were made (such as using a constant name that was not defined – PHP will assume that name to be a string instead of null or an empty value). So, in the event of warnings, it is better to take action immediately and resolve any ambiguity. In our example, we used some warnings for invalid input, but we could use some lower-level warnings, such as E_USER_NOTICE, to give less importance to the error log entry, or higher-level warnings, such as E_USER_ERROR, which would halt the script. As you can see, these warnings depend on task specifications, and, with PHP, it is easy to achieve this.
Logging Errors at Script Shutdown
Fatal errors, such as a call to an undefined function or the instantiations of an unknown class, cannot be handled by the registered error handler. They would simply halt script execution. So, you might ask why we then use E_ALL as the $error_types argument in set_error_handler(). This is just for convenience, because it is easiest to remember, and it describes, in some way, the fact that it's covering all the error types it can cover. The thing is that fatal errors have to halt script execution, and if this simple responsibility was left to the custom error handler, it would have been easy to bypass by simply not invoking script halting with exit() or its alias, die().
It is still possible to catch and log some of the fatal errors, by using the register_shutdown_function() function – which does exactly this – registers a function (a callable) to be invoked at script shutdown, and error_get_last(), which will return the last error, if any:
register_shutdown_function( callable $callback [, mixed $... ] ): void
Here, the first parameter is a callable to be invoked at shutdown, followed by optional parameters that will become $callback arguments. Consider the following snippet:
register_shutdown_function(
function (string $file, int $line) {
echo "I was registered in $file at line $line", PHP_EOL;
},
__FILE__,
__LINE__
);
In the snippet, the callable receives two arguments – the string $file, and the integer $line – values of which are set by the __FILE__ and __LINE__ magic constants, passed as parameters with number two and three in register_shutdown_function().
Multiple functions can be registered for invocation at shutdown, using register_shutdown_function(). These functions will be called in the order of their registration. If we call exit() within any of these registered functions, processing will stop immediately:
error_get_last(): array
No parameters are expected by the error_get_last() function, and the output is the aforementioned associative array that describes the error or, if no error has happened thus far, then null is output.
Exercise 8.4: Logging Fatal Errors at Shutdown
Spotting fatal errors is very important because it will give you important information on why exactly the application crashes when it does. In this exercise, we want to catch and print the information relating to script halting (the reason and the place where it happened). Therefore, you will log such errors using the custom error handler, previously created and registered in the error-handler.php file:
- Create a file called on-shutdown.php and insert the following content. Unlike other examples, we now store the error handler file output, which is the custom error handler callback (remember the last line, return $errorHandler;, in the 'error-handler.php' file?). We want to keep the error handler for later use:
<?php
$errorHandler = require_once 'error-handler.php';
- In this step, we define the shutdown function, which gets the last error using the error_get_last() function, and stores it in the $error variable, which is evaluated, and, if it's not null, then goes to the next step. If you have an error type of E_ERROR or E_RECOVERABLE_ERROR, then proceed further:
if ($error = error_get_last()) {
if (in_array($error['type'], [E_ERROR, E_RECOVERABLE_ERROR], true)) {
Note
We used [E_ERROR, E_RECOVERABLE_ERROR] in this example; feel free to use all fatal error codes in your code.
- Now, it's time to use the error handler; it is invoked, and the parameters are specified in the appropriate order, so as to match the callback signature:
$errorHandler(
$error['type'],
$error['message'],
$error['file'],
$error['line']
);
Note
Since the last error we got has the same structure as any other errors, instead of duplicating the logic of the handler (logging the error in a specific format), we have reused the error handler callback for this purpose.
- The shutdown function is registered using register_shutdown_function():
register_shutdown_function(
function () use ($errorHandler) {
if ($error = error_get_last()) {
if (in_array($error['type'], [E_ERROR, E_RECOVERABLE_ERROR], true)) {
$errorHandler(
$error['type'],
$error['message'],
$error['file'],
$error['line']
);
}
}
}
}
}
);
- In the last line of the script, we simply try to instantiate a class that does not exist in order to trigger the fatal error:
new UnknownClass();
Run the script in the command-line interface with php on-shutdown.php; you should see the following output:

Figure 8.15: Screenshot of the error message
This message is an E_ERROR that is printed by the default error handler, which is also responsible for halting the script execution in the event of such a fatal error, as discussed earlier. So, you may be wondering whether we can handle it before the default handler gets invoked, and we can actually do that, but let's look at this further.
This is a lot of information for a single error. Here is what happens:

Figure 8.16: Information for all the error messages
This message includes the same information – we have the call stack as well (the path the runtime process followed until reaching the error). This error message is a throwable error (better known as an exception) and is printed by the default exception handler. The exceptions are special objects, which contain error information, and which we will learn about in more detail. In this particular case, because no custom exception handler is registered, the exception is converted to an error.
In the last block (the third message box), we print the converted error, which is sent to the custom error handler.
The output may look unexpected, but it makes sense. Trying to instantiate an unknown class will trigger an error exception, which, in the absence of a registered custom exception handler, will convert the exception to an error and will fire both – the default error handler and the default exception handler. In the end, with the script shut down, the shutdown function gets invoked, where we catch the last error and send it to our custom error handler to be logged.
Exceptions
An exception is an event that occurs during the runtime of a program, and that disrupts its normal flow.
Starting with version 7, PHP changed the way in which errors are reported. Unlike the traditional error reporting mechanism used in PHP 5, in version 7, PHP uses an object-oriented approach to deal with errors. Consequently, many errors are now thrown as exceptions.
The exception model in PHP (supported since version 5) is similar to other programming languages. Therefore, when an error occurs, it is transformed into an object – the exception object – that contains relevant information about the error and the location where it was triggered. We can throw and catch exceptions in a PHP script. When the exception is thrown, it is handed to the runtime system, which will try to find a place in the script where the exception can be handled. This place that is looked for is called the exception handler, and it will be searched for in the list of functions that are called in the current runtime, until the exception was thrown. This list of functions is known as the call stack. First, the system will look for the exception handler in the current function, proceeding through the call stack in reverse order. When an exception handler is found, before the system handles the exception, it will first match the type of exceptions that the found exception handler accepts. If there is a match, then the script execution will resume in that exception handler. When no exception handler is found in the call stack, the default PHP exception handler will be handed the exception, and the script execution will halt.
The base class for exceptions was the Exception class, starting with PHP version 5 when exceptions were introduced to PHP.
Now, let's go back to the error reporting in PHP 7. Starting with PHP 7, most fatal errors are converted to exceptions and, to ensure backward compatibility for existing scripts (and for libraries to be able to be consistent with exception handlers in both PHP 5.x and PHP 7.x), fatal error exceptions are thrown with a new exception base class called Error. At the same time, a new interface was added, called Throwable, which is implemented by both the Exception and Error classes. Therefore, catching Throwable in a try-catch block will result in catching any possible exception.
Basic Usage
Consider the following block of code:
try {
if (!isset($argv[1])) {
throw new Exception('Argument #1 is required.');
}
} catch (Exception $e) {
echo $e->getMessage(), PHP_EOL;
} finally {
echo "Done.", PHP_EOL;
}
Here, we can distinguish four keywords: try, throw, catch, and finally. I'll explain the code block and keyword usage here:
- The try block is used to run any code that is expected to fail in an exceptional case (throwing an exception error). Inside this block, we may throw exceptions explicitly or not if (when the exception is thrown by a function, that we run inside the try block,), relying on the bubbling-up-stack exceptions, property of exceptions to go back through the call stack (searching for an exception handler mentioned previously);
- throw is used to trigger a new exception, and it requires an exception class instance as an argument (any class that extends the Exception or Error class – more on this later).
- The catch block is used to handle exceptions, and requires the exception type (class) to "catch", and the variable name under which the exception will be stored; the exception type can be a concrete class name, an abstract class name, or an interface name – the caught exceptions are the ones that implement, extend, or indeed are the concrete-specified classes; multiple catch blocks may be specified, but only the first type-matching caught exception block will be executed; in the absence of any catch block, the finally block is required.
- The finally block will run the code inside it for each try attempt, even if no exception was thrown, or if the exception was thrown and caught, or if the exception was thrown but wasn't caught with any of the catch blocks. This is especially useful in the case of long-running processes for closing the open resources after the specific task ends (files, database connections, and so on).
In the preceding example, the script enters the try block and checks whether the first argument is set at runtime and, if it isn't set, it will throw an exception of the Exception type, which is caught by the catch block, because it expects exceptions of the Exception class, or any other class that extends the Exception class. The caught exception is available under the $e variable after entering the catch block.
Exercise 8.5: Implementing Exceptions
In this exercise, you will throw and catch exceptions in PHP. To achieve this, we will create a script that will instantiate a class based on user input. Also, the script will print several sentences to trace the script flow in order to understand better how the exception mechanism works in PHP:
- Create a file called basic-try.php and add the following code. Mark the beginning of the script with a SCRIPT START message:
<?php
echo 'SCRIPT START.', PHP_EOL;
- Open a try block and print the Run TRY block message:
try {
echo 'Run TRY block.', PHP_EOL;
- If no class name is specified in the input argument, print the NO ARGUMENT: Will throw exception. message to give notification of the intention, and throw an exception:
if (!isset($argv[1])) {
echo 'NO ARGUMENT: Will throw exception.', PHP_EOL;
throw new LogicException('Argument #1 is required.');
}
- Otherwise, when we have an input argument, we print it and try an instantiation assuming the input argument is a known class name. The new object is dumped to output with the var_dump() function:
echo 'ARGUMENT: ', $argv[1], PHP_EOL;
var_dump(new $argv[1]);
- Close the try block and add the catch block, hinting the Exception class as the accepted exceptions type to be caught. In the catch block, we print the exception information formatted in a text message:
} catch (Exception $e) {
echo 'EXCEPTION: ', sprintf('%s in %s at line %d', $e->getMessage(), $e->getFile(), $e->getLine()), PHP_EOL;
- Add the finally block, which does nothing special in this script, except print the information about reaching this stage of the execution process:
} finally {
echo "FINALLY block gets executed. ";
- Finally, print the message informing the user that the script execution has exited the try/catch block and that the script will end:
echo "Outside TRY-CATCH. ";
echo 'SCRIPT END.', PHP_EOL;
- Run the script in the command-line interface using the following command:
php basic-try.php;
The output should look like this:

Figure 8.17: Output of the try/catch program
Notice that the last two lines of the try block did not execute, and that's because an exception was thrown – LogicException, due to a missing input argument. The exception gets caught by the catch block, and some information is printed onscreen – the message, file, and the line of the throw location. Since the exception is caught, the script resumes its execution.
- Now, run php basic-try.php DateTime; the output will be as follows:
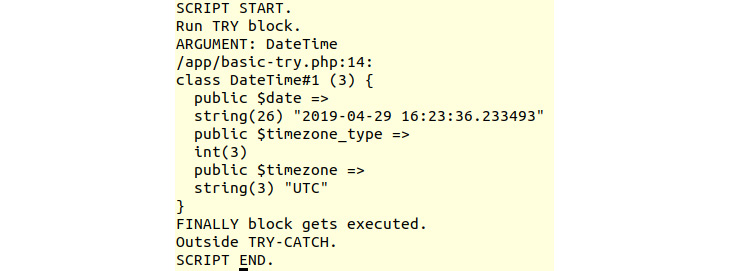
Figure 8.18: Output of the command
You will notice that, now, we have ARGUMENT: DateTime in the output, followed by the DateTime instance dump. The script flow is the normal one, without any exceptions thrown.
- Run the script with php basic-try.php DateTimeZone; the output is as follows:
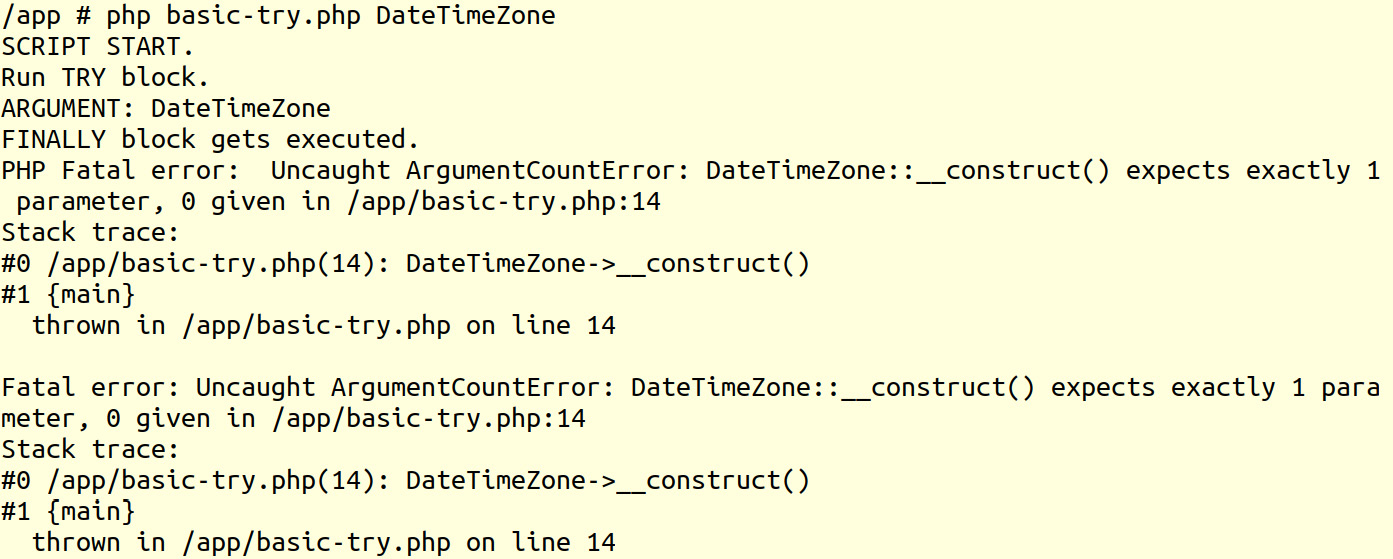
Figure 8.19: Throwing error due to missing parameter
Now, we got an exception error, and the interesting thing here is that the exception does not appear to be caught – see that the ARGUMENT line in the output is followed by the FINALLY line, and no EXCEPTION is printed. This is because the thrown exception does not extend the Exception class.
In the preceding example, ArgumentCountError is extending the Error exception class and is not caught by the catch (Exception $e) statement. Therefore, the exception was handled by the default exception handler and the script process was halted – notice that the FINALLY line is not followed by either the Outside TRY-CATCH. or SCRIPT END. lines.
- Copy the script to a new file called basic-try-all.php and add the catch (Error $e) block; the added code should be placed somewhere between the try and finally blocks:
} catch (Error $e) {
echo 'ERROR: ', sprintf('%s in %s at line %d', $e->getMessage(), $e->getFile(), $e->getLine()), PHP_EOL;
- Run the following command:
php basic-try-all.php DateTimeZone;
The output is as follows:
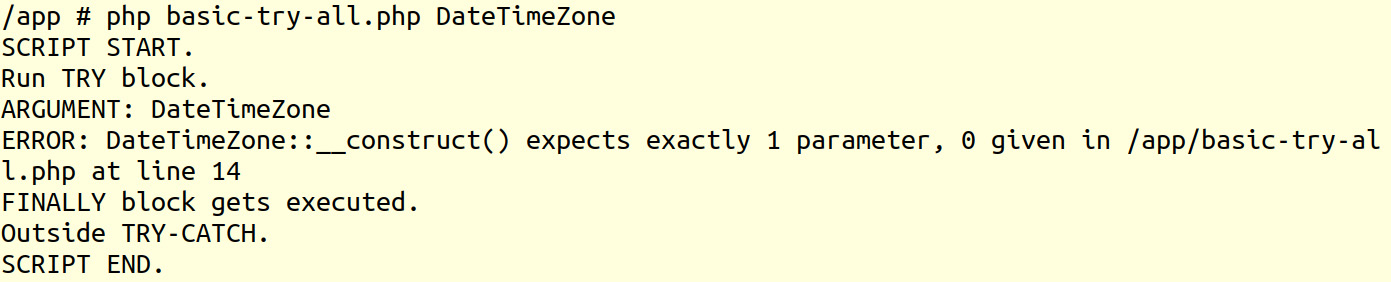
Figure 8.20: Output of the command executed
As expected, the error exception was now caught and printed in our format, and the script did not end unexpectedly.
In this example, we saw how it is possible to catch exceptions. More than that, we learned the two base exception classes, and we now understand the difference between them.
In the previous exercise, the throwable interface was mentioned, which is implemented by both the Error and Exception classes. Since the SPL (Standard PHP Library) offers a rich list of exceptions, let's display the exception hierarchy for Error exceptions that were added in version 7 of the PHP:

Figure 8.21: Exception hierarchy
Many other custom exception classes can be found in today's modern PHP libraries and frameworks.
Custom Exceptions
In PHP, it is possible to define custom exceptions, and also to extend them with custom functionality. Custom exceptions are useful since the basic functionality can be extended according to application needs, bundling business logic in a base application exception class. Also, they bring meaning to the application flow, by being named according to the business logic to which they are related.
Exercise 8.6: Custom Exceptions
In this exercise, we will define a custom exception, with extended functionality, which we will throw and catch, and the custom formatted message will then be printed on the screen. Specifically, this is a script that validates an email address:
- Create a file called validate-email.php and define the custom exception class, called InvalidEmail, which will extend the Exception class. In addition, the new exception class provides the option to store and retrieve the context as an array:
<?php
class InvalidEmail extends Exception
{
private $context = [];
public function setContext(array $context)
{
$this->context = $context;
}
public function getContext(): array
{
return $this->context;
}
}
Note
The suggested exception name does not include the Exception suffix, as this is used as a naming convention. Although exception names don't require a specific format, some developers prefer to add the Exception suffix, bringing the "specificity-in-class-name" argument, while others prefer not to include the suffix, bringing the "easier-to-read-the-code" argument. Either way, the PHP engine doesn't care, leaving the exception naming convention up to the developer or to the organization for which the code is written.
- Add the validateEmail() function, which returns nothing, but throws exceptions in the case of errors. The validateEmail() function expects the input parameter to be the same as script input arguments. If position 1 of the input array is not set (the first argument is not present), then an InvalidArgumentException exception is thrown. After this step, the function execution will stop. Otherwise, when position 1 is set, we validate the value with the built-in filter_var() function
- and the FILTER_VALIDATE_EMAIL flag. If the validation fails, then we instantiate the InvalidEmail exception class, set the context with the test value, and then throw it:
function validateEmail(array $input)
{
if (!isset($input[1])) {
throw new InvalidArgumentException('No value to check.');
}
$testInput = $input[1];
if (!filter_var($testInput, FILTER_VALIDATE_EMAIL)) {
$error = new InvalidEmail('The email validation has failed.');
$error->setContext(['testValue' => $testInput]);
throw $error;
}
}
- Use a try-catch block to run the validateEmail() function and print the success message if no exceptions were thrown, or if the exception stipulates otherwise:
try {
validateEmail($argv);
echo 'The input value is valid email.', PHP_EOL;
} catch (Throwable $e) {
echo sprintf(
'Caught [%s]: %s (file: %s, line: %s, context: %s)',
get_class($e),
$e->getMessage(),
$e->getFile(),
$e->getLine(),
$e instanceof InvalidEmail ? json_encode($e->getContext()) : 'N/A'
) . PHP_EOL;
}
Therefore, in the try block, you will invoke the validateEmail() function and print the successful validation message. The message will be printed only if no exception is thrown by the validateEmail() function. Instead, if an exception is thrown, it will be caught in the catch block, where the error message will be printed onscreen. The error message will include the error type (the exception class name), the message, and the file and line number where the exception was created. Also, in the case of a custom exception, we will include the context as well, JSON-encoded.
- Run the script without an argument:
php validate-email.php;
The output will look like this:

Figure 8.22: Executing code without passing arguments
We got InvalidArgumentException, as expected since no argument was provided to the script.
- Run the script with invalid arguments:
php validate-email.php john.doe;
The output will look like this:

Figure 8.23: Executing code with invalid arguments
This time, the caught exception is InvalidEmail, and the context information is included in the message that is printed onscreen.
- Run the script with a valid email address:
php validate-email.php [email protected];
The output will look like this:
Figure 8.24: Output for a valid email address
This time, the validation was successful, and the confirmation message is printed onscreen.
In this exercise, you created your own custom exception class, and it can be used along with its extended functionality. The script is not only able to validate the input as email, but it will also give the reason (exception) in the case of validation failure, bundling some helpful context when appropriate.
Custom Exception Handler
Usually, you only want to catch and treat certain exceptions, allowing the application to run further. Sometimes, however, it is not possible to continue without the right data; you do want the application to stop, and you want to do it gracefully and consistently (for example, an error page for web applications, specific message formats and details for a command-line interface).
To accomplish this, you can use the set_exception_handler() function. The syntax is as follows:
set_exception_handler (callable $exception_handler): callable
This function expects a callable as an exception handler, and this handler should accept a Throwable as a first parameter. NULL can be passed as well, instead of a callable; in this case, the default handler will be restored. The return value is the previous exception handler or NULL in the case of errors or no previous exception handler. Usually, the return value is ignored.
Using a Custom Exception Handler
Just like in the default error handler case, the default exception handler in PHP will print the error and will also halt script execution. Since you don't want any of these messages to reach the end user, you would prefer to register your own exception handler, where you can implement the same functionality as in the error handler – render the messages in a specific format and log them for debugging purposes.
Exercise 8.7: Using a Custom Exception Handler
In this exercise, you will define, register, and use a custom exception handler that will print errors in a specific format:
- Create a file called exception-handler.php and add the following content. Define and register your own exception handler:
<?php
set_exception_handler(function (Throwable $e) {
$msgLength = mb_strlen($e->getMessage());
$line = str_repeat('-', $msgLength);
echo $line, PHP_EOL;
echo $e->getMessage(), PHP_EOL;
echo '> File: ', $e->getFile(), PHP_EOL;
echo '> Line: ', $e->getLine(), PHP_EOL;
echo '> Trace: ', PHP_EOL, $e->getTraceAsString(), PHP_EOL;
echo $line, PHP_EOL;
});
In this file, we register the exception handler, which is an anonymous function that accepts the Throwable parameter as a $e variable. Then, we calculate the message length and create a line of dashes, of the same length as the error message, using the mb_strlen() and str_repeat() built-in functions. What follows is simple formatting for the message, including the file and line where the exception was created, and the exception trace; everything being wrapped by two dashed lines – one on top, and the other on the bottom, of the message block.
- We will use the basic-try.php file as the starting point for our example. Copy this file to basic-try-handler.php and include the exception-handler.php file in basic-try-handler.php, right after the SCRIPT START line:
require_once 'exception-handler.php';
- Since we know that, in this example, we only catch Exception, while we skip Error exceptions, we'll run the command directly that would produce the Error, so that it can get caught by the handler. Therefore, run the following command:
php basic-try-handler.php DateTimeZone;
Expect an output similar to the following:

Figure 8.25: Output of the command
Now, the output looks cleaner than the one produced by the default exception handler. Of course, the exception handler can be used to log exceptions, especially unexpected ones, and add as much information as possible so that bugs are easier to identify and trace.
As you may notice, the exception handler is very similar to the error handler in PHP. Hence, it would be great if we could use a single callback to perform error and exception handling. To help in this matter, PHP provides an exception class called ErrorException, which translates traditional PHP errors to exceptions.
Translating Errors to Exceptions
To translate PHP errors (caught in the error handler) to exceptions, you can use the ErrorException class. This class extends the Exception class and, unlike the latter, it has a different constructor function signature from that of the class it extends.
The constructor syntax of the ErrorException class is as follows:
public __construct (string $message = "", int $code = 0, int $severity = E_ERROR, string $filename = __FILE__, int $lineno = __LINE__, Exception $previous = NULL)
The accepted parameters are the following:
- $message: The exception message string
- $code: Integer representing the exception code
- $severity: The severity level of the exception (while this is an integer, it is recommended to use one of the E_* error code constants)
- $filename: The filename where the exception was thrown
- $lineno: The line number in the file where the exception was thrown
- $previous: The previous exception used for the exception chaining
Now, let's see how this class works.
Exercise 8.8: Translating Errors to Exceptions
In this exercise, we will register an error handler that will only have to translate errors to exceptions and then invoke the exception handler. The exception handler will be responsible for handling all exceptions (including the translated errors) – this can be logging, rendering an error template, printing an error message in a specific format, and so on. In our exercise, we will use the exception handler to print the exception in a friendly format, as used in the previous exercise:
- Create a file called all-errors-handler.php, define the exception handler, and then save it under the $exceptionHandler variable. This is the same callback function we used in the previous exercise:
<?php
$exceptionHandler = function (Throwable $e) {
$msgLength = mb_strlen($e->getMessage());
$line = str_repeat('-', $msgLength);
echo $line, PHP_EOL;
echo get_class($e), sprintf(' [%d]: ', $e->getCode()), $e->getMessage(), PHP_EOL;
echo '> File: ', $e->getFile(), PHP_EOL;
echo '> Line: ', $e->getLine(), PHP_EOL;
echo '> Trace: ', PHP_EOL, $e->getTraceAsString(), PHP_EOL;
echo $line, PHP_EOL;
};
- Now, we define and assign the error handler to the $errorHandler variable. This function will instantiate ErrorException, using the function arguments for class constructor parameters. Then, the exception handler is invoked, passing the ErrorException instance as the only parameter. Finally, if the error severity is E_USER_ERROR, curtail execution of the script:
$errorHandler = function (int $code, string $message, string $file, int $line) use ($exceptionHandler) {
$exception = new ErrorException($message, $code, $code, $file, $line);
$exceptionHandler($exception);
if (in_array($code , [E_ERROR, E_RECOVERABLE_ERROR, E_USER_ERROR])) {
exit(1);
}
};
- In the last part of the script, we simply set the error and the exception handlers:
set_error_handler($errorHandler);
set_exception_handler($exceptionHandler);
- Now, we will test the new handlers using an example where errors were reported, and the error handler was used. Let's pick the sqrt.php script, copy it to sqrt-all.php, and replace the require_once 'error-handler.php'; line at the beginning of the file with require_once 'all-errors-handler.php';:
<?php
require_once 'error-handler.php'; // removed
require_once 'all-errors-handler.php'; // added
- The content of sqrt-all.php can be found at https://packt.live/2INXt9q (the following code is explained in Exercise 8.3, Triggering Errors):
- Run the following commands in the following sequence:
php sqrt-all.php
php sqrt-all.php s5
php sqrt-all.php -5
php sqrt-all.php 9
The output will be as follows:
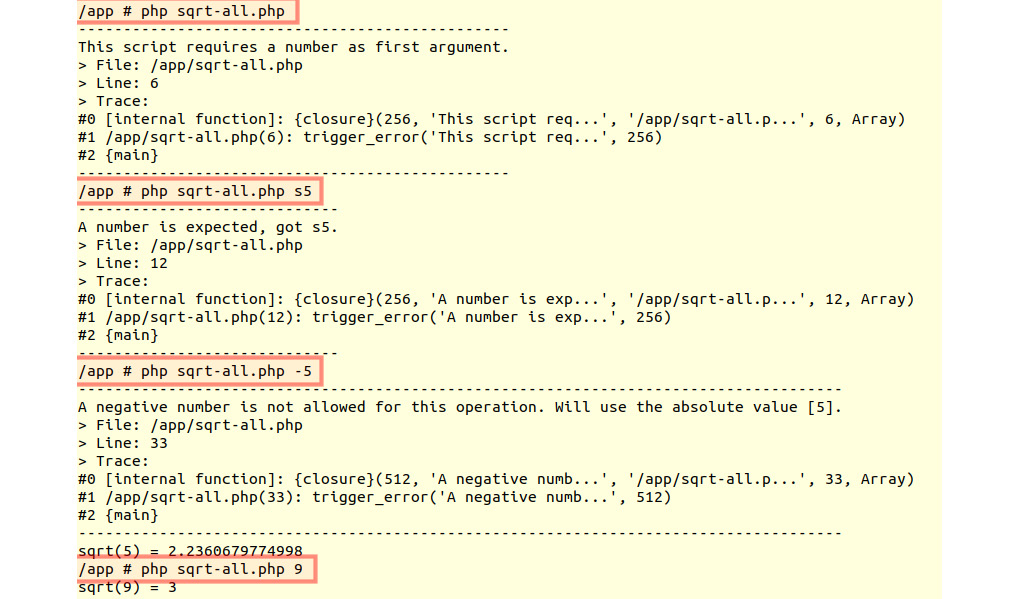
Figure 8.26: Output for different cases
As before, E_USER_ERROR (code 256) brings the script to a halt, while E_USER_WARNING (code 512) allows the script to continue.
In this exercise, we managed to forward all the errors caught with the error handler to the exception handler by converting each of them to an exception. This way, we can implement the code that handles both errors and exceptions in a single place in the script – in the exception handler. At the same time, we have used the trigger_error() function to generate some errors and have them printed by the exception handler.
Yet, we are mixing application/technical error handling with business logic error handling. We want more control in terms of the flow of operations, so as to be able to handle issues on the spot and act accordingly. The exceptions in PHP allow us to do precisely that – to run a block of code for which some exceptions are expected, and which will be handled on the spot when they occur, controlling the flow of the operations. Looking at the previous exercise, we see that we can improve it by "catching" the errors before they reach the error handler, so we can print some less verbose error messages, for example.
To achieve this, we will use the exceptions approach. Therefore, we will use try-catch blocks, which allow us to control the flow of operations, instead of the trigger_error() function, which sends the error directly to the error handler.
Exercise 8.9: Simple Exception Handling
In the following exercise, we will implement a multipurpose script that aims to execute arbitrary PHP functions. In this case, we will not have so much control over input validation, since arbitrarily picked functions require different input parameter types, in a specific order, and a variable parameter count. In this case, we will use a method that validates and handles the input, and, in the event of validation failures, it will throw exceptions that are caught by the current function:
- Create a file called run.php and include the error handler file. Then, we define a custom exception, called Disposable, so we can catch precisely the exception that we anticipate might be thrown:
<?php
require_once 'all-errors-handler.php';
class Disposable extends Exception
{
}
- Next, we declare the handle() function, which will be in charge of validation and running the script given the function name and arguments. A Disposable exception will be thrown when no function/class name argument is provided:
function handle(array $input)
{
if (!isset($input[1])) {
throw new Disposable('A function/class name is required as the first argument.');
}
- Otherwise, the first argument is stored in the $calleeName variable:
$calleeName = $input[1];
$calleeArguments = array_slice($input, 2);
The callee arguments are prepared as a slice from the original input, since, in the first position (index 0) in the $input variable, where there is the script name and, at the second position (index 1), where there is the callee name, we need a slice that starts index 2 from $input; for this purpose, we are using the array_slice() built-in function.
- If the callee is an existing function, then use the call_user_func_array() function to invoke the $calleeName function, providing the argument list of $calleeArguments:
if (function_exists($calleeName)) {
return call_user_func_array($calleeName, $calleeArguments);
- Otherwise, if $calleeName is an existing class name, then create an instance of the $calleeName class, providing the list of arguments for the constructor method:
} elseif (class_exists($calleeName)) {
return new $calleeName(...$calleeArguments);
- Finally, if the callee is not a function or a class name, then throw a Disposable exception:
} else {
throw new Disposable(sprintf('The [%s] function or class does not exist.', $calleeName));
}
}
- In the last part of the script, we use the try-catch block. In the try part, we call the handle() function providing the script arguments, and store the output in the $output variable:
try {
$output = handle($argv);
echo 'Result: ', $output ? print_r($output, true) : var_export($output, true), PHP_EOL;
We display the result in the following manner: if $output evaluates to TRUE (a non-empty value such as zero, an empty string, or NULL), then use the print_r() function to display data in a friendly format; otherwise, use var_export() to give us a hint regarding the data type. Note that output printing will not happen if the handle() function throws an exception.
- The catch part will only catch Disposable exceptions, which are the anticipated error messages that will be printed on the screen. exit(1) is used to signal unsuccessful script execution:
} catch (Disposable $e) {
echo '(!) ', $e->getMessage(), PHP_EOL;
exit(1);
}
- Run the script with php run.php and then php run.php unknownFnName; expect the following output:

Figure 8.27: Output of the commands
We got the expected output – the handle() function threw Disposable exceptions in both cases and, therefore, the function output was not printed.
- Run the script using the following command:
php run.php substr 'PHP Essentials' 0 3;
The output will be the following:

Figure 8.28: Printing a substring
In this case, substr is a valid function name and is therefore called, with three arguments being passed. substr is performing extraction from a string value (first parameter), starting a specific position (the second parameter – 0 in our case), and returns the desired length (the third parameter – 3 in our case). Since no exception was thrown, the output was printed on the screen.
- Run the script using the following command:
php run.php substr 'PHP Essentials' 0 0;
The output will be the following:

Figure 8.29: No string printed to the console
Since we got an empty string, in this case, the output is printed with var_export().
- Run the script using the following command:
php run.php substr 'PHP Essentials';
The output will be as follows:
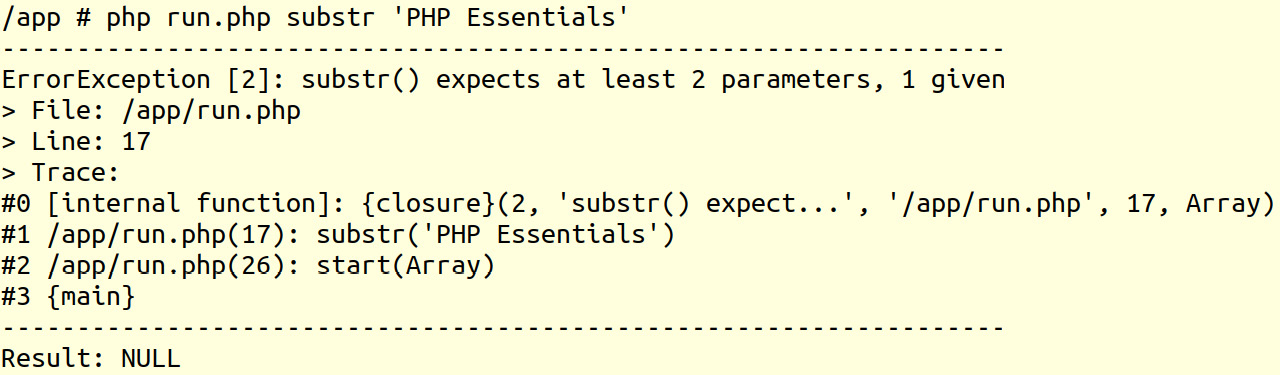
Figure 8.30: Printing the warning message
In this case, an E_WARNING message was reported, since the substr() function requires at least two parameters. Since this was not a fatal error, execution of the script continued, and NULL was returned. The output was again printed with the same var_export() function.
- Run the script using the following command:
php run.php DateTime;
The output will be as follows:
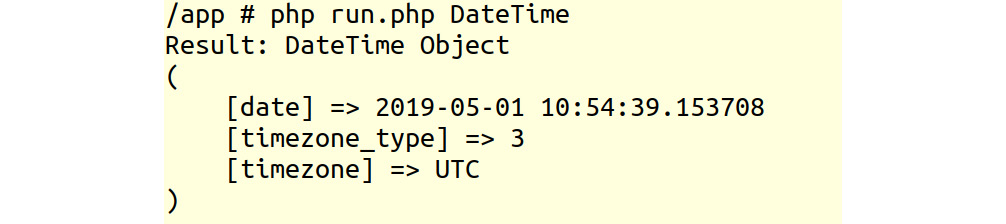
Figure 8.31: Printing the time details
- Run the script using the following command:
php run.php DateTime '1 day ago' UTC;
The output will be as follows:
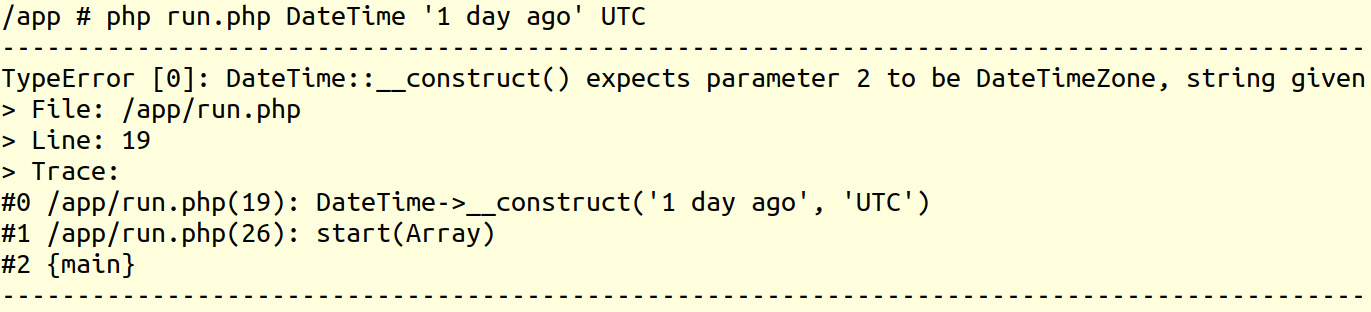
Figure 8.32: Fatal error
As you can see, we are now dealing with a fatal TypeError exception. This exception was not caught and was handled by the exception handler; therefore, the script was halted.
Since this is a generic multi-purpose script, it is very difficult to handle all kinds of errors, validating specific inputs for each callee, be it a function name or a class name – in our case, you would write input validation rules for each function or class that is expected to be called. One thing to learn here is that being as precise as possible is a good approach to programming, since this gives you, the developer, control over your application.
Exercise 8.10: Better Usage of Exceptions
In this exercise, we'll try a better approach to DateTime instantiation, compared with the previous example, for the purpose of showing how being precise gives you better control over your script. This approach is supposed to parse the input data and prepare the DateTime class arguments while respecting the accepted data types for each:
- Create the date.php file, require the error handlers, and define the custom exception called Disposable:
<?php
require_once 'all-errors-handler.php';
class Disposable extends Exception
{
}
- Next, we define the handle() function, which will handle the request processing. First, it will check for the class name argument in $input[1], with a Disposable exception being thrown if no such value is found:
function handle(array $input)
{
if (!isset($input[1])) {
throw new Disposable('A class name is required as the first argument (one of DateTime or DateTimeImmutable).');
}
- Otherwise, the value is validated, with the requirement that only one of DateTime or DateTimeImmutable is allowed; a Disposable exception is thrown if another name is passed:
$calleeName = $input[1];
if (!in_array($calleeName, [DateTime::class, DateTimeImmutable::class])) {
throw new Disposable('One of DateTime or DateTimeImmutable is expected.');
}
- The desired time is stored in the $time variable, with the default value of now if no argument was set. The time zone is stored in the $timezone variable, with the default of UTC if no time zone argument was set:
$time = $input[2] ?? 'now';
$timezone = $input[3] ?? 'UTC';
- Next, the try-catch blocks are used when trying to instantiate DateTimeZone and the $calleeName objects. All Exception errors are caught, and a friendly message is thrown with the Disposable exception class instead:
try {
$dateTimeZone = new DateTimeZone($timezone);
} catch (Exception $e) {
throw new Disposable(sprintf('Unknown/Bad timezone: [%s]', $timezone));
}
try {
$dateTime = new $calleeName($time, $dateTimeZone);
} catch (Exception $e) {
throw new Disposable(sprintf('Cannot build date from [%s]', $time));
}
- Finally, if everything goes well, the $dateTime instance is returned:
return $dateTime;
}
- The final part of the script is a try-catch block, as in the previous exercise, where handle() is run with the script input arguments, the output of which is stored in the $output variable, which is then printed onscreen using the print_r() function:
try {
$output = handle($argv);
echo 'Result: ', print_r($output, true);
- If the handle() function throws a Disposable exception, this is caught and the error message is printed onscreen before the process is halted with exit code 1. Any other exception will be handled by the exception handler registered in all-errors-handler.php:
} catch (Disposable $e) {
echo '(!) ', $e->getMessage(), PHP_EOL;
exit(1);
}
- Run the script with php date.php and then with php date.php Date; the expected output is as follows:

Figure 8.33: Printing the error messages for Disposable exceptions
As expected, the Disposable exceptions were caught, and the error messages were displayed onscreen. Since no exceptions were thrown, no output result is printed.
- Run the script using the following command:
php date.php DateTimeImmutable midnight;
The output is as follows:

Figure 8.34: Printing the time details
Now, the script printed the DateTimeImmutable object, which has today's date and the time set to midnight, while the default UTC is used for the time zone.
- Run the script with php date.php DateTimeImmutable summer and then with php date.php DateTimeImmutable yesterday Paris; see the output, which should look like this:

Figure 8.35: Exceptions caught inside the functions
As you can see, these are the Exception class exceptions caught inside the handle() function, and then thrown as Disposable exceptions (to be caught in the upper level) with custom messages.
- Finally, run the program using the following command:
php date.php DateTimeImmutable yesterday Europe/Paris
You should get something like this:

Figure 8.36: Printing Europe/Paris date time details
This would be yesterday's date, midnight in the Europe/Paris time zone. In this case, the script has executed without exceptions; the second argument for DateTimeImmutable was a DateTimeZone object with the Europe/Paris time zone setting, and therefore the result was printed as expected.
Activity 8.1: Handling System and User-Level Errors
Let's say you have been asked to develop a script that would calculate the factorial number of the given input, with the following specifications:
- At least one input argument is required.
- The input arguments should be validated as positive integers (higher than zero).
- For each input provided, the script should calculate the factorial number; the result is printed line by line for each input argument.
You should validate the inputs according to the specifications and handle any error (thrown exceptions). No exception should halt the execution of the script, the difference being that the expected exceptions are printed to the user output, while for unexpected exceptions, a generic error message is printed, and the exception is logged to a log file.
Perform the following steps:
- Create a file called factorial.php, which will run the script.
- Create the exception handler, which will log the formatted log message to a file; the message format is the same as in the exception handler of the all-errors-handler.php file.
- Create the error handler to deal with the system errors reported; this will forward the errors to the exception handler (translating the errors to exceptions).
- Register both the exception and the error handlers.
- Create the custom exceptions, one for each validation rule.
- Create the function that validates and calculates a single number input (for example, calculateFactorial()).
- Create a function that will print the error message in a specific format. It will prepend (!) to each message and will include a new line feed.
- If no input arguments are provided, display a message that highlights the requirement of at least one input number.
- Iterate through the input arguments and invoke the calculateFactorial() function providing the input argument. The result will be printed using the format: 3! = 6 (where 3 is the input number, and 6 is the result of calculateFactorial()).
- Catch any (expected) custom exception that might be thrown by the calculateFactorial() function and print the exception message.
- Catch any unexpected exception, other than the custom exceptions defined previously, and invoke the exception handler to have them logged in the log file. Also, display a generic error message to the user output (for example, an unexpected error occurred for input number N, where N is the input number provided in the calculateFactorial() function).
The output should be similar to the following:

Figure 8.37: Printing factorials of integers
Note
The solution to this activity can be found on page 552.
Summary
In this chapter, you learned how to deal with PHP errors and how to work with exceptions. Now, you also understand the difference between traditional errors and exceptions and their use cases. You learned how to set error and exception handlers. Now, you understand the different error levels in PHP, and why some will curtail the execution of the script, while most of them will allow the script to execute further. Also, to avoid code duplication, you learned how to translate traditional errors to exceptions and forward them to the exception handler.
Finally, my advice to you is to consider setting up a logging server (some free solutions are available for download and use), where you can send all the logs, so that, when you access the logging platform, you can filter the entries (for example, by severity/log level or by a search term), create data visualizations with various aggregations (for example, counts of warnings in the last 12 hours at 30-minute intervals), and more. This will help you to identify certain error level messages much more quickly than browsing through a log file.
The logging server is particularly useful when the application is deployed on at least two instances, due to the centralization of logs, which allows you not only to spot a problem very quickly, but you will also be able to see the instance that caused it and potentially more context information. In addition, a log management solution can be used for multiple applications.
In fact, for the latter, you can check out titles including Learning ELK Stack; video courses including the ElasticSearch, LogStash, and Kibana ELK series; and many others on the Packt Publishing platform.
While logging into a filesystem is perfectly acceptable, especially while developing, at some point, while developing your application, the production setup will require a centralized logging solution, be it HTTP access/error logs, application logs, or others (especially in a distributed architecture/microservices). You want to be productive and code or fix bugs, rather than lose yourself between files and lines of logs stored in a filesystem.
In the next chapter, we will define the composer and manage libraries using Composer.