
Overview
By the end of this chapter, you will be able to use the different data types in PHP to store and work with data; create and use arrays; implement the concept of multidimensional arrays; work with operators to evaluate the values of operations; and perform type casting to convert variables from one type to another.
Introduction
In the last chapter, we covered how to work with PHP's templating engine to write information to web pages, how to work with the interactive shell on the command line, and what variables are and their importance.
This chapter will follow on and build on these concepts. We will start by going over PHP's data types, followed by an introduction to arrays, what they are, how to use them, and the different types of arrays that are possible. Along the way, functions built into PHP that enable our code to execute specific actions will also be covered.
What are Data Types?
Values assigned to variables in PHP will be of a set data type. The following are the eight primitive data types:
- Strings – A simple text-based value
- Integers – Hold a numeric value, which is a whole number
- Floats – Hold a numeric value; can be a whole number or decimals
- Booleans – Hold a single value equating to true or false (1 or 0 is the numeric value of true and false)
- Arrays – Hold multiple values or other arrays within itself
- Objects – Hold a more complex data structure
- Resource – Holds a resource reference; for example, the reference of a function
- NULL – This value actually means there is no value
Let's now learn about the different types in more detail.
Integers
Integers are whole numbers. Typical examples of working with integers are when specifying quantities in a shopping cart, or as an ID when working with databases (Chapter 7, Data Persistence), or any time you need to perform math operations; for example, $number = 1024. Here, $number is of the integer type holding the value 1024.
Strings
A string is made up of characters and numbers. There is no limit to how long a string can be, but you may be restricted when storing strings in a database or other storage areas.
In its simplest form, a string can be created by putting single or double quotes around a series of characters. These can be any characters, such as letters, numbers, or special characters.
Single and Double-Quoted Strings
Strings can contain variables as well as text. Single and double-quoted strings are the same except for one variation. Any variables in a single-quoted string will display the actual variable, and not its value. For instance, consider the following:
$name = 'Dave';
echo 'Hello $name';
This will print Hello $name instead of Hello Dave.
Now, consider the following example:
<?php
$name = "Dave";
echo "Hello $name";
This will print Hello Dave.
Thus, we can see how the double quotes display the values of the variable.
Also, if you want to have a single-quote character in a single-quoted string, you will have to escape it using the backslash character. Backslash characters also need to be escaped.
This example demonstrates the use of a backslash to escape single quotes inside a single-quoted string:
echo 'Your code isn't bad, but it could be better';
// will print: Your code isn't bad, but it could be better.
You will notice the // characters in the preceding example. This means it's a comment. Comments are useful when you want to make notes explaining what the intention of the code is and to make the code readable. The comment is and will be ignored by the script.
There are single-line comments such as those above the // characters that will add a comment to the current line.
To use multiple-line comments, the syntax is as follows:
/*
This is a multi line comment
It can use as many lines as needed
to end a multiline comment use
*/
PHP supports the use of variables inside strings when using double quotes. Take this example, where a number is assigned to $number and is then displayed inside a string:
$number = 123;
echo "The number is: $number";
// will print: The number is: $number
Let's now take a look at some examples of double-quoted strings. We will use the same strings we used in the preceding examples relating to single quotes:
<?php
$number = 123;
echo "The number is: $number";
// will print: The number is: 123
echo '<br>';
echo "Your code isn't bad, but it could be better";
// Your code isn't bad, but it could be better
Did you notice any difference in the outputs of the single and double-quoted strings? Observe the output of the second string. The value of the $number variable got printed instead when we used double quotes:

Figure 2.1: Output of the string examples
Heredoc and Nowdoc Syntaxes
At times, there may be a need to declare a large string having large blocks of text. Using single and double-quoted methods, things can get messy pretty quickly. To help with this, PHP has two more methods for declaring strings. These are called the heredoc and nowdoc syntaxes. Using these syntaxes, a string can span multiple lines. Moreover, you do not need to worry about escaping any quotes. Here is an example of a string declared using the heredoc syntax:
$number = 100;
$longString = <<<STRING
This string is spanned across multiple lines.
We can use "double quotes" also.
We have declared number $number before it.
STRING;
Don't worry if it looks strange. If you print it, the following output will be displayed on screen:
This string is spanned across multiple lines. We can use "double quotes" also. We have declared number 100 before it.
In the preceding code snippet, we first declared a variable, $number, and set its value to 100. After that, we declared a $longString variable. Note the <<< operator at the beginning followed by the word STRING. STRING is called a token or identifier here. The <<< operator and the token should be at the very start, while, using heredoc, there should not be any content on that line. The actual string starts from the next line. You can write in multiple lines. When you are done, the token is written again in a separate line and without any spaces before it. If the STRING token at the end is not on a separate line, PHP will throw you an error.
For example, take a look at the following:
$preferedHost = 'Linux';
$preferedLanguage = 'PHP';
$storeString = <<<STRING
This string is spanned across multiple lines.
The preferred host in this example is $preferedHost.
The preferred language in this example is $preferedLanguage
STRING;
We have also used double quotes in the string, and we do not need to escape them. Also, note that the variable's value is printed. This means that the heredoc syntax behaves like a double-quoted string.
This means that you can use any word as the string token but, often, an End of Thread (EOT) name is used. For example, take a look at the following:
$name = 'Dave';
$str = <<<EOT
An example string
That spans multiple lines.
Note
A common convention when using heredoc is to use EOT to denote the characters to start and end the block. Everything in between will be stored in a variable.
Variables can also be used without any special configuration. You simply need to display them like $name EOT.
The preceding command is now stored in a variable called $str.
Let's now have a look at a string declared using the nowdoc syntax. We will use the same string used in the previous example and change it to the nowdoc syntax:
$number = 100;
$longString = <<<'STRING'
This string is spanned across multiple lines. We can use "double quotes" also. We have declared number $number before it.
STRING;
echo $longString;
Everything is the same as in the case of heredoc, except for one difference. The token or identifier has single quotes around it, which makes it the nowdoc syntax. It behaves like single-quoted strings and, hence, no variable parsing is done inside, which is why it will produce the following output:
This string is spanned across multiple lines. We can use "double quotes" also. We have declared number $number before it.
Unlike heredoc, the $number variable has not been parsed and displays as is on screen. This is ideal for large blocks of static text.
Floats
A float is a number that has decimal values. Floats can be useful when needing to store money in a decimal format, for example, for shopping cart systems.
Floats (also referred to as floating-point numbers or doubles) can be declared as follows:
$w = 13.3333;
$x = -0.888;
$y = 17e+2;
$z = 8e-2;
We have declared four variables in the preceding code block. The $w variable has a positive value, while $x has a negative value. PHP also supports declaration using scientific notation. The last two variable declarations, $y and $z, are declared using it. The value of $y is 1700, and the value of $z is 0.08.
Note
Here, e means "ten to the power of".
Boolean
A Boolean is the simplest type available. It can have only one of two values: true or false. Booleans are used to check whether a condition is true or false, as in whether a variable has an intended value. You will see this in upcoming exercises and learn in further detail in Chapter 3, Control Statements, you will learn where conditionals are used. Declaring Booleans is easy. Consider the following examples:
$isAdmin = true;
$isAdmin = false;
Exercise 2.1: Using Simple Data Types
So far, we have covered strings, integers, floats, and Booleans. Let's now put this into practice in terms of how you might use them. In this exercise, we will calculate the total number of items purchased by a customer in a single order and print the total. We can say that a given order is complete only if the final total is greater than, or equal to, 25. Here are the steps required to perform this:
- Create a new file named order.php inside the chapter2 folder (if you haven't already created it, please create a folder now and call it chapter2).
- Next, open PHP and define the following variables. This will allow us to simulate an order being processed. We will define a $str variable that holds the text that is to be printed when displaying the sum, while the $order variable will hold the cost of the item(s) purchased. We will define the $additional variable to hold the additional charges added to the bill. The $orderTotal variable will hold the amount of the total bill, and a Boolean variable, $complete, will indicate whether the order is complete. Set this to false by default:
<?php
$str = 'Your order total is: ';
$order = 20;
$additional = 5;
$orderTotal = 0;
$complete = false;
- With these variables defined, we can start the order simulation. First, let's add $additional to $order and store the result in $orderTotal:
//add additional items to order
$orderTotal = $order + $additional;
- Next, using an if statement (don't worry, we haven't covered this yet, but it will be covered in detail in the next chapter; for now, just think if (expression) then perform the given steps), establish whether $orderTotal is equal to 25:
//if order is equal to 25
if ($orderTotal >= 25) {
- The order has been matched to 25, so change $complete to true and then display a message to the customer:
//change $complete to true to indicate the order is complete
$complete = true;
//display the $str and add the orderTotal
echo $str . $orderTotal;
- Putting it all together gives us the following:
<?php
$str = 'Your order total is: ';
$order = 20;
$additional = 5;
$orderTotal = 0;
$complete = false;
//add additional items to order
$orderTotal = $order + $additional;
//if order is equal to 25
if ($orderTotal >= 25) {
//change $complete to true to indicate the order is complete
$complete = true;
//display the $str and add the orderTotal
echo $str . $orderTotal;
}
- Now, open the command line and navigate to the chapter2 folder. Run the following command on the command line:
php -S localhost:8085
Now, go to the browser and open http://localhost:8085/order.php.
You will see the following output on your screen:

Figure 2.2: Output of the order
In this exercise, we saw how we can use different data types to perform calculations and make decisions on that basis. We will cover the if condition in Chapter 3, Control Statements, in detail, thus providing more clarity on how different decisions could be taken depending on the conditions.
Arrays
An array is another data structure that is available in PHP. Unlike a normal variable, which stores a single value, an array is a data structure that can hold a collection of items. You can think of an array as a list of items. These items can be of any type, such as a string, a number, a Boolean, or even another array. Each item can be of a different type. The first could be a string, while the second could be an integer. The third can be a Boolean or another array. This allows for lots of flexibility.
Suppose you need to store nine names. Rather than creating nine different variables, we can just create an array variable with nine elements. Each element of an array can be accessed using an index. This index can either be a numerical or a string. Numerical indexes always start from 0. So, an array having 9 elements will have indexes from 0 to 8. The first element will have an index of 0, the second will have an index of 1, and so on. The final element will have an index of 8. As you will see in the examples, these indexes are used to access the values from the array. Items can be added to, and removed from, the array using PHP's built-in array functions, which we will see later in this section:
<?php
$names = ['Dave','Kerry','Dan','Jack','James','Ruby','Sam','Teresa','Tony'];
print_r($names);
?>
This displays the following output:
Array
(
[0] => Dave
[1] => Kerry
[2] => Dan
[3] => Jack
[4] => James
[5] => Ruby
[6] => Sam
[7] => Teresa
[8] => Tony
)
To display Jack, which has an index of 3, you can print it as follows:
<?php echo $names[3];?>
Indexed and Associative Arrays
There are two types of arrays in PHP – indexed arrays and associative arrays. Indexed arrays have numerical indexes starting from 0, while associative arrays have string indexes. Let's take a look at an example of an indexed array:
<?php
$arrDays = ['Monday', 'Tuesday', 'Wednesday', 'Thursday', 'Friday', 'Saturday', 'Sunday'];
print_r($arrDays);
?>
We have declared an array named $arrDays. To create this array, we have used PHP's [] function and, inside it, we have provided a comma-separated list of seven days of the week. Each of these is called an element of an array. Then, we have used the print_r() function to print this array.
Note
print_r() is used to look at the contents of a variable. This could be a single value, an array, or an object. For instance, the following is the outcome of printing the contents of the $arrDays array to the screen.
The following is the output of the preceding snippet will look as follows. It will show both the indexes and values of all the array keys as follows:
Array
(
[0] => Monday
[1] => Tuesday
[2] => Wednesday
[3] => Thursday
[4] => Friday
[5] => Saturday
[6] => Sunday
)
The preceding output shows the array with its indexes and the value of each element at that index. Let's now try to access the individual elements of the array. The following code shows how to access individual array elements:
<?php
$arrDays = ['Monday', 'Tuesday', 'Wednesday', 'Thursday', 'Friday', 'Saturday', 'Sunday'];
echo 'Element at index 0 is ' . $arrDays[0];
echo '<br>';
echo 'Element at index 4 is ' . $arrDays[4];
Running the preceding code will produce the following output:
Element at index 0 is Monday
Element at index 4 is Friday
Remember that array indexes start from 0. Hence, to get the first element of the array, we used square brackets after the variable name and passed 0 to it. Similarly, we passed 4 to get the fifth element.
PHP provides a count function that can be used to determine the length of an array. Here is how to use it:
<?php
$arrDays = ['Monday', 'Tuesday', 'Wednesday', 'Thursday', 'Friday', 'Saturday', 'Sunday'];
echo 'Length of the array is: ' . count($arrDays);
// output: Length of the array is: 7
We have used the same $arrDays array as earlier. After declaring the array, we print the length of the array using the count function.
Moving on to associative arrays, these are similar to indexed arrays, but the indexes in associative arrays are provided by us. This makes it easier to access items as you do not have to remember indexes. The following is an example of how to create an associative array:
<?php
$heroInfo = array(
'name' => 'Peter Parker',
'superheroName' => 'Spiderman',
'city' => 'New York',
'creator' => 'Stan Lee'
);
print_r($heroInfo);
?>
This results in the following output:
Array
(
[name] => Peter Parker
[superheroName] => Spiderman
[city] => New York
[creator] => Stan Lee
)
In the preceding code, we have declared a variable, $heroInfo. Unlike indexed arrays, here, we are providing the indexes explicitly. name, superheroName, city, and creator are all indexes. The => operator is used after the index to assign a value at that index. After assigning, we print the array using the print_r function.
Like indexed arrays, we will use the index to fetch an element from the array. The following is the code used to access elements from the $heroInfo array:
<?php
$heroInfo = array(
'name' => 'Peter Parker',
'superHeroName' => 'Spiderman',
'city' => 'New York',
'creator' => 'Stan Lee'
);
echo $heroInfo['name'];
echo '<br>';
echo $heroInfo['superHeroName'];
?>
In the preceding code, we are accessing the name and superHero indexes to find respective values. The code will produce the output mentioned here:
Peter Parker
Spiderman
To recap, index arrays are arrays where the indexes are numeric. For instance, if you have an array of people with their names as the values, the index will be the automatic index assigned to each entry starting from 0:
<?php
$people = [];
$people[] = 'David Carr';
$people[] = 'Dan Sherwood';
$people[] = 'Jack Batty';
$people[] = 'James Powell';
$people[] = 'Kerry Owston';
$people[] = 'Ruby Keable';
//display the contents of $people
print_r($people);
This produces the following output:
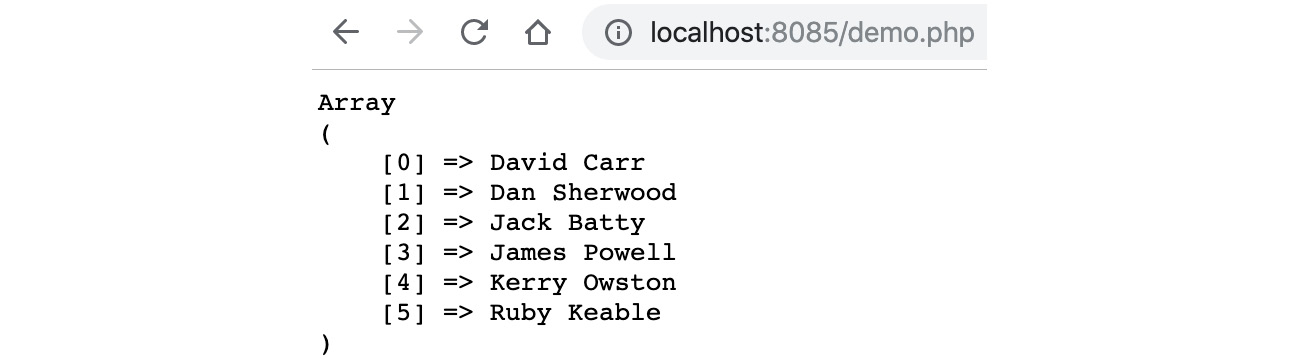
Figure 2.3: Displaying the contents of the array
Associative arrays, on the other hand, use named keys instead of indexed ones. For instance, you could have an array of people with their name as the keys and their job title as the values:
<?php
$people = [];
$people['Rose'] = 'Principal Software Architect';
$people['Laura'] = 'Senior Software Architect';
$people['Jane'] = 'Project Manager';
$people['Mary'] = 'Software Architect;
//display the contents of $people
print_r($people);
This produces the following output:

Figure 2.4: Printing the job titles
Adding and Removing Items from an Array
An array is a stack data structure. Items can be added to the array or removed. There are multiple ways to add and remove items, the following section will show how to add an item to an array using an array index approach and to use a named key approach. The array_push function will be explained and how it can be used to push an item to an array. array_pop can be used to remove an item from an array, this will be demonstrated.
PHP provides multiple array functions. These functions can be used to add items to an array, remove items from an array, and several other tasks besides.
There are two ways in which elements can be added to an array. Here is the first method:
<?php
$animals = ['Lion', 'Cat', 'Dog'];
$animals[] = 'Wolf';
print_r($animals);
We have an array, $animals, that contains three items. Notice that we have used square brackets after the variable name and have assigned a value, Wolf, to it. This will insert this item at the end of the array and a new index will be created. You can confirm this by printing the array, which will give the following output:
Array ( [0] => Lion [1] => Cat [2] => Dog [3] => Wolf )
In the case of associative arrays, you will also have to provide the key name. Here is an example:
<?php
$heroInfo = array(
'name' => 'Peter Parker',
'superheroName' => 'Spiderman',
'city' => 'New York',
'creator' => 'Stan Lee'
);
$heroInfo['publisher'] = 'Marvel Comics';
print_r($heroInfo);
Here, we have added a new key publisher to the $heroInfo array. This will append the value, Marvel Comics, to the end of the array and the array will appear as follows:
Array ( [name] => Peter Parker [superheroName] => Spiderman [city] => New York [creator] => Stan Lee [publisher] => Marvel Comics )
Another way to add elements to an array is to use the array_push function. The following is an example of the array_push function. We will use the same array used previously:
<?php
$animals = ['Lion', 'Cat', 'Dog'] ;
array_push($animals, 'Wolf');
print_r($animals);
This produces the following output:
Array
(
[0] => Lion
[1] => Cat
[2] => Dog
[3] => Wolf
)
The array_push function takes two parameters. The first is the name of the array, and the second is the value we want to insert. It will also append the value Wolf to the end of the array.
The array_pop function can be used to remove an element from the end of an array; for example:
<?php
$stack = array("black", "red", "green", "purple");
$fruit = array_pop($stack);
print_r($stack);
This will produce the following output:
Array
(
[0] => black
[1] => red
[2] => green
)
The unset method is another way to remove an element, but this allows you to specify the key to be removed:
<?php
$stack = array("black", "red", "green", "purple");
unset($stack[1]);//remove red as this is the key matching 1
This will produce the following output:
Array
(
[0] => black
[2] => green
[3] => purple
)
A multidimensional array is an array containing one or more arrays. This is often used when nesting arrays; for instance, you have a school's array that holds arrays of schools in each array where the name and location of the school would be stored. Let's elaborate with an exercise.
Exercise 2.2: Creating a Multidimensional Array
As we saw, arrays are a collection of items. These items can be of any type. Hence, an array can contain an integer, a float, a Boolean, or any other type. This also means that an array can also be an element of an array. Arrays with other arrays inside them are called multidimensional arrays. An array that does not have any array inside it is termed as being single or one-dimensional. Let's perform an exercise where we will create a multidimensional array and then access the items inside it:
- Create a new file named array.php inside the chapter2 folder.
- Declare an array, heroInfo:
array.php
1 <?php
2 $heroInfo = [
3 [
4 'heroName' => 'Spiderman',
5 'weapon' => 'Spider web'
6 ],
7 [
8 'heroName' => 'Iron Man',
9 'weapon' => 'Mark L'
10 ],
11 [
12 'heroName' => 'Thor',
13 'weapon' => 'Mjolnir'
14 ],
- Use the pre HTML tag to format the output:
echo '<pre>';
print_r($heroInfo);
echo '<pre>';
- Open the command line and navigate to the chapter2 folder.
- Run the following command on the command line:
php -S localhost:85
- Now, go to the browser and open http://localhost:85/array.php:
You will see the following output on your screen:
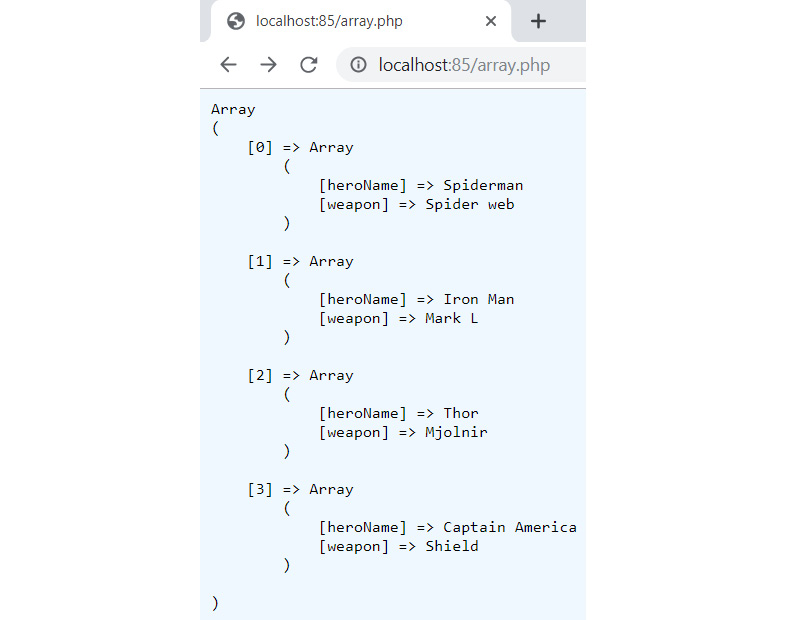
Figure 2.5: Printing the elements of an array
The preceding code declares an array named $heroInfo that has four elements. All the elements are themselves associative arrays. Each of these arrays has two keys, heroName and weapon. We then print the contents of this array. We have used the pre HTML tag so that the output is formatted nicely on screen.
Let's now try to access some elements from this array.
- Add the following lines after the closing pre tag:
Using the array, extract the hero names and weapons. To do this, specify the array name followed by the index, and then the subindex, in other words, $heroInfo[3]['heroName']:
echo 'The weapon of choice for ' . $heroInfo[3]['heroName'] . ' is ' . $heroInfo[3]['weapon'];
echo '<br>';
echo $heroInfo[2]['heroName'] . ' wields ' . $heroInfo[2]['weapon'];
- Save the file and refresh the browser page. You should see an output likes the following screenshot:

Figure 2.6: Printing the results
The preceding array has four elements. Hence, $heroInfo[3] will give us the fourth element of this array. The fourth element is an array in itself, with heroName being Captain America and weapon being a Shield. To get the hero name, we use the square brackets again and pass a weapon as the key. Therefore, $heroInfo[3][ 'heroName'] gives us the value Captain America. Similarly, $heroInfo[3]['weapon'] gives us Shield. We have done the same for the third element of the array in the last line of code. Deeper nesting is also possible for multidimensional arrays.
In this exercise, we looked at multidimensional arrays and how they can be used to store multiple arrays and display their contents and extract specific items from the array.
Scalar Types
Scalar type declaration is either coercive (no need to be specified explicitly) or strict (type hinted strictly). By default, types are coercive.
Coercive means that PHP will coerce a number to an integer even if it's a string.
Take the following example. Here, we have a function called number that's been type hinted to only accept integers.
In this example, a string is being passed. When running PHP in coercive mode (this is on by default), this will work and print 1 to the screen:
<?php
function number(int $int)
{
echo "the number is: $int";
}
number('1');
To facilitate strict mode, a single declare directive is placed at the top of the file containing the following:
declare(strict_types=1);
Now, run the example again in strict mode:
<?php
declare(strict_types=1);
function number(int $int)
{
echo "the number is: $int";
}
number('1');
This produces an error as follows:
Fatal error: Uncaught TypeError: Argument 1 passed to number() must be of the type int, string given
This is because, in strict mode, a string cannot be cast to an integer.
Note
Type hinting is covered in Chapter 4, Functions.
This forces strict data types, which means that they cannot be changed during the script life cycle.
Type Conversion
PHP does not require us to explicitly declare the type of a variable. The type of a variable is set when it is assigned a value.
But there are times when we need to change the type of a variable. Sometimes, we have float values in the form of a string, and we want to use them as floats in our code. This is typical when accepting values from end users. Suppose a user has filled a float value in a form. While saving it to a database, you will have to change it from a string, which is how the initial values are stored, to a float if the database column type is float.
To achieve this, type casting is used. Consider the following example:
$x = "13.3333";
var_dump($x);
echo "<br>";
$y = (float) $x;
var_dump($y);
First, we have declared a variable, $x, which is a string having a value of 13.3333. Then, we use PHP's var_dump function to display the type and the value of $x. After that, we use PHP's cast float (to cast a data type on a variable, set the data type in parentheses before the $x variable or float) to change the type of the $x variable and assign it to $y. After this, we again use the var_dump function to display the type and value of $y.
Running the preceding code will generate the following output:
string(7) "13.3333"
float(13.3333)
You can see that the type of variable, $y, has now changed to float and its value is now floating number 13.333 instead of string 13.333.
Here is a list of all the casts that are available in PHP:
- (int) – integer
- (bool) – Boolean
- (float) – float (also known as "floats," "doubles," or "real numbers")
- (string) – string
- (array) – array
- (object) – object
- (unset) – NULL (NULL means there is no value)
Let's have a look at some more examples of different types and understand the details behind them.
Exercise 2.3: Converting a Boolean to an Integer
In this exercise, we will take in Boolean variable and convert it to an integer, thus demonstrating the concept of type casting:
- Create a PHP file called convertbooleanint.php inside the chapter2 folder. Open the php tag. Display a heading, Boolean to Int, and declare two variables containing true and false:
<?php
echo '<h3>Boolean to Int</h3>';
$trueValueBool = true;
$falseValueBool = false;
- Add another heading and use var_dump to look at the value of $trueValueBool and $falseValueBool:
echo '<h3>Before type conversion:</h3>';
var_dump($trueValueBool);
echo '<br>';
var_dump($falseValueBool);
- Now, add another heading, and this time change the variables to be integers by casting them to int. Then, use var_dump to look at their updated values:
echo '<h3>After type conversion:</h3>';
$trueValueInt = (int) ($trueValueBool);
$falseValueInt = (int) ($falseValueBool);
var_dump($trueValueInt);
echo '<br>';
var_dump($falseValueInt);
This will produce the following output:
Boolean to Int
Before type conversion:
bool(true)
bool(false)
After type conversion:
int(1)
int(0)
This exercise demonstrated how to take Booleans and use casting to change their data types to integers.
Exercise 2.4: Converting an Integer to a String
In this exercise, we will do the opposite and convert an integer to a Boolean:
- Create a PHP file called convertintstring.php inside the chapter2 folder. Open the php tag. Display a heading, int to string, and declare a variable holding an integer called $number:
<?php
echo '<h3>int to string:</h3>';
$number = 1234;
- Display another heading and use var_dump to look at the contents of $number:
echo '<h3>Before type conversion:</h3>';
var_dump($number);
- This time, change the data type of $number to a string and assign this to a new variable called $stringValue, and then dump that using var_dump:
echo '<h3>After type conversion:</h3>';
$stringValue = (string) ($number);
var_dump($stringValue);
This gives the following output:
int to string:
Before type conversion:
int(1234)
After type conversion:
string(4) "1234"
We started with an integer, $number, set its value to another variable, and then prefixed it with (a string) to set its data type. We then dumped its contents using var_dump to examine the contents. This technique can be used to examine variables to ensure that they are the desired data type.
PHP also provides a series of is_datatype() functions:
- is_array
- is_bool
- is_callable
- is_countable
- is_double
- is_float
- is_int
- is_integer
- is_iterable
- is_long
- is_null
- is_numeric
- is_object
- is_real
- is_resource
- is_scalar
- is_string
These can be used to determine which data type they use:
is_array($variable);
This returns a Boolean value indicating whether the given variable matches the data type of the function.
Exercise 2.5: Converting Centimeters to Meters
In this exercise, we will create a script that will take three arguments from the command line: a name, a number in meters, and another number in centimeters. These two numbers together will represent the user's height. For example, a user called Jo whose height is 1 m 65 cm would enter "Jo 1 65." For the output, we will convert the centimeters to meters and print it along with the name. Observe the following steps:
- Create a file named activity-height.php inside the chapter2 folder.
- First, open PHP, collect the arguments from the command line, and then assign these to variables. To collect the variables, $argv can be used. This is a command used to collect the variables in this context; they are known as arguments. The meters and centimeters should be cast to int. This can be done using (int) $arg followed by the index. For example, (int) $argv[2]:
<?php
// get all arguments
$name = $argv[1];
$heightMeters = (int) $argv[2];
$heightCentiMeters = (int) $argv[3];
- Next, convert centimeters to meters by using (float) and then divide the centimeters by 100:
// convert centimeters to meters
$cmToMeter = (float)($heightCentiMeters/100);
- Now, add the height in meter to the result centimeters to meters:
$finalHeightInMeters = $heightMeters + $cmToMeter;
- Finally, display the results:
// display the output
echo $name . ': ' . $finalHeightInMeters . 'm';
- Open the Terminal, navigate to the chapter2 folder, and then run the following command at the command line:
php activity-height.php Alex 1 75
You should see the output on your Terminal just like in the following screenshot:

Figure 2.7: Printing the height
Now, let's try to understand the code. We have declared three variables – $name, $heightMeters, and $heightCentiMeters. Since we will be taking 3 values from the command line, we have used PHP's predefined $argv array to get these values using the indexes 1, 2, and 3. We started from index 1 because $argv[0] is always the script name, which will be activity-height.php in this case. Note that we have used the integer cast for $heightMeters and $heightCentiMeters.
After getting the values of variables, we converted the height in centimeters to meters by dividing the figure by 10 and then stored the resulting value in the $cmToMeter variable. On the last line, we display the result as required. The reason casting was needed here was to ensure that the data is of the correct data type. For instance, an array could have been passed. By setting the data type, the script told it what data type must be set and, if it cannot be set, it will throw an error.
In this example, you saw how to divide two values to convert meters to centimeters. This is an example of an arithmetic operation. Let's now take a look at some more examples of operators.
Operators and Expressions
An operator in PHP is something that takes one or more values or expressions and applies an operation to give a result that is either a value or another expression.
PHP divides the operators into the following groups:
- Arithmetic operators
- String operators
- Bitwise operators
- Assignment operators
- Comparison operators
- Increment/decrement operators
- Logical operators
- Array operators
- Conditional assignment operators
Arithmetic Operators
Arithmetic operators are used to perform math operations, for example, addition, subtraction, division, and multiplication.
There is the + operator. This takes different numbers separated by a + operator and will add the values together:
<?php echo 24 + 2; ?>
This will give us 26 as the output.
There is the - operator. This takes different numbers separated by a – operator and will subtract the values:
<?php echo 24 - 2; ?>
This will give us 22 as the output.
There is the * operator. This takes different numbers separated by a * operator and will display the product:
<?php echo 24 * 2; ?>
This will give us 48 as the output.
There is the / operator. This takes different numbers separated by a / operator and will print the result:
<?php echo 24 / 2; ?>
This will give us 12 as the output.
The % (modulo) operator is used to calculate the remainder of the division of two given numbers:
<?php echo 24 % 5; ?>
This will give us 4 as the output.
String Operators
String operators have concatenation operators and concatenation assignment operators. Concatenation means adding one or more variables to an existing variable. For instance, let's say we have the following:
<?php
$first = 'Hello';
$second = 'World!';
Now, we want to display these items together using concatenation:
<?php echo $first . ' ' . $second; ?>
Concatenation uses the . notation – we can join multiple variables this way. In this example, we separate the two variables with a space. Notice the notation: a .' followed by a space, and a '. to add the required space between the words.
Concatenation assignment means appending a variable to an existing one:
<?php
$str = ' second part';
$result = 'first part';
$result .= $str;
echo $result;
The output is as follows:

Figure 2.8: Demonstrating string concatenation
As you can see, using the .= notation, the $str variable is appended to the $result variable.
Bitwise Operators
Bitwise operators allow evaluation and manipulation of specific bits within an integer. In this case, the integer is converted to bits (binary) for faster calculations.
Take two variables, $a and $b. They can be evaluated with these conditions:
<?php
$a = 1;//0001 in binary
$b = 3;//0011 in binary
//Bits that are set in both $a and $b are set.
echo $a && $b;
echo '<br>';
//Bits that are set in either $a or $b are set.
echo $a || $b;
echo '<br>';
//Bits that are set in $a or $b but not both are set.
echo $a ^ $b;
The output is as follows:
1
1
2
The $a && $b expression will return 1 on calculating the result of AND of the last bits of both operands. The $a || $b expression will perform OR of the last bits of both operands and will return 1.
The result of 2 is the total number of binary bits that are in either $a or in $b, but excluding the bits that exist in both $a and $b.
Note
For more information on the decimal to binary conversion, you can take a look at https://packt.live/2B0M2XK.
Assignment Operators
When assigning a value to a variable using =, this constitutes an assignment operator:
<?php
$year = 2019;
Comparison Operators
To compare two values, the comparison operator is used. There are two common comparison operators – ==, meaning equal to, and !=, meaning not equal to.
Note
The assignment operator (=) is used to assign a value. It cannot be used for performing comparison operations, since comparing whether a value is the same as another requires the use of the == operator. To establish whether two variables are identical, in other words, the same type, use the identical === operator.
Here is an example:
<?php
$cost = 200;
$money = 150;
if ($cost == $money) {
echo 'cost matches money';
}
if ($cost != $money) {
echo 'cost does not match money';
}
The output is as follows:

Figure 2.9: Demonstrating the use of comparison operators
Increment/Decrement Operators
To increment a value, use the ++ operator. This will increment the value by one. Alternatively, using + and a number will increment a value by that number. For example, +3 will increment by 3:
<?php
$cost = 200;
$cost++;
echo $cost; //this will give 201
To decrement a value, the process is the same, but with –:
<?php
$cost = 200;
$cost--;
echo $cost; //this will give 199
Logical Operators
Here, we will look at logical operators.
The and operator performs the logical conjunction of two expressions. It returns the Boolean value true if both the expressions evaluate to true. The && operator is another way of saying and. The OR operator returns the Boolean value true if either of the two operands evaluates to true, otherwise it returns false. The || operator is another way of saying or.
The ! operator means NOT. It can be used to check whether an expression does not match. For instance, consider the following:
<?php
$isAdmin = true;
If (! $isAdmin) {
//will only run if $isAdmin == false
}
Array Operators
The PHP array operators are used to compare arrays:
- == means equal to (the values of two variables match). Consider the following example:
$num1==$num2
This returns true if the value of $num1 is equal to the value of $num2.
- === means identical to (the two variables are the same type and value):
($num1 === $num2);
This returns true if the value and the data type of $num1 are equal to the value and data type of $num2.
- !== means not equal to (the values from the two variables are different):
($num1 !== $num2);
This returns true if $num1 is not equal to $num2, or they are not of the same type.
Conditional Assignment Operators
The PHP conditional assignment operators are used to set a value depending on conditions:
- ?: This is used in ternary comparisons such as $x = expr1 ? expr2 : expr3 (this will be covered in more detail in the next chapter).
- ??: This is a null-coalescing operator meaning that if the first expression is true, then use it, otherwise use the second condition such as $x = expr1 ?? expr2 (this will be covered in more detail in the next chapter).
Activity 2.1: Printing the BMI of a User
Suppose you decide one day you want to monitor your health, but don't want to use a third-party tool. You could build a simple tool to take measurements including name, weight, and height. From there, you can calculate your BMI.
In this activity, you will write a script that will take variables from the script in order to perform calculations to get a BMI result. You will set a number of defaults, but also build an option to specify your own data via query strings.
Here are the steps to complete the activity:
- Create a tracker.php file.
- Define a $name string to store the name of the user.
- Define a $weightKg integer to store the weight in kilograms.
- Define a $heightCm integer to store the height in centimeters.
- Convert the height to meters.
- Calculate the value of the height squared.
- Calculate the BMI by dividing the user's weight by the value of the height squared.
- Display a message to the screen displaying the name and BMI result.
The output will look as follows:

Figure 2.10: Expected outcome of the activity
Note
The solution to this activity can be found on page 505.
Summary
In this chapter, we learned about different PHP data types, including string, integer, float, and array. We also learned about different ways of declaring strings, including the heredoc and nowdoc syntaxes. We performed array operations in which we used indexed, associative, and multidimensional arrays and added and removed elements from arrays. We also performed type casting to change the types of variables.
In the next chapter, conditional logic will be covered. Conditionals introduce logic to your scripts and allow different actions to happen depending on different conditions; for instance, let's say you had a variable containing the word Pending and you want to show a statement only if the word is equal to Pending.
Understanding conditionals will unlock new ways of writing your code and allow further user interaction.