
Overview
By the end of this chapter, you will be able to declare classes with constants, attributes, and methods; instantiate a class; work with constructors and destructors; implement class inheritance, access modifiers, static fields, and methods; use class type hinting as dependency injection; use attribute and method overriding; apply attribute and method overloading via magic methods; use final classes and methods; autoload classes; and use traits and apply namespacing.
To summarize, we will have a look at Object-Oriented Programming (OOP) concepts that can be leveraged to write modular code.
Introduction
In order to understand the Object-Oriented Programming (OOP) approach, we should start by discussing the procedural-oriented programming approach first. The procedural approach is the conventional way of writing code in high-level languages where a problem is considered a sequence of things to be performed, such as walking, eating, reading, and so on. A number of functions can be written to accomplish such tasks. The procedural approach organizes a set of computer instructions into groups called procedures – also known as functions. Therefore, functions are first-class citizens in your code. When we focus that much on functions, consequently, the data gets less attention.
In a multi-function program, despite the fact that functions can house local data, a lot of important data is defined as global data. Several functions might operate on such global data and, therefore, the data might become vulnerable. Also, such an approach might not establish a secure way of interacting with data using functions.
The following figure shows you how functions operate on global data and how they interact with each other:

Figure 5.1: Data and functions in the procedural-oriented approach
Now, the object-oriented approach comes with a number of different ways to secure your data by tying the data more closely to the functions so that accidental modifications to the data from external functions can be prevented. The approach, by nature, allows us to decompose a large problem into smaller entities called objects and bundles the data and functions into such objects. The following figure shows how data and functions are organized into objects:

Figure 5.2: Data and functions in the object-oriented approach
A programming approach should address major concerns, such as how we represent real-life problem entities in a program, how to design a program with standard interfaces to interact with functions, how to organize a program into a number of modules so that we can reuse and extend them later, how to add new features to such modules, and much more. The object-oriented approach was developed to address such issues.
The Object-Oriented Approach
In programming, a thing that is describable and has a certain set of actions can be referred to as an object. An object might represent a real-life entity with a certain number of actions to perform. A dog can be described by using certain states, such as color, breed, age, and so on, and performs certain actions, such as barking, running, wagging its tail, and so on. A table fan can be described by color, speed, direction, and so on, and perform actions such as changing speed, changing direction, rotating, and so on.
In OOP, data and code are bundled together into an entity, which is known as an object. Objects interact with each other. Consider a teacher object and a student object. The teacher might have certain subjects to offer and the student might enroll in these subjects. Hence, if we consider enrolling as an action of the student, then the student object might need to interact with the teacher object regarding the available subjects and register for one or more subjects. Simply put, an object is data that performs actions.
Bundling code into objects has its own benefits, such as your code base becoming modular, which means you can maintain, reuse, and debug your code individually against objects. The implementation of an object (code) remains hidden from the outside world, which means we can hide our data and internal complexities and can interact with the object via a standard set of procedures. For example, in order to use a table fan, you don't need to learn about AC motors or electronic circuitry; rather, you can use the table fan via the provided actions, such as the speed control buttons or rotation control. Hence, hiding such information is another important aspect of OOP.
Such code bundling also differentiates OOP from procedural programming. An object simply contains attributes, also known as data, and a bunch of methods to communicate with that object. These methods are the functions of procedural programming. In OOP, some of these methods can be used to interact with that object, and these methods therefore make up its interface.
There are a good number of famous programming languages, such as C++, Java, PHP, Python, C#, JavaScript, Ruby, Dart, Swift, Objective-C, and so on, that support OOP. Since the introduction of PHP to its most recent version, PHP supports the complete set of object-oriented models. PHP supports class-based object initiation, constructors and destructors, inheritance, property visibility, polymorphism, abstract and final classes, static fields and methods, anonymous classes, interfaces, namespaces, magic methods, object cloning, object comparisons, type hinting, traits, and much more interesting OOP techniques and tools. We will be discussing them in this chapter and will practice the concepts of OOP using different examples.
OOP Concepts
The object-oriented approach addresses programming problems using the generalized concepts given in the following list. In this chapter, we are going to discuss these concepts in detail and practice them using a number of exercises so that, by the end of the chapter, we'll be used to working with these concepts:
- Objects are entities with data and interfaces. They may represent a person, a vehicle, a table fan, or maybe a bank account that plays a role in our program. Data and functions (or methods) live together inside an object.
- Classes are templates for object creation. Data is the description of an object, while functions are the behaviors of that object, so such definitions of data and methods can be written using a class. Classes can be referred to as custom data types.
- Data encapsulation is the wrapping up of data and functions into a single unit – that is, a class. Imagine an unbreachable capsule with data and functions encapsulated inside so that the outside world cannot access the data as long as we don't expose methods for them. Such insulation of the data from direct access by the program is called data hiding. In short, declaring a class is the encapsulation of data.
- Data abstraction is the act of representing essential properties and features without giving details. So, the entire entity description remains abstract and the responsibility of detailing the entity can be done via the entity creation process or inheritance. Such abstraction enables everyone to "follow the guidelines and do it your way."
- Inheritance is the process of acquiring properties and behaviors of another class so that common properties and behaviors can be reused in a hierarchical manner.
- Polymorphism is the concept of using the same definition for multiple purposes. For example, flying is a polymorphic behavior, as birds and airplanes have their own different ways of flying.
- Dynamic binding is the linking of a function call to the code that will be executed in response to the function call. With this concept, the code associated with the given function is unknown until the call is made at runtime. Say that multiple objects implemented the same function differently and at runtime, the code matching the object being referenced would be called.
- Message passing is the way that objects interact with each other. It involves specifying the object name, the name of the methods, and the information to be sent. For example, if a car is an object, changing speed is a method on it, and speed in kilometers per hour is the speed parameter to be passed. The outside world will use the car object to send the "change speed" message to that parameter.
Figure 5.3 depicts the preceding concepts using a vehicle analogy:
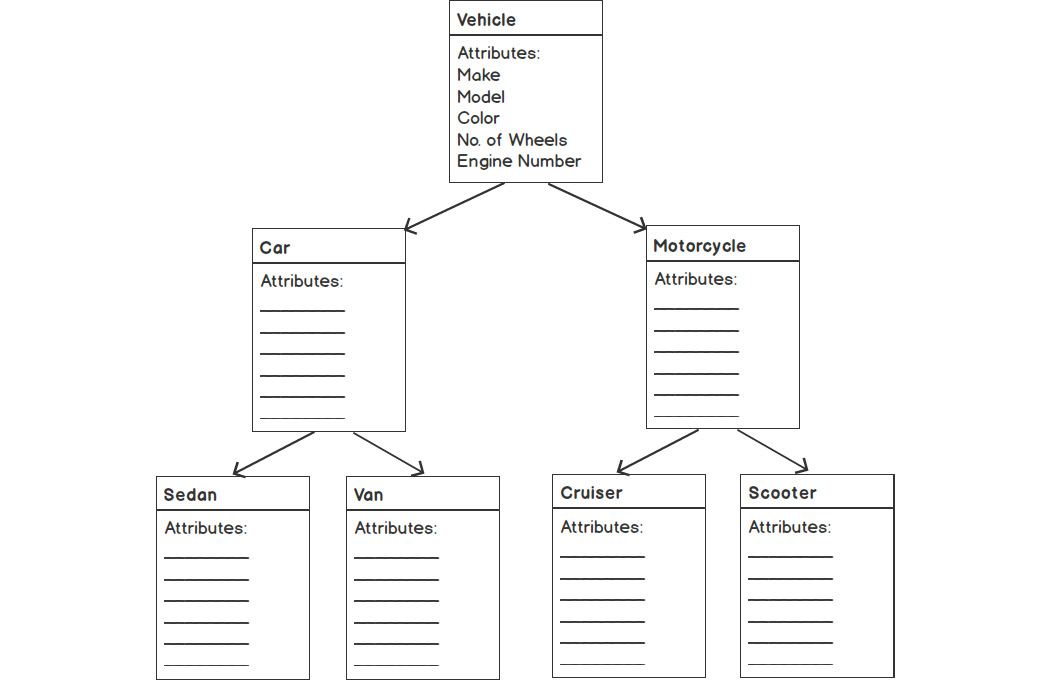
Figure 5.3: Vehicle property inheritance diagram
There are many different types of vehicles, such as cars, buses, motorcycles, airplanes, and many more. Vehicles have general properties such as make, model, color, wheels, engine size, and so on. These are the common properties found in vehicle subtypes or classes too. Since cars, buses, motorcycles, and so on share a common list of properties, those common properties and behaviors come from the parent class, and each subclass adds its very own properties and behaviors. For example, cars have four wheels and motorcycles are two-wheelers, cars have more passenger capacity than a motorcycle, and so on. Therefore, such deviations of vehicle types should be placed into their own vehicle subclasses. Thus, we can inherit common properties and gradually add our own properties using object-oriented concepts.
Classes
A class is a blueprint of an object. What data an object should contain and what methods are needed to access that data can be described using a class. A class acts as a template for object creation. Consider a car designed using a blueprint as a guide. Vehicle type, make, model, engine size, color, and so on are defined in the Car class along with the methods to retrieve this information, such as get the model name, start the engine, and so on.
A class begins with the class keyword followed by the given name and the body enclosed in a pair of curly braces. The body of the class houses class members and they are variables, constants, functions, class variables (also known as class properties or class attributes), and the functions that belong to the class, known as class methods.
Check out the following class declaration:
class ClassName
{
// Class body
}
//or
class ClassName
{
// Class variables declarations
// Class methods declarations
}
A class name starts with letters or underscores followed by any number of alphanumeric characters and underscores. PHP's predefined class names, constants, and reserved keywords – for example, break, else, function, for, new, and so on – cannot be used as a class name.
The list of reserved words in PHP can be found at https://packt.live/2M3QL1d.
In the PHP Standards Recommendations, PSR-1 recommends that a class name is declared in CamelizedClassName and class methods are declared in camelizedMethodName. Note the camel case of class name and the use of lowercase at the start of the method names.
To learn more about PSR-1: Basic Coding Standard, visit https://packt.live/2IBLprS.
Let's check out the following simple Person class:
class Person
{
public $name = 'John Doe';
function sayHello()
{
echo 'Hello!';
}
}
Here, class Person {…} is the Person class declaration. A single attribute has been added with the line public $name = 'John Doe';, and the body also contains the sayHello() member method, which prints a simple string.
In the next section, we will be discussing how we should instantiate a class and what happens in memory when we perform such an instantiation.
Instantiating a Class
An object is an instance of a class, so instantiating a class means creating a new object using the class. We can instantiate a class using the new keyword, as follows:
$object = new MySimpleClass();
With the instantiation, an object is created in memory with copies of its own attributes. Here, the $object variable doesn't hold the actual object; rather, it points to the object. Just to be clear here, the $object variable is a pointer to the object and doesn't hold a reference to the object.
The $object variable should be of the MySimpleClass type as classes are often called as custom data types. Then, the constructor method gets called automatically if one is declared. A class constructor and destructor are two special kinds of methods; for example, __construct() and __destruct(), which are called automatically with object creation and deletion, respectively.
To access an object's properties and methods, we can use the -> object operator, as in the following:
$object->propertyName;
$object->methodName();
So, object creation involves memory allocation followed by the constructor method being called automatically. We are going to discuss constructor and destructor methods in later sections.
Class Attributes
As we have already seen, class attributes and variables hold data. To write a class attribute in PHP, we need to start with the public, private, or protected keyword, then the rest is the general PHP variable assignment statement. In the previous example, in the Person class, the public $name = 'John Doe'; line was used to assign a person's name; here, the public keyword is an access modifier or class member visibility keyword and it has been used so that the attribute can be accessed outside of the class. We will be discussing access modifiers in detail in later sections.
Note that the class structure is compiled before the PHP file execution. Regarding value assignment in class attributes, the value should be static, meaning the value must not be dependent on the runtime. For example, the following class attributes won't work:
public $date = getdate();
public $sum = $a + $b;
Here, the attributes are dependent on the getdate() function's return and an arithmetic expression evaluation, respectively, as function calling and the arithmetic expression evaluation won't be performed during the class' compile time and can be evaluated at runtime, so such variable initialization won't work in the case of class attributes.
So, class attributes that do not involve in runtime information should be considered a good attribute, such as the following:
public $num = 10;
public $str = 'I am a String';
public $arr = array('Apple', 'Mango', 'Banana');
Here, the preceding variables can be evaluated at compile time rather than at runtime.
Non-static class attributes—for example, the public, private, and protected attributes—can be accessed by using the $this object context referrer variable with the -> object operator, as in the following:
class Person
{
public $name = 'John Doe';
function printName()
{
echo $this->name;
}
}
Also, static properties can be written with the static keyword at the start of the variable declaration and can be accessed using the self keyword followed by the :: (double colon) operator. The double colon is also called the scope operator:
class Person
{
public static $name = 'John Doe';
function printName()
{
echo self::$name;
}
}
More on access modifiers and static properties can be found in later sections.
Class Constants
Class-specific constants (fixed values that do not change throughout the program) can be written inside a class, as in the following examples:
class SampleClass
{
const ONE = 1;
const NAME = 'John Doe';
}
echo SampleClass::ONE; //1
echo SampleClass::NAME; //John Doe
Note that class constants do not use $ as it is used in variable declaration and are all the letters are in uppercase. The default visibility of the constant is public and they can be accessed with the :: scope operator from outside of the class.
Note
According to the PHP Standards Recommendations, PSR-1, "Class constants MUST be declared in all upper case with underscore separators." You can read more at https://packt.live/2IBLprS.
Class constants are allocated memory for a single class and not for every class instance.
Also, you can use such constants using self:: inside a class, as in the following:
class SampleClass
{
const ONE = 1;
const NAME = 'John Doe';
function printName()
{
echo self::NAME;
}
}
echo SampleClass::NAME; //John Doe
The self:: operator can be used only inside a class. Since PHP 5.6.0, the constant expression has been added as in the following:
class SampleClass
{
const ONE = 1;
const SUM = self::ONE + 2;
}
echo SampleClass::SUM;//3
Class constants also support access modifiers; for example, public, private, and so on, which will be demonstrated in the Access Modifiers section.
You can use such constants in PHP interfaces, which are another OOP tool to establish a common interface or the standards that classes should implement.
The $this Variable
$this is the pseudo variable that is available when class member variables or methods are called within an object context. $this works when we have instantiated a class and can be used to access the corresponding object's members. So, to access an attribute in an object context, we use $this->attribute_name, and to access a method, we use $this->methodName().
Note
For example, a $name attribute declared in the class should be accessed with $this->name, not with $this->$name. Mind the $ here.
Class Methods
Class methods are just functions and act like wrappers on the class data assigned to attributes. Getter and setter are the two most common ways of fetching and assigning data, respectively. Both of these methods simply return and assign data from and to member variables. We might want to prefix the getter and setter methods with get and set followed by a quick descriptive method name of our choice; for example, getMyValue() or setMyValue(). Although this is not necessary, this practice improves code readability.
Check out the following getter and setter methods example:
class Person
{
public $name;
function getName()
{
return $this->name;
}
function setName()
{
$this->name = 'John Doe';
}
}
Here, the key concept of such member methods is to provide a wrapper around the data available in an object.
Along with these, another type of method can often be used that performs certain actions or executions based on the available data within the object:
Person.php
17 function sayGreetings()
18 {
19 if (date('G') < 12)
20 {
21 $greetings = 'Good Morning';
22 }
23 elseif (date('G') < 17)
24 {
25 $greetings = 'Good Afternoon';
26 }
27 else
28 {
29 $greetings = 'Good Evening';
30 }
Here, the sayGreetings() method could be an example of a member method that implements an algorithm to identify the current hour and load a greetings string into a local variable, and later on prints the greetings string with the given attribute value assigned at $name. The method works for printing greetings – for example, 'Good Morning John Doe', 'Good Afternoon John Doe', and 'Good Evening John Doe' – based on the current hour in 24-hour format, returned by the date('G') function.
We also have some manager methods, such as constructor and destructor, to initiate properties of an object and clean up the memory utilized by an object, respectively. In later sections, we will be discussing them in detail.
Exercise 5.1: Using the Getter and Setter Methods
In the following exercise, you will declare a Vehicle class with attributes such as make, model, color, and number of wheels. Also, to access and work on those given attributes, we will be declaring some methods, such as to get the model name, get the engine number, get the number of the wheels, and so on:
- Create a PHP file named Vehicle.php and declare the Vehicle class with the following attributes:
<?php
class Vehicle
{
public $make = 'DefaultMake';
public $model = 'DefaultModel';
public $color = 'DefaultColor';
public $noOfWheels = 0;
public $engineNumber = 'XXXXXXXX';
}
A Vehicle object is described using a make, model, color, number of wheels, and engine number. Here, we have added this data about the vehicle in terms of class attributes. As different types of data can be bundled together inside a class, our Vehicle class can act as a custom data type. Just like the preceding class, we can enclose a lot of metadata about an object, as per OOP concepts.
Note that the values that have been assigned to the class attributes do not depend on runtime; they can easily be assigned at compile time. All of them are clearly different types of data and are accessible or visible from outside the class as they use a public access modifier.
- Now it is time to add member methods to the class. As per our exercise goal, we need to know information such as the number of wheels the vehicle has, the engine number, and the make, model, and color. In order to obtain that information, we are going to add the following five methods after the attributes section:
Vehicle.php
9 function getMake()
10 {
11 return $this->make;
12 }
13 function getModel()
14 {
15 return $this->model;
16 }
17 function getColor()
18 {
19 return $this->color;
20 }
Here, we have added five getter methods: getMake() returns the company name/make, getModel() returns the model name, getColor() returns the color name, getNoOfWheels() returns the number of wheels the vehicle has, and getEngineNumber() returns the engine number. All of these methods are pretty straightforward to execute, and they access the attributes using $this to return the values.
- To set the vehicle make, model, color, number of wheels, and engine number, we need setter methods. Now, let's add the corresponding setter methods after the preceding five getters:
Vehicle.php
29 function setMake($make)
30 {
31 $this->make = $make;
32 }
33 function setModel($model)
34 {
35 $this->model = $model;
36 }
37 function setColor($color)
38 {
39 $this->color = $color;
40 }
41 function setNoOfWheels($wheels)
42 {
43 $this->noOfWheels = $wheels;
44 }
Here, we have added the five setter methods to set our appropriate class attributes. The setMake($make) method accesses the class attribute for $make using $this->make and assigns the $make argument to it. The same goes for setModel($model), setColor($color), setNoOfWheels($wheels), and setEngineNumber($engineNo). All of them access the corresponding class attributes to assign the passed parameter to them. Hence, we can set class attributes using setter methods.
Finally, our class looks like the following:
Vehicle.php
1 <?php
2 class Vehicle
3 {
4 public $make = 'DefaultMake';
5 public $model = 'DefaultModel';
6 public $color = 'DefaultColor';
7 public $noOfWheels = 0;
8 public $engineNumber = 'XXXXXXXX';
9 function getMake()
10 {
11 return $this->make;
12 }
- Now, let's instantiate the class as follows:
$object = new Vehicle();
Here, the class has been instantiated to create an object of the Vehicle class.
- Set the class attributes using the setter methods, as follows:
$object->setMake('Honda');
$object->setModel('Civic');
$object->setColor('Red');
$object->setNoOfWheels(4);
$object->setEngineNumber('ABC123456');
Here, we have assigned the make, model, color, number of wheels, and engine number class attributes via the class member methods; that is, setter methods.
- To access the data stored in the Vehicle object handler, $object, we need to use getter methods, as in the following:
echo "Make : " . $object->getMake() . PHP_EOL;
echo "Model : " . $object->getModel() . PHP_EOL;
echo "Color : " . $object->getColor() . PHP_EOL;
echo "No. of wheels : " . $object->getNoOfWheels() . PHP_EOL;
echo "Engine no. : " . $object->getEngineNumber() . PHP_EOL;
- Run the Vehicle.php file using the Vehicle.php PHP command. The preceding code should output the following:

Figure 5.4: Vehicle object's setter and getter methods
So, we have a Vehicle class that describes a particular type of vehicle with different attributes associated to vehicle, and the getter and setter methods to work on the attributes. From now on, we will be working with this Vehicle class to exercise our OOP understanding.
Just to summarize, the exercise we walked through is all about defining a class, so the key learning here is that we have to add class attributes that sufficiently describe the particular type of object and write methods to set and fetch data from those attributes.
In the next section, we will discuss how constructor and destructor methods fit a role in a class structure and walk through an exercise on how to instantiate the Vehicle class.
Constructor
A constructor, such as __construct(), is a special kind of method that is invoked automatically when instantiating a class.
The syntax of a class constructor is as follows:
class ClassName
{
function __construct()
{
//function body
}
}
Let's add a __construct() method in our previously discussed Person class as follows:
class MySimpleClass
{
public $name;
function __construct($username)
{
$this->name = $username;
}
}
The key idea behind using a __construct() method is to perform the initial set of executions that need to be done immediately upon object creation. In the preceding simple approach, a __construct() method performs attribute assignment(s).
Hence, we can create instances of the Person class like the following:
$person1 = new Person('John Doe');
$person2 = new Person('Jane Doe');
echo $person1->name; //prints John Doe
echo $person2->name; //prints Jane Doe
Here, the MySimpleClass constructor, __construct(), takes an argument, $username, and assigns it to the $name attribute by accessing it with $this->name.
Apart from the initial value assignment, a constructor method might hold a database connection, set cookies, hold an HTTP client, accept dependencies as arguments, and much more.
A constructor method must not have a return statement, it can accept arguments, and the name should always be __construct().
Destructor
The destructor method, __destruct(), is invoked automatically when an object is destroyed. When we remove an object or perhaps a PHP script ends its execution and releases the memory utilized by the variables, then __destruct() gets called.
The syntax of a class destructor is as follows:
class ClassName
{
function __destruct()
{
//function body
}
}
Let's add a __destruct() method to our previously discussed Person class, as follows:
class Person
{
//attributes and methods
function __destruct()
{
echo 'The object has been removed.';
}
}
Here, as an example, the __destruct() method can be added for log-keeping purposes.
If we unset() the object handler variable to destroy the object instance, as follows, the destructor should be called automatically:
$person = new Person();
unset($person); //output: The object has been removed.
Also, the destructor method is invoked automatically if no object is found in the memory, as follows:
$object = new Person();
$object = NULL; //output: The object has been removed.
Apart from the preceding manual object destruction, when the script execution ends, all the __destruct() methods within different objects are invoked automatically and PHP will start to release the memory.
Note
A destructor method does not take arguments.
Just to summarize, so far, we have learned about class declaration with attributes and methods, the instantiation of a class, and constructor and destructor methods. Hence, we should walk through the next exercise to apply these concepts.
Exercise 5.2: Instantiating the Class and Printing the Details
In the following exercise, you will learn how to instantiate the Vehicle class that we created in the previous exercise. We will introduce a constructor to it so that we can assign attributes via the constructor's parameters instead of assigning the values during the class declaration. We should be able to print that information using the corresponding getters:
- Open the Vehicle class file, Vehicle.php, and you should see the attributes as follows:
Vehicle.php
1 <?php
2 class Vehicle
3 {
4 public $make = 'DefaultMake';
5 public $model = 'DefaultModel';
6 public $color = 'DefaultColor';
7 public $noOfWheels = 0;
8 public $engineNumber = 'XXXXXXXX';
9 function getMake()
10 {
11 return $this->make;
12 }
We have a better way of assigning the values of these attributes using a constructor method.
- Modify the attributes as follows:
public $make;
public $model;
public $color;
public $noOfWheels;
public $engineNumber;
Here, we have taken out the default values assigned to the attributes.
- Add the __construct method after the attributes section as follows:
function __construct($make = 'DefaultMake', $model = 'DefaultModel', $color = 'DefaultColor', $wheels = 4, $engineNo = 'XXXXXXXX')
{
//function body
}
Here, we have added the default values of the constructor's parameters as the default values for the attributes if no values were passed.
The constructor method will be invoked automatically with the instantiation of the Vehicle class. If we can pass parameters with the new object creation, they are received inside the constructor.
- Within the __construct() method, assign the parameters to the corresponding attributes, as follows:
function __construct($make = 'DefaultMake', $model = 'DefaultModel', $color = 'DefaultColor', $wheels = 4, $engineNo = 'XXXXXXXX')
{
$this->make = $make;
$this->model = $model;
$this->color = $color;
$this->noOfWheels = $wheels;
$this->engineNumber = $engineNo;
}
Here, we have assigned the attributes obtained from the constructor arguments.
- Erase or comment out the following lines for the Vehicle class initialization and the use of setters and getters from Vehicle.php:
$object = new Vehicle();
$object->setMake('Honda');
$object->setModel('Civic');
$object->setColor('Red');
$object->setNoOfWheels(4);
$object->setEngineNumber('ABC123456');
echo "Make : " . $object->getMake() . PHP_EOL;
echo "Model : " . $object->getModel() . PHP_EOL;
echo "Color : " . $object->getColor() . PHP_EOL;
echo "No. of wheels : " . $object->getNoOfWheels() . PHP_EOL;
echo "Engine no. : " . $object->getEngineNumber() . PHP_EOL;
We have erased these lines as we are going to include the Vehicle.php file in another file that will take care of the Vehicle initialization. So far, we have the Vehicle class ready to use in the next steps.
- Create a new PHP file called vehicle-objects.php in the same directory and add the following lines to require the Vehicle class:
<?php
require_once 'Vehicle.php';
In the vehicle-objects.php script, we have added the Vehicle class using the require_once command, which will add the file if it's not already added or produce a fatal error in the event that the file is not found. For the next steps, we will be working on this file.
- Now, it's time to instantiate the class. Create an object without passing any arguments to the constructor as follows, after requiring the Vehicle class:
$vehicle = new Vehicle();
Here, we have created an object of the Vehicle type with the new keyword and the constructor should be called after the memory allocation for the copy of the object's own attributes.
As we have getter methods written already to access the preceding attributes, we should try to print the attribute information.
- Print the attribute information with the following:
$vehicle = new Vehicle();
echo "Make: " . $vehicle->getMake() . PHP_EOL;
echo "Model: " . $vehicle->getModel() . PHP_EOL;
echo "Color: " . $vehicle->getColor() . PHP_EOL;
echo "No of wheels: " . $vehicle->getNoOfWheels() . PHP_EOL;
echo "Engine No: " . $vehicle->getEngineNumber() . PHP_EOL;
As all of the Vehicle member methods are public, we can access the vehicle data via the interface of the instantiated $vehicle object.
Also, all of the Vehicle attributes are public, so we can access the attributes using the $vehicle object handler outside of the class. So, the following code should output the same as the preceding:
$vehicle = new Vehicle();
echo "Make: " . $vehicle->make . PHP_EOL;
echo "Model: " . $vehicle->model . PHP_EOL;
echo "Color: " . $vehicle->color . PHP_EOL;
echo "No of wheels: " . $vehicle->noOfWheels . PHP_EOL;
echo "Engine No: " . $vehicle->getEngineNumber() . PHP_EOL;
Note
The standard way to access object attributes is via the object's member methods. When we apply restrictions on object attributes, accessing them should be performed via object interfaces or methods only.
- From the terminal or console, run vehicle-objects.php using the php vehicle-objects.php command. The preceding code outputs the following:

Figure 5.5: Vehicle object's default attributes
Here, we haven't passed arguments to the class constructor, so the default parameter values have been assigned to the attributes.
- Now, we will create another object with parameters passed to the constructor after the lines in step 7, like the following:
$vehicle1 = new Vehicle('Honda', 'Civic', 'Red', 4, '23CJ4567');
echo "Make: " . $vehicle1->getMake() . PHP_EOL;
echo "Model: " . $vehicle1->getModel() . PHP_EOL;
echo "Color: " . $vehicle1->getColor() . PHP_EOL;
echo "No of wheels: " . $vehicle1->getNoOfWheels() . PHP_EOL;
echo "Engine No: " . $vehicle1->getEngineNumber() . PHP_EOL;
- Rerun Vehicle.php using the php vehicle-objects.php command. The portion of code in step 9 outputs the following:
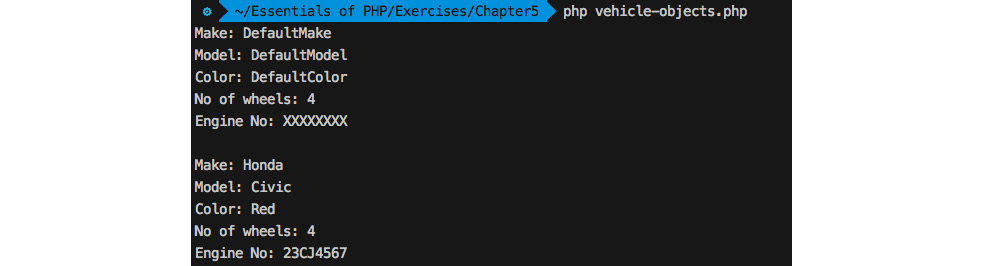
Figure 5.6: Printing the details on the terminal
So, the attributes' initial values can be settled via the constructor parameters. Regardless of the constructor parameters, attributes can be assigned using setter methods when you want to prevent direct access to your attributes.
Inheritance
To implement the idea of reusability, we need to learn the process of acquiring the properties of objects of one class (the parent class) using the objects of another class (the child class). Hence, inheritance is the process of deriving one class from a base class (the parent class) and the derived class (a child class or subclass).
Inheritance supports the flow of information in a hierarchical way to the derived objects so that, along with the inherited properties, the derived class can add its own properties. Again, such a derived class can be inherited by another and so on. Bundled data and actions can be reused in an organized manner to add additional features to derived classes.
Inheritance allows us to implement the idea of hierarchical classification as follows:
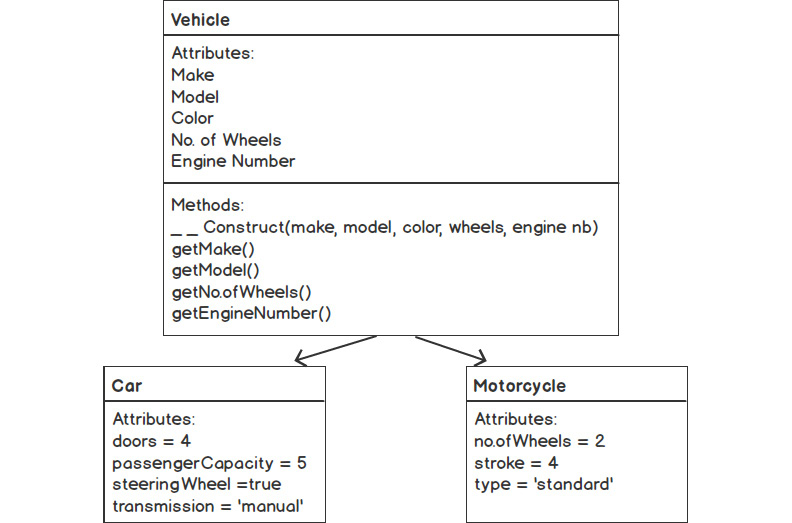
Figure 5.7: Inheritance diagram
As the preceding diagram shows, the Car and Motorcycle classes can be derived from the base Vehicle class to reuse the attributes, constructors, and methods. Hence, the derived classes inherit the members from the base class and are allowed to add their own members for example, Car adds four doors — or modify inherited members — motorcycle modifies the number of wheels to two, and so on.
With the derived classes, you can keep and reuse the members of the parent class. Also, you can override the parent's properties and methods to tailor your demands in the derived classes. Modifying inherited members in derived classes is called overriding, which is another OOP paradigm. We will look at a detailed example of method overriding in later sections.
In short, inheritance allows us to share common characteristics and behaviors through generations of classes.
PHP uses the extends keyword to inherit from a parent class. The syntax of PHP class inheritance is as follows:
class MyNewClass extends MySimpleClass
{
//class body
}
PHP supports single inheritance, meaning a class can inherit from a single class; not like Java, where you can inherit from multiple classes at a time.
In order to access a parent class' member attributes and methods, write the following:
class MySimpleClass
{
public $propertyName = 'base property';
function methodName()
{
echo 'I am a base method. ';
}
}
class MyNewClass extends MySimpleClass
{
//class body
}
$object = new MyNewClass();
$object->propertyName; //holds, 'base property'
$object->methodName(); //prints, 'I am a base method. '
So, the properties from the parent class can be reused in the derived object. Normally, in order to share common properties and behaviors, we establish a base class so that the subclasses don't need to add the same properties and behaviors repetitively. Thus, the data and the code operating on that data can be reused and the size of the code base remains minimal.
Again, while deriving, you can add your additional members and use the parent members as follows:
class MyNewClass extends MySimpleClass
{
public $addedProperty = 'added property';
function addedMethodName()
{
parent::methodName();
echo 'I am an added method. ';
}
}
$object = new MyNewClass();
$object->propertyName; //holds 'base property'
$object->addedProperty; //holds 'added property'
$object->addedMethodName(); //prints 'I am a base method. I am an added method.'
Here, MyNewClass adds its own $addedProperty attribute and the addedMethodName() method.
You can access and work with the parent's members using the parent keyword followed by the scope operator, ::; for example, parent::. In the preceding example, the MyNewClass child class adds its own addedMethodName() member method, which accesses the parent's methodName() method in it by using parent::methodName() and prints the 'I am an added method' string. Hence, $object->addedMethodName() prints 'I am a base method. I am an added method.'.
Note
A child class can't access or inherit the private properties or members of a parent class since something that's private is meant to remain private.
Exercise 5.3: Implementing Inheritance
Now is the time to classify different vehicle types and leverage the Vehicle class to derive new types of vehicles, such as car, bus, truck, motorcycle, and so on. In order to produce new types of vehicle objects, we will extend the Vehicle class to derive newer classes such as Car and Motorcycle.
In this exercise, you will learn how to derive classes from the Vehicle class. We will create Car and Motorcycle subclasses and add new attributes in them, and print the Car and Motorcycle attributes by instantiating corresponding objects:
- Create a new Car class file, Car.php, in the same directory and add the following lines to include the Vehicle class:
<?php
require_once 'Vehicle.php';
- The Car class extends the Vehicle class. Add the following content after the require command:
class Car extends Vehicle
{
//class body
}
The Car class inherits all the attributes and methods from the parent class. Now it's time to add new attributes or properties into the Car class so that a car object can be distinguished among other types of vehicles.
- A car should have doors, passenger capacity, a steering wheel, transmission, and so on and inherit the default four wheels along with other properties. Add the following attributes into the Car class:
class Car extends Vehicle
{
public $doors = 4;
public $passengerCapacity = 5;
public $steeringWheel = true;
public $transmission = 'Manual';
//class body
}
Hence, the Car class itself is a vehicle so it possesses all the given characteristics of a vehicle and adds its own set of characteristics.
- Now, it's time to leverage the beauty of inheritance. We will be using the inherited constructor from the Vehicle class. We can set the car's attributes by passing them as constructor parameters. We can instantiate the Car class and access the Vehicle class' members using the object of the Car class, as follows:
$car = new Car('Honda', 'Civic', 'Red', 4, '23CJ4567');
echo "Vehicle Type: " . get_class($car) . PHP_EOL;
echo " Make: " . $car->getMake() . PHP_EOL;
echo " Model: " . $car->getModel() . PHP_EOL;
echo " Color: " . $car->getColor() . PHP_EOL;
echo " No of wheels: " . $car->getNoOfWheels() . PHP_EOL;
echo " No of Doors: " . $car->doors . PHP_EOL;
echo " Transmission: " . $car->transmission . PHP_EOL;
echo " Passenger capacity: " . $car->passengerCapacity . PHP_EOL;
Here, alongside additional car properties, we can access the inherited features of the base class. The get_class() returns the class name that we have used to obtain the Vehicle type as a class name. Note that we are accessing the inherited methods using the child object's handler.
- Run Car.php from the terminal with the php Car.php command. The preceding code outputs the following:

Figure 5.8: Printing the details of the car
- Similarly, let's create another type of vehicle type here. Create a Motorcycle class by extending the Vehicle class. Create a Motorcycle.php file in the same directory with the following content:
<?php
require_once 'Vehicle.php';
class Motorcycle extends Vehicle
{
public $noOfWheels = 2;
public $stroke = 4;
//class body
}
Again, this specific type of vehicle adds its new attributes. This is how inheritance enables your object to move forward with the newer characteristics while reusing the existing features. Note that $noOfWheels and $stroke can also be set in the constructor, but we also override these values here, in case the Motorcycle class is instantiated with the default empty constructor.
- Now, let's instantiate the derived Motorcycle class, and access the inherited and added properties as follows:
<?php
require_once 'Vehicle.php';
class Motorcycle extends Vehicle
{
public $noOfWheels = 2;
public $stroke = 4;
}
$motorcycle = new Motorcycle('Kawasaki', 'Ninja', 'Orange', 2, '53WVC14598');
echo "Vehicle Type: " . get_class($motorcycle) . PHP_EOL;
echo " Make: " . $motorcycle->make . PHP_EOL;
echo " Model: " . $motorcycle->model . PHP_EOL;
echo " Color: " . $motorcycle->color . PHP_EOL;
echo " No of wheels: " . $motorcycle->noOfWheels . PHP_EOL;
echo " No of strokes: " . $motorcycle->stroke . PHP_EOL;
So, a two-wheeler type of vehicle should have the $noOfWheels attribute as a value of 2. Note that $noOfWheels has been overridden here with 2 and an additional $stroke attribute, which is the stroke type of Motorcyle. The default is 4.
- Run the Motorcycle.php file from the terminal with the php Motorcycle.php command. The preceding code outputs the following:

Figure 5.9: Inherited and added attributes of the motorcycle object
So far, we have derived Car and Motorcycle by extending the Vehicle class, added new properties into derived classes, and accessed parent attributes and methods in a straightforward manner since all of them are publicly accessible. Inheritance lets you implement your objects in a hierarchical way. You might be adding new features or reusing existing ones throughout the system to keep your code modular. In the exercise, we noticed that accessing parent members is easy and there are no restrictions to prevent you from accessing their data.
In order to enforce a specific data access policy on the class attributes, we will need the Access Modifiers before the class attributes and method declaration.
Access Modifiers
Two core concepts sitting at the heart of OOP are modularity (which allows for reusability) and encapsulation (which bundles data and methods, in order to hide information). It is important to establish access guidelines for data and interfacing among objects so that who can access what and to what extent is defined. Access modifiers provide access protection for object constants, attributes, and methods. The concept is to secure the object's members so that we can declare public, protected, and private member constants, attributes, and methods for the object. The public, protected, and private keywords are also known as visibility keywords in PHP. The public keyword can be used before a member to access the member from outside via the object. The protected keyword can be used to access a member from the derived class but not from outside. The private keyword can be used to restrict the access of a member to its own class only and for it to not be accessible via derivation or from outside.
Let's look at an example of the public, protected, and private keywords applied to class members:
<?php
class MySimpleClass
{
public PUBLIC_CONSTANT = 'Public';
protected PROTECTED_CONSTANT = 'Protected';
private PRIVATE_CONSTANT = 'Private';
public $publicAttribute = 'Public Member';
protected $protectedAttribute = 'Protected Member';
private $privateAttribute = 'Private Member';
public function publicMethod()
{
//function body
}
protected function protectedMethod()
{
//function body
}
private function privateMethod()
{
//function body
}
}
$object = new MySimpleClass();
$object->publicAttribute;//ok
$object->protectedMember;//fatal error
$object->privateAttribute;//fatal error
To elaborate on the class members with the new access modifiers prefixed, check out the following table for the public, protected, and private access modifiers:

Figure 5.10: Scope of the access modifiers
All public members can be accessed from outside of their own object or derived object using an object handler such as $object->publicAttribute or $object->publicMethod(), and to access them from inside their own object or derived object we need to use the special $this variable.
All protected members can be accessed only from inside their own object or derived object using $this-> protectedAttribute or $this->protectedMethod(). Accessing them using the $object->protectedAttribute object handler will produce a FATAL error. Hence, an access modifier can be used when we allow data and behaviors to be reused via derivation only.
Private members are exclusively private to their own objects and are non-accessible via inheritance. The whole idea with this access modifier is that class-specific data and behaviors cannot be reused:
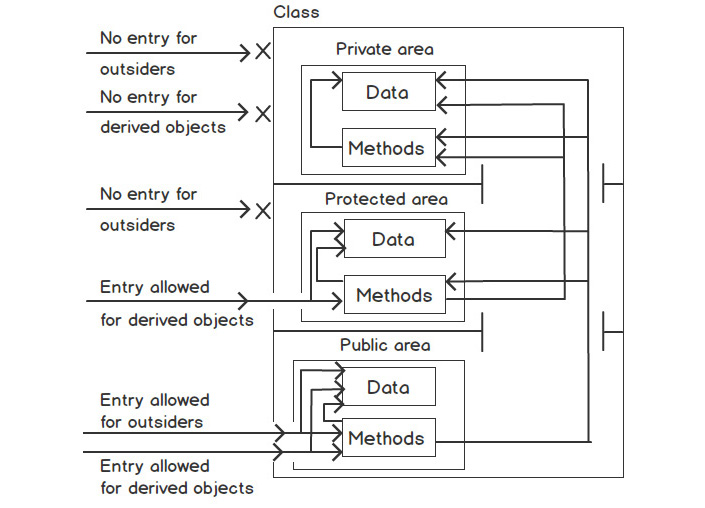
Figure 5.11: Access modifiers diagram
The diagram shows who can access what data and which methods. Outsiders can access an object's public data and methods only via the object's handler. An outsider's access is restricted to protected and private areas. Access is allowed to protected areas only by means of derivation and private areas are meant to be private for the class. Therefore, the restricted areas of a class can be accessed by its own methods and the world is set to access those restricted areas indirectly if and only if the class declares those methods that access their own restricted areas as public.
Note
If no access modifiers are mentioned before a method, then it will be considered public by default.
It's now time to apply access modifiers to the Vehicle class. Let's walk through an exercise. In the Vehicle class, the number of wheels should be available for the different types of vehicles to be implemented, the engine number should be confidential, and the other information should not be confidential.
Exercise 5.4: Applying Access Modifiers
In this exercise, we need to apply access modifiers before the Vehicle class attributes so that we can ensure the hiding of the data for the engine number variable, $engineNumber. The engine number can be obtained only via the getter getEngineNumber() member method. Also, the number of wheels should not be available outside the class; rather, it should be available to derived classes to implement their own number of wheels and the rest of the attributes can be accessed outside the class:
- Open the Vehicle.php file and update the access modifiers of the $noOfWheels attribute as follows:
<?php
class Vehicle
{
public $make;
public $model;
public $color;
protected $noOfWheels;
public $engineNumber;
//methods
Here, we have protected the $noOfWheels data as this needs to be available to the child classes to implement their own number of wheels and should not be available outside of the class. We have modified the $noOfWheels attribute from public to protected.
- Also, the engine number should be private to different vehicle types. Update the $engineNumber visibility from public to private as follows:
class Vehicle
{
public $make;
public $model;
public $color;
protected $noOfWheels;
private $engineNumber;
//methods
Here, due to a visibility change for the $engineNumber attribute, the attribute should remain private to its own class and should not be available to the derived classes or outside of the class. One way to access such private attributes is to write a public getter method for outsiders or a protected getter method for derived classes only.
Some vehicle types might need to modify the number of wheels and we won't be allowing outsiders to make that modification; hence, we declare the $noOfWheels attribute as protected. What if the number of wheels is set as public? It might get modified directly (read: bizarrely): a car might have two wheels, or a motorcycle might be modified to have 100 wheels. That's why we wanted the attribute to be modified only in subclasses and not by outsiders.
Here, the first three attributes are publicly visible, meaning these are the common attributes of any vehicle types and such information can be accessed directly via the object if anyone wants to do that.
So, we are able to deliver restrictions on class attributes using the visibility keyword. Let's try accessing the attributes with updated visibility by instantiating the class.
- Create a new vehicle-visibility.php file and instantiate the Vehicle class as follows:
<?php
require_once 'Vehicle.php';
$vehicle = new Vehicle();
- Try to access the member attributes outside of the class using the object handler, just the same as earlier:
$vehicle = new Vehicle();
echo "Make: " . $vehicle->make . PHP_EOL;
echo "Model: " . $vehicle->model . PHP_EOL;
echo "Color: " . $vehicle->color . PHP_EOL;
echo "No of wheels: " . $vehicle->noOfWheels . PHP_EOL;
echo "Engine No: " . $vehicle->engineNumber . PHP_EOL;
Note that we are trying to access $noOfWheels and $engineNumber outside the class using the $vehicle object handler with an object operator. Both should produce a FATAL error.
- From the terminal or console, run vehicle-visibility.php using the php -d display_errors=on vehicle-visibility.php command. Using the –d flag with display_errors=on should override the default display_erros=off from php-cli:
The preceding command outputs the following:

Figure 5.12: Accessing a protected property of the vehicle object
- Let's take out the line with $vehicle->noOfWheels and try to rerun the previous command:
Make: DefaultMake
Model: DefaultModel
Color: DefaultColor
Fatal error: Cannot access private property Vehicle::$engineNumber ...
- We need to alter our approach for accessing such restricted attributes. We need to use the getNoOfWheels() and getEngineNumber() object interface, as follows:
$vehicle = new Vehicle();
echo "Make: " . $vehicle->make . PHP_EOL;
echo "Model: " . $vehicle->model . PHP_EOL;
echo "Color: " . $vehicle->color . PHP_EOL;
echo "No of wheels: " . $vehicle->getNoOfWheels() . PHP_EOL;
echo "Engine No: " . $vehicle->getEngineNumber() . PHP_EOL;
- So, if we rerun the script, we should see that all the expected values have been printed as follows:

Figure 5.13: Accessing private and protected properties via methods of the vehicle object
Now, we should try accessing the modified visibility attributes from the child class to see the differences.
- Let's try accessing the modified visibility attributes from the child class. Open Car.php and locate the line with $car->getNoOfWheels(). The protected $noOfWheels attribute is inherited by the $car object and is available only via the getNoOfWheels() standard interface.
Try to run Car.php using the php -d display_errors=on Car.php command. The command prints the following:
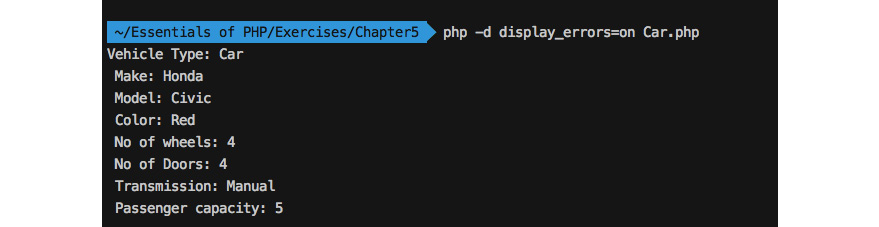
Figure 5.14: Accessing the parent's attributes via inheritance
This is how access modifiers ensure data protection throughout child classes. If we try accessing the protected attribute using $car->noOfWheels, it will produce a fatal error.
- Now, let's try to access the private property of the parent class of Car.php and add the following line:
echo " Engine number: " . $car->engineNumber . PHP_EOL;
Remember, although a car is a vehicle and is inherited from the Vehicle class, the attribute should remain private to the Vehicle class and is unknown to the Car object.
- Try to rerun the previous command and it will raise a Notice message (a PHP interpreter's message) as the property is unknown to the $car object:
Vehicle Type: Car
Make: Honda
Model: Civic
Color: Red
No of wheels: 4
No of Doors: 4
Transmission: Manual
Passenger capacity: 5
Notice: Undefined property: Car::$engineNumber ...
Engine number:
PHP will raise a Notice message only because the property is completely unknown to the object. So, this is how visibility keywords can be applied before class members in order to ensure the hiding of data and protection through inheritance. Note that a Notice message is information about wrongdoing by the interpreter and would not halt the program execution, while an error should halt the program execution and must be resolved in order to execute the program.
In summary, access modifiers allow us to establish control over our data and behaviors and provide guidelines for how data should be communicated via standard methods. Hence, we have learned how to protect, privatize, and publicize data when we need to establish secure data communication between objects.
Static Fields and Methods
When class instances or objects want to have the same data among them, the class needs to have such data declared as static. Each instance might have its own copy of data, but we use static members to have a certain portion of data and behavior that should be the same instance-wide.
Static fields or attributes and methods are just attributes and methods declared with the static keyword after the access modifiers and serve the special purpose that you can access static attributes, constants, and methods without instantiating the class. So far, we have accessed members that are declared inside a class from the object context. In the case of accessing class members without an object, we declare them as static members and access them with the :: scope operator (double colon).
The syntax looks like the following:
class MySimpleClass
{
public static $myStaticProperty = 'I am a static property. ';
public static function myStaticMethod()
{
return 'I am a static method. ';
}
}
echo MySimpleClass::$myStaticProperty; //prints 'I am a static property.'
echo MySimpleClass::myStaticMethod(); //prints 'I am a static method.'
To access static properties or methods from their own class, check out the following example:
class MySimpleClass
{
public static $myStaticProperty = 'I am a static property. ';
public static function myStaticMethod()
{
return self::$myStaticProperty . 'I am a static method. ';
}
public static function myAnotherStaticMethod()
{
echo self::myStaticMethod();
}
}
echo MySimpleClass::myAnotherStaticMethod();
//prints 'I am a static property. I am a static method.'
So, static members can be accessed outside of the class using the class name and the :: scope operator. Also, to access the static members inside the class, we can use the self keyword followed by the :: scope operator.
To access static properties or methods from subclasses, we use the parent keyword followed by the :: scope operator. Check out the following example:
class MySimpleClass{
public static $myStaticProperty = 'parent static property. ';
public static function myStaticMethod()
{
return self::$myStaticProperty . 'parent static method. ';
}
}
class MySubClass extends MySimpleClass{
public static function printSomething()
{
echo parent::myStaticMethod();
}
}
echo MySubClass::printSomething();
//prints, parent static property. parent static method.
Also, static methods are available in the object context:
$object = new MySubClass();
echo $object->printSomething();
Note
Static attributes and members are global variables and functions, except they live inside a class that is accessible from anywhere via the class name. Static members should be public; otherwise, accessing them from outside using the class name would produce a fatal error.
parent:: and self::
self:: refers to the current class and can be used to access static attributes, constants, and methods.
Similarly, parent:: refers to the parent class and can be used inside subclasses in order to access parent's member attributes, constants, and methods.
Exercise 5.5: Applying a Static Member
In this exercise, we will walk through an interesting use case for static members. We will be adding a static attribute to the Vehicle class and will increment the attribute inside the constructor so that the static member gets increased with each object creation:
- Open Vehicle.php and add a static property in the class, as follows:
<?php
class Vehicle
{
public $make;
public $model;
public $color;
protected $noOfWheels;
private $engineNumber;
public static $counter = 0;
Here, we have added a $counter static property and initiated the counter with 0.
- Now, just add a line in the constructor to increment $counter by using self::$counter++ as follows:
function __construct($make = 'DefaultMake', $model = 'DefaultModel', $color = 'DefaultColor', $wheels = 4, $engineNo = 'XXXXXXXX')
{
$this->make = $make;
$this->model = $model;
$this->color = $color;
$this->noOfWheels = $wheels;
$this->engineNumber = $engineNo;
self::$counter++;
}
Here, the counter gets incremented with each object creation as we know the constructor method gets called while instantiating the class. In our case, the Car and Motorcycle subclasses don't have a __construct() method declared in them so they should be using the parent class' constructor via inheritance.
- Now, open Car.php and create Car objects multiple times, as follows. Print the $counter static variable using Car::$counter:
$car1 = new Car('Honda', 'Civic', 'Red', 4, '23CJ4567');
$car2 = new Car('Toyota', 'Allion', 'White', 4, '24CJ4568');
$car3 = new Car('Hyundai', 'Elantra', 'Black', 4, '24CJ1234');
$car4 = new Car('Chevrolet', 'Camaro', 'Yellow', 4, '23CJ9397');
echo "Available cars are " . Car::$counter . PHP_EOL;
Here, the static attribute inherited by the derived Car class contains the number of the objects created at any particular point in time. So, we get to know the number of cars available in the application. The preceding should print Available cars are 4. Note that we are reusing the static counter in the constructor of the parent Vehicle class, meaning the derived Car objects share the same counter.
- Now, to count Motorcycle objects, just create some objects and print the $counter static variable using Motorcycle::$counter:
$motorcycle1 = new Motorcycle('Kawasaki', 'Ninja', 'Orange', 2, '53WVC14598');
$motorcycle2 = new Motorcycle('Suzuki', 'Gixxer SF', 'Blue', 2, '53WVC14599');
$motorcycle2 = new Motorcycle('Harley Davidson', 'Street 750', 'Black', 2, '53WVC14234');
echo "Available motorcycles are " . Motorcycle::$counter. PHP_EOL;
The preceding should print Available motorcycles are 3. So, we have declared a static counter in the parent class and created objects and accessed the static attribute using child class names to get the number of objects created. This is how we can implement so many interesting features with the static property and methods.
Class Abstraction
In OOP, class abstraction is the way to define the common behaviors of objects so that derived classes can implement those behaviors in their own way to achieve different purposes. Just take the vehicle analogy: both cars and motorcycles have engines in common, but you know the engines are completely different for each type of vehicle. So, the class abstraction should provide an abstract engine for both types of vehicles. To match an exact common definition of an engine, the engine should start, the engine should stop, and we might want to know the status of the engine — whether it is running or not.
Each type of vehicle should implement its way to start the engine. For example, we could start a car engine by using a key in the ignition, whereas a motorcycle might need us to kick-start the engine:
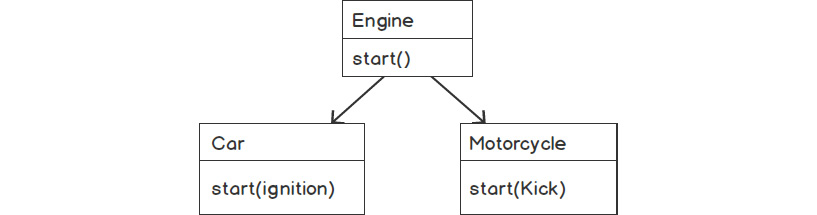
Figure 5.15: A simple abstract engine diagram
PHP supports abstract classes and methods and they can be written with the abstract keyword at the start. An abstract class cannot be instantiated; rather, it can be inherited to achieve common behaviors among objects. A class must contain at least an abstract method to be an abstract class. Using such a class, we deliver common methods to subclasses. In an abstract class, the common methods could be abstract because they only have the signatures and the subclasses implement those methods in their own way. A method declared as an abstract method must not have the implementation written in it.
Check out the following syntax:
abstract class ClassName{
abstract function methodName(param1);
// more abstract method declarations
function anotherMethod()
{
//function body
}
//more implemented functions
}
class MyChildClass extends ClassName{
function methodName(param1, param2)
{
//the implementation goes here
}
}
An abstract class can have some implemented methods in it, along with abstract methods. Generally, we leave those methods as abstract, which should have a different implementation in different child classes.
As well as the abstract method implementation, the child class must add all the arguments given in the abstract method and optionally can add extra arguments. Say the abstract method comes with two parameters, then the child class must add both of the given parameters and can optionally add its own parameters.
In the following exercise, we will be adding basic engine functionality to cars and motorcycles so that the engine can be turned on and off.
Exercise 5.6: Implementing an Abstract Class
In this exercise, we will be converting the Vehicle class into an abstract class so that we can deliver the engine-start action in an abstract manner and each subclass can implement its own way of starting the engine. We can add an abstract engine start method so that Car and Motorcycle can inherit the engine action to implement it and start the vehicle in their own way. The whole idea of this exercise is to practice and understand how abstraction helps us to achieve certain scenarios. In order to provide an abstract engine start to each vehicle type, we will declare the Vehicle class as abstract by simply adding the abstract keyword in front of it and adding an abstract engine-start method. Since Car and Motorcycle extended the Vehicle class, they will be forced to implement the abstract method.
PSR Naming Conventions
An abstract class name must be prefixed by abstract; for example, AbstractTest. You can take a look at https://packt.live/2IEkR9k.
Let us take a look at the steps:
- Open the Vehicle.php class and add the abstract keyword before the class keyword, as follows:
abstract class Vehicle
{
//code goes here
}
So, the Vehicle class became an abstract class, as discussed.
- Also, prefix the class name with Abstract:
abstract class AbstractVehicle
{
//code goes here
}
Rename the Vehicle.php file to AbstractVehicle.php.
- Update the Car.php file with the abstract AbstractVehicle class name and the AbstractVehicle.php filename, as follows:
<?php
require_once 'AbstractVehicle.php';
class Car extends AbstractVehicle
{
//code goes here
}
And for Motorcycle.php, add the following:
<?php
require_once 'AbstractVehicle.php';
class Motorcycle extends AbstractVehicle
{
//code goes here
}
- We need to add an attribute to the AbstractVehicle class to store the engine status – whether it is started or stopped, so let's add a protected $engineStatus attribute as a Boolean type so that it holds the status of the running engine as true or false:
<?php
abstract class AbstractVehicle
{
public $make;
public $model;
public $color;
protected $noOfWheels;
private $engineNumber;
public static $counter = 0;
protected $engineStatus = false;
Here, we have added an $engineStatus attribute that is false by default, so we can confirm that the engine is not running.
According to our abstract class concept, we will add some implemented methods that will be the same in each vehicle type and some non-implemented abstract methods that will be implemented differently in each vehicle type. The engine starting is different in a car and a motorcycle so this method should be abstract, but stopping the engine or getting the engine's status should be the same for both.
- Add the following abstract method signature in the abstract Vehicle class, which should be implemented differently (read: behave differently) in Car and Motorcycle:
abstract function start();
Now, both vehicle subclasses will be enforced to add an implementation of this method in their own classes.
- Also, we will be delivering common functionalities in terms of the implemented method so that the subclasses can avail them. Add the following two methods in the AbstractVehicle class:
function stop()
{
$this->engineStatus = false;
}
function getEngineStatus()
{
return $this->engineStatus;
}
Here, in order to stop the engine and get the engine's status, we have added the stop() and getEngineStatus() methods. So, these two should be the same in Car and Motorcycle.
Finally, the abstract AbstractVehicle class with a single abstract method looks like the following:
AbstractVehicle.php
1 <?php
2 abstract class AbstractVehicle
3 {
4 public $make;
5 public $model;
6 public $color;
7 protected $noOfWheels;
8 private $engineNumber;
9 public static $counter = 0;
10 protected $engineStatus = false;
- Now, it's time to implement the abstract start() method in the subclasses. A car has its own way of starting its engine — you need to place the key in the ignition. In Car.php, add a private property, $hasKeyinIgnition, along with the start() implementation, as follows:
Car.php
1 <?php
2 require_once 'AbstractVehicle.php';
3 class Car extends AbstractVehicle
4 {
5 public $doors = 4;
6 public $passengerCapacity = 5;
7 public $steeringWheel = true;
8 public $transmission = 'Manual';
9 private $hasKeyinIgnition = true;
10 public function start()
11 {
12 if($this->hasKeyinIgnition)
13 {
14 $this->engineStatus = true;
15 }
So, a car implements the engine start with the key in the ignition. $this->hasKeyinIgnition should be true to set the $engineStatus variable to start or true.
- We can create a Car object and start/stop the engine as follows:
$car = new Car('Honda', 'Civic', 'Red', 4, '23CJ4567');
$car->start();
echo "The car is " . ($car->getEngineStatus()?'running':'stopped') . PHP_EOL;
$car->stop();
echo "The car is " . ($car->getEngineStatus()?'running':'stopped') . PHP_EOL;
- Run Car.php with the php Car.php command. The preceding code should output the following:

Figure 5.16: Abstract method implementation on the car objec
- A motorcycle needs a key to unlock the vehicle and a kick on the corresponding lever to start the engine. The term "kickstart" was coined from this particular type of vehicle. Open Motorcycle.php to simulate the key being in place and a kickstart taking place. Let's add two private attributes, $hasKey and $hasKicked, and implement the start() method as follows:
class Motorcycle extends AbstractVehicle
{
public $noOfWheels = 2;
public $stroke = 4;
private $hasKey = true;
private $hasKicked = true;
public function start()
{
if($this->hasKey && $this->hasKicked)
{
$this->engineStatus = true;
}
}
}
Here, in the start() method, we have checked that both elements for starting a motorcycle engine are present and started the engine by setting $engineStatus to true.
- Similarly, we can create a Motorcycle object and start/stop the engine as follows:
$motorcycle = new Motorcycle('Kawasaki', 'Ninja', 'Orange', 2, '53WVC14598');
$motorcycle->start();
echo "The motorcycle is " . ($motorcycle->getEngineStatus()?'running': 'stopped') . PHP_EOL;
$motorcycle->stop();
echo "The motorcycle is " . ($motorcycle->getEngineStatus()?'running': 'stopped') . PHP_EOL;
- Run Motorcycle.php with the php Motorcycle.php command. The preceding code should output the following:

Figure 5.17: Abstract method implementation on the motorcycle object
So, different behaviors of the same action among the children should come from the parent in an abstract way.
Interfaces
We have discussed how an abstract class can come up with common and abstract methods. In an abstract class, we keep the methods abstract that should be different in derived classes. What if we want a full set of abstract functionalities? Or, what if we want to settle a standard of functionality? Maybe we want to establish a standard set of methods to communicate with the object? This is why we need an interface. An interface groups similar abstract methods so that it can express an abstract feature and different classes that need that feature can implement the interface. For example, the Flight feature is implemented by Birds and Aeroplanes. Hence, the Flight interface has to be fully abstract so that Birds and Aeroplanes can implement completely different flight techniques.
An interface can be similar to a class without the class keyword and without all the method's body. Therefore, an interface is a collection of method signatures to be implemented like the following syntax:
interface MyInterface{
function methodName1();
function methodName2();
//so on
}
class MyClass implements MyInterface{
function methodName1()
{
//method body
}
function methodName2()
{
//method body
}
}
An interface cannot be extended but rather implemented; classes use the implements keyword to inherit the given interfaces so that they can implement them. PHP supports constants in interfaces so that implementing classes have those constants automatically defined. A class that implements an interface should implement every method and if any method remains unimplemented, then it will produce a fatal error.
A class can implement multiple interfaces:
class A implements B, C
{
// class body
}
And an interface can extend multiple interfaces:
interface.php
1 interface A
2 {
3 function a();
4 }
5
6 interface B
7 {
8 function b();
9 }
10 interface C extends A, B
11 {
12 function c();
13 }
So, a class can extend a single class and can implement multiple interfaces, and an interface can extend multiple interfaces. But implementing/extending interfaces should not have methods with the same name, which creates interface clashing.
Note
Interfacing methods are always public and you can't declare access modifiers for method prototypes in their declaration.
Interface constants can be accessed similarly to class constants but they cannot be overridden through inheritance by classes or interfaces.
Here is a representation of the Drive interface:

Figure 5.18: Drive interface diagram
Referring to the preceding diagram, consider the vehicle analogy again. Cars and Motorcycles both can be driven so they need their own drive interfaces. While driving, they should change their speed, change gear, apply breaks, and so on. We can see that driving behavior is common and the necessary actions are the same in both types of vehicles. The thing is, despite the same actions, their way of dealing with those actions is different. This is where we need an interface. We might want to declare a Drive interface with the changeGear(), changeSpeed(), and applyBreak() abstract methods.
Therefore, an interface focuses on functionality, rather than being a template (of an abstract class) for an object. And this is the main difference between the interface and class abstraction.
We can add a simple drive interface for Car and Motorcycle so that the vehicle can change speed, change gear, and apply the brake. If the vehicle hasn't implemented the brake, then a fatal error will be displayed.
Let's add the driving feature as an interface in the following exercise.
Exercise 5.7: Implementing an Interface
In this exercise, we will practice working with the object interfaces and learn how an interface can settle a standard way of implementing behaviors for objects. We will create an interface with the necessary driving guidelines, such as the ability to change speed and gear, or the ability to apply the brakes when needed:
Note
As per PSR naming conventions, an interface name must be suffixed by interface; for example, TestInterface (https://packt.live/2IEkR9k).
- Create the following Drive interface and save the file as DriveInterface.php:
<?php
interface DriveInterface
{
public function changeSpeed($speed);
public function changeGear($gear);
public function applyBreak();
}
Here, we have declared the Drive interface with a minimal set of method signatures. Remember, no implementation should be available here; rather, the implementation should be shifted to objects that implement such an interface.
To change the speed, we have added the changeSpeed($speed) method signature, which accepts an argument for the speed to achieve. To change the gear, we have added the changeGear($gear) method signature, which accepts an argument for the gear number to be shifted to. To apply the brakes, we have added the applyBreak() method so that we can just simulate the "break" behavior whenever required.
- Add the interface to both the Car and Motorcycle classes as follows:
<?php
require_once 'AbstractVehicle.php';
require_once 'DriveInterface.php';
- Now, the Car and Motorcycle class should implement the interface as follows and add their own implementations for changeSpeed(), changeGear(), and applyBreak():
class Car extends AbstractVehicle implements DriveInterface
{
}
class Motorcycle extends AbstractVehicle implements DriveInterface
{
}
If we try to run Car.php or Motorcycle.php, it will produce a fatal error that the classes must contain three abstract methods and, therefore, be declared abstract or implement the remaining methods. Therefore, we need to add the implementation of those three interfaces or methods.
- Add the implementation of those three methods in the Car class as follows:
public function changeSpeed($speed)
{
echo "The car has been accelerated to ". $speed. " kph. ". PHP_EOL;
}
public function changeGear($gear)
{
echo "Shifted to gear number ". $gear. ". ". PHP_EOL;
}
public function applyBreak()
{
echo "All the 4 breaks in the wheels applied. ". PHP_EOL;
}
Here, Car has implemented the three methods from the DriveInterface interface. We can put the relevant implementation in them but, for the sake of learning, we have just printed a simple line in them.
- Now, instantiate the Car class as follows and start driving:
$car = new Car('Honda', 'Civic', 'Red', 4, '23CJ4567');
$car->changeSpeed(65);
$car->applyBreak();
$car->changeGear(4);
$car->changeSpeed(75);
$car->applyBreak();
Here, we have accessed the driving methods to execute the operations implemented by Car.
- If we try to run the Car script, with php Car.php, the preceding code should print the following:

Figure 5.19: The DriveInterface interface implemented by car
- Also, add the implementation of those three methods in the Motorcycle class, as follows:
public function changeSpeed($speed)
{
echo "The motorcycle has been accelerated to ". $speed. " kph. " . PHP_EOL;
}
public function changeGear($gear)
{
echo "Gear shifted to ". $gear. ". " . PHP_EOL;
}
public function applyBreak()
{
echo "The break applied. " . PHP_EOL;
}
Here, we have implemented the DriveInterface interface in the Motorcycle class. Just like that, you can come up with your own implementation and, here, for the sake of learning, we have printed different information in this DriveInterface implementation.
- Now, instantiate the Motorcycle class as follows and start driving:
$motorcycle = new Motorcycle('Kawasaki', 'Ninja', 'Orange', 2, '53WVC14598');
$motorcycle->changeSpeed(45);
$motorcycle->changeGear(3);
$motorcycle->applyBreak();
Here, we have accessed the driving methods to execute the operations implemented by Motorcycle.
- If we try to run the Motorcycle script with php Motorcycle.php, the preceding code should print the following:

Figure 5.20: The DriveInterface interface implemented by Motorcycle
Hence, the vehicles can shift gears, change speed, and brake while driving. The DriveInterface interface described what should be the standard behaviors for vehicles for driving and their derived objects obeyed the formula of the standard feature. Moreover, the interface can add more functionalities so that the derived objects are forced to implement them.
Note
The declaration of implemented methods and interface methods must be compatible with each other; for example, the number of arguments or the signature should be exactly the same.
Abstract Classes versus Interfaces
We have learned how the concepts of class abstraction and object interfaces work nicely as added dimensions of inheritance to deliver common behaviors and standards for derived objects. There are frequent debates about when to use abstract classes and when to use interfaces. Although we have gone through the practical use cases of both via our exercises, the topic still needs discussion.
Abstract classes are meant to deliver common behaviors or actions via methods to extended objects while keeping vital room for common methods to be implemented differently by derived objects. In contrast, interfaces are for setting standard ways of interacting with objects. An abstract class must have at least one abstract method, whereas all the methods in an interface are abstract. Remember, this is not a concept of having one or more abstract methods versus all abstract methods. Both have their own use cases when it comes to inheritance: the abstract class delivers the common functionalities and allows us to implement our own functionalities, whereas the interface is not about sharing functionalities at all; rather, the interface is all about setting standards for certain actions.
Simple abstract classes can have implemented methods and attributes, whereas interfaces cannot as they contain constants and method signatures without bodies. Therefore, it is not possible to share code via interfaces.
In previous exercises, the abstract class provided us with common engine functionalities and allowed us to deal with specific features of the engine in our own way. The interface showed us the standards to drive the car and we followed the guidelines accordingly to achieve our own goal of driving actions.
Class Type Hinting Plays a Role in Dependency Injection
Type hinting allows us to define the type of data to be passed as arguments into a function. PHP supports class type hints, which means that, in function arguments, you can mention which class type the passed argument object belongs to. For example, a User class might want to use a Mailer service to deliver email. The Mailer object can be passed to the User class and the User needs to make sure that nothing except a Mailer object is passed to it.
Check out the following example where the function argument was expected to be an instance of a specific class:
function myMethod($object)
{
if(!($obj instanceof ClassName))
{
throw new Exception('Only Objects of ClassName can be sent to this function.');
}
}
If the object is not an instance of the expected class, then an exception is thrown with the message 'Only Objects of ClassName can be sent to this function.'.
Note
An exception is a class that is throwable and catchable with an error message so that the catch block can catch the exception and work accordingly. Chapter 8, Error Handling, discusses exceptions in detail.
The preceding snippet is equivalent to the following class type hinting syntax:
function myMethod(ClassName $object)
{
}
So, with class type hinting, we can enforce the function or method caller to pass the appropriate type of object. When class type hinting is applied, PHP automatically performs instanceof checking and produces an error if the object doesn't satisfy the class relationship.
Dependency injection is the technique of supplying an object to another object that is dependent on the first object. For example, a user object might need to send out emails and perform certain database operations; therefore, the user is dependent on the mailer object and the database object. We could supply such mailer and database objects to the user object as follows:
User.php
1 <?php
2 class User
3 {
4 public $name;
5 private $mailer;
6 private $database;
7
8 function __construct(string $name, Mailer $mailer, Database $db)
9 {
10 $this->name = $name;
11 $this->mailer = $mailer;
12 $this->database = $db;
13 }
14 }
Here, while instantiating the User class, we have passed the name of the user, a mailer object, and a database object as arguments. The Mailer $mailer class type hint ensures that the only instance of the Mailer class can be supplied and the other class type hint at Database $database ensures that the only instance of the Database class can be supplied. We have added these two object dependencies in the user's constructor so that the object gets loaded with certain dependencies and any failure upon injecting dependencies will prevent object creation.
The preceding technique is called constructor injection. You can inject dependencies using a setter method or you can use a dependency injection container. You could search for books or online resources to extend your learning about dependency injection even further.
In the next section, we are going to discuss two important aspects of polymorphism that serve the same purpose for different conditions.
Overriding
Overriding is the process of updating an existing implementation (an inherited implementation) with a new one; it can be redeclaring a class attribute in derived objects or it can be taking an inherited member method to update with a whole new function body. Overriding keeps the external interface the same while the internal
functionalities might be fully changed to suit your own objectives. In PHP, you can do both attribute and method overriding. Note that this overriding happens in new classes derived by inheritance.
For example, an animal class might provide a common behavior; for example, eat. Such behavior is shared among the animal subclasses via inheritance. But the fact is, each animal subclass has its own way of eating. Like dogs and birds, they have redefined the behavior of eating in their own class. The idea of adding your own way of doing something is conceptualized as overriding.
Attribute Overriding
Attribute overriding is the process of replacing the parent's class' data in the subclass. We have already seen that the Motorcycle class overrides the inherited number of wheels from the parent Vehicle class to two as motorcycles are two-wheelers. So, in order to suit the derived class' requirement, we have overridden the attribute:
<?php
require_once 'AbstractVehicle.php';
class Motorcycle extends AbstractVehicle
{
public $noOfWheels = 2;
public $stroke = 4;
}
Method Overriding
Method overriding is necessary when we need to rewrite an inherited method. For example, to get the price of a vehicle, the class provides a getter method and the vehicle subclasses can avail the getter via inheritance. What if we want to tweak the returned price for a particular type of vehicle; for example, a discounted motorcycle price, and keep the getter intact for Car? We need to tweak the desired subclass price getter by overriding it.
Check out the following example of method overriding:
class MySimpleClass{
public $propertyName = 'base property';
function methodName()
{
echo 'I am a base method. ';
}
}
class MyNewClass extends MySimpleClass{
function methodName()
{
echo 'I am an overridden method. ';
}
}
$object = new MyNewClass();
$object->propertyName; //holds 'base property'
$object->methodName(); //prints 'I am an overridden method.'
So, we can override the inherited method and update the method with the new implementation.
Let's have some fun and sell our vehicles. So far, we have been adding technical features to our vehicles with the help of OOP. Now, let's add some commerce-related features to our vehicle types. In the following exercise, the price for the car and motorcycle should be returned using a common method. The price of a motorcycle should be returned after applying a 5% discount, and no discount is applicable to the car price.
Exercise 5.8: Overriding an Inherited Method
In this exercise, we will practice method overriding by adding a simple getPrice() getter method to the parent Vehicle class and override the method from our child classes. If we add a getter method with the implementation of the method into the parent Vehicle class, then it should be available for all the subclasses to use. We are going to override the getPrice() method in the Motorcycle class since we need to handle the pricing in a different way in that subclass:
- Open AbstractVehicle.php and add the following protected attribute in the attributes section:
protected $price;
- Also, add the getPrice() and setPrice() price getter and setter methods in the methods section as follows:
function getPrice()
{
return $this->price;
}
function setPrice($price)
{
$this->price = $price;
}
Here, the getPrice() simply returns the price and setPrice() takes $price as an argument, assigns it to the price attribute of the vehicle, and both these methods should be available to the Car and Motorcycle objects so that we can set and get the prices of a car and a motorcycle, respectively.
- Imagine there is a discount of 5% on all kinds of motorcycles for a special occasion. Now, we need to apply the discount to the price of this particular vehicle type.
In order to handle prices differently, we need to override the getPrice() method in the Motorcycle.php class and add the getPrice() method into the class, as follows, and modify the price calculation:
function getPrice()
{
return $this->price - $this->price * 0.05;
}
Here, we have deducted the discounted value from the original price. So, the motorcycle objects will return the discounted price and the car objects will return the original price.
- In order to test the discounted price, we should instantiate the Motorcycle class, set the price, and get the price to see whether a discount has been applied or not. Let's do the following in Motorcycle.php:
$motorcycle = new Motorcycle('Kawasaki', 'Ninja', 'Orange', 2, '53WVC14598');
$motorcycle->setPrice(5000);
echo "The price is ". $motorcycle->getPrice() . PHP_EOL;
Here, we have settled the original price as 5000 and tried to get the price using the getPrice() method.
- Now, if we run Motorcycle.php with the php Motorcycle.php command, the preceding code outputs the following:
The price is 4750
So, the discount mentioned has been applied to the motorcycle price and if we apply the getter and setter methods for the cars, we should get the car price equal to the original price that we set. This is why, when we need something to be delivered in a different manner by the child classes, we need an override.
Overloading
Another important aspect of using the polymorphism concept of overloading relates to the use of the same thing defined differently or the same thing behaving differently on different occasions.
Generally, among programming languages such as C++ and Java, method overloading or function polymorphism is just declaring the same function with different parameters; for example, int add(int a, int b), int add(int a, int b, int c), double add( double a, double b, double c), and so on. These might have different implementations inside. In such a traditional way, the function name remains the same while the return type and the number of arguments and their types might be different. This also happens in statically typed programming languages (C++/Java) where type checking happens at compile time and function binding depends on the type of each parameter. Hence, for statically typed languages, each such function is different.
In PHP, you could try to declare a function or method with the same name as the following:
function add($a, $b)
{
//function body
}
function add($a, $b, $c)
{
//function body
}
This would produce a fatal error that you cannot redeclare a function or method with the same name.
PHP doesn't support declaring same function multiple times. Still, you can achieve classical function overloading using the built-in func_get_args() function in order to enable the same function, taking a multiple number of arguments since PHP isn't bothered about parameter types. Here's an example for the sake of discussion here. Let's use the following approach:
function add()
{
$sum = 0;
$args = func_get_args();
foreach ($args as $arg)
{
$sum += $arg;
}
return $sum;
}
echo add(1, 2); //outputs '3'
echo add(10.5, 2.5); //outputs '13'
echo add(10.5, 2.5, 9.6, 55.2); //outputs '77.8'
func_get_args() can really turn your functions on to support multiple arguments. Also, if you are worried about parameter types, you can deal with type checking inside the function.
So the preceding approach is not the approach we are going to talk about in this section on method overloading in OOP. PHP has a lot to offer flexibility-wise when it comes to overloading in OOP. Still, the approach is different from other languages and that might be why there is some controversy about the way it serves overloading compared to traditional overloading.
The interpretation of overloading in PHP is different than most of the other object-oriented languages. Overloading allows you to have multiple methods with the same name but different signatures.
PHP allows the overloading of attribute and method calls by implementing certain magic methods. These magic methods are invoked when trying to access the attributes and methods that are not declared or are not accessible in the current scope. Such special proxy methods are to create attributes and methods during runtime (dynamic attributes and methods), and we can implement magic methods easily in our class for numerous functionalities.
Attribute Overloading
We might need to add data to our objects at runtime; for example, in our Car subclass, we haven't declared attributes such as model, year, owner name, and so on. But while running the program, we might want to welcome such attributes to be stored in our objects. PHP allows you to achieve such dynamic attribute addition at runtime in terms of attribute overloading. Hence, with such dynamic declaration, attributes become polymorphic enough in use and can be overloaded easily.
For attribute or property overloading, PHP supports the following two magic methods:
- public __get(string $attribute) : mixed
- public __set(string $attribute, mixed $value)
__get() is invoked when accessing or reading data from not declared or not accessible (protected or private) attributes and __set() is invoked when trying to write data to not declared or not accessible (protected or private) attributes. All we need to do is implement these two special methods in our class to avail the dynamic (created at runtime) attributes. __set() accepts any types (mixed) of data in the second parameter; __get() returns that type of data. Here, the mixed keyword has been used to explain that the method returns or accepts a type of data, such as integer, string, array, object, and so on.
Let's look at the class here, which has these two method implementations:
<?php
class MyMagicClass
{
private $arr = array();
public function __set($attribute, $value)
{
$this->arr[$attribute] = $value;
}
public function __get($attribute)
{
if (array_key_exists($attribute, $this->arr))
{
return $this->arr[$attribute];
}
else
{
echo 'Error: undefined attribute.';
}
}
}
$object = new MyMagicClass();
$object->dynamicAttribute = 'I am magic';
echo $object->dynamicAttribute . PHP_EOL; //outputs, I am magic
Here, the private declared property, $arr , holds the dynamic attributes coming from the __set() setter magic method. The attribute has been used as an array key to store the passed value with the $this->arr[$attribute] = $value line.
Also, to return the settled attribute via the implemented getter magic method, __get(), we have checked that the attribute exists in the array using the array_key_exists() function. If it exists, then return the attribute value by accessing $arr with the attribute name as a key. Otherwise, print an error message.
At the $object->dynamicAttribute = 'I am magic'; line, we have accessed an attribute that is not declared anywhere within the MyMagicClass class. So, behind the scene, the magic method invoked __set('dynamicAttribute', 'I am magic') to store the attribute. The __get('dynamicAttribute') is invoked with the line echo $object->dynamicAttribute . PHP_EOL;.
Thus, implementing such magic methods gives you a lot of flexibility to define your own attributes. Remember that attribute overloading works in object context and not in a static context.
Now, the questions are, are we going to allow many attribute creation on the fly or should we apply some restrictions? Or is there any predefined set of attributes that we accept as overloaded. The answer is yes, we should predefine the set of attributes that we are going to overload. In the previous example, we should add a predefined list of overloadable attributes into an array and in __set(), the given dynamic attribute should be cross-checked with our predefined array to check whether it is
allowed or not.
Let's check out the following example:
MyMagicClass.php
1 <?php
2 class MyMagicClass
3 {
4 private $arr = array('dynamicAttribute' => NULL,'anotherAttribute' => NULL);
5 public function __set($attribute, $value)
6 {
7 if (array_key_exists($attribute, $this->arr))
8 {
9 $this->arr[$attribute] = $value;
10 }
11 else
12 {
13 echo 'Error: the attribute is not allowed. ';
14 }
15 }
Here, we have added an associative array in the $arr private property and when the __set() method triggers, we cross-check that the attribute is allowed in $arr using the array_key_exists() function; otherwise, we print an error message.
We are flexible enough to come up with innovative implementations and restrictions of such special proxy methods. After the magical setter and getter implementations, we can implement the following two magic methods:
- public __isset(string $attribute) : bool
- public __unset(string $attribute): void
The __isset() one should be implemented if we want to check the attribute with isset($attribute) or the empty($attribute) function. Similarly, we should implement __unset() if we want to implement and unset the attribute with the unset($attribute) function. Without __isset() and __unset(), we won't be able to use native isset() and unset().
Note
PHP's magic methods should not be declared as static since they trigger only in object context. The implemented magic methods must be declared as public. Also, pass by reference cannot be used as parameters in magic methods. The __ notation is reserved for magic methods.
Method Overloading
Method overloading is all about doing extra work with the same method. For example, in our Car subclass, we haven't declared the honking behavior. What if we can avail the honk() method dynamically (at runtime) and can overload the normal honking behavior with honking loud? PHP supports such dynamic method declaration and we are allowed to overload those methods.
For method overloading, PHP supports the following two magic methods:
- public __call(string $method, array $arguments): mixed
- public static __callStatic(string $method, array $arguments): mixed
These are the __call() invoked when the inaccessible method has been called in the object context and the __callStatic() invoked when the inaccessible method has been called in the static context. The second argument of these methods is $arguments, which is a numerically indexed array. The index 0 contains the first argument and so on.
Let's check out the following implementations of these magic methods:
MyMagicMethodClass.php
1 <?php
2 class MyMagicMethodClass
3 {
4 public function __call($method, $arguments)
5 {
6 var_dump($arguments);
7 }
8 public static function __callStatic($method, $arguments)
9 {
10 var_dump($arguments);
11 }
12 }
Here, with the $object->showMagic('object context', 'second argument'); line, showMagic() is declared nowhere or is a non-accessible method to the object handler, so behind the scenes the __call() is invoked like __call('showMagic', array('object context', 'second argument')). Also, you can see that the showMagic() method can interact with a different number of arguments.
Similarly, __callStatic('showMagic', array(static context')) works in the static context when MyMagicMethodClass::showMagic('static context') gets called.
Exercise 5.9: Implementing Attribute and Method Overloading
In this exercise, let's implement the overloading magic methods in AbstractVehicle so that both vehicle types should have the facility to define their dynamic attributes and methods at runtime. All we need to do is, go through our previously discussed implementation of the __set(),__get(), and __call() magic methods into the AbstractVehicle class. This will help the Car and Motorcycle objects avail such runtime properties and method creation:
- Open AbstractVehicle.php and add the following private attribute, which holds dynamic time attributes:
private $runtimeAttributes = array();
Here, $runtimeAttributes should act as an associative array to store the runtime key-value pairs of the dynamic attributes. The attribute or property name should be the key with the associated value.
- Now, we should add the magic setter, __set(), in the AbstractVehicle class, as follows:
function __set($attribute, $value)
{
$this->runtimeAttributes[$attribute] = $value;
}
Here, the $attribute name and $value are passed to the magic method via the $attribute and $value arguments. The $value runtime attribute has been stored in the associative array using the $attribute attribute name argument as key, so that, later, we can access the runtime attribute with $this->runtimeAttributes[$attribute].
- Let's add the magic getter, __get(), as well:
function __get($attribute)
{
if (array_key_exists($attribute, $this->runtimeAttributes))
{
return $this->runtimeAttributes[$attribute];
}
else
{
echo "Error: undefined attribute. " . PHP_EOL;
}
}
Here, the magic method asks to return the runtime attribute value by passing the attribute name as an argument. The method checks whether the attribute name is available as a key in $this->runtimeAttributes using PHP's array_key_exists() function. If the attribute was set previously, then it should return it, else it will print the preceding error message.
- Now, try such attribute creation at runtime in the Car.php class. For example, we can add car properties such as ownerName, make, year, and so on, as follows:
$car = new Car('Honda', 'Civic', 'Red', 4, '23CJ4567');
$car->ownerName = 'John Doe';
echo " Owner: ". $car->ownerName . PHP_EOL;
$car->year = 2015;
echo " Year: ". $car->year . PHP_EOL;
$car->wipers;
Here, we haven't declared $ownerName and $year in the Car class. When an attribute is accessed via a Car object handler that is not declared or not accessible to the object, then PHP invokes magic methods in order to deliver you that attribute. Note that without assigning a value to such a runtime attribute, it won't be available or registered.
Since the Car class inherited the implemented magic methods and we have settled values on both the attributes using $car->ownerName and $car->year, they have been added into the $runtimeAttributes array, which is private to the parent Vehicle class.
- If we try to run Car.php with the php Car.php command, the preceding code should be printed as follows:

Figure 5.21: Attribute overloading and non-existing attribute access of the car object
Here, we tried to access the car wipers using $car->wipers, which weren't assigned earlier. As a result, an attempt to access such attributes will print the message Error: undefined attribute.. Now, it's time to add a magic method __call() implementation into the AbstractVehicle class, so that the Car and Motorcycle objects can avail the dynamic method interfaces in them. Add the __call implementation into the Vehicle class as follows:
function __call($method, $arguments)
{
echo "The method $method() called. " . PHP_EOL;
}
- Here, we have added the implementation of the magic method with two arguments. The first argument, $method, is for the method name, and the latter one, $arguments, is a numerically indexed array of arguments to be passed when we invoke the given method.
So, we can add our own styles or patterns as implementation, but now, for the sake of simplicity, we have just printed the method name inside the function.
- Add the following line at the bottom of Car.php:
$car->honk();
Here, we have called the honk() method to dynamically add the honking behavior to our Car objects.
- If we run Car.php using the php Car.php command, it will output the following:

Figure 5.22: Method overloading of car
- We can now overload the honk() method easily by updating the __call() method at AbstractVehicle.php with the following content:
AbstractVehicle.php
111 function __call($method, $arguments)
112 {
113 switch ($method) {
114 case 'honk':
115 if (isset($arguments[0])) {
116 echo "Honking $arguments[0]... " . PHP_EOL;
117 } else {
118 echo "Honking... " . PHP_EOL;
119 }
120 if (isset($arguments[1])) {
121 echo "$arguments[1] enabled... " . PHP_EOL;
122 }
123 break;
124 default:
125 echo "The method $method() called. " . PHP_EOL;
126 break;
127 }
128 }
Here, we have added a switch case to accommodate different dynamic methods. We have added a case for the honk() method so that we can respond to it and perform steps for the honk() method. In the honk() case, for demo purposes, we have checked for supplied arguments, we have printed a message based on the first argument, and printed another message based on the second argument and so on. We can also handle the arguments differently.
- At the bottom of Car.php, after the previous $car->honk() line, add the following two lines:
$car->honk('gently');
$car->honk('louder', 'siren');
Here, we have overloaded the honk() method and the method became polymorphic. We can honk (default), we can honk gently, we can honk louder, and we can enable the siren in the event of an emergency. The whole idea of the honk analogy is to summarize how we can overload methods in PHP.
- If we run Car.php using the php Car.php command, it will output the following:

Figure 5.23: The honk method overloaded
This is how we can add dynamic properties and behaviors to our objects, and, yes, of course we can add attribute/method restrictions and cross-check them with a prebuilt checklist, implement patterns, and so on in such magic methods.
Final Classes and Methods
When we finalize our class declaration by providing a standard set of attributes and methods to describe an object and we neither want the class to be modified nor an extension of that class, we need to declare it with the final keyword. For example, in a simple login process, we match the given password with the stored password to grant access to the user. We don't want this password matchmaker method to be modified so we need to declare the method as final or our user authentication class might have a standard set of methods that we don't want to be modified or extended so we need to declare the class as final.
Final classes are written to not be inherited and final methods cannot be overridden. PHP uses the final keyword before the final class and final methods.
Check out the following example of the final class:
final class MyClass
{
public function myFunction()
{
echo "Base class method called.";
}
}
class MyChildClass extends MyClass
{
}
Here, if we try to extend the final class, MyClass, it will produce a fatal error that the MyChildClass class may not inherit from the final MyClass class.
Also, let's have an example for the final methods:
class MySimpleClass
{
final public function mySimpleMethod()
{
echo "Base class method mySimpleMethod() called.";
}
}
class MyChildClass extends MySimpleClass
{
public function mySimpleMethod()
{
echo "Child class method mySimpleMethod() called.";
}
}
The preceding will produce a fatal error as you cannot override a final method.
Exercise 5.10: Implementing a Final Class and Methods
In this exercise, we are going to practice implementing a final class and methods to understand what the consequences of finalizing methods and classes are. We will be applying a member method as final in the Car subclass and then we will be applying the Car class as final so that we can block any derivation (inheritance) from the Car class:
- Open Car.php and locate the start() method as follows:
<?php
public function start()
{
if($this->hasKeyinIgnition)
{
$this->engineStatus = true;
}
}
As you can see, Car checks that the key is in the ignition to turn on the engine. We need to make sure that the engine start involves checking for the key. In other words, we won't allow the overriding of this engine start procedure. Hence, we need to lock any possible overriding via derivation by using the final keyword before the access modifier of the start() method.
- Add the final keyword before the start() method as follows:
final public function start()
{
if($this->hasKeyinIgnition)
{
$this->engineStatus = true;
}
}
Here, the start() method has been finalized and no override should be allowed.
- Create a new Car subclass, Van, in a PHP file, Van.php, with the following content:
<?php
require_once 'Car.php';
class Van extends Car
{
}
Here, Van is an offspring of the Car class and is ready to override any methods acquired from the parent.
- Let's try overriding the final method, start(), declared by the Car class:
class Van extends Car
{
public function start()
{
$this->engineStatus = true;
}
}
Here, the Van class overrides the Car class' engine start() method, which is not permissible from the Car class.
- If we run Van.php using the php –d display_errors=on Van.php command, we should see the following fatal error:

Figure 5.24: The Van subclass attempts to override the Car engine start method
The override failed at the Van subclass. When we need to secure our methods from communicating with an object, we need to finalize those methods.
- Now, let's say we don't need further derivation of the Car class and we have finalized the Car class, as follows, by adding the final keyword before the Car class keyword:
final class Car extends AbstractVehicle implements DriveInterface
{
}
- Again, if we run Van.php using the php –d display_errors=on Van.php command, we should see the following fatal error:

Figure 5.25: The Van subclass attempts to extend the Car class
This is how the final keyword can be used to prevent method overriding and class extending. In practice, methods that should not be overridden anyhow should be finalized and classes that should not be extendable should be finalized.
Traits
In a single inheritance language such as PHP, we often feel that we could have extended another class to inherit some functionalities. For example, in our Car class, we have inherited all the generic vehicle functionalities and now we might be in need of adding some e-commerce functionalities. Again, the Motorcycle class might want to have such e-commerce functionalities. As e-commerce related methods do not belong to the Vehicle class, we need to think of an alternative approach to reuse such e-commerce behavior. Hence, when we need to add a group of behaviors to our objects, we group the behaviors in terms of methods with a trait and use the trait inside our classes. A trait is similar to a class but you can't instantiate it; rather, you can use traits inside classes. A trait can be used in a class context with the use keyword; for example, use TraitName.
Check out the following trait syntax:
trait MyTraitName{
function one()
{
…
}
function two()
{
…
}
}
class MyClass extends B{
use MyTraitName;
}
$object = new MyClass();
$object->one();
$object->two();
Here, the MyTraitName trait helps to group multiple methods, one() and two(), and to reuse these methods, we can use the trait using MyTraitName;. Hence, the trait methods become available to MyClass{…} and can be called using the MyClass{…} object handler, as in the preceding code.
You can use multiple traits as follows:
class MyClass extends B
{
use Trait1, Trait2;
}
Again, the member inserted by a trait overrides an inherited member. Let's check out the following example:
<?php
class A{
public function say()
{
echo 'Base ';
}
}
trait T{
public function say()
{
parent::say();
echo 'Trait ';
}
}
class MyClass extends A{
use T;
}
$object = new MyClass();
$object->say(); //outputs, Base Trait
Here, MyClass extends class A, which has a method named say(), since MyClass avails the trait method say(). Then, we can consider the MyClass member say() as overriding the say() parent. In order to call the original parent method, say(), the trait supports parent:: to access the parent's methods. Trait is all about delivering methods to your class that are assumed to be a useful part of your class.
Current class members can override the members added by traits. Again, if we extend the preceding example, we can derive the following example:
MyClass.php
1 <?php
2 class A
3 {
4 public function say()
5 {
6 echo 'Base ';
7 }
8 }
9 trait T
10 {
11 public function say()
12 {
13 parent::say();
14 echo 'Trait ';
15 }
Notice that the say() method gets overridden according to the sequence. Trait methods override inherited methods and class members override trait methods. Hence, say() from parent class A gets overridden by the say() method of trait T, and then, finally, say() in MyClass overrides the trait's say() method.
A trait is a way of adding functionalities and additions to inheritance. A trait enables you to add more features horizontally without the need to inherit another class.
Exercise 5.11: Implementing Trait
In this exercise, we will create a new trait named PriceTrait and shift the price setter and getter methods from the AbstractVehicle class to this trait. Since price-related methods should not belong to core vehicle features but to e-commerce features, we will add all sorts of price methods into the new price-related trait. The whole idea of shifting price-related methods into PriceTrait is to conceptualize how traits should come into the scenario and group logically related methods under a name.
Note
As per the PSR naming conventions, the Trait name must be suffixed by Trait; for example, TestTrait (https://packt.live/2IEkR9k).
- Open AbstractVehicle.php and locate the getPrice() and setPrice() methods.
- Create a new PHP file called PriceTrait.php with the following trait:
<?php
trait PriceTrait
{
}
- Cut the getPrice() and setPrice() methods from the Vehicle class and paste them into the PriceTrait trait as follows:
<?php
trait PriceTrait
{
public function getPrice()
{
return $this->price;
}
public function setPrice($price)
{
$this->price = $price;
}
}
Here, we have added the PriceTrait body with the getPrice() and setPrice() methods shifted from the AbstractVehicle class. Note that the methods still contain the original lines that use $this (the object instance variable), though, traits cannot be instantiated, meaning that these methods are intended to be accessed by the objects of classes that are going to use PriceTrait.
- Now we need to require the PriceTrait.php file in the AbstractVehicle class, as follows, so that the AbstractVehicle class can use the trait:
<?php
require_once 'PriceTrait.php';
abstract class AbstractVehicle
{
//code goes here
}
- Use PriceTrait from the Vehicle class, as follows:
<?php
require_once 'PriceTrait.php';
abstract class AbstractVehicle
{
use PriceTrait;
public $make;
public $model;
public $color;
protected $noOfWheels;
private $engineNumber;
public static $counter = 0;
protected $engineStatus = false;
protected $price;
...
Here, in the line use PriceTrait, the AbstractVehicle class acquired the PriceTrait trait that comes with two methods for price set and get. Hence, the Car and Motorcycle classes inherited these two methods, which was our intention, to add features horizontally like this. Note that we have kept the $price attribute intact at the AbstractVehicle class to access it via the setter and getter of the derived vehicles.
- There are no changes in the Car and Motorcycle subclasses as they should avail the trait methods automatically. As the parent Vehicle class uses PriceTrait, the trait methods become members of the Vehicle class and the subclasses can override such inherited methods. The Car class doesn't override price methods but the Motorcycle class overrides the getPrice() method to apply a 5% discount to the given price. Locate the getPrice() method in the Motorcycle class:
function getPrice()
{
return $this->price - $this->price * 0.05;
}
Here, after trait, such an override works for the subclass and no change should be required here.
- In order to test the discounted price, we should instantiate the Motorcycle class, set the price, and get the price to see whether a discount has been applied or not, which was previously done in Motorcycle.php. Locate the following content in the Motorcycle.php file:
$motorcycle = new Motorcycle('Kawasaki', 'Ninja', 'Orange', 2, '53WVC14598');
$motorcycle->setPrice(5000);
echo "The price is ". $motorcycle->getPrice() . PHP_EOL;
- Now, if we run Motorcycle.php with the php Motorcycle.php command, the preceding code outputs the following:
Figure 5.26: The trait method overridden by Motorcycle
Therefore, traits can be used to add member methods of a class, can override any existing member methods of the same name, and can be overridden via inheritance. Alternatively, we could have used PriceTrait in the Car and Motorcycle classes directly instead of the Vehicle class by adding the trait in them. Our intention is to share the common characteristics of vehicles via the parent Vehicle class, that's why we have used the trait in the mother class.
Class Autoloading
You may skip this section if you choose to use Composer. Consider class auto loading for legacy PHP projects who can't use Composer.
Note
With the addition of PHP's package manager, Composer, you can leverage Composer's autoloader to load classes, libraries, and so on. See https://packt.live/2MrJG9u for more details. Chapter 9, Composer is dedicated to discussing Composer and Autoloading in detail.
To use a class inside a file that is located in another file, we have to include the corresponding file that contains the class in the current file. This approach ends up including a good number of files in any PHP script. Hence, we need something that automatically includes our required class files.
In order to load your class automatically, PHP comes with the spl_autoload_register() function. With that function, we can register any number of autoloaders so that we can load classes and interfaces on demand. Yes – on-demand. That means the autoloading is lazy – it loads the classes or interfaces only when they are called.
Check out the following simple code snippet:
<?php
spl_autoload_register(function ($className)
{
require_once $className. '.php';
});
$obj1= new ClassName1();
$obj2 = new ClassName2();
Preceding snippet is equivalent to the following:
<?php
require_once 'ClassName1.php';
require_once 'ClassName2.php';
$obj1 = new ClassName1();
$obj2 = new ClassName2();
So, in the preceding code snippet, you can see that we have passed an anonymous PHP function to the spl_autoload_register() function. This anonymous function accepts the class or interface name and tries to include/require the corresponding file. With the spl_autoload_register function, we can register our own such autoloader functions and we can do all sorts of operations to load the file, such as setting the file path/directory, checking whether the file exists or not, throwing an exception, and so on. Hence, we can avoid a larger list of file inclusion statements.
Say, for Car.php and Motorcycle.php, we can just replace the following two lines with the spl_autoload_register() function:
require_once 'AbstractVehicle.php';
require_once 'DriveInterface.php';
The preceding snippet can be replaced with the following:
spl_autoload_register(function ($className)
{
require_once $className. '.php';
});
So, like the following, when the Car class extends the AbstractVehicle class and implements the DriveInterface interface, the autoloader is invoked to load the corresponding class file and interface file:
class Car extends AbstractVehicle implements DriveInterface
{
...
}
Here, the registered autoloader is invoked to load the file when the class or interface has been used.
Note
To autoload PSR-4 classes, follow the guidelines at https://packt.live/314fBCj.
The spl_autoload_register() function specification can be found at https://packt.live/2B1PLEu.
Namespaces
As the name suggests, a namespace provides naming and scoping, therefore, a namespace is another way of encapsulating items. We can call a named scope, a namespace can house related constants, functions, classes, abstract classes, traits, and interfaces in a group with a name, and they can be accessed using the name.
As an analogy, consider the naming of people. People are given unique names in a family in order to identify them and call them by. Beyond family, what if there are two people with the same name? There could be one John Doe in the computer science department and another John Doe in the electrical department. Coincidentally, they end up in the varsity's football team, so they can be called John Doe of computer science and John Doe of the electrical department. Surely, the team doesn't want to pass the football to the wrong John Doe.
The same goes for computer filesystems: there are directories and subdirectories. Inside a directory, there could be other directories and there can't be two directories with the same name. Again, files with the same name can exist in two different directories; for example, /usr/home/readme.md and /var/projects/readme.md.
In programming, a namespace solves problems such as name collisions where classes or libraries have the same name so that they can be utilized under a different name. Surely, we don't want to write a class that pollutes the global scope by conflicting with another class's name. Also, the namespace provides aliasing – we can shorten a long name, so that code readability improves.
PHP supports the namespace with the namespace keyword, as follows:
<?php
namespace MyNamespace;
const MYCONST = 'constant';
function myFunction()
{
...
}
class MyClass
{
...
}
echo MyNamespaceMYCONST;
echo myFunction(); //resolves to MyNamespacemyFunction
echo MyNamespacemyFunction();//explicitly resolves to MyNamespacemyFunction
$object = new MyNamespaceMyClass();
The namespace should be the first statement you declare in your script. Although, you can write code without using a namespace.
If we don't define a namespace, our code stays in the global namespace. That's why the global namespace can be easily polluted by producing name collisions.
Alternative syntax for declaring a namespace is as follows:
namespace MyNamespace
{
...
}
We can declare multiple namespaces within a single file as follows:
<?php
namespace MyNamespaceA;
class MyClass
{
...
}
namespace MyNamespaceB;
class MyClass
{
...
}
$object1 = new MyNamespaceAMyClass();
$object2 = new MyNamespaceBMyClass();
It is strongly discouraged to put multiple namespaces into the same file in order to promote good coding practices. A general use case for an example of having multiple namespaces in the same file is including multiple PHP files in the same file.
You can also declare subnamespaces to achieve a hierarchy of namespaces, as follows:
<?php
namespace MyNamespaceSubNamespace;
const MYCONST = 'constant';
function myFunction()
{
...
}
class MyClass
{
...
}
echo MyNamespaceSubNamespaceMYCONST;
echo MyNamespaceSubNamespacemyFunction();
$object = new MyNamespaceSubNamespaceMyClass();
We can import a namespace using the use keyword and, optionally, we can alias the namespace with the as keyword as follows:
//file1.php
<?php
namespace MyNamespaceA;
const MYCONST = 'constant';
function myFunction()
{
...
}
class MyClass
{
...
}
The file2.php will be as follows:
<?php
namespace MyNamespaceB;
require_once 'file1.php';
use MyNamespaceAMyClass as A; //imports the class name
$object = new A();//instantiates the object of class MyNamespaceAMyClass
use function MyNamespaceAmyFunction;//importing a function
myFunction();//calls MyNamespaceAmyFunction
use function MyNamespaceAmyFunction as func;//aliasing a function
func();//calls MyNamespaceAmyFunction
use const MyNamespaceAMYCONST; //imports a constant
echo MYCONST;//prints the value of MyNamespaceAMYCONST
Here, at the use MyNamespaceAMyClass as A; line, MyClass and MyNamespaceA are imported inside MyNamespaceB and, while importing, we aliased the class name to A so that we can instantiate the MyClass class as class A with $object = new A();.
The same goes for other imports. We can import a function from another namespace, such as using the MyNamespaceAmyFunction; function and alias it by using the MyNamespaceAmyFunction as func; function.
That way, we can call the function using the func() alias name. Also, we can do the same while importing constants. With the use const MyNamespaceAMYCONST; line, we have imported the constant.
Combining multiple importing is also possible:
//file2.php
<?php
namespace MyNamespaceB;
require_once 'file1.php';
use MyNamespaceAMyClass as A, MyNamespaceAmyFunction;
$object = new A();//instantiates the object of class MyNamespaceAMyClass
myFunction();//calls MyNamespaceAmyFunction
Here, we have imported a class and a method together in the use MyNamespaceAMyClass as A, MyNamespaceAmyFunction; line and aliased the class name as A. Normally, bringing in the necessary classes or functions from a namespace is the purpose of such importing instead of importing the whole namespace.
PHP namespaces have so much to offer and there are more use cases and aspects that can be learned at https://packt.live/2AYilqj.
Exercise 5.12: Implementing Namespaces
In this exercise, we will apply namespaces to our vehicle-related classes, traits, and interfaces. We will apply a common namespace to the AbstractVehicle class, DriveInterface, Car, and Motorcycle classes. Also, for the traits, we will apply a different namespace so that we can keep the traits out of the common namespace:
- Create a Vehicle directory to relocate AbstractVehicle.php and DriveInterface.php in it.
- Relocate AbstractVehicle.php and DriveInterface.php in the vehicle subdirectory, under your current working directory.
- Create another directory, Traits, for relocating the PriceTrait.php file and future traits.
The directory structure looks like the following:

Fig 5.27: Namespaced directory structure
- Now it's time to apply namespaces to our classes and traits. Open the PriceTrait.php file and add the Traits namespace at the beginning, as follows:
<?php
namespace Traits;
trait PriceTrait
{
}
Here, we have declared the Traits namespace at the beginning of PriceTrait. Our intention is to add different trait files in future, under the same namespace; for example, namespace Traits (at the beginning of any new trait files). The whole idea is to apply the Traits namespace across multiple trait files so that we can pick the right trait via the namespace. Hence, we can use PriceTrait like we use TraitsPriceTrait in different classes.
- Open the AbstractVehicle.php file and remove the following line:
require_once 'PriceTrait.php';
Since we are going to autoload the classes and trait files, we don't need to manually require files.
- Add the following namespace before the AbstractVehicle class:
namespace Vehicle;
Here, the Vehicle namespace will be our common namespace to share across vehicle subclasses and interfaces.
- Update the use PriceTrait using the namespace, as follows:
<?php
namespace Vehicle;
abstract class AbstractVehicle
{
use TraitsPriceTrait;
…
}
Here, the use TraitsPriceTrait; line tells the autoloader to load PriceTrait from the Traits directory located in your code base root.
- Add the Vehicle namespace before the DriveInterface interface, as follows:
<?php
namespace Vehicle;
interface DriveInterface
{
…
}
Here, DriveInterface shares the Vehicle namespace, so the interface is accessible via the same namespace.
- Open the Car.php file to eliminate the following manual file inclusion:
require_once 'AbstractVehicle.php';
require_once 'DriveInterface.php';
Replace the Vehicle namespace with the following:
<?php
namespace Vehicle;
class Car extends AbstractVehicle implements DriveInterface
{
…
}
Here, Car shares the same namespace, Vehicle. So, in the class line, Car extends AbstractVehicle and implements DriveInterface, AbstractVehicle, and DriveInterface to resolve the current namespace, which is Vehicle. This is similar to the Car class extending to VehicleAbstractVehicle and implementing VehicleDriveInterface.
- Now, add the spl_autoload_register() function before the Car class as follows:
<?php
namespace Vehicle;
spl_autoload_register();
class Car extends AbstractVehicle implements DriveInterface
{
…
}
Hence, the autoloader function should load the AbstractVehicle class and the DriveInterface interface from the Vehicle directory as it supports class loading from a namespaced directory.
- Do the same for the Motorcycle.php, as follows:
<?php
namespace Vehicle;
spl_autoload_register();
class Motorcycle extends AbstractVehicle implements DriveInterface
{
…
}
Here, the Motorcycle class also shares the same namespace, Vehicle, to avail AbstractVehicle and DriveInterface.
- At Car.php, add the following Car instance to test the AbstractVehicle and DriveInterface implementation:
$car = new Car('Honda', 'Civic', 'Red', 4, '23CJ4567');
$car->start();
echo "The car is " . ($car->getEngineStatus()?'running':'stopped') . PHP_EOL;
$car->changeGear(1);
$car->changeSpeed(15);
$car->changeGear(2);
$car->changeSpeed(35);
$car->applyBreak();
$car->stop();
echo "The car is " . ($car->getEngineStatus()?'running':'stopped') . PHP_EOL;
Here, just to test the extended class and the implemented interface, we have instantiated the Car class and accessed different member methods using the object handler.
- The preceding code will produce the following output if we run the Car.php script with the php Car.php command:

Fig 5.28: Namespace applied to Car
We can see that the Car class can access the namespace applied to the abstract class and the interface.
- Now, to Motorcycle.php, add the following Motorcycle instance to test the AbstractVehicle and DriveInterface implementation:
$motorcycle = new Motorcycle('Kawasaki', 'Ninja', 'Orange', 2, '53WVC14598');
$motorcycle->start();
echo "The motorcycle is " . ($motorcycle->getEngineStatus()?'running': 'stopped') . PHP_EOL;
$motorcycle->changeGear(3);
$motorcycle->changeSpeed(35);
$motorcycle->applyBreak();
$motorcycle->stop();
echo "The motorcycle is " . ($motorcycle->getEngineStatus()?'running':'stopped') . PHP_EOL;
$motorcycle->setPrice(5000);
echo "The price is ". $motorcycle->getPrice() . PHP_EOL;
- The preceding code will produce the following output if we run the Motorcycle.php script with the php Motorcycle.php command:

Fig 5.29: Namespace applied to Motorcycle
In the preceding exercise, we saw that the Vehicle namespace encapsulated all the relevant items, such as the abstract class, the interface, and the subclasses. Thus, a namespace can be shared across multiple files among relevant code components. Also, we can subnamespace internal libraries, plugins, utility files, and so on. The idea of the namespace is to assemble your project under a unique and relevant name so that none of your code components conflict when you integrate third-party code components.
Activity 5.1: Building a Student and Professor Object Relationship
In this activity, we will implement OOP concepts to create Student and Professor classes with parameterized constructors, attributes, and member methods. We will instantiate both classes and establish a relationship between the objects. A professor might have a certain number of students enrolled in their class. The list of students should be printed using a member method of the Professor object.
The steps to be performed are as follows:
- Create a directory named activity1 to put all our activity content in it. This should be our working directory (you can cd to the directory).
- Create a script file called activity-classes.php.
- Create Professor and Student classes in separate directories with the following functionalities.
Both use their own namespacing to load the classes automatically.
Both take the name as the first argument in the constructor; the Professor class accepts the second argument as a list of students – the list will be filtered for instances of Student only.
Both will have the title property, which, by default, for the Professor class is Prof. and for the Student class is student.
- Create a function that will print the Professor's title, name, the student count, and the list of students.
- Create a Professor instance, providing a name and a list of students – instances of Student with a name in the constructor.
- Add a random amount of Student instances to the Professor instance.
- Change the title of the professor to Dr..
- Print the output by invoking the function with the Professor instance.
The output should look like the following:
Dr. Charles Kingsfield's students (4):
1. Elwin Ransom
2. Maurice Phipps
3. James Dunworthy
4. Alecto Carrow
Note
The solution for this activity can be found on page 515.
Summary
In this chapter, we worked with object-oriented concepts and took note of how each of those concepts fitted into different scenarios. Encapsulation, inheritance, polymorphism, data abstraction, dynamic binding, and message passing all added new dimensions to our program. Note that these concepts can be adopted when they fit your particular scenario; until then, there's no need to complicate the program. We have seen that the misuse of OOP principles is common, and, down the road, that adds a burden of complexity.
Dependencies should be injected from outside rather than being hardcoded inside. Abstractions should not depend on details; hide your data appropriately, hide your complexities, and expose simplicity when message passing. Overall, the mapping of the objects in your program with the problem domain should be taken care of. Remember this simple statement: "If you can't reuse it, then it doesn't possess value."
In the next chapter, we will describe request handling, storing local data, and file uploads.