

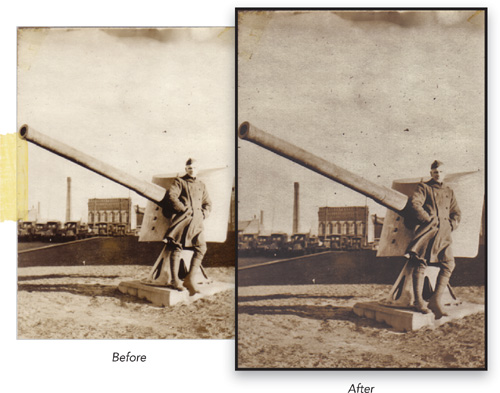
The same thing goes for this chapter as the previous one. As I wrote this book, I began realizing that lighting issues accounted for the majority of problems with the old photos I had. Sure, we’ll get into the rips and tears later, but the same thing holds true for old photos as it does for new ones. You’ve got to start with a well-exposed photo. If you don’t start there, then all of the work you do to a photo will have less impact because people will inevitably concentrate on the fact that the photo is too bright or too dark.
There are a lot of things that lead to our old photos becoming too light. It could be those photos were stored in a frame on a wall that was in sunlight all day, it could be the paper the photo was printed on, or it just could be the result of the camera technology 50 to 100 years ago. Whatever the cause, photos that are too light just don’t look good, so I’ve got a few ways you can fix them.
Method 1: The Easy Way
This is the easy way. It works great if the entire photo is too light and you want a quick way to darken it.
Open a light photo. By the way, you’ll probably hear different terms for light photos. “Washed out” is a popular phrase. Whether “light” or “washed out,” these photos just appear to lack detail altogether because they’re either faded from time or overexposed in the first place.
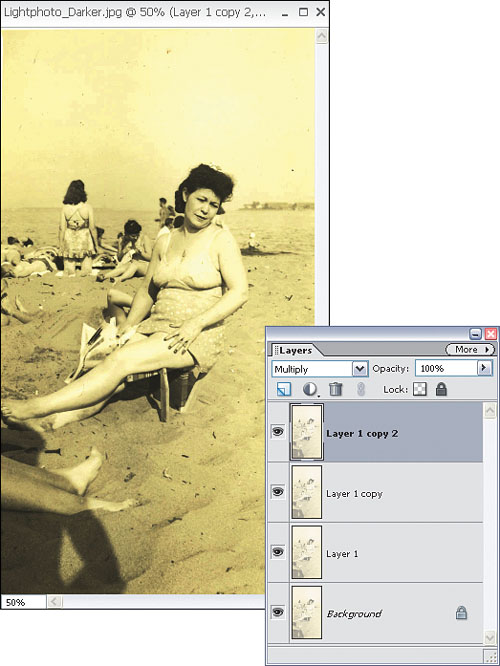
Duplicate the Background layer by pressing Ctrl-J (Mac: Command-J). This should leave you with two copies of the same photo in the Layers palette.
Look in the top left of the Layers palette and you’ll see the blend mode pop-up menu. By default, the layer’s blend mode is set to Normal. Go ahead and expand this menu, and choose Multiply.
This immediately darkens the photo and restores some detail and contrast back into the image.
If you find the photo is still not dark enough, try duplicating the top layer (the one you just set to Multiply). Press Ctrl-J (Mac: Command-J) to make another copy of the layer and it will retain the same Multiply blend mode and add even more detail and contrast to your photo. Try it two or three more times until you’ve got the photo to a point where you can see more of the details and it’s not so washed out.


Method 2: When You Need More Control
This technique is a lifesaver when you need a little more control. For example, as you start to darken a lighter photo, you may inadvertently darken some areas you didn’t want to.

Take a look at this example. I used the previous technique of duplicating the layer and changing the blend mode to Multiply. Notice how it severely darkened the dress at the bottom left of the photo. It’s really too dark at this point. This technique lets you have a little more control over what gets darkened.
Here I’ve got a photo that already has some darker areas. If I were to darken the entire photo using the previous technique, then those areas would become too dark.
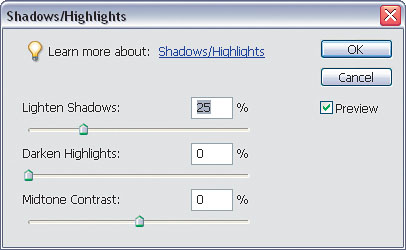
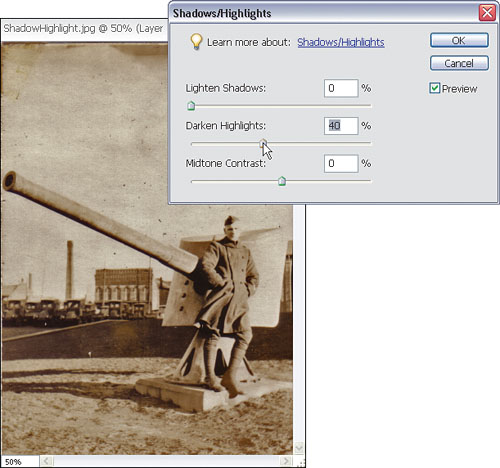
Go to the Enhance menu and choose Adjust Lighting>Shadows/Highlights.
The Shadows/Highlights adjustment dialog will open. This dialog works great for controlling the amount of darkening you add to an image because it looks at the light areas specifically and leaves the already dark areas alone.
Because we’re not trying to lighten the photo, drag the Lighten Shadows slider all the way over to the left to 0%.
Now start dragging the Darken Highlights slider toward the right. You don’t want to go too far because you’ll make the lighter areas (the sky in this photo) look too much like the dark areas. Somewhere around 40–50% usually works well, but feel free to push it higher if you have a really faded photo.
Don’t forget to finish this one up by trying to adjust the Midtone Contrast slider a bit toward the right. This will reduce some of the darkening that may have occurred to some of the already dark areas. A setting of +20–30% works well here.


A lot of times people mistake a photo that lacks contrast for a photo that is too light. Frankly, it’s really easy to do. Photos without much contrast are light as well, but in a different way. You can usually see the details and people in the photo, but you just can’t see them very well. The photo will look very grayish overall and that just doesn’t make for an interesting photo. The best way I can think of to describe this is that the photo looks very “blah” (that’s a technical term by the way). There are a couple of easy ways to fix this though.
Method 1: The Easy Way
As you can imagine, there’s an easy way to do this and a hard way. Let’s take a look at the easy way first. Sometimes it works and sometimes it doesn’t, but it’s worth a try.
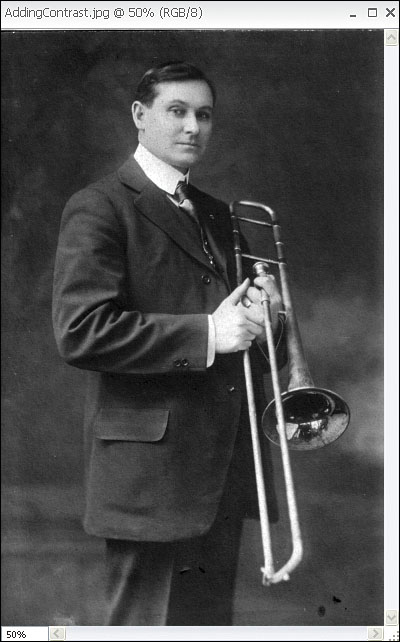
Open a photo that is lacking contrast. These photos generally just look very bland to me. I can see the people in them but the lack of contrast causes the people to blend into everything around them.
Go under the Enhance menu and choose Auto Contrast, or press Ctrl-Alt-Shift-L (Mac: Command-Option-Shift-L).
Elements will automatically try to fix the photo by boosting the contrast. As you can see, it looks much better than it did. The upside to this technique is that it’s fast and definitely worth a try. The downside...you don’t get any control, so if you’re not happy or your photo needs some more work, then you’re pretty much out of luck and you’ll have to start over. If this one doesn’t work for your photo, then read on because the next technique should do wonders for it.


Method 2: A Levels Adjustment
I have to say that I love this technique. It takes a photo that may have been a lost cause and turns it into something great.
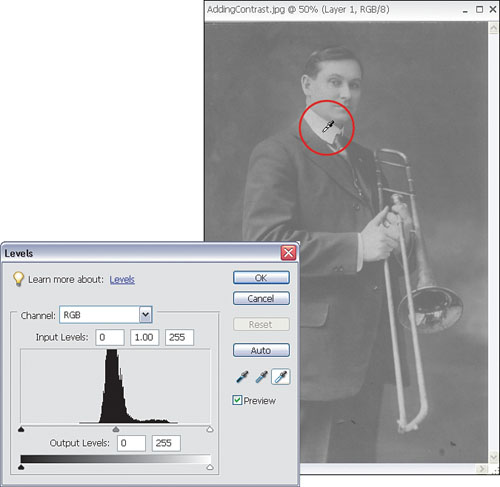
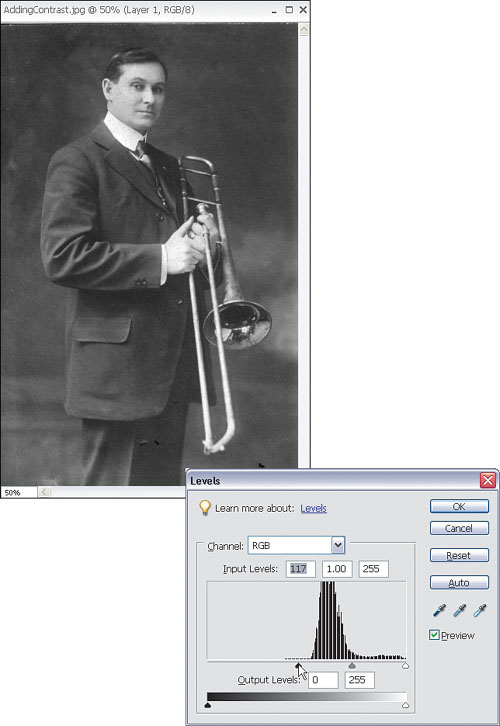
Try the same photo as we used in the first technique. This time, go under the Enhance menu and choose Adjust Lighting>Levels, or just press Ctrl-L (Mac: Command-L).
This will open the Levels dialog. If you’ve been reading other tutorials in this book, then you’ll know this adjustment pretty well. It’s not only a great tool for lightening or darkening photos, but it works great for adding contrast as well.
First, click on the white highlights Eyedropper on the right side of the dialog. Then click on something in the photo that should be white. Shirts work great, as in this example here. If there isn’t anything white, then try clicking on the background or sky.
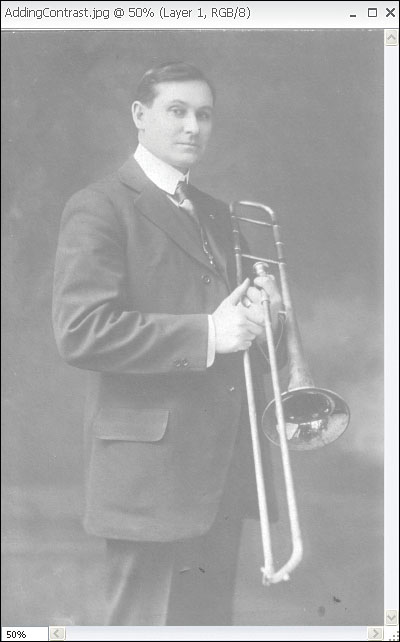
That should immediately make the entire photo look drastically different, but better.
To finish this off, take a look at the histogram in the dialog. If there are any areas on the far left or right sides that appear flat, like in this example, then drag the Input Levels slider on that side until it meets the mountainous area. Here, I’m dragging the black slider over to the right. This will add even more contrast to the photo.
Tip
When you’re done with this tutorial, the photo may be too dark or too light. If so, then try the lightening or darkening techniques covered in this chapter and in Chapter 6.


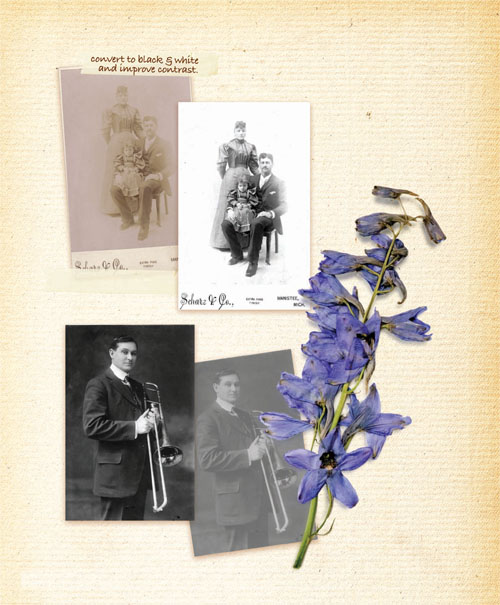
One way to work with old photos is to convert them to black and white first. This takes all of the guesswork about color out of the process and lets us concentrate on just black and white. And since most of the photos are black and white, or close to it anyway, you really don’t lose anything. This technique works great for both darkening the photo and adding some great contrast, all at the same time.
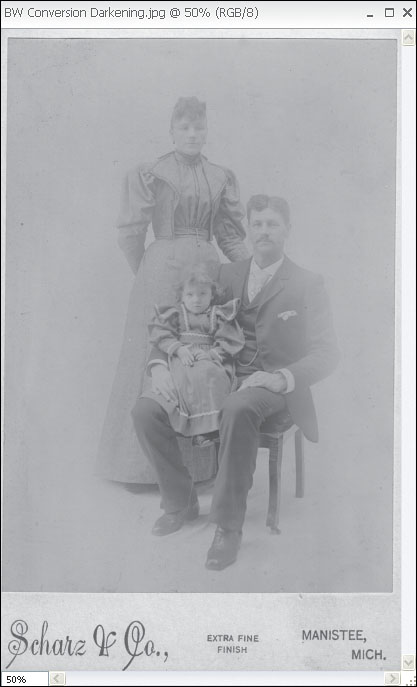
So far, we’ve looked at how to darken photos that are too light. We’ve also looked at how to add some contrast to light photos. Here we’ve got a photo that is both too light and that could use a contrast boost. This time though, we’re going to use a technique that you probably wouldn’t normally think of.
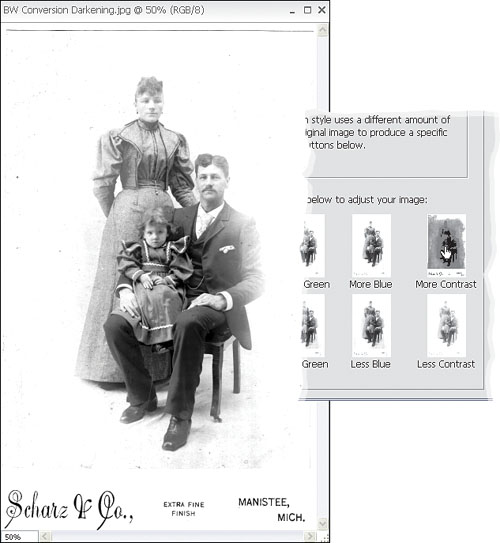
Go to the Enhance menu and choose Convert to Black and White, or press Ctrl-Alt-B. This is a new feature in Elements 5 for converting color photos to black and white. It happens to work great for old photos as well.
When the Convert to Black and White dialog opens, you’ll see that all of the color is removed from the photo.
In the dialog’s Select a Style section, you’ll see a few preset black-and-white conversions that you can click on to apply. I recommend clicking on all of them to see what they look like, but you’ll most likely settle on my favorite for old photos—Newspaper. This automatically darkens the photo and adds a nice amount of contrast too.
Next, let’s work on separating the people from the background a little more. Clicking on More Red, More Green, or More Blue in section 3 will lighten the entire photo. Since the people in the photo are what you’re working on, their color will most likely fall into the red category, so click on More Red until that background becomes almost white. I did it twice for this photo.
Okay, at this point you should have the people darkened a bit and separated from the background pretty well. Now it’s time to add some contrast to finish it off. Notice the More Contrast button at the bottom right of the dialog? Click on that two times to boost the contrast. Isn’t that amazing? It almost makes the entire photo come to life. Click OK when you’re done to apply the fix. Then sit back and think of how you just cheated Elements by using a dialog that was probably never intended for the purpose of fixing old photos to do a killer improvement of this one. Makes you feel like you got away with something, doesn’t it? Don’t worry, I won’t tell.


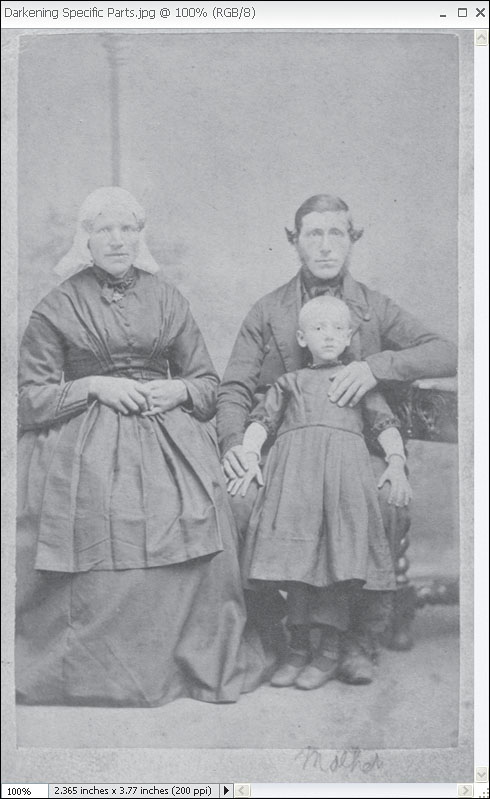
Many times, no matter what we do to darken a photo, certain areas in the photo are still just too light. When that happens, we need to take things a step further and work specifically on those areas to darken them.
Open a photo that you’ve already tried to darken. Here I’ve used the techniques in this chapter to darken this photo. The overall photo looks fine but the facial features are just still too light.
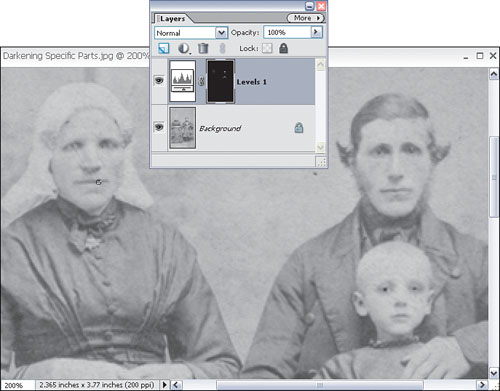
First, click on the Create Adjustment Layer icon at the top of the Layers palette (it’s the little half-black/half-white circle). Then choose Levels from the pop-up menu to add a Levels adjustment layer.
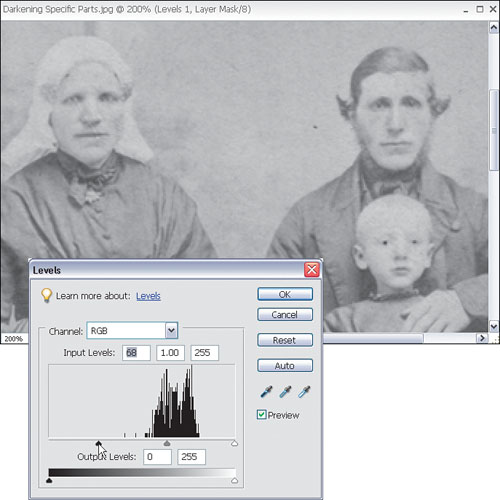
In the Levels dialog, take the black Input Levels slider and move it over toward the right until the details in the face start becoming clearer. They may never be crystal clear because of the quality of the photo, but you can indeed make them darker than they were.
Click OK to close the dialog. Now you’ll have a Levels adjustment layer in the Layers palette, and you’ll have a small white mask thumbnail right next to the adjustment layer thumbnail as well. Make sure the layer mask is active (you’ll see a thin black frame around the corners), then go to the Edit menu and choose Fill Layer. From the Use pop-up menu, choose Black and click OK to fill that mask with black. This will totally hide the effects of the Levels adjustment you just added.
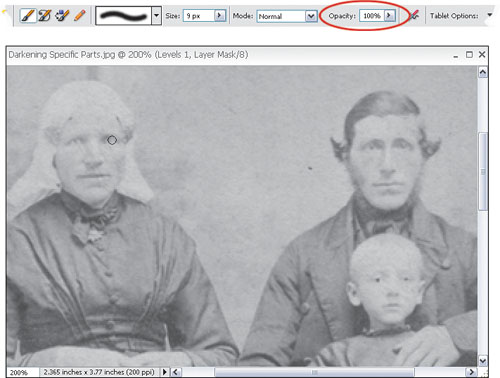
Press B to select the Brush tool. Choose a small, soft-edged brush about the size of one of the people’s eyes. Also, set the Opacity in the Options Bar to 100%.
Press the letter D to set your Foreground color to white. Now start clicking on the eyes in the photo to paint with white. Notice how they start to darken and the detail becomes more apparent.
Continue to click-and-paint on the facial features that you want to bring back. For the rest of the features here (mouths, noses), I set the Brush tool’s opacity to 50%, so if you need to, you can set the opacity lower and click-and-paint on the same area several times to build the effect.
When you’re done, if the facial features are too dark or not dark enough, you can always double-click on the Levels adjustment layer in the Layers palette to reopen the dialog. Then move the black slider to see how it affects your image. Try moving the white slider to the left just a bit to add a little more contrast to those areas as well. It may help the blacks appear darker. This is a great way to finish off and see if you can pull any more detail out of those facial features.