
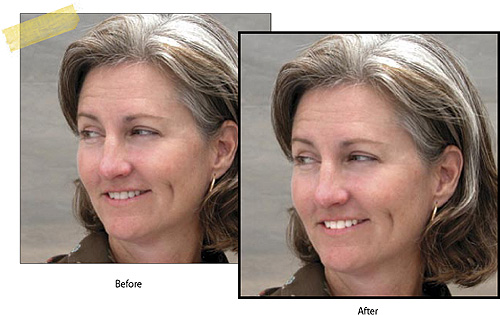
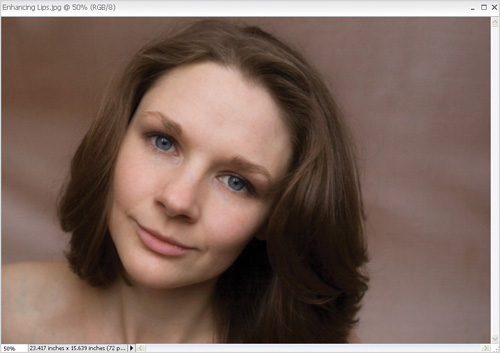
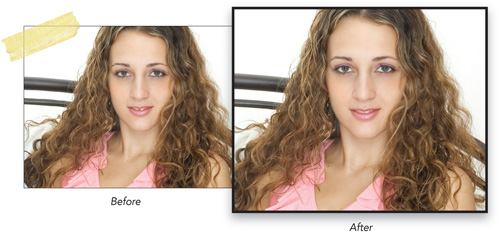
After the eyes, the mouth and the smile tend to be the other areas we look at the most in a portrait. Unfortunately, there’s a ton of things that can distract us in, on, or around the mouth. Teeth, lip color, braces, the overall smile...these are all things that can make or break a photo. In this chapter, we’ll look at some small and subtle ways to make the entire mouth area the star of your photos.
This is one of those questions that I get just about every other day. The actual form of the question ranges anywhere from “How do I get rid of yellow teeth?” to the simple, “How do I make teeth whiter?” Fortunately, the answer is just about the same for all circumstances.
Method 1: Brightening Dull Teeth
This one works best as an overall teeth-brightening technique. It’s great for teeth that have a grayish tint to them and appear to be a little darker, but not yellow. It also works great when you just want to make the teeth pop out a little more. You can skip to Method 2 if you want to whiten yellow teeth.
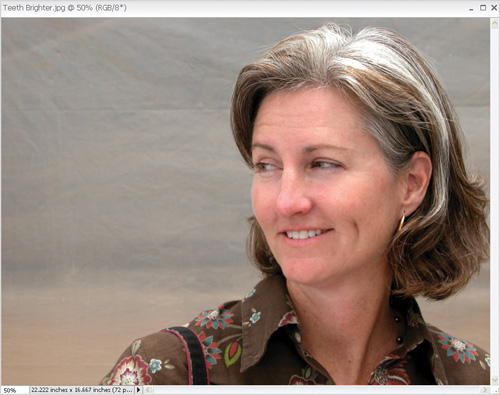
Open a photo where the person’s teeth have a grayish darker tint to them.
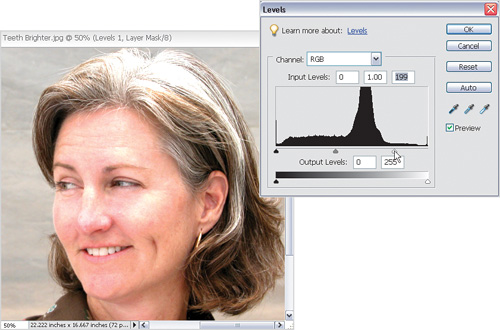
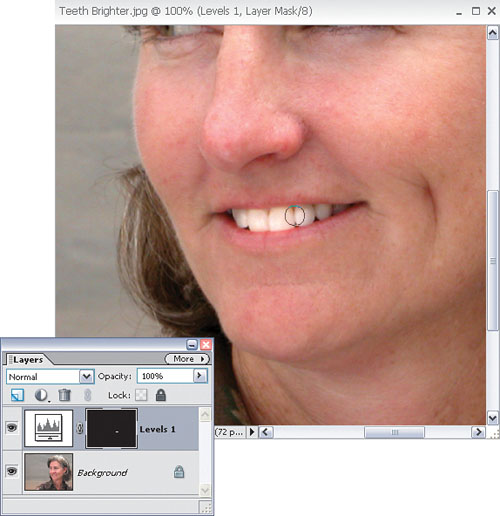
Add a new Levels adjustment layer by clicking on the Create Adjustment Layer icon at the top of the Layers palette and selecting Levels. When the Levels dialog opens, drag the white Input Levels slider on the right about 25% toward the left. Click OK. This will, in effect, lighten the entire photo.
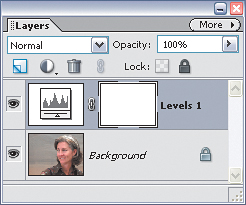
After you make the adjustment, the Levels adjustment layer will appear above your photo in the Layers palette. You’ll see a little white thumbnail to the right of it. It’s called a mask, but don’t get caught up in the name right now if you’ve never used one before. All you need to do is fill this thumbnail (aka: mask) with black. The easiest way is to press D, then X to set your Foreground color to black, then press Alt-Backspace (Mac: Option-Delete). This will fill the mask with black and hide the effects of the Levels adjustment that we just made.
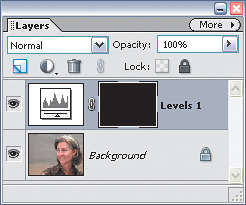
Use the Zoom tool (Z) to zoom in on the teeth if you need to. Then, press B to choose the Brush tool, press X to set your Foreground color to white, and start painting over the teeth. This will reveal the Levels adjustment on the teeth only, thus making them whiter.
Tip
If the teeth end up being too white or too dark, you can always double-click on the Levels adjustment layer’s thumbnail and tweak the effect one way or the other by moving the white Input Levels slider.
Method 2: Whitening Yellow Teeth
While the previous technique worked for overall teeth brightening, it would most likely just turn yellow teeth into bright yellow teeth. That’s where this technique steps in. It works best on teeth that have a yellow tint to them.
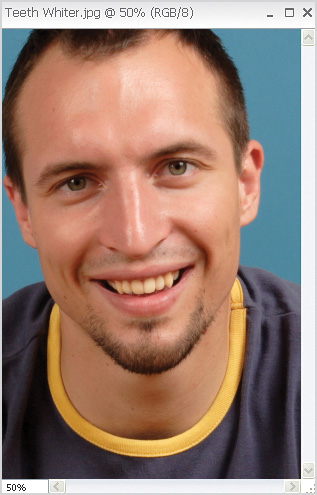
Open a photo where the person’s teeth appear to have a yellow tint.
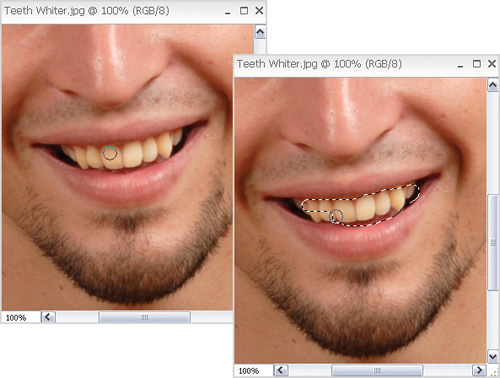
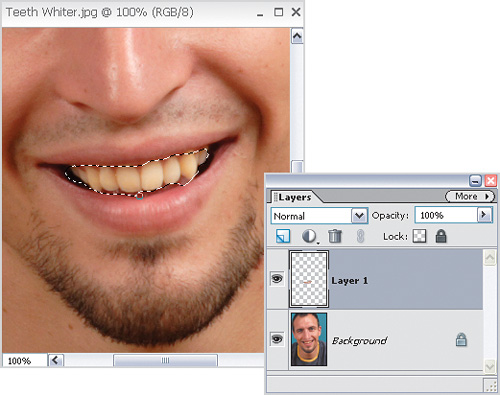
Press Z to get the Zoom tool and zoom in on the teeth. Press A to get the Selection Brush. Then, in the Options Bar, choose a soft-edged brush from the Brush Picker that is about half the size of one of the teeth.
Start painting with the Selection Brush to select the teeth. I do a quick pass over the edges first. Then click-and-paint again to cover the rest of the area. Don’t worry if you select a part of the surrounding area, though. We’ll fix that in the next step.
If you’ve inadvertently painted over some other areas (lips, gums, etc.), then press-and-hold the Alt (Mac: Option) key and start painting to remove them.
Once you’ve got the teeth selected, press Ctrl-J (Mac: Command-J) to copy them onto a new layer.
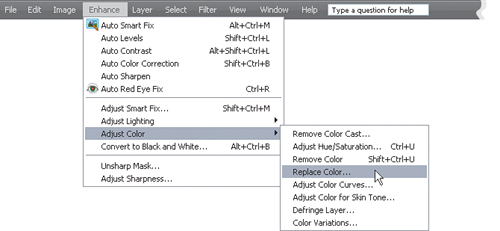
Now go to the Enhance menu and choose Adjust Color>Replace Color.
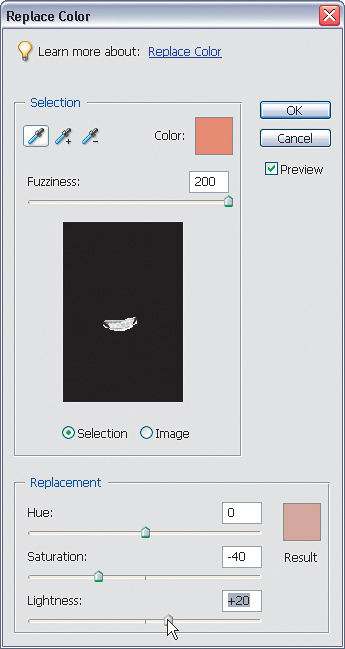
In the Replace Color dialog, drag the Fuzziness slider all the way to the right to 200. Then at the bottom of the dialog, take the Saturation slider and move it to the left to around -40. Then take the Lightness slider and move it to the right to +15–20. Try 20 first, and if it’s too bright then pull back to 15. Click OK and you’re done. The teeth should be nice and white.
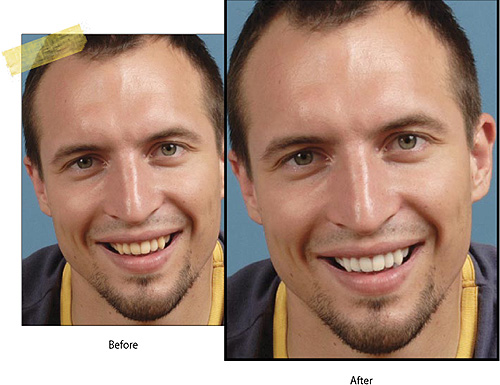
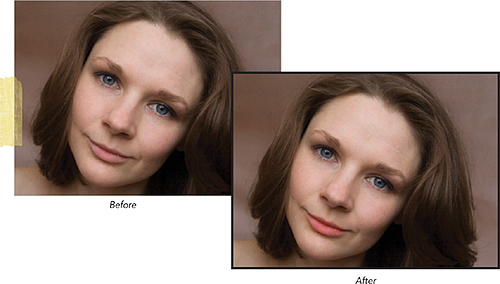
I debated whether or not I should call this tutorial “Luscious Lips,” but I thought better of it. This technique is great for giving the lips just a little extra punch. Here, we‘ll enhance the color of the lips. Often, you’ll find that the lip color is just too lifeless, but there’s an easy way to fix that.
Open the photo where the subject’s lips look like they blend in with everything else on the face.
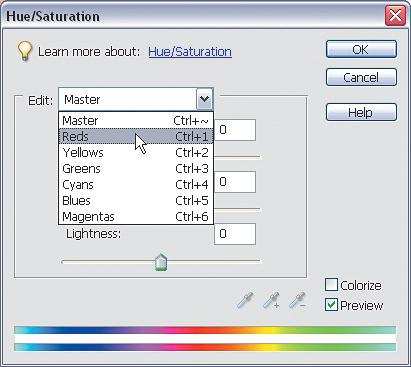
Click on the Create Adjustment Layer icon at the top of the Layers palette and select Hue/Saturation. When the Hue/Saturation dialog opens, the Edit pop-up menu at the top should read Master. Go ahead and change this to Reds because we want to target the red tones directly here.
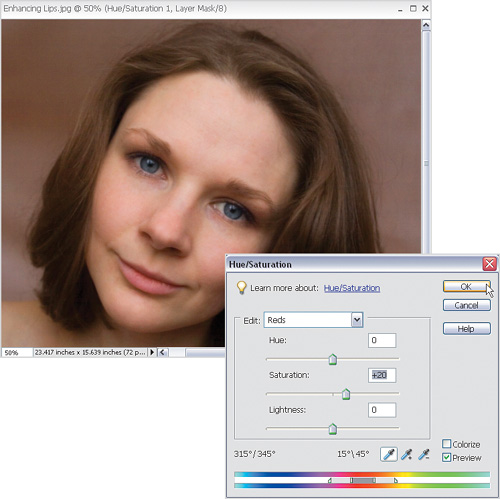
Drag the Saturation slider over toward the right until you start to see the lips turn redder. Don’t go too far just yet because you don’t want that drastic of a change. Somewhere around +15–20 is good to start with. Click OK to close the dialog.
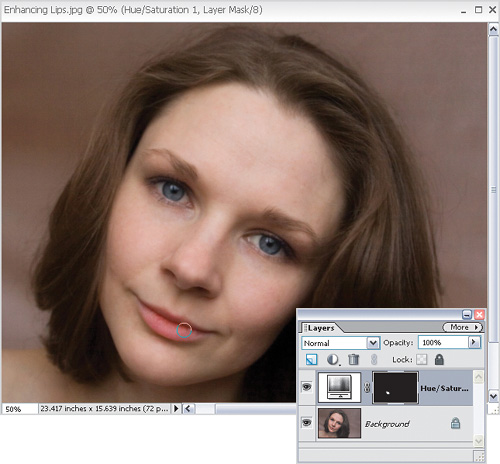
In making this adjustment, you’ve really enhanced all of the reds in the photo which is not what we’re after. So, let’s restrict it to just the lips. Press D, then X to set your Foreground color to black, then click once on the Hue/Saturation adjustment layer’s mask to select it, and fill it with black by pressing Alt-Backspace (Mac: Option-Delete). Doing this hides the red-enhancing effect we just created.
Now press B to choose the Brush tool, press X to set your Foreground color to white, and start painting over the lips. You’ll start to see the red re-appear back in the lips but not the rest of the photo. If you mess up and paint too far, just press X again to switch your Foreground color back to black and paint it away. Now you can double-click on the Hue/Saturation adjustment layer to tweak the red color to make it stronger or weaker. This way you’ll only see it on the lips and not the rest of the photo.

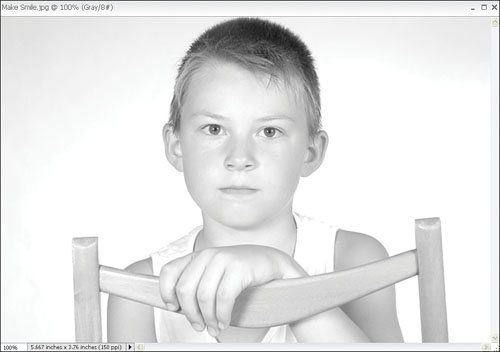
What is it about smiling? Some people can’t wait to get in front of the camera and will show us those pearly whites without hesitation. Others just refuse to smile. It happens a lot with kids and pre-teens. They seem to hit a point where it’s not “cool” to smile. Little do they know that you have Photoshop Elements, though. In addition to the multitude of embarrassing things you can do to a person, with a few clicks of the mouse you can at least add a little smirk to those that won’t smile for the camera.
Find a photo of that person that just won’t smile for you. Now it’s time for revenge. Well, kind of—we really can’t add teeth in there, but at least we can make them look somewhat happy.
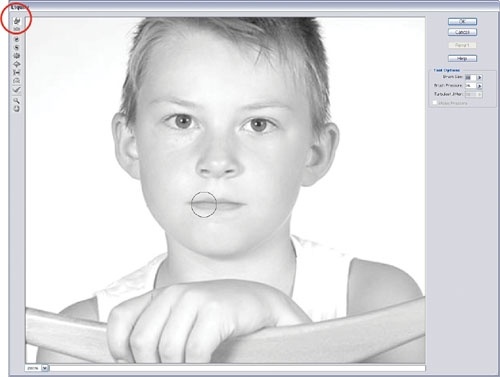
Go to the Filter menu and choose Distort>Liquify. Press W to select the Warp tool (it’s the first tool at the top left). In the Tool Options on the right side of the dialog, increase your brush size until your brush is roughly the size of half the mouth.
Making a person smile isn’t as much about the mouth as it is the cheek area around it. If you were to just curl the mouth upward, it would look kind of funny. Instead, it’s the muscles in the cheek area that seem to pull the lips upward. So, put only about a quarter of your brush over the edge of the mouth and leave the rest of it above and outside in the cheek area. Then simply click-and-drag upward to add a little smile to those frowning lips.
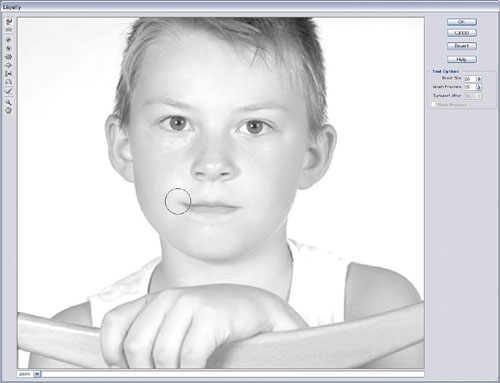
Switch over and do the other side. If you find the effect is too much and you’re having a hard time keeping it from looking fake, then try dropping the Brush Pressure setting on the right side of the dialog. This will give you a little more room for error.

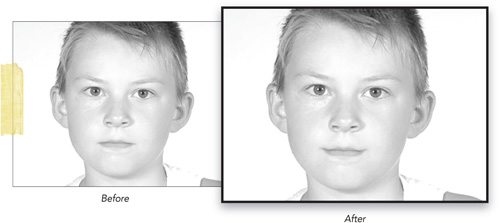
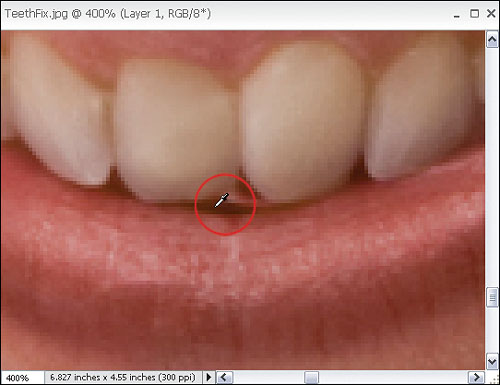
Some folks are blessed with perfect teeth. Others (myself included) are not so blessed. Most of the time it’s okay, but once in a while a space between the teeth may be a little distracting to the overall photo. Luckily we have Elements to fix this. Be careful though, you don’t want to hurt your subject’s feelings by making them think they had all of these problems. Remember, they’re going to see the portrait you’re creating. Make it real by doing selective and tasteful work—not a total makeover.
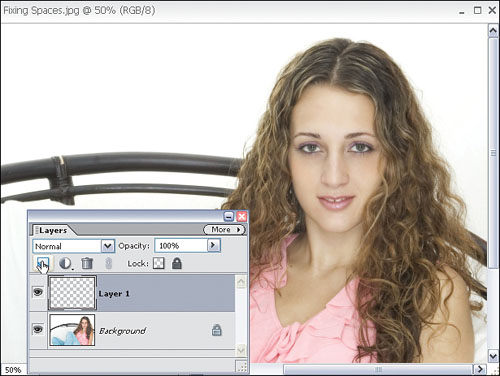
After you locate the photo with the space between the teeth that you’d like to fix, go ahead and create a blank layer on top of it (by clicking on the Create a New Layer icon at the top of the Layers palette). We’re going to use the Clone Stamp tool here, so we might as well take advantage of the fact that it’ll let us work on a blank layer.
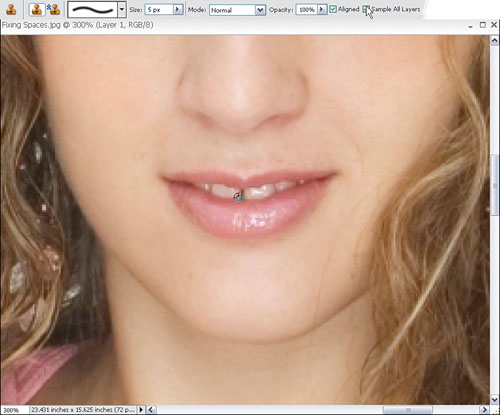
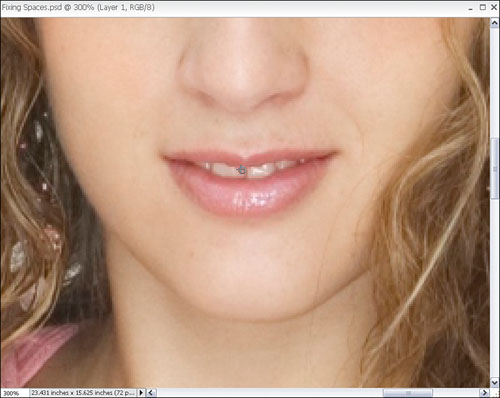
Press Z to zoom into the photo and then select the Clone Stamp tool from the Toolbox (or just press the letter S). In the Options Bar, turn on the Sample All Layers checkbox. What we want to do here is just extend the tooth to the side of the space a little, so we need to lower our brush size significantly so we can be precise. Press-and-hold the Alt (Mac: Option) key and sample an area right at the center and bottom of the tooth.
Move your cursor over until it’s right inside the gap (on the tooth’s side). Click-and-drag from the bottom part of the tooth and follow the contour of it as it moves up toward the lip or gum. You’re essentially extending the side of the tooth here.
Depending on the gap, you may be able to get away with one brush stroke here. If not, resample and continue extending the tooth until the gap is closed.

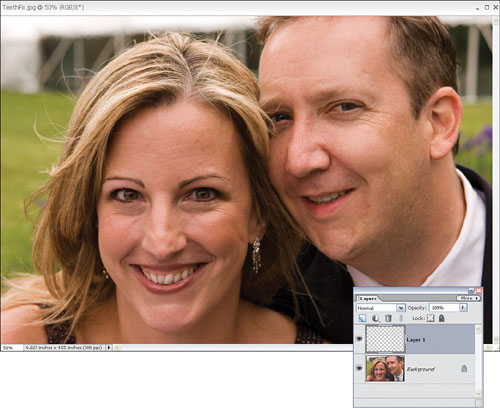
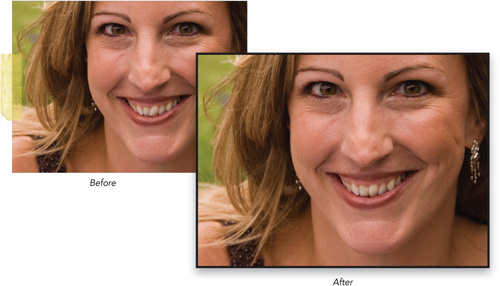
Just like the technique before this one, fixing teeth is a tricky thing. There’s a fine line between offending the subject and a tasteful enhancement. A good rule of thumb here is to not make any adjustments to other people that you wouldn’t do to yourself. Here, we have a nice photo of a couple, and with one small adjustment to the teeth we can really make the smile stand out.
Open the photo that you’re going to fix. Start out by creating a blank layer above the Background layer by clicking on the Create a New Layer icon at the top of the Layers palette.
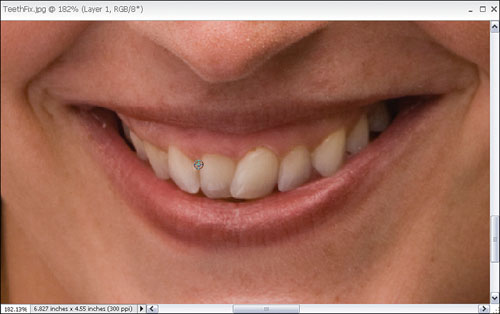
Click once on the blank layer to select it, press the letter Z to get the Zoom tool, and zoom in on the teeth. Then press S to select the Clone Stamp tool and make sure that the Sample All Layers checkbox is turned on in the Options Bar. Press-and-hold the Alt (Mac: Option) key and click on the top of the space between two other teeth to sample that area. The best way to fix crooked teeth is by building a straight space between the teeth that need fixing.
Now, with the Clone Stamp tool, paint straight down the center of the two middle teeth to build a fake space between them. As you get toward the bottom, start curving the brush stroke along the contour of the tooth.
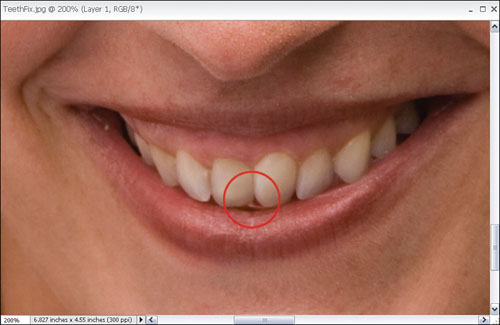
Press-and-hold the Alt (Mac: Option) key again and sample the center of the tooth on the right. Then click-and-drag to start painting on the tooth on the left to get rid of the part of the original tooth we left behind in the last step.
You may need to do this a few times to get the teeth to match up. Continually resample with the Clone Stamp tool to keep patterns from starting to appear.
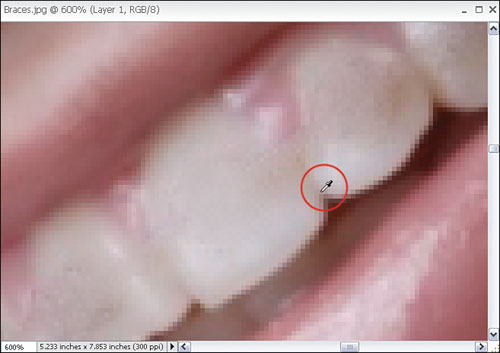
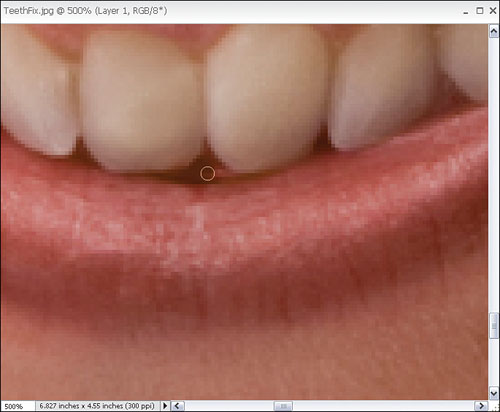
The last thing to do is to fix the area of space between the lip and the teeth. Zoom in on that area and you’ll see some remnants of the tooth shape that was originally there.
Now, select the Eyedropper tool (I) and click on a dark spot in that empty area to sample the color. (You’ll see your sampled color in your Foreground color swatch at the bottom of the Toolbox.)
Switch to the Brush tool (B) and drop your brush size way down until it fits inside this area. Start painting over the ghosted tooth shape to remove it and restore a realistic appearance between the teeth and the lip below them.


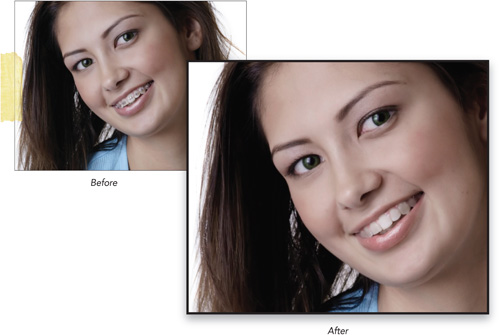
Remember how I said there’s a fine line between tasteful retouching and retouching that is just flat-out fake? Well, in this tutorial we’re going to make an exception because braces aren’t really a part of anyone’s life that they care to remember. They’re not part of us. They’re a temporary fix for something and most people can’t wait to get them off, so it’s okay to take a creative approach here—especially if it’s a portrait that you’re going to look back on one day. Why remember the braces—just remember the smile.
Warning
Before we begin, I have to warn you that this is a fairly advanced tutorial. Braces are a very invasive thing when it comes to teeth and they don’t leave much of the original tooth exposed. Because of this, it takes some serious time and effort to remove them. Sorry, I don’t want to scare you away. I just want to let you know this one may take some extra time. As a reference, it took me about 30–45 minutes to work on the image in this tutorial.
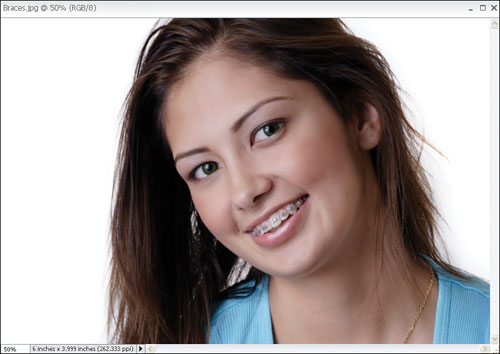
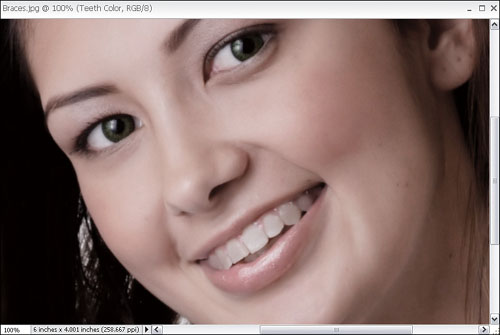
Open a photo of someone with braces. If you’re lucky, they have those newer braces that are transparent or the color of teeth. If not, they’re the silver kind. As you can see here in this photo, we’re working with the old silver kind.
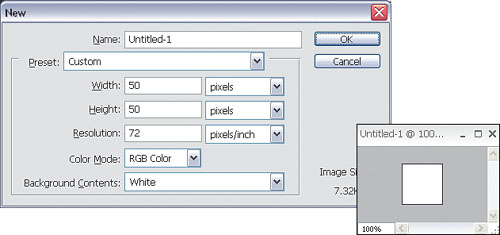
The first part is something I learned from Jane Conner-Ziser and it’s a great little trick. First, choose File>New>Blank File and create a new document. Enter 50 pixels for the Width and Height, 72 ppi for Resolution, and choose RGB Color as the Color Mode. Click OK to make the document.
Choose Edit>Fill Layer to open the Fill Layer dialog. Change the Use setting to 50% Gray and hit OK. This fills the layer with a neutral gray color.
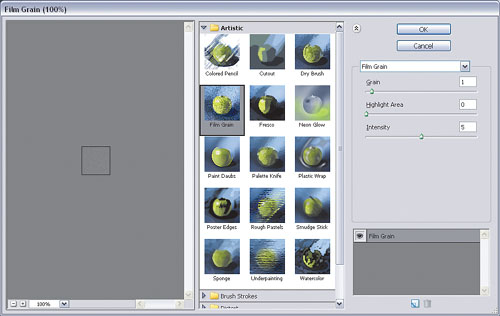
Now choose Filter>Artistic>Film Grain. Set the Grain to 1, the Highlight Area to 0, and the Intensity to 5, then hit OK.
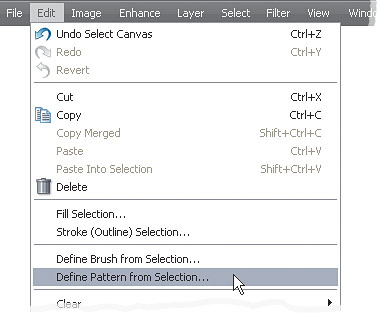
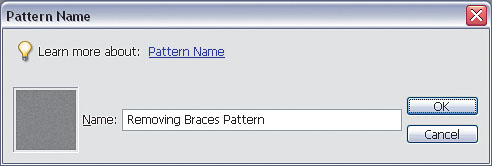
Press Ctrl-A (Mac: Command-A) to Select All. Go to the Edit menu and choose Define Pattern from Selection. In the Pattern Name dialog, give your pattern a descriptive name like “Removing Braces Pattern” and click OK.
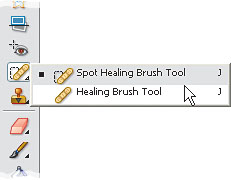
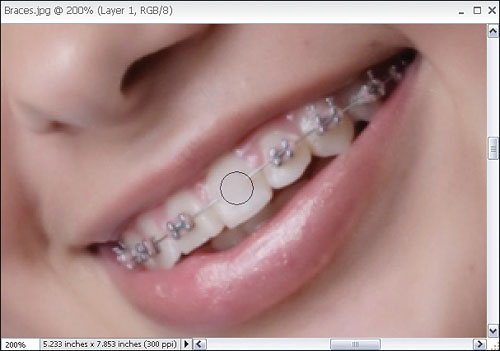
Okay, we’ve just created a pattern that is going to help us remove the braces. Now it’s time to remove them. Switch back to your photo and press the letter Z to get the Zoom tool and zoom in on the braces. Then select the Healing Brush tool from the Toolbox (or press J until you have it). In the Options Bar, set the Mode to Screen and click on the Pattern radio button. Then click the small down-facing arrow next to the Pattern thumbnail and from the Pattern Picker, click on the pattern that you just saved in Step 5. Don’t forget to turn on the Sample All Layers checkbox.
Also in the Options Bar, set the Healing Brush to a soft-edged brush in a size that is just larger than one of the braces. Click on the Create a New Layer icon at the top of the Layers palette to create a new blank layer. Then, click in the center of one of the braces to start removing it. As you click, you’ll see it start to disappear. Click a few more times until it’s gone. Don’t worry that the wire is still there—we’ll take care of that in another step. Right now, we’re just going to get rid of the big areas.
Do the same for the rest of the braces on the teeth. Make sure you change the brush size to take into account the teeth that are receding into the background. The closer you keep your brush strokes over only the braces, the better things will turn out. Use the shortcut Ctrl-[ (Left Bracket; Mac: Command-[) to increase the brush size or Ctrl-] (Right Bracket; Mac: Command-]) to decrease it.
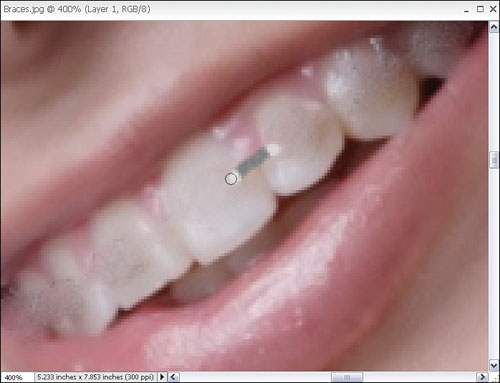
Now, decrease your brush size so it’s just slightly larger than the wire. Click on the wire with the Healing Brush and start removing it just like you did the braces.
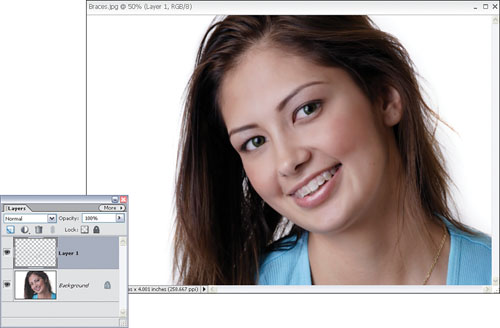
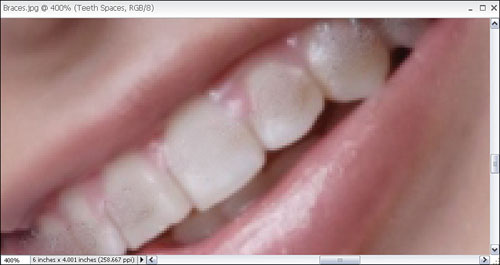
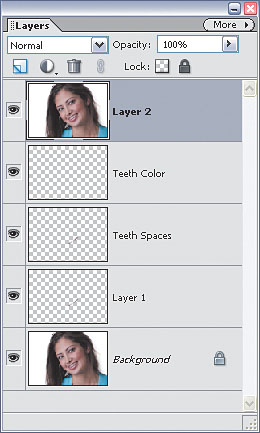
Okay, we’ve got a good start here and we’ve done a lot of the heavy work. Now it’s time to take care of the details. At this point, your image should look similar to mine and your Layers palette should have just two layers—the original photo and the layer on top that we’ve been doing all of our healing work on.
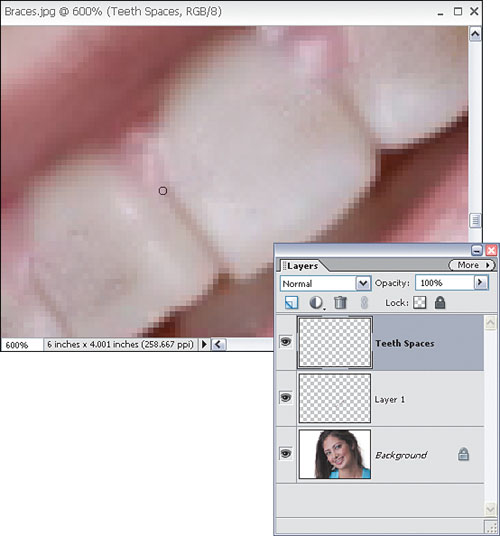
The first thing we need to do is add some spaces between the teeth. They all seem to blend together at this point. Select the Eyedropper tool (I) and click to sample the color between two of the teeth where a space is still intact. This will change your Foreground color to that color you just sampled.
Select the Brush tool (B), and choose a very small soft-edged brush—about 2–4 pixels should do. In the Options Bar, drop the Opacity of the brush down to 30%. Click on the Create a New Layer icon at the top of the Layers palette and start painting a space between those two teeth. (Double-click on the new layer’s name if you want to rename it so you know what is on each layer.) Make sure you build up each paint stroke by painting over it several times, since your brush opacity is so low.
Repeat Steps 11 and 12 for the spaces between each tooth. It’s best to continually resample an area from the existing space between the teeth because the color changes between each one.
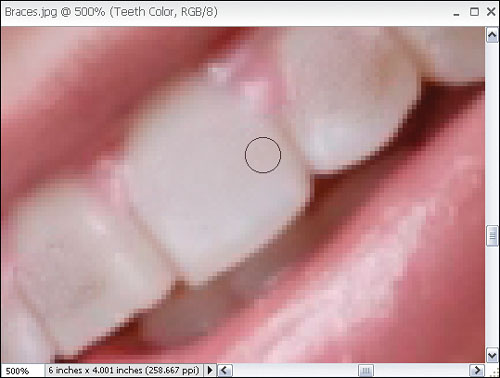
Now that we’ve made a good start in rebuilding the teeth, it’s time to start getting the color back. Create another blank layer on top of the rest. Use the Eyedropper tool to sample a color toward the center of one of the teeth, but make sure it’s not over an area we healed with the Healing Brush back in Step 7. Select the Brush tool, set its opacity to 40%, and start painting on the tooth that you just sampled from (increase your brush size if needed). Again, click multiple times with the Brush tool to build up the effect.
Repeat the previous step for each tooth. Because of shadows, highlights, and lighting, each tooth may be a slightly different color so make sure you sample a color from each tooth. When you get to the edges you’re going to have to, well, fake it. You can probably tell that those areas are pretty much gone so you’ll have to use the color from the tooth closest to it to just fill in that space. Make sure you don’t go over the lips though.
Whew! We’re almost there. The last thing we need to do is to apply some final touches. Start out by creating a flattened version of your photo with all of the layers compressed. Since we don’t want to lose the original work, in case we need to tweak it, there’s a cool keyboard shortcut for this. Click once on the topmost layer to select it, and then press Ctrl-Alt-Shift-E (Mac: Command-Option-Shift-E; also known as the entire keyboard). Seriously though, this is a great shortcut and it creates one flattened layer on top of the rest.
Finally, select the Dodge tool from the Toolbox (or press the letter O until you have it) and set the Exposure setting in the Options Bar to 20%. Paint over the middle teeth to lighten them a bit. If needed, select the Burn tool (press the letter O again, until you have it) and do the same for the teeth on the edges to darken them a bit if they’re too light. You can always look at your original photo to see the lighting and determine if the outer teeth are darker than the ones in the center.