
Chapter 1. Selections and Cutouts

Let’s kick off by going through a number of techniques for making selections and cutouts. As always with Photoshop, there are countless ways to achieve the same or similar results. In this chapter I take you through the techniques I use most often in my own workflow.
Making selections can be frustrating. I’m sure you’d much rather spend your time being creative than making selections, but there are times that they’re unavoidable, especially when compositing. But with a little knowledge and a little practice, you’ll soon find that they don’t take much time at all.
Quick Selection Tool and Refine Edge
When the Quick Selection tool was introduced, it seemed everyone I spoke to was achieving incredible results; for me, though, it was quite a different story.
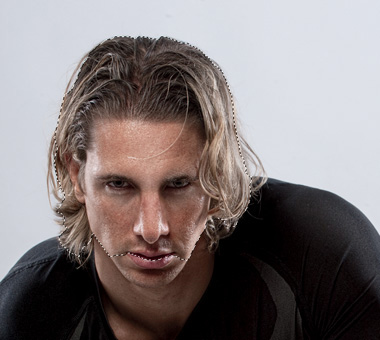
Sure, simple selections were no problem, but when it came to getting a great selection of both body and hair, I ran into issues.
The solution I found was to use the Quick Selection tool to make two selections—one of the body, one of the hair—and then combine them.
1. With a suitable image open (that is, one in which the cutout includes fly-away hair), choose the Quick Selection tool from the toolbar (Figure 1.1), and in the options at the top of the screen make sure that the Add to Selection icon is turned on (middle option) and that the Auto Enhance checkbox is selected (Figure 1.2).

2. Click the photo, and drag only around the body area (leave the head until later) to select it (Figure 1.3).

As you drag, more and more of the image will be selected. If you select too much, Option/Alt-drag the areas you want to remove.
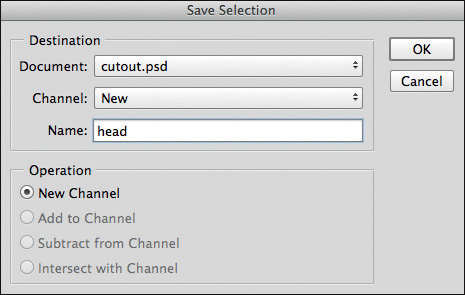
3. Choose Select > Save Selection, name the selection body (Figure 1.4), leaving the other settings at their default as in Figure 1.4, and click OK.

4. Choose Select > Deselect, and use the Quick Selection tool to drag over the hair and face, selecting them.
Note
When selecting the hair it’s important that you don’t include any areas where you can see through to the background (Figure 1.5). This is very important and a key part of making a great selection using the Quick Selection tool. Option/Alt-drag over any areas in which you can see the background to remove them from the selection (Figure 1.6).

5. We can now go into Refine Edge to pick up all of those fine flyaway hairs. Click the Refine Edge button at the top of the screen in the Quick Selection options (Figure 1.7).
6. Now you’ll choose how you would prefer to see the image when working on your cutout. When I’m working on a cutout that will eventually be placed in a bright scene like this one, I tend to favor On White, which can be found in the View drop-down menu (Figure 1.8). Conversely, when the background scene is going to contain lots of dark areas, I favor On Black.

7. Next increase the Radius slider to start adding the remaining hair into the selection. If too high a pixel amount is used, the cutout can get a little funky as in Figure 1.9, so it’s best to bring it up gradually. For this example, a Radius of 25px worked well as in Figure 1.10.


8. Select the Smart Radius checkbox to see if it enhances your selection. Then with the Refine Radius tool (Figure 1.11), paint around the entire outside of the head to pick up all the hair not yet included.

Tip
I find that I get best results with the Refine Radius tool when I paint around the head with it just touching the hair, as opposed to using a large brush and painting all over the head and background area.
9. Selecting Black & White from the View menu will show how the selection is now looking (Figure 1.12). Gray areas indicate where the selection is not so good and will likely be including some of the background area. In this example increasing the Contrast slider to 25% helped to reduce the gray.
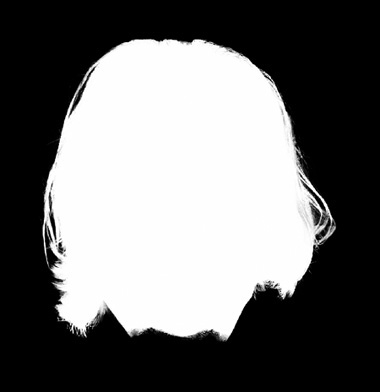
10. In the Output To menu, choose Selection and click OK. Choose Select > Save Selection, name this selection head (Figure 1.13), leaving the other settings at their default and click OK.
11. Now that we have made selections of the body and head, we need to combine them into one selection for cutting out. Click the Channels tab. Click the thumbnail of the body channel to view it and then hold down the Command/Ctrl key, and click the thumbnail of the head channel to load it as a selection (Figure 1.14). Fill this with white by going to Edit > Fill > Contents > White. Click OK. Choose Select > Deselect, or you could use the keyboard shortcut Command/Ctrl+D.

12. Drag the head channel into the trash at the bottom of the Channels panel. Click the body channel thumbnail (Alpha channel).
13. It looks good, except for an area on the right where some of the hair hasn’t been completely selected (Figure 1.15). To add this to the selection, paint with a white brush over that area.

14. There’s also an area where some of the white has gone onto the black, and between some of the hairs, making it look gray. Paint it with a brush in the Overlay blend mode. This allows you to paint in white or black and not affect the opposite color, as it only affects the gray.
Tip
When using the Overlay blend mode to tidy up, you’ll get the best results when you build up to an effect as opposed to going in with settings that are too high. I tend to use about 20% opacity and paint over it several times (Figure 1.16).
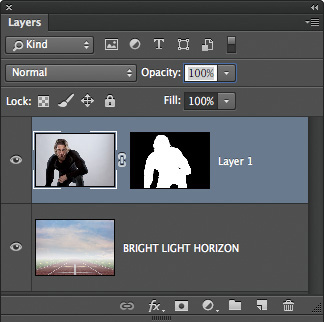
15. Click the RGB channel thumbnail to return the athlete to full color, and then click the Layers panel. To cut out the athlete and place him into a new scene, go to Select > Load Selection, choose body from the Channel menu, and click OK. This loads the complete selection of the athlete.
16. Click the Layer Mask icon at the bottom of the Layers panel and now the athlete has been cut from the background. Choose the Move tool (V), and drag the now cutout athlete into the new background by clicking within the image area and dragging onto the new background tab (Figures 1.17 and 1.18).

Note
When dragging on top of the new background tab, wait for the image to open, continue to drag into the image area, and then release.
Now that the athlete is cut out and in position with a new background, in the following section I’ll show you how to improve the cutout further with a layer style.
Improving Cutouts with Layer Styles
Here’s a great little trick you can use to show more of those fine fly-away hairs and make your cutout look even better.
This technique uses a layer style, which is normally attached to a layer, but I’ll show you how to make it more user friendly.
1. Staying with the athlete image and making sure that the cutout is the active layer, click the fx icon at the bottom of the Layers panel and choose Inner Shadow (Figure 1.19).

2. Change the Angle setting to 90. This determines the direction that the inner shadow is coming from, and since we want to pick up fine hairs on both sides of the athlete’s head, a setting of 90 makes the shadow come from directly above his head (Figure 1.20).

3. At the moment the shadow on the hair is black, but we can improve the look further by making the shadow the same color as the athlete’s hair, adding to the realism. Click the color swatch in the Structure section to bring up the Color Picker. Then place your cursor, which is now a color sampler, on the athlete picture and click an outer part of his hair. This replaces the black color of the shadow with the color of the hair you just sampled. Click OK to close the Color Picker.
4. Before closing the Layer Style properties, deselect the Preview checkbox, and then select it again. Do this a few times, and you’ll notice that the inner shadow we’ve applied does a great job showing even more hair, but the inner shadow has also been applied around the whole of the athlete’s body.
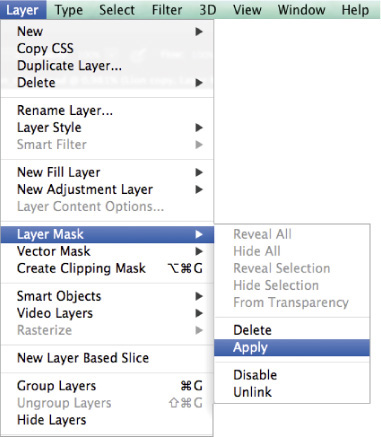
5. To reveal the inner shadow layer style only on the hair, click OK to close the Layer Style properties, and then choose Layer > Layer Style > Create Layer (Figure 1.21).

6. Click this new layer in the Layers panel to make it active. Option/Alt-click the Layer Mask icon at the bottom of the Layers panel to add a black layer mask and completely hide the result of the Inner Shadow layer style.
7. Choose a soft-edged white brush (making sure to put the brush back into the normal blend mode in the options at the top of the screen) at 100% opacity and click on the black layer mask. Then paint over the athlete’s hair to reveal the result of the original Inner Shadow layer style (Figure 1.22).

How to Remove the Annoying Outline
It’s very common when making selections and cutouts to end up with a thin outline around the person or object, as in Figure 1.23.

This outline is part of the original background. Removing it is very straightforward when you have a layer mask, as you’ll see in the following steps.
1. Click the layer mask attached to the layer containing the cutout of the athlete to make it active. With the Lasso tool, make a rough selection around the athlete’s body, but leave out his head (Figure 1.24).

2. Go to Filter > Blur > Gaussian Blur, add a Radius of 1 pixel, and click OK.
3. Choose Image > Adjustments > Levels, and gradually drag the black point in toward the center of the histogram (Figure 1.25) until the outline around the athlete disappears. Click OK, and then deselect the rough selection by pressing Command/Ctrl+D.

Note
When you use a Levels adjustment to remove the outline, you’re actually increasing the amount of black in the layer mask, which in turn shrinks the white area (the cutout). Adding a small amount of Gaussian Blur stops the cutout from having a sharp and defined outline, and so helps it blend into the scene more realistically.
Quick Mask
Whenever I make selections I regularly use Quick Mask to check how accurate my selection is, and to add to it or take away from it if necessary. Quick Mask is a great way to clearly see exactly what has been selected and a quick way to make alterations.
1. With an image open, double-click the Quick Mask icon at the bottom of the toolbar (Figure 1.26).

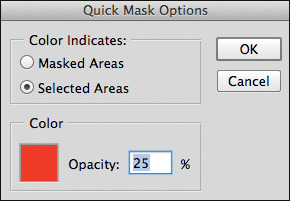
2. With the Quick Mask properties open, make sure that the Selected Areas checkbox is selected and click OK (Figure 1.27).

Note
The default setting for Quick Mask is Masked Areas, meaning that what isn’t included in the selection is covered in a red overlay. But from now on, when you enter Quick Mask mode, whatever is selected will be covered in the red overlay. I find this makes it easier when adding to or taking away from a selection. To change the color of the overlay, double-click the Quick Mask icon to open the properties and click the red color swatch.
3. Having made a selection, go into Quick Mask mode by pressing Q or by clicking the Quick Mask icon in the toolbar. The red overlay appears, indicating the selection (Figure 1.28).

4. With the red overlay it’s easy to see what is missing from the selection, such as the underside of the arm and part of the pants. To include these areas in the selection, paint over them with a black brush at around 75% hardness; to remove areas that should not be part of the selection, paint with a white brush at 75% hardness.
5. Press Q or click the Quick Mask icon in the toolbar.
Tip
If the red overlay is too bright and is preventing you from seeing the image, double-click the Quick Mask icon in the toolbar and reduce its opacity from within the Quick Mask properties (Figure 1.29).
Faking Cutouts: Part 1
Sometimes an image’s background is too busy or too similar in tone and contrast to what you’re trying to select and cut out. The Pen tool is great in situations like these, but if what you’re trying to cut out includes hair or fur, then you can turn to brushes.
Brushes are incredibly powerful, and you can use them to fake the look of hair or fur—saving time and frustration.
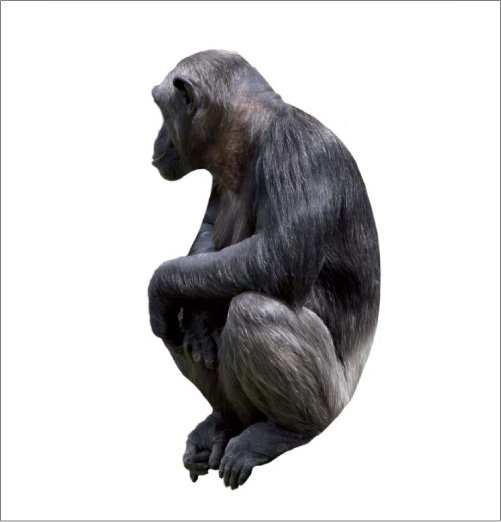
Figure 1.30 shows the image we’ll be working with.

1. With the image open in Photoshop, use the Quick Selection tool to make a rough selection of the chimpanzee (Figures 1.31 and 1.32).


2. Press Q or click the Quick Mask icon in the toolbar. The red overlay is a little too bright to be able to see what needs to be added to or removed from the selection of the feet, so double-click the Quick Mask icon to bring up the properties. Lower the opacity to 15% and click OK (Figure 1.33).

3. Press Q or click the Quick Mask icon in the toolbar to turn it back on. Use a white or black medium soft-edged brush to improve the selection of the feet.
4. Press Q or click the Quick Mask icon in the toolbar to turn it off. Click the Layer Mask icon at the bottom of the Layers panel; this shows the chimpanzee on a transparent background. Command/Ctrl-click the New Layer icon to add a layer below the chimpanzee. Choose Edit > Fill > Contents > White, and click OK (Figures 1.34 and 1.35).


5. Click the layer mask icon at the bottom of the Layers panel, and choose a hard-edged brush with a black foreground color. Zoom in and paint along the outline of the chimpanzee to remove the hair from along his back, shoulders, arm, and head (Figure 1.36).
6. Now the brushes do their magic as we paint back the areas we’ve just removed, but this time in the shape of fur so that it looks as though we made a perfect selection.
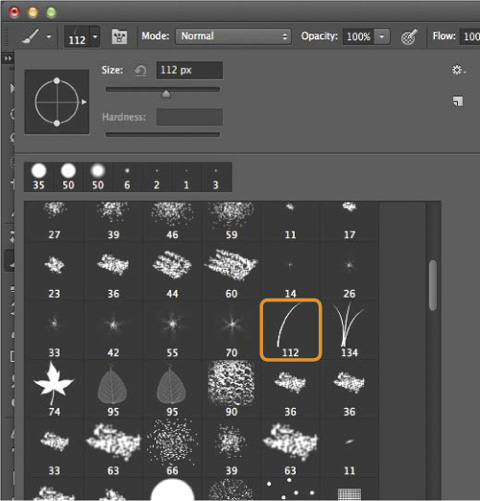
7. In the options bar at the top of the screen, click the Brush Preset Picker icon and choose number 112, which looks like a single blade of grass (Figure 1.37).
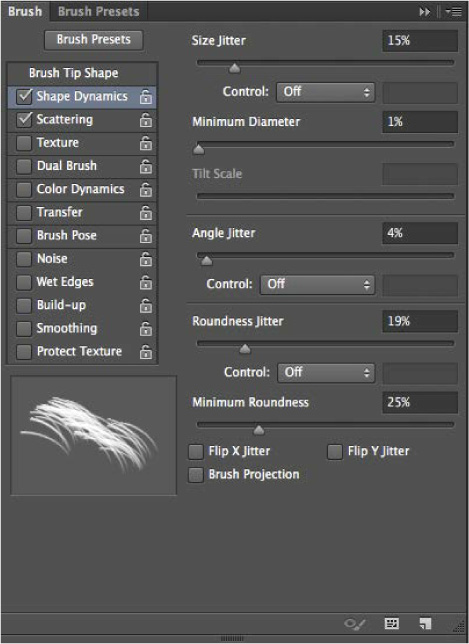
8. Click the Brush Panel icon at the top of the screen in the Options bar (Figure 1.38) so that we can change the settings of the brush to make it look like hair. Click Shape Dynamics, and set Size Jitter to 15% and Angle Jitter to 4%, so as to vary the shape and angle of the brush with each new stroke (Figure 1.39).

9. Click Scattering, set Scatter to 50%, and select the Both Axis checkbox. Set Count to 4, turn off any other brush panel settings, and click Brush Tip Shape. Change Angle to –95 degrees, and set Size to 45 pixels (Figure 1.40).

10. Set the foreground color in the toolbar to white. With the layer mask active, paint along the outline of the chimpanzee to bring back the hair that we removed earlier; this time it is revealed in the shape of the brush we just created (Figures 1.41 and 1.42).


Tip
When painting along the outline, continually change the angle of the brush head by altering the Angle setting in the Brush panel. Select the Flip X or Flip Y checkbox to flip the brush head horizontally or vertically, respectively (Figure 1.43).

Faking Cutouts: Part 2
Most of the time brushes do a great job with cutouts. But one technique doesn’t necessarily work for every picture or situation. In this example the challenge was to select the fine hair of the lion’s mane from the background and make it look believable.
So here’s a great technique I learned from friend, and insanely gifted artist and animator, Aaron Blaise. First we need to create a brush:
1. Go to File > New, and create a document that’s 2000 pixels square at 240ppi (Figure 1.44).

2. Choose a hard-edged brush with a black foreground color and paint random dots on the new document (Figure 1.45). These dots will form the individual hair strands.
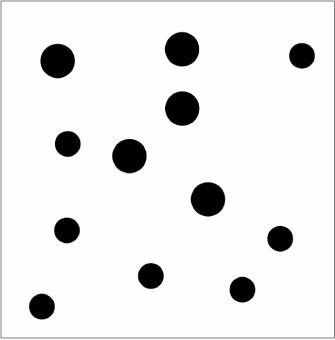
3. To turn the dots into a brush, go to Edit > Define Brush Preset, name it hair, and click OK (Figure 1.46). We no longer need the document we used to make the brush, so choose File > Close and don’t save.

Figure 1.47 shows the image we’ll work with.
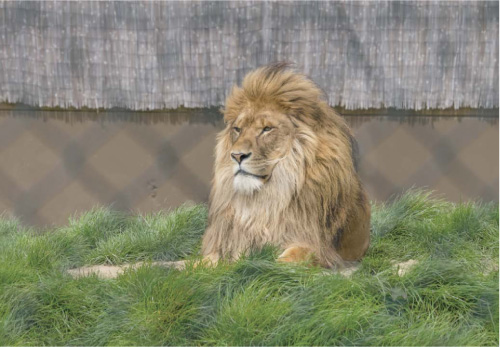
4. Use the Quick Selection tool and Refine Edge to select the lion. Choose Selection as the Output To method in Refine Edge (as we did earlier with the athlete cutout), click OK and add a layer mask to cut the lion from the background. Create a copy of this layer by going to Layer > New > Layer via Copy, and then choose Layer > Layer Mask > Apply (Figure 1.48). (This keeps the original safe in case you make a mistake.)
6. Choose the Smudge tool from the toolbar (Figure 1.49). Go to the Brush Picker and choose the hair brush we just created (Figure 1.50).

7. In the options at the top of the screen, set Mode to Normal, set Strength to 75%, and make sure that the Sample All Layers and Finger Painting checkboxes are unselected (Figure 1.51).

8. Use the Smudge tool to apply brush strokes around the outside of the mane and drag out the hair that is already there. This creates the look of extra hair strands (Figure 1.52).

Tip
To clearly see the new hair you are painting/smudging in, add a blank layer, fill it with white (Edit > Fill, and choose white from the Use menu), and drag it beneath the layer containing the cutout; just as in the earlier example faking the cutout of the chimpanzee.
Tip
Vary the Strength and Size settings of the Smudge tool as you work around the hair to create a more random and believable effect. You could also create several more brushes and use them in combination to enhance the result.
Advanced Blending
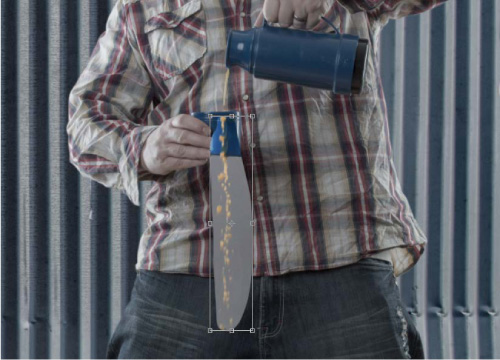
The Blend If sliders can do more than I have space in this book to explain. I tend to use them for controlling how color appears within the highlight and shadow areas of a picture, and also for extracting colored liquid.
Here’s how they can be used to extract colored liquid, in this case coffee, from its original background. Figure 1.53 shows the final image.
Note
The overflowing coffee was photographed much lower down and in a controlled manner against a gray seamless background, so as to prevent unnecessary mess in the studio and make it easier to extract.
1. With the coffee image open in Photoshop, use the Lasso tool to make a rough selection around the overflowing coffee (Figure 1.54). Go to Edit > Copy.

2. With the picture open that you want to add the liquid into, go to Edit > Paste and then Edit > Free Transform to resize the liquid so that it fits into the scene (Figure 1.55).
3. Click the fx icon at the bottom of the Layers panel, and then click Blending Options.
4. Within the Blending Options are the Blend If sliders. From the Blend If menu, choose Red. Drag the black marker in the This Layer gradient bar to the right (Figure 1.56).

You’ll see the gray background and blue cup begin to disappear, but the coffee remains (Figure 1.57).

Note
In this example choosing Red from the Blend If drop-down menu worked but this will vary depending on the image you use.
5. At the moment the coffee cutout looks harsh around the edges. To soften this and help the cutout blend into the scene, Option/Alt-click the black marker in the gradient bar. Doing so splits it into two so you can move each part independently. Moving them to 147/198 worked great (Figures 1.58 and 1.59).


Color Range
Color Range is a great way to make selections based on, well, color.
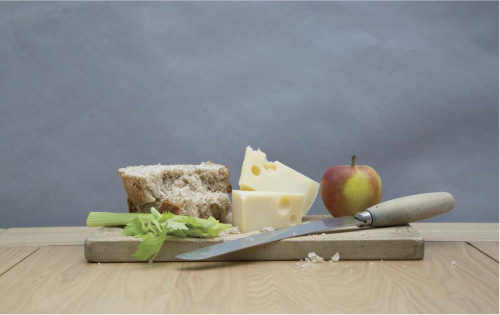
Figure 1.60 shows a cheese board I photographed against a gray background; during retouching I will add texture to make the background look more like a wall. First I need to make a selection that will include all of the background, including the small visible areas among the parts of the food.
1. With the image open in Photoshop, go to Select > Color Range.
2. Click the Eyedropper tool that has the + symbol on it, then drag around the background area of the image to add to the selection (Figure 1.61).

Note
In the Color Range properties, the preview pane shows in real time what is being added to or taken away from the selection. Areas in white are being selected; areas in black are not.
3. Think of the Fuzziness slider as range: the more you move it to the right, the more areas will be selected. In this case I’ve left it at 30. In Figure 1.62 we can see that parts of the knife are included in the selection, but we will sort that out in the next step. Click OK.

4. Press Q to enter Quick Mask, and with a white foreground color, paint over the knife with a normal round brush to remove the overlay.
5. Press Q to exit Quick Mask mode. Go to Select > Save Selection, name the selection wall, click OK, and go to Select > Deselect.
6. Now that there’s a saved selection of the background, textures can be added very easily using blend modes. (I’ll cover this in more detail in Chapter 2.) Go to File > Place Embedded (File > Place in earlier versions of Photoshop), navigate to a texture that you wish to use, and click OK. This places the texture at the top of the layer stack. Resize the layer by dragging the transform handles, and press Return/Enter. The layer is added as a Smart Object layer.
7. So that the layer is only on the gray paper, go to Select > Load Selection, choose wall from the Channel menu, and click OK (Figure 1.63).

8. Click the Layer Mask icon at the bottom of the Layers panel, and change the blend mode of the texture to Soft Light. Figure 1.64 shows the result with the added texture and a color effect.

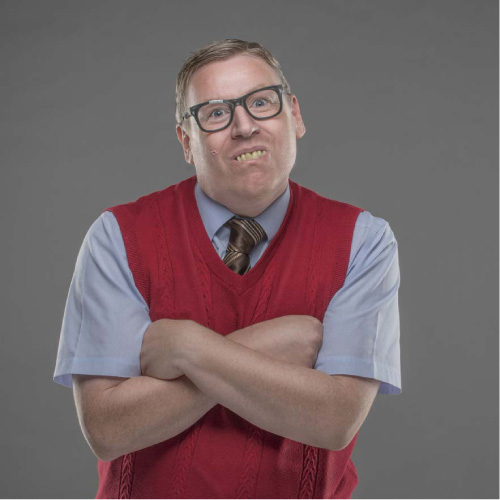
Color Range is great for selecting areas that contain a color, as the name would suggest. Another way that I use it is to change the color of clothing, as you can see in Figures 1.65 and 1.66. In this example the clothing has been selected and then the color changed, using a Hue/Saturation adjustment layer.

The Pen Tool
Without a doubt, using the Pen tool is the best way to make clean, sharp selections and cutouts.
I’m not talking about selecting hair, because there are other methods more suited for that, but when you want to select something with straight lines and curves, nothing beats the Pen tool. But it’s also the tool that most frustrates new users of Photoshop.
In this short section I give you a few pointers to help you get the most out of the Pen tool. With a little practice, the tool is actually very simple to use.
1. Choose the Pen tool in the toolbar, and make sure that the Path option is selected in the options bar (Figures 1.67 and 1.68).


2. Go to File > New, create a new document 1000 pixels by 800 pixels at 240ppi, and click OK. (We’re just using this new document to practice.)
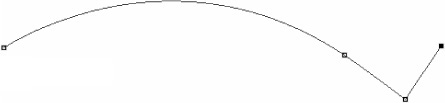
3. Curves are the hardest thing to create with the Pen tool. Choose the Path Selection tool (Figure 1.69), and in the options at the top of the screen ensure that the Constrain Path Dragging checkbox is selected (Figure 1.70). (Depending on your version of Photoshop, you may notice that it is turned off by default.)


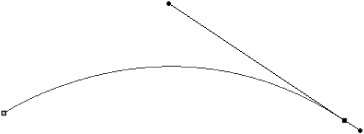
4. Grab the Pen Tool ‘P’. Now click down in the document to add a point. Then add another point in the document a little distance away from the first, but before releasing drag a little in the direction that you wish to head (Figure 1.71).
5. To make this a curve, Command/Ctrl-click the line and drag upward (Figure 1.72). As you drag up or down on the line, you’ll see that the handles increase in length.
6. To make a sharp corner without a curve, use the Option/Alt key. Once you have clicked to lay down a point, hold down the Option/Alt key and click directly on it. Now you have told Photoshop that the next point you create should be joined with a straight line as opposed to a curve. This is how to draw a path, and an eventual selection, around objects where there is no curve (Figure 1.73).
Tip
The Command/Ctrl key is extremely useful when working with the Pen tool. For example, hold it down and click any point to drag it to a new position. Or hold it down, click any handle, and drag to change the angle and length of a curve.
7. Once you have traced whatever you want to select with the Pen tool, the path can now be found in the Paths panel. To turn this path into a regular selection, click the Load Path as a Selection icon at the bottom of the Layers panel (Figure 1.74) and save it.

Tip
The Rubber Band option allows you to see exactly where each line will be when you click to add points. To turn it on, select its checkbox in the options bar (Figure 1.75).

Note
You can always use the Edit > Step Backwards command to go back a few steps if you find that things start to go wrong; this is extremely useful and quickly gets you back on track.
Channels for Selections
Channels are a great way to make selections, but I tend to use them in combination with other methods to get the best possible result.
Here I’ll show you how I use channels to select the tail hair on the giraffe in Figure 1.76. I’ve already used the Pen tool to select the head, neck, body, and legs, and I used Refine Edge to pick up all the hair on the mane. These selections have been saved, so all that remains is to select the hair on the giraffe’s tail.

1. In the Channels panel, click the Red, Green, and Blue channels in turn. I am looking for the channel that gives the most contrast between the tail hair and the background; in this case, it’s the Green channel (Figure 1.77 and 1.78).


Figure 1.78 The Green Channel gives the most contrast between the giraffe’s tail and the background.
2. Create a copy of the Green channel by dragging it over the New Channel icon at the bottom of the Channels panel, and name it Green copy (tail) (Figure 1.79).

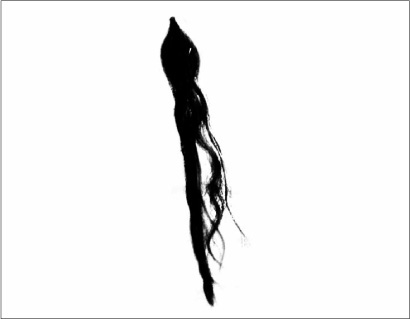
3. With the Lasso tool, make a rough selection around the tail hair. Then go to Select > Inverse so that everything but the tail hair is selected. Then go to Edit > Fill and choose White from the Contents menu. Click OK, and then choose Select > Deselect.
4. Choose Image > Adjustments > Levels. With the White Point Eyedropper, click an area of the background around the tail hair; with the Black Point Eyedropper, click the hair.
5. There remain a few gray areas around the hair (Figure 1.80). Set the foreground color to white. Choose a medium soft-edged brush and in the options bar choose the Overlay blend mode, set Opacity to 50%, and apply a few paint strokes over the gray areas.

Note
Painting with a brush in the Overlay blend mode means that it affects only the gray areas. This allows us to paint in white and get close to the black areas without affecting them, but I find I have more control when I use an opacity lower than 100%.
6. Go to Image > Adjustments > Invert.
Now we’ll combine the body, mane, and tail selections into one complete selection that we can use to cut the giraffe from its original background.
7. Drag the Body channel onto the New Channel icon at the bottom of the Channels panel to create a duplicate; rename it Giraffe.
8. With the Giraffe channel active, Command/Ctrl-click the Mane channel thumbnail to load it as a selection; fill it with white by going to Edit > Fill and choosing White from the Contents menu. Command/Ctrl-click the Tail channel thumbnail to load it as a selection, and fill that with white also (Figures 1.82 and 1.83).

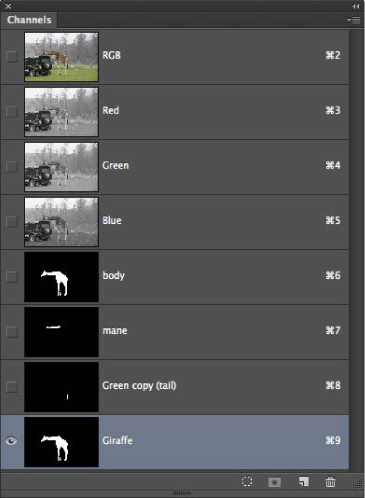
9. Click the RGB channel to return to the normal full-color view. Go to Select > Load Selection, choose Giraffe from the Channel menu, apply a layer mask, and then add it into a composite (Figure 1.84).

Note
It’s always advisable to save selections just in case you need to make changes later on. Save images as Photoshop (.psd) files or TIFF (.tif) files.