
Chapter 4. Special Effects

In this chapter I share some special effects that I regularly use in my own pictures.
I’m often asked how I create these effects and whether they come from using third-party plug-ins. The great thing is that they’re all created within Photoshop, and each one is quick and easy to produce.
Over the next few pages I’ll show you techniques I use for turning day into night, creating a cartoon/painterly effect, and making your own dust, debris, snow, and rain brushes. Plus, I show a quick and easy black and white conversion technique, and how to fake the wet look.
Turning Day into Night
Techniques for turning a day scene into a night scene open up a whole new world of creative possibilities.
Here’s a really simple way to do exactly this, and how to add realistic street lighting by using the Camera Raw filter and a layer mask.
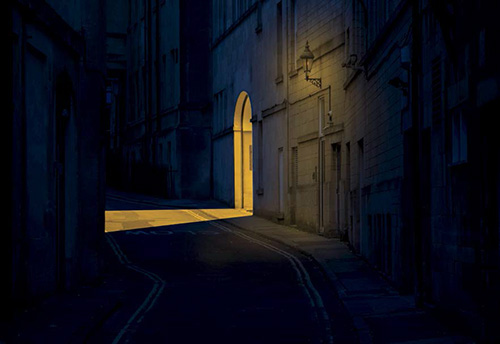
1. With an image file open in Photoshop (Figure 4.1), create a copy by going to Layer > New > Layer via Copy (Command/Ctrl+J). Name this layer night.

2. Because we’re going to make use of a filter for this effect, we want to use it as a Smart Filter, so go to Filter > Convert for Smart Filters, and then to Filter > Camera Raw.
3. To create the nighttime look, move the Temperature slider to –55 so that we introduce much more blue into the picture. Then darken the picture by moving the Exposure slider to –3.00 (Figure 4.2), and click OK.

Now that we have the beginnings of our nighttime scene (Figure 4.3), we’ll move on to adding the street lighting.

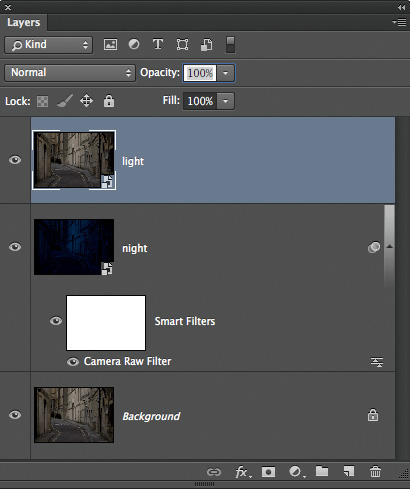
4. Click the original background layer at the bottom of the layer stack, and create a copy by pressing Command/Ctrl+J. Rename it light, drag it to the top of the layer stack, and go Filter > Convert for Smart Filters (Figure 4.4).
5. Go to Filter > Camera Raw, increase Temperature to +100 and Vibrance to +100, and click OK.
6. Click the triangular icon to the right of the night and light layers (Figure 4.5) to hide the layer masks that are attached to the Smart Filter, and to prevent the layer stack from becoming too long.

7. Click the uppermost layer (light), and Option/Alt-click the layer mask icon at the bottom of the Layers panel. This adds a black mask and hides the contents of the light layer.
8. Press D to set the foreground and background colors to their default, and then with a white foreground color and a normal soft-edged brush at 25% opacity, paint around the wall light and down to the ground and pavement (Figure 4.6).

Tip
Releasing and pressing down with the brush increases the opacity of the light layer showing through the black layer mask.
9. Let’s take this a step further and make it appear as though there’s a light inside the doorway that is spilling out onto the road surface. With the same white brush, change the hardness to 90% and, with the layer mask selected in the Layers panel, paint inside the doorway and onto the road (Figure 4.7).
Note
Option/Alt-click the layer mask to see that the area around the door and road surface is pure white (Figure 4.8), meaning that the full color of the light layer is showing through. To reduce this, we need to make the white area not quite so white. We can do that with the output levels. Option/Alt-click the layer mask to go back to the picture.

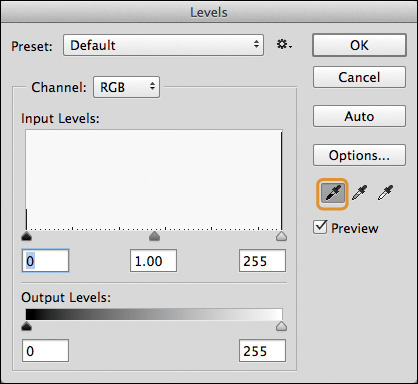
10. Option/Alt-click the layer mask to go back to the picture. Use the Lasso tool to make a rough selection around the doorway and the light on the road surface (Figure 4.9). Then go to Image > Adjustments > Levels and drag the White Output Levels mark to 170 (Figure 4.10). Click OK, and then choose Select > Deselect (Command/Ctrl+D). This makes the light in the doorway and on the road surface not quite so bright.


Note
Option/Alt-click the layer mask and you can see that the area of the door and road surface has gone from pure white to a light shade of gray.
The Cartoon or Painterly Effect
Contrary to what most people believe, this effect isn’t created by using a third-party plug-in but instead makes use of two filters built into Photoshop: Reduce Noise and High Pass.
It creates a wonderful textured feel and seems to add more dimension to a picture—as if it’s coming out of the screen or off the print a little. It works especially well when used on pictures with a fun element.
1. Create a merged layer at the top of the layer stack by going to Select > All, then to Edit > Copy Merged, and then to Edit > Paste (Shift+Command/Ctrl+ Option/Alt+E). Rename the layer painterly.
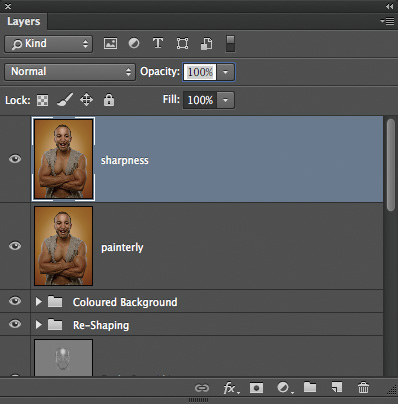
2. Create a copy of this new layer by pressing Command/Ctrl+J. Name this layer sharpness (Figure 4.11).
3. Turn off the sharpness layer by clicking the eye icon to the left of the layer. Click the painterly layer, and go to Filter > Convert for Smart Filters and then to Filter > Noise > Reduce Noise.
4. With the Reduce Noise properties open, set Strength to 10, set all other sliders to 0 (Figure 4.12), and click OK.

Tip
If you place your cursor within the preview inside the Reduce Noise filter, and then click and release, you will see the before and after views.
5. Most times I apply this effect twice, but the second time I use a slightly lower strength. Go to Filter > Noise > Reduce Noise, and this time set Strength to 5 and click OK.
Applying this effect tends to reduce the sharpness in areas like the eyes, hair, and so on. To bring some of this sharpness back but maintain the painterly effect, we can use the High Pass filter.
6. Click the sharpness layer and click to turn the eye icon on so that the layer is visible. Then go to Filter > Other > High Pass, add a Radius of 1 pixel, and click OK. Then change the blend mode of the sharpness layer to Overlay (Figure 4.13).

A radius of just 1 pixel is enough to bring back sharpness for most pictures; very rarely would you want to use an amount of 2 pixels or beyond. Also, applying this effect using Smart Filters means that you can very easily and quickly increase or decrease the final result.
Debris and Dust
Debris and dust are something you often see in movie posters when there’s a lot of action and explosions. As always with Photoshop, there are countless ways to create this debris and dust effect.
Creating the Brush
1. Create a new document: go to File > New, make the dimensions 1500px width and 1500px height, set the resolution to 240ppi, and for Background Contents choose anything other than Transparent. Click OK.
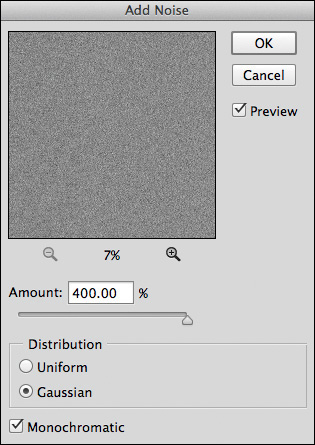
2. Then go to Filter > Noise > Add Noise, set Amount to 400%, set Distribution to Gaussian, and select the Monochromatic checkbox (Figure 4.14).
3. For this effect to work we need to make the noise bigger. Choose the Rectangular Marquee tool, Shift-click, and drag out a square in the center of the document (Figure 4.15).

4. Copy this selection onto its own layer by pressing Command/Ctrl+J. Then go to Edit > Free Transform, Shift+Option/Alt-click any corner transform handle and drag outward so that the square fills the document. As a result, the size of the noise has been increased. Flatten the layers by going Layer > Flatten Image.
5. Go to Filter > Filter Gallery, and then to Stylize > Glowing Edges. Here is where you can experiment with the Edge Width, Edge Brightness, and Smoothness settings to create random shapes that will pass as being debris. In this example I found that setting Edge Width to 14, Edge Brightness to 20, and Smoothness to 1 worked great (Figures 4.16 and 4.17).


6. Click OK to close the Filter Gallery, and then press D to set the foreground and background colors to their default of black and white. Press X so that white becomes the foreground color. Choose the Gradient tool from the toolbar and, in the options at the top of the screen, select the Foreground to Transparent from the Gradient Picker, and the Linear gradient as in Figure 4.18.

7. Drag inward from each side (left, right, top, and bottom) and from the corner of the document several times. This will cover the debris that is too close to the edge and ensure that there are no straight lines (Figure 4.19). Then go to Image > Adjustments > Levels, click the Black Point sampler icon (Figure 4.20). Zoom in on the document and click any of the debris shapes (this darkens them all so that they stand out more). Click OK to close the Levels Adjustment dialog.
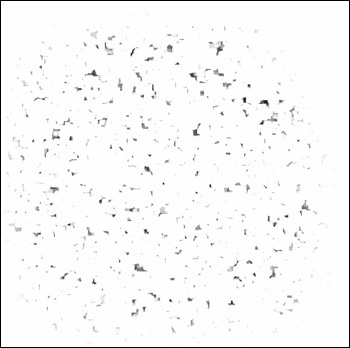
Figure 4.19 The result of using several gradients to remove the debris from the edges and to remove any straight lines
Note
When you’re defining (creating) a brush, Photoshop makes the darkest areas opaque and the gray areas semitransparent. White areas are completely ignored.
8. Choose Edit > Define Brush Preset, name the brush Debris, and click OK. Choose the Brush tool (B), and in the options at the top of the screen click to open the Brush Preset Picker. The brush we just created will appear as the very last in the list. Click this new brush to select it, click the gear icon in the top right of the Brush Preset Picker properties to open a menu (Figure 4.21), and choose Save Brushes.

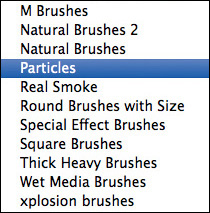
9. Name the brush set Particles, and click OK.
The Particles brush set, which contains the Debris brush, is now stored for future use and will appear in the Brush Preset Picker’s list of brushes (Figure 4.22), meaning you can share it and export it. (Brush sets are a great way to keep similar brushes together.)
Saving Brush Presets
Now we can make some adjustments in the Brush panel to make the Particles brush look and behave as we want it to.
1. Choose the Brush tool (B), and from the Brush Preset Picker choose the Particles brush. Click the Brush panel icon (Figure 4.23).

2. In Brush Tip Shape, set Spacing to 60%. In Shape Dynamics, set Size Jitter to 5% and Angle Jitter to 100% (Figure 4.24). In Scattering, set Scatter to 25% and Count to 1. In Transfer, set Opacity Jitter to 65%.

3. To save these settings as a preset, click the gear icon in the top right of the Brush panel properties and choose New Brush Preset (Figure 4.25). Name the preset Debris/Dust, and click OK.

4. With an image open in Photoshop that you want to add debris to, add a new blank layer to the top of the layer stack and name it debris 1.
5. Use the Debris brush with a black foreground color to paint the debris. Debris in the distance would be small because it is farthest from the camera, so to make it appear out of focus go to Filter > Convert for Smart Filters and then to Filter > Blur > Gaussian Blur. I used a blur amount of 20 pixels (Figure 4.26). Then click OK.
6. Add another blank layer and name it debris 2. Increase the size of the brush a little because the debris nearer to the camera would be larger, and then apply a few brush strokes. Go to Filter > Convert for Smart Filters, and then to Filter > Blur > Gaussian Blur and apply less blur than in the previous step. I applied a blur amount of 15 pixels. Click OK.
7. Add another blank layer and name it debris 3. This debris should be slightly larger than the previous layer, so increase the size of the brush. Add a small amount of Gaussian Blur (5 pixels) so that it still has the look of movement. Click OK.
8. Add another blank layer and name it debris 4. This will be the debris nearest the camera. This debris needs to be largest of all, so increase the size of the brush to the maximum and apply a few brush strokes (if you want the debris to be even bigger, use Edit > Free Transform and resize the contents of the layer). Finally, go to Filter > Convert for Smart Filters, and then to Filter > Gaussian Blur and add a blur amount similar (if not slightly more) to the amount you used on the debris 1 layer.
Note
In Figure 4.27, you can see that adding layers of debris at varying sizes and with different amounts of blur creates the feeling of depth. You can add as many layers of debris as you like, but I recommend no less than three: farthest away, in line with the subject, and closest to the camera.

Creating a Snow Scene
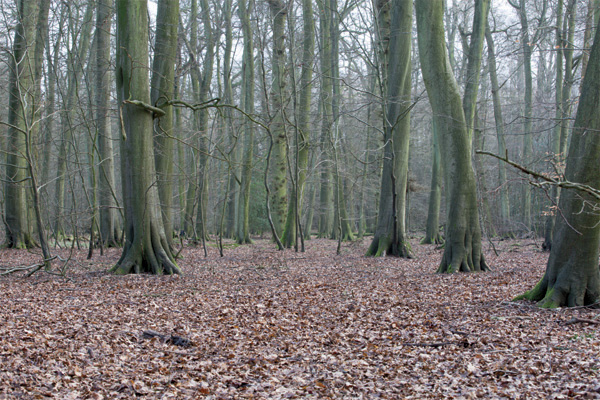
Here’s a simple technique that I use for creating a realistic snow scene. When it’s used on a picture in which there is little or no detail in the sky, it is incredibly effective, especially when falling snow is added.
1. With a suitable picture open in Photoshop (Figure 4.28), go to Select > Color Range. In the Color Range properties, choose Sampled Colors from the Select menu, choose the Selection option, and choose None from the Selection Preview menu (Figure 4.29).

2. Move your cursor on top of the open photo, and click once with the Eyedropper tool. You can see what is being selected from the white areas in the Color Range preview box. Now that you have sampled an area of the picture, move the Fuzziness slider left or right to add or take away from the selection. When you are happy that enough has been selected, click OK.
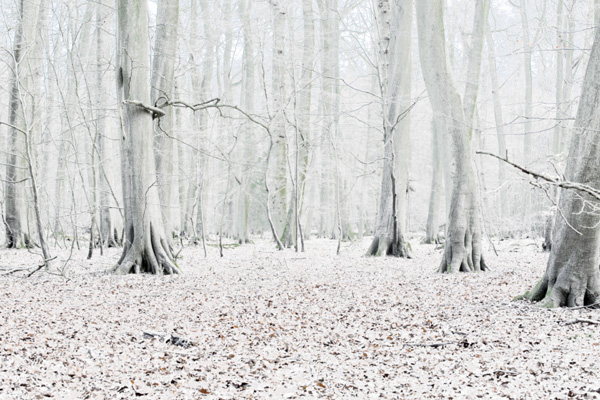
3. Add a new blank layer to the top of the layer stack by clicking the New Layer icon at the bottom of the Layers panel. Name the layer snow (Figure 4.30). Go to Edit > Fill, choose White from the Contents menu, and click OK.

4. Go to Select > Deselect (or press Command/Ctrl+D). Add a small amount of blur, so that the snow has no sharp edges, by going to Filter > Blur > Gaussian Blur, adding a Radius of 2 pixels, and clicking OK (Figure 4.31).
Note
You may need to make a few attempts and experiment with Color Range by clicking and sampling different areas of your picture before you get the result you’re after. You can also duplicate the snow layer by pressing Command/Ctrl+J, which will increase the amount of snow cover.
You can take it one step further by using the Particles brush to create falling snow. The technique is exactly the same as for debris, but use the brush with a white foreground color (Figure 4.32).

Rain
Here’s how to create rain using a few Photoshop filters, as well as how to turn it into a brush that you can keep and use in the future.
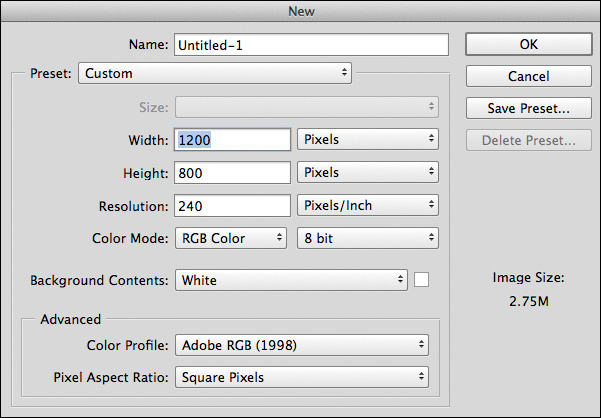
1. Press D to set the foreground and background colors to their default of black and white. Create a new document by going File > New. Set Width to 1200px, Height to 800px, and Resolution to 240ppi, and click OK (Figure 4.33). (It doesn’t matter what color you set as Background Contents so long as you don’t use Transparent.)
2. Go to Filter > Noise > Add Noise, set Amount to 400%, and choose Gaussian and Monochromatic (Figure 4.34). Click OK. Go to Filter > Blur > Motion Blur, and set Angle to –52 and Distance to 70 pixels (Figure 4.35).


3. You may notice that the motion blur around the edges of the file don’t look quite right (Figure 4.36). Go to Edit > Free Transform, Shift+Option/Alt-click a corner transform handle, and drag outward until the edges aren’t visible. Press Return/Enter.

Note
If you can’t use Free Transform, then the layer you’re working on may be locked. Simply click the padlock icon to the left of the layer to unlock it.
4. Go to Image > Adjustments > Levels, choose the Black Point sampler, and then click within the image. This changes the look of the layer entirely, and you’ll see lines appear that we’ll be able to use as rain (Figure 4.37). Try clicking around different areas of the layer, which will create results with more or less rain. Once you have the look you’re after, click OK.

5. To turn this rain effect into a brush, go to Image > Adjustments > Invert so that the rain effect is now black against a white background. Photoshop uses the dark and gray areas to form the brush, ignoring the white areas. Go to Edit > Define Brush preset, name the preset rain, and click OK.
Tip
When adding rain to your pictures, stick to the principles covered earlier: Create a number of layers with rain of different sizes and blur strengths to add depth (Figure 4.38).

The Wet Look
Here’s a simple technique you can use for making something look wet, which I applied to the model in the previous rain technique. Of course nothing beats the real thing, but this can give a great result.
1. Create a merged layer at the top of the layer stack by going to Select > All, then to Edit > Copy Merged, and then to then Edit > Paste (or press Shift+Command/Ctrl+Alt/Option+E). Name the merged layer wet look.
2. Go to Filter > Filter Gallery > Artistic > Plastic Wrap and experiment with the settings until you get the look you’re after. I set Highlight Strength to 20, Detail to 5, and Smoothness to 15 (Figures 4.39 and 4.40).

3. Add a black layer mask to the wet look layer by Option/Alt-clicking the layer mask at the bottom of the Layers panel. Then with a normal white soft-edged brush at 20% opacity, paint over areas of the image to reveal the wet look. Apply several brush strokes to build up the opacity in areas where you want the wet look to be more visible.
Black and White Conversion
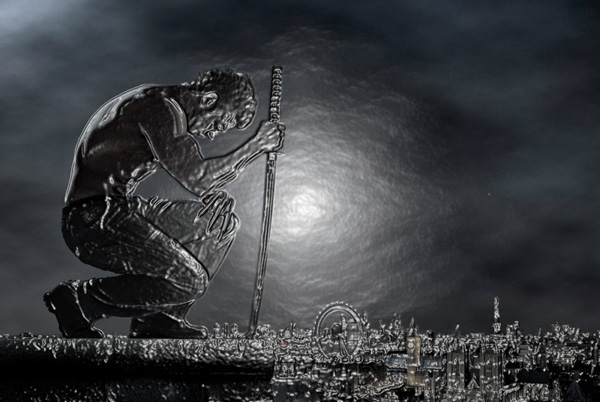
I often use black and white conversions as a way to reduce the color in my pictures. In this example, I’ll show you how I applied it to a physique photograph that I shot of UK-based natural bodybuilder Nigel St. Lewis.
1. With the image that you want to convert to black and white open in Photoshop, press D to set the foreground and background colors to their default of black and white. Then click the Gradient Map adjustment layer icon (Figure 4.41).
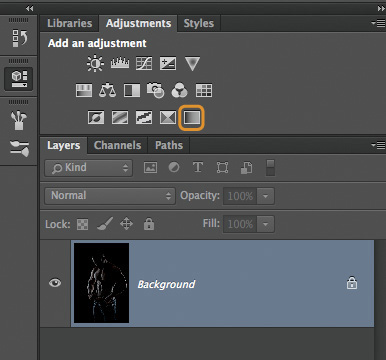
2. We can now make adjustments to get exactly the look we’re after. Click the gradient bar in the Gradient Map properties (Figure 4.42).

3. Drag the Gradient Editor to one side so that you can see your picture. Drag the Black Output Levels marker and the White Output Levels marker (Figure 4.43) to make adjustments to the black and white conversion.

A new icon appears under the gradient (Figure 4.44). This controls the transition from black to white.

4. Drag the new icon left or right until you get the look that you’re after (Figure 4.45 on the following page).

Adding Fake Blood
As photographers and retouchers, we don’t always have the luxury of using a make-up artist at the time of a photo shoot to create effects such as cuts and bruises. But here is how you can create them in Photoshop.
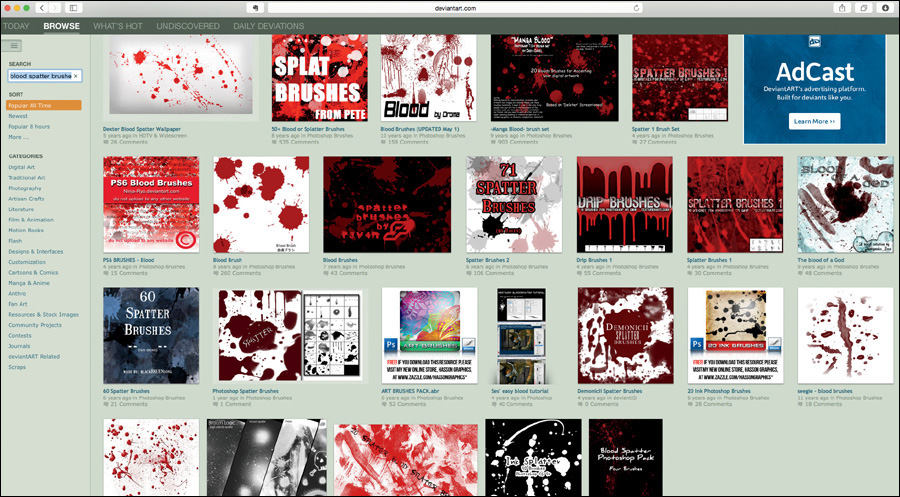
The blood and scratches are added using a series of brushes, but rather than creating them we’ll download them. Places like www.deviantart.com have an enormous database of brushes available for free, but be sure to read the terms of use (Figure 4.46).
Installing the Blood Brushes
When you download brushes from the Internet, you’ll generally be downloading a set containing brushes with different looks, giving you many creative possibilities. There’s no particular set of brushes that I recommend; I suggest you download and try a variety. Once they’re downloaded, they’re easy to install.
1. With Photoshop open, choose the Brush tool (B) and then click to open the Brush Preset Picker from the options bar at the top of the screen. Click the cog icon in the upper-right corner, and choose Preset Manager (Figure 4.47).

Tip
You can also choose the Preset Manager from the Brush Presets tool in the toolbar: click the small arrow in the upper-right corner of the panel.
2. In the Preset Manager, click Load (Figure 4.48), navigate to the blood brushes you downloaded, and click OK.

You’ll see all the blood brushes in the list of brushes in the Preset Manager.
3. So that all the blood brushes are easy to find, organized, and available to use at a later date, it’s good practice to create a set that contains them all. In the Preset Manager, click the first blood brush, Shift-click the last brush, and then click Save Set (Figure 4.49).

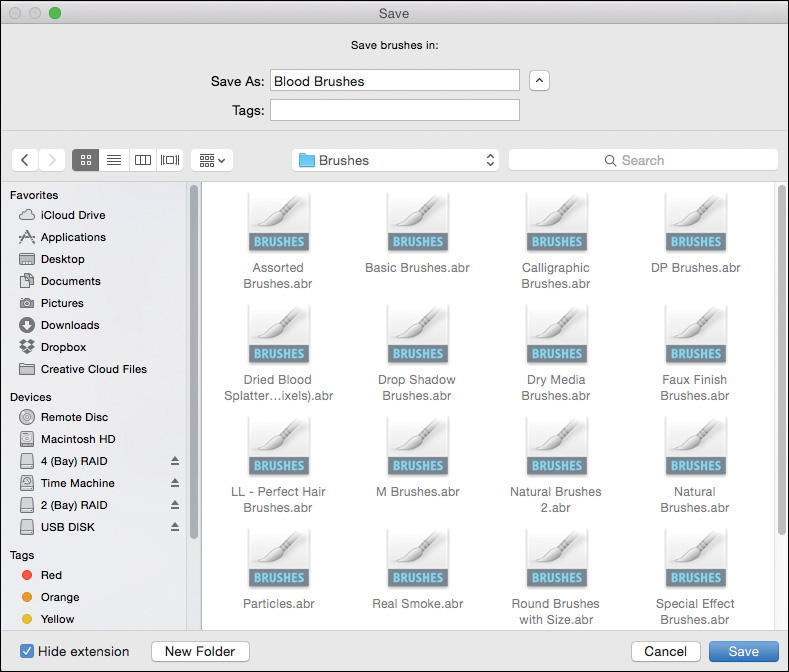
4. Name the set Blood Brushes, save the set onto your hard drive (Photoshop > Presets > Brushes), and click OK (Figure 4.50).
Using the Blood Brushes
First we need to get the color of the blood right. In the real world, blood isn’t the color of tomato ketchup, as we see a lot, but is actually much darker.
1. Click the foreground color in the toolbar to open the Color Picker.
2. In the middle area we have a vertical line made up of different colors. To choose the initial color, move the pointer up or down (Figure 4.51).

3. Now that we’ve chosen the initial color, we can target a specific area. Click inside the large square, and drag the circular pointer. In Figure 4.52 you can see what changes certain areas of the square make. You can see the color in real time in the preview box. Once you’re happy with the color, click OK to close the Color Picker.

4. Add a new blank layer to the top of the layer stack, and name it blood.
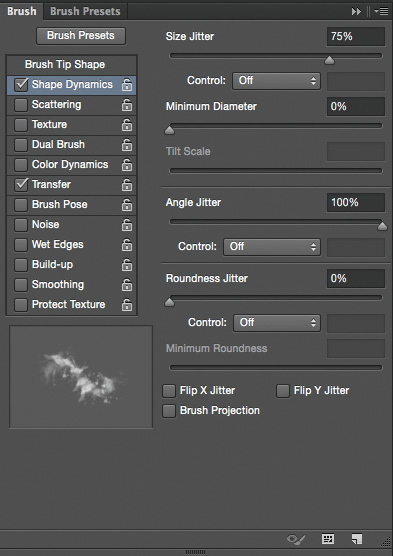
5. Choose one of the blood brushes from the Brush Preset Picker, and then click the Brush Panel icon (Figure 4.53) so you can make adjustments to how the brush behaves.

6. In Shape Dynamics, I set Size Jitter to 75% and Angle Jitter to 100% (Figure 4.54). In Transfer, I set Opacity Jitter to 100% (Figure 4.55).

7. In Figure 4.56 the blood effect looks very two-dimensional. To remedy this, change the blend mode of the blood layer from Normal to Overlay and then adjust the opacity of the layer (Figure 4.57).


Adding Swelling
Here’s how to use a couple of tools in the Liquify filter to make it appear as though the fighter has a swollen eye.
Note
In the more recent Photoshop updates we are able to use the Liquify filter as a Smart Object but if you don’t have this option, simply duplicate the layer you are going to work on and then use Liquify; that way, your working copy is safe.
1. With the layer containing your subject active, go to Filter > Convert for Smart Filters, and then to Filter > Liquify (Figure 4.58).

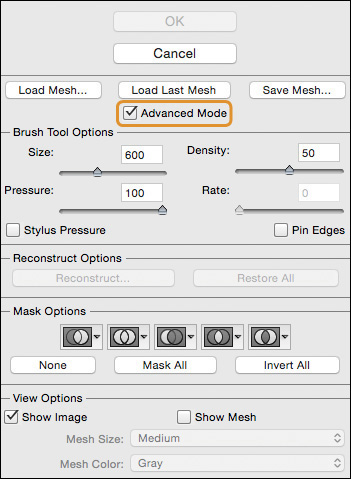
2. In the Liquify Filter properties, select the Advanced Mode checkbox (Figure 4.59) so that all of Liquify’s tools are available.
3. Use the Zoom tool (Z) to zoom in on the area you wish to liquify.
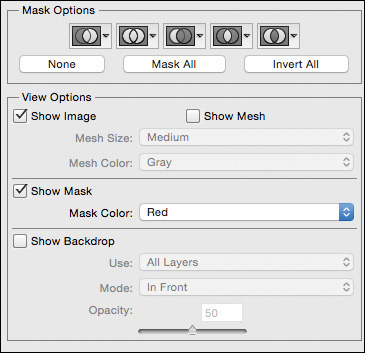
4. I want the area around the fighter’s eyebrow to be swollen, but I need to ensure that other areas aren’t affected. I use the Freeze Mask tool for this (Figure 4.60). Make sure the Show Mask checkbox is selected (Figure 4.61), and paint over the areas you want to protect. In Figure 4.62 I’ve painted an area in the middle of the fighter’s eye.

Note
If you paint over too much of an area with the Freeze Mask tool, you can remove some of the selection with the Thaw Mask tool, located directly underneath it in the toolbar.
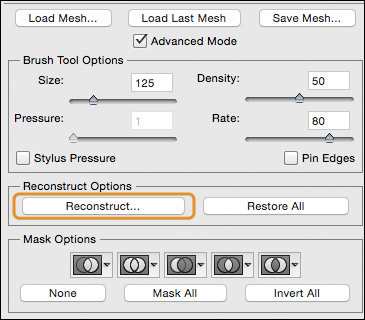
5. Choose the Bloat tool (Figure 4.63), and set Size to 125, Density to 50, and Rate to 80 (Figure 4.64). (Experiment with the settings to suit yourself.)

6. With the Bloat tool, click several times around the area you want to swell.
7. Deselect the Show Mask checkbox, click Reconstruct (Figure 4.65), and move the Amount slider left and right to dial in exactly how much of the effect you wish to keep (Figure 4.66). Click OK.

The Details Effect
The gritty, detailed look is extremely popular in movie posters, and many retouchers like to add it to their own work.
There are three different techniques I use for adding or enhancing details. I’m a big believer in knowing a variety of techniques that you can call on to produce similar results. Figure 4.67 shows the image we’ll be using each technique on.

Details with Photoshop
This was a technique I first saw being demonstrated by the German digital artist Calvin Hollywood.
1. With the image file open in Photoshop, create two copies by pressing Command/Ctrl+J twice (Figure 4.68).

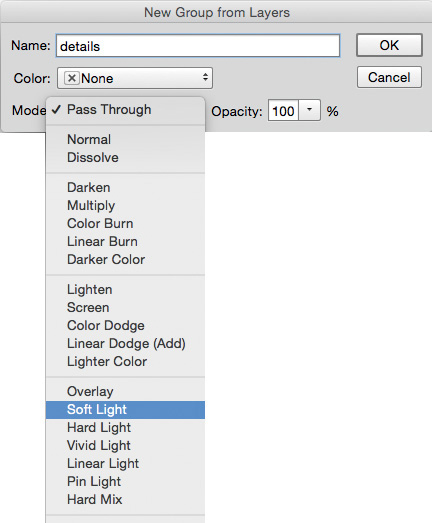
2. Click the uppermost layer, and Shift-click the layer below so that both copies are selected. Then go to Layer > New > Group from Layers. Name the group details, change Mode to Soft Light (Figure 4.69), and click OK.
3. Click the triangle icon for this group to open it and reveal the two layers inside. Change the blend mode of the uppermost layer in the group to Vivid Light (Figure 4.70).

4. On the same layer, go to Image > Adjustments > Invert, which restores the picture to how it originally appeared; however, the image has now been set up to enhance details.
5. Convert the layer to a Smart Object by going to Filter > Convert for Smart Filters. Add the details by going to Filter > Blur > Surface Blur.
6. In the Surface Blur properties, set the Radius and Threshold settings to the same number. I find that settings not exceeding 30 produce the best results (Figure 4.71).

Note
Don’t set the amount too high in the Surface Blur filter, as it can introduce halos and artifacts into your pictures, especially if they have lots of shadow areas. You can see this just under the rim of the hat in Figure 4.72.

7. To limit where and how strongly the details are applied, close the details group by clicking the triangle icon, as before, and Option/Alt-click the layer mask icon to add a black layer mask. Then with a white medium soft-edged brush, paint over the image to reveal the details. Use a lower opacity brush when painting over the skin as opposed to the clothing.
Details with the Nik Collection
I’m using the latest version of Nik Color Efex Pro 4, which includes a preset called Detail Extractor.
I’m a big fan of this plug-in not just because of the results but also because it allows me to work nondestructively.
1. Starting from the beginning, with no layers other than the original image, go to Filter > Convert for Smart Filters, and then to Filter > Nik Collection > Color Efex Pro 4.
2. From the Presets list, choose Detail Extractor. The default settings are immediately applied (Figure 4.73).
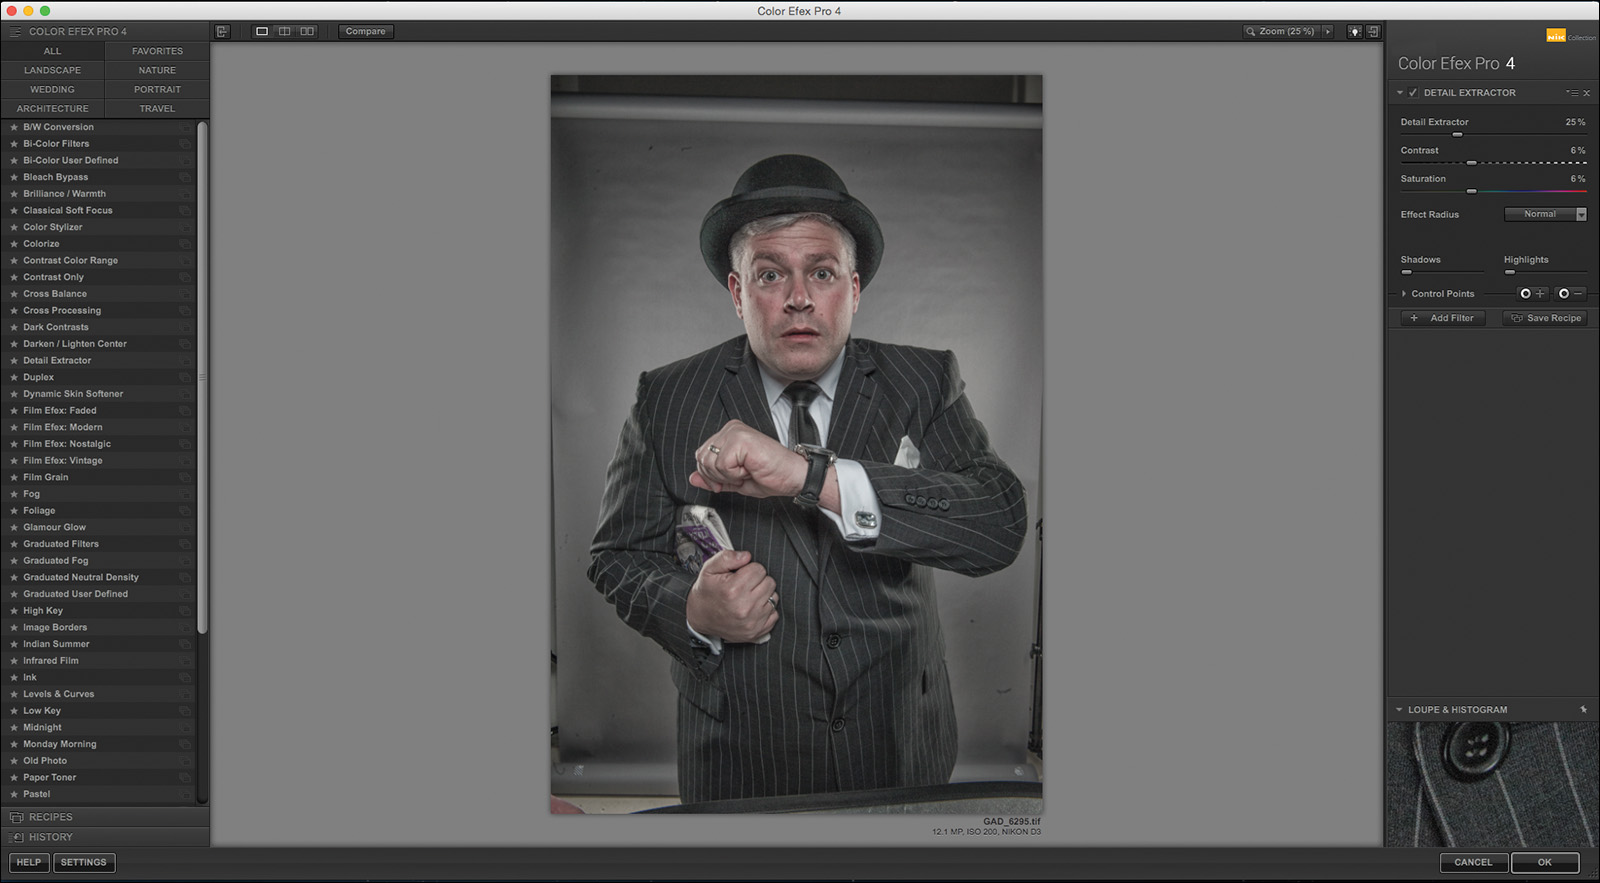
3. More often than not I’ll use the default settings, but experiment with them to see what you prefer (Figure 4.74). Click OK.

4. Because the details have been applied to the entire picture, click the white layer mask attached to the filter in the layer stack (Figure 4.75) and go to Image > Adjustments > Invert to change it to black.

5. With a white medium soft-edged brush, paint over the image area to reveal the details. Use a lower opacity brush when painting over the skin as opposed to the clothing.
You can see that it enhances the details and information incredibly. Unlike the previous technique, it creates very few (if any) artifacts and halos.
One side effect of using this preset for enhancing details is that it also brightens the image (Figure 4.76). In this particular picture that isn’t what we want, because the model’s suit needs to remain dark.

Details with Topaz Details
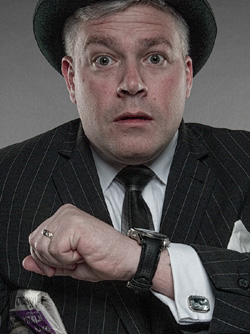
The final technique I turn to for enhancing details, depending on the image, is Topaz Details. The result it produces is quite different from the previous two techniques, and it also adds a slight textured effect. This plug-in gives great results but needs to be used sparingly on skin.
1. With the image open in Photoshop, go to Filter > Convert for Smart Filters, and then to Filter > Topaz Labs > Topaz Details 3.
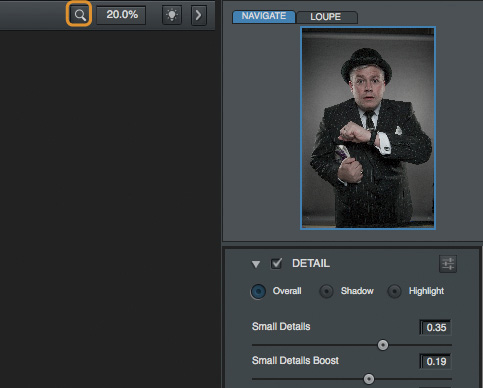
2. In the Detail section, I adjust only the Small Details, Small Details Boost, Medium Details, and Medium Details Boost settings, with the uppermost slider increased to the right the most, and less for the three others, to produce an arc (Figure 4.77). Click OK.

Tip
To see a true representation of how the plug-in is affecting the image, increase the magnification to 100% by clicking the magnifying glass in the upper-right corner (Figure 4.78).
For this particular image, this plug-in has produced the best result because it enhances detail and maintains the original darkness of the suit (Figure 4.79).
3. Because the details have been applied to the entire picture, click the white layer mask attached to the filter in the layer stack, and go to Image > Adjustments > Invert to change it to black. Then with a white medium soft-edged brush, paint over the image to reveal the details. Use a lower opacity brush when painting over the skin as opposed to the clothing.

Here is the before image with the model photographed against a plain gray background, allowing for textures to be added or for cutting out and compositing a new background.

After (facing page), final composited and retouched image.