Chapter 11. Assassin
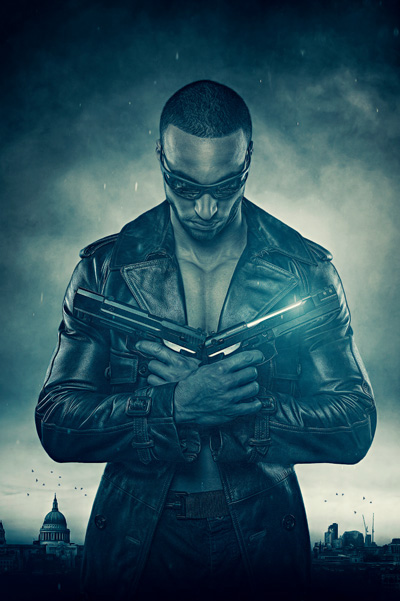
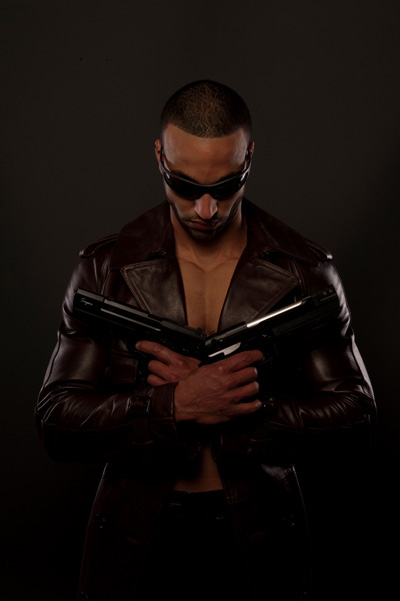
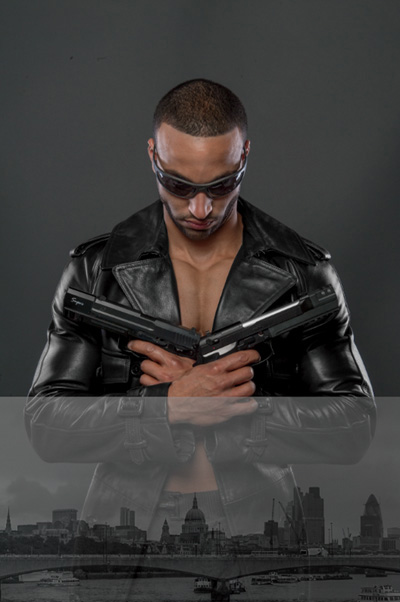
In this final chapter I take you through all the retouching from start to finish for a picture I call “Assassin.”
This is a themed composite image that was originally shot against a gray seamless background, with the intention that in the retouching I would use textures to create a wall behind the model.
The out-of-camera file with the best pose from the shoot was underexposed, but thanks to Camera Raw and all the information held in the file, a lot more detail was recovered. This meant that what was originally a throwaway image became a keeper with a new background composited behind.
In this tutorial I’ll cover techniques shown throughout the book but also show you some new ones, such as a moveable vignette, and an alternative way to create lens flares and reflections.
Because the model was going to have a background added behind him with a light source on it, I used a three-light setup consisting of two gridded strip boxes on either side of the model. This was to mimic the highlights that would be caused by a light coming from behind the model. To the front was a medium octabox, also with a grid (Figure 11.1). Grids gave more control over the direction of the light and reduced spill. I shot at f/11 so that the model was in focus from front to back.

Camera Raw
As always we’ll start the retouch in Camera Raw and then send the file into Photoshop as a Smart Object, so that we maintain a nondestructive workflow.
1. Go to File > Open and navigate to the assassin.dng raw file. Click OK to open the file in Camera Raw.
2. To enhance the detail in the raw file, in the Basic section tab, set Exposure to +1.60, Highlights to –100, Shadows to +50, and Blacks to +10 (Figure 11.2).

3. Because the image has an orange color cast, correct the white balance by choosing the White Balance tool (Figure 11.3) and clicking the background area to the side of the model’s head (Figure 11.4).

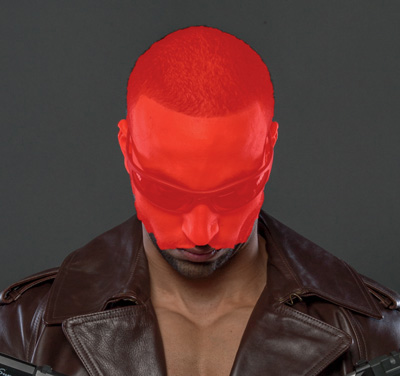
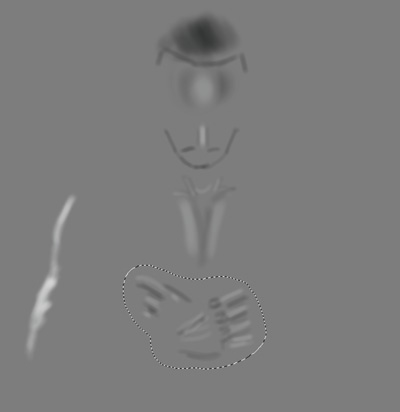
4. The model’s hands look too dark in comparison to the rest of his skin, so choose the Adjustment Brush (Figure 11.5), and reset all the sliders to their defaults by double-clicking their slider markers. Select the Mask checkbox, and paint over the model’s hands so that they are covered in the red overlay (Figure 11.6).
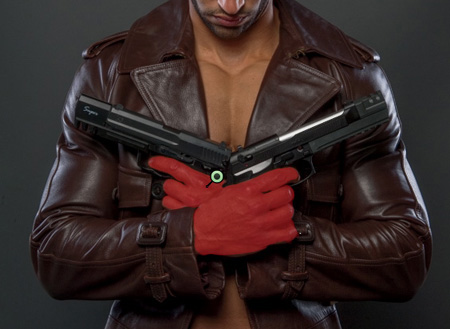
Figure 11.6 Red mask overlay indicating that only the model’s hands will be affected by the adjustments
5. Deselect the Mask checkbox (Figure 11.7) to hide the red overlay, then adjust the hands by setting Temperature to +5, Tint to –20, and Exposure to +0.50 (Figure 11.8). Exit the Adjustment Brush by clicking the Hand tool (H) in the toolbar.


6. In the HSL/Grayscale section under the Saturation tab, with all the adjustment sliders at 0, set Oranges to –20 (Figure 11.9) to reduce the orange cast on the model’s skin.

7. In the Detail section tab, increase Sharpening Amount to 85 and Masking to 62 (Figure 11.10). As the final picture is going to have a hard/gritty feel to it, we can afford to add a high amount of sharpening.

8. On the model’s pants the button is visible underneath his belt. Zoom in with the Zoom tool (Z). Choose the Spot Removal tool (Figure 11.11), and with Type set to Clone and the Show Overlay checkbox selected (Figure 11.12), brush over the button to hide it (Figure 11.13).


Tip
When you use the Spot Removal in Camera Raw with Type set to Clone or Heal, a red pin indicates the area you brush over and a green pin indicates the source chosen by Camera Raw to cover it with. If necessary, drag the green pin for a better result.
Composition
We’ve retouched the file in Camera Raw and now we’ll move it to Photoshop to create the composite image.
1. Now that we are finished in Camera Raw, Shift-click Open Object in the lower-right corner to open the image in Photoshop as a Smart Object.
To improve the composition and overall balance of the image, we’ll move the model into the center of the frame and widen his stance.
2. Go to Edit > Free Transform. In the options at the top of the screen, ensure that the chain icon isn’t depressed, and then increase the width (W) to 103% (Figure 11.14). Then press the left arrow key on your keyboard eight times so that the model is shifted to the left and is now central in the frame. Press Return/Enter.

Selecting the Model
I photographed the model against gray seamless paper with the intention of using the blend mode compositing technique to add a new background. But we’ll be adding a scene as opposed to a solid background, so we cannot use that technique and will need to make a selection.
For an image like this, with dark clothing against a fairly dark background, my choice is to use the Pen tool on the body and then Refine Edge on the hair.
1. With the Pen tool (P), and the options at the top of the screen set to Path, draw out a path around the model’s body but leave out the top of his head and hair (Figure 11.15).

2. In the Paths panel, click the Load Path as a Selection icon (Figure 11.16). Now that we have a visible selection indicated by the marching ants (Figure 11.17), click the Layers panel and choose Select > Save Selection.


3. In the Save Selection properties, name the selection body and click OK, leaving all other settings as they are (Figure 11.18). Then go to Select > Deselect.

4. Choose the Quick Selection tool (W) and drag inside the image area on top of the model to select the head. Check the selection by entering Quick Mask mode by pressing Q, or clicking the Quick Mask icon in the toolbar. To finesse the mask, paint with a brush in black or white to add to or remove from the selection.
The head should now be covered in a red overlay, indicating that it is selected (Figure 11.19).
5. Exit Quick Mask by pressing Q, and then choose the Quick Selection tool (W). From the options bar at the top of the screen, choose Refine Edge. Select the Smart Radius checkbox, and increase Radius to 2.5px (Figure 11.20). Set Output To to Selection, and click OK.

6. Go to Select > Save Selection. Name the selection head, leave all settings at their default (Figure 11.21), and click OK. Then go to Select > Deselect.

7. Click the Channels tab, and then click once on the thumbnail of the body channel (Figure 11.22).

8. Command/Ctrl-click once on the thumbnail of the head channel to load it as a selection (Figure 11.23). Fill this area with white by going to Edit > Fill > Contents > White, and click OK. Then go Select > Deselect to cancel the active selection.

9. Click the head channel in the Channels panel, and drag it into the trash as we no longer need it. Double-click the word body in the body channel, and rename it cutout. Click the thumbnail of the RGB to return to the full-color view of the model (Figure 11.24).

Ordinarily at this stage I would enhance the image details by converting it to a Smart Object, and then using a third-party plug in such as Detail Enhancer in Nik Color Efex Pro 4, as covered in Chapter 4. But for this image I will enhance details using the Photoshop technique, and because this is a destructive process I will wait until later in the retouch.
Dodging and Burning
Using the dodging and burning technique covered in Chapter 2, we’ll now add depth and dimension to the model.
1. Click the Layers panel tab, and then add a new 50% gray layer by going to Layer > New > Layer. Name this layer dodge and burn, change Mode to Soft Light, and select the Fill with Soft-Light-neutral color (50% Gray) checkbox (Figure 11.25). Click OK.

2. Choose the Dodge tool from the toolbar, and in the options at the top of the screen set Range to Midtones and Exposure to 10%. Select the Protect Tones checkbox (Figure 11.26).

The material of the model’s coat means it needs little dodging and burning to add to the depth and dimension, so the main areas to work on are the chest, hands, and head.
3. The highlights on the left arm are not quite as bright as the right arm. So with the Dodge tool, brush several times over the highlight area running down the left arm to brighten it up (Figure 11.27).

4. Option/Alt-click on or underneath the eye icon for the dodge and burn layer in the Layers panel to show just the 50% gray layer (Figure 11.28). Then with the Lasso tool, select any areas that have very defined dodging and burning (Figure 11.29).

5. Go to Filter > Blur > Gaussian Blur, and add 6 pixels of blur (Figure 11.30) so that the highlight and shadow areas blend together. Click OK. Go to Select > Delselect, then Option/Alt-click to turn on the eye icon for the dodge and burn layer, and return to the picture of the model.

Retouching the Jacket
Ideally our model would have been wearing a black jacket rather than brown. But it’s quick and easy to change the jacket to black using a simple black and white gradient map.
1. Press D to set the foreground and background colors to their default of black and white, and then click the Gradient Map Adjustment layer icon (Figure 11.31).

This immediately gives a great black and white conversion, but there are certain areas that need to be addressed. The highlights on the right side have lost detail, and the shadow areas have become too dark.
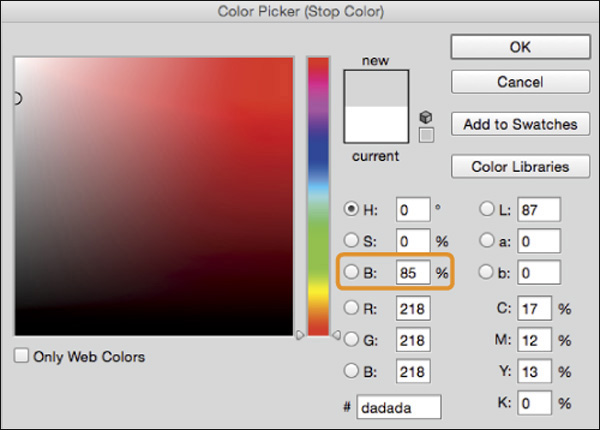
2. Click the gradient bar (Figure 11.32) in the Gradient Map properties to open the Gradient Editor, and then click the white point marker (Figure 11.33). This enables us to set the color that we want white to be represented by in the gradient; since pure white is too bright, we can set it to gray.


3. Click the white color swatch (Figure 11.34) to open the Color Picker, change Brightness to 85 (Figure 11.35), and click OK.

4. Brighten the shadow areas by dragging the midtone point (Figure 11.36) to the left. I found that dragging to 40% brightened the shadow areas sufficiently.

5. Click OK to close the Gradient Editor, then click the layer mask attached to the Gradient Map adjustment layer (Figure 11.37). Go to Image > Adjustments > Invert to change the layer mask to black, and conceal the black and white conversion.

6. With white as your foreground color, choose a medium soft-edged brush. With the Gradient Map adjustment layer active, paint on top of the image area to reveal the black and white conversion all over the model’s jacket (Figure 11.38).

Note
There is no need to be too accurate when painting in the black and white conversion on the model’s jacket, because we will perfect it using a selection in the following steps.
7. Quickly remove any areas where you’ve revealed the black and white conversion outside of the model by going to Select > Load Selection > Channel, choosing cutout, and clicking OK. This loads the selection of the model we made earlier. Now go to Select > Inverse, and then to Edit > Fill > Contents and Black. Click OK. Go to Select > Deselect to remove the selection.
8. To remove any areas where the black and white conversion has gone onto the model’s chest, choose the Quick Selection tool and, in the options at the top of the screen, select the Sample All Layers checkbox (Figure 11.39). Then drag to make a selection of the model’s chest (Figure 11.40).


9. If needed, hold down the Shift key and drag to include the visible part of the model’s stomach and hands in the selection. Go to Edit > Fill > Contents and Black, and click OK. Go to Select > Deselect to remove the selection.
Adding the Background
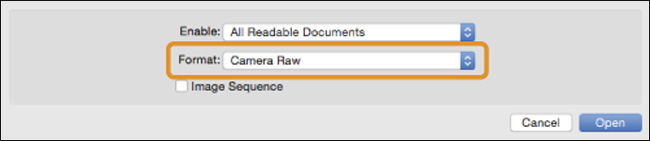
Now we’ll prepare the background and add it into place. We’ll be using the london.jpg file, and although it’s not a raw file we’ll retouch it in Camera Raw.
1. Go to File > Open, navigate to the london.jpg file, and in the Format menu choose Camera Raw (Figure 11.41).
2. In the Basic tab, set Shadows to +100, Clarity to +75, and Saturation to –100 (Figure 11.42).

3. Straighten the image by double-clicking the Straighten tool (Figure 11.43). Press Return/Enter, and click Open Image.
4. Go to Select > All, and then to Edit > Copy. Click back on the model picture, and go to Edit > Paste to add the London picture. Rename this layer London.
5. The London layer should be at the top of the layer stack. Lower its opacity to 50% so that you can see the model through it (Figure 11.44), then go to Edit > Free Transform and resize the London layer so that it fills the image area, and press Return/Enter. Press 0 to set the opacity of the layer to 100%, and use the Move tool (V) to drag the layer into place.
London photograph by Dave Clayton
Figure 11.44 Lower the opacity to help with positioning the London layer.
6. Add a new blank layer to the top of the layer stack, and press D to set the foreground and background colors to their default of black and white. Go to Filter > Render > Clouds, and use the Rectangular Marquee tool to drag out a selection in the center of the image area (Figure 11.45).

7. Press Command/Ctrl+J to copy this selected area onto its own layer. Then go to Edit > Free Transform, and Shift-Option/Alt-drag a corner transform handle to resize this layer outside the image boundary (Figure 11.46). Press Return/Enter, and rename this layer clouds.

8. Click the original render clouds layer below and drag it to the trash, and then drag the London layer to the top of the layer stack. Click the layer mask icon to add a white layer mask to the London layer (Figure 11.47).
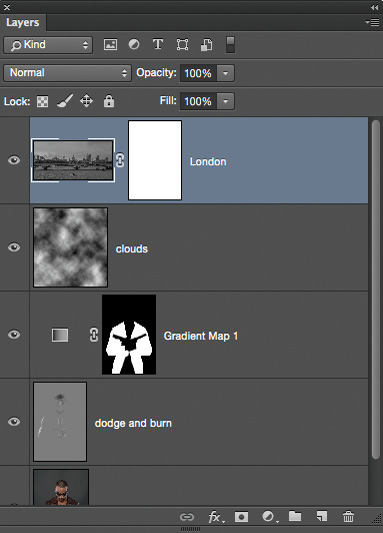
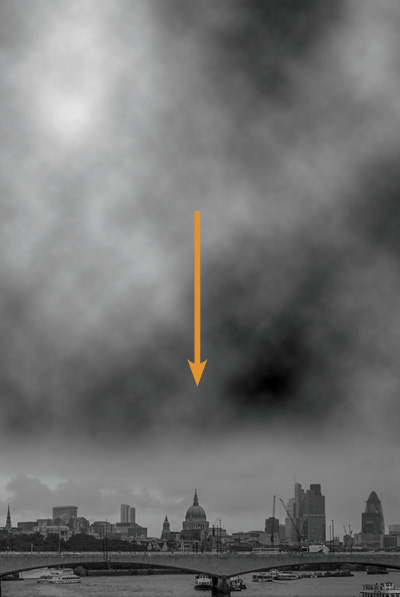
9. With a black foreground color, choose the Gradient tool with Foreground set to Transparent and a Linear gradient (Figure 11.48). Click the layer mask attached to the London layer, and then drag a gradient to blend the clouds and London layers together (Figure 11.49). (Note: You may need to apply several strokes with the Gradient tool.)

10. Click the clouds layer and lower the opacity to 70%. Shift-click the London layer so that both are selected, and then go to Layer > New > Group from Layers, rename it background scene, and click OK.
11. Go to Select > Load Selection > Channel > Cutout and click OK. Option/Alt-click the layer mask icon at the bottom of the Layers panel (Figure 11.50) to reveal the model (Figure 11.51).


12. Click the assassin layer at the very bottom of the layer stack, and then add a Hue/Saturation adjustment layer. Lower Saturation to –85 so that the model matches the background more closely.
Note
The assassin layer is a Smart Object, so we could lower the saturation of the model by double-clicking the thumbnail and going into the Camera Raw filter. We used a Hue/Saturation adjustment instead so that it would be easier to judge how much the saturation needed to be lowered. I did not want to remove the color completely.
Add a Moveable Vignette
Now we’ll darken the area around the model with a vignette. This technique creates a moveable vignette that we can reposition at any stage.
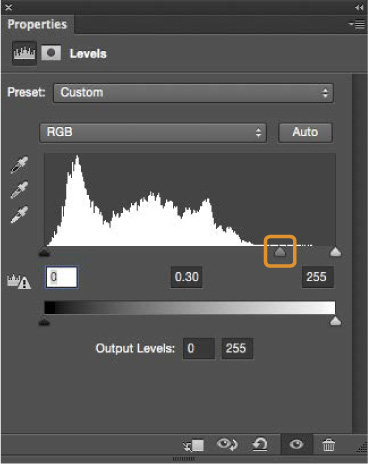
1. Click the background scene group at the top of the layer stack, and add a Levels adjustment layer. Drag the midtone point to 0.30 (Figure 11.52) so that the entire image is darkened.
2. Click the layer mask for the Levels adjustment, then with a black foreground color, choose a normal soft-edged brush and click once in the center of the image (Figure 11.53). Then go to Edit > Free Transform, and Shift-Option/Alt-drag any outer transform handle out-ward to increase the size of the vignette (Figure 11.54). Press Return/Enter, and rename this adjustment layer vignette.


Tip
To reposition the vignette, use the Move tool (V). With the layer mask attached to the Levels adjustment layer active, drag in the image area.
3. Add a new blank layer to the top of the layer stack, name it darken bottom, and with the black soft-edged brush paint across the very bottom of the image to darken it further.
The Glasses
To add a little more interest to the picture we’ll add a reflection on the glasses. The reflection won’t be entirely accurate because it won’t contain the model’s hands and guns, but just adding something is enough to sell the fake.
1. Go to the london.jpg file. (If it’s not open go to File > Open, navigate to the file and click OK.) Go to Select > All, and then to Edit > Copy.
2. Click back on our model picture, and then make a selection of the lenses in the glasses using whichever tool you prefer (Figure 11.55).

3. With the selection of the lenses visible, go to Edit > Paste Special > Paste Into and add the London file. Go to Edit > Free Transform to resize the layer, and drag to reposition the pasted image to avoid having the same parts visible that appear in the background scene group (Figure 11.56). Press Return/Enter to lock in the transformation.

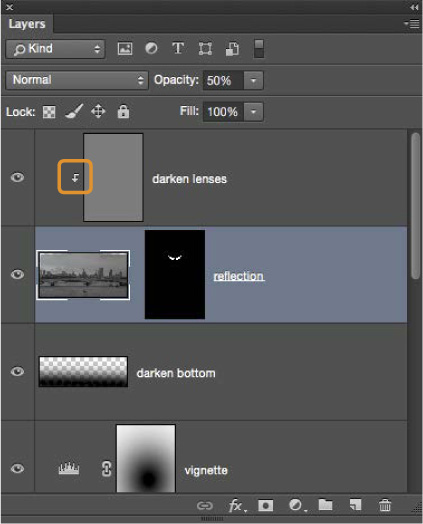
4. To add a slight distortion to the layer because of the shape of the lenses, go to Filter > Distort > Pinch. Add an Amount of –4 and click OK (Figure 11.57). Rename this layer reflection and lower the opacity to 50%.

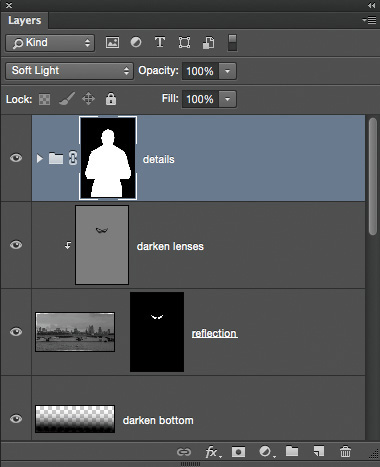
5. Now we’ll darken the outer portions of the lenses. Go to Layer > New > Layer, name it darken lenses, change Mode to Soft Light, select the Fill with Soft-Light-Neutral-Color (50% gray) checkbox, and click OK.
6. Grab the Burn tool, and in the options at the top of the screen set Midtones and Exposure at 30%. With the darken lenses layer selected, go to Layer > Create Clipping Mask to restrict the burning to the lenses (Figure 11.58). Now darken the outer areas of the lenses using the Burn tool.
Finishing Touches
With the composite elements in place, now is the time that I would step away from the image and return later with fresh eyes to add finishing touches.
Regularly stepping away from the image you’re retouching enables you to view things more clearly when you return, and see if anything you’ve done needs to be altered.
Enhancing the Details
1. Add a merged/stamp layer to the top of the layer by Select > All, then Edit > Copy Merged, and then Edit > Paste (or press Shift+Option/Alt+Command/Ctrl+E).
2. Press Command/Ctrl+J to create a copy of this layer. Shift-click the layer below so that both layers are selected, go to Layer > New > Group from Layers, name the group details, and click OK. Change the blend mode of the group to Soft Light.
3. Click the triangle icon for this group to open it and reveal the two layers inside. Change the blend mode of the uppermost layer in the group to Vivid Light (Figure 11.59).

4. On the same layer, go to Image > Adjustments > Invert, which restores the picture to how it originally appeared; however, the image has now been set up to enhance details.
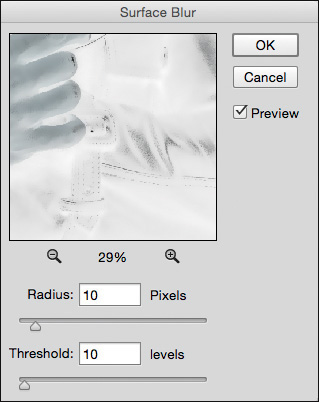
5. Convert the layer to a Smart Object by going to Filter > Convert for Smart Filters. To add the details, go to Filter > Blur > Surface Blur and set Radius to 10 and Threshold to 10 (Figure 11.60). Click OK.
6. To restrict the details so that they are affecting only the model and not the background, first close the group by clicking the triangle icon. Then go to Select > Load Selection > Channel and choose cutout from the menu. Click OK to load the cutout selection, and add a layer mask by clicking the layer mask icon at the bottom of the Layers panel (Figure 11.61).
Lens Flare
In Chapter 2, I showed you how to add lens flares using a 50% gray layer and the Lens Flare filter.
Here’s another way to add lens flares, using a brush and a blend mode.
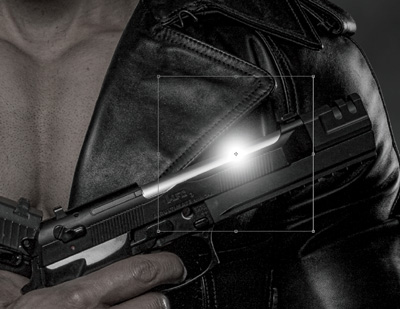
1. Add a new blank layer to the top of the layer stack, name it center glow, and change the blend mode to Linear Dodge (Add). Then with a white foreground color and a normal soft-edged brush at 100 pixels, click the shiny metal part of the gun (Figure 11.62).

2. Press Command/Ctrl+J to create a copy of layer. Change the name of the layer to outer glow. Go to Edit > Free Transform, Shift-Option/Alt-click a corner transform handle, and drag outward to resize it (Figure 11.63). Press Return/Enter.
3. Lower the Fill of the outer glow layer to 60% (Figure 11.64). This makes the flare less bright and allows darker areas of the image to show through. Lower the fill of the center glow layer to 55% (Figure 11.65).


Coloring / Toning
1. Create a group at the top of the layer stack, containing both of the lens flare layers, by clicking the outer glow layer and Shift-clicking the inner glow layer so that they are both selected. Then go to Layer > New > Group from Layers and name the group lens flare. Then go to File > Place Embedded (File > Place in earlier versions of Photoshop), navigate to the thingys.jpg image file, and click OK (Figure 11.66).

2. If necessary, resize the thingys file to fill the layer by adjusting the transform handles, then click OK. Rename this layer thingys.
3. To hide the darker parts of the layer and leave the brighter parts visible, change the blend mode of the thingys layer to Screen. To add some movement to the thingys, go to Filter > Blur > Motion Blur. Set Angle to –45 and Distance to 35 (Figure 11.67) and click OK. Lower the opacity of the thingys layer to 80%.

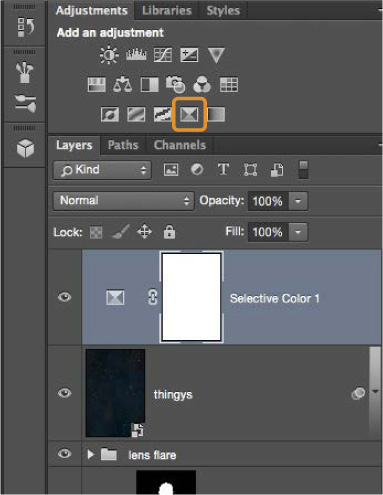
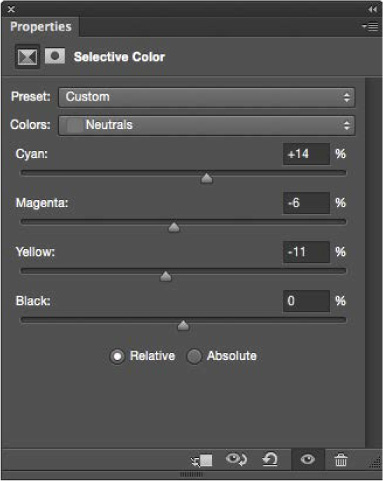
4. Add a Selective Color adjustment Layer (Figure 11.68). In the Selective Color properties, from the Colors menu choose Neutrals. Set Cyan to +14, Magenta to –6, Yellow to –11, and Black to 0 (Figure 11.69).
5. From the Colors menu, choose Blacks. Increase the contrast in the image by adjusting Black to +20 (Figure 11.70). Lower the opacity of the Selective Color adjustment layer to 80%.

The Cartoon or Painterly Effect
To finish, we’ll add the cartoon/painterly effect that I use on a lot of my images.
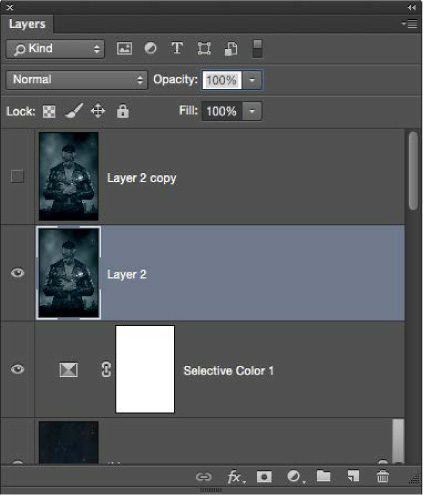
6. Add a merged/stamped layer to the top of the layer stack by going to Select > All, then to Edit > Copy Merged, and then to Edit > Paste. Press Command/Ctrl+J to create a copy.
7. Click the eye icon of the uppermost layer to turn it off, and then click the layer beneath (Figure 11.71). Go to Filter > Noise > Reduce Noise, and set Strength to 10 and all other sliders to 0 (Figure 11.72). Click OK.

8. Click the uppermost layer in the layer stack and turn it on (make it visible) by clicking to reveal the eye icon. Then go to Filter > Other > High Pass, add in 1 pixel (Figure 11.73), and click OK. Change the blend mode of the layer to Overlay.