
Opening a new LEGO MINDSTORMS NXT 2.0 set is definitely exciting, but at the same time you’re faced with the task of getting everything in order and then learning the basics. Sound difficult? It isn’t. The NXT 2.0 set’s user-friendly features make getting started easy. And this chapter will further clarify that process, guiding you through the steps and offering additional insights and instructions that will help you to get the most out of your NXT 2.0 set.
The NXT 2.0 set requires six AA batteries and a computer (PC or Mac). In addition, if you choose to establish a wireless connection between your NXT and computer (an optional feature), your computer must have Bluetooth capability.
Six AA batteries fit into the back of the NXT and power the NXT, motors, and sensors. Under most circumstances, regular alkaline batteries are recommended: they’re relatively cheap and work well. If you will be using your NXT quite frequently, however, consider investing in some rechargeable batteries. They don’t provide quite as much power as alkaline batteries do, but they can save you some money over the long haul. Energizer E2 lithium batteries are another option. These last much longer, provide more power, and are noticeably lighter than either alkaline or rechargeable batteries. However, these particular lithium batteries are extremely expensive, currently costing several times more than alkaline batteries.
You’ll use a computer—whether a desktop or a laptop—to access several of the set’s features (such as NXT-G programming) after installing the included software. Windows and Mac OS X are compatible with the NXT software. Although the software’s system requirements specify that compatible versions of operating systems include Windows XP, Windows Vista, and Mac OS X versions 10.4 and 10.5, newer versions of Windows and Mac OS X will probably work as well (i.e., Windows 7 and Mac OS X version 10.6). A more detailed list of system requirements appears on the side of the NXT 2.0 set.
Before you can download programs from your computer to your NXT, you must first establish a connection between the two. Although the NXT 2.0 set includes a USB cable for making this connection, you can also use Bluetooth technology to establish a wireless connection. Your NXT is already Bluetooth capable, but your computer must either have built-in Bluetooth capability or use a Bluetooth adapter to wirelessly communicate with your NXT.
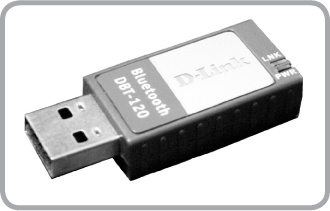
If your computer is not already Bluetooth capable, you should purchase a Bluetooth adapter from an electronics store or an online retailer such as Amazon.com. If you’re using Windows XP or an older Mac computer (new iMacs, the MacBook, and the MacBook Pro come standard with Bluetooth technology), I highly recommend one particular adapter: the D-Link DBT-120 (Figure 2-1). Some DBT-120s look slightly different from the one shown in Figure 2-1, but it should work the same as long as the label says it’s a DBT-120.
Note
The LEGO MINDSTORMS user guide packaged with the NXT 2.0 set refers to a Bluetooth adapter as a Bluetooth dongle. These two terms—Bluetooth adapter and Bluetooth dongle—are basically synonyms.
For an alternative to the DBT-120, check out the LEGO online store, which is currently selling another Bluetooth adapter. Browse to http://www.lego.com/, search for Bluetooth, and select Bluetooth Dongle (Item #9847). Although the product description doesn’t mention a specific brand, the adapter appears to be the Abe UB 22S, which is compatible with both Windows XP and Mac OS X.
If you’re using an operating system other than Windows XP, I would recommend searching Amazon.com for a newer Bluetooth adapter that specifically supports your operating system. Additionally, not all Bluetooth adapters are compatible with the NXT; you can check the Bluetooth section of the MINDSTORMS website for more compatibility information: http://www.mindstorms.com/bluetooth/.
What do you want to do immediately upon opening an NXT 2.0 set? Naturally, you want to create a functional robot. With the Quick Start kit included in your set (Figure 2-2), you can accomplish that within just 30 minutes. After opening your NXT 2.0 set, grab this small kit and rip it open. Some of the pieces (such as the NXT and motors) are packaged separately, but you will find in the kit most everything you need to construct a small robot. The building instructions are in the LEGO MINDSTORMS user guide (Programming a Robot–Establishing a Connection with Bluetooth Technology and Downloading a Program). Make sure you put six AA batteries in your NXT before you start building the robot.

Note
Unlike the RCX microcomputer used in previous generations of MINDSTORMS products, the NXT does not require you to initially download firmware onto it. Instead, the NXT ships with the firmware already installed, which it semi-permanently retains in its Flash memory. In other words, as soon as you put batteries in your NXT, it should be entirely operable.
After constructing and testing the robot from the Quick Start kit, you should install the NXT software on your computer. This software contains the challenges (sample projects), the NXT-G programming environment, and more.
To begin installing the NXT software, place the CD-ROM included with your NXT 2.0 set in your computer’s CD-ROM drive. If you’re running Windows, insert the CD-ROM and then wait for a menu like the one in Figure 2-3 to appear on the screen. Click the proper language and then follow the onscreen instructions.
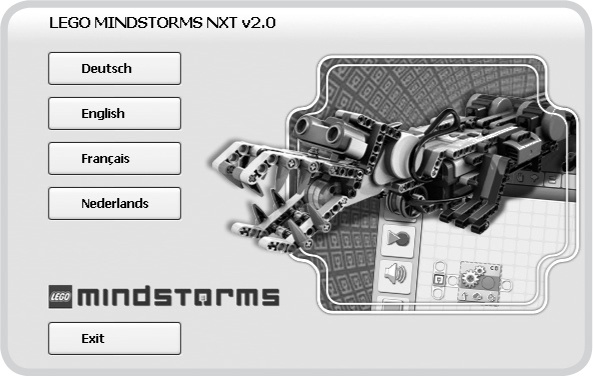
If you’re running Mac OS X, you must manually run the installer on the CD-ROM to view this menu, however. To do this, open the MINDSTORMS NXT CD-ROM on your computer, and then double-click the Install icon. Once the menu appears, click the proper language and follow the instructions.
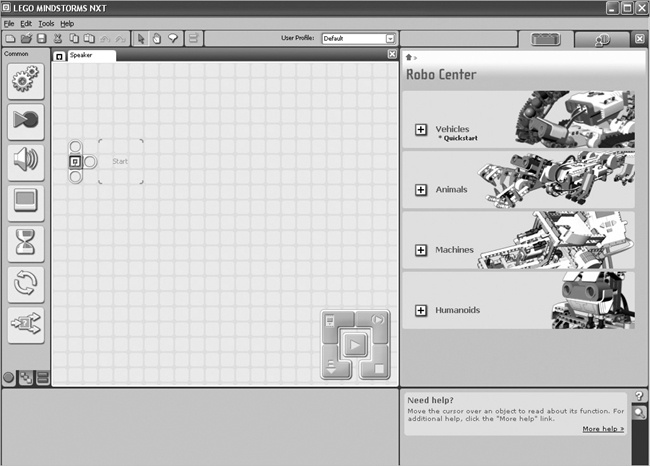
Once you have installed the software, launch it and wait for the program to load. When it has finished loading, you will see the main screen (Figure 2-4). The NXT software has three main features: the NXT-G programming interface, the Robo Center, and My Portal.
Although Part III covers NXT-G in depth, in this chapter you’ll learn how to tackle the following basic tasks so that you can begin programming:
Create a new NXT-G program
Add a programming block to an NXT-G program
Establish a connection between your computer and the NXT using the USB cable or Bluetooth technology
Download an NXT-G program to the NXT
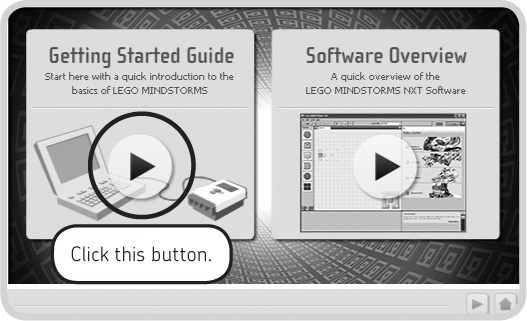
Included in the NXT software is a short tutorial that covers these tasks (minus the Bluetooth technology), so we’ll follow the tutorial’s instructions. First, make sure you are still on the main screen of the NXT software. Click the large play button below the words Getting Started Guide (Figure 2-5) to begin watching the tutorial. Watch the entire tutorial before going forward.

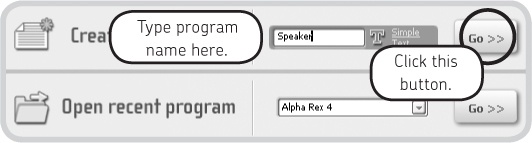
When the tutorial has finished, you can begin creating a new NXT-G program. Near the bottom of your screen you will see sections labeled with the words Create new program and Open recent program. You can use the adjacent text boxes to create new NXT-G programs or quickly access existing ones. As instructed by the tutorial, you will create a new program called Speaker. Type Speaker into the Create new program text box and then click the Go>> button (Figure 2-6).
Your new NXT-G program should appear right away (Figure 2-7). It’s currently empty, containing no programming blocks, but you’ll change that. Drag the Sound block into the work area’s Start position and change the block’s sound to !Error 02 in the configuration panel (Figure 2-8). When you’ve accomplished this easy task, your one-block program is complete.
In order to download the new program onto the NXT, you must establish a connection between your computer and the NXT. There are two ways to establish this connection: You can use the USB cable that came with your NXT 2.0 set, or you can use Bluetooth technology to connect wirelessly. Since the tutorial uses the USB cable, let’s begin with that method.

Note
You can also consult Part II of your LEGO MINDSTORMS user guide for information about using the USB cable.
As instructed in the tutorial, press the orange button on your NXT to turn it on (you inserted the necessary batteries when you were working with the Quick Start kit earlier). Grab the USB cable that came with your NXT 2.0 set, plug the appropriate end into the USB port on the front end of your NXT, and then plug the other end into an available USB port on your computer. Only one end can fit into your NXT, so it will be easy to determine which end goes where. If your computer has more than one USB port, I encourage you to leave the USB cable plugged into it merely as a matter of convenience.
Note
If you are using Windows XP, plugging in the USB cable will cause a small message about new hardware to appear in the lower-right corner of your screen. You shouldn’t need to do anything except wait a moment until the message changes to Your new hardware is installed and ready to use.
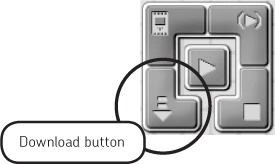
Look to the bottom-right corner of your NXT-G program for the Controller. The Controller has five different buttons, but the only one we’re interested in right now is the Download button, the one in the lower-left corner (Figure 2-9) which downloads an NXT-G program to the NXT when clicked. Click it now to begin downloading your program. A dialog will appear to show the progress (Figure 2-10).
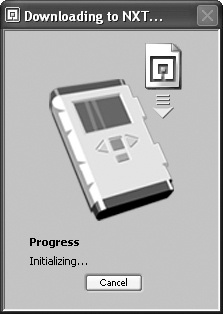
When the Downloading to NXT dialog disappears and your NXT beeps, the program has finished downloading. Remove the USB cable from your NXT, and then press the orange button on the NXT four times to select and run the Speaker program. The Sound block you used should result in your NXT emitting an error noise (Error 02, to be precise). Congratulations! You have just created, downloaded, and run your first NXT-G program.
If the download process for a program ever fails, check to make sure that the NXT is still powered on; it turns off by itself after a certain amount of time. If that’s not the problem, check the NXT’s LCD for the USB icon that denotes an unsuccessful USB connection (see page 20 of your LEGO MINDSTORMS user guide). If an unsuccessful USB connection is the culprit, try pulling out the USB cable and plugging it back in. If the USB connection seems fine, check the battery level indicator in the upper-right corner of the NXT’s LCD to see how much power the batteries have—perhaps you need to put fresh batteries in the NXT. If the battery level is fine, check the running icon adjacent to the battery level indicator on the NXT’s LCD (see Chapter 3 of your LEGO MINDSTORMS user guide). If the icon isn’t spinning, your NXT has frozen and needs to be reset (see Spacing Gears on Perpendicular Axles in your LEGO MINDSTORMS user guide for instructions).
If you are not going to set up Bluetooth technology right now, skip to The Robo Center.
As mentioned earlier, your NXT can wirelessly communicate with your computer, but your computer must have either built-in Bluetooth capability or a Bluetooth adapter to use this feature. Although you may have to purchase the Bluetooth hardware for your computer separately, it is definitely worth the extra cost. Using Bluetooth technology, you can easily download a program to your robot from the other side of the room.
Note
Many computers do not have built-in Bluetooth capability with the notable exception of new Macs, as mentioned earlier. If your computer does or if you are already using a Bluetooth adapter, skip the next few paragraphs about installing Bluetooth adapters on your computer.
At the beginning of this chapter, I recommended purchasing the D-Link DBT-120 Bluetooth adapter if your computer isn’t already Bluetooth capable (see Requirements). It takes almost no effort to install this adapter on a computer running Windows XP or Mac OS X.
Plug the DBT-120 into one of your computer’s available USB ports. Since Bluetooth software is included with Windows XP and Mac OS X, your computer should automatically install the adapter. You shouldn’t have to do anything. If you are using Windows XP, message bubbles pop up in the lower-right corner of your screen as the computer installs the adapter.
If for some reason your computer cannot automatically install the adapter, you should manually install it using the Bluetooth software provided with the DBT-120 on a CD-ROM. Just follow the instructions in the DBT-120 documentation to do so.
If you will be attempting to install a Bluetooth adapter other than the DBT-120, follow the same instructions. Plug the adapter into your computer and see if your computer will automatically install it. If it won’t, install the Bluetooth software packaged with the adapter and see if that will work. It is extremely important that you plug the adapter into your computer first and see if your computer can automatically install it with its own Bluetooth software, however. The software packaged with some Bluetooth adapters does not work with the NXT, which means that those adapters require you to use your computer’s built-in Bluetooth software.
Once your computer is Bluetooth capable, the next step is to connect your computer to your NXT. This process is accomplished within the NXT-G interface. The LEGO MINDSTORMS user guide contains excellent instructions for this procedure, so I will not duplicate them here. If you are using a PC, consult Table 4-2 through The Pegs; if you are using a Mac, consult The Pegs through The Gears. All users should keep in mind these tips and reminders:
By default, the Bluetooth feature of the NXT is turned off. As stated in the LEGO MINDSTORMS user guide, you can turn on this feature by going to the Bluetooth submenu on your NXT (see Bevel Gears of the user guide) and turning on Bluetooth there (see The Miscellaneous Elements of the user guide).
Make sure that your NXT is visible to other Bluetooth devices. This option is also under the Bluetooth submenu on the NXT (see The Miscellaneous Elements of the user guide).
When you enter and confirm the passkey, remember that the default passkey is 1234 and that you will need to enter it both on your computer and on your NXT as illustrated in the LEGO MINDSTORMS user guide. (In case you’re wondering, you will not need to enter a passkey every time you use the NXT’s Bluetooth feature.)
Once you’ve gotten connected with Bluetooth technology, try downloading the same one-block program you used earlier. Downloading an NXT-G program with a Bluetooth connection is exactly the same as downloading one with a USB connection—only there is no cable involved! When the NXT uses its Bluetooth functionality, it does use more battery power, however. The following tips can help you conserve battery power:
Turn off the NXT when it’s not in use.
Turn off the NXT’s Bluetooth feature when you know you won’t be using it in the near future.
Configure the NXT’s sleep mode to activate more quickly (see Connecting the Electronic Pieces with Electrical Cables of the LEGO MINDSTORMS user guide).
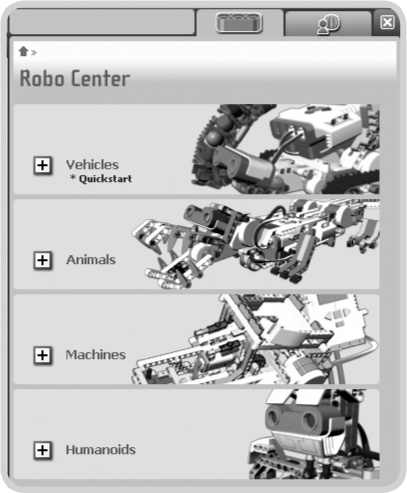
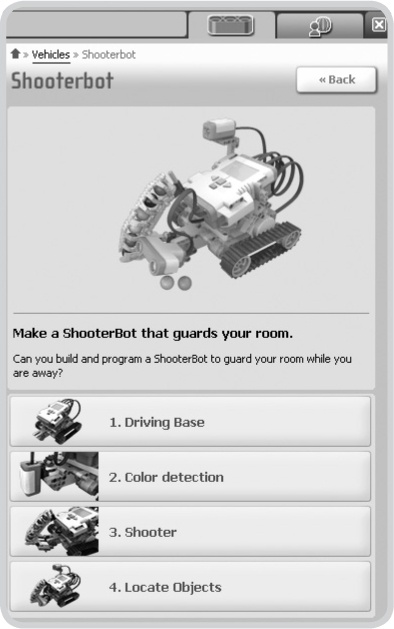
The Robo Center (Figure 2-11) is positioned on the far right side of the NXT software’s main screen, and it contains sixteen challenges that are split up between four different robots: Shooterbot (a vehicle), Robogator (a walking alligator), Color Sorter (a sorting machine), and Alpha Rex (a walking humanoid). Navigating within any of the four categories—Vehicles, Machines, Animals, and Humanoids—reveals challenge specifications, building instructions, and programming instructions.
Note
In order to have more room to work in the NXT-G interface, you can temporarily hide the Robo Center by clicking the close button shown in the upper-right corner of Figure 2-11. You can reactivate the Robo Center by clicking the Robo Center tab, which appears at the top of the Robo Center and has a picture of an orange LEGO piece.
The Vehicles category includes the Shooterbot challenges (Figure 2-12). Do you remember the robot you created earlier with the Quick Start kit? That was actually the Shooterbot’s driving base. Since you have already constructed the driving base, you might consider working on one or more of the four Shooterbot challenges after reading this chapter to begin getting familiar with construction and programming. Remember that you do not need to follow the building instructions for the driving base since you have already constructed it from the Quick Start kit.
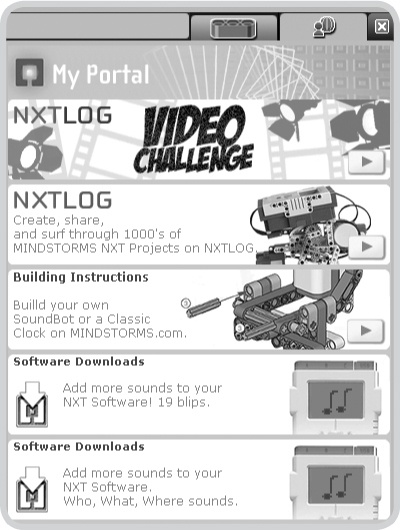
My Portal is a feature that requires Internet access to display MINDSTORMS news and additional downloads and projects to complement the NXT 2.0 set. When you launch it by clicking the My Portal tab adjacent to the Robo Center tab, the software connects to the MINDSTORMS website, gathers information, and then displays its dynamic content. Figure 2-13 shows what My Portal looks like as of this writing, but by the time you read this book, it will have almost certainly changed.
After working with the NXT software for a while, it’s time to focus for a moment on the important task of organizing the pieces. Open up your NXT 2.0 set and look inside. All the pieces are jumbled together, which means that you will often have to search for a piece when you need it. And sometimes that search can be frustratingly long. To avoid needless rummaging, you need a much more efficient approach to working with the pieces.
In order to properly organize the pieces, you need some type of storage container with compartments or sections into which you can sort the pieces. If you have been a LEGO fan for some time, you may already have a storage system in place, allowing you to easily integrate the pieces into your current collection of LEGO pieces. If you do not have such a setup, however, there are a number of solutions.
One of the best solutions is to purchase a single storage case or container capable of holding all of the pieces in the NXT 2.0 set. Figure 2-14 shows an example of such a case, which also has several noteworthy features: removable dividers for customizing the sizes of compartments, a sturdy handle, and a lid that is both transparent (it’s nice to be able to see the contents at a glance) and lockable (you never know where your LEGO hobby might take you). You can find storage cases like this one at hardware and craft stores. In addition, Appendix C lists a few websites where you can purchase storage items.
Note
Due to the messy nature of the electrical cables, I always keep them individually bound with rubber bands when not in use. Simply take a single electrical cable, fold it compactly, and then bind it up with a rubber band.
On the other hand, it’s not imperative that you fit all of the pieces inside one storage container. In fact, if you are planning to expand your collection of LEGO pieces, it might be better to purchase several different storage containers that will accommodate more pieces. For many people, however, starting off with something simple and inexpensive may be the best approach; you can always expand your storage space later if necessary.

Note
Before purchasing a storage case for the NXT 2.0 set, first look around your home for one (or more) storage items that you could use. The storage case in Figure 2-14 contained drill bits, nails, and screws before I decided to turn it into a storage case for my set.
As for how you should sort the pieces within storage cases or containers, I offer no definitive answer. Providing one or more individual compartments for each type of piece is not always possible, and people use different sorting methods anyway. You will eventually develop your own personal approach to sorting LEGO pieces, too. Nevertheless, here are a few general tips for sorting the pieces in the NXT 2.0 set:
Sort all of the electronic elements, including the cables, separately from the rest of the non-electronic pieces.
Keep miscellaneous pieces and pieces that you rarely use separate from the rest of the pieces.
When working with relatively small quantities of pieces, you can sometimes successfully group similar pieces. You could group all or most of the gears together, for example.
The NXT 2.0 set contains several types of very small LEGO pieces that are quite similar, but you will find it helpful to keep most of these sorted separately.
In this chapter, you set up your NXT 2.0 set and became familiar with the most important of its features and functions. You began by using the Quick Start kit to construct and test a small robot, and then you installed the NXT software on your computer and briefly explored the NXT-G interface, the Robo Center, and My Portal. Finally, you learned how to properly organize the pieces from the NXT 2.0 set for increased building efficiency. The next chapter begins Part II, which discusses the exciting topic of building.