
Although the MINDSTORMS NXT 2.0 set contains over 600 LEGO pieces, the handful of electronic pieces among these serve as the primary components, giving NXT creations their functionality and intelligence. What makes the electronic pieces even more significant is that their capabilities surpass those of all the other electronic LEGO elements that have appeared over the years. In order to effectively use these vital, powerful pieces in your creations, you must be familiar with their purposes and potential.
In this chapter, we’ll examine the electronic NXT pieces, beginning with the most important one: the NXT. We’ll go on to discuss the servo motors, the sensors, and finally the electrical cables that connect the electronic pieces.
The LEGO Group has been developing microcomputers for some time. The RCX, Scout, Micro Scout, and other microcomputers have appeared in LEGO products since the late 1990s, but the NXT (Figure 3-1) is the most powerful LEGO microcomputer yet. Although the official documentation refers to it as an “intelligent, computer-controlled LEGO brick,” it’s hard to think of it as simply a special brick. While it’s certainly a LEGO element, the NXT is also a genuine computer—a programmable microcomputer.
Dismantling the NXT would reveal the complexity of its design. A variety of electronics operate within it, but the primary components are a main processor and a co-processor that store information and manage the other electronics. The main processor is an Atmel 32-bit ARM7 processor with 256KB Flash memory, 64KB RAM, and a speed of 48 MHz. The co-processor is an Atmel 8-bit AVR processor with 4KB of Flash memory, 512 bytes of RAM, and a speed of 8 MHz. Although these processors cannot compare with those found in today’s average home computer, remember that the NXT is a microcomputer; for its purposes, it can operate with significantly less memory and processing speed.

In the previous chapter, you installed batteries in your NXT, downloaded an NXT-G program to it, and ran the program. As you pressed buttons on the NXT to navigate to your NXT-G program, I’m sure you noticed the various menus on the NXT’s LCD. You’re probably also wondering about the features and capabilities of the NXT itself. In fact, the NXT has a number of noteworthy features:
Three output (motor) ports
A USB port
Four input (sensor) ports
Bluetooth capability
A loudspeaker
Four buttons and an LCD
Although the output ports and the USB port serve entirely different purposes, we’ll consider them together since they are located on the same end of the NXT (Figure 3-2).

Because the NXT is the only piece in the NXT 2.0 set with its own power source (six AA batteries), it is generally responsible for powering and controlling the other electronic elements, including the motors. The output ports provide a place for the motors to connect to the NXT using electrical cables (which we’ll discuss in Connecting the Electronic Pieces with Electrical Cables). All the necessary power and data are transmitted through the cables.
I’ve labeled the output ports and the USB port in Figure 3-2, but they are also labeled on the NXT. The output ports are labeled A, B, and C, and the USB port is labeled USB. (The letters appear upside down in Figure 3-2 because they are meant to be viewed from the front of the NXT.) In the case of the output ports, the lettering scheme serves no purpose other than to help you distinguish between motors when using them. For example, suppose that you created a robotic arm and used a motor in output port A to raise and lower the arm and a motor in output port B to rotate the arm. When you’re ready to program the NXT, you know to use output port A when changing the arm’s position and output port B when rotating the arm.
Note
You can use any of the motors in any of the output ports. The motors in the NXT 2.0 set are identical, as are the output ports on the NXT itself.
The USB port, which you used in the previous chapter, allows you to use the USB cable included with the NXT 2.0 set to establish a connection between your NXT and your computer. As Figure 3-2 shows, the USB port is square with a hump at the top. One of the ends of the USB cable matches this port, and the other end (which plugs into your computer) is shaped like a thin rectangle.
The NXT has four input ports labeled simply 1, 2, 3, and 4 (Figure 3-3). Using electrical cables, sensors connect to the NXT through these ports. The cables transmit sensor data from the sensors to the NXT and any necessary power from the NXT to the sensors. Like the output ports’ lettering scheme, the numbering scheme on the input ports serves no purpose other than to help you distinguish among the sensors when you’re using them. You can use any input port for any sensor, but the default is as shown in Table 3-1.

Table 3-1. The Default Sensor Ports on the NXT
port number | sensor type |
|---|---|
Port 1 | Touch sensor |
Port 2 | Touch sensor |
Port 3 | Color sensor |
Port 4 | Ultrasonic sensor |
Note
The NXT is backward-compatible with sensors designed for the LEGO RCX microcomputer. In order to use these sensors with the NXT, you must purchase special converter cables, however. You can find these converter cables at the online LEGO store, where you can currently purchase them in packs of three. Go to http://www.lego.com/ and search for converter cable.
One of the most exciting features of the NXT is its built-in Bluetooth capability. You learned in Chapter 2 that Bluetooth technology provides wireless connectivity (communication) to a wide variety of electronic devices. The NXT’s Bluetooth functionality comes from a CSR BlueCore4 chip, which has its own microcontroller and an external 8MB Flash memory. It is entirely hidden from view, installed on the inside of the NXT, and has a range of approximately 10 m or 33 feet. Specifically, the NXT uses Bluetooth technology to accomplish the following:
Wirelessly communicate with a Bluetooth-capable computer. Using the official NXT software on your computer, you can download programs to your NXT, manage files on your NXT, receive live feedback from your NXT, and more.
Wirelessly communicate with other NXTs (up to three but one at a time). You could design separate creations that communicate with each other, or you could use multiple NXTs that communicate with each other in a single creation (a very big creation).
Wirelessly communicate with a Bluetooth-enabled mobile phone. By downloading an application from the MINDSTORMS website and installing it on your mobile phone, you can use your phone to control an NXT robot! Visit the following link to download the application (look in the Advanced section for the Mobile Application Software): http://mindstorms.lego.com/en-us/support/files/default.aspx.
Although not necessarily a vital component, the loudspeaker—which emits sound through several slits on the right side of the NXT—is both a useful and fun feature. When programming with NXT-G, you can select from an extensive list of sounds (including beeps, blips, music, words, phrases, numbers, and more) and play them over the NXT’s loudspeaker. You can also use an interactive keyboard to specify tones for the loudspeaker to play. We’ll explore this feature further when we discuss NXT-G in Part III.
Note
The NXT-G 2.0 software now includes a Sound Editor that you can use to record and save your own sound files for use in your programs. You’ll learn more about this neat feature in Part III as well.
In reality, the loudspeaker can either enhance a robot’s performance or serve as the main feature of a robot’s performance. Using the loudspeaker to play a round of applause when the robot has successfully accomplished a task would be an example of the former; using the loudspeaker to play tones based on sensor readings would be an example of the latter.
Although sometimes overlooked, the NXT’s four buttons and LCD are important features. Figure 3-4 shows the NXT’s four buttons: the orange Enter button, the light gray Left and Right buttons, and the dark gray Clear/Go Back button. You use these buttons to navigate among and select the menus and options on the NXT’s LCD. In addition, NXT-G allows you to program the Enter, Left, and Right buttons for use as sensors. An interesting application of this feature would be a robot that acts as a safe, requiring that you press the correct combination of buttons before allowing you to access its contents.

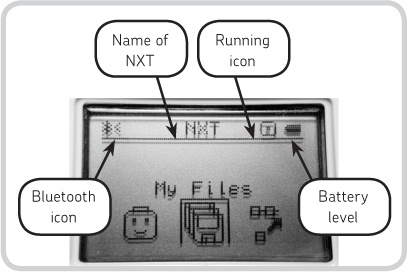
Figure 3-5 shows the NXT’s LCD, which measures 100 × 64 pixels. Unlike other LEGO microcomputers, the NXT has an LCD capable of effectively displaying text and pictures. Figure 3-5 also points out some of the symbols and icons that appear above the line at the very top. For the details on all of the symbols and icons that display above the line, consult pages 20 through Chapter 3 of the LEGO MINDSTORMS user guide.
Note
You can customize the name of your NXT. See Chapter 3 of your LEGO MINDSTORMS user guide for instructions.
Don’t think that you can only use the LCD to select programs or change options on the NXT. You can use it as an important part of your creations by displaying custom text and drawings on it. You can even use the LCD as the central feature of a robot. I’ve seen creations that use the LCD to play Tetris, Etch A Sketch, and tic-tac-toe!
Let’s briefly practice navigating the NXT’s menus and options. Turn on your NXT by pressing the orange Enter button. Your NXT will play a sound (via the loudspeaker), flash the LEGO and MINDSTORMS logos on the LCD, and then transition to the main menu.
Within the main menu are seven submenus with different options and data (only three menus or selections are visible at a time). Use the Left and Right buttons to scroll through them. When you’ve found a menu that interests you, press the Enter button to select it. To return to the main menu (or the previous menu), press the Clear/Go Back button. The seven submenus are as follows:
My Files. This submenu contains all programs, sound files, and datalog files on the NXT. The Software subfolder holds the NXT-G programs downloaded from your computer, the NXT Files subfolder holds programs you’ve created on the NXT, the Sound Files subfolder holds all sound files for user-created programs and the NXT firmware, and the Datalog Files subfolder holds all datalog files generated from the Datalog submenu.
NXT Program. This submenu allows you to create programs directly on your NXT. Although definitely not as powerful as NXT-G, NXT Program is useful for making short programs for testing purposes. When selected, NXT Program presents five empty spaces on the LCD, and you fill the spaces with programming commands. See Figure 3-5 and The Servo Motors of the LEGO MINDSTORMS user guide for more information.
NXT Datalog. This submenu allows you to create datalog files containing sensor or motor readings taken over a period of time. When you select a value to read from a sensor or motor, you’ll be asked for the appropriate input or output port.
View. This submenu allows you to display the readings of the sensors and motors. For some of the electronic elements, you’ll find more than one option (e.g., inches and centimeters for the ultrasonic sensor). When you select an option, you’ll be asked for the appropriate input or output port.
Bluetooth. This submenu allows you to access and modify the Bluetooth options on your NXT. There are four subfolders—My Contacts, Connections, Visibility, On/Off—and a Search option that activates a search for other Bluetooth devices. Consult Bevel Gears through The Miscellaneous Elements of the LEGO MINDSTORMS user guide for more information on the Bluetooth submenu.
Settings. This submenu allows you to view and change the settings of your NXT. Options include Volume, Sleep, NXT Version, and Delete Files.
Try Me. This submenu offers six sample programs—one for the motor and five for sensors—that you can use to test the electronic elements “in a fun way” (as the user guide puts it). When testing a motor or sensor with the Try Me programs, you must have the electronic element in the default output/input port on the NXT. The programs will remind you which port is the default.
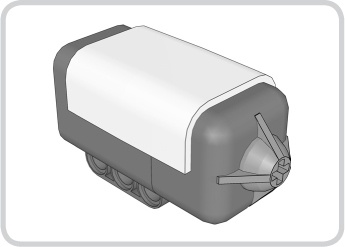
NXT robots can move in many different ways—they can grasp, race, walk, swivel, and do much more—and that capability comes from using the NXT servo motors (Figure 3-6). Although LEGO motors have existed for some time, the three (identical) servo motors in the NXT 2.0 set are an entirely new type that LEGO first introduced in the original version of the NXT set.

The servo motor uses a built-in rotation sensor or tachometer to precisely control the motor’s output shaft (rightmost part of Figure 3-6). Attached to the output shaft are two circular orange parts—which we’ll call shaft heads—that rotate with the output shaft. By connecting LEGO pieces to the shaft heads, you can transfer power from the motor to your creation. The motor itself also has several places for attaching LEGO pieces, and you’ll often use these to secure the motor to your creation.
When programming a motor, you can use degrees or rotations to specify a desired rotation. For example, you can specify that the motor should rotate 540 degrees (the motor is accurate to within 1 degree) or 1.5 rotations. Of course, you can also simply instruct the motor to run indefinitely or for a specified amount of time (e.g., 5 seconds). The motors can operate at different speeds, and there are certainly times when you’ll want to run the motors at less than full power.
LEGO fans are heartily commending the introduction of the NXT servo motor, as previously they had to use a motor and a rotation sensor separately to achieve precision. Actually, many people have creatively used touch and even light sensors to count motor rotations!
Much of the NXT 2.0 set’s potential lies in its excellent selection of sensors: two touch sensors, a color sensor, and an ultrasonic sensor. Unlike the first version of the NXT set, there is no light sensor or sound sensor included. Instead, the color sensor replaces the light sensor, and the second touch sensor replaces the sound sensor (most people will probably find the extra touch sensor more useful than the sound sensor). The three types of sensors in the NXT 2.0 set—touch, color, and ultrasonic—vary from extremely simple to highly complex and fall into two categories: passive sensors and digital sensors.
The NXT 2.0 set includes two passive sensors, both of which are touch sensors. Passive sensors either do not require power from the NXT in order to function or do not require the NXT to employ a process that rapidly switches between supplying power to and reading the value of a sensor.[1]
Simple and robust, the touch sensor (Figure 3-7) is useful for a wide variety of applications. The orange missile-shaped tip at the front end, known as a push button, provides the touch-sensing abilities. When pressed, the push button moves backward into the sensor and completes an electrical circuit, resulting in a flow of electricity detectable by the NXT. When released, the push button springs forward, the circuit is broken, and the electrical flow stops. Hence, this simple configuration allows for only two possible conditions: pressed or released.
Just as the touch sensor can have two different conditions, it can produce two different values or readings. If the push button is pressed, the NXT reads the touch sensor as having a value of 1; if it’s not pressed, the NXT reads a value of 0. You can use these values in several ways, however. For example, you can use any of the following conditions to trigger a reaction in a robot:
When the touch sensor is pressed
When the touch sensor is released
When the touch sensor is pressed and released (i.e., “bumped”)
On a historical note, the introduction of the NXT touch sensor ends the dominance of a previous touch sensor design. Though the NXT touch sensor is considerably less compact, I much prefer its more effective push button design. In addition, if you look closely at its push button, you’ll notice a shaft-shaped hole. This hole accommodates LEGO axles, allowing you to customize the push button. (You’ll learn about axles in Chapter 4.)
The NXT 2.0 set includes two digital sensors: the color sensor and the ultrasonic sensor. An NXT digital sensor has two important characteristics: It has its own microcontroller, which enables the sensor to take readings of its environment itself (as opposed to the NXT doing it), and it sends its data to the NXT using I2C communication, which allows the sensor to operate independently and transmit only its readings to the NXT.[2]
Note
As of this writing, you can purchase additional digital sensors from the online LEGO store. Two digital sensors not included in the NXT 2.0 set are the accelerometer sensor and the compass sensor. The former measures acceleration and gives robots a sense of which way is up; the latter provides a sense of direction (north, south, etc.). You can purchase each sensor through the LEGO store: go to http://www.lego.com/ and search for accelerometer sensor or compass sensor.
The NXT color sensor (Figure 3-8) is a new LEGO element—although unofficial versions have existed for some time—and is perhaps the most popular feature of the NXT 2.0 set. This sensor has not one but three functions. The first function is obvious: color detection. Before you start envisioning robots capable of identifying shades of magenta and heliotrope, you need to realize that the color sensor does have limitations. Specifically, the color sensor can detect six colors: black, blue, green, yellow, red, and white. That may not seem like many colors, but you can actually create a number of interesting projects that use the color sensor to detect one or more of these colors. For example, the official Color Sorter robot uses the color sensor to identify balls of four colors and sort them based on their color.

Note
For best results when identifying colors with the color sensor, mount the sensor on your robot so that it sits at a right angle to surfaces and about 1 cm from surfaces. In addition, be aware that the color sensor can encounter problems if the surrounding area is brightly lit.
The second function of the color sensor is measuring light intensity. It can determine the brightness or darkness of its surrounding area (what we would call ambient light) as well as the light reflected off surfaces using its light-emitting diode (LED). For this function, the NXT generates the light sensor’s reading as a percentage. The highest possible reading is 100 percent, which you can easily achieve by holding the sensor up to a light bulb. The lowest possible reading is 0 percent, which you could achieve in a very dark closet. A possible application of this function would be a robot that monitors the light level in a dark room and attacks an intruder who shines a flashlight into the room.
The third function of the color sensor is an interesting one: The sensor can act as a color lamp. Using NXT-G, you can have the color sensor emit a red, green, or blue light. Although this lamp might not always serve a particularly useful purpose—merely making the robot look more interesting—there are a number of unique ways in which the lamp can become an integral part of a creation. For example, a robot might use the color sensor to flash a series of different colored lights, and then a human must use a few buttons to repeat the exact same sequence of lights.
Aside from the NXT itself, the ultrasonic sensor (Figure 3-9) is probably the most recognizable piece in the NXT 2.0 set. This sensor detects an object by determining the distance between itself and that object, allowing your creations to “see,” though certainly not to the extent that we humans can.
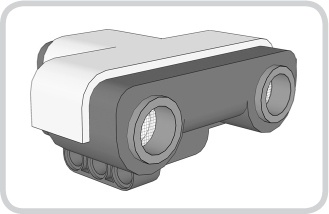
The ultrasonic sensor operates by employing a sonar-like system. It sends out a highfrequency sound wave (inaudible to humans), which reflects off an object. When the wave returns to the sensor (called a rebound), the sensor derives the distance between itself and the object from the amount of time it took the wave to return. Figure 3-10 demonstrates how the wave proceeds from the sensor, bounces off of an object, and returns to the sensor (the object is a LEGO tire from the NXT 2.0 set).
The ultrasonic sensor has a range of 2.55 m or 8.4 feet and maintains an accuracy to within 3 cm. In fact, the NXT measures the ultrasonic sensor’s readings in either inches or centimeters. An important fact to keep in mind is that the ultrasonic sensor can “see” larger objects better than smaller ones, objects with solid surfaces better than softer ones, and square or box-like objects better than smooth ones.
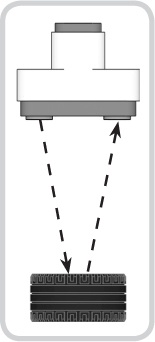
Figure 3-10. The ultrasonic sensor sends and then receives a sound wave to determine the distance between itself and an object.
Multiple ultrasonic sensors operating in the same room can interfere with each other; this occurs when the waves sent by one ultrasonic sensor rebound to another ultrasonic sensor, resulting in an erroneous reading. This warning applies to ultrasonic sensors in general, not just the LEGO ones. You may not own more than one ultrasonic sensor at this point, but you should keep this warning in mind in case your robot will be performing against or around other NXT robots.
One of the ultrasonic sensor’s most common applications is in object-avoiding robots. Unlike the setup in which a robot detects objects by bumping into them with a touch sensor, the ultrasonic sensor enables a robot to avoid objects before colliding with them. You can also use the ultrasonic sensor in many other creative ways. For example, you can use it as a motion detector, since an object that moves into or out of the sensor’s range will result in different rebounds.
I have repeatedly referred to the NXT electrical cables in this chapter, which you must use to connect the motors and sensors to the NXT. Now we shall finally examine these cables—one of which is shown in Figure 3-11—and then practice connecting the electronic elements.
First and foremost, there are seven cables in the NXT set, and you can use any cable to connect any electronic piece to the NXT: The cables are not specific to the electronic pieces. The only differences between the cables are their sizes. Table 3-2 lists the approximate lengths of the cables and the quantity and function of each size.

Table 3-2. The Electrical Cables in the NXT Set
length | quantity | function |
|---|---|---|
20 cm/8 inches | 1 | This is the smallest size and perfect for connecting electronic pieces positioned closely to the NXT. |
35 cm/14 inches | 4 | This is a moderate, all-purpose size that is the most commonly used. |
50 cm/20 inches | 2 | This is the longest size, which you’ll use in larger robots or situations requiring longer connections. |
Second, observe Figure 3-12, a close-up of the connector on the ends of the NXT cables. If you’re thinking that these connectors look very familiar—like the connectors on phone cable—you’re correct. The connectors on the NXT cables are RJ12 connectors with a right-side adjustment. The prongs on the connectors can snap under excessive force, so you should treat the cables with a measure of care. They are, however, by no means fragile.

Note
If you would like to purchase additional NXT cables, you can do so at the official online LEGO store. Go to http://www.lego.com/, search for connector cables, and select Connector Cables for MINDSTORMS NXT (Item #8529).
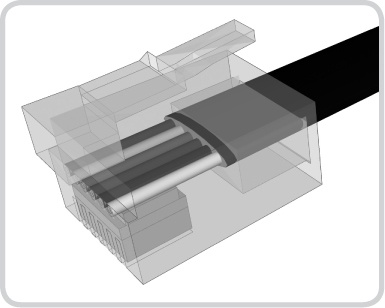
If you observe the center of Figure 3-12 carefully, you may be able to see the individual wires that run through the cables. There are actually six of these wires, and you can see them much more clearly in Figure 3-13, which is a computer-generated image. With these six wires, the electronic elements can transmit information to the NXT and receive power at the same time. For example, a servo motor can transmit its sensor data to the NXT (remember that it has a built-in rotation sensor) while also receiving power for rotating its output shaft.
Let’s get some practice connecting and using the NXT electronics. Take out all of your electronic NXT pieces and press the Enter button to turn on the NXT. Take either end of an electrical cable and snap it into input port 1 on the NXT (it only fits one way). Take the touch sensor and snap the other end of the electrical cable into its connector hole in the back. Navigate to the Try Me menu on the NXT, select Try-Touch, and then select Try-Touch Run (you must have the touch sensor in input port 1 in order for this program to work). Press the touch sensor’s push button, and the LEGO minifig pictured on the NXT’s LCD will open his mouth and shout, “Whoops!” Release the push button, and the minifig’s mouth will close.
When you are finished experimenting with the touch sensor, press the Clear/Go Back button on the NXT to exit the program. Now test the color sensor, ultrasonic sensor, and a servo motor, using the appropriate Try Me subfolders. Simply use an electrical cable to connect the sensor or motor to the NXT, navigate to the appropriate icon in the Try Me submenu, and run the program, making sure you have the sensor or motor on the default input or output port.
Where the NXT electronic pieces are concerned, we’ve only touched on the basics in this chapter. If you’d like to study them in depth, download the Hardware Developer Kit (HDK) from the following link (look in the Advanced section for the Hardware Developer Kit): http://mindstorms.lego.com/en-us/support/files/default.aspx. The HDK contains detailed technical specifications and the schematics for the electronic pieces. Although LEGO fans use it as a guide for developing custom hardware (e.g., custom sensors), you can also read it to simply gain a better understanding of how the NXT electronic elements operate. I used this excellent resource to help me write this chapter.
In this chapter, you became familiar with the NXT electronic pieces—the core components of the NXT 2.0 set—and saw how they can transform static LEGO structures into active creations. We began by examining the powerful NXT, which is the most important electronic piece, and then we discussed the servo motors, which give your creations precise movement. We observed the three types of sensors in the NXT 2.0 set—touch, color, and ultrasonic—and then we concluded by discussing the NXT electrical cables used to connect the electronic pieces. In the next chapter, you will learn about the rest of the LEGO pieces in the NXT 2.0 set—pieces that also serve important functions.
[1] The NXT also supports active sensors, which do require this rapid procedure. Examples of active sensors include the light and rotation sensors designed for the RCX microcomputer. You can only use these sensors with the NXT if you also use the converter cables mentioned earlier.
[2] See Activating a Robot and Chapter 2 of the LEGO MINDSTORMS Hardware Developer Kit (HDK) 1.00. For more information about this document, see Getting NXTreme.