3
studless or studfull?
In Chapter 2, we took a peek at the difference between two styles of building with LEGO pieces: studless (using beams) and studfull (using bricks and plates). The two styles are significantly different, and each offers advantages. The styles can also be combined in order to use the best qualities of each technique in a single construction. As a matter of fact, most of today’s LEGO Technic sets and MOCs (My Own Creations, a term builders use for their custom models) use a combination of the two approaches rather than a purely studless or studfull building technique.
The successful builder knows which combination works best for a given construction, which style should serve as its basis, and to what extent the other style should be incorporated. We’ll address these issues in this chapter.
First, we’ll discuss the pros and cons of each technique and compare one to the other. Then we’ll focus on how the two techniques can be combined to bring out the best from both, using official LEGO sets and amateur builders’ MOCs (like my Monster Truck, shown in Figure 3-1) as examples.
LEGO evolving
The entire LEGO building system was originally 100 percent studfull. The first studless pieces appeared when the LEGO Technic line was already well developed and initially only complemented the studfull style rather than forming a new one. But as the Technic sets evolved, studless pieces grew very popular, and the studfull pieces were nearly entirely phased out.
Today, most Technic sets are studless, with studfull pieces used to add certain minor details to already mechanically functional and sound constructions. And when you consider the fact that most of the new specialized elements, such as electric motors, pneumatic switches, turntables, and actuators, are designed specifically to fit the studless style rather than the studfull one, it becomes obvious that studless pieces are of primary importance to Technic today. Learning to build with studless pieces, which is usually more challenging than with studfull ones, is crucial to keeping up with new additions to the Technic system.
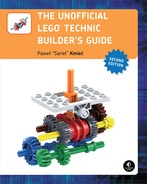
But we shouldn’t abandon studfull pieces completely. Many amateur Technic builders don’t follow the LEGO Group’s doctrine, and they continue to publish primarily studfull MOCs that are both very functional and good-looking (like my Kenworth truck, shown in Figure 3-2).

Figure 3-1: My Monster Truck model took the approach of modern LEGO Technic sets: It was almost entirely studless, with studfull pieces used only for minor details, like the grille.
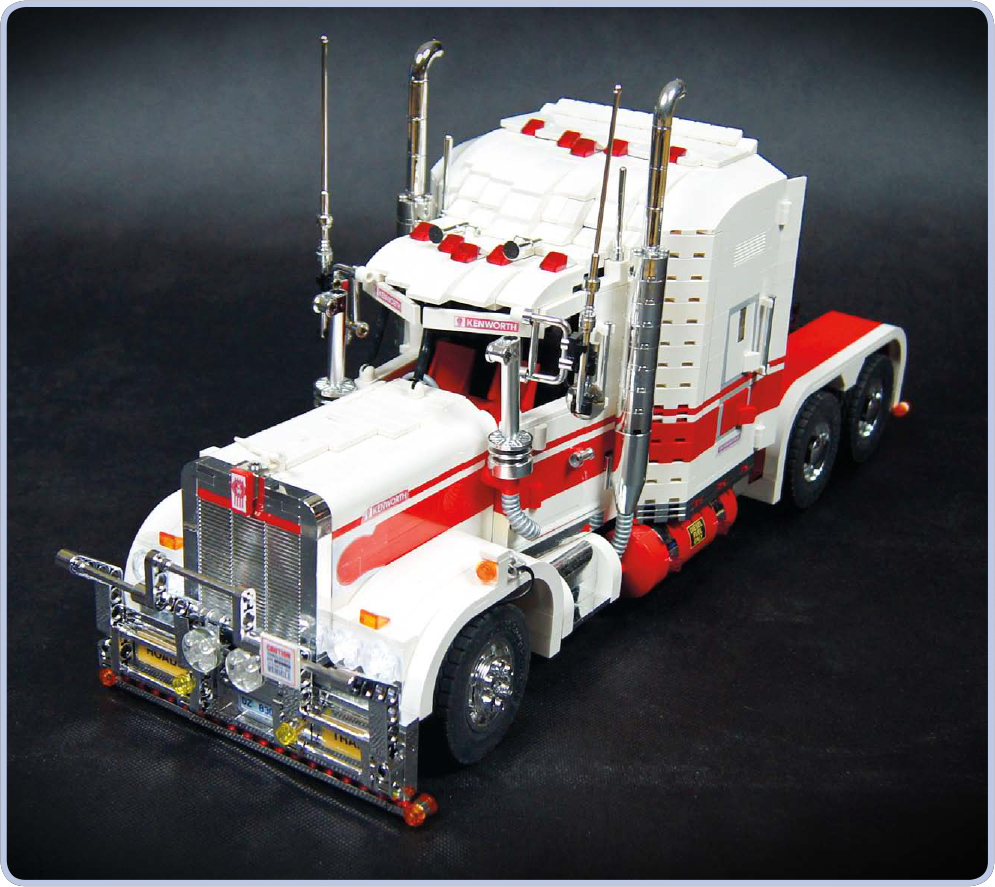
Figure 3-2: My Kenworth Road Train model appeared completely studfull on the outside, despite including an array of Mindstorms NXT elements, which are best suited for studless structures.
studfull building
Technic bricks and regular plates are the basis of the studfull style. Technic bricks differ from regular LEGO bricks (as shown in Figure 3-3) in that they have hollow studs on top and slightly thicker rods inside them.

Figure 3-3: Side-by-side comparison of a regular LEGO brick (red) and a LEGO Technic brick (yellow)
Thanks to their altered design, Technic bricks are less likely to come apart when subjected to lateral pressure. (They are still easy to tug apart on purpose.) To make your designs resistant to high torque, you’ll need to lock your studfull bricks using pins and other pieces. Studless beams are more space efficient than studfull Technic bricks, as shown in Figure 3-4.
reinforcing studfull constructions
When you add extra pieces to a combination of LEGO pieces to keep them together, you’re reinforcing them. Technic bricks are usually combined with plates to allow vertical reinforcement. A brick–two plates–brick combination is used to ensure proper vertical spacing of the bricks and their pin holes to allow reinforcement with a vertical piece (shown in Figure 3-5). The corner and hinge plates allow for perpendicular connections, as shown in Figure 3-6, or angled connections, as shown in Figure 3-7.
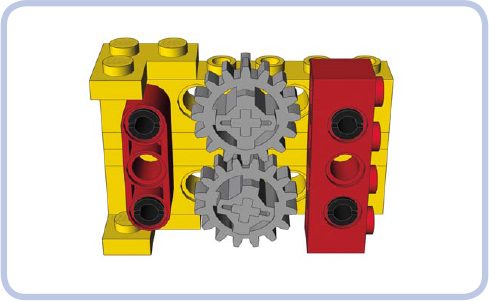
Figure 3-4: Two 1×6 Technic bricks are locked vertically to prevent them from coming apart when high torque is applied to the gears. The little space used by the studless locking piece (left) compared to the studfull one (right) leaves space for plates on the top and bottom of the two bricks and allows the use of bigger gears.
Figure 3-5: The brick–two plates–brick combination makes sure the spacing between bricks allows vertical connection. The addition of plates keeps the pin holes in the bricks exactly 1 stud apart.
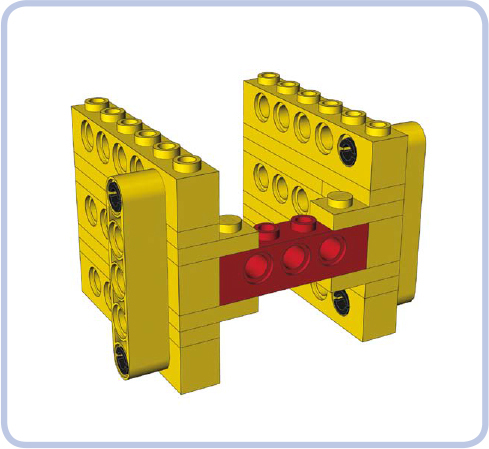
Figure 3-6: Even though the red brick is not reinforced directly, it is kept firmly in place by L-shaped corner plates that are locked with reinforced bricks.
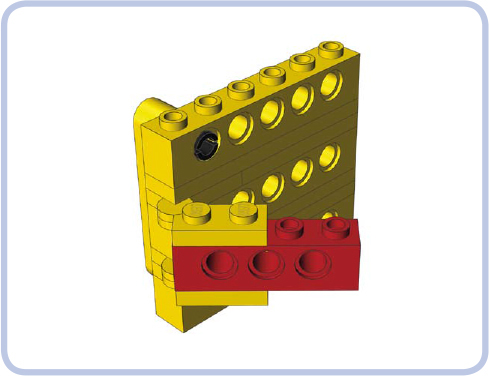
Figure 3-7: Two reinforced hinge plates secure the red Technic brick while allowing it to be set at any angle.
The use of plates as spacers, however, has a disadvantage: It reduces the number of pin holes as compared to an entirely studless structure of the same size, as shown in Figure 3-8. Therefore, studfull structures can house fewer axles and other elements that require pin holes.

Figure 3-8: As these superimposed images show, the combination of bricks and plates (yellow) not only allows for fewer pin holes than the combination of studless beams (red)—six as compared to nine—but also takes up significantly more space.
In general, studfull constructions are bigger and heavier than studless ones, with a less dense internal structure. They often need to be reinforced, but the resulting structures are very rigid. They are also orientation dependent because of their asymmetry, meaning that the direction their studs face affects the number of possible combinations between pieces.
Additionally, studfull constructions don’t work as well with vertical elements; for example, vertical axles are difficult to secure firmly in studfull structures.
studfull advantages
In general, studfull constructions are
![]() Easy to combine horizontally
Easy to combine horizontally
![]() Easy to combine with non-Technic pieces and thus better suited to creative design
Easy to combine with non-Technic pieces and thus better suited to creative design
![]() Able to form very rigid constructions with firm horizontal connections
Able to form very rigid constructions with firm horizontal connections
![]() Able to use a variety of plates for connections at many angles
Able to use a variety of plates for connections at many angles
![]() Able to create a rigid connection that maintains the relative orientation of the pieces
Able to create a rigid connection that maintains the relative orientation of the pieces
studfull disadvantages
In general, the disadvantages of studfull connections are that they
![]() Require reinforcements to prevent vertical separation under torque
Require reinforcements to prevent vertical separation under torque
![]() Have pin holes that are distributed less densely, making for bigger constructions
Have pin holes that are distributed less densely, making for bigger constructions
![]() Are not symmetrical, meaning that their orientation affects how easy they are to combine
Are not symmetrical, meaning that their orientation affects how easy they are to combine
![]() Do not easily fit most of the modern specialized pieces, such as motors and actuators
Do not easily fit most of the modern specialized pieces, such as motors and actuators
![]() Are a poor fit for vertical elements, such as axles and gear wheels
Are a poor fit for vertical elements, such as axles and gear wheels
![]() Are bigger and heavier than studless pieces
Are bigger and heavier than studless pieces
studless building
The studless style consists of beams connected with pins, as well as a variety of specialized connectors. Beams are symmetrical, so they can be combined in any orientation, allowing for real three-dimensional building, as shown in Figure 3-9. In most cases, beams are connected with regular Technic pins, but some studless connectors come with integrated pins, as shown in Figure 3-10.

Figure 3-9: This structure, comprised of studless frames connected with pins and bushings, is symmetrical, meaning that it has no definite top or bottom. Unlike studfull structures, it can have axles inserted from any direction.

Figure 3-10: While most studless connectors have just pin and axle holes (yellow), some come with integrated pins (red).
creating rigid studless connections
Once connected, studless pieces are much more difficult to separate than bricks and plates, but that doesn’t necessarily mean that they are rigid. Since pins are round, any two studless pieces connected with a single pin can oscillate relative to each other. Using pins with friction can make this oscillation a little less likely to occur, but using two or more pins for each connection ensures a truly rigid and static connection.
Figure 3-11 shows the difference between a rigid and nonrigid connection. The advantage of using rigid connections is that a rigid studless structure usually doesn’t need additional reinforcement when axles and gears are added, because its pieces remain in place under torque (see Figure 3-12). The axle holes can be used to easily create a rigid connection, as shown in Figure 3-13.

Figure 3-11: A comparison of nonrigid (left) and rigid (right) connections between studless pieces. In a nonrigid connection, pieces stay together, but their orientation can change—the yellow beam can be rotated left or right, regardless of the type of pin used for the connection. In a rigid connection, pieces are connected and fixed to each other so that their orientation does not change.
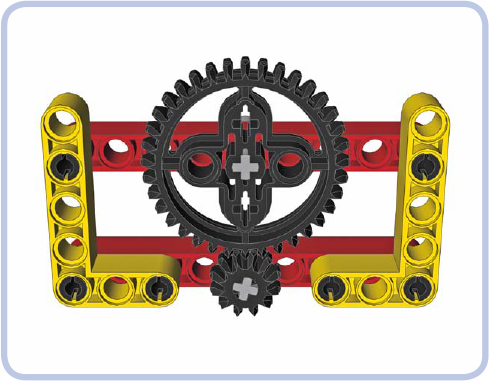
Figure 3-12: Pieces kept together by a rigid connection usually don’t need extra reinforcement in order to stay together when torque is applied. These four pieces act as one due to their rigid connections.

Figure 3-13: When two studless pieces have axle holes, a single axle is enough to create a rigid connection between them. However, such a connection won’t be as strong as one made with two or more pins.
Beams are smaller and lighter than bricks, but they are also more elastic. Long beams are therefore more likely to bend or even buckle under a load than long bricks, making it more difficult to create large, rigid studless structures and requiring more complex connections using smaller pieces. Another difficulty comes when you want to create a perpendicular connection between beams without putting one beam on top of the other. It’s possible to do so only with a right-angle connector or with a 5×7 studless frame (see Figure 3-14). These frames are quite popular and can also be used as a means of reinforcing builds.

Figure 3-14: Only two types of pieces (light grey) allow you to easily create rigid connections between perpendicular beams on the same level.
The presence of both pin and axle holes means that studless pieces and connectors can also be connected with axles to create bigger, sturdier structures. These sorts of connections require advance planning because of the complexities of the studless technique (see Figure 3-15). When making a structural axle connection, you should have a good idea of the size of your structure and know which pin holes can be used for pins and which have to be reserved for axles. All of these considerations make it more challenging to build with studless pieces. There is even a popular saying that doing so resembles playing chess: The builder needs to plan a couple of steps ahead.
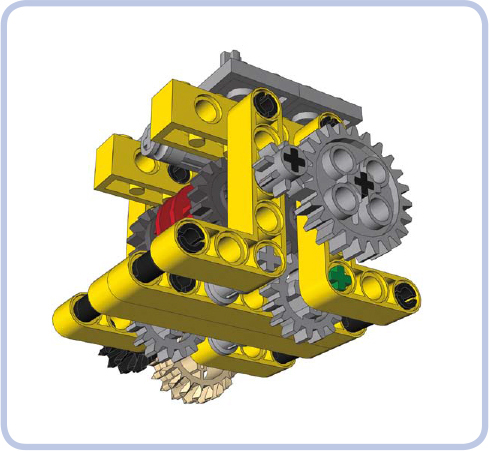
Figure 3-15: I used studless pieces to connect this gearbox. Thus, this build required me to plan which pin holes would be filled with axles and which with pins, to figure out how many connections would be needed to keep the structure rigid, and to carefully select pieces best suited in shape and size.
Learning to build primarily with studless pieces allows you to build stronger, sturdier, and more compact structures; hence, studless MOCs are usually more functional, smaller, and lighter than studfull ones. They can give your model a fairly skeletal or “hollow” appearance, though. To avoid this and to create a good-looking studless model (like the Ford GT40 in Figure 3-16), you can add panels and flexible axles, or you can combine a studless interior structure with a studfull body, an idea fully explored later in this chapter.
studless advantages
In general, the advantages of studfull connections are that they
![]() Are easy to combine in any direction, allowing for three-dimensional building
Are easy to combine in any direction, allowing for three-dimensional building
![]() Are easy to combine with most modern Technic pieces, such as motors and actuators
Are easy to combine with most modern Technic pieces, such as motors and actuators
![]() Have more pin holes, making compact construction elements possible
Have more pin holes, making compact construction elements possible
![]() Rarely need extra reinforcement (if using rigid connections)
Rarely need extra reinforcement (if using rigid connections)
![]() Are smaller and lighter than studfull pieces
Are smaller and lighter than studfull pieces
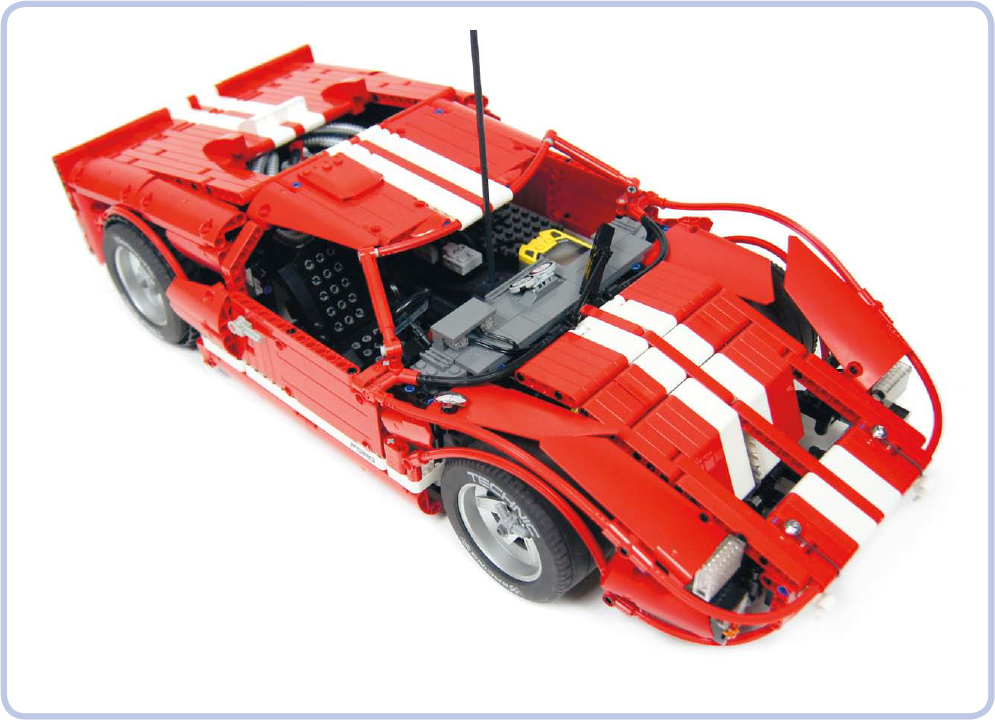
Figure 3-16: My Ford GT40 model had a completely studless body. It combined beams, panels, and flexible axles to re-create the flowing lines of the original car. Studless pieces can create shapes that are impossible to model with bricks, at the cost of certain conventions—in this case, panels approximated the shape of the hood in a way not possible with studfull pieces, but there were gaps between them.
studless disadvantages
In general, the disadvantages of studfull connections are that they
![]() Are less rigid; the largest studless structures have to be complex (or reinforced) to maintain rigidity
Are less rigid; the largest studless structures have to be complex (or reinforced) to maintain rigidity
![]() Are harder to combine with non-Technic pieces
Are harder to combine with non-Technic pieces
![]() Require at least two pins to create a rigid connection; extra pieces with complex shapes are often needed for rigidity
Require at least two pins to create a rigid connection; extra pieces with complex shapes are often needed for rigidity
![]() Don’t always look as good as bricks
Don’t always look as good as bricks
combining the styles
Combining the two styles in a clever way can be a key to creating a good-looking, highly functional MOC.
With vehicular models, the chassis and the body are often independent, and we can take advantage of that independence. For example, adding a studless body to a studfull chassis results in a very sturdy but light model, and it’s a popular combination when building in large scale, when weight is a serious concern. Adding a studfull body to a studless chassis, on the other hand, results in compact, good-looking models with many functions.
get inspired by Technic sets
Classic LEGO sets ingeniously mixed the two styles before the Technic line evolved into its primarily studless stage. Figures 3-17 through 3-27 provide examples of different styles of building, just to inspire your own creations.

Figure 3-17: The 8850 Jeep is one of the last completely studfull LEGO Technic sets. Note that while the silhouette of the Jeep is modeled quite well, the bricks facing various directions look somewhat chaotic.

Figure 3-18: The 8480 Space Shuttle set does an excellent job of modeling the complex shape of the real vessel with bricks and hinge plates. Studless pieces are present, but they don’t dominate yet.

Figure 3-19: The 8448 Super Street Sensation set features a large supercar with a studfull chassis under a studless body. The model combines the rigidity of the studfull pieces, crucial at this size, with the lightness of studless ones.
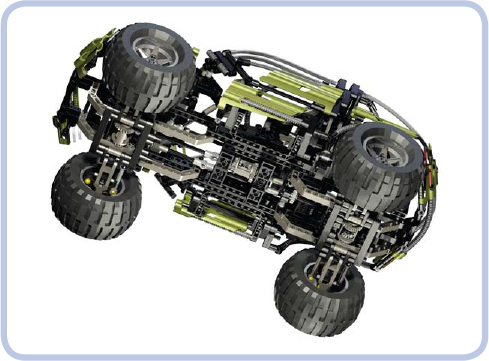
Figure 3-20: The 8466 4×4 Off-Roader set features another large car model, but this time only the center of the chassis remains studfull. This center provides the rigidity needed by the car’s impressive suspension system, but the set itself is mainly studless.
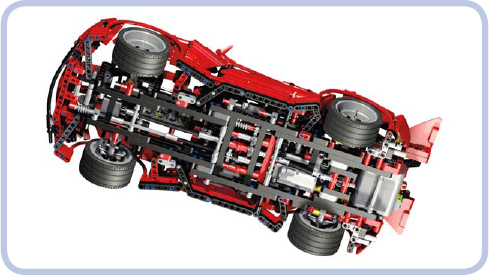
Figure 3-21: The 8070 Super Car set can be considered a direct descendant of the 8448 set. It’s completely studless, with a very rigid, although shorter, chassis.

Figure 3-22: The acclaimed 8421 Mobile Crane set is primarily studless, but it uses a combination of bricks and plates for the most heavily loaded part of the boom.
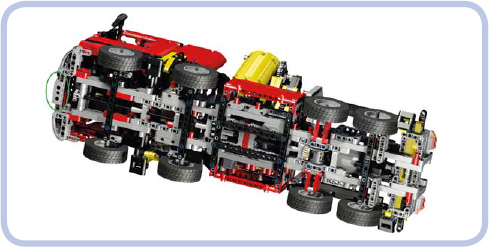
Figure 3-23: The 8285 Crane Truck set is an outstanding achievement in creating a rigid, sturdy studless chassis for a heavy vehicle. Studfull pieces are still there—note the clever use of a Technic brick to attach the license plate under the front bumper.
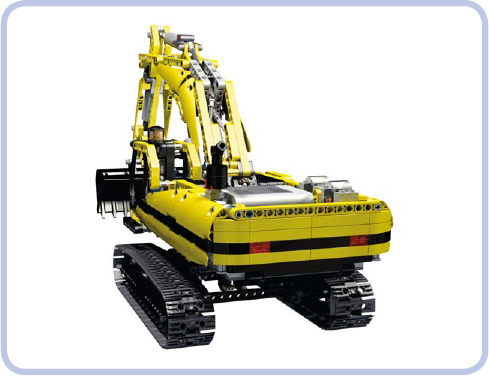
Figure 3-24: The 8043 Motorized Excavator set has a realistic silhouette created with studless panels, but it also uses studfull ones, mainly tiles and curved slopes, to model its rear end.
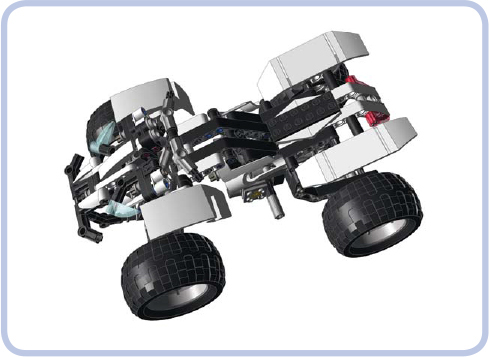
Figure 3-25: Some LEGO panels come in surprising shapes. The 8262 Quad-Bike set proves these panels can be used to excellent aesthetic effect.
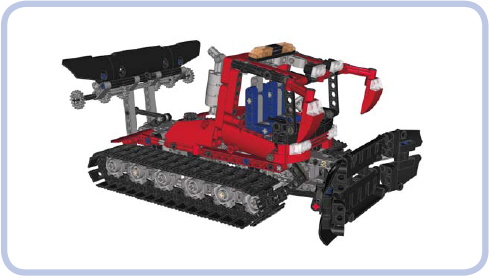
Figure 3-26: The 8263 Snow Groomer set uses a number of studfull pieces as cabin details, which are too small to be modeled with studless pieces.
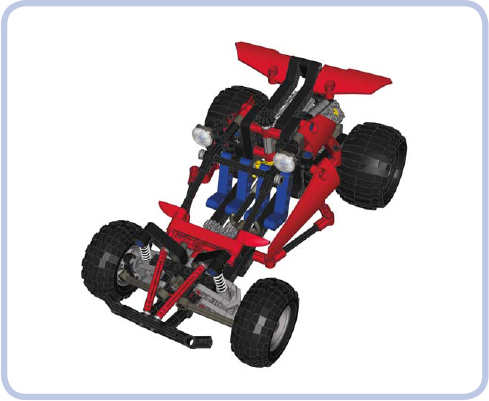
Figure 3-27: The 8048 Buggy set is a great example of creating a small, authentic-looking vehicle using studless pieces only.
While modern LEGO Technic sets use studfull bricks only when necessary, making the distinction between chassis and body quite subtle, MOCs can do something much more dramatic. You can create splendid-looking models by building a studfull body around a studless chassis and then incorporating large numbers of classic LEGO bricks. Many accomplished builders abandon the Technic aesthetic completely and instead aim to make their models look as authentic as possible using any LEGO pieces that suit their needs. This is often called the Model Team approach, in reference to the discontinued LEGO Model Team line of large-scale vehicular models. These are Technic models that really “work”—that steer, drive, shift gears, and so on—but don’t resemble Technic models. This building technique, possible usually only at medium and large scale, involves covering the Technic structure with bricks and tiles, thus concealing any pin holes, axles, wires, and motors. Figures 3-28 through 3-30 show examples of the Model Team approach, while Figure 3-31 shows a build using studless pieces, panels, and flexible axles as a counterexample.
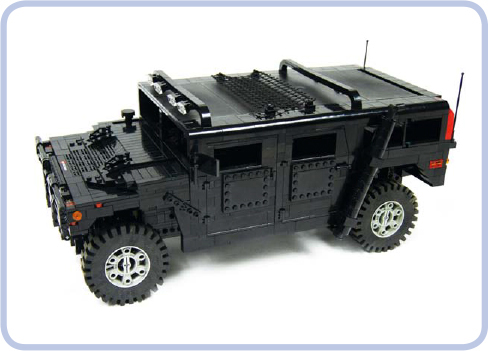
Figure 3-28: My Humvee model used a studfull body on a mixed chassis. The central bearing structure of the chassis was studfull, and the areas between wheels, where compactness was crucial, were studless. The resulting model was very rigid and compact for its functionality but also very heavy.
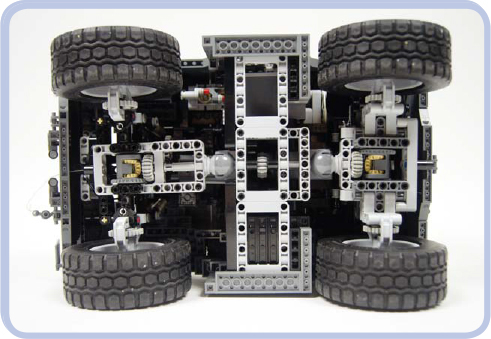
Figure 3-29: My model of the RG-35 4×4 MRAP vehicle (an armored personnel carrier) combined a completely studless chassis with a fully studfull body. The realistic model was extremely compact, but its densely built body made it top-heavy.

Figure 3-30: My model of a sentry turret from the Portal game used a complex combination of pieces to create an egg-shaped body. The body consisted of five separate studfull parts—front, rear, left, right, and top—attached around a studless skeleton. No existing studless pieces could achieve that body shape.
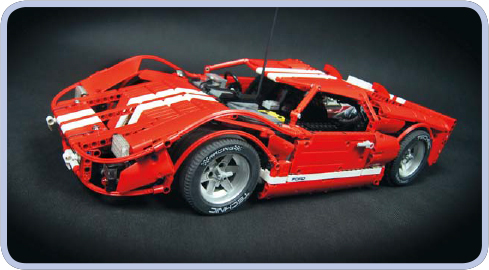
Figure 3-31: My Ford GT40 model used studfull pieces only for minor details of the body and cabin interior. It lacked some rigidity, but it weighed only 2.35 kg while being over 0.5 m long. It’s the counterexample to Model Team builds.
methods for connecting bricks and beams
Now that you’ve been inspired by models that successfully combine studless and studfull pieces, let’s consider the practical aspects of actually connecting the two. In addition to using pins to connect pieces, as shown in Figure 3-32, we can use half pins to work like regular studs, as shown in Figures 3-33 and 3-34.
Some connections are considered incorrect because they align pieces in a manner not equal to a full number of studs, as shown in Figure 3-35. While sturdy, these misaligned pieces will make finishing your model extremely difficult, as the relative spacing of the pieces is no longer 1 full stud.
Electric components are usually designed to fit with either studless or studfull constructions, so incorporating them into mixed models can be challenging. You’ll need to think creatively to secure these mismatched elements into your constructions. The Power Functions IR receiver (Figure 3-36), Medium motor (Figure 3-37), and switch (Figure 3-38) are the most common examples. You’ll learn more about the Power Functions system in Chapter 14.
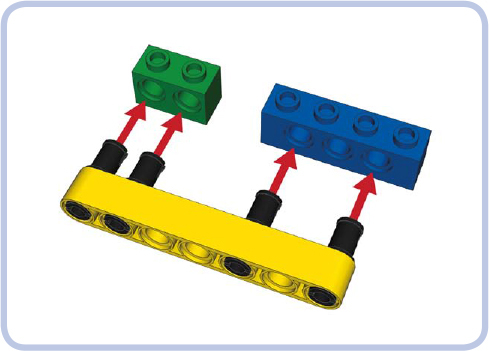
Figure 3-32: Beams can be easily connected with bricks using pins. Note that we can choose regular Technic bricks (blue) or bricks with centered pin holes (green) to adjust the alignment.
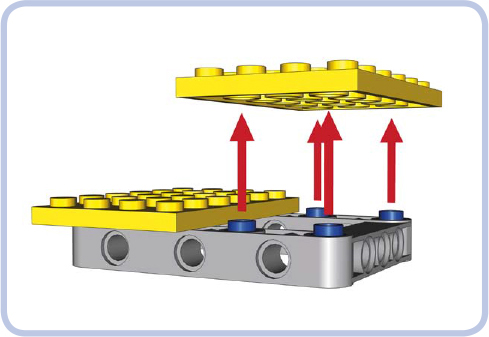
Figure 3-33: When half pins are inserted into pin holes, their tops work just like studs. Bricks or plates can be firmly attached to them, and we can select their exact alignment by carefully choosing the positions of our half pins.
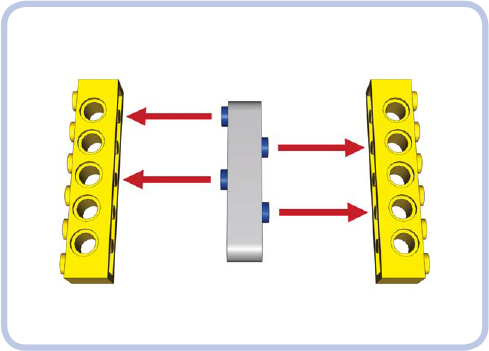
Figure 3-34: The symmetry of the studless pieces allows for complex connections that can grow in several directions.

Figure 3-35: This connection, with studs inserted into the beam’s pin holes, is sturdy but considered incorrect. This is because—unlike in the previous examples—the spacing between the bricks’ pin holes is not equal to a full number of studs. In terms of LEGO units, the bricks are misaligned.
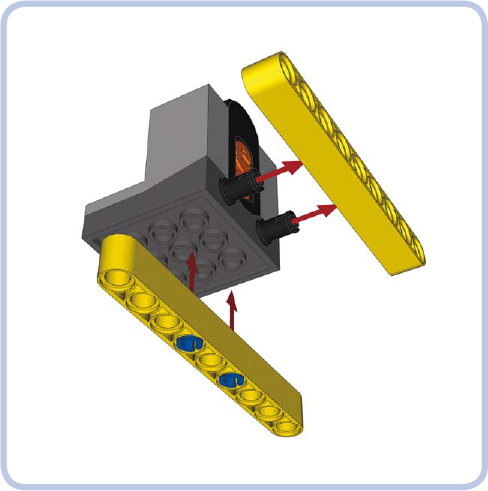
Figure 3-36: With its plate base, the Power Functions IR receiver is easily connected to studfull pieces. For studless connections, we have the option of using pins or half pins (as studs), shown above.

Figure 3-37: Jumper plates (blue) can be used to align the Power Functions Medium motor to studfull pieces.

Figure 3-38: The Power Functions switch is easily connected to studfull pieces, but creating a rigid connection with a studless piece is more challenging.
even vs. odd
The final challenge is matching the two styles’ widths. Studfull pieces are designed for even-numbered spacings of 2 or 4 or 6 studs, and so on. Studless pieces are designed for odd spacings, 3 or 5 or 7 studs. This difference raises difficulties when combining the two styles—for example, a studless chassis is in most cases an odd width, but a studfull body around it is easier to build at an even width. Of course, length and height often also require matching, but in practice width is usually the primary challenge, because the left and right sides of most models are symmetrical. In other words, making a model wider or narrower requires changing its central part, while length and height can be adjusted by adding pieces at the top or back of the model.
A pair of half-stud-wide liftarms (shown in blue in Figure 3-39) are well suited for matching a single-stud difference in width. Other pieces and connectors designed to overcome this spacing problem are shown in Figures 3-40 to 3-44.
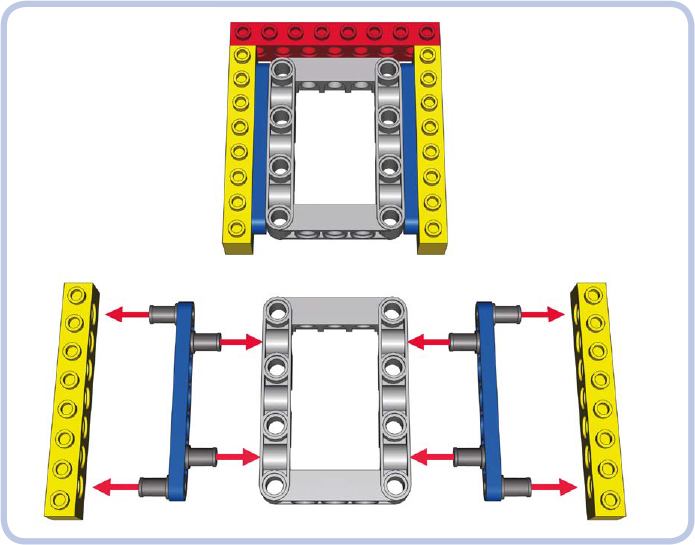
Figure 3-39: Half-stud-wide beams (blue) and three-quarter pins (dark grey) can be used to create a very firm connection between pieces of even and odd width.

Figure 3-40: Three types of studless connectors created specifically to handle a half-stud difference

Figure 3-41: Connectors (yellow) used to align a 6-stud-long piece (red) to the center of a 7-stud-long piece (blue)

Figure 3-42: Connectors (yellow) used to align a 6-stud-long piece (red) to the center of a 5-stud-long structure (blue)

Figure 3-43: A combination of two connectors (yellow) used to align a 6-stud-long piece (red) to the center of a 7-stud-long structure (blue)
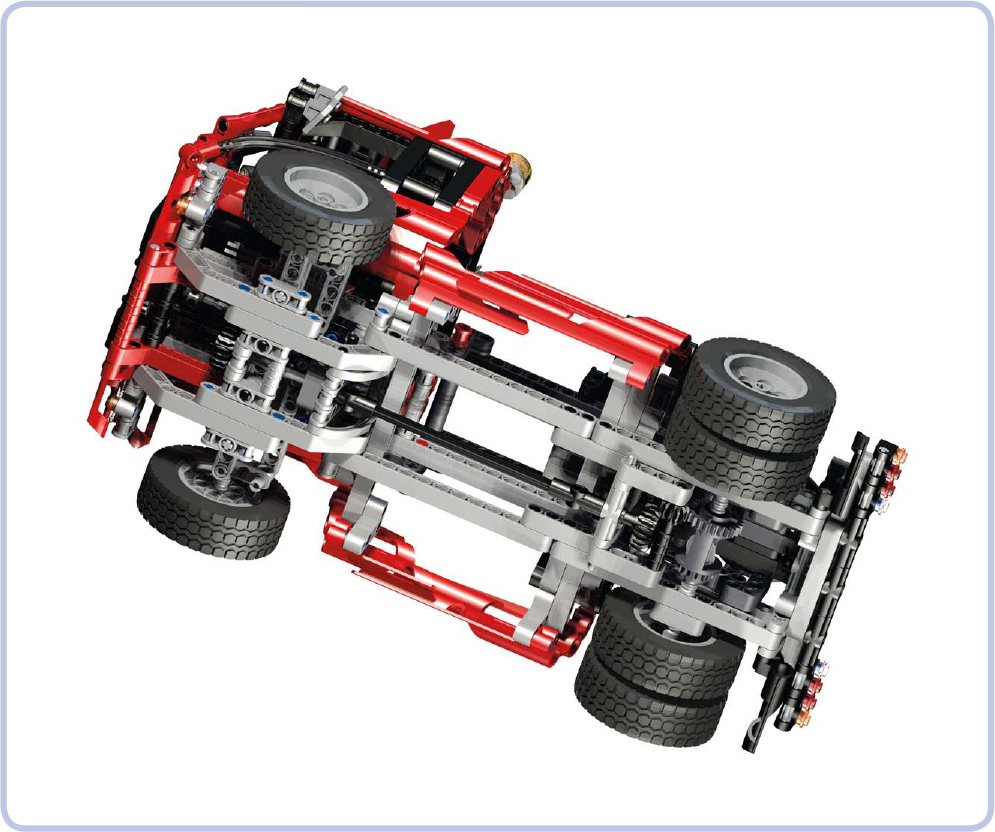
Figure 3-44: The 8436 Truck set, with a studless chassis built around a 4-stud-wide differential, is a great example of combining structures of even and odd width. The use of the adjusting connectors in this set creates a very rigid yet light structure.
Depending on where and when your adventure with LEGO Technic started, you may be unfamiliar with one building style or the other. The best way to understand how an unfamiliar style works is by playing with a LEGO set that uses it extensively. If this proves difficult, remember that there is nothing wrong with sticking to the system you know and like. After all, innovation is quite often driven by our creative constraints!