Using a Run-D.M.C. song as the name of a chapter on iPod tips and tricks gets me some props. Some street cred, because no matter how young and cool some of my readers might be, they can’t dis Run-D.M.C. because they helped put rap on the map, and rappers of all ages still give them respect. (Notice how I used the terms “props,” “street cred,” and “dis” in the opening? I did that as a shout-out to my homies and peeps. See, there I go again, using that hip street talk all the kids are using these days.) Look, here’s the deal: When you’re a middle-aged white guy, all you remember are the slang terms used when you were growing up. Then you start listening to stations like Mix 100.7 and Oldies 104, and you never hear new street slang again. So the old street slang still sounds “new” to you. So, when you’re in a situation where you’re desperate to sound cool again (as I clearly am here), you instantly revert to words you remember were once cool. Like “props” and “dis.” You might even throw in an occasional “chillin’,” or if you’re really old, you might actually call someone a “jive turkey” (believe it or not, there was a time when people under the age of 18 would use that term [with a straight face], and other people would think they were cool). So now I just sit around listening to old Salt-N-Pepa songs and repeating every cliché ever uttered on early editions of Yo! MTV Raps. Well, gotta go—my posse’s hookin’ up with another suck’a crew. (Forgive me.)
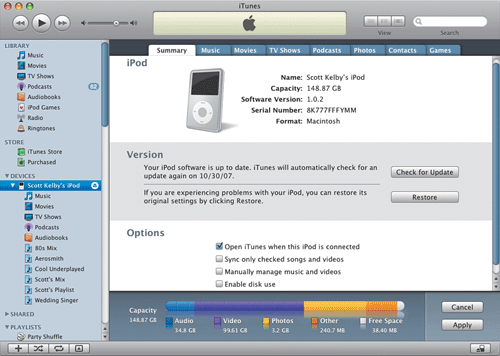
If you want all the background info about what’s going on inside your iPod, the best place to get that is from within iTunes itself. Just connect your iPod to your computer, and then in iTunes click on your iPod in the Devices list on the left side of the iTunes window. This brings up the iPod Preferences window with loads of info about your iPod. In fact, there’s so much info, it has to be separated into different tabs that appear across the top of the window. The first section that appears is the Summary tab, which shows the basic info for your iPod (your iPod’s serial number, the total capacity of your iPod, etc.), and below that is a section where you can update your iPod software, or restore the original factory settings if you need to erase everything and completely start from scratch. Below that is a set of options for your currently connected iPod, and at the bottom is a graph that shows how much of your iPod storage space is used up, and the color bars show what they’re taken up with. The tabs across the top of the Preferences window vary depending on which iPod you have connected, but you can think of them as preference settings for your particular iPod. For example, to set your preferences for which playlists are downloaded into your iPod, click on the Music tab. To decide which podcasts are downloaded into your iPod, click on the Podcasts tab. Do you see where this is going? Good, because one more “To decide which...” and I was going to have an aneurysm.
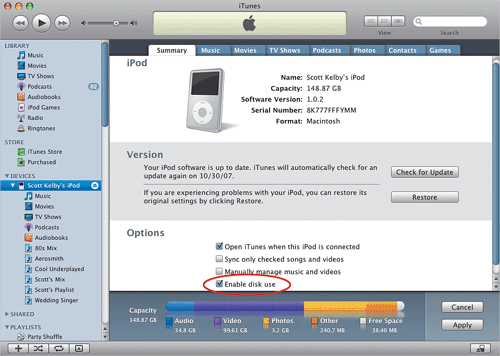
That title is kind of misleading, because your iPod actually is a hard disk, so it’s not like you’re fooling it into believing it’s a hard disk—it already knows it. However, for it to act like a regular hard disk (where you can store regular data, text files, Photoshop files, videos, etc.), you have to tell it that it’s okay to do this. Start by connecting your iPod to your computer, and the Preferences Summary tab automatically appears. On the Summary tab, in the Options section, turn on the checkbox for Enable Disk Use. (Note: You only need to turn this option on when you have the “auto-update” feature active in the iTunes Preferences. Otherwise, if you’ve chosen to update your iPod manually, the Enable Disk Use feature is on by default. See the next page for clarification.) Your iPod will now appear on your desktop, and you can add files by dragging-and-dropping them onto the iPod icon, just like any other removable hard disk. This is great for moving non-music files between machines. There’s one thing to remember though: when it’s in this “disk” mode, you have to eject your iPod manually by Control-clicking (PC: Right-clicking) on the iPod icon (either on your desktop or in the iTunes Source list) and choosing Eject in the contextual menu that appears.
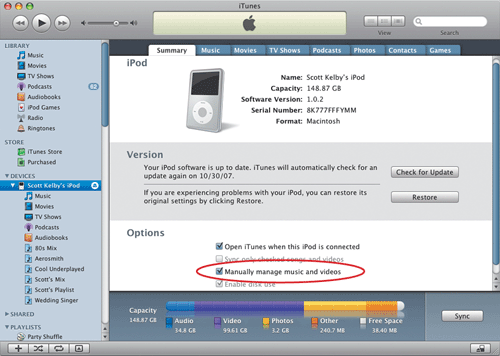
Each time you connect your iPod to your computer, iTunes automatically starts an updating (auto-synchronizing) process that transfers onto your iPod any new songs you’ve downloaded in iTunes, so your iPod is always up-to-date. It also deletes from the iPod any songs you may have removed from your iTunes Music Library, to keep iTunes and your iPod always “in sync.” So, if you’re not downloading new songs often, or you’re not ready to take certain songs off the iPod, or your iTunes Music Library is larger than the amount of space on your iPod, you might not want it automatically syncing every time you put your iPod in its Dock just for charging—especially since this syncing ties up your iPod and iTunes. If you’d prefer to update your iPod manually, you can turn off this “auto-syncing.” Here’s how: While your iPod is connected to your computer, click on your iPod’s icon under Devices on the left side of the iTunes window. When your iPod’s Summary tab appears, choose Manually Manage Music and Videos (or choose Manually Manage Music if you don’t have a video iPod). Now you’re in charge of syncing, and here’s how it works: Look to the immediate left of your iPod in the iTunes Source list and you’ll see a gray triangle. Click on it to see all the playlists on your iPod. To update your iPod manually, just drag a song from your iTunes Music Library (at the top of the Source list on the left) and drop it where you want it on one of the iPod’s playlists. If it sounds like an awfully manual way to sync, that’s because it is.
If your iPod won’t turn on, most likely it’s one of two things: (1) Check to see if your button lock (that Hold button on top of the iPod) is turned on. If it is, all buttons are locked. Slide it over so you don’t see the orange indicator any longer (which unlocks all the buttons), then press any button to turn on your iPod. If that doesn’t do the trick, then go to Plan B: (2) It’s probably the battery. Try plugging your iPod into your computer using the USB 2 cable. If neither of these two solutions works, try resetting your iPod (using the instructions on the next page).
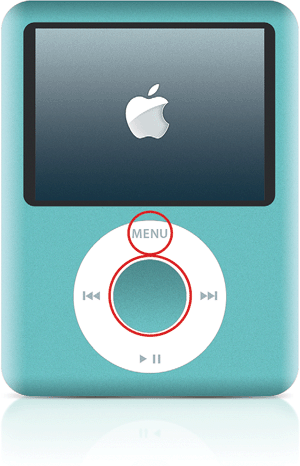
If your iPod locks up (meaning, it’s on, but you can’t get it to do anything—you’re stuck on a screen and the buttons don’t do anything, the Click Wheel doesn’t click, etc.), you can reset your iPod, which will usually do the trick (don’t worry—resetting won’t erase your songs or playlists). To reset your iPod, just slide the Hold button (that button on top of your iPod or bottom of your nano) over to the lock position (so the bright orange color shows), and then slide it back again to unlock it. Now hold down both the Menu button and the center Select button until the Apple logo appears in the LCD window (this usually takes less than 10 seconds), then release both buttons. If you have an older iPod, you still slide the Hold button to the lock position and then unlock it, but you press-and-hold the Play/Pause button and the Menu button instead. If you’re not sure how old your model is, also try sliding the Hold button, then press-and-hold the Play/Pause button and the center Select button. One of those three combinations is bound to reset an older iPod.
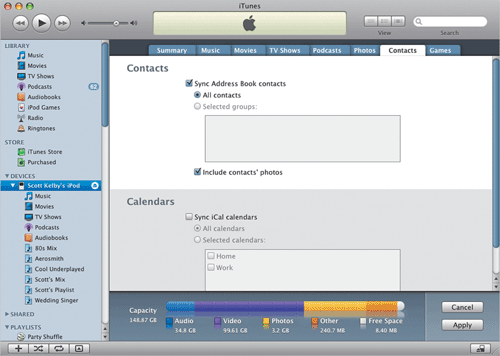
You can make your iPod act like a mini-PDA by having it store your contacts (addresses, phone numbers, etc.). If you’re on a Mac and you’re using Apple’s Address Book application (which comes with every Mac), it couldn’t be easier—just connect your iPod to your Mac (which launches iTunes). Click the Contacts tab in the iPod Preferences window. In the Contacts tab, turn on the Sync Address Book Contacts checkbox. You can choose to synchronize all of your contacts, or selected groups only. If you have not upgraded to at least iTunes version 4.8, you will have to open iSync from your Applications folder instead. (It’s easier to just update your iTunes, so go ahead and do that first.) If you’re using a Windows PC, when you turn on the Sync Contacts From checkbox, you will have to choose which program to synchronize with (Windows Address Book, Outlook, etc.) from the adjacent pop-up menu. If you haven’t updated your iTunes, it’s a little more involved, but it’s still easy. Once your iPod is connected, open your contact manager and then drag addresses (your vCards) directly from your contact manager into the Contacts folder on your iPod. (Note: To access the iPod’s Contacts folder, you’ll first have to set the iPod to act like a hard drive, which we covered earlier in this chapter.) Once you’ve loaded your contacts, you’ll access them the same way as mentioned above for Macs.
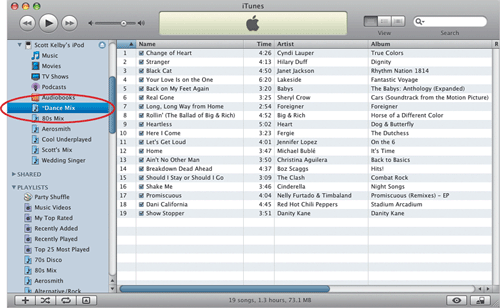
Playlists appear in your iPod in alphabetical order (which makes sense). But what if you want a particular playlist at the top of the list (maybe your favorite playlist)? You can do that pretty easily by pulling an alphabet scam—basically, you just add an asterisk (*) before the playlist’s name. For example, if your favorite playlist is called “Dance Mix,” you’ll just double-click directly on the playlist’s name (in the Source list on the left of the iTunes window) and rename it with an asterisk before the playlist’s name (so it would now be named “*Dance Mix.” Now that playlist will appear at the top position (but it still won’t move above any Smart Playlists). Easy enough, eh?
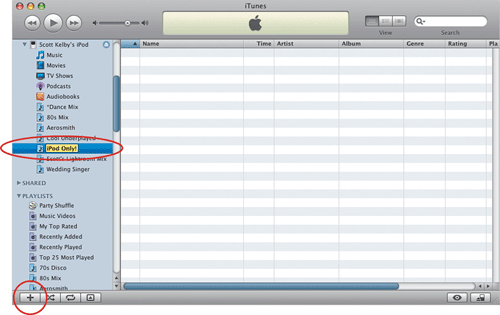
If there’s a playlist that you want to appear just on your iPod (maybe it’s a playlist you use when jogging, and you never play it in iTunes while sitting at your desk eating a Snickers), you can have this playlist appear only on your iPod. Just connect your iPod to your computer, then turn on the manual update feature (covered earlier in this chapter). Now click on your iPod in the Source list on the left side of the iTunes window and click on the gray triangle to its left to show a list of the playlists already on the iPod. Now click on the Create a Playlist button in the bottom left-hand corner of the iTunes window, and a new empty playlist will appear within the list, with the name field already highlighted (so type in a name, then hit the Return [PC: Enter] key on your keyboard to lock it in). Now drag-and-drop songs directly into this “iPod Only!” playlist, knowing that this playlist will appear only on your iPod and won’t be adding useless clutter to your regular list of playlists (being the neat freak that you are).
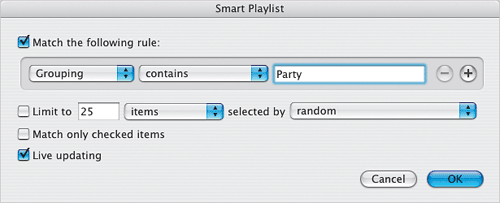
Back a couple of years ago, Apple added the ability to embed your own keywords into an MP3 and, because they’re embedded, when you move a song from one computer to another, these embedded keywords go right along with the songs. Now, how would you use this? Let’s say you’re a DJ at a party next week. As you go through your songs, you find ones you might want to use at the party, so you can go under the File menu and choose to Get Info on each song. Then, click on the Info tab at the top of the resulting dialog, and in the Grouping field enter your keyword, “Party,” and click OK. Then, when it’s time to put together a mix for the party, you can have iTunes create a Smart Playlist by choosing New Smart Playlist from the File menu, and in the resulting dialog, choose Grouping from the first pop-up menu; in the second menu choose Contains; and in the text field enter “Party.” When you click OK, all the songs with the keyword (Grouping) of Party (regardless of their genre) will appear in your new “Party” Smart Playlist. It makes the Smart Playlist feature even smarter.
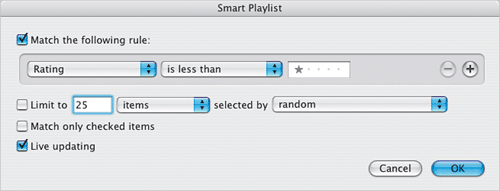
By now you can see how important it is to rate your songs (especially if you want to make Smart Playlists, and believe me—you want to make Smart Playlists). But you know (and I know) there are songs you haven’t rated yet. Well, here’s a quick way to find all your unrated songs and gather them in one place so you can rate them. Press-and-hold the Option (PC: Alt) key and click on the Create a Playlist button in the bottom-left corner of the iTunes window to bring up the Smart Playlist dialog. From the first pop-up menu choose Rating; from the second menu choose Is Less Than; in the stars field click on the first dot to assign the ranking of one star; and then make sure the Limit To checkbox is turned off, so it will get all your unrated songs. Click OK, and iTunes will instantly assemble a playlist of nothing but your unranked songs. Start playing a song from that list, and as soon as you rank the song—boom—it jumps off the Smart Playlist. When you’re done, connect your iPod, and iTunes will add your new rankings there as well. See, that wasn’t as hard as you thought it would be.
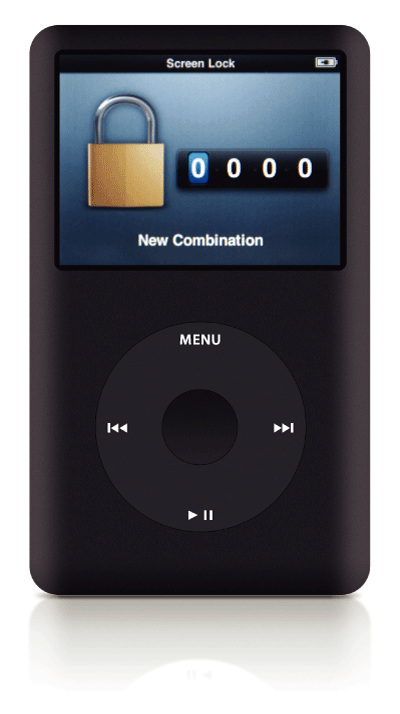
Screen Lock enables you to lock your iPod’s screen (using password protection), so if it were to fall into the hands of some scurrilous ne’er-do-well (a thief, or worse—your little brother), the screen would be locked, rendering it pretty much useless. To turn this feature on, start at the main menu, then go under the Extras menu, where you’ll find Screen Lock. Select Screen Lock, and first you’ll want to set your combination (numeric password). Selecting Screen Lock brings up a screen where you use the Click Wheel to choose the numbers you want as your passcode (you press the Select button to confirm your first number, and it automatically highlights the next number field over, but you can also move from field to field using the Previous/Rewind and Next/Fast-Forward buttons). Once you finish entering all four digits of your passcode, you’ll be asked to confirm those numbers (yup—you have to enter all four digits again), and if you confirm all four numbers correctly, a little bar appears where you get to choose whether to Lock your iPod or Reset the passcode (which turns the locking off). If you choose Lock, it shows a large lock icon onscreen. To unlock your screen, press the center Select button and enter your passcode.


