
Chapter 6
Application Security
Information in this chapter:
- The FortiGuard Portal and the Fortinet Blog
- Individual Licensing (per-feature or à la carte)
• Configuring FortiGuard on the FortiGate
- Concepts about FortiGuard Updates
- Configuring FortiGuard Updates
- Configuring Scheduled Updates
• Doing UTM Analysis: Concepts
- UTM Inspection under the Hood
• Troubleshooting the FortiGuard Distribution Network (FDN) Connectivity
- Troubleshooting Configuration and Connectivity Issues
- Troubleshooting and Tuning Performance Issues
• The need of Application Control
• Deciding when to use Application Control
• Before you Configure Application Control (Sizing and Design steps)
• How Application Control Works
• Configuring Application Control
- Creating an Application Control Profile
• Network Antivirus / Anti-Spyware
• The need of Network Antivirus
• Deciding when Network Antivirus is a Good Idea
• Before you Configure Network Antivirus (Sizing and Design steps)
• How Network Antivirus Works in the FortiGate
• Before you Configure IPS (Sizing and Design steps)
• How IPS Works in the FortiGate
• How Web Content Filtering Works in the FortiGate (Sizing and Design steps)
As threats are constantly evolving, Network Security technologies and mechanisms are almost never static, especially when they aim to analyze content. To understand the importance of the topic, we must remember that many threats, such as Bots, Ransomware, Advanced Persistence Threats (APTs), Viruses or SPAM, have a heavy content component and are not purely focused on the network layer. In this case, “content” refers to the interpretation and analysis of the payload of packets and not the way they are being transported. In other words, we are talking about the layers four to seven of the OSI Model.
Content Inspection technologies such as Antivirus, IPS, DLP, or Application Control, have two main components: an Inspection Engine and a set of Inspection Rules.
The Inspection Engine is in charge of analyzing the traffic that it receives, and usually does this by extracting the content from the data flow, interpreting and applying the Inspection Rules that it obtains from a configuration. The strength of an inspection engine can be judged on how successfully it handles the changing threat environment particularly when considering the threat posed by mutant attacks such as polymorphic viruses. The configuration can be a file that lists a static set of rules, an automated source that provides dynamically updated rules or an inline configuration as performed by manual analysis. Each of these sources can include a time stamp component to address the rapid changes in content that must be assessed.
The engine analyzes the entire information flow and can be tuned to achieve better performance, gain a deeper understanding of the information context, or allow the Inspection Rules to become more precise and accurate. This tuning is not easy, but fortunately, does not need to be frequent either. The enhancements must be carefully designed and thoroughly tested. Otherwise, you face the risk of increasing failure, as the engine is usually more complex than the Inspection rules. The Inspection Engine must be rock solid, so it always behaves predictably.
The Inspection Rules are a different story. As new threats (viruses, bad applications, attacks, etc.) are discovered, inspection rules must be quickly released to address them. This can be in a specific way (describing a specific attack pattern) or more general (describing behavior related to the attack). Typically, a general defense is released and, as the attack it addresses is better understood, more specific rules are written that are less susceptible to false positives. If a highly focused attack is detected, local administrators may also write their own rules.
These rules have evolved in complexity, much as Inspection Engines have. These days, they are not merely a pattern or a sequence of characters that is recognized in traffic. It is now possible to derive information from both context and environment. This can include things such as the frequency of the events, the times the event has been seen from the same source or towards the same destination, or even to simulate behavior based on controlled execution.
Thus, to be effective with Content Scanning, you must have a very solid and robust Inspection Engine, but the security vendor behind the Content Scanning mechanism (i.e. behind the Inspection Engine) must also have a reliable, fast, and accurate way to deliver inspection rules. If both components are not in place and reliable, the protection will not be effective.
Fortinet has a team, named FortiGuard, dedicated to ensuring the Content Scanning technology is always updated, accurate, and robust. Every time you see this name, you know that there are a number of resources, technical and human, involved in maintaining the dynamic protections offered by all Fortinet products.
This chapter’s examples assume that only one VDOM is being used in each scenario. If you are using multiple VDOMs, be aware that each configuration must be made within each of them.
FortiGuard
Introduction to FortiGuard
FortiGuard is important for all services that require updates. The FortiGuard Team consists of a large number of Security Analysts distributed in several countries that are dedicated to analyzing various areas necessary for complete security protection. These areas include Antivirus (AV), Web Content Filtering (WCF), Intrusion Prevention (IPS), AntiSpam, Application Security, Application Control, Vulnerability Control and Management (VCM), and Web Security. These researchers use automated tools to add updates to FortiGuard, so they only see action when something really new and complex is at hand, which happens more often than you would think.
This human FortiGuard team is focused on discovering ways to improve Fortinet’s Inspection Engines. These engines are proprietary to Fortinet, which defines the roadmap and controls the future of the technology. When problems occur; the developers may assist with diagnosing, troubleshooting, and creating a fix. Finally, since the technology was developed in-house, Fortinet does not have to pay any royalties, keeping the price low. These same advantages apply to the creation of the signatures (Inspection Rules) that feed to the devices installed around the world.
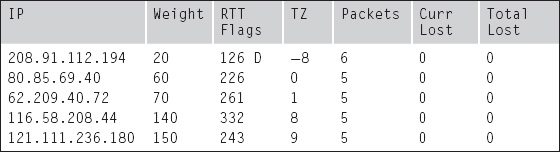
The Fortinet Distribution Network (FDN) is how Fortinet effectively distributes content to all devices across the world. You can think of the FDN as a “repository in the cloud” for both Inspection Engines and Signatures. When Fortinet Devices (such as FortiGates, FortiWeb, or FortiCarrier) are configured for dynamic security inspection, they constantly query the FDN to determine which server is closest. Once determined, this server is queried for security updates which, once found, are downloaded and applied. However, this only occurs if the device is entitled. In other words, this occurs when the serial number is linked to a license contract which references the service that has been updated. If you wish to know the servers that feed your device, you may run the CLI command “diagnose debug rating.”
Each mechanism (Antivirus, Web Content Filter, etc.) works differently, so the FortiGuard technology and processes differ from mechanism to mechanism, as explained later in this chapter. However, you must understand the general architecture:
1. FortiGuard Security Analysts scour the Internet for information. Information also is pulled from partnerships with companies like Adobe or Microsoft and is gleaned from independent research on new attacks and applications. Specialized groups also create information about specific fields of study. Analysts also approve updates generated via automated detection and classification tools.
2. Once a FortiGuard Security Analyst has identified a potential enhancement for an Inspection Engine or is able to create a signature, they commit the appropriate change. These changes are implemented through automated systems so errors can be reduced. Once done, the quality assurance process further vets the change.
3. The update is uploaded to the FDN, usually to a master server which handles propagation. Thus, sometimes, it can take several minutes before the server to which you are connected gets the update. There is some periodicity on the updates: Antivirus is updated four times a day, IPS twice a day, and AntiSpam and Web Content Filter updates are done in real time. Of course, the rise of an important threat could increase the frequency of updates.
4. The Fortinet device queries the FDN upon reboot (or upon network connectivity being established) and then determines the closest FDN server. This server is queried periodically, as configured, to determine if there are any relevant security updates. If there are, they are downloaded.
5. If a high-severity threat is discovered, updates may be pushed to the device outside of the normally scheduled update times. However, for this to occur, the device must be directly accessible from the Internet and configured to accept these emergency updates (see Figure 6.1).

Figure 6.1 How FortiGuard Works?
Tip
FortiManager as local FortiGuard Server
FortiGuard Distribution Network controls all security updates, effectively storing them “in the cloud”. However, due to reasons of bandwidth or isolation, an organization may wish to store such updates within the local network. This is done with the FortiManager, a dedicated management device. Please verify the latest FortiManager datasheet from http://www.fortinet.com to review which FortiManager models support this feature.
The FortiGuard Portal and the Fortinet Blog
The FortiGuard team also maintains an online portal for information about the content inspection features and specific tools: http://www.fortiguard.com. As you work with your FortiGates, you will definitely want to become familiar with this portal. It is where Fortinet analysts publish papers and information about issues and behaviors for specific technologies. It is also where you may find the latest engines and signatures.
The FortiGuard portal also contains tools to submit new URLs for web filtering, virus samples, spam samples, tuning information for Application Control, and a tool to help you delist your systems if they are detected to be causing problems on the Internet. The FortiGuard portal also hosts a set of “Encyclopedias” that detail specific viruses, attacks, and applications that have been built into the FortiGate. This can be useful when analyzing logs and alerts.
Another useful site is the Fortinet Blog: http://blog.fortinet.com. Most articles published here are written by the FortiGuard team and detail the current research being done to keep the systems up to date and protecting your environment. Occasionally, people from other departments submit articles to the blog. You probably want to review this site at least once a week.
FortiGuard Licensing
It can be challenging to hire a group of smart people capable of doing detailed security research and to maintain the infrastructure capable of distributing updates all over the world in a very short period of time. This is why most security firms charge for updates. Of course, Fortinet is no exception. FortiGate devices access these resources through appropriate licensing.
Fortinet offers licensing for updates on these features: Antivirus, IPS, AntiSpam, Web Content Filter, and Vulnerability Management. While many firms license such technologies in terms of total users, concurrent users, mailboxes, IP counts, or sessions, Fortinet simplifies the process and simply licenses according to the performance of the device. Basically, the bigger a box you have, the more you pay to keep it up-to-date.
Fortinet offers two options to license updates for the security services: As a Bundle and Individually (A la carte). Let’s review each one.
Bundle Licensing
A “Bundle” or “Flat” license includes pretty much all the security features the FortiGate can support. However, a Bundle not only includes technical updates, but also additional services such as support. Since all possible services are packaged together, Bundle licensing often has a lower price tag than purchasing the updates and services individually.
Bundles typically include 8 × 5 Support, 8 × 5 Hardware Replacement (Return and Replace), Entitlement to Firmware Upgrades and new features, and licenses for Antivirus, IPS, Web Content Filter, and AntiSpam. However, depending on the FortiGate hardware model, some features might not be available to the bundle (such as Vulnerability Management). There are also advanced Bundle options that offer upgrades to 24 × 7 support or faster hardware replacement.
In general, you should expect that if you purchased a bundle, you have the license to download most security updates for your device. Bundles are convenient because all you have to worry about is configuring your device to obtain the maximum protection for your network, without the fear of missing a license.
It is also important to remember that you need more than one feature to provide maximum protection for your network. Since no security technology can ever protect against 100% of the threats, you need a combination to come close to this number. Web Content Filtering is a good example. If you do not also use Application Control to block proxies and anonymizers like Tor or Ultrasurf, your users may easily bypass your carefully crafted policies. If you don’t leverage Antivirus, you run the risk of malware infecting your systems via the Web. This is why the Bundle model works: you can leverage all available protections.
Individual Licensing (per-feature or à la carte)
Despite the advantages of the Bundle model for most organizations, some may already have a good set of protections and are only interested in a single feature. If this is the case for you, you might find it more convenient to purchase only the license for the feature you need.
Fortinet offers separate licensing for each security feature: Vulnerability Management, Antivirus, IPS, Web Content Filter, and AntiSpam. It is also possible to purchase two or more separate licenses and apply them to the same device, even though this is often more expensive than going the Bundle route.
Tip
Application Control Licensing
You might have noticed that Application Control is not listed as a licensable feature. This is because Application Control leverages the IPS mechanism, so if you are entitled to IPS, you automatically get Application Control.
Configuring FortiGuard on the FortiGate
Concepts about FortiGuard Updates
Before getting into the configuration for FortiGuard, it is important to understand a few concepts. The first is that there are two methods for downloading security updates: scheduled and online.
Scheduled updates are used for Antivirus and IPS, and work by downloading incremental signature files for these features. This means the FortiGate only downloads the latest changes to the signature database, as opposed to the entire database. The Antivirus and IPS signature files are locally stored on the FortiGate and are updated only when scheduled. This way, the FortiGate may do faster inspection and be more resilient to network outages. In other words, even if the device cannot reach the FDN, it will still be able to perform Antivirus and IPS inspection. However, the tradeoff here is that a device could easily get out-of-date.
Consider that the longer the update cycle, the more data must be downloaded to bring the signature databases to current, but the shorter the update cycle, the more resources are spent updating rather than protecting. In general, updating every 3 h should be fine for most environments. However, in more sensitive environments, a higher frequency should be considered.
FortiGates also support Push Updates. These are used to ensure that important signature packages are automatically forced onto devices. This means that even if a signature package is released the minute after the FortiGate queried for updates, the FortiGate will get it immediately. This feature, however, must be configured locally by an administrator. By default, Push Updates are disabled.
Online updates are used for Web Content and E-mail filtering (AntiSpam). These features require the FortiGate device to be connected to the FortiGuard Network. In other words, every time the FortiGate needs to analyze content for AntiSpam or Web Content Filter, it submits information to the FDN and receives an analysis. Due to this, you must consider the ideal behavior in the case of a network outage or reliability issue. In most environments, loss of access to the FDN would match up to times when the organization would be receiving no email and no users would be browsing the web. However, if you are using FortiGate devices as internal barriers for scoping reasons or between security zones, you may still need protection. In these cases, you can effectively fake a constant Internet connection by placing an internal FortiManager device that caches the updates from the Internet. All internal FortiGates point to the FortiManager and pull updates from there. The FortiManager will update itself once the external network again becomes available.
Tip
FortiGuard Updates tunneling
It is generally assumed that there is direct connectivity between the FortiGate and the Internet. However, if this is not the case, and a proxy must be used, you must configure your devices to use “tunneling updates.” This is activated with the command “config system autoupdate tunneling.”
Configuring FortiGuard Updates
There are three things you need to verify before configuring any type of updates:
1. You are entitled to updates.
In order to be entitled to updates you must both (a) purchase your licensing as a “bundle” or have purchased the appropriate licenses for the specific features you need and (b) register your device on the support portal (https://support.fortinet.com). This is necessary because this step broadcasts your FortiGate’s serial number to the FDN Servers to let them know it is entitled to the updates. Please bear in mind that the moment you register your FortiGate, your warranty begins. Also is important to remember that a FortiGate cannot be registered if it’s been over one year since it was shipped by Fortinet to your distributor.
Once registered, a FortiGate unit should look similar to what is shown in Figure 6.2. What your device displays may differ depending on which licenses you purchased.
Figure 6.2 A recently Registered FortiGate Entitled to FortiGuard Services
2. You have Connectivity.
Make sure the FortiGate you are configuring has connectivity to either the Internet or to the FortiManager that stores the updates. FortiManagers may be used both to provide access in the event of a loss of Internet connectivity, but also to easily manage a large set of FortiGates. If you are configuring a FortiManager to store the FortiGuard updates, then you must configure it similar to the example below:
FGT # config system autoupdate override
FGT (override) # set address 192.168.1.1
FGT (override) # set status enable
FGT # config system fortiguard
FGT (fortiguard) # set srv-ovrd enable
In this example, the address of “192.168.1.1” is that of the FortiManager. The first section configures the scheduled updates and the second configures the online updates. You must have access to UDP ports 53 and 8888 between the FortiGate and the real-time update source and on TCP ports 443, 8889, and 8890 to the scheduled update source.
3. You have DNS resolution working.
DNS is used for updates, as well as several FortiGuard functions, so it must be properly configured.
Configuring Scheduled Updates
In order to configure scheduled updates, you must first decide what period makes sense in your environment. Consider the following:
1. A higher frequency often results in greater security, as the window between an update becoming available and it being deployed will be minimized. However, it also means that more FortiGate resources will be spent (memory and CPU used for the task).
2. A lower frequency increases the risks from running outdated appliances, thereby reducing protection and increasing the chance of an incident.
3. Updates are particularly sensitive for Antivirus and IPS. The FortiGuard team generally releases Antivirus four times in a day and IPS twice a day. However, this is not necessarily at the same time each day. Thus, it is considered wise to update every 3 h. This means that, on average, you will connect twice and receive no update. Figure 6.3 shows the relationship between updates and query frequency. For high security scenarios, consider updating every hour.
Figure 6.3 Finding the Right FortiGuard Update Frequency
Once you have determined the update schedule, you must follow the steps below. If you encounter difficulty, please refer to the troubleshooting section where each command is reviewed in greater detail.
Before you configure your unit, check which updates are already loaded. This way, you can check that, after configuration, you are receiving updates.
Version: Fortigate-51B v4.0,build0496,111108 (MR3 Patch 3)
Virus-DB: 14.00000(2011-08-24 17:17)
Extended DB: 14.00000(2011-08-24 17:09)
IPS-DB: 3.00097(2011-10-28 16:39)
FortiClient application signature package: 1.131(2011-11-08 20:53)
Serial-Number: FG50BH3GNNNNNNNN
Max number of virtual domains: 10
Virtual domains status: 1 in NAT mode, 0 in TP mode
Virtual domain configuration: disable
Notice that you can tell this system has not been updated for a while, due the difference between the System Time and the dates of the Antivirus and IPS Databases.
Now we must ensure updates occur at a given interval. Remember that Scheduled Updates are used for Antivirus and IPS updates. By default, the FortiGate is configured for daily updates. You can confirm this by the following command:
FGT # diagnose autoupdate status
FDN availability: available at Sun Feb 26 22:01:51 2012
Virus definitions update: enable
IPS definitions update: enable
This command tells you that the FDN is available and the FortiGate can reach the servers. It also tells you that Push Updates are disabled, so urgent updates created by Fortinet will NOT be pushed and instead will need to be downloaded on the next update period. It also says that Virus and IPS definitions will be updated (enable for both options), and that Updates are scheduled to happen daily at 1:56. The FortiGate uses a 24-h format, so that is really 1:56 in the morning.
Let’s configure now the FortiGate to perform updates for Antivirus and IPS every 3 h, 30 min after the hour.
FGT # config system autoupdate schedule
FGT (schedule) # set frequency every
FGT (schedule) # set time 03:30
The command above does NOT mean to update every 3 h and a half. Instead, the update will be done every 3 h, and the update will happen 30 min after the hour. Assuming updates began at a half hour after midnight, the next updates would happen at 3:30, 6:30, 9:30, etc.
Next, we may wish to enable push updates, so we don’t miss updates to critical threats.
You can verify the changes using the “diagnose autoupdate status” command again.
FGT # diagnose autoupdate status
FDN availability: available at Sun Feb 26 22:20:56 2012
Push availability: unavailable
Update every: 3 hours at 30 minutes after the hour
Virus definitions update: enable
IPS definitions update: enable
Finally, to ensure that the Antivirus and IPS updates are done immediately, use the command “execute update-now”. Alternatively, you can issue “execute update-av” or “execute update-ips” commands to update Antivirus and IPS individually.
Configuring Online Updates
As mentioned earlier, online (real-time) updates are used for Web Content Filter and AntiSpam. This means every time a URL or a mail message is analyzed, the FortiGate queries the FDN in real time to determine the proper action.
To configure online updates, all you need to set is the port to use. By default, UDP port 53 is used. However, if you need to change it, you do so as follows:
Another thing you might want to modify is the cache for Web Content Filter and AntiSpam updates. Cache can improve the performance of the box, and by default is enabled to hold AntiSpam updates for 30 min (1800 s) and Web Content updates for 1 h (3600 s). You can specify also the amount of the FortiGate memory used to optimize the performance. The commands below show how to modify the default timeout for the AntiSpam and Web Content Filter cache entries, and leave it in 2 h for both. Additionally, we allocate four percent of the system memory for AntiSpam.
FGT # config system fortiguard
FGT (fortiguard) # set AntiSpam-cache enable
FGT (fortiguard) # set AntiSpam-cache-ttl 7200
FGT (fortiguard) # set AntiSpam-cache-mpercent 4
FGT (fortiguard) # set webfilter-cache enable
You can confirm that your FortiGate is ready to do Web Content Filtering and AntiSpam inspection when you get an output similar to that below.
-=- Server List (Wed Feb 29 13:25:26 2012) -=-
You might also get a message similar to this:
The service is not enabled.
If you get this error message, you either need to create a Web Content Filter profile and assign it to a Firewall policy or there are network communication issues. If you are seeing a shorter list of FDN servers, you definitely have network issues. Please review the troubleshooting section below for additional information.
Doing UTM Analysis: Concepts
UTM Inspection under the Hood
Thus far, all of the sample configuration steps were performed to ensure that the FortiGate was going to receive updates from the FDN, allowing traffic to be inspected by the IPS, Antivirus, Application Control, Web Content Filtering, or AntiSpam mechanisms. We have told the FortiGate to be prepared to receive these updates and hold them ready. However, we have not told the FortiGate so far HOW these mechanisms should be put to work: what traffic should be inspected, when should be inspected, and what to do if a policy violation is found. There is a very important concept that applies to all the Content Inspection technologies… the Profile.
When the firewall policy allows traffic, the FortiGate may designate the content as needing further inspection. This behavior is dependent on whether the firewall policy has a UTM profile defined.
UTM profiles exist for each Content Inspection function, and it is their job to tell the FortiGate whether further inspection is needed, and how it will be performed. Specific Profile configuration will be discussed in each function’s section. However, it is important to understand the concept and how it relates to a firewall policy.
Tip
UTM Profiles and FortiGuard Updates
As of FortiOS 4.3, FortiGuard updates will NOT happen unless there is a UTM profile associated with a firewall policy. In other words, if no firewall policy has a UTM profile, FortiGate updates will NOT be performed.
Each Content Inspection function (IPS, Antivirus, etc.) has two internal components: a proxy and a daemon.
There are two methods to perform any of the UTM functions; one is by just looking into the traffic passing-by the FortiGate and performing a “string comparison”. This is pretty much just looking for patterns in the traffic similarly to how you look for a given text string inside a document. This method is called “Flow-based” because it just analyzes the stream of traffic, searching for patterns and is usually limited to only analyzing small portions of the traffic. (As to do larger portions would cause traffic interruption.) This typically misses the context of the session.
The other method is to actually get into the middle of the traffic, effectively breaking the connection, and re-establishing it with the FortiGate in the middle, thereby ensuring that the entire session is inspected. This method is called proxy-based.
Both forms of inspection have their pros and cons. We can summarize the characteristics of each one in Table 6.1.
Table 6.1 Differences between Flow-based and Proxy-based Inspections
| Type of Inspection | Flow-based | Proxy-based |
| Speed/Performance | Faster | Slower |
| Resources | Less resources (CPU, Memory) | More resources (CPU, Memory) |
| Security | Lower | Higher |
| Analysis method | Comparing information seen from a connection to a database of known bad situations | Understanding the session state and content, and conducted specific analysis on relevant information |
| TCP transparency | TCP flow is not broken. If necessary, only packet headers (at layer 4) are changed | TCP connection is broken, since a Man-in-the-middle operation occurs. This means that TCP sequence numbers are changed, for example |
| Protocol awareness | Doesn’t really need to be protocol-aware. Flow-based inspection could recognize a virus on a flow, without actually knowing the file type. It would not unpack compressed files going on an e-mail attachment or FTP download for example | Understands the protocol being analyzed. For example, if a compressed file is detected as an e-mail attachment or while downloading files from an FTP Server, it can be unpacked so the internal files are analyzed by an Antivirus. A proxy exists for HTTP, FTP, SMTP, POP3, IMAP, and IM protocols |
| File size limits | Does not have a file size limit when doing scanning, as it scans only a portion of the file at any time | Since it buffers the file for a complete analysis, it has a file size limit directly related to the amount of memory available in the FortiGate |
| FortiOS features Supported | Antivirus (Flow-based AV), IPS, Application Control, Web Content Filter (WCF) | Antivirus (Proxy-based AV), Data Leak Prevention (DLP), Web Content Filtering (WCF), AntiSpam |
On FortiOS, the functions performed by Flow-Based Inspection regularly use the IPS Engine. The functions performed by Proxy-based Inspection regularly use a (you guessed it!) proxy process. This proxy process is responsible for understanding the connection (identifying e-mail attachments, HTTP downloads, etc.) and passing relevant information to other processes (sending PDF files to the DLP engine, executable files to the Antivirus engine, etc.).
Inside FortiOS, Inspection Engines like the Antivirus engine or the IPS Engine are run in the form of Daemon. Like a service in Windows or a Unix daemon, a FortiOS daemon is just a program that is always running and is responsible for specific tasks, such as scanning a file for viruses or deciding the category to which a URL belongs.
Connections that utilize Proxy inspection are stored in the Proxy Connections Table. This table is different from the firewall session table and helps to track all of the connections that are being inspected. A session is held in the Proxy Connections Table so long as it requires further inspection by a daemon, and is typically held for a shorter time than in the firewall session table.
FortiOS proactively assigns a percentage of the available RAM to host the Proxy Connections Table. This is always a fixed amount of memory that results on a given amount of connections available for Content Inspection operations done by the proxy. This number is different for every FortiGate model and can be obtained via a CLI command.
The command above will show how many HTTP connections are being proxied. The above says that from 3952 Proxy connections available on the table, only 26 are being used. We have to clarify that those are NOT all the HTTP sessions going through the system, but only those that are being analyzed using the Proxy-based inspection method.
You could also query the total amount of HTTP sessions going through the FortiGate.
FGT# diagnose test application http 4 | grep Connections //This command obtains the amount of concurrent proxy connections
FGT# diagnose sys session filter clear
FGT# diagnose sys session filter dport 80
FGT# diagnose sys session list | grep “total session” // This command obtains the amount of concurrent firewall sessions that have port 80 as destination port
On this example, the system had recorded a total of 46 HTTP sessions at the same time that only 18 were being proxied. You can use the above commands to review the connections being inspected by the proxy of the several protocols: ftp, smtp, http, pop3, imap, nntp.
As of FortiOS 4.0 MR2, also known as 4.2, the number of proxy connections available is the same for all protocols that are subject to content inspection. FortiOS has a pool from which it assigns to each protocol that requests inspection. In older versions, each protocol had a different limit, but this resulted in wasted resources. The modern shared-pool method is more efficient.
Tip
Information Levels
What does the “4” mean in the “diagnose test application http 4” command?It means the level of information that the diagnose command will display. If you hit <ENTER> before putting a value there, the command will give you the options available, as you can see:
You can, of course, use the above commands without the “| grep” part. This would display the entire output of the command, which can be useful for diagnostics. We are not reproducing that here because the output could get quite lengthy, but you can play with your FortiGate to see what other parameters exist. Some of them are interesting.
UTM Profiles
One of the biggest criticisms of Fortinet, when it launched the FortiGate, was that people could not believe that Fortinet could do in a single box what other vendors required many systems to accomplish. This is possible because the security administrator can enable or disable inspections at will. Thus, it is possible to use a Fortigate for only Antivirus or IPS, both or more. This flexibility is done with the UTM Profile, a piece of configuration that tells the FortiGate exactly what inspection is to be done for particular traffic flows. However, the UTM profile alone is not sufficient. In order to be used, each profile must be connected to a firewall policy.
Tip
Profiles for each Content Inspection Technology
Older FortiOS releases had the concept of a Protection Profile. This was a single profile with settings for the different Content Inspection technologies. So, Antivirus settings, Web Content Filter settings, AntiSpam Settings, etc. were all configured within a single profile. Since FortiOS 4.0 MR2, there are separate profiles for each inspection technology. These are referred to as UTM Profiles.
You can create several profiles for a single Content Inspection technology. Thus, you can have an Antivirus profile that inspects user-generated HTTP traffic and quarantines dangerous files. You can then have another profile that scans FTP traffic destined to a file server. This traffic should likely not be quarantined, as that could cause operations issues.
There are limits on the amount of UTM profiles you can create, the number dependent on the model of the FortiGate. You can find the exact number of UTM profiles allowed in the FortiGate Maximum Values document (available at http://docs.fortinet.com) available for each FortiOS release. Due to resource constraints, these may change between releases. An excerpt of the table is shown in Figure 6.4.
Figure 6.4 Excerpt of the FortiGate Maximum Values Document, showing the Amount of UTM Profiles Available per Function and per FortiGate Model
A UTM profile, however, has no limits to the number of rules that can use it. If it makes sense logically, you can use the same Antivirus profile for all the virus protection rules. Bear in mind, however, that this might not be optimal for either performance or management of the device. The less tailored a UTM profile, the more likely you are to initiate inspection where you do not need to. It is wise to plan ahead.
Troubleshooting the FortiGuard Distribution Network (FDN) Connectivity
Troubleshooting Configuration and Connectivity Issues
When experiencing issues with updates, the first thing you should review is whether or not there is connectivity between the FortiGate and the external world. This specifically applies to the FDN Servers at service.fortiguard.net. You should be able to at least resolve a name, and if ICMP ping packets are not blocked, then you should be able to get replies. Here is a good test.
FGT # execute ping service.fortiguard.net
PING guard.fortinet.net (209.66.81.153): 56 data bytes
64 bytes from 209.66.81.153: icmp_seq=0 ttl=53 time=72.4 ms
64 bytes from 209.66.81.153: icmp_seq=1 ttl=53 time=70.8 ms
64 bytes from 209.66.81.153: icmp_seq=2 ttl=53 time=71.0 ms
--- guard.fortinet.net ping statistics ---
The above result indicates that there is connectivity to both the Internet to one of the FDN servers. The name service.fortiguard.net has several IP addresses associated to it, so every time you query for the IP addresses associated to that name, you will always see more than one. You can try this by using the nslookup command (Windows) or dig command (Linux, OSX) to review the IP addresses associated to this name.
Non-authoritative answer:
At this point, if you are not resolving the names above, you should check your DNS for proper configuration. Remember that the FortiGate has some DNS servers preconfigured, and you may wish to change them. You can see what your DNS servers are with the following command:
If you are resolving DNS names and the Internet connectivity is working, the next step is to review whether the Antivirus and IPS databases are being updated. Assuming, of course, your FortiGate is entitled to such updates.
FGT # diagnose autoupdate status
FDN availability: available at Sun Feb 26 22:20:56 2012
Push availability: unavailable
Update every: 3 hours at 30 minutes after the hour
Virus definitions update: enable
IPS definitions update: enable
This tells you that FDN is reachable and that scheduled updates are configured. Now you might need to take a look on how old your engines and definitions are by checking when the last update was done for each element.
FGT # diagnose autoupdate versions
Contract Expiry Date: Wed Feb 27 00:00:00 2013
Last Updated using manual update on Fri Oct 28 13:38:00 2011
Contract Expiry Date: Wed Feb 27 00:00:00 2013
Last Updated using manual update on Wed Aug 24 17:17:00 2011
Vulnerability Compliance and Management
Contract Expiry Date: Wed Feb 27 00:00:00 2013
Last Updated using manual update on Mon Feb 27 03:27:00 2012
This command has an extremely lengthy output, so the above is just an excerpt. However, you can see it gives you the time and date for each engine and definition update as well as when the last update attempt was performed. However, remember that, to save on resources, if an inspection module is not configured and linked to a firewall policy, it will not be updated.
To force the update of all configured signatures and engines that are licensed to you:
Alternatively, you could try to update only the signatures and engines for a given technology, using any of the following commands:
| update-ase | update AS engine/rules |
| update-av | update AV engine/definitions |
| update-ips | update IPS engine/definitions |
Another thing that also could hinder updates is not having clear communication on the necessary ports. You must ensure that the common ports used by FortiGuard updates are open: UDP/53, UDP/888, TCP/443, and TCP/8889. If you have configured Push Updates as part of the scheduled updates, then UDP Port 9443 needs to be open too.
For Online real-time updates (Web Content Filtering and AntiSpam), make sure that when you are issuing a “diagnose debug rating” or “get webfilter status” command, you get a list of several servers, as below:
-=- Server List (Wed Feb 29 13:34:54 2012) -=-
A “healthy” status should show around 20 servers in the list above. Please bear in mind the IP addresses might be different between runs and that is ok, but the amount of IP addresses listed is important. If you are seeing only two or three, that’s a common sign that there is something wrong. Usually that means port UDP 53 and UDP 8888 are both blocked. It can also mean that the reply packets coming from the FDN Servers are blocked. This sometimes occurs because the FortiGate uses a source port in the range 1024–1035 for communication to the FDN Servers. The FDN then replies using these numbers (1024–1035) as destination ports because that is where the communication was generated from. However, firewalls and IPS devices that are unaware of this communication might falsely block this as an attack. So, if you have difficulty and the FortiGate is not directly connected to the Internet, check your Firewall/IPS logs on the perimeter device. If you must change the source port range being used for this communication, use the commands below:
This configuration tells the FortiGate to use UDP ports 2048–4096 as the source port of the FortiGuard queries for Online updates. The values you could use here are 1–25,000—If you are having issues with the default, which is 1024–25,000, then probably you should restrict the ports on chunks of 2048 ports (as the example above) and test. Unfortunately, you would likely have to do this by trial and error.
For a complete list of ports that are used by FortiGate, please refer the article in the Knowledge Center.1 For a summary of FortiGuard update communication, see Figure 6.5.
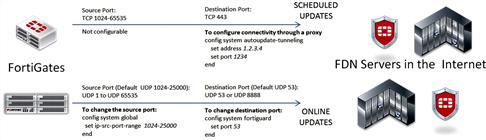
Figure 6.5 FortiGate to FortiGuard Communication Ports
Troubleshooting and Tuning Performance Issues
While we will discuss troubleshooting steps for each Content Inspection technology later on this chapter, there are some steps that are common to all.
1. Look at the number of Proxy Connections being used.
When people take a look at the FortiGate datasheets, it’s not uncommon for people to think that the “Firewall Concurrent Sessions” number applies to all the functions, including Content Inspection. As we stated earlier, this is not true. Using the “diagnose test application” commands, we can monitor how many content inspection sessions are being used. Remember that each protocol will show its own numbers. You can display statistics for all protocols using the proxyworker statistics
Here you will get an idea on how close the Proxy Connections Table has been to exhaustion. You can run the “diagnose test application proxyworker 4” command, without the “grep,” and it will give you detailed statistics on the usage of the general proxy for all protocols.
2. Configure a fast and reliable DNS.
Several Content Inspection functions require DNS. This is why the FortiGates shipped with DNS servers preconfigured. These preconfigured DNS servers are managed by Fortinet, and are often busy. The longer it takes to get an answer, the slower some FortiGate functions can become. Configuring an under-used and nearby DNS server will help ensure there are no delays.
3. Optimize UTM Profiles.
Use the minimum necessary UTM profiles. The idea is not to cut flexibility, but to avoid wasting resources, and potentially duplicating effort if you have many UTM profiles.
Application Control
Introduction
Several years ago, when the Internet began, applications were better behaved. To begin with, there were no such things as “network-based applications”. All applications ran on the local systems, and the Internet was used only as platform network, not as a platform. Back then, applications used well-defined ports, and you could establish a direct relationship for a network protocol (like POP3), to a port (TCP/110), to a program (Eudora or Microsoft Mail).
However, as the Web grew more popular, it was used to serve not only information but also taking feedback, information, and even code from users. Developers began changing first to a hybrid model where code ran both in the browser and on servers and then moved the servers to “the cloud”. Cloud computing forced a change to the security paradigm. No longer could we rely on each protocol mapping to a single purpose. Now we had a single protocol (HTTP) being used for many purposes such as E-mail, Word Processing, File Transfer, Games, and, of course, malicious software. This paradigm change required network inspection to become smarter, so it could identify applications.
The Need of Application Control
Application control is in high demand for a number of reasons, but the two most important ones are (1) most traffic uses the port TCP/80 to exit the organization’s network, and (2) we need more control over the information flowing through the network. Thus, we need the ability to detect, classify, and enforce a security policy for a given application, regardless of the method used to connect and transmit over the network.
Deciding when to use Application Control
Application Control is more often used for Outbound than for Inbound traffic. This is, you would normally need Application Control for connections being generated from your users to the Internet.
You would normally NOT need Application Control if:
• You are using your firewall to protect traffic between Internal Segments only, or between remote networks over which you have full administrative control that includes the servers and services throughout the entire network. In this scenario, it is often better to enforce authentication in the application itself. The FortiGate would assist by controlling traffic based on source and destination IPs. If you know what applications are running on a given server, you can effectively white list the network traffic.
• You want to analyze data being sent over HTTP (Port TCP/80) to look for sensitive information. For this, you would use the FortiGate Data Leak Prevention (DLP) feature.
• You have the list of IP addresses or Fully Qualified Domain Names of the servers your users will access. If you can identify the server and trust that it will be running only known services (and you have means to periodically audit that), then you could use regular firewall rules.
• You are primarily concerned about the classification of web pages and are comfortable with Fortinet’s categories (“Peer-to-peer file sharing”, “social networking”, “web-based e-mail”, etc.) to block access. Or if you want to only allow access to categories such as “Child Education” or “Finance and Banking”. Please note that in this case, you might still need Application Control to do a more granular analysis on the page content. This is particularly true, if you wish to be selective and strip content or shape traffic around applications that might be embedded on pages.
You might need Application Control if:
• For any reason you need to allow free access to the Internet for port HTTP/TCP/80, and you want to avoid applications that are typically used to abuse this access.
• You need to monitor and obtain reports on what web applications are being used by your people. It is possible to configure Application Control to just monitor applications without actually blocking anything.
• You need additional controls around web traffic to ensure that applications that could be embedded by authorized websites get proper treatment, such as blocking or Traffic Shaping.
You might also want to review the policies and regulations that affect you and your organization. Regulations are often why organizations enable Application Control on their FortiGates.
Before you Configure Application Control (Sizing and Design steps)
Application Control imposes load in the FortiGate. In general, since Application Control shares some internal mechanisms with IPS including the Inspection Engine, it would be fair to say that Application Control imposes around the same load that IPS would on the system. However, as it is a Flow-based inspection technology, the load is lighter than similar proxy-based technologies. Also, it does not use the Proxy Connection Table, so it does not add to the risk of running out of proxy connections.
You should use a Network Diagram to identify where the users are and how they are expected to generate HTTP traffic. This way, you can identify which flows carry traffic that would require deeper analysis than just source/destination. Pay special attention to the traffic that have little or no restriction on the destination addresses or ports, since the lack of restrictions can be used by potentially risky applications to transfer data. These are the traffic flows that should have Application Control applied to them. In general, be specific on what you are trying to achieve. For example: do you wish to reduce liability due to internal users running malicious applications or are you more interested in carving out the majority of your bandwidth for business-critical purposes? Having a statement on what you are trying to achieve will greatly help you create a configuration that will match that statement.
How Application Control works
Applications are constantly evolving, and in order to be effective, FortiGuard Analysts are constantly updating the list of supported Applications. We must remember that the only way the FortiGate can identify an Application is by analyzing the traffic it sees, correlating source and destination ports and IPs, as well as traffic patterns. However, the behavior can change over time as the developers creating these applications add features in real time. This is why it is important to keep the Application Control signature database up-to-date.
Remember that Fortinet keeps Encyclopedias online at http://www.fortiguard.com. By browsing to “Application Control Service” and then to “Application Control Encyclopedia”, you can access detailed information about the applications recognized by the FortiGate. The same portal contains an Application Submission form that allows you to submit information to the FortiGuard analysts about an application that needs to be updated or added to the system. The submission form will return a ticket number via e-mail and Analysts will consider adding support for (or enhancing) the application mentioned. You don’t need to own a FortiGate to submit, but existing customers will receive higher priority.
Just as with IPS, every modern FortiGate has an initial Application Control signature database. Since this database is stored locally, it is possible to start analyzing traffic at any time. This is good because it allows the immediate detection of known applications. However, once again it is important to remember that the efficiency and accuracy of detecting applications will largely depend on how up-to-date the database is. Due to this, you should first update the IPS database with the “exec update-ips” command, which includes the Application Control signatures.
Configuring Application Control
Creating an Application Control Profile
Before you may begin using Application Control, you must create an Application Control List and define the specific applications that you wish to either block or traffic-shape. In the example below, we will block Skype and Proxy Applications (UltraSurf, Tor, Hopster, etc.). This is where many Fortinet users start with Application Control.
FGT3 # config application list
// configure an application list
FGT3 (list) # edit My_AppCtrl_List
// My_AppCtrl_List is the name for this list
new entry ‘My_AppCtrl_List’ added
FGT3 (My_AppCtrl_List) # set comment “Block Skype and Proxies”
// A comment, so I can know what I’m trying to achieve here
FGT3 (My_AppCtrl_List) # config entries
// Config the entries for the list
// The application with ID 10…
// Applications that fall under category 6…
// Will be blocked, which means the packets belonging to the application will be dropped. Other actions are pass, which will let the application through, and reset, which will generate a TCP RESET packet to the source of the connection.
// We are done with entries on this list.
// We are done with the My_App_Ctrl_List configuration
As you can see, defining an Application list is simple, though the use of Application and Category IDs may be confusing. If you use the GUI, they are configured automatically when you select the names, but within the CLI, you might have difficulty determining the “magic numbers”. To make this easier, you can use the “?” shortcut within the CLI. To get a list of all possible values, simply hit the question mark key when you need to enter an ID number and the system will provide you with a list.
FGT3 # config application list
FGT3 (list) # edit My_AppCtrl_List
| ID | Select Category ID |
| 1 | IM |
| 2 | P2P |
| 3 | VoIP |
| 5 | Media |
| 6 | Proxy |
| 7 | Remote.Access |
| 8 | Game |
| 12 | Web |
| 15 | Network.Service |
| 16 | Business |
| 17 | Update |
| 19 | Botnet |
| 21 | |
| * |
FGT3 (1) # set application ?
| ID | Select application ID |
| 29025 | 1und1.Mail |
| 17534 | 2ch |
| 17535 | 2ch_Post |
| 16284 | 3PC |
| 16616 | 4shared |
| 16534 | 6cn |
| 17045 | 9PFS |
| 18285 | 9PTV |
| 26378 | 24im |
| 16558 | 51.Com |
| 28325 | 51.Com.BBS |
So, as you can see, applications can be referenced as directly and optionally chosen so that specific behaviors may be applied. However, applications are also grouped into Categories. If you use a category instead of an application, the selected action will be applied to each application in the category (see Figure 6.6).
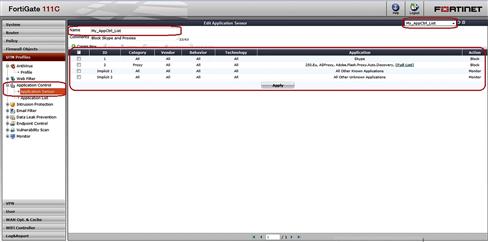
Figure 6.6 Application Control List as seen in the GUI
Once you have defined an Application Control list, you can reference it from a firewall policy. In this example, we assume that the switch interface represents a network segment devoted to users and that WAN1 is the Internet interface. Thus, once applied, a computer on the switch interface will not be able to use Skype or any Proxy applications via the Internet.
FGT3 (policy) # edit 99 // 99 is just a policy ID
FGT3 (99) # set srcintf switch // Source Interface is switch
FGT3 (99) # set srcaddr all // Source address is all, so any IP address will be accepted as source
FGT3 (99) # set dstintf wan1 // Destination Interface is WAN1
FGT3 (99) # set dstaddr all /// Source address is all, so any IP address
FGT3 (99) # set service ANY // Any IP service
FGT3 (99) # set action accept // Accept this traffic
FGT3 (99) # set schedule always // All the time
FGT3 (99) # set logtraffic enable // Log this traffic
FGT3 (99) # set nat enable // Enable NATting behing the FortiGate IP address of the outgoing interface. In this case, the IP address assigned to the WAN1 interface
FGT3 (99) # set utm-status enable // Enable UTM inspection
FGT3 (99) # set application-list My_AppCtrl_List // Use the Application List previously defined.
Network Antivirus/AntiSpyware
The Need of Network Antivirus
Traditionally, Antivirus technology has existed on the endpoint, the specific workstations, and servers where malware tends to run. However, as threats grew more complex, so did their protections. Thus, in addition to existing on the endpoint, Antivirus also moved to the perimeter.
Fortinet’s technology provides protection against many types of malicious software. Being a network device, the FortiGate is better positioned than endpoint protection to detect malicious network traffic, such as the communication channels that malware authors use to control the systems they infect. However, to properly protect against blended threats, nothing beats the combination of an edge technology like FortiGate combined with an endpoint Antivirus solution.
Basically, you don’t want the Antivirus running on your system to be your last line of defense. This is especially true of reactive mechanisms, since the threat must first be detected before the protection be developed. Also, there are advanced threats that look for Antivirus software running locally on endpoints, and then shut them down or temporarily disable them to avoid detection. So, supplementing the endpoint protection systems with a network focused system makes a lot of sense. Not only do you have two potential catch points, but by filtering out malicious software before it reaches the endpoint, you are requiring less work of the endpoint, thereby saving resources for other uses.
Fortinet manages to save even more resources by implementing an offloading mechanism called the Content Pattern Recognition Language (CPRL) in the Content Processor (CP) ASIC. This chip is included in every FortiGate and has the ability to tie into the Antivirus and IPS functions, speeding them up drastically.
Deciding when Network Antivirus is a Good Idea
There are two network regions where you may wish to place network Antivirus: between a server and the rest of the network or between your users and the rest of the network.
For Servers, your goal would be to protect both the server itself and the data stored on the server. For example, if you have an FTP server, you may wish to protect against attacks that compromise the server itself so it can then spread to other users that access FTP. This was a very common attack in the late 2000s and took over many webhosting companies. You may also want to protect email servers so your users, internally and externally, are not infected by malware that is delivered to their INBOX. Finally, you may wish to protect outbound traffic from web servers. Web servers are increasingly targeted by attackers and used to host multi-stage downloader malware.
Basically, it is wise to place Antivirus to look at bidirectional traffic to all servers on both IPv4 and IPv6 networks. When implementing Antivirus in this manner, be sure to check your firewall policies and make sure that each path to your servers has protection on it. It is common for FortiGate administrators to forget to protect a failover path or emergency access VPN. Any path without protection is a potential point of compromise.
When protecting users, it is important to remember that inspection is based on traffic flow. For example, when a user downloads a file, they initiate the connection to the file server, and the file is then downloaded across the established connection. Thus, even though the file is coming “in” to the network, it will be inspected based on the rules for traffic going “out”, as that is the direction in which the session was established.
Secondly, bear in mind that, while the FortiGate is very efficient at scanning this traffic, it does take resources. If you have users communicating with systems that you know to be safe (text files coming from an FTP server, for example), you can turn off inspection on those pathways and reduce total load on the system. Note, however, that in some highly sensitive or regulated environments, you have to inspect all traffic regardless of expected content. In these situations, you may want to get a FortiGate one size larger than you would otherwise need, just to reduce the risk of load issues.
Tip
Submitting Virus Samples to Fortinet
The FortiGuard team allows you to submit virus samples via the FortiGuard portal (http://www.fortiguard.com). If you suspect you have an infected file, you can scan it online and find out if it is detected as a currently recognized threat. If it was determined to not be a threat and you suspect this to be a false negative, you can go to the further step of submitting it to a FortiGuard Analyst. You will usually get a response before 48 hours.
Before you Configure Network Antivirus (Sizing and Design steps)
Due to the amount of resources required to support it, Antivirus is often the most expensive feature on the FortiGate. Even though it is accelerated, not all of the processing is offloaded, so both CPU and RAM can be consumed quickly. This is especially true if you are using Antivirus in a Proxy-Based mode. Thus, you should be careful with WHAT you choose to scan.
• First, you should define which files will and will not be allowed. A typical configuration, for example, is to block executable files. This is done in the DLP configuration, but the choice made there will affect what will be scanned by Antivirus.
• Second, you should determine both your scanning size limit and whether files that exceed this limit will be allowed or denied. This only applies when you are doing Proxy-Based analysis, but if you are in this mode, you should know that the size of the file you allow determines how much RAM can be consumed by that part of the system. Generally speaking, since malware is becoming increasingly stealthy, larger files are safer, so many administrators choose to disable file scanning for files larger than 10 Mb (for example). While highly sensitive environments may wish to take a similar approach, files larger than the limit can be discarded, thereby providing greater security.
• Third, you will need to define the protocols, sources, and destinations to be scanned. Resist the temptation of scanning everything as that will likely waste resources on the FortiGate, causing you to purchase a larger device than you need, and cost you time and effort tracking down alerts.
Once you have defined the WHAT, you must determine the HOW:
• First, determine whether you need to use Proxy- or Flow-based scanning. Refer to Table 6.1 for a refresher on the differences. Basically, though, it’s a decision between performance (flow-based) and security (proxy-based). Flow-based will catch a good amount of malicious software. However, it doesn’t uncompress files, such as zip, rar, or arj. Proxy-based scans more deeply than flow-based scans do. Additionally, due to hardware limitations, not all FortiGate models support Flow-based Antivirus scanning.
• Second, you should determine which Antivirus database you wish to use. There are three different databases that can be used for proxy-scanning, though due to memory limitations, not all FortiGate models support all three.
• Normal—Scans for “current” malware that’s been seen on other networks within the last several months.
• Extended—Scans for “recent” malware, that has been seen in the last year.
• Extreme—Scans for all known malware, including both recent malware and “zoo” lists.
Zoo viruses are viruses that have not been active for more than a year.
As you can imagine, choosing “Extreme” will greatly reduce performance. This is a tradeoff and, in the interests of speed, many people choose to run as “Normal” or “Extended” and trust their endpoint AntiMalware system to catch older and custom malware. However, it is only a good idea to do this if you have an extremely trustworthy AntiMalware system running on the endpoints.
• Finally, you must determine the Antivirus priority. If performance is critical and the cost of downtime or slowness exceeds the cost of a security breach, you may set the device to favor throughput over scanning. You do this through the “optimize” command. If your device tells you that that command does not exist, your FortiGate does not have this capability. Once this mode is changed, your device will need to be rebooted.
How Network Antivirus works in the FortiGate
Remember that FortiGates download updates from the FortiGuard team, so they reside locally. Thus, the more comprehensive your selected database, the more space it will take up on your device. You can choose the three databases defined in the previous section or “flow-based”. You can also configure grayware protection which scans for attacks like adware, keyloggers, and spyware.
FGT2 # config Antivirus settings
FGT2 (settings) # set default-db extended
You should also give consideration to how the system will behave when resources are low. FortiGates automatically enable a protection mechanism called “conserve mode” when memory begins to run low. This is basically a series of memory recovery measures that include blocking new connections to avoid over-subscribing the system. Once there is enough RAM available, this mode is deactivated. If you choose to prioritize the system for Antivirus, you might want to define a fail-open state, so if the device becomes overloaded, Antivirus scanning ceases so memory can be recovered. However, be careful doing this, as it opens you up to a scenario whereby an attacker can launch a denial of service attack on your device to get their malware past your defenses. When using the “set av-failopen” mode, your options are “pass”, so traffic is passed with no inspection until memory becomes available, “idledrop”, which forces closure of unused connections, “off”, which stops accepting new connections, or “one-shot” which turns off scanning completely.
In addition to running out of RAM, you can also run out of proxy session table entries. This behavior is defined by the “set av-failopen-session” command. The parameters match those of “av-failopen” described above.
In addition to global options, there are also protocol-specific options. While these do apply to the way the UTM as a whole handles a protocol, they are technically not “global”, because they do not apply to all protocols. Each protocol definition can affect one of: http, ftp, imap, pop3, smtp, nntp, and im. If you are running a FortiGate with SSL inspection capabilities, you can also define options for https, ftps, imaps, pop3s, and smtps. Each protocol also has its own specific options. In the HTTP example below, options include “clientcomfort”, which avoids timeouts by sending the client packets every few seconds (as defined by the interval and bytecount), “no-content-summary”, which masks the files from appearing in the GUI dashboard, and “oversize”, which blocks files that exceed the size specified in the limit (in Mb). In the FTP example, the “splice” options keep a copy of the downloaded file as it streams it to the user. This way, if malware is found in the file, the connection can be aborted.
FGT3 # config firewall profile-protocol-options
FGT3 (profile-protoc∼l) # edit My_Prot_Opts
new entry ‘My_Prot_Opts’ added
FGT3 (My_Prot_Opts) # config http
FGT3 (http) # set inspect-all enable // Inspect all ports, not just 80.
FGT3 (http) # set options clientcomfort no-content-summary oversize
FGT3 (http) # set oversize-limit 2 // Maximum threshold is 10% of systems RAM
FGT3 (http) # set comfort-interval 5
FGT3 (http) # set comfort-amount 5
FGT3 (My_Prot_Opts) # config ftp
FGT3 (ftp) # set options oversize no-content-summary splice
Once the protocol options are determined, you can assign the profile to a firewall policy. In the example, you’ll see that FTP-based malware is set to be quarantined on the FortiGate if found. This means that the administrator must be diligent at checking the quarantine and dealing with what is found. In contrast, HTTP-based scanning is set to drop any compressed files that have a password assigned. Since such files are encrypted and cannot be scanned, this is the safest approach.
FGT3 # config Antivirus profile
FGT3 (profile) # edit MyAVProfile
FGT3 (MyAVProfile) # config ftp
FGT3 (ftp) # set options scan quarantine
FGT3 (MyAVProfile) # config http
FGT3 (http) # set options scan
Finally, you must add an Antivirus policy to the firewall.
Intrusion Protection (IPS)
Introduction
Network-Based attacks became quite common once it was demonstrated they were possible. As they grew more complex, it became important not only to detect them, but also to block them. Though the industry originally deployed Intrusion Detection Systems (IDS), which identified specific attack code targeting specific vulnerabilities and alerted people, it has since moved on to Intrusion Prevention Systems (IPS). Though this change was originally viewed as risky because false positives could take a network offline, the technology has matured and is now very reliable.
The FortiGates leverage the CPRL and the Content Processor (CP) ASIC to implement IPS. When you configure your firewall to allow connections to your server, you increase the risk of attacks crossing trust boundaries. So, in general, if your network is connected to another network that is less trustworthy, you should consider running IPS.
While IPS has traditionally been used for edge-based protection as something of a firewall “backup”, it is usually more effective to tie it into the network segmentation process. Thus, if you have servers that you isolate to a different network and dedicate a FortiGate interface to that traffic, you can activate IPS and protect against both internal and external attacks. This helps protect against attackers focusing on vulnerable operating systems and applications as well as simplifying various aspects of regulatory compliance.
Before you Configure IPS (Sizing and Design steps)
IPS is potentially resource intensive, so any deployment should be done with care. You must understand how IPS works: responsibility of the engine, and how signatures function.
The IPS engine is a “smart sniffer” that catches network traffic and compares it traffic against a signature database, where each signature represents a known attack. Properly written signatures tell the IPS engine what to look for without triggering false positives. Ideally, these signatures match against the behavior of an attack and are, over time, tuned to reduce false positives.
As seen in Figure 6.7, an IPS signature has several properties that:
• Name—Distinguishes the signature from others. By virtue of naming conventions, it usually references the product, service or protocol being affected, and the type of attack.
• Target—Specifies whether the attack attempts to exploit the client side of the connection, the server side of the connection, or both.
• OS (Operating System)—Identifies if this attack is specific to operating system. Values include Windows, Linux, BSD, Solaris, MacOS, Other, or all.
• Enable—Identifies whether this signature is enabled and being scanned for by the Engine.
• Action—Identifies whether the traffic should be passed or blocked if the rule is triggered.
• ID—Used for cross reference in reports and the FortiGuard Encyclopedia.
• Packet Log—Identifies whether packet log is enabled. This log records the traffic as it was seen by the IPS engine and can be used for further analysis. Logging can be done locally on the FortiGate (if the device has a hard disk) or sent to a FortiAnalyzer device.
• Severity—Indicates the criticality of the attack, according to the Common Vulnerability Scoring System (CVSS).
• Protocols—Identifies whether the attack is protocol specific. Applies to both specific protocols (HTTP, SSH, DNP3) and more general ones (TCP, UDP, ICMP).
• Applications—Identifies whether the attack is known to a specific application or group of applications such as Oracle, SCADA, P2P, or sendmail.
• Last updated—The date when the signature was updated by FortiGuard.
• Logging—Identifies whether this signature will generate a log entry when triggered.
• Revision—Helps track when the signature was released.
• Group—Organizes signatures based on type (applications, file_transfer, web_app, etc.).
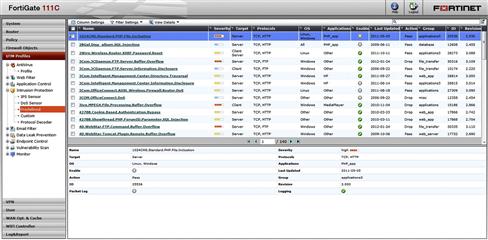
Figure 6.7 IPS Signature Properties
Before you configure your system, you must decide what will be scanned. You may wish to review network segments to identify which contain sensitive data, which operating systems are running or which applications are installed. This way, you won’t have to enable all signatures.
There is always great temptation to enable more than what is needed, as this increases your visibility as to what is occurring within your network. Most people generally start by over-enabling to help get understanding about the network. However, this should be reduced over time, as each event that IPS triggers should be analyzed according to your incident management system.
Once you have decided which traffic will be scanned, you should consider logging. Some attacks might warrant no logging, if they are low risk. Others should be logged for future audit purposes and still others should have a pull packet capture run so that they may be analyzed by the forensics team at a later date. Also, keep in mind that as the attacks against the network are specific to operating systems and applications, and the FortiGate’s checks are simplified versions of these, they will never be perfect. Thus, you will constantly be tuning your environment. You should also consider how you will address events that trigger on another system like server-side AntiMalware or Applicaton Whitelisting. Any true event that occurs there will likely have bypassed the FortiGate and are therefore false negatives.
FortiGates can leverage quarantines as an optional response to a triggered signature. While this is a very useful feature, you should think about it with care. A badly configured quarantine can lead to a self-inflicted Denial of Service (DoS) as, in the event of a false positive, the entire local network could be brought down. Thus, review any signatures that you wish to link to a quarantine for a long period of time (weeks, months, etc.). Basically, if your environment has processes that run once a week, testing for a week should be sufficient. However, if you have monthly processes, you may have to go longer.
You should also consider how you wish to respond to Denial of Service (DoS) attacks. To defend against these attacks, the only possible measure that can be implemented on the target side is measuring the frequency of the requests, and if they exceed what the infrastructure can support, break the flow. The FortiGate can do this, but you must perform your calculation carefully so you do not accidentally block legitimate requests. Trial and error testing works best.
Finally, you might want to verify that your Network Time Protocol (NTP) configuration is appropriate. Connect all servers and network equipment, including the FortiGate, to that NTP Server. While this is not required, it will greatly simplify any IPS analysis, as you could easily compare logs on many systems. This is essential if you must do forensic analysis on the attacks that you face. To review NTP on the FortiGate, you can use the following commands:
How IPS Works in the FortiGate
The first configuration step involves defining global IPS parameters for your environment. Possible values are explained after the comment (//) character.
FGT3 # show full-configuration ips global
set algorithm engine-pick // high, low and engine-pick
set anomaly-mode continuous // continuous and periodical
set engine-count 0 // process count: 0 to 999999999
set fail-open enable// enable or disable
set ignore-session-bytes 204800 // bytes: 1 to 999999999
set session-limit-mode heuristic // accurate or heuristic
set socket-size 8 // megabytes: 1 to 64
The algorithm parameter tells the IPS engine how to do signature matching. High is faster but more memory, so it should be uses when performance is important. This mode is only used when IPS and Application Control are the only content inspection feature used. Low is slower but also uses less memory. Engine-pick is the default and bases its choice on the amount of memory available and the type of inspections being performed. In general it is safe to leave it that way.
anomaly-mode tells the engine how anomaly events (DoS-related events) will be caught: continuous blocks all the traffic once the threshold is exceeded, and traffic is allowed once the threshold is reached again. periodical blocks only the packets above the threshold, allowing all the packets below the threshold.
engine-count limits the number of IPS engine processes running on the FortiGate. If the value is changed from the default, you must ensure that you are not exceeding the capabilities of your CPU and memory. Tune this parameter only if IPS is the primary content inspection analysis performed. More IPS processes may result in better performance, but could also overload the system if they exceed your available hardware.
fail-open tells the IPS engine how to behave if, for some reason, the IPS engine becomes unresponsive. Leave it enabled on environments where availability takes precedence over security, but disable it if security matters more.
ignore-session-bytes identifies the number of bytes to be analyzed in a session. The larger the amount, the more memory will be used. The default is 204,800 bytes or around 200 kilobytes. The assumption is that if a session is malicious, the attack will be in the first 200 kb. If there is no indication of a problem, the rest of the session will be ok.
session-limit-mode tells the DoS sensors how to count sessions. By default, the FortiGate uses a heuristic formula to estimate the number of sessions. This is less CPU intensive but also less accurate. If, for example, you define a threshold of 100,000, you could trigger the limit with 99,500 or 101,000 connections. If you set it to accurate, more CPU will be used, but the count will be exact.
socket-size defines the amount of memory devoted to holding packets for the IPS engine. You usually do not need to change this, but if you require RAM for extra uses, you may wish to do so. You can also increase it if IPS plays an important role in your protection scheme.
traffic-submit tells the FortiGate whether or not key attack metrics will be submitted to FortiGuard for further analysis. Enable it to ensure Fortinet continues enhancing IPS engine and signatures.
Once the global parameters are properly tuned, you will need to create IPS profiles that cover two areas: Misuse detection (IPS Sensor) and Anomaly detection (DoS Sensor).
To create an IPS Sensor you must have first determined what you want to protect. Let’s say that you have only Windows and Linux server and that they are running E-mail (SMTP, POP3), Web, and FTP. Further, you only wish to enable protection against “critical” and “high” severity threats. Finally, you want to enable all these signatures regardless of whether Fortinet disables them by default.
FGT3 (sensor) # edit MyServerFarm
new entry ‘MyServerFarm’ added
FGT3 (MyServerFarm) # set comment “Protecting Server Farm: Windows/Linux”
FGT3 (MyServerFarm) # config entries
FGT3 (1) # set location server //Only use signatures targeting servers. Another option is “client”.
FGT3 (1) # set protocol HTTP FTP SMTP POP3
Other properties of the signature filter that were not used in the example above include:
set application—Filters based on application, such as Apache or MySQL. Typing a “?” will give you a list of available options.
set log—When set to “enable”, forces all signatures to be logged. When set to “disable”, forces them to not be logged. Otherwise, the “default” setting allows each signature to log or not based on its own configuration.
set log-packet—Enables packet logging for the signatures that match the filter.
set quarantine—Blocks communication for a period of time upon triggering the signature. attacker blocks all communications from the IP address identified as source of the attack. both blocks only the traffic between the attacker and the victim, leaving the attacker free to send information to other systems behind the FortiGate. interface will disable the interface itself, blocking all traffic, which can be dangerous depending on the interface that triggers. Be careful with this setting as it could cut your network completely off from others.
set quarantine-expiry—Only visible if quarantine is set to “attacker”, “both”, or “interface”. Configures the amount of time (in minutes) to activate the quarantine block.
set quarantine-log—Configures whether or not a quarantining event will be logged.
Assigning an IPS Sensor to a firewall policy is similar to assigning any other Content Inspection:
FGT3 (0) # set service HTTP FTP SMTP POP3
FGT3 (0) # set schedule always
FGT3 (0) # set utm-status enable
IPS sensors detect misuse, but a completely different sensor is used to detect anomalies. These are caught with DoS Sensors. The DoS Sensors allow you to precisely define traffic patterns. The parameters below are groups based on the modes in which they are affected.
Anomaly Mode
tcp_syn_flood—TCP SYN packet rate (packets/second) to a single destination address.
udp_flood—UDP packet rate (packets/second) going to a single destination IP address.
udp_scan—UDP packet rate (packets/second) coming from a single IP address.
icmp_flood—ICMP packet rate (packets/second) going to a single IP address.
icmp_sweep—ICMP packet rate (packets/second) coming from a single IP address.
Session Limit Mode
tcp_src_session—Number of TCP sessions coming from a single IP address.
tcp_dst_session—Number of TCP sessions going to a single IP address.
udp_src_session—Number of UDP sessions coming from a single IP address.
udp_dst_session—Number of UDP sessions going to a single IP address.
icmp_src_session—Number of concurrent ICMP sessions coming from a single IP address.
icmp_dst_session—Number of concurrent ICMP sessions going to a single IP address.
If you wish to configure a DoS sensor to stop SYN flood at a rate of 10,000 packets per second from the Internet while simultaneously quarantining and logging more than 7000 connections for 10 min between a potential attacker and one of your servers, you could do as follows:
FGT3 (DoS) # edit MyDoS_Sensor
new entry ‘MyDoS_Sensor’ added
FGT3 (MyDoS_Sensor) # set comment “DoS Sensor for the Internet”
FGT3 (MyDoS_Sensor) # config anomaly
FGT3 (anomaly) # edit tcp_syn_flood
FGT3 (tcp_syn_flood) # set status enable
FGT3 (tcp_syn_flood) # set threshold 10000
FGT3 (tcp_syn_flood) # set log enable
FGT3 (tcp_syn_flood) # set action block // If anomaly-mode is continuous, traffic to the IP address being attacked will be blocked. If it is set to periodical, packets below 10,000 per second will be allowed but packets above 10,000 per second will be blocked.
FGT3 (anomaly) # edit tcp_src_session
FGT3 (tcp_src_session) # set status enable
FGT3 (tcp_src_session) # set log enable
FGT3 (tcp_src_session) # set threshold 7000
FGT3 (tcp_src_session) # set action block
FGT3 (tcp_src_session) # set quarantine attacker
FGT3 (tcp_src_session) # set quarantine-expiry 10
Next, you just assign this profile to a policy. In this example, we are applying to all source and destination addresses, but we could also specify a firewall object here. We could also restrict by protocol if we wished.
Web Filtering
Introduction
Web Content Filtering is a simple technology, but one with a tremendous impact. It basically analyzes two items for each URL requested: the category of the site and the content of the page. While similar to DLP in concept, it does not look for sensitive content and block based on what it finds. Instead, it identifies the category of the site and makes a determination based on that.
Reasons for using Web Content Filtering range from wanting to improve internal productivity, keep users off of dangerous and illegal sites or restrict sites based on the morals of those in charge of the organization. In general, the need to block content for whatever reason, can be met with Web Content Filtering.
How Web Content Filtering Works in the FortiGate (Sizing and Design steps)
As mentioned earlier in this chapter, the Web Content Filter (WCF) uses online, real-time updates. Thus, any website that you are browsing to is compared against the list maintained by FortiGuard and the decision is made in the moment.
Since the database is stored on the FDN and not locally, you get a more rapidly updating list at the cost of not being able to directly edit it yourself. Luckily, the FortiGuard team has tools in the FortiGuard portal (http://www.fortiguard.com) that allow you to both verify a URL’s category and, if you disagree, suggest a change. Also, if the web page is not classified (which, while rare, does happen), you can submit the URL and a FortiGuard Analyst will classify it for you. Average response time is less than 48 h.
When a user browsing through a FortiGate requests a Web page that has not yet been classified, it is passed to a list of URLs that will be analyzed and pre-classified by automated mechanisms. Among other things, the number of times that the page has been requested is taken into account so popular but unclassified are reviewed first. If the automated mechanism can classify to an acceptable certainty level, then the classification is uploaded immediately. If, however, the automated mechanism is uncertain, a FortiGuard analyst will review it manually.
Configuring Web Content Filtering
There are two types of Web Content Filter: Regular and FortiGuard Web Content Filter.
For Regular Web Filter, you must decide on a list of words to detect on a web page and the score for each word. The score is a numerical value that is cumulatively added for each occurrence of a detected word, though each specific word only counts once. Our editors will not use actual profanity, so here is an example of blocking web pages that contain the names of planets.
FGT3 # config webfilter content
FGT3 (Earth) # set status enable
FGT3 (Earth) # set action block
FGT3 (Earth) # set lang western
FGT3 (Earth) # set pattern-type wildcard // Could be regexp for regular expression, or wildcard
FGT3 (Mars) # set status enable
FGT3 (Mars) # set action block
FGT3 (Mars) # set lang western
To activate it, we must first assign this configuration to a Web Content Filter profile. The threshold is set to 10, so both words must be present to trigger the action.
FGT3 # config webfilter profile
FGT3 (profile) # edit My_WebFilter
new entry ‘My_WebFilter’ added
FGT3 (My_WebFilter) # config web
FGT3 (web) # set bword-threshold 10
FGT3 (web) # set bword-table 1 // reference to the WebFilter list by its index. 1 means the first (and assuming this is a new configuration, the only) we have.
Finally, we must assign this list to a firewall policy. However, before we do that, let’s configure a profile with FortiGuard Web Filtering. Suppose, we want to block security risks or the categories, Malicious Websites, Phishing, and Spam URLs. Everything else will be allowed.
FGT3 # config webfilter profile
FGT3 (profile) # edit My_FGD_WCF_Profile
new entry ‘My_FGD_WCF_Profile’ added
FGT3 (My_FGD_WCF_Pro∼i) # config ftgd-wf
FGT3 (ftgd-wf) # set options log-all-url
FGT3 (ftgd-wf) # config filters
FGT3 (filters) # edit 26 // An ID
FGT3 (26) # set category ? // here after hitting the question mark, the list of categories appears
25 Streaming Media and Download
FGT3 (26) # set category 26 // we want to block category 26, which is Malicious Websites
FGT3 (61) # set category 61 // we want to block category 61, which is Phishing
FGT3 (86) # set category 86 // we want to block category 61, which is Spam URLS
Once the WCF Profile has been defined, it can be assigned to the firewall policy.
FGT3 (0) # set service HTTP DNS
FGT3 (0) # set schedule always
FGT3 (0) # set utm-status enable
FGT3 (0) # set profile-protocol-options default
Once this is configured, the system will block categories not allowed by the Profile.
Bear in mind, the above example was to restrict users based on the IP address they belong to. In this case, all devices behind the interface switch, regardless of their IP address, will be filtered. We can also use authentication to apply Web Content Filtering to only a group of users, based on what user group they belong to. It is also possible to apply more (and different) Content Inspection mechanisms to several groups of users, so guests are more restricted in the type of Web Pages they can access via the corporate Internet connection and get applied stricter Application Control and Antivirus configurations, for example. But discussing user authentication is beyond the scope of this chapter. In general, once the FortiGate authenticates a user and identifies it as part of a group, it can use that information to apply to the user a set of controls by using UTM profiles, adequate to the type of user being identified.