
Chapter 12. Building a Trouble-Ticket System
In this chapter
▪ 12.1 Trouble-Ticketing System
▪ 12.5 Building the JavaScript Application
▪ 12.7 User-Registration Component
▪ 12.8 Account-Editing Component
▪ 12.9 Ticket-Creation Component
▪ 12.10 Ticket-Editor Component
▪ 12.12 Assign-Tickets Component
▪ 12.13 Security Considerations with AJAX Applications
▪ 12.14 Comparing Our AJAX-Driven Application against a Standard MVC Model
When developing with AJAX, the first decision you need to make is how much you’re going to rely on it. It’s possible to use it as an optional HTML enhancement, as an integral part to specific features, or as the driver for an entire site. In this chapter’s use case, we build a small trouble-ticket system using a design that is 100 percent AJAX powered. Moving to this extreme can be problematic on public sites, but it’s a great choice for an internal application like this. Using this case, we can see the differences that having AJAX and JavaScript as the driving force of our development can make. We’ll also see a number of techniques and design decisions that can be used in any application—no matter how you’re using AJAX.
12.1 Trouble-Ticketing System
Many information technology groups use some kind of Web-based trouble-ticket system to support their users. These applications allow users to report problems; they also allow support personnel to respond and manage the issue’s life cycle. In this use case, we’ll be building a small-scale trouble ticketing system. This system works, but it doesn’t have all the features you might need in a true production system. This sample application will be fully reliant on AJAX communications, setting it on the far right of the reliance scale.
The trouble-ticketing system has two main components:
• The first component is the back end, which handles database updates, queries, and authentication.
• The second is the JavaScript/HTML front end, which uses AJAX to talk to the back-end services infrastructure.
You may hear a design like this called a Service-Oriented Architecture (SOA), but besides helping us communicate with those familiar with the term, it doesn’t help us along the learning process, so you can file away the buzzword for future use. This JavaScript front end will replace the control logic you would normally write on the server. If you’re used to a model view controller (MVC) programming abstraction, you can think of moving the view and most of the controller code to the client. Not all of the controller code can be moved though, because the client is still an untrusted entity; in addition, authentication, data cleaning, and mapping service requests to a particular piece of code still have to happen on the server.
The overall design of the JavaScript system is one based on components. Each component contains some HTML code and some JavaScript code that powers it. In other scenarios, you might want to also include the CSS style information directly in the component, but in this case, the style rules were left at a global level. The components are designed so that their HTML is present on the page from its initial load, sitting inside a DIV container that has a display attribute of none. When one of the components is needed, its container is shown. This process reveals the HTML and allows the user to interact with it.
A similar component design can be used in an application that uses AJAX as an enhancement tool. If AJAX components are designed to provide generic user-interface components, they can be used in other projects, but you’ll generally still want to make customized versions of them. These versions would do specific tasks, such as providing AJAX logins or searching for users. In this project, the components are application specific; this specificity helps lower their complexity and makes it easier to understand them. It also makes their development faster; many times, I find it useful to wait until after I have done two or three specific implementations of a component before I make a generalized one. This lets you learn about the problem space, and it makes it easier to build a truly reusable component instead of one that works only in cases that match its original use.
To understand the code of our trouble ticket system, we must first look at the tasks it must perform:
• Register new users
• Log in users
• Update user accounts
• Create tickets
• Update tickets
• Assign tickets to users
• Give users a way to see all their assigned tickets
A system that has this level of functionality provides a relatively basic trouble-ticket system, and it offers us more then enough functionality to understand the process of building a fully AJAX-powered application.
12.2 AJAX Reliance Scale
You can use AJAX such that it’s 100 percent optional, and your application will be just fine with JavaScript turned off. This type of AJAX usage is usually accomplished by developing an application and then adding small amounts of JavaScript to enhance specific functions. JavaScript behaviors are a great technique to use in this approach. At the opposite end of the spectrum, you have a pure AJAX application; in a case like this, the back-end Web server provides only a set of services (such as creating users, listing tickets, and so on). The entire user interface and the logic that drives it are built in JavaScript. A Web application with AJAX enhancement follows the normal Web pattern; forms post like normal to the server and pages reload on a regular basis. An AJAX application breaks out of that mode: The site is loaded once, and from that point on, all interaction with the server is controlled by JavaScript, with requests being made as needed and the DOM being updated as well.
These two styles of AJAX development create two ends of a scale. Although both these approaches have their merits, most applications won’t fit neatly into either of the categories. Instead, you’ll have a mix somewhere in the middle; an enhanced application will add features such as user selection that work only with AJAX support, but other functions will submit like normal. You might also have a page with few normal reloads. It will not quite fit into the AJAX application structure because the majority of the logic rests on the back-end server.
One important item to remember is that although applications can exist all along the scale, you’ll have a hard time moving an application from one end to the other. If your design is structured around server-side logic, you can easily make features that require AJAX optional again by providing non-AJAX versions of them. However, you might have a tough time getting rid of all the page reloads, because you’ll find yourself having a large amount of duplicated client and server logic that will be hard to keep in sync. Making a completely AJAX-driven application not rely on AJAX communications will offer these same types of problems, because you’ll have to duplicate large amounts of logic on the server to make the switch. If you’re making a mixed application, you won’t have this problem, because moving small features that cause normal refreshes to an AJAX request will be easy. An AJAX reliance scale with a number of AJAX applications placed on it is shown in Figure 12-1.
Figure 12-1. AJAX reliance scale
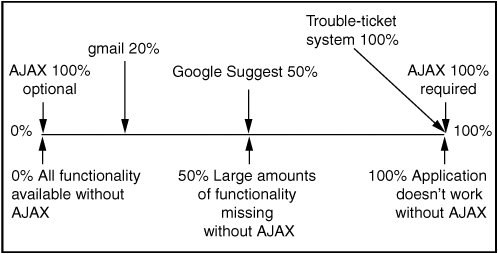
The trouble ticket system built in this chapter will rely on AJAX for server communication needs past the original page load. This puts the application at the far right of the scale, with applications like Mp3act, which is described in Chapter 4, “Adding AJAX to Your Web Development Process.” Heavy reliance like this can make supporting old browsers extremely difficult, but old browser support isn’t usually needed for internal applications, so this isn’t an issue for the trouble-ticket system.
12.3 Creating the Back End
The first step to building our application is creating the back-end services that will perform all the database work. Think of the functions as a set of services that will be exposed to the client application. In some cases, these services might already exist and are offered to other applications using SOAP or some other Web services technology, but in most cases, you’ll be creating them just for your AJAX application. Because the trouble-ticket application is offering only basic functionality, the back end in this case can be quite simple. In this case, it’s grouped into a single class, but as the application grows, you may want to factor it into multiple classes to keep it manageable.
Because the focus of this use case is AJAX, we’re not going to look at the back- end code in detail. The back end is implemented in PHP and uses a lightweight class to talk to a MySql database. The code is in Ticket.class.php, with the SQL to set up the database in Ticket.sql. If you want to run the example on your own server, you’ll need to edit the first six lines of the Ticket.class.php file, updating its database connection settings. A nice aspect about a back end like this is that it can be easily implemented in any language that has a library to expose the services provided by the class using a JSON RPC mechanism or something similar. We’ll be using HTML_AJAX to expose the class from PHP and will cover that in detail once we cover the API provided and the results to expect from each method.
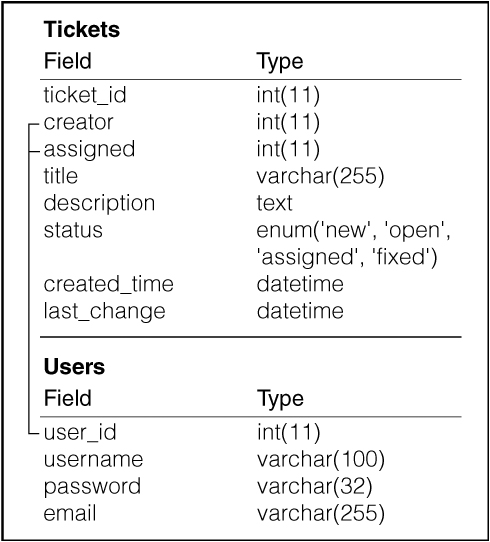
All interactions with the back end are performed by using the API provided by the Ticket class. The methods perform actions against the database that has two tables. The basic definition of the Tickets and Users tables is shown in Figure 12-2.
Figure 12-2. Database definition of Tickets and User Tables
The addUser method creates a new user; it takes three parameters: the new username to use, the password, and the email address. The method does basic validation requiring that none of the fields is empty; if any are, the method returns false. If a user is successfully added, the method returns true. The method’s signature is
addUser($username,$password,$email)
The updateUser method updates information about the currently logged in user. If no user is logged in, the method returns false. If the update succeeds, an associative array containing the user’s profile is returned. The method takes a single parameter, which is an associative array containing the fields to update. updateUser’s signature is
updateUser($fields)
An example input is as follows:

Although we store a user_id, username, password, and email address for each user, only emails and passwords can be updated; user_id is auto_created, and username can be set only when an account is created. An example profile array that would be returned by this method is as follows:

The listUsers method returns an array containing a list of all the users in the system. The key of the array is the user_id, and the value is the username. The array is ordered by the username. The listUsers method takes no parameters:
listUsers()
An example output is shown here:
array
1 => 'josh'
The addTicket method adds a new trouble ticket to the system. It takes two parameters: the title of the ticket and a descriptive text field. The user must be logged in to submit a ticket; if the user isn’t logged in, this method returns false. On successful creation of a ticket, the method returns the new ticket_id. addTicket has a signature of
addTicket($title,$description)
getTicket grabs an associative array with all the information about a ticket. This method can be used without logging in. The returned array contains two subarrays: the first subarray with a key of users contains the output from listUsers, whereas the second subarray with a key of ticket is the ticket information. The getTicket method’s signature is
getTicket($ticketId)
Example output is shown here:
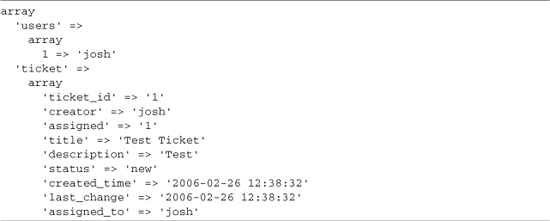
The updateTicket method updates the fields of a ticket. It has a method signature of
updateTicket($ticketID,$fields)
The first parameter is the ID of the ticket to update, and the second is an associative array of the fields. All the ticket fields except for the ticket_id can be updated using this method. The last_change field is automatically set to the current time when this method is run. The user must be logged in to use this method; false is returned if the user isn’t logged in. When the update is completed, an associative array containing the same output as getFields is returned. Ticket status can be updated with this method; possible status values are new, assigned, open, and fixed. An example input value for the attribute $fields is shown here:

The assignTicket method assigns a ticket to a specific user. It takes two parameters: a $ticket_id and a $user_id. The user must be logged in to use this method; if he or she is not, it returns false; after the ticket is successfully updated, output that matches getTicket is returned. If $userId is set to false, the ticket is unassigned. This method will also automatically update the status of the ticket; if the current status of the ticket is new and $userId isn’t false, then the status will be changed to assigned. If the current status of the ticket is assigned and $userId equals false, then the status of the ticket will be changed to open. Note that updateTicket uses this method if its assigned field is set. The value of this field is passed in as $userId. assignTicket’s signature is
assignTicket($ticketId,$userId)
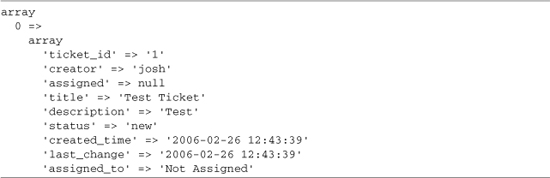
The listUnassignedTickets method lists all the tickets in the system that haven’t been assigned to a user. The array is ordered by the last_change date of the tickets. The listUnassignedTickets signature is
listUnassignedTickets()
Example output is shown here:
The listAssignedTickets method returns a list of tickets that are assigned to the currently logged in user. If this method is called without the user being logged in, false is returned. The array is ordered by the last_change date of the tickets. The listAssignedTickets method has no parameters and has a signature of
listAssignedTickets()
Example output is shown here:
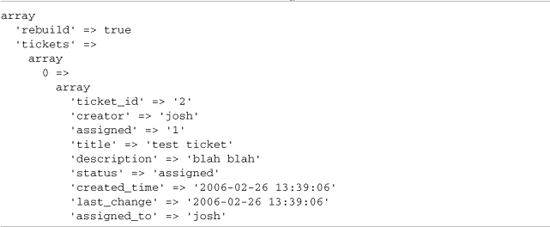
The listUpdatedTickets method provides a way to get updated information about tickets that are assigned to the currently logged in user and that have changed since the last time you checked with the back end. This method tries to return a minimal number of ticket records, but in cases where tickets have been unassigned, it sets a flag to note that the table displaying the data needs to be rebuilt and returns the full output of listAssignedTickets. When the rebuild flag is set, the ticket data is returned under a tickets index.
listUpdatedTickets($last_call_time,$current)
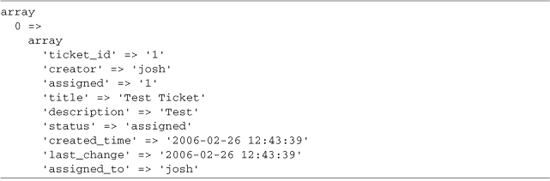
An example of output returned in normal mode and then in rebuild mode is shown in Listings 12-1 and 12-2. In normal mode, only new and changed tickets are sent to the client where the table displaying them is updated. In rebuild mode, all the tickets are sent to the client, where the entire table is rebuilt.
Listing 12-1. Normal listUpdatedTickets Output


Example 12-2. Rebuild Mode listUpdatedTickets Output
The login method logs a user into the system, storing this status in the user’s session. It takes two parameters: the username and the password. If the login is unsuccessful, false is returned; if the login is successful, the user’s profile information is returned. The method signature is
login($username,$password)
An example profile output is shown here:

The isLoggedIn method returns true if the user is logged in and false if the user isn’t. This method isn’t usually called by a JavaScript client but is instead used by other methods in the Ticket class. isLoggedIn has a signature of
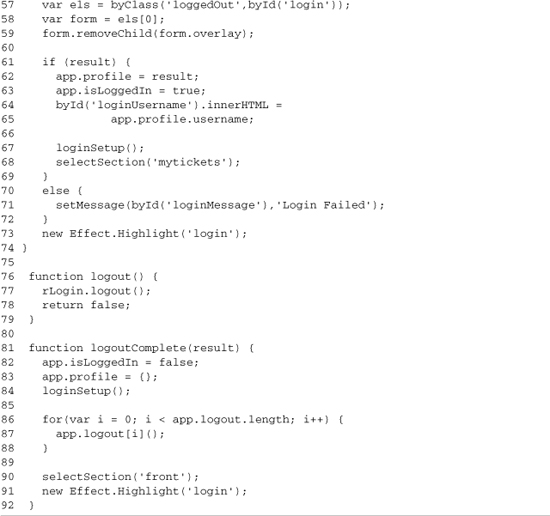
isLoggedIn()
The profile method is used to get information about a user’s profile. The method takes one optional parameter: $field. If $field is set, that value from the user’s profile will be returned; otherwise, the entire profile will be returned. If the user isn’t logged in when this method is called, false will be returned. The profile output is identical to the output of a successful login. The profile method has a signature of
profile($field = false)
The logout method logs the current user out of the system and destroys the user’s current PHP session. This method always returns a value of true. logout has no parameters; its signature is
logout()
12.4 Exporting the Back End
Now that we’ve reviewed the functionality provided by the back-end Ticket class, let’s look at what we need to do to export it to a JavaScript client. We have a number of options, including generating an XML file from the output of each Ticket method, creating chunks of HTML for each method, or having JSON encode the data. XML would work for an application like this, but there is no standard for describing PHP data structures in XML with which JavaScript automatically knows how to deal. An HTML chunk option is less than ideal because it would entail writing more PHP code and would limit flexibility. JSON is a great choice for an application such as this because code is available for PHP to encode its data structures into JSON, and JavaScript can directly evaluate the data it sends. In addition, JSON is a smaller encoding format than the other options, which helps keep our application running quickly. For these reasons, we will use JSON.
Now that we’ve decided that were going to use JSON, we need to figure out how we’re going to make it accessible to the client. One option is to create a PHP page for each method; that page will look at the incoming POST data, transform it to PHP data types, call the method of the Ticket class, and then return its output formatted as JSON. An example of what this would look like for the login method is shown in Listing 12-3.
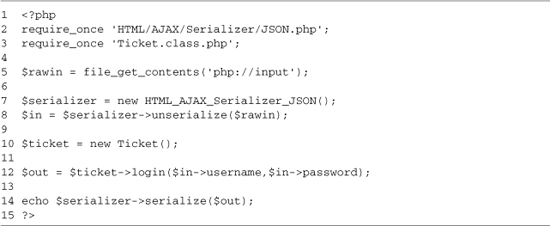
Lines 2–3 include the classes needed for this page. We’re using the JSON serializer code from HTML_AJAX, but any PHP JSON library would work. Line 5 reads the raw POST input, with lines 7 and 8 using the JSON Serializer class to decode it into a PHP object. On line 10, we create a new Ticket instance, calling the login method on line 12. We then send the output to the client on line 14, serializing it into the JSON format. An example HTML page that can be used to test this login page is shown in Listing 12-4.
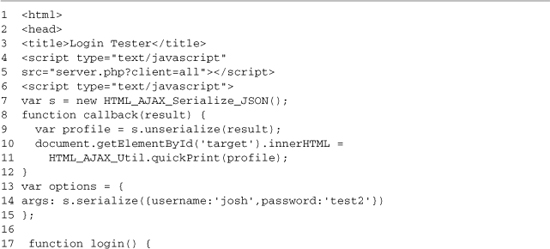

In Listing 12-4, we’re again using the HTML_AJAX libraries to handle some of the AJAX grunt work. On lines 4–5, we include the HTML_AJAX JavaScript library. On lines 6–20, we define some functions to test making a JSON request to log in. On line 7, we create an instance of HTML_AJAX_Serialize_JSON; this instance will be used to transform JavaScript data to JSON strings and JSON strings back to JavaScript. Lines 8–12 define a callback function; this function will be called when our AJAX request is complete. It takes the resulting AJAX string and turns it into a profile object (line 9); it then uses a utility method to print its contents to a target element.
Lines 13–15 set up an options object, which contains a JSON string that will be posted to the PHP page. Lines 17–19 define the login function that makes the AJAX request. The request will be made to Login.php, calling the callback function when it’s complete, and will pass in the serialized JSON string we set up in the options object. Line 23 provides us with a function to test it. When you run the login function, you will get output from the server that contains the user’s profile, because that’s what a successful login returns. An example is shown here:
user_id:1
username:josh
email:[email protected]
loggedIn:true
This system works by sending the JSON-encoded string to the server; in this case, the string would be like so:
{"username":"josh","password":"test2"}
The server decodes that into a PHP object that looks like this:
![]()
The login method on the Ticket class is called; this method returns a profile array. This array is turned into a JSON string, which is sent back to the client. This JSON string looks like this:
{"user_id":"1","username":"josh","email":"[email protected]","loggedIn":true}
This string is then decoded to a JavaScript object, where it can be used, or in the test case, where it is displayed in the target element.
We could follow this same pattern to create a PHP page for every Ticket method, but fortunately, we have a simpler option. HTML_AJAX provides code to automatically expose the Ticket class’s methods in a similar fashion. On the PHP side, this functionality is provided through the HTML_AJAX_Server class. An example of exporting the Ticket class is shown in Listing 12-5.
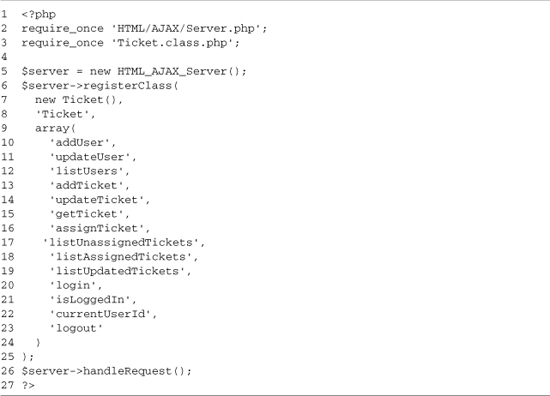
This page is fairly simple. It creates a new HTML_AJAX_Server, registers the Ticket class with it, and then has the server handle requests to the page. Lines 2–3 include the required classes for the page. Line 5 creates the new HTML_AJAX_Server instance. Lines 6–25 register the class. Line 7 is the instance of the Ticket class, line 8 is the name to export it to JavaScript as, and lines 9–24 are an array of Ticket methods to export. These methods don’t have to be specified; if they are not specified, PHP introspection is used to detect them, but if you’re running on PHP 4, PHP can’t detect the case of the functions; this can be annoying when we look at the JavaScript side of the equation because all the methods will be exported in lowercase—no matter what they look like in the PHP code.
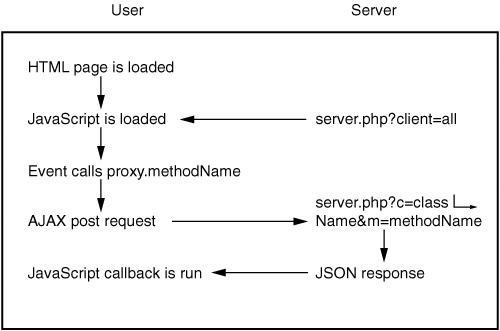
On the JavaScript side, HTML_AJAX provides a stub class that has all the methods that were exported. When you call one of these methods, an AJAX call is made against the server. When working with this setup, it’s important to remember that you don’t have a PHP object being remotely controlled through JavaScript. Instead, you have an automatic wrapping of a JavaScript method to an AJAX call. Each method call takes an HTTP request, which means you have a new instance of the PHP Ticket class for each response; this process is shown in Figure 12-3.
Figure 12-3. Data flow of multiple requests to PHP using HTML_AJAX’s generated JavaScript proxy
To create this JavaScript class, you simply need to add another include to your HTML file. The syntax is Server.php?stub=Name. This includes the JavaScript class definition. When you create an instance of this class, you pass it in a single parameter, which is the callback object to use. Matching methods on this callback object will be used to handle the response of the AJAX request. For example, if you call ticket.login, the login method on the callback object will be called when the request is complete. An example of calling the login method using HTML_AJAX’s auto class export is shown in Listing 12-6.
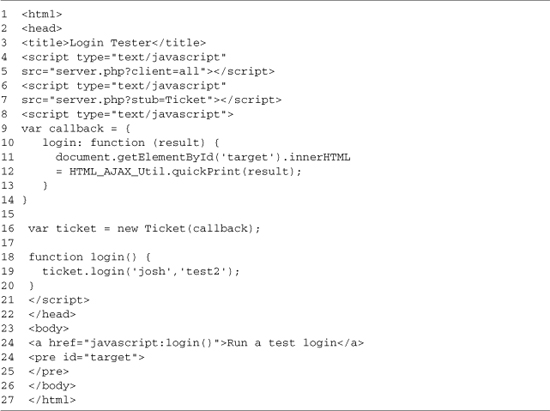
Using the stub class helps reduce the complexity of our JavaScript code because it makes the AJAX request look much like a normal AJAX call. JSON serializing and unserializing happens automatically, so you only deal with JavaScript data types. The big changes from Login.html are as follows: including the Ticket stub (lines 7–8), making the callback a hash (lines 9–14), and using a remote stub object to make the AJAX call (lines 16 and 19). The other item to note is that the code doesn’t worry about any of the data serialization, letting us move to another format at any time without changing any application code.
12.5 Building the JavaScript Application
Now that the back end of the application is complete, we need to look at building the front end. This code needs to build the user interface, manage the application flow, and communicate with the back end. To help manage this process, we;ll be breaking the application into a number of different components. Each component is made up of an HTML file and a JavaScript file, and each component performs one action, such as logging a user into the site or adding a ticket. The various components will be tied together by some simple JavaScript code that controls the site.
The JavaScript controller is a simple design; it is based around the idea of showing and hiding DIV elements to enable a current section of the site. All the JavaScript and HTML code will be loading into the browser on the initial page load and then will use a function to pick which code to deal with. Each part of the application with which you can interact is called a section, and it could be made up of multiple components, if needed; note, however, that in this case, each section will contain just one.
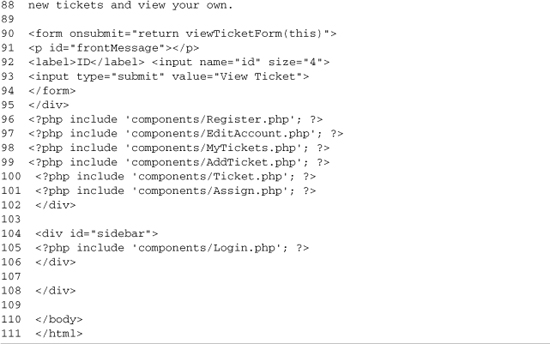
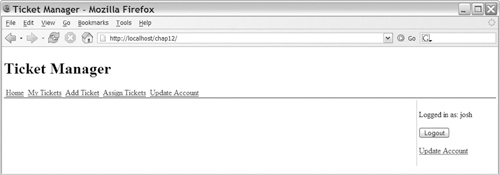
The basic site setup is a PHP page that loads the application; this page includes ticket.js, which contains JavaScript shared throughout the entire site. It also includes all the HTML code for the various components and their associated JavaScript files. The components are used to build the various sections of the application, and only one is visible at a time. There is also a site sidebar that always shows the login component. This setup was used because some features, such as viewing a ticket, can be used without logging in, but other features, such as adding a new ticket, require the user to be logged in. The basic layout of the user interface can be seen in Figure 12-4.
Figure 12-4. Basic ticket-manager interface
The look of the ticket application is controlled by the Ticket.css CSS file. There is no need to cover the CSS in detail because it doesn’t do anything AJAX-specific. The one item to note is that it does specify default display types for a number of CSS classes; this allows us to have all of the various sections of the site hidden by default, so you don’t see them until they have been selected. Now that you’ve seen what we’re building, let’s look at it in detail, starting with the page that pulls it all together (see Listing 12-7).
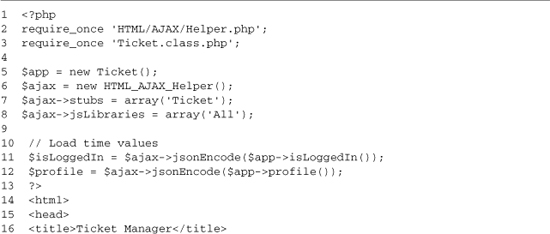
The first 57 lines of index.php do the JavaScript setup for the entire application. This includes setting up our interaction with the HTML_AJAX-powered back end and including the JavaScript for the various components. Each component has its own JavaScript file, which is great from a development point of view but could become a scalability problem over time due to the number of HTTP requests required to load them all. You could easily replace all the individual JavaScript includes with a request to a PHP script that combined the files automatically, if that ever became a problem.
Lines 2 and 3 require the PHP classes that will be used to build this page. One of these is the HTML_AJAX_Helper class (line 2), which we will be using to output some JSON-encoded strings and to quickly build the JavaScript include line for the HTML_AJAX libraries. The Ticket class (line 3) will be used to get the user’s current login status. Outputting this information in index.php keeps us from having to do an AJAX call at page-load time to figure out if the user is already logged in. Line 5 creates an instance of the Ticket class, which will be used later, and lines 5–8 create an HTML_AJAX_Helper instance and then configure it. Setting its stub property to Ticket sets it to load the generated JavaScript stub class for the PHP Ticket class we registered in Server.php. Setting its jsLibraries to All gives us the entire set of HTML_AJAX JavaScript libraries; you could limit this to just the components you’re using to reduce the amount of JavaScript code that is required, but most sites don’t need that level of optimization. Lines 11 and 12 encode login status and the currently logged in user’s profile as JSON strings so that we can use them later.
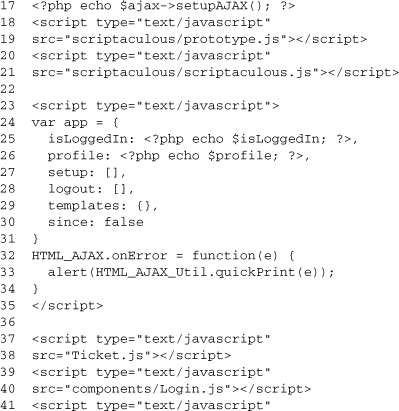
Line 14 starts the HTML output. The first task is to include the JavaScript libraries we’re going to use. Line 17 uses the helper class to output the HTML_AJAX JavaScript includes and is followed by the includes for scriptaculous on lines 18–21. We will be using HTML_AJAX for communications and scriptaculous for visual effects and drag-and-drop support. The next step (lines 23–35) is to define the JavaScript app object; this object is used to hold data that will be reused throughout our JavaScript application. We could use a number of separate variables, but combining them into one object helps us keep track of variables that are safe to use throughout the application; included in this variable are the user’s login status (line 25) and the user’s profile data (line 26). We also set up a development error handler for HTML_AJAX requests (lines 34–36); you could leave this for production as well, but normally, you’ll want to show users a less technical error message.
Lines 37–52 require the JavaScript files that are used throughout the site. The first is Ticket.js (see Listing 12-8), which contains the site’s shared code, followed by the JavaScript for the various components. The order in which the components are required shouldn’t matter because they don’t have intercomponent dependencies. All the shared code is included in Ticket.js, with interactions of items such as login status handled through the application object or through CSS classes. The setup is completed by including the Ticket.css file, which gives the application its basic look and feel.
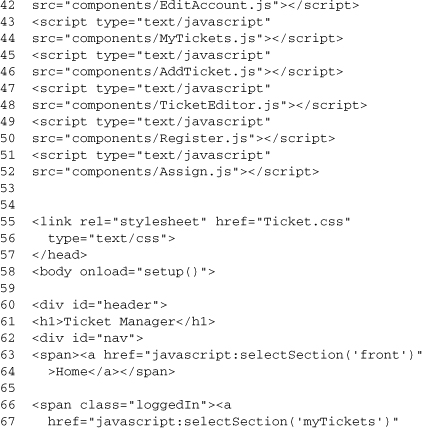
The rest of the file builds a basic user interface; this includes a navigation menu, a simple front page, and a sidebar. On line 58, we add an onload handler to the page, which calls a setup method that exists in the shared Ticket.js file. Next, the page defines the header DIV (lines 60–81). This DIV contains the application’s name (line 61) and its navigation links (lines 62–80). The navigation links call the setSection function to change which section is selected, and they use a CSS class to mark which ones should be shown when the user is logged in. Any element on the page with a CSS class of loggedIn will be shown only when the user is logged in. The hiding and showing of these elements is handled in the login component.
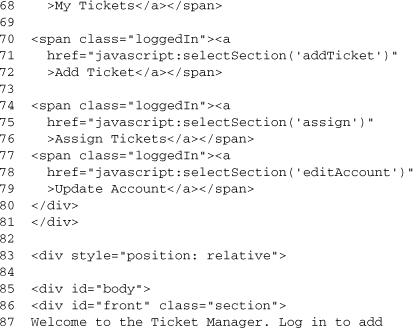
Lines 85–102 define the main body of the application. Most of this is just including the HTML for the given modules, but the default view is created right on this page because it is so simple. It contains a form (lines 90–94) that calls the viewTicketForm function when submitted. This function is defined in the ticket component. The page finishes by defining a sidebar DIV (lines 104–106) that includes the login component. Having the login on the sidebar allows the user to log in or out at any time.
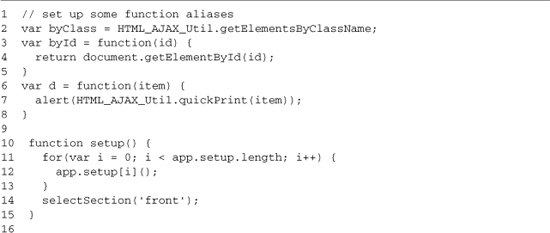
Ticket.js contains the JavaScript code that is shared throughout the application. At the start of the file, we define several utility functions that cut down on the amount of typing we have to do while writing the application. The first one, which appears on line 2, is byClass, which is an alias to an HTML_AJAX function that returns an array of elements that have the given CSS class. Lines 3–5 define the byId function, which is a wrapper for document.getElementById, and lines 6–8 define a quick debug function, which is useful during the development process.
Lines 10–15 define the setup function. This function is called by the document’s load event and gives each module in the application a way to run some code at load time without first having to register an event handler. This is done by looping over the functions in the app.setup array (lines 11–13) and running them. Because the modules are included before the onload event runs, they can add functions to this array as they are included. The setup finishes by selecting the front section of the application.
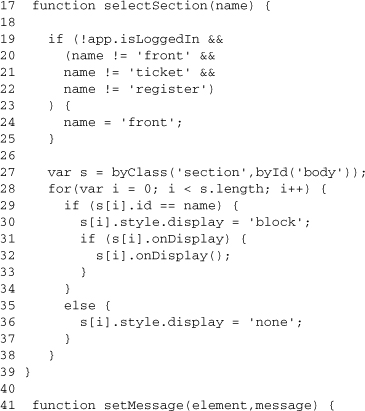
The next item defined in Ticket.js is the selectSection function. This function acts as the main controller of the application, selecting which section will be shown. It takes a single parameter, which is the ID of the section to be shown. First, the function checks whether the user is logged in (lines 19–25). Only the front, ticket, and register sections can be used without logging in. By doing this check, we prevent errors from taking the user to a section that won’t work. Next the function selects all the sections within the body; each section is marked with section class, so we use the byClass function to do this. Then we loop over the sections; if the ID matches the section we passed in (line 29), we show it (line 30) and run its onDisplay method if it exists. Otherwise, we hide the section (line 27). Running the onDisplay method gives the section a way to run code as the section is displayed. This gives it the opportunity to update data or clear out old data.
Lines 41–49 define the setMessage function. This is a simple function that allows us to give the user a success or failure message that will be shown for three seconds and then fade off the screen. The first parameter to the function is the DOM element to fade; the second parameter is the message to use. Depending on your design, you can always use a single message target so that the first parameter isn’t needed, but in this case, the flexibility is needed, so the same code can be used for login messages. The fading out of the message is performed by the use of a scriptaculous effect (line 48), which is applied inside a setTimeout call; the delay on running the timeout function is in milliseconds, so the value of 3000 equals 3 seconds.
When combined with an alert color, such as yellow or red, notification messages that appear and then fade away after a short period can be very successful in AJAX applications. The disappearing message keeps the alerts timely, and it is needed so that the user can tell which action the message applied to, because a page reload won’t be clearing it. The biggest downside of this approach is that the user can lose useful information if it disappears before he or she has read the message. One approach to get around this problem is to add a message history to the application. Instead of being removed completely, the message is added to the message history after three seconds. An example message is shown in Figure 12-5.
Figure 12-5. Message that will fade away after three seconds

The positionOver function is used to position a passed-in element over its parent element. This is used when you want to cover an element, such as a form, with an opaque message while it is being AJAX processed. This is a useful loading technique because it will prevent the form from being clicked while you are processing the last request it sent. To use the function, follow these steps:
1. Create a new element (usually a DIV).
2. Style it.
3. Add any messaging it should have.
4. Append it to the element you want to hide.
Once the element has been added, you run positionOver(element), and the element is positioned to hide all the elements to which it was added. You can show the parent by removing the element from the DOM or setting its display property to none. Scriptaculous effects, such as fade, are a good way to remove this element. The positioning elements of this function can be achieved using CSS on some browsers, but if you want it to work everywhere, size the element with CSS.
Another possible approach to preventing a form from being submitted while its results are loading is to disable its form submission button. This is often accompanied with changing the label on the button to a loading message. Both approaches provide good feedback to the users, but positioning a DIV over the form gives the developer the ability to display a larger loading message. Figure 12-6 shows an example of positioning an element over a form as a loading message; Figure 12-7 shows an example of disabling the form submission button.
Figure 12-6. Providing form-loading status by using the positionOver function
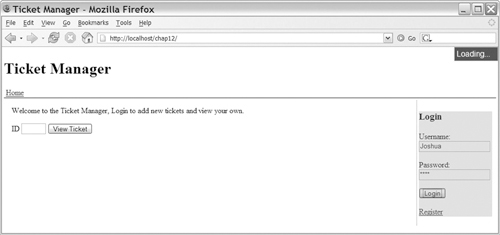
Figure 12-7. Providing form-loading status by disabling the form submission button
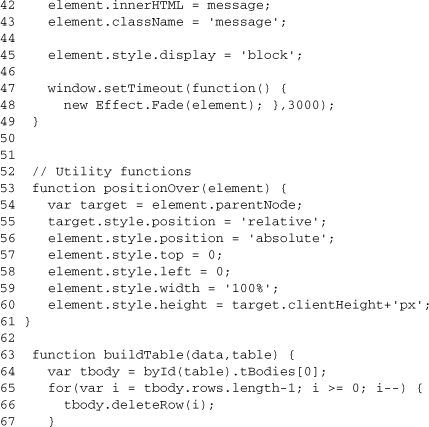
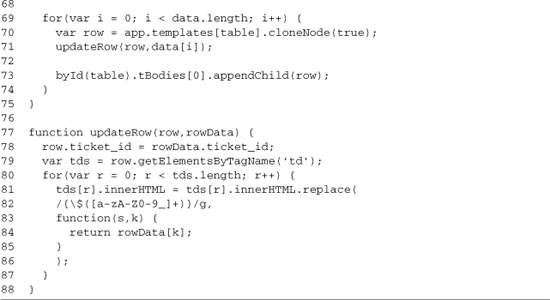
The last two functions in Ticket.js work in concert to allow us to dynamically update tables using a template approach. The first function, buildTable (lines 63–75), takes an array of data and the ID of the table to update. It deletes all current rows from the table’s body (if you put your headers in the <thead> tag, they will not be deleted) on lines 65–67. Then it loops over all the data (lines 69–74), creating a new row by cloning a template node and then runing updateRow using that row’s data.
The updateRow function (lines 77–87) takes the data and applies it to the row using a regular expression replacement. The function starts by setting the ticket_id on the tr element (line 78). This is an application-specific assignment because not all data will contain a ticket_id in each row, but similar approaches are often used for other IDs (or even all the row’s data) because it makes the data available to later JavaScript code. The actual replacement has to be done by updating the innerHTML property of each table cell (td tag), because even though the table row (tr tag) has an innerHTML property, updating it won’t work properly. Thus, we get all the td tags in the row (line 79) and loop over them, running a replace against their innerHTML, with a callback function grabbing the correct data with which to use in the replacement. The regular expression (line 82) is designed to match against strings such as {$variable_name}. The name of the variable is passed into our replacement function (lines 82–85) and used to grab the correct index from the row of data. This allows us to create a template like this:
<tr><td>#{$ticket_id}</td><td>{$title}</td></tr>
This template is used to build each row of output. After replacing its tokens with data that has a matching ticket_id and title property, you will produce a table row like this:
<tr><td>#4</td><td>A Sample Ticket</td></tr>
This same replacement approach could be used against many other types of DOM elements; in fact, the most problematic elements for this approach are tables because they don’t update properly when working with the innerHTML of their individual rows.
12.6 Login Component
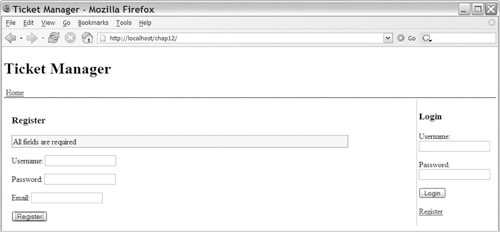
The login component provides a login form and a logout form to the ticket manager application. This form is displayed on the sidebar and is always present. Besides providing the user interface in the sidebar, the login component provides hooks for other components to be login aware. This is done by hiding and showing elements that have specific CSS classes. Elements with the loggedOut class are shown only when the user is logged out, and elements with the loggedIn class are shown only when the user is logged in. The login user interface is shown in logged-out mode in Figure 12-8. It is shown in logged-in mode in Figure 12-9. The HTML that creates the login is shown in Listing 12-9.
Figure 12-8. User is logged out; the login component shows a login form
Figure 12-9. User is logged in; the login component shows a Logout button

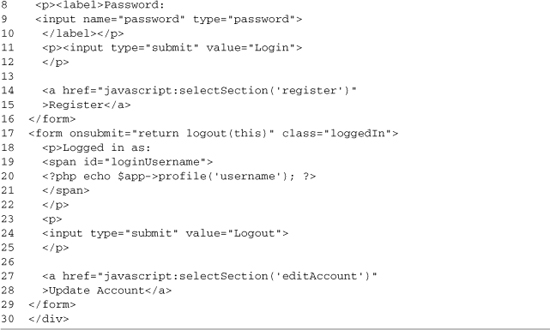
The login component is made up of two parts; the first, Login.php, provides the simple login user interface. The second, Login.js (shown in Listing 12-10), provides the JavaScript logic to power it. The entire interface is created at load time, with parts of it being shown or hidden as needed. There isn’t a lot happening here; first the form for logging in is created (lines 2–16), and then the form for logging out (lines 17–29) is created. Both forms are processed through the addition of onsubmit handles; these handles will stop the normal form submission processes and instead perform an AJAX call. The login form contains a message target (line 4) that is used with the setMessage function (from Ticket.js) to display a login failure message. The login form also contains a link to the user registration form, which uses the selectSection function (line 14), whereas the logout form contains a link to the account editing form (line 27), which also uses selectSection.

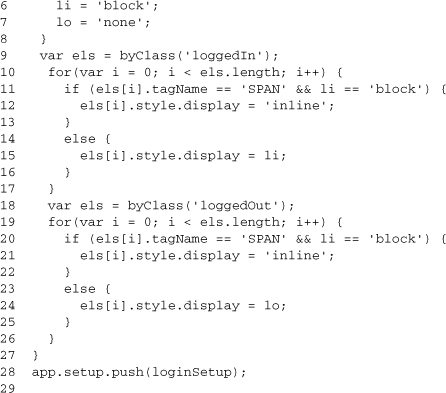
The Login.js file provides the functionality behind the login component, processing the forms provided by the user interface and hiding and showing elements as needed. The first part of Login.js is the setup logic; this is composed of the loginSetup function, which will be run at page load, and the creation of a remote AJAX class for accessing the back end. The Setup function (lines 1–27) works by checking whether the user is logged in (line 5) and setting the appropriate style.display value for the logged in case (variable li, line 6) and the logged out case (variable lo, line 7). Once these are set, it’s just a matter of using the byClass function to get a list of all the elements with the loggedIn class (line 9), looping over them (lines 10–17), and setting each element’s style.display property. During this process, we also check for span elements because they need to be given the display property of inline, instead of the display property of block. This process is then repeated for elements with the loggedOut class (lines 18–27), with the style properties being set to the opposite values. Once the setup function is defined, it is added to the app.setup array, which will run the loginSetup function on page load.
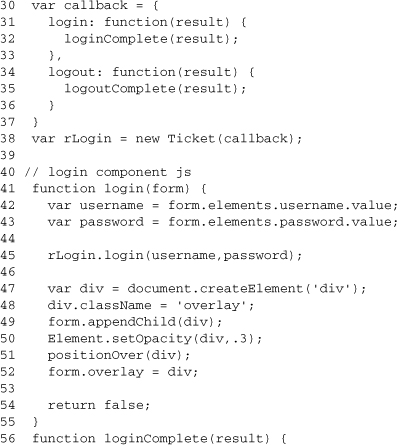
Next, the AJAX stub class is set up. This class is provided by HTML_AJAX and will call the matching callback function to the method that is called when an asynchronous request is completed. Thus, in the setup process, we define the callback functions (lines 30–37) for the methods that this component needs. To increase readability, these callback functions are kept simple and just call out to other functions that do the real work. An instance of the Ticket stub class is created on line 38; this instance will be used for all AJAX access in the component.
Next, we define the two login functions. First login() is defined; it processes the form and sends an AJAX request. Then, loginComplete() is defined; it takes the results from the AJAX call and updates the user interface. The login function starts by grabbing the username and password from the form (lines 42–43); it then makes an AJAX call (line 45), which performs the login on the server. The rest of the function adds loading notification; this is done by creating a semi-opaque div, which is added to the form and then positioned over it using the positionOver function defined in Ticket.js.
When the AJAX request is complete, loginComplete is run; the result is either false or an array containing the user’s profile. The function removes the loading overlay (lines 57–59) and then checks the value of the result. If the result is an object containing the profile, app.profile and app.login are set (lines 62–63), the logout form has the user’s username added to it (lines 64–65), and the loginSetup function is called (line 67). The loginSetup function will show all the elements that have a loggedIn class, hiding those with the loggedOut class. The successful login is completed by showing the mytickets section of the application. If the login is unsuccessful, the only action that is taken is the showing of a Login Failed message with the setMessage function. In either case, a scriptaculous highlight effect is used to show that loading has completed and that the login component on the screen has updated its contents.
The last part of Login.js contains the logout() function and its callback function, which is logoutComplete(). The logout process is simpler than the login process because it can’t fail. The logout function (lines 76–79) simply calls the rLogin.logout method, making the AJAX request. It then returns false, canceling the normal form submission. LogoutComplete (lines 81–92) is called when the logout is complete on the server; it clears the user’s profile, marks the user as logged out, and then calls the loginSetup function to show and hide any login-driven visual elements. Next the function calls all the registered logout functions. These work much like setup functions and give the other modules a chance to run code once a logout is complete; usually this code clears data that should be accessible only when the user is logged in. The function finishes by changing the current section to the front page and highlighting the login form to show that it has been changed to a login form.
12.7 User-Registration Component
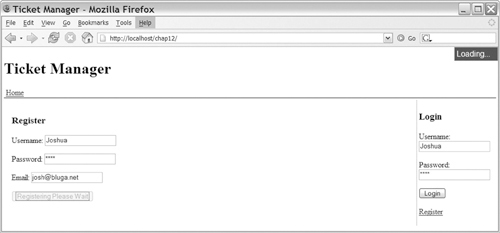
The user-registration component provides a way for people to register themselves as users of the ticket manager application. It’s a simple component, providing a form and the code needed to process that form using AJAX. An example of the form is shown in Figure 12-10, with the HTML that builds the UI shown in Listing 12-11.
Figure 12-10. User registration form
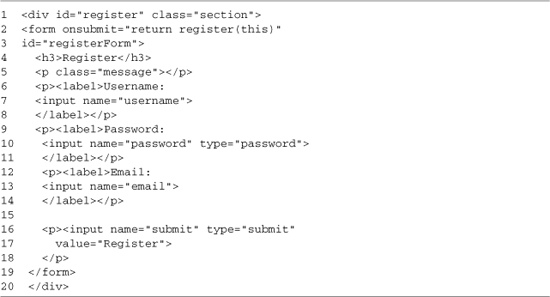
Register.php provides the basic form. It calls the register function when submitted (line 2) and has an ID so that it can be easily accessed from JavaScript. All the other form elements can be accessed through the form’s elements array, so they need only a name attribute. This access method allows form elements to look just like non-AJAX forms. The form also contains a message target (line 4), which is used to display validation messages. The HTML is powered by the JavaScript added by register.js, which is shown in Listing 12-12.
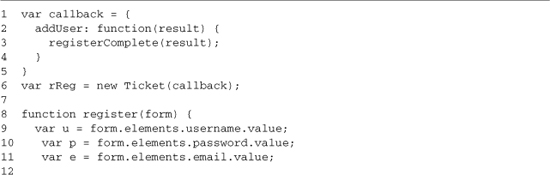
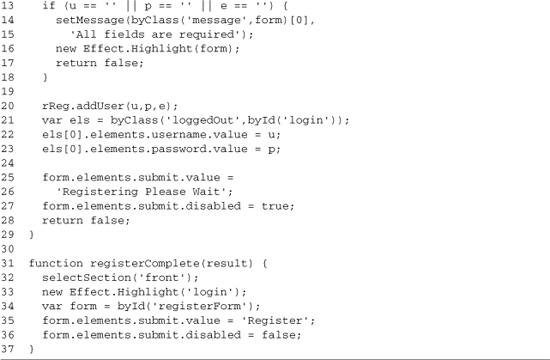
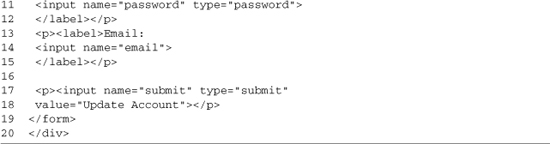
The register component doesn’t need a setup function, so it starts by setting up its AJAX instance (line 6). It defines a single callback, addUser (lines 2–4), which calls the registerComplete function. Next we define the register function (lines 8–29), which is called when the registration form is submitted. The function grabs the values of the fields it will be submitting (lines 9–11) and then does some basic validation. If the validation fails, we use the setMessage function (lines 14–15) to display a warning to the user and stop the form submission by returning false. Remember that validation is also enforced on the server, so we’re not using this code to protect our back end, just to provide a good user experience. If the validation succeeds, we make an AJAX call to addUser, passing in the username, password, and email address (line 20). This call is followed by code that prepopulates the login form with the new username and password (lines 22–23). The next step is to display the loading status, which is done by disabling the submission button of the registration form (lines 25–27).
When the server has returned a response, the registerComplete function (lines 31–37) is run by the callback function. This function selects the front page of the application (line 34), highlights the login form (line 33) to show the user that he or she should log in, and then re-enables the registration form (lines 35–36) in case we want to register another user.
12.8 Account-Editing Component
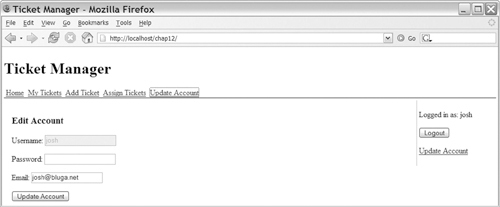
The account-editing component provides a similar form to the registration component, allowing the currently logged in user a way to update his or her password and email address. This page is quite simple and looks just like the registration screen, except that the username input box is disabled because the back end doesn’t allow usernames to be changed. An example of the account-editing screen is shown in Figure 12-11; the HTML that generates it is shown in Listing 12-13.
Figure 12-11. Account-editing component
Listing 12-13. EditAccount.php
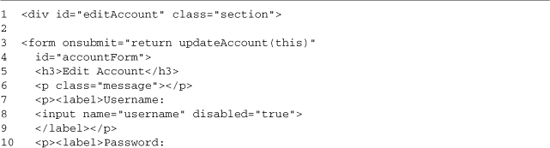
The HTML for the account-editing component is nice and simple. It creates a form that calls the updateAccount function on submit (line 3). It contains the same fields as the registration form, except that its username field is disabled (line 8). The matching JavaScript for editAccount.js is shown in Listing 12-14.
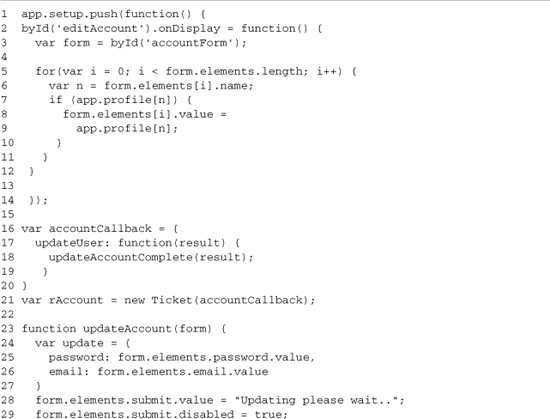
EditAccount.js starts by defining setup and onDisplay functions (lines 1–14). The setup function is used only to register the onDisplay function (lines 2–12). The onDisplay function takes the account form (line 3) and loops over its elements (lines 5–11), setting the value of each field that has a name matching the name of a property in the user’s profile. This will populate the account form with the user’s account information when the account editor is selected.
On lines 16–21, the AJAX class is set up. This component uses only the updateUser function, so it’s the only one with a callback. The response to this method is sent to the updateAccountComplate function. The updateAccount function on lines 23–32 takes the account form and performs an AJAX submission of it. This is done by creating an object containing the form’s values (lines 24–27) and then sending it to the server on line 30. The function also contains some basic user feedback; the Submit button’s value is changed to a loading message and disabled (lines 28–29). Wrapping up the file is the updateAccountComplete function (lines 34–41), which takes the results from the server, updates the user’s profile with them (line 35), and then turns off the loading messages set by the updateAccount function (lines 38–40).
12.9 Ticket-Creation Component
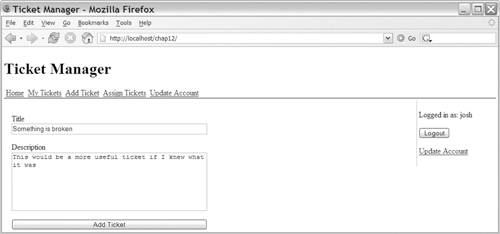
The ticket-creation component provides a form that is used to add a new ticket to the application. The user must be logged in to use this component. The ticket-creation process is kept simple because the form requires only a title and a description; the rest of the information will be pulled in from the user’s profile or set later during the editing process. An example of the ticket-creation form is shown in Figure 12-12; the HTML is shown in Listing 12-15.
Figure 12-12. Ticket-creation form
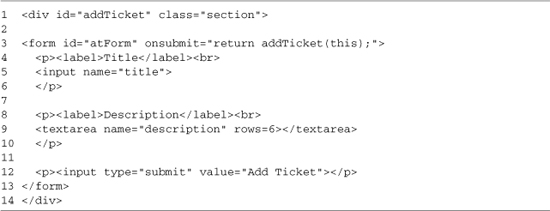
AddTicket.php contains a simple form. When the form is submitted, the addTicket function is called. This function is shown in Listing 12-16.
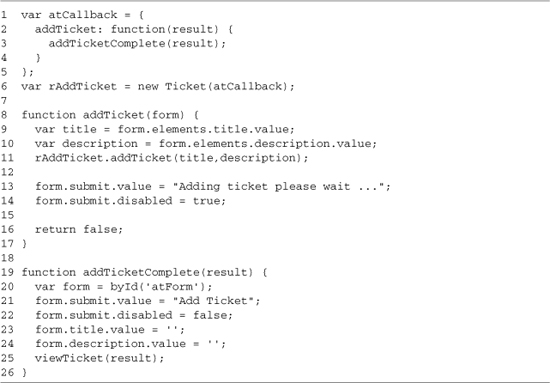
The HTML that drives the JavaScript for adding a ticket is quite simple. On lines 1–6, we set up the AJAX class; it contains a callback for the addTicket method, which calls addTicketComplete. The addTicket method (lines 8–17) processes the form, the values are pulled from its elements array (lines 9–10), and the values are sent to the server by using the AJAX stub class’s addTicket method (line 11). The function finishes by adding a loading message to the form’s submission button (lines 13–14). The addTicketComplete function (lines 19–26) removes the loading indication set by addTicket, clears out the form, and then runs the viewTicket method, which is defined in the ticket-editor component.
12.10 Ticket-Editor Component
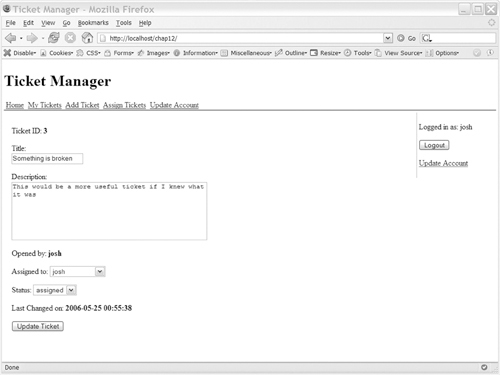
The ticket-editor component provides a form that is used to edit tickets. It allows you to update the ticket’s title and description, assign it to a user, and change its status. It also shows some details, including who opened the ticket and when it was last changed. The ticket-editing interface is created by TicketEditor.php (see Listing 12-17) and is shown in Figure 12-13.
Listing 12-17. TicketEditor.php
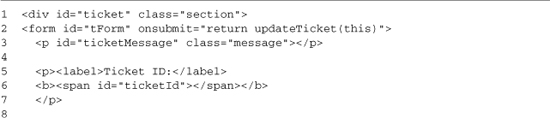
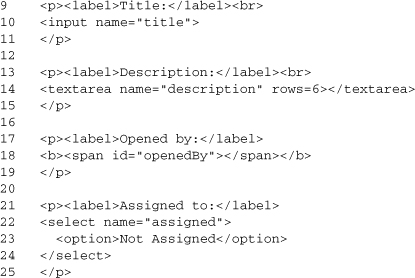
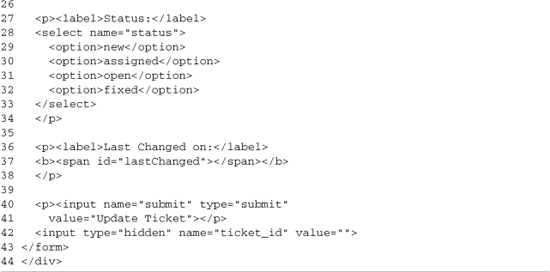
The ticket editor contains a larger form than the other components in the application, but from an HTML standpoint, it is not any more complex. When the form is submitted, it will run the updateTicket function (line 2), which performs the AJAX submission. The form contains a message target, which will be used to give the user feedback (line 3). The form also contains a number of spans, which will have their innerHTML updated to show static information (lines 6 and 37). The other new element of the form is the addition of a select element that will be dynamically updated with the users in the system (lines 22–24). The matching JavaScript is shown in Listing 12-18.
Listing 12-18. TicketEditor.js
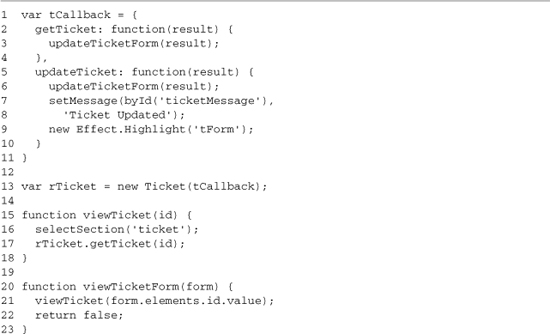

This component doesn’t require setup methods, but it does have to set up its AJAX class (line 12). We will be using two of the server’s methods—getTicket and updateTicket—so callback functions are added for each. The getTicket callback calls the updateTicketForm method when it is called, and the updateTicket method calls that same method. We will also be providing a user feedback message and highlighting the form (lines 7–9).
Lines 20–23 define the viewTicket method; this is used by other parts of the application, such as the add ticket component, to select a ticket to view. This method sets the current section to ticket and does an AJAX call to getTicket. The viewTicketForm method (lines 20–23) calls viewTicket, getting the value of ticket_id from the form that is passed in.
The updateTicket function (lines 25–46) processes a submission of the ticket form. It builds an object that contains the fields to update and then makes an AJAX call to updateTicket (line 42) with that list. The fields object is defined on line 26, and then the easy fields (title and description) are added to it. Next the assigned value is processed (lines 30–37); assigned is set using a select box, and its first option needs a special value. We support this value mapping by checking the select box’s selected index (line 31), and if the first option is not selected, using its value. Otherwise, the mapping code uses the value of false. Setting the assigned property to false lets the back end know that the ticket is unassigned and allows it to clean up the database accordingly. Finishing the process, the status property is added to the fields object (line 40), and the AJAX update is performed.
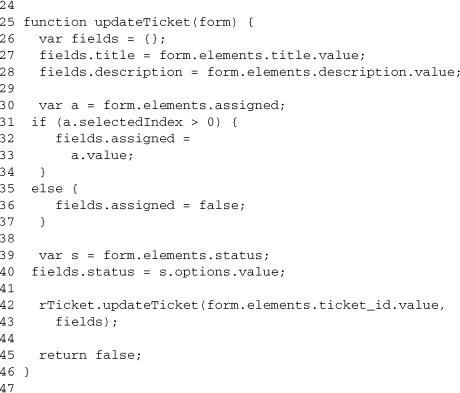
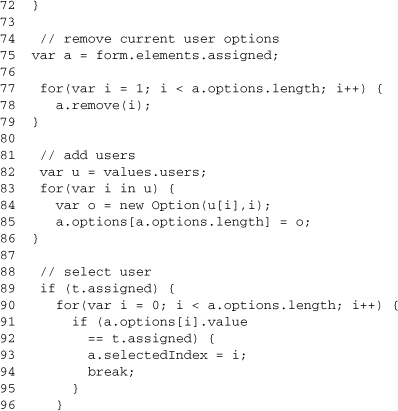
The updateTicketForm function updates the form that is used to edit the data. It starts with some basic error checking (lines 49–54). If the server isn’t able to find a ticket for a given ID, it returns false. Thus, the function checks for a false value, sets an error message if it finds one, and then sets the application to the front page. If the ticket exists, we start updating the form. We start with the input boxes, text area, and spans (lines 58–64) and then move on to the select boxes. Status contains a hard-coded set of options, so it can be selected by looping over the list, matching the status value against the options text, and then setting the element’s selectedIndex property (lines 66–72).
The users array is dynamic, so the process has to start by updating the list of users from the data that is returned from the server. This is done by creating a new Option instance for each user and adding it to the select element options array. With the list updated, we loop over the list as we did in the status case. The only difference is that this time, we compare the option’s value because we have a user_id. If no user matches, the selected index is set to 0, which is the “not assigned” option.
The function finishes by doing a basic security check. If the user is not logged in, the Submission button is disabled, and a message telling the user to log in to update the ticket is shown. This check allows the same page to be used for authenticated and nonauthenticated users. Like any other security check, this code on the client is there just to provide a good user experience; the back end also enforces security and would prevent any not-logged-in user from updating a ticket, no matter what he or she did to the client’s code.
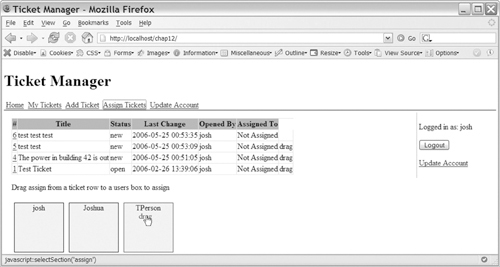
12.11 My-Tickets Component
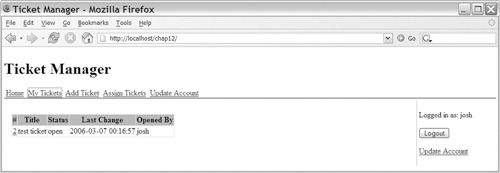
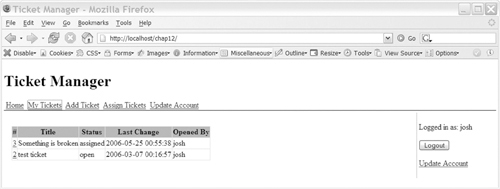
The my-tickets component is the user’s default screen within the application; it provides the user with a list of tickets that have been assigned to him or her. This component does a large amount of dynamic table processing and tries hard to load the minimal amount of data it needs from the server. The data minimization is important because when you’re viewing your ticket list, it will poll the server on a 30-second interval, looking for updated tickets. You can see the my-tickets view in Figure 12-14, which is created from myTickets.php (see Listing 12-19).
Figure 12-14. The my-tickets view
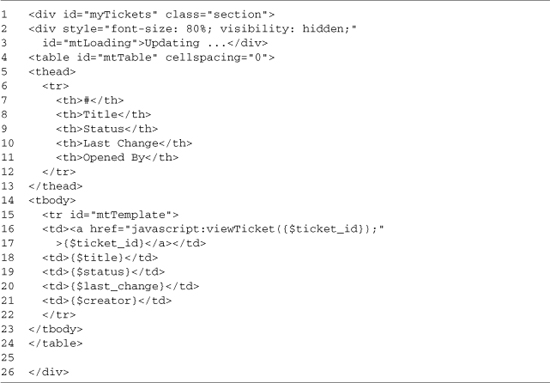
This component has a small template but a large amount of functionality. The template contains two elements: a notice area to display a message when the table is being updated (lines 2–3) and the actual table that shows the user’s assigned tickets. The table contains a header, which is contained in the thread tag so that the buildTable function won’t remove it. It also contains a table in its body, which will be cleared when buildTable updates the table. The template is marked with an ID so that it can be pulled out during page load by the component’s setup function. The tokens are in the format described in the explanation of the updateRow function, so the {$status} will be replaced with the corresponding status line from the server. This simple templating system gives a great deal of flexibility, which is shown on lines 16–17, where we add a link around the ticket_id. The matching JavaScript that uses this HTML is shown in Listing 12-20.
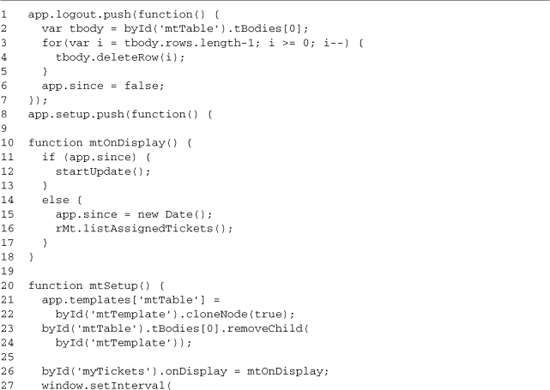
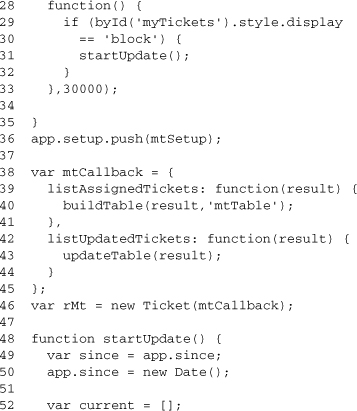
MyTicket.js starts by creating three setup functions:
• The first is a function to be called when the user logs out (lines 1–7). This function is needed to clear out the user’s current tickets so that the tickets currently shown won’t be reused if another user logs in from the same browser.
• The second is the onDisplay function (10–18), which runs when the page is displayed and sends an AJAX request to the server to update the list of tickets that are being shown.
• The third is the Setup function (lines 20–36), which runs on page load. This function clones the row template for the table, storing it in the app object (lines 21–24). It registers the onDisplay function (line 26), and it sets up a function to run on a 30-second interval (lines 23–33). This function will run every 30 seconds while this page is loaded. The function does a simple check to see if the user is on the My Tickets section (line 29); if it is, the function starts the update process (line 31).
Lines 38–46 set up the AJAX class for this component. Callbacks are set up for the listAssignedTickets method, which is used on initial page load, and for listUpdatedTickets, which is used to get updates afterward. The Ticket instance is created on line 46.
The startUpdate function (lines 48–61) gets the data needed to call the server’s listUpdateTicket method. This method needs the last time an update was asked for, which is stored in app.since (lines 49–50). It also needs a list of the current tickets being displayed, which is created by looping over the ticket table and reading the ticket_id property on each row (lines 54–57). Once this data is ready, a loading indicator is shown (line 59) and the AJAX call is made (line 60).
Finishing up the component is the updateTable function (lines 63–91). This function takes the data returned from the server and updates the ticket table with it. The function starts by disabling the loading indicator set by the startUpdate function (line 64); it then checks to see what type of data was returned. If it is a complete set of data (lines 65–68), then the buildTable function is used, and the function stops. If there is an updated set of data, we loop over the new data, inserting new rows at the top of the table or replacing current ones. Lines 70–71 prepare the new row, using updateRow and its template system. Lines 74–81 determine if we are doing an update or a replace; this check is done by looping over the current tickets and looking for matching ticket_ids. If the ID exists, then we are updating a current row by removing the old row and inserting the new one (lines 87–88). If the ID doesn’t exist in the table, we insert a new row at the top of the table.
12.12 Assign-Tickets Component
The ticket-assignment component provides the users of the ticket manager with a quick way to assign unassigned tickets to users in the system. This is done by dragging tickets from a table and dropping them on a box that represents each user. This interface is a good example of the power that fully interactive interfaces give users. A drag-and-drop approach is especially useful for tasks such as sorting or assigning, because they are made up of elements that are mappable and that are often time-consuming with pre-AJAX approaches. The scriptaculous library is used to provide the drag-and-drop logic in this example. The interface of the assign-tickets component is created by Ticket.php (see Listing 12-21) and is shown in Figure 12-15.
Figure 12-15. Assign-tickets component
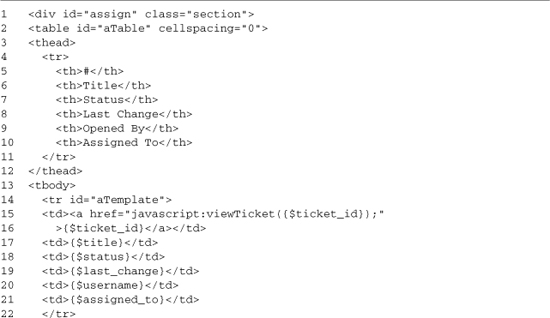
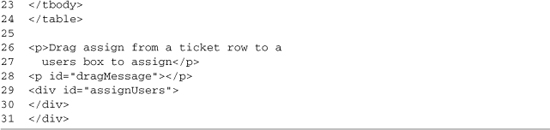
The Ticket.php file provides the interface for assigning tickets to users. This interface is made of two parts: The first is a table that lists unassigned tickets, and the second is a box containing boxes for each user. The table is defined on lines 2–24 and follows the standard, dynamic-table model we’ve used throughout the application. It contains a thead tag (lines 3–12), which contains the headings for the table, and a tbody tag, which contains a single row (lines 14–22). This row acts as the template for the buildTable and updateRow functions in Ticket.js. The file also contains a DIV (lines 29–30) to hold the drop targets for the ticket rows. This target is empty now because the targets will be built dynamically from the list of users. The JavaScript that builds the user drop targets and powers the rest of the interface is shown in Listing 12-22.
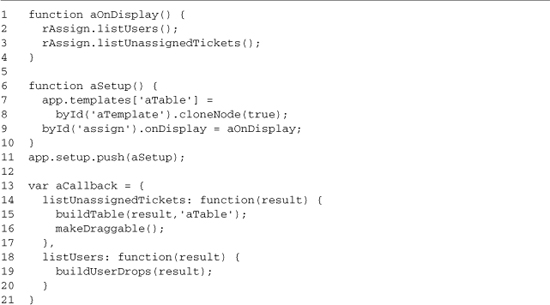
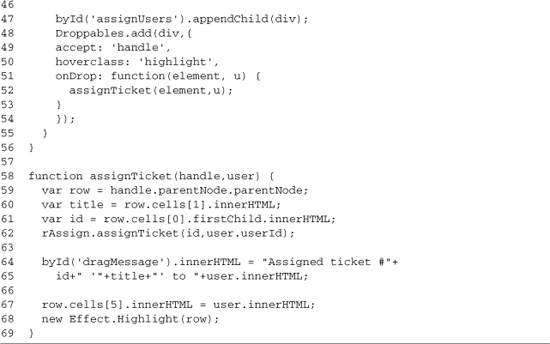
The ticket-assignment component uses both a setup function and an onDisplay function, so it starts by setting those up. The onDisplay function (lines 1–4) is run each time the user loads the section. In this function, AJAX calls are made to the server to load the users and unassigned tickets in the browser. The ticket information is updated when the section is displayed because you don’t want to be in a situation in which you are reassigning tickets that someone else already assigned. This problem can happen if you are working with stale data; updating the data on section display least guarantees you fresh data at the start of the assignment process. The Setup function (lines 6–9) loads the template row into the app object using cloneNode so that it can be used later—even after the source is overwritten. The Setup function also registers the onDisplay function because that can’t be done until the assign DIV is loaded.
The next ten lines take care of setting up the AJAX class. Callbacks for listUnassignedTickets and listUsers are registered. As in the rest of the application, these callbacks do minimal work, leaving the implementation to functions that are registered later in the file.
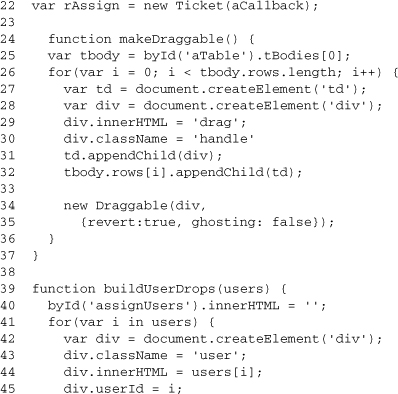
The rest of Assign.js contains the functions that provide the functionality of the component. MakeDraggable (lines 24–37) makes the rows in the ticket table draggable. It does this by looping over the rows in the body of the table and adding a new td on the right side. This td will contain a div, which is the drag handle for the row. The use of the handle DIV makes it clear how you should interact with the table; it works better than directly dragging-and-dropping the table rows because the rows have a variety of bugs in different browsers and they don’t always offer a great user experience. The DIV is made draggable on lines 34–35 by creating a new scriptaculous Draggable instance; the revert option is set to true so that the DIV stays in place after it is dragged to a user’s drop target.
The buildUserDrops function takes a list of users that is returned from the server and dynamically creates a DIV for each user that is used as a drop target for the ticket rows. This process starts by clearing the target DIV (line 40) because drops may already be in place from an earlier view of this section. Then the list of users is iterated over. On lines 42–45, a DIVis created, and it’s populated with some of the user’s information. Included in this is the user’s user_id set as a property on the DIV so that it can be accessed by other code when the tickets are dropped. The function finishes by adding the new DIV to the target area (line 47) and making it a drop target (lines 48–54). When we make it a drop target, we set an onDrop handler. This handler calls the assignTicket function and gives us a way to tie the drop event from the user interface to the back end.
The assignTicket function runs when a drop is completed. The first parameter, handle, is the DIV from the ticket row; the second parameter, user, is the user’s drop target DIV. The function starts by using the handle’s parentNode property to get the actual table row (line 59), and then it uses the row to get the title of the ticket (line 60) and the ticket’s ID (line 61). With that information, an AJAX call to the server can be made. This call assigns the ticket to the specified users (line 62). The rest of the function provides status feedback to the user; lines 64–65 provide a textual message, and lines 67–68 update the assigned column in the ticket table and highlight the row to show that it’s been updated.
12.13 Security Considerations with AJAX Applications
The ticket manager application has a relatively simple security model. There are no different user levels; the only issue to worry about is whether the user logged in. If the user is logged in, he or she has the ability to edit and create tickets; otherwise, he or she can only view them. The user’s login status is stored on both the JavaScript side and the server. On the JavaScript side, this status is used to hide the links to actions that the user can’t perform. On the server side, the login status is used to enforce what actions the user can perform. This setup highlights an important rule in any Web application: The client can’t be trusted.
Often, when we build an AJAX application, we forget that our back-end code is still being exposed through normal HTTP requests. Just because the JavaScript-driven user interface doesn’t allow a ticket to be created doesn’t mean that an HTTP request directly to the back-end addTicket method can’t be made. The methods exposed in the Ticket class are a public interface to the application; they need to check login status if a login is required to use the method, and they need to do any required data escaping.
Even though libraries such as HTML_AJAX make it easy to expose a PHP class for AJAX, access doesn’t mean that you can remove the controller from your application and expose your data models directly to JavaScript. The code that handles an AJAX request is now the front-line code of your application and needs to take appropriate precautions.
12.14 Comparing Our AJAX-Driven Application against a Standard MVC Model
You have many different design choices that you can make when building a Web application, but one that is often used is the MVC model. In an MVC application, your model code handles interacting with the database, the view manages how the content is displayed, and the controller ties things together. When you move to an AJAX-driven application, this model will still exist, only now you have the possibility of having it twice: once on the server and once on the client. In many cases, the controller and view classes will mainly disappear from the server side because that functionality is transparently provided by the AJAX communications library.
In the ticket manger, the controller functionality was provided by the HTML_AJAX_Server class. The server class takes incoming requests and maps them to the appropriate method on the ticket class; it then takes the output and uses a JSON serialization class as the view. In the ticket manager, the model is less clear, but the model component is still the ticket class. In some ways, the ticket class is still a controller because it handles user input, decides what to do with it, and then returns data or errors. As the ticket manager application grows, a common refactoring approach would be to pull the code that creates the queries into its own classes, leaving only the code for cleaning the input and for picking the entity to work with in the ticket class. You can also build an AJAX-driven application without the use of JSON; instead of returning data to the client, you would return chunks of HTML. In an HTML, chunk-style AJAX application, you would keep the standard view component in the MVC model. (The view component is a template in most Web applications.)
On the JavaScript side of the application, you can also choose an MVC model to drive your application. However, you’re less likely to see a pure implementation because most JavaScript code is event driven. (That is, it responds only to user interaction, such as the clicking of a link.) In addition, it is harder to work in a controller model than the standard, URL-driven approach used on the server. A strict view also isn’t needed on the JavaScript side because you can interact directly with the DOM, but you may find template-based approaches to be quite useful because the templates make the development processes much simpler. Models follow much of the same pattern; in a simple AJAX application, they can be simple data structures mapped directly from the server using JSON. However, as features are added, you’ll find it useful to wrap this data inside JavaScript classes. These classes can take care of caching data in the client, handle validation, and even combine multiple requests to allow you to lower the number of requests you send to the server.
Overall, building an AJAX-driven application has the tendency to lower the amount of code you have on the server and increase what you have on the client. However, even with large amounts of functionality being provided by an AJAX library, the server-side code will still need to provide more than simple data access. All of the application’s security will have to be enforced on the server. You’ll also need to manage the first-time page generation on the server, which may include preloading large amounts of data to save you from doing a bunch of AJAX requests as soon as the page is loaded. The server will also tend to have methods that combine multiple-step processes; due to the high latency of AJAX requests, you will want to minimize the number of round trips to the server that are required to process a single action.
Building a fully AJAX-driven application gives you a lot of power, but be careful when using this approach. You’ll have a lot more important logic running on the client, so you’ll need to update your testing approaches to account for this. You also want to be careful about ending up with a design that leaves you with a complex back end and then a complex front end that performs many of the same functions. If you have a fully driven AJAX application, you should strive to keep one side of the application as simple as possible. If you’re pushing data out using JSON, that side should be the back end; if you’re pushing out chunks of HTML, that side is the front end. If you let both sides become complicated, you’ll find yourself with two interdependent pieces that are hard to maintain and debug.
12.15 Summary
The ticket manager use case showed us a different development pattern. A light-weight back end exposed services that a heavier front-end JavaScript application used to build the actual ticket manager. This made JavaScript the primary development language and shifted the development processes much further from the standard Web development model than the other use cases. The approaches we covered would also be useful in cases in which JavaScript was taking more of a secondary role. These approaches include the following:
• Exposing back-end functionality as a service gives the most flexibility to your AJAX code.
• JSON’s lightweight encoding makes it the perfect fit for heavy AJAX use.
• Building small JavaScript components that are self-contained and have simple rules for interacting with the rest of the application helps manage complexity.
• Usability must be thought about at the initial design stage, not bolted on later.
• Visual sorting is easy to implement and easier for users to understand.
• Creating utility functions for common JavaScript operations can speed development and make code more readable.
The ticket manager is a rich Internet application, offering quick response times, features such as drag-and-drop ticket assignments that are seldom seen in Web 1.0 applications, and high levels of usability throughout. However, it just scratches the surface of what’s possible.
AJAX offers the ability to create highly interactive applications. AJAX-powered applications have the ability to help us create a new Web—a Web 2.0. As you walk down the path to AJAX development, you need to be careful to avoid the bumps in the road. Keep your focus on the user’s experience, not on technology, and strive to keep your code simple. As you rely more and more on AJAX, you’ll want to move complexity to the client code, not create a situation in which both sides of the equation are extremely complex. AJAX development gives you lots of options, from moving data with JSON to updating the page with server-side generated HTML. However, what determines your success won’t be what programming strategy you use, but how well you keep your focus on what the user needs.