
Chapter 11. Adding an AJAX Login to a Blog
In this chapter
▪ 11.1 Why Logins Work Well with AJAX
▪ 11.3 Extending the Login Form
▪ 11.4 Implementing the AJAX Comment Login System Using XML
A common feature of many Web logs is the ability to leave comments. When these systems were first implemented, they allowed anyone to fill in a couple of fields and post a comment directly to the site. Today, however, most blogs have some sort of moderation system with which the blog owner can approve—or disapprove—comments. In an effort to streamline this process, many blogs also use logins. The problem with a login to a site like a blog is that it’s not something you need to do until you go to post a comment. This makes a standard login process involving a couple of different redirects annoying, especially if you’ve already filled out a comment before attempting to log in. AJAX offers you the ability to streamline this process because you need to submit only the login form, not the entire page.
11.1 Why Logins Work Well with AJAX
A login is a type of application that fits into an AJAX paradigm well. Logins are forms that need to be submitted, but they generally take up only a small part of a page. On public sites, you might want to log in multiple times, generally in relation to another action that you’ve already performed, such as filling out a comment form. A login form also needs the ability to show login failure messages and make it easy for the user to type in his or her password again. To sum up, a Web site login is generally a few square inches on a Web site, and it’s handy to have the login on every page of a site. Treating it as its own separate entity works well, and using AJAX so that only the login section submits when logging into the site makes for a much nicer user experience. AJAX-based logins are used by many of the Google sites. An example of Google’s AJAX login is shown in Figure 11-1.
Figure 11.1. Google’s AJAX login

11.2 Building an AJAX Login
Building an AJAX login is a simple process if you’re using an AJAX library that supports submitting a form using AJAX. If your library of choice doesn’t do that, you have a bit of work to do, but it’s only two fields, so grabbing their values by hand isn’t too hard. Our first login implementation will use HTML_AJAX and its formSubmit method; this is the simplest AJAX login case, but it may not work in all cases due to its limited flexibility.
Although it’s possible to use other methods, the easiest way to create an AJAX login system is to use cookie-based logins. PHP has a system called sessions that makes this easy to do. Before outputting any content, run the session_start() function; if a session ID cookie exists, PHP uses this ID to load any data associated with this ID from where it is stored on the server. If the session ID cookie doesn’t exist, PHP generates a random string that identifies this session and adds a header to send to the browser. Other server-side languages offer similar features, either built-in or through standard libraries. The important part of a session-based approach is that it stores only an ID in the browser cookie; all other data is stored on the server.
The AJAX login form works by updating information in the session to say that the user is logged in. Because the data is stored on the server, other pages don’t need to be notified that a login has occurred. If the other pages submit any data, the server can check that the user is logged in. Our login form will provide a form with inputs for a username and password. When the form is submitted, PHP code will update the session storing the username for latter use. The PHP page will then generate a logout button, because redisplaying the form doesn’t make sense. In review, the workflow of login form is shown in Figure 11-2.
Figure 11-2. Workflow of the AJAX login process using HTML_AJAX
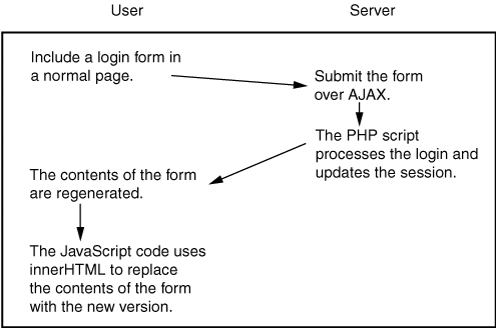
1. Include a login form in a normal page.
2. Submit the form over AJAX.
3. The PHP script processes the login and updates the session.
4. The contents of the form are regenerated.
5. The JavaScript code uses innerHTML to replace the contents of the form with the new version.
To start this process, we need a Web page into which we want to log. This page needs to run session_start() before outputting content, and it needs to include the HTML_AJAX JavaScript libraries. Last, it needs to include the login form. A minimal sample page is shown in Listing 11-1.
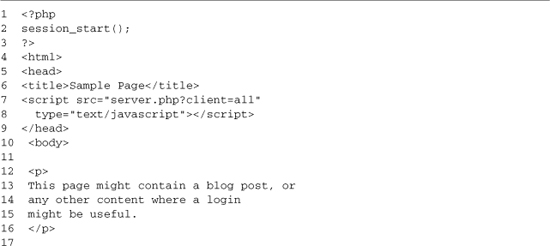
This sample page could hold any kind of content, but it must meet the requirements for the embedded login form. Line 2 starts the session. Because this command adds HTTP headers to the response, it needs to be done before any content is generated. Lines 7–8 include the HTML_AJAX JavaScript libraries; you always want to include JavaScript files in the head section of the HTML document because they will slow the display of any HTML that follows the includes. Lines 18–20 contain a wrapper DIV for the form. When the form is submitted, the innerHTML of this DIV will be replaced with updated content. Line 11 includes an external PHP file that generates the login form. The basic form could be produced directly in this page, but having the form always generated by the same code helps in its maintenance. The rest of the page could be any HTML content; in this case, it’s just a paragraph of text (lines 12–16). Finishing the basic login system is the SimpleLogin.php file (see Listing 11-2).


The first 20 lines of SimpleLogin.php handle processing the form. This code logs the user in or out and creates a $message variable that can be used to tell the user that a login has failed. On line 4, the code checks whether the hidden variable ajaxLogin is set; if it is set, we perform a login. Line 2 starts a session if it hasn’t already been; this allows this page to be included in another page or to work stand-alone. The actual login check is hard-coded to a username of jeichorn and a password of test (lines 7–10). If the login succeeds, we set a flag in the session (line 9). If the username or password does not match, we set the session login flag to false (line 12) and set $message to a failure message (line 13). Lines 16–19 contain code for handling logout. If the hidden field ajaxLogout exists, we set the session login flag to false and add a notification message to $message.
The rest of the page generates the login form or the logout form. The form tag is generated on lines 21–23. Its method is set to POST, and its action is set to this same page, SimpleLogin.php. When the form submission button is clicked, the onsubmit handler on the form (line 23) calls HTML_AJAX.formSubmit. The first parameter is the form to process; the value this, which means the current form, is used. The second parameter is the ID of the element to update with the results. Line 25 contains PHP code to output the message that was set up during the login processes. Lines 27–28 check to see which mode the form is in. If the login flag isn’t set at all, or if it’s set to false, then we produce a login form (lines 30–40). If the login flag is set to true, we produce a logout form (lines 42–46). The login forms are minimal—just a login and password field or a logout button. You can see what this basic form looks like in Figure 11-3.

11.3 Extending the Login Form
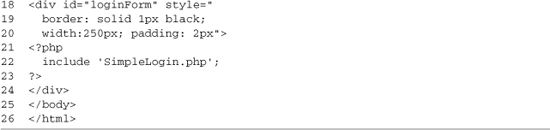
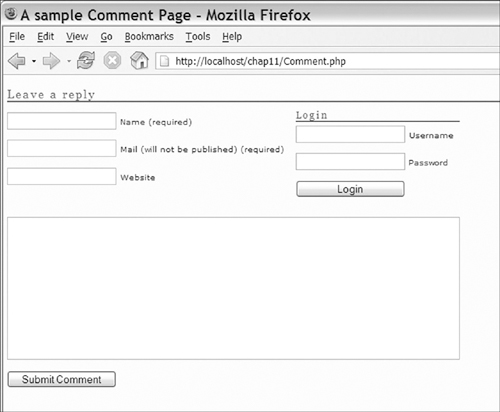
With some basic formatting, we now have an AJAX login form that easily meets the needs of pages that need a login. However, in the case of a blog, you usually want to load some profile information into the current page as well. To do this, we need to make some data available to the rest of the site and update the login form. The Comment section of my blog is shown in Figure 11-4; you can see that we also want to load the user’s name, email address, and Web site. On some sites, you might hide these fields after a login because the values from the user’s profile will be used, but we will just update these fields directly, allowing the user to change the information for this post.
Figure 11-4. Comment form from my blog
From a user interface standpoint, this form will be easy to extend. There is room to the right of the informational fields to add a login box. The login form will be submitted over AJAX, and instead of returning a logout form, it will return some JavaScript that will populate the fields with information from the user’s profile. If the user is already logged in when he or she comes to this page, he or she will just get the prepopulation of his or her profile information. The user will not get a logout button, because logging out from this area of the user interface doesn’t make a lot of sense. This approach can be accomplished in this fashion because our AJAX library is doing a lot of work for us.
When you add new content to a document using innerHTML, the JavaScript included in it isn’t run; HTML_AJAX includes code to pull the JavaScript code out and evaluate it (returning to code). An updated comment form with a login added is shown in Figure 11-5. The code that builds this form is shown in Listing 11-3.
Figure 11-5. Sample comment form with a login
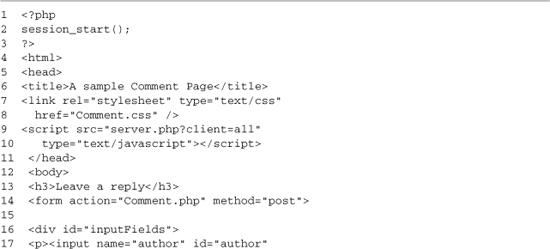

Comment.php is mainly a form (lines 14–41) for submitting a comment to a blog. In the example shown in Listing 11-3, submitting the form doesn’t do anything, but the goal isn’t to show how to submit comments. The goal is to show how a login form that loads profile data could be integrated with a comment system. To make this integration work, the page starts a session on line 2 and then pulls in the needed JavaScript library files on lines 9–10. A CSS file is also included. This file handles the formatting of the page and the positioning of the login form. Forms can’t be nested, so if you want that visual effect, you’ll need to accomplish it with a positioning effect. The login form is included on line 43; it sits inside a DIV with the ID of loginForm. This wrapper DIV helps in positioning the form and gives it an element to update with its results. The login code from Listing 11-2 was updated to work with this comment form, loading profile data when a login is complete; this code is shown in Listing 11-4.
Listing 11-4. CommentLogin.php


Like the login code in Listing 11-2, the first part of CommentLogin.php takes care of processing POSTs from the login form. On lines 2–4, we start a session if one hasn’t already been started. Then on lines 7–24, we process the login. The information is again hard-coded to keep the example clear. If the username and password match jeichorn and test (lines 10–11), we set a flag in the session and add some profile information to the session. In some applications, this information could include other demographics and various application details, such as the user’s ID or what permissions he or she has. If the login fails, the clogin flag is set to false, and a message is provided.
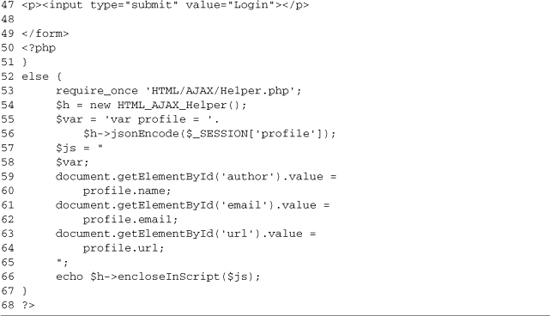
The form generated by CommentLogin.php has two modes: One is a normal login form (lines 28–49), whereas the other produces some JavaScript that updates the comment form. We check which mode we’re in on lines 25–26, which show the login form when we’re not logged in. Lines 35–47 produce the actual elements of the form, giving us username and password inputs as well as a submit button and a hidden field to let this page know we are trying to log in.
The logged-in mode of the form uses the HTML_AJAX_Helper class to help it produce some JavaScript. We include this class on line 53 and then create an instance of it on line 54. On lines 55–56, we use the helper’s jsonEnode method to turn the session’s profile data into a JSON string that can be directly used in the JavaScript we’re writing. We then write the rest of the JavaScript, updating each field in the comment form, using the user’s ID and the matching value from the profile. After that, we use another helper method to quickly add a script tag around this JavaScript. Because this login code is session driven, the logged-in mode will be used each time the parent Comment.php page is reloaded after a single login has happened. With this design, you need to close your browser to log out, but you normally put a Logout button somewhere else on the page where it would make sense.
11.4 Implementing the AJAX Comment Login System Using XML
The HTML_AJAX-powered implementation of an AJAX login form was easy to implement, but it is tightly tied to the HTML_AJAX library. You could implement it in a similar fashion with another library that has the same features, but you need to take a different approach if you’re using a lighter weight library. Because the HTML_AJAX approach generates JavaScript on the fly, it can be especially hard to do if your language of choice doesn’t have JSON support. XML is often a good alternative if you lack JSON support, because it’s easier to create by hand and more mature; therefore, it has wider language support. Any of the communications patterns that were covered at the beginning of this book are a possibility, but you’ll find the ones that use a more standard page-based approach will be easiest to integrate into existing sites. RPC-based approaches can also be useful, but they introduce a different style of interaction into your Web-based applications. Thus, you’ll need to think about them from the start, if you’re planning on using them.
To give a better idea of what an alternative implementation would look like, I’ve implemented the same comment updating system using Sarissa and XML. The back end is still written in PHP, but instead of generating HTML and JavaScript, it will now generate XML code that is used by client-side JavaScript. This will increase the amount of JavaScript you need to write, but it may well be worth it, especially if you’re already using XML throughout your site.
In this example, we start with the back end script XMLCommentLogin.php, because the JavaScript code doesn’t make sense until you see the XML with which it is working. All the XML messages are contained within the root node of login. When a login fails, an XML message like the one shown here can be returned:

If a login was attempted, a message should always be provided. An alternate version of this response with no message nodes can be received on the initial page load. This alternate response happens when the login status is read from the session. The other case is, of course, the XML that is shown when a user is logged in. This response contains profile data; using XML for data like this is nice because it makes it easy to extend for future purposes. An example of the XML returned by a successful login is shown here:
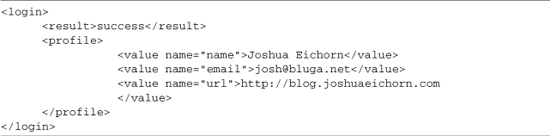
In a successful case, a result message and profile data are returned. The value tags within the profile tag store the actual profile information. In this example, the name attribute matches the ID of the field we want to update, but in most cases, this mapping wouldn’t work and you would have to add code to match the XML nodes and the field IDs. In the initial page load case, the same response as a successful login is used. The code that generates these messages is shown in Listing 11-5.
Listing 11-5. XMLCommentLogin.php
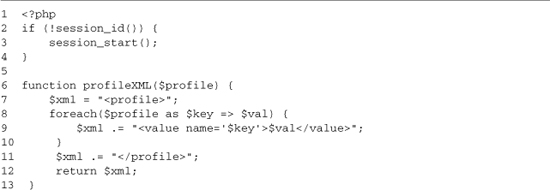


Like the other login pages, Listing 11-5 is included directly in the main content page to produce the loading of default values. Unlike the other pages, it needs a specific flag set to know this is happening. It needs this flag because it sends a content-type header on line 50, and we want to do that only in the stand-alone case. The page starts by initializing the PHP session; like all the login examples, the actual status of the login is stored on the server. Just as in normal Web development, storing the login status on the client is a big security problem. Next (lines 6–13), we set up a helper function, profileXML, which loops over profile data and generates XML for it. It’s in a helper function because we need to be able to access it in two places: once for a successful login (line 28), and once for the already logged-in case (line 42).
Lines 15–47 handle the actual login processing. We’re using GET requests in this case because they are easier to accomplish with Sarissa, but this could cause some future problems. GET requests can be cached, unlike POST requests, which could make it hard to use this same code as a method to reload profile data. On line 15, we check whether we have a login attempt; if so, we start building our output xml string (line 16) and then do a login check (lines 19–20). If the login succeeds, we set the session flag (line 30) and load the user’s profile into the session (lines 22–26). The successful login process is completed by outputting the needed XML. The successful login code first outputs a result tag (line 27) and then the profile data (line 28) by calling the profileXML helper function.
If the login fails, we output a result tag with a value of fail (line 33) and add a message tag whose value will be displayed on the login form (line 34). The failed login process is finished by setting the SESSION flag to false (line 35). Lines 39–47 contain the two default loading cases. If the user is logged in, we generate the profile XML (lines 41–43); if the user isn’t logged in, we output the failure XML with no messages (line 46). The file finishes by outputting an XML Content-type header (line 50), which is needed because PHP generates HTML files by default, and then we display the xml (line 52). This example is used by a comment page, shown in Listing 11-6, which has been updated to use the Sarissa library to consume the XML.


XMLComment.php provides the same comment form as the Comment.php example. Because it’s using the Sarissa library, the code quickly diverges because it defines several JavaScript functions to handle the XML. The page starts with some basic PHP setup, starting the session (line 2) and setting $inline to true so that the XML-generating page knows not to send Content-type headers. The page then includes the same CSS (lines 8–9) and the Sarissa library (lines 10–11), including its XPath support (lines 12–13). Then, we move into the JavaScript. The first item we define is the loginData variable, which will contain the XML generated by XMLCommentLogin.php. This variable allows us to load the profile data at page load if the user is already logged in.
After that, we define a function that will handle submitting the login form (lines 18–49). It starts by getting a Sarissa DOM Document (line 19); it then sets up its onreadystatechange handler (lines 20–38). When the page is loaded (readyState == 4), this handler will use an XPath query to grab the result node (lines 22–23) and then check to see whether its value is successful (lines 25–26). If the value is success, the profile information will be loaded using the loadProfile function. If the value isn’t success, an XPath query will be used to load the message node (lines 30–31), and then the content of this message will be added to the paragraph element with an ID of message (lines 32–35).
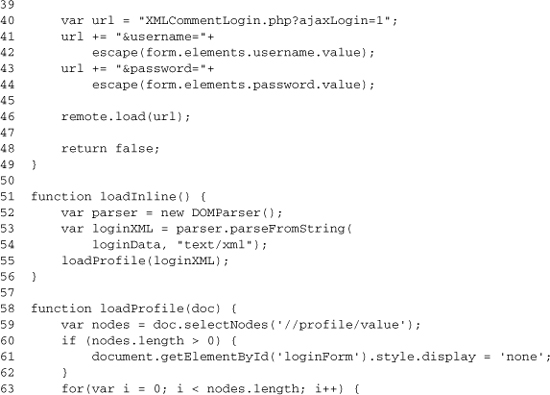
Once the handler is set up, the URL to be used in the request is created (lines 40–44). Because we’re making a GET request, the data is appended to the query string. The values are read from the form using the elements.elementName syntax. Each value read from the form is escaped; this escaping makes sure that we won’t get a broken URL. Once we have a URL, we use the DOM document’s load method to make the request (line 46) and then return false (line 48) so that the form won’t do a normal submission. Lines 51–56 define the loadInline function; this function is called at page load, and it uses a DOMParser to load the XML from loginData and then calls loadProfile on it.
The JavaScript code finishes up by defining the loadProfile function; this function takes a login result DOM document and loads the profile data into the comment form. It does this by making an XPath query that loads all the value nodes into an array (line 59). If that query succeeds, it first hides the login form (line 61) and then loops over the array (lines 63–67), grabbing the name of the value from its name attribute, grabbing the HTML element with an ID that matches that name, and then setting that element’s value to the value of the tag. If the names do not match, you can loop over the nodes, creating a hash with the name as the key, and then write out each update by hand.
Listing 11-7. XMLComment.php Continued

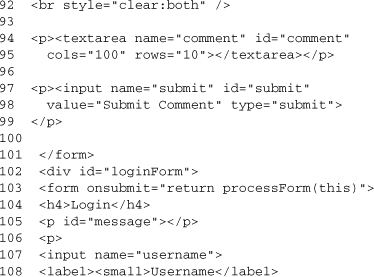

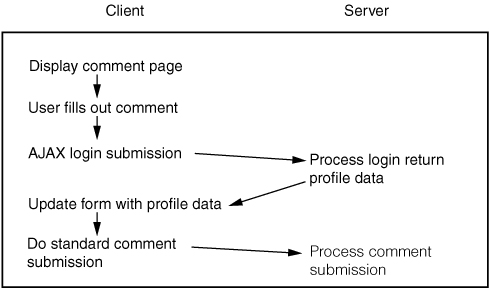
The rest of the page builds the user interface. It has a few changes from Comment.php. The big one is that the login form is defined directly on this page instead of being included. On line 72, we set an onload handler. This handler called loadInline loads any current profile data. After that, we have just the standard comment form until line 102, where we define the login form. The only difference in this form is that it is now calling the processForm function in its onsubmit handler. This event handler will start the AJAX submit process when the user clicks the Submit button. The data flow of the user filling out a comment, logging in, and then submitting his or her comment is shown in Figure 11-6; this data flow is identical in both the HTML_AJAX and Sarissa XML cases.
Figure 11-6. Workflow of the AJAX login process using Sarissa
11.5 Summary
In this chapter’s use case, we focused on submitting forms over AJAX and then updating parts of the document using the returned information. You can implement this pattern in many different ways, but it’s common to use a library’s AJAX form submission features to do so. This form submission feature is especially powerful if the library supports adding JavaScript to the page along with HTML when doing the update. Be careful when deciding which parts of a page to upgrade with AJAX in this fashion; if you start making one form update many different parts of a page, you can make it hard for a user to see what is happening. Thus, this updating strategy actually works best for self-contained actions or for those that seem related. Even in related cases, you may want to add some visual effects, such as highlighting the changed elements, to make it clear that something has happened.
The page segmenting pattern can be especially useful in cases where you need to look up information while completing another form. This could be anything from selecting a billing address on a shopping cart to selecting a permissions group in a user editor. When designed correctly, you can often package these components in your server-side framework in such a way that they can be reused without your having to write any JavaScript for their subsequent uses. In the next chapter’s use case, we look at some other reusable components and how standard ones can be combined to build a small application.