
Chapter 2. Getting Started
In this chapter
▪ 2.2 Cross-Browser XMLHttpRequest
▪ 2.3 Sending Asynchronous Requests
▪ 2.4 AJAX Without XMLHttpRequest
▪ 2.5 Fallback Option 1: Sending a Request Using an IFrame
▪ 2.6 Fallback Option 2: Sending a Request Using a Cookie
The foundation that makes AJAX possible is the communication layer with the server. The most complete option for performing this communication is the JavaScript XMLHttpRequest object. If XMLHttpRequest is not suitable to you, hidden IFrames and cookies can also be used. We will examine both options later in this chapter.
This chapter introduces you to the XMLHttpRequest object, showing you how to work around its implementation differences between browsers. After that, we make some actual page requests, both in a synchronous fashion and in an asynchronous fashion. This chapter finishes with some various fallback approaches that can be used if a browser doesn’t support XMLHttpRequest, including how to use IFrames and cookies as your communication channel.
2.1 XMLHttpRequest Overview
Originally, Microsoft designed XMLHttpRequest to allow Internet Explorer (IE) to load XML documents from JavaScript. Even though it has XML in its name, XMLHttpRequest really is a generic HTTP client for JavaScript. With it, JavaScript can make GET and POST HTTP requests. (For POST requests, data can be sent to the server in a format of your choosing.) The main limitations to XMLHttpRequest are due to the browser security sandbox. It can make only HTTP(S) requests (file URLs, for example, won’t work), and it can make requests only to the same domain as the currently loaded page.
The security limitations of XMLHttpRequest do limit the ways in which you can use it, but the trade-off in added security is well worth it. Most attacks against JavaScript applications center around injecting malicious code into the Web page. If XMLHttpRequest allowed requests to any Web site, it would become a major player in these attacks. The security sandbox reduces these potential problems. In addition, it simplifies the programming model because the JavaScript code can implicitly trust any data it loads from XMLHttpRequest. It can trust the data because the new data is just as secure as the page that loaded the initial page.
Despite the fact that XMLHttpRequest provides only a small API and just a handful of methods and properties, it has its differences between browsers. These differences are mainly in event handling and object instantiation (in IE, XMLHttpRequest is actually an ActiveX object), so they aren’t hard to work around. In the following overview of the XMLHttpRequest API, the Mozilla syntax for XMLHttpRequest instantiation is used. If you want to run the examples in IE, you need to replace new XMLHttpRequest(); with either new ActiveXObject(“MSXML2.XMLHTTP.3.0”); or the full cross-browser instantiation method shown in the “Cross-Browser XMLHttpRequest” section of this chapter.
XMLHttpRequest is the most-used method for AJAX communications because it provides two unique features. The first feature provides the ability to load new content without that content being changed in any way, which makes it extremely easy to fit AJAX into your normal development patterns. The second feature allows JavaScript to make synchronous calls. A synchronous call stops all other operations until it’s complete, and while this isn’t an option that is usually used, it can be useful in cases in which the current request must be completed before further actions are taken.
2.1.1 XMLHttpRequest::Open()
The open method is used to set the request type (GET, POST, PUT, or PROPFIND), the URL of the page being requested, and whether the call will be asynchronous. A username and password for HTTP authentication can also be optionally passed. The URL can be either a relative path (such as page.html) or a complete one that includes the server’s address (such as http://blog.joshuaeichorn.com/page.html). The basic method signature is:
open(type,url,isAsync,username,password)
In the JavaScript environment, security restrictions are in place. These security restrictions cause the open method to throw an exception if the URL is from a different domain than the current page. The following example uses open to set up a synchronous GET request to index.html:

2.1.2 XMLHttpRequest::Send()
The send method makes the connection to the URL specified in open. If the request is asynchronous, the call will return it immediately; otherwise, the call will block further execution until the page has been downloaded. If the request type is POST, the payload will be sent as the body of the request that is sent to the server. The method signature is:
send(payload)
When you make a POST request, you will need to set the Content-type header. This way, the server knows what to do with the uploaded content. To mimic sending a form using HTTP POST, you set the content type to application/x-www-form-urlencoded. URLencoded data is the same format that you see in a URL after the “?”. You can see an example of this encoded data by making a form and setting its method to GET. The following example shows a synchronous POST request to index.php that is sending a URLencoded payload. If index.php contains <?php var_dump($_POST); ?>, you can see the submitted data translated as if it’s a normal form in the alert:

2.1.3 XMLHttpRequest::setRequestHeader()
There are many different cases in which setting a header on a request might be useful. The most common use of setRequestHeader() is to set the Content-type, because most Web applications already know how to deal with certain types, such as URLencoded. The setRequestHeader method signature takes two parameters: the header to set and its value:
setRequestHeader(header,value)
Because requests sent using XMLHttpRequest send the same standard headers, including cookie headers and HTTP authentication headers, as a normal browser request, the header name will usually be the name of the HTTP header that you want to override. In addition to overriding default headers, setRequestHeader is useful for setting custom, application-specific headers. Custom headers are generally prefixed with X- to distinguish them from standard ones. The following example makes a synchronous GET request adding a header called X-foo to test.php. If test.php contains <?php var_dump($_SERVER); ?>, you will see the submitted header in the alert:

2.1.4 XMLHttpRequest::getResponseHeader() and getAllResponseHeaders()
The getResponseHeader method allows you to get a single header from the response; this is especially useful when all you need is a header like Content-type; note that the specified header is case-insensitive. The method signature is as follows:
getResponseHeader(header)
getAllResponseHeaders returns all the headers from the response in a single string; this is useful for debugging or searching for a value. The following example makes a synchronous GET request to test.html. When the client receives a response, the Content-type is alerted and all the headers are alerted:

2.1.5 Other XMLHttpRequest Methods
All browsers implement an abort() method, which is used to cancel an in-progress asynchronous request. (An example of this is shown in the “Sending Asynchronous Requests” section in this chapter.) Mozilla-based browsers also offer some extra methods on top of the basic API; for instance, addEventListener() and removeEventListener() provide a way to catch status events without using the on* properties. There is also an overrideMimeType() method that makes it possible to force the Content-type to text/xml so that it will be parsed into a DOM document even if the server doesn’t report it as such. The Mozilla-specific methods can be useful in certain circumstances, but in most cases, you should stay away from them because not all browsers support them.
2.1.6 XMLHttpRequest Properties
XMLHttpRequest provides a number of properties that provide information or results about the request. Most of the properties are self-explanatory; you simply read the value and act on it. The on* properties are event handlers that are used by assigning a function to them. A list of all the properties follows:
• status. The HTTP status code of the request response.
• statusText. The HTTP status code that goes with the code.
• readyState. The state of the request. (See Table 2-1 in the next section of this chapter for values.)
• responseText. Unparsed text of the response.
• responseXML. Response parsed into a DOM Document object; happens only if Content-type is text/xml.
• onreadystatechange. Event handler that is called when readyState changes.
• onerror. Mozilla-only event handler that is called when an error happens during a request.
• onprogress. Mozilla-only event handler that is called at an interval as content is loaded.
• onload. Mozilla-only event handler that is called when the document is finished loading.
Note
Mozilla resets event handlers, such as onreadystatechange, after a request is completed, so you need to reset them if you are making multiple calls with the same object.
2.1.7 readyState Reference
Table 2-1 shows the possible values for the readyState variable. It will return a number representing the current state of the object. Each request will progress through the list of readyStates.

The readyState variable and the onreadystatechange event handler are linked in such a way that each time the readyState variable is changed, the onreadystatechange event handler is called.
2.2 Cross-Browser XMLHttpRequest
One of the attributes that have made XMLHttpRequest such a popular transport for AJAX requests is that it is easy to use in a way that is compatible across multiple browsers. The big two browsers, IE and Firefox, provide the same basic API. This consistency makes for a similar development experience. Opera and Safari also support the same basic API, but only in their more recent versions.
When you are writing cross-browser, the first problem you need to overcome is that XMLHttpRequest is an ActiveX object in IE, and it’s a normal JavaScript object in Mozilla and the other browsers. There are a number of approaches to overcoming this problem, including optional JScript code for IE, but I find that the simplest solution is just to use exceptions. Listing 2-1 shows an example that tries every version of the XMLHTTP ActiveX object, if needed. This helps make our implementation as robust as possible. The function also throws an exception if it’s not possible to create an XMLHttpRequest object. This gives us a way to give error messages or to fall back to IFrame requests, if needed.
Listing 2-1. Cross-Browser XMLHttpRequest Creation
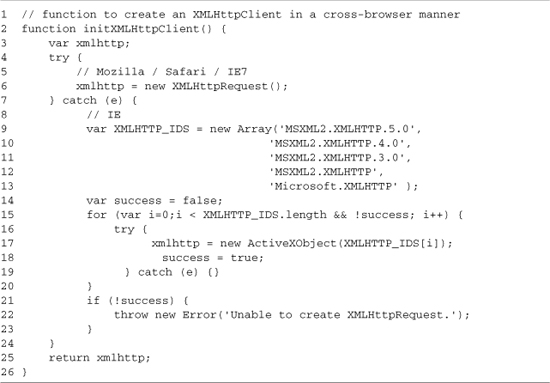
The overall pattern of this code is simple: Create an XMLHttpRequest instance in the most optimal way possible, as shown in line 6. This creation should always succeed on Mozilla-based browsers, such as Firefox, on Opera, and on the upcoming IE 7.
If XMLHttpRequest doesn’t exist, catch the exception that is thrown, as shown in line 7. Getting an exception means you’re on IE or an old browser. To test for IE, attempt to create an ActiveX version of XMLHttpRequest, which is accomplished by the following:
1. Looping over all possible ActiveX identifiers. This action will create an ActiveX instance for each identifier until the creation succeeds, setting the success flag to true, as shown in lines 9–20.
2. If creation is successful, returning an XMLHttpRequest instance, as shown in line 25. Otherwise, throwing a JavaScript exception, as shown in line 22.
This approach allows for minimal overhead if the browser supports a native XMLHttpRequest object while fully supporting IE. It also gives us an error if XMLHttpRequest isn’t supported at all. This error could be displayed to the user at this point, or you could insert another communication approach, such as hidden IFrames.
2.3 Sending Asynchronous Requests
Synchronous requests are easier to use than asynchronous requests because they return data directly and remove the hassle of creating callback functions. However, they aren’t the standard use case for XMLHttpRequest because the entire browser is locked while the request is happening. There are some circumstances in which blocking is useful (mainly when a decision needs to be made before the current function ends), but in most cases, you’ll want these requests to happen in the background. An asynchronous request allows the browser to continue running JavaScript code and users to continue interacting with the page while the new data is loaded. With the proper user interface, asynchronous communication allows an AJAX application to be useful even when the user’s connection to the site is slow.
To make an asynchronous call, we need to accomplish two tasks: set the asynchronous flag on open to true, and add a readyStateChanged event handler. This event handler will wait for a ready state of 4, which means the response is loaded. It will then check the status property. If the status is 200, we can use responseText; if it’s another value, we have an error, so we’ll need to create an alert dialog to show it. An asynchronous call to test.php is shown in Listing 2-2. The initXMLHttpClient function from an earlier chapter section, “Cross-Browser XMLHttpRequest,” is used to create our XMLHttpRequest object.
Listing 2-2. Making an Asynchronous Request

Although this code gets the job done, it’s not a great long-term solution because we will have to write a new onreadystatechange method for each call. The solution to this is to create our own HttpClient class that wraps XMLHttpRequest. Such a class gives us an easy-to-use API and a property to use for the callback that has to deal only with successful requests. Just adding some helper methods would be a simpler solution, but that’s not a possibility because IE doesn’t allow you to add methods to an ActiveX object.
A sample XMLHttpRequest wrapper class is shown in Listing 2-3. The main features of the HttpClient class are a callback property that is called when a successful asynchronous request is complete and a makeRequest method that combines the open and send functions. It also provides event properties that are called when a request is made (onSend), when it ends (onload), and when an errors occurs (onError). A default onSend and onLoad implementation is provided, which creates a basic loading message while requests are being made.
Listing 2-3. HttpClient XMLHttpRequest Wrapper


The HttpClient class contains comments explaining its basic functionality, but you will want to look at a couple of areas in detail. The first areas are the properties you’ll want to set while interacting with the class; these include the following:
• requestType(line 4). Used to set the HTTP request type, GET is used to request content that doesn’t perform an action whereas POST is used for requests that do.
• isAsync(line 6). A Boolean value used to set the request method. The default is false, which makes an synchronous request. If you’re making an asynchronous request, isAsync is set to true. When making an asynchronous request, you also need to set the callback property.
• callback(line 12). This property takes a function that takes a single parameter result and is called when a request is successfully completed.
Lines 16–31 contain simple functions for handling some basic user feedback. When a request is sent to the server, a DOM element with the ID of HttpClientStatus is shown (lines 16–19). When it completes, it is hidden again (lines 23–26). The class also defines a function to call when an error happens (lines 29–31); it creates an alert box with the error message. Common errors include receiving a 404 page not found HTTP error message or not being able to create an XMLHttpRequest object. The implementation of these three functions is simple, and you’ll likely want to override them with more sophisticated application-specific versions.
Lines 33–56 contain the init method, which is identical to the initXMLHttpClient function we created in Listing 2-1, except for what it does with its error message. Now it sends it to the onError method. You won’t be dealing with this function directly because the makeRequest method will take care of it for you. The makeRequest method (lines 62–79) is your main interaction with the class. It takes two parameters: a URL to which to make the request and a payload that is sent to the server if you’re making a POST request. The actual implementation is a more generic version of the code shown in Listing 2-2. The _readyStateChangeCallback (lines 82–99) method is set as the readyState handler by makeRequest. It handles calling onSend when the initial request is sent and then calling onload when the request completes. It also checks for a 200 HTTP status code and calls onError if some other status is returned.
Listing 2-4 uses the HttpClient class and shows its basic usage. A wrapper class like this helps cut down the amount of code you need to write per request while giving a single place to make future changes.
Listing 2-4. Using the HttpClient XMLHttpRequest Wrapper

Using the HttpClient XMLHttpRequest wrapper is a simple task. You start by including it in the header of your HTML page (line 5), and then you can proceed to use it. You do this by creating an instance of the class (line 9), configuring its basic properties (in this case, setting isAsync to true (line 10)), and then setting up some code to call makeRequest. In most cases, this code will be contained in a function so that it can be tied to a user-driven event, such as clicking a link. The call is made by the test function (lines 12–17); the test function first sets up a callback to run when the request is complete (lines 13–15), and then it calls makeRequest (line 16), which starts the AJAX call.
2.4 AJAX Without XMLHttpRequest
There are a number of cases in which you might not have XMLHttpRequest support. The most common would be in the case of an older browser. This is the hardest to work around, not because there is no AJAX fallback, but because all the other DOM manipulation that you do within the application won’t work. Another problem case is when your browser supports everything that is needed except for XMLHttpRequest. This problem could occur when IE is in a mode where it can’t use ActiveXObjects or when you are using a pre-7.6 version of Opera. In some cases, especially intranet applications, it’s easy to just require an upgrade, but if you want to use AJAX on a public site, you’ll want to think about using some sort of fallback mechanism. The best candidate for a fallback is to use hidden IFrames. Another option is to use cookies, but they can send only a limited amount of data per request, so it is hard to drop in cookie-based approaches as a replacement for code that has been written with XMLHttpRequest in mind. Only XMLHttpRequest supports synchronous calls, so if they are necessary for your application, then using it as a fallback will not be possible.
If you’re using a fully wrapped XMLHttpRequest and you don’t use synchronous calls, providing transparent fallback to your program should be possible. You need only to replace the final throwing of an exception in the example init method with the instantiation of your IFrame HTTP client. The main item to remember about using another approach instead of XMLHttpRequest is that it’s not going to gain you huge leaps in compatibility. The major browsers already support XMLHttpRequest. This support makes browsers with JavaScript turned off, not those running an unsupported browser, the biggest group that can’t use your AJAX application. The advantages and disadvantages of the AJAX communication techniques are shown in Table 2-2.
Table 2-2. Advantages and Disadvantages of AJAX Techniques


2.5 Fallback Option 1: Sending a Request Using an IFrame
IFrames make a suitable transport for asynchronous calls because they can load content without causing the entire page to reload, and new IFrame elements can be created using JavaScript. The nicest attribute about an IFrame is that a form can use one as its target, reloading that IFrame instead of the entire page; this approach allows large amounts of data to be sent to the server using POST.
One difficulty in using an IFrame as a transport is that the page we’re loading needs to be HTML, and it needs to have a JavaScript onload event handler to tell the parent document when it’s done loading. This need forces all requests being made with IFrames to be made to pages designed to deal with IFrame requests. (Code can’t just grab an XML file in the way that XMLHttpRequest allows.)
Note that the use of IFrames does have a number of further limitations:
• Support of only asynchronous requests
• Server pages needing changed
• Phantom entries in browser’s history
• Odd back/forward button behavior in some browsers
• Large differences in browser implementations, especially in older browsers
One advantage that an IFrame has over XMLHttpRequest is that it can be used to make file uploads. Due to browser security limitations, only user actions, such as clicking a form, can interact with files on the user’s machine. This makes targeting a form to an IFrame the only option for file uploads that do not involve a normal form POST and page reload cycle. However, there is no reason you can’t fall back to using an IFrame for file uploads and XMLHttpRequest for the rest of your AJAX requests. Unless you are making remote scripting-style AJAX requests (which is covered in Chapter 3, “Consuming the Sent Data”), working around IFrame limitations will add a significant amount of work to any AJAX development project.
2.5.1 Creating a Hidden IFrame
To get maximum compatibility with older browsers, you could just add the IFrame to your HTML and give it a size of 0x0. (You can’t just hide it, or some browsers won’t load it.) However, this approach isn’t flexible, so you will want to create the frame dynamically. Not all older browsers support document.createElement, but browsers without that support will generally lack the other dynamic capabilities needed to use the data you’re loading, so it’s best to provide support to them with a static HTML version of the page. In the following example, the IFrame is created using innerHTML because it’s simpler than creating it using DOM methods. Note, however, that it could also be created with document.createElement, just like the div to which it’s being added:

2.5.2 Creating a Form
If you want to make only a GET request, you can change the value of the IFrame’s src property, but to do POST, you need to use a targeted form. GET isn’t a good solution for AJAX requests for two reasons: it can send only a limited amount of data (an amount that changes depending on the browser), and GET can be cached and/or preloaded by proxy servers, so you never want to use it to perform an action such as updating your database.
Using a form with an IFrame is easy. Just set the form’s target attribute, and when you submit the form, the result loads in the IFrame. The following example creates our form and sets its targets to the IFrame we created earlier in the “Creating a Hidden IFrame” section of the chapter:

2.5.3 Send Data from the Loaded Content to the Original Document
The only way to know that the content of the IFrame has loaded is to have the content page run some JavaScript that notifies the parent page in which the IFrame is embedded. The simplest way to do this is to set the onload event handler on the document you are loading. This limitation means you can’t use an IFrame for loading arbitrary content like you can with XMLHttpRequest. However, it’s still useful for cases in which a single server page is already being used as an AJAX gateway. Here is an example of onload:
<body onload="parent.document.callback(result)">
2.5.4 Complete IFrame AJAX Example
A full example of an IFrame that AJAX requests includes two pieces. The first piece is the client-side code to create the IFrame and form. The second piece is the server-side code, which prepares some data and sends it back to the parent document in its onload event handler.
The first part of the example (Listing 2-5) is the JavaScript code in a simple HTML file. This page is used for testing; the callback function just alerts the contents of the results. The second part of the example (Listing 2-6) is a simple PHP script, which takes the data from POST and sends it back to the parent document. To make a useful system, you might also want to include some extra variables in the form, which would tell the PHP code what to do with the uploaded data, or you could put the logic directly into the script and use a different target page for each task you wanted to accomplish.
Listing 2-5. Making an AJAX Request Using an IFrame


Listing 2-5 is made up of three functions:
• createRemotingDiv for setting up the IFrame.
• sendRequest for making an AJAX request.
• test for making an AJAX request. The test function is tied to a link (line 55) in the pages’ HTML. Clicking on this link allows the user to start an AJAX request.
The createRemotingDiv function (lines 5–28) combines the previously described code for creating a hidden IFrame with the code for creating a form to submit to it. When the form is created, it’s targeted against the newly created IFrame, making the form submission use it instead of reloading the current page. Showing the IFrame during development is often useful in the debugging process so that you can see any output generated by the page you’re calling. You can do this by editing the style on line 8 and changing it to width:200;height:200;.
The sendRequest function (lines 30–40) makes an AJAX request. It takes the URL to which to make the request, a payload to send to the server, and a callback function to run when the request is complete. The function uses createRemotingDiv to set up the process (lines 31–34). Then sendRequest updates the action on the IFrame form (line 35), adds the payload value on the form, and submits the form using the IFrame. When the new page is loaded into the IFrame, the new document uses a JavaScript onload handler to call the callback function that was passed into the sendRequest method. The PHP page that processes the form POST and creates the onload JavaScript is shown in Listing 2-6.
Listing 2-6. PHP Server Page That Handles an IFrame AJAX Request

On the server side, the form is processed and output is created in the form of an HTML page. The simplest way to add new data is to generate JavaScript containing the new data. In this case, we are just echoing the data back to the client by putting it in the result variable (lines 4–6). Normally, you’ll be running server-side code here and either outputting a string (as in this case) or adding new JavaScript code to run against the parent document. The callback function on the parent is called by the onload handler on the body tag (line 11).
2.6 Fallback Option 2: Sending a Request Using a Cookie
You can transfer data to your server using cookies, but any implementation using them will be severely limited. Cookies have a maximum size of 4k, and each domain can set only 20 of them, which means that each request is going to be size-limited. Cookie-based AJAX is most useful when your site is designed for it, because its limitations make it hard to use it as a fallback. The basic functionality is provided by setting a cookie, loading an image, and then polling on an interval while waiting for the response to appear. The implementation is simple; to do something besides alerting the contents of the result, you just set your own custom onComplete event handler. An example where the server returns the input and the number of times it has been called is shown in Listings 2-7 and 2-8. The example’s JavaScript is shown in Listing 2-7, and the PHP code, which reads the cookie and then sets a response, is shown in Listing 2-8.
Listing 2-7. Cookie-Powered AJAX


In Listing 2-7, the cookie-powered AJAX functionality is wrapped inside the JavaScript class CookieRequest. Requests to the server are made with the call method (lines 11–19). The call method takes a URL to which to send the request. It also takes a payload (the content we want to send to the server), which is sent in the request cookie. The method then uses the setCookie method to set a cookie named CR (line 14); it then creates a new Image object and sets its src to the requested URL (line 15). The method finishes by starting a timer, which runs the read method every 500 milliseconds.
The read method (lines 20–38) checks for the presence of the CR cookie (lines 23–24). If it exists, the data in it is passed to the onComplete method (line 26). If the data isn’t present, we check for errors; this is done by comparing the number of checks we’ve completed against the max checks set in the attempts property (line 31). If there is an error, the onError method is called (line 32). If no error is present, we start another timer to do the next check (lines 34–35).
Lines 39–44 contain methods that you’ll override when using the class. The onComplete method is called when data is successfully loaded. This is the equivalent of the callback property in the HttpClient class. The onError method is called if the request doesn’t complete successfully; of course, you could leave this as an alert, but, in most cases, you’ll want to provide a more understandable error message to your users or even retry the request.
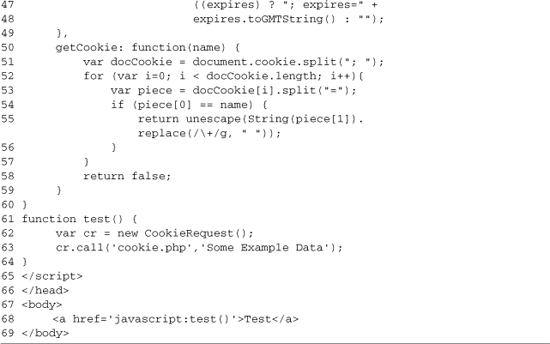
The CookieRequest class also contains helper methods for dealing with getting and setting cookies. setCookie (lines 45–49) works by setting the value of document.cookie to a urlencoded string in the format of cookie name=value. getCookie (lines 50–59) works by splitting document.cookie into one part for each cookie (the cookies are separated by “;”) and then looping over these parts looking for a cookie with the specified name. If a matching name is found, the value is returned; otherwise, false is returned.
The PHP page that is used with Listing 2-7 is shown in Listing 2-8. It is used as the URL in the call method and processes the payload that is set; it then sets a response for read to grab.
Listing 2-8. PHP Server Page for Handling a Cookie AJAX Request
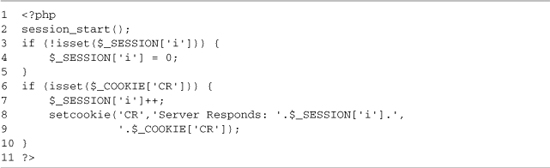
This PHP code provides the basic functionality needed to interact with cookie-based AJAX requests. It uses PHP sessions to store a counter and increments it as each request is made. As you extend this code, you could use different PHP pages to decide which action to perform, or you could include that information in the cookie that is sent from the client. Lines 2–5 handle basic session setup, setting the counter to 0 if this is the first call. Lines 6–10 handle the checking of the client cookie and the sending of the response. This is done by setting a cookie that then will be sent with the response (line 8–9). If you want to handle large server responses, you would need to include code to split the data among multiple cookies.
2.7 Summary
At the heart of AJAX is the communication channel with your server. The best way to accomplish AJAX communication is by using XMLHttpRequest. XMLHttpRequest provides the ability to make synchronous and asynchronous requests while providing an easy-to-use programming model. XMLHttpRequest’s biggest disadvantage is that it doesn’t work on IE6 when ActiveX is disabled, which can cause problems for security-conscious users. For cases in which XMLHttpRequest can’t be used, you do have a number of different options. The best of these options is the use of hidden IFrames. IFrames require server pages to be specially tailored to respond to their requests. This shortcoming makes for a much less flexible implementation but one that is still capable of getting the job done for many AJAX applications.
When you need to support old browsers, you can use either IFrames or cookie-based solutions. Cookie-based solutions can even be used on version 3 browsers, if needed. Note, however, that the limited dynamic ability of a browser from that period makes building any large-scale AJAX applications a very difficult task. When targeting modern browsers, compatibility isn’t a huge concern, and you can choose the AJAX communication layer with the best features: XMLHttpRequest.